“This article introduces various DB technologies ranging from the latest version of SQL Server, Azure SQL, Business Intelligence, to Machine Learning.”
(In Korean: SQL Server 최신 버전, Azure SQL, Business Intelligence, Machine Learning에 이르기까지 다양한 DB기술을 소개합니다.)
*Relevant Activity: I have been writing a series of articles about new features of SQL Server 2022 on my website: 김정선의 Data 이야기 (visualdb.net)
“Databases in a company are the place where information is stored to drive the company’s production processes. Tera of data, dozens of databases, millions of rows, the entire activity depends on this, and information security can no longer be an option, we have to think about security by design and security by default.”
“If you work with SQL Server, it’s really helpful to understand advanced information about how indexing works, memory management, etc. You’ll find tips about creating better indexes & queries and how to debug issues better.”
“This is a practical course that enables you to understand the power platform comprehensively and organically. Through the practical course, you can learn each element systematically while covering various practical aspects, making it a very suitable course for beginners and intermediate learners. I recommend this course.”
(In Korean: 파워플랫폼에 대한 전체적인 이해를 종합적이고 유기적으로 가능하게 하는 실습과정입니다. 실습과정을 통해서 실무적인 요소를 두루 다루면서도 체계적으로 하나하나 익힐 수 있어서 초보자와 중급자 모두에게 매우 적절한 실습과정이어서 추천했습니다.)
The Microsoft Ignite 2023 conference has been a showcase of ground breaking AI advancements, offering a wealth of opportunities for the enhancement of ERP (Enterprise Resource Planning) solutions. These technological strides are more than just innovations; they are pathways to augment the functionality, efficiency, and user experience of ERP systems.
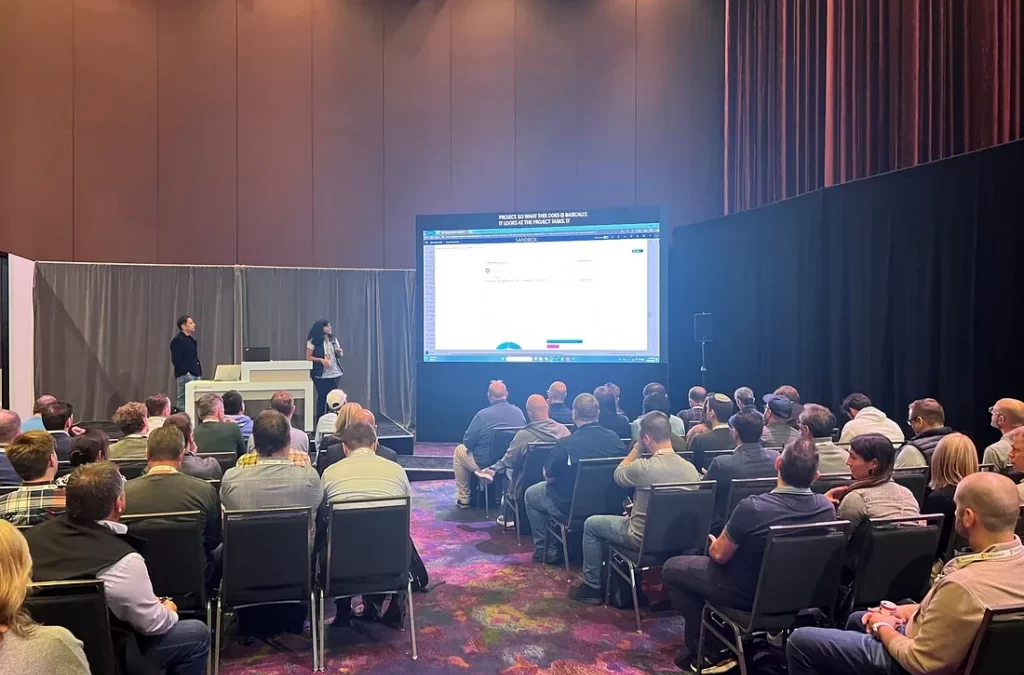
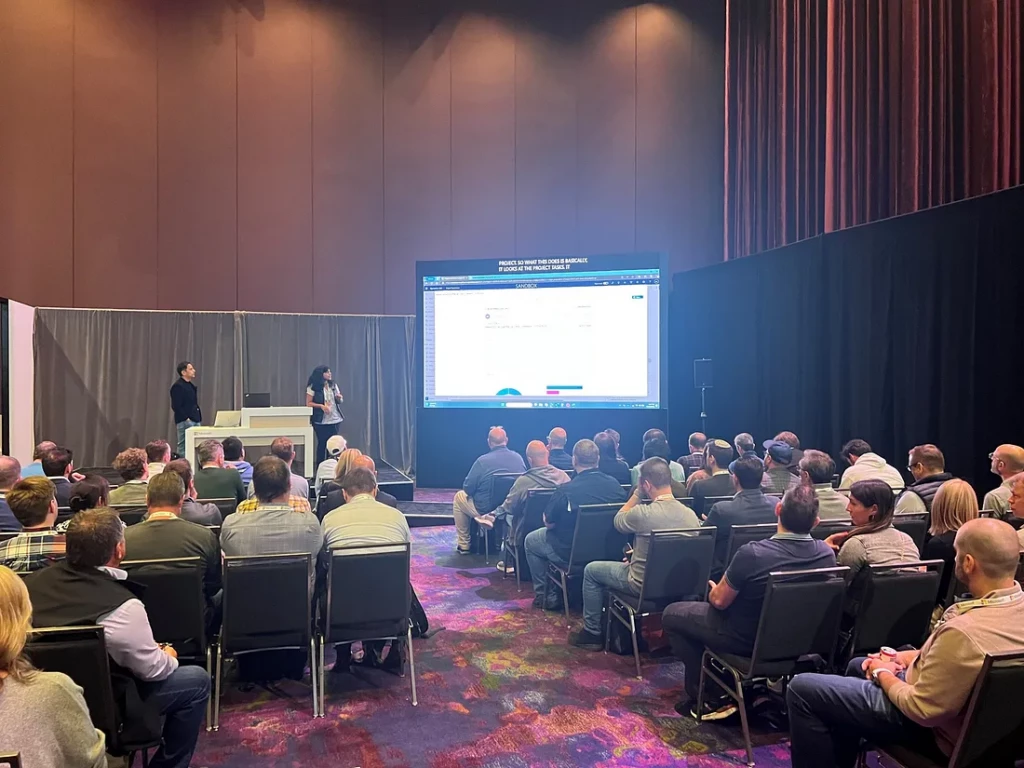
Image: Anupam Sharma & Rupa Mantravadi showcasing Copilot Scenarios in Dynamics 365 AI ERP Applications
Top 10 Insights and Opportunities for ERP Applications:
This blog explores how the top 10 key insights from Ignite 2023 can be leveraged to enhance ERP products, benefit their users, assist ISVs (Independent Software Vendors) in developing custom solutions, and support the core business users of these ERP systems.
1. Revolutionizing Productivity with Copilot in Microsoft 365:
Microsoft 365 Copilot:
This innovation is a testament to Microsoft’s commitment to enhancing workplace efficiency and creativity. Its integration across applications like Outlook, Excel, and Teams exemplifies Microsoft’s vision for a seamlessly interconnected work environment.
Opportunity for ERP:
Incorporating ERP-focused Copilot plugins into M365 applications can revolutionize ERP workflows through the automation of routine tasks and the provision of intelligent insights from the ERP system for decision-making within the productivity suite. Such integration is poised to significantly boost time efficiency and improve accuracy for ERP system users.
2. Extending Copilot’s Reach:
Diverse Integration:
Expanding Copilot to aid in the completion of tasks across diverse roles and functions, such as business processes and IT administration represents a strategic initiative to integrate AI thoroughly into all facets of work.
Opportunity:
Expanding Copilot into ERP systems can provide tailored assistance in various ERP areas like financial planning, supply chain management, operations, human resources, commerce etc. offering a more intuitive and guided user experience.
3. Strategic Enhancements:
Bing Chat Enterprise Transition:
The transformation of Bing Chat into Copilot (copilot.microsoft.com) offers an opportunity for ERP systems to utilize enhanced external signals for improved demand planning, supply chain risk management, and support functions.
Copilot Studio:
This tool can be utilized by ISVs and ERP developers, enabling them to craft tailored AI solutions that integrate flawlessly with core ERP systems, thereby improving functionality and user experience. It also offers administrative capabilities to refine core ERP Copilot skills with additional grounding, topics, and more.
4. Data and AI Synergy with Microsoft Fabric:
Unified Data Handling:
Integrating Microsoft Fabric with AI tools and making this GA (Generally Available) is a significant step towards enhancing data-driven decision-making.
Opportunity:
Microsoft Fabric’s integration can enhance data-driven decision-making in ERP systems. It can unify data from various sources, providing a more comprehensive view for analytics and reporting within ERP systems.
5. Advancements in Azure AI platform:
Model-as-a-Service:
Simplifies the integration and customization of AI models, marking a significant advancement in AI application development.
New AI Models:
Introduction of GPT-3.5 Turbo, GPT-4 Turbo, and DALL·E 3 revolutionizes AI application development.
Opportunity:
The integration of advanced AI models like GPT-3.5 Turbo and GPT-4 Turbo into ERP systems can enable more sophisticated data analysis using tools like advance data analytics, code interpreter and predictive modeling, aiding in strategic business planning and forecasting.
6. Enhanced Cloud Infrastructure and NVIDIA Collaboration:
Azure Maia and Cobalt Chips & Azure Boost:
These advancements supercharge AI workloads and improve storage and networking, enhancing ERP system efficiency and scalability.
NVIDIA AI Foundry Service:
This partnership boosts AI model development, leveraging NVIDIA’s tools with Azure’s infrastructure.
Opportunity:
These innovations enable faster processing and robust AI capabilities in ERP solutions, facilitating advanced analytics and decision-making.
7. Ethical AI Deployment:
Responsible AI Initiatives:
Emphasizing ethical use with initiatives like the Copilot Copyright Commitment and Azure AI Content Safety.
Opportunity:
The focus on responsible AI use ensures that ERP solutions remain compliant with legal standards and ethical guidelines, building trust among users and stakeholders.
8. AI Integration in Windows Experiences:
Windows 11 AI Tools:
Aiming to make AI more accessible and position Windows as the prime platform for AI development.
Opportunity:
Enhanced AI tools in Windows can improve the accessibility and usability of ERP solutions, offering a more seamless and integrated experience across devices and platforms.
9. Enhanced AI-Driven Security Solutions:
Microsoft Sentinel and Microsoft Defender XDR Integration:
Creates a unified security operations platform, enhancing threat protection.
Opportunity:
The integration of advanced security solutions can bolster the security of ERP systems, protecting sensitive business data and ensuring compliance with industry standards.
10. AI Skill Development and Credentials:
Microsoft Applied Skills Credentials:
Covering various aspects of AI, these credentials are crucial for validating expertise in this rapidly evolving field.
Opportunity:
Providing training and credentials in AI can empower ERP professionals to leverage AI capabilities effectively within Dynamics 365, enhancing the overall value and utility of ERP solutions.
Image:This year’s theme highlights Microsoft’s full embrace of its identity as the “Copilots company.”
Microsoft Ignite 2023 has opened a new chapter in the evolution of ERP applications, with AI at its core. By embracing these AI advancements, ERP solutions can be significantly enhanced, redefining how businesses leverage these systems for strategic and operational excellence.
Learn More
Interested in learning more about Copilot’s in-app help guidance? Here are your next steps:
Read the Copilot Product Documentation:
For comprehensive and detailed information about Copilot’s capabilities and functionalities, be sure to check out our product documentation. You’ll find in-depth insights into how Copilot can enhance your experience with Dynamics365 Supply Chain Management –
Read the Responsible AI FAQ for Copilot and its capability of generative help and guidance.
If you’re already using Dynamics 365 Supply Chain Management, you can enable and experience Copilot’s capabilities to streamline your operations. Here’s how:
Step 1: Enable Copilot Feature: Follow our documentation for existing customers to learn how to enable this feature. Once enabled, you’ll have access to Copilot’s powerful in-app help guidance within Dynamics 365 Supply Chain Management.
Step 2: Access Copilot – Locate the Copilot icon at the top of your screen within Dynamics 365 Supply Chain Management, then click on it to open the conversational sidecar experience. Copilot will introduce itself and encourage you to ask questions.
Step 3: Pose Your Question – In any uncommon or challenging task within the application, simply ask Copilot for guidance. For better results, especially when seeking documentation-related in-app help, consider starting your questions with ‘How.’
Step 4: Instant Guidance – Copilot will provide you with step-by-step guidance; all responses are grounded by our public documentation.
Please note that Copilot’s capabilities are exclusively available to existing Dynamics 365 Supply Chain Management customers. If you’re one of them, don’t miss out on the opportunity to enhance your user experience and streamline your operations with Copilot.
Join Copilot for finance and operations apps – Yammer
Stay informed about the most recent Copilot by becoming a member of our Copilot for finance and operations Yammer Group . Share your Feedback and be the first to know about the latest enhancements.
This article is contributed. See the original author and article here.
Introduction:
In the ever-changing landscape of contemporary business, effective supply chain management is paramount. Central to this complex system is the critical process of demand planning and forecasting, which profoundly impacts a company’s capacity to fulfil customer requirements, optimize inventory, and maintain a competitive edge. This article explores the significance of demand forecasting and how Microsoft seamlessly incorporates it into its new demand planning in Dynamics 365 Supply Chain Management.
The Crucial Role of Demand Planning and Forecasting:
Precise demand planning and forecasting play a pivotal role in diverse facets of business operations, yielding advantages throughout the entire supply chain:
Accurate Inventory Management: Precise demand forecasting optimizes inventory levels, finding the balance between excess stock and stockouts.
Customer Satisfaction: Accurate forecasting ensures products are available in the right place at the right time, enhancing customer satisfaction and brand loyalty.
Cost Reduction: Effective demand forecasting minimizes holding costs for excess inventory and reduces costs associated with stockouts.
Resource Allocation: Anticipating demand aids in efficiently allocating resources, including labor, production capacity, and raw materials.
Improved Collaboration: Accurate forecasting fosters collaboration across the supply chain, enhancing coordination between suppliers, manufacturers, and retailers.
Long-term Planning: Strategic planning benefits from accurate forecasting, aiding businesses in adapting to changing market conditions and trends.
Competitive Advantage: Organizations responding effectively to market changes gain a competitive edge.
Image: Snapshot of demand planning in Dynamics Supply Chain Management
Exploring a Range of Demand Forecasting Models:
Below is a concise examination of diverse forecasting models employed in general Supply Chain demand planning, accompanied by insights into their potential applications within a business context.
Qualitative Forecasting:
Delphi Method: In the tech industry, when forecasting the demand for a new product, experts from different fields like engineering, marketing, and finance may anonymously provide input through multiple rounds of questionnaires.
Market Research: A smartphone company might conduct extensive market research, including customer surveys and competitor analysis, to forecast demand for its next flagship device.
Time Series Analysis:
Prophet: In the retail sector, employ Prophet time series analysis for precise demand forecasting, enabling efficient inventory management, minimizing stockouts, and maximizing profitability.
Exponential Smoothing: A fashion retailer might use exponential smoothing to predict future sales based on the recent trend in sales for specific clothing items.
ARIMA: A beverage company could apply ARIMA models to forecast demand for a seasonal drinks during holidays.
Best Fit: In healthcare, ‘Best Fit’ involves selecting the optimum statistical model to capture dataset patterns. Applying best-fit time series analysis anticipates patient needs, optimizes resource management, and enhances operational effectiveness for improved outcomes and satisfaction.”
ETS (Error-Trend-Seasonality): Hospitality and Tourism, utilize ETS models to forecast hotel bookings and tourism trends, enabling businesses to optimize pricing strategies and allocate resources efficiently based on seasonal fluctuations.
Causal Models:
Regression Analysis: An automobile manufacturer might use regression analysis to predict the impact of advertising spending on the demand for a particular car model.
Econometric Models: In the energy sector, econometric models could be employed to forecast electricity demand based on economic indicators such as GDP and population growth.
Machine Learning Models:
Neural Networks: An e-commerce platform might use neural networks to predict customer demand for various products by considering factors like browsing history, purchase patterns, and customer demographics.
Random Forest: A retail chain could employ a random forest model to forecast the demand for different product categories based on historical sales data and external factors like economic trends.
Judgmental Forecasting:
Expert Input: In the pharmaceutical industry, stakeholders may provide expert opinions to forecast the demand for a new medication, considering factors like regulatory approval, market acceptance, and healthcare trends.
These forecasting models offer diverse approaches, catering to various industries and scenarios.
Demand forecasting in Dynamics 365 Supply Chain Management
In the context of demand planning in Dynamics 365 Supply Chain Management, the efficiency of demand forecasting is bolstered by a robust suite of features. The system taps into the potential of built-in out-of-the-box AI-powered algorithms, integrates existing models, utilizes the capabilities of Custom Azure Machine Learning (AML), advanced forecasting models, forecasting profiles, and streamlined data hierarchy management to enhance the precision of demand planning. Through the seamless integration of these elements, the platform guarantees the accuracy of demand forecasts, facilitates the smooth identification and handling of outliers, and adeptly oversees various facets of the supply chain.
Built-in AI Algorithms:
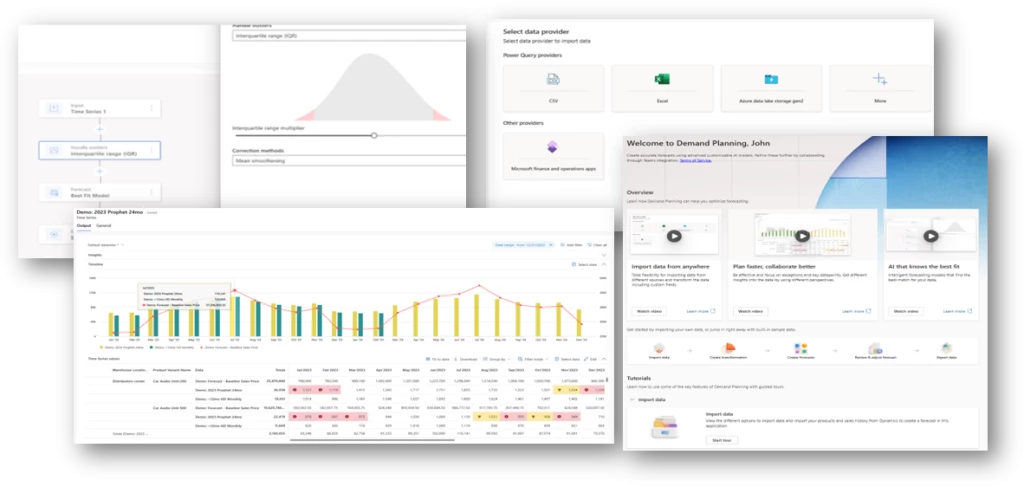
Access to pre-configured and out-of-the-box AI-based models like Arima Prophet, ETS, and outlier removal without the need for additional configuration provides users with a powerful and user-friendly forecasting solution. This feature enables businesses to quickly leverage advanced forecasting techniques, enhancing the accuracy of predictions.
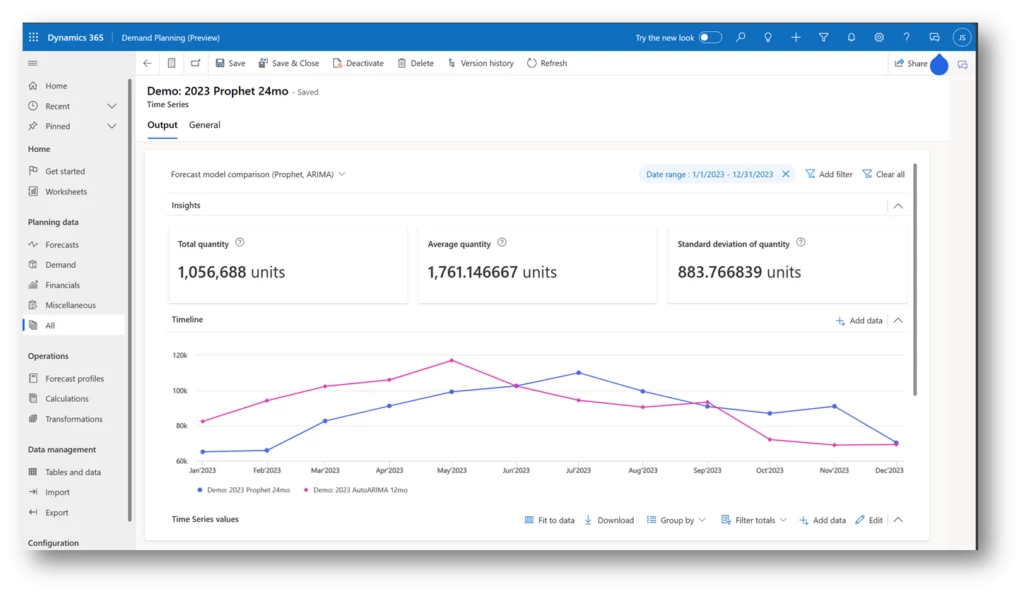
Image: Prophet Forecast – Output
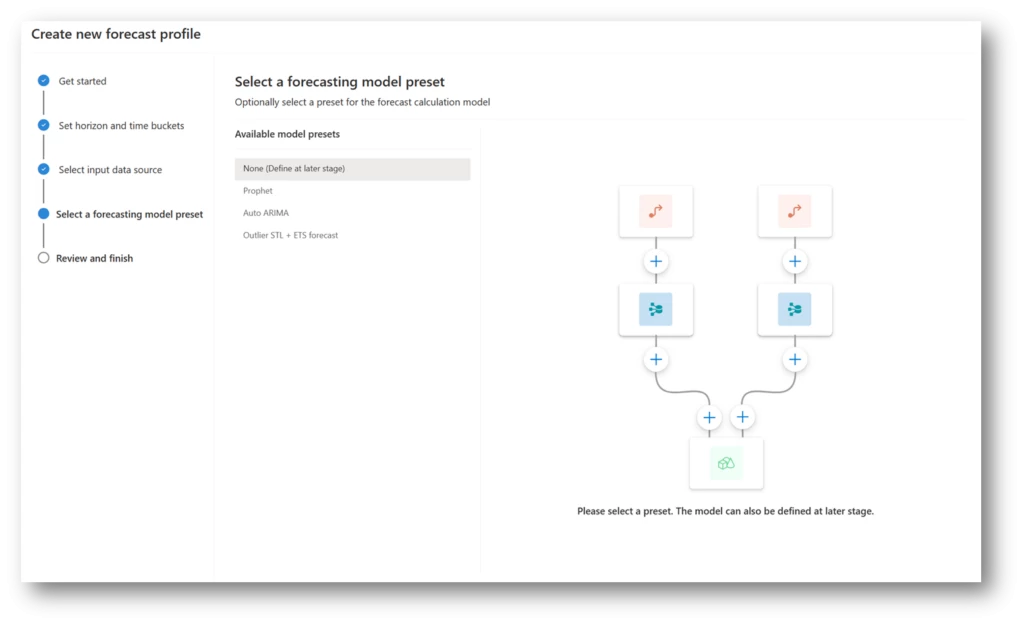
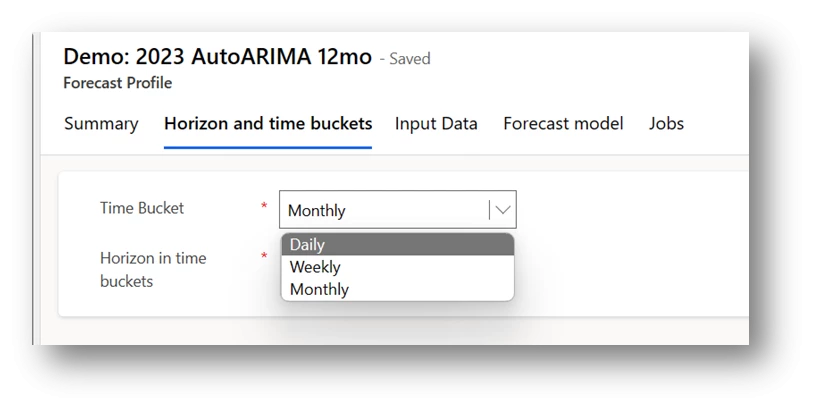
Advanced Forecasting Models:
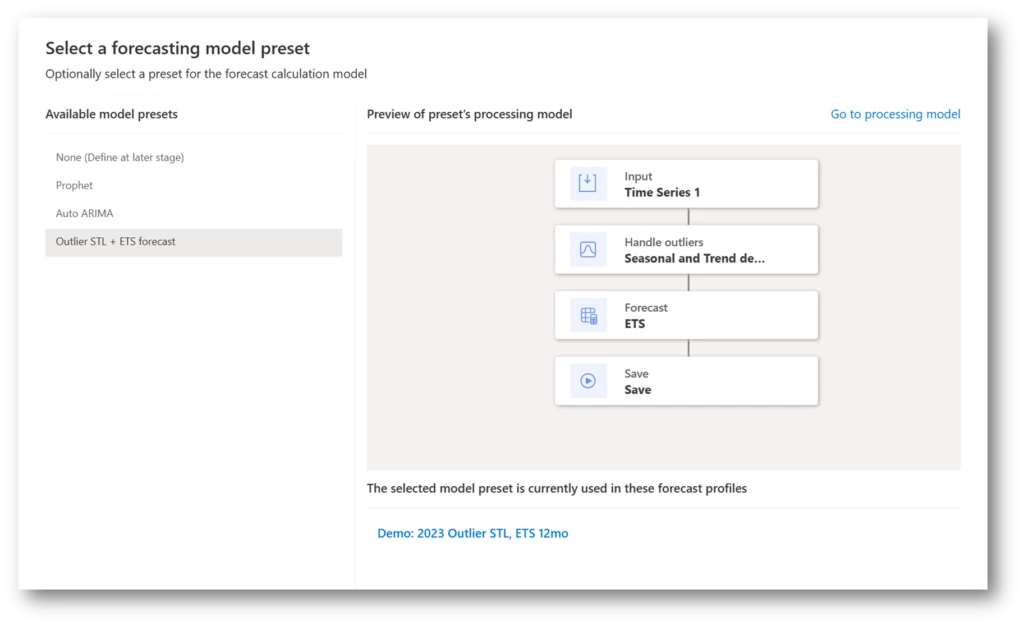
The platform supports advanced forecasting methods such as ARIMA, ETS (Error-Trend-Seasonality), Prophet, and Best fit, ensuring a high degree of accuracy in demand forecasts. Leveraging the capabilities of custom Azure Machine Learning (AML), this flexibility empowers businesses to customize their forecasting strategies based on the distinct characteristics of their products and the dynamics of their market.
Image: Advance Forecasting Model selection
Use your own Forecast Models
If you’ve created your own forecasting models or utilize Azure Machine Learning within Dynamics 365 Supply Chain Management, you can leverage the collaborative editing features within the app to directly invoke your custom models. This allows you to seamlessly integrate your pre-built models alongside the out-of-the-box models provided, tailoring your forecast for optimal accuracy.
Forecasting Profiles:
Users can craft and manage forecasting profiles, streamlining calculations and facilitating the application of outlier removal techniques. This feature adds a layer of customization to the forecasting process, allowing organizations to adapt to specific business requirements and scenarios.
Outlier Detection and Removal/Handiling:
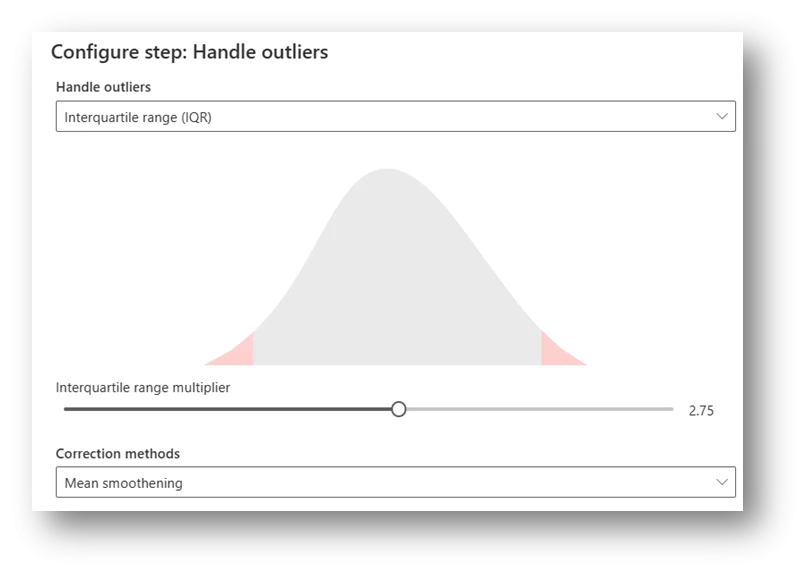
Detecting outliers in demand planning is a vital component of forecasting and supply chain management. The identification of outliers plays a key role in enhancing the precision of demand forecasts and ensuring the appropriate handling of anomalies. This process is streamlined through the intuitive Outlier Detection capabilities embedded in demand planning within Dynamics Supply Chain Management.Detecting and eliminating outliers is a pivotal stage in data preprocessing, essential for enhancing the accuracy and dependability of statistical analyses and machine learning models. Employ advanced methods, particularly the Interquartile Range (IQR) and Seasonal-Trend Decomposition using LOESS (STL), to skillfully pinpoint and preemptively manage outliers. This strategic approach contributes to improved precision and effectiveness in data analysis.
Outlier Removal/Handling Techniques:
Leverage sophisticated approaches, notably the Interquartile Range (IQR) and Seasonal-Trend Decomposition using LOESS (STL), to adeptly identify and proactively address outliers for enhanced precision and effectiveness in data analysis.
Image: Outlier Configuration – Interquartile Range (IQR)
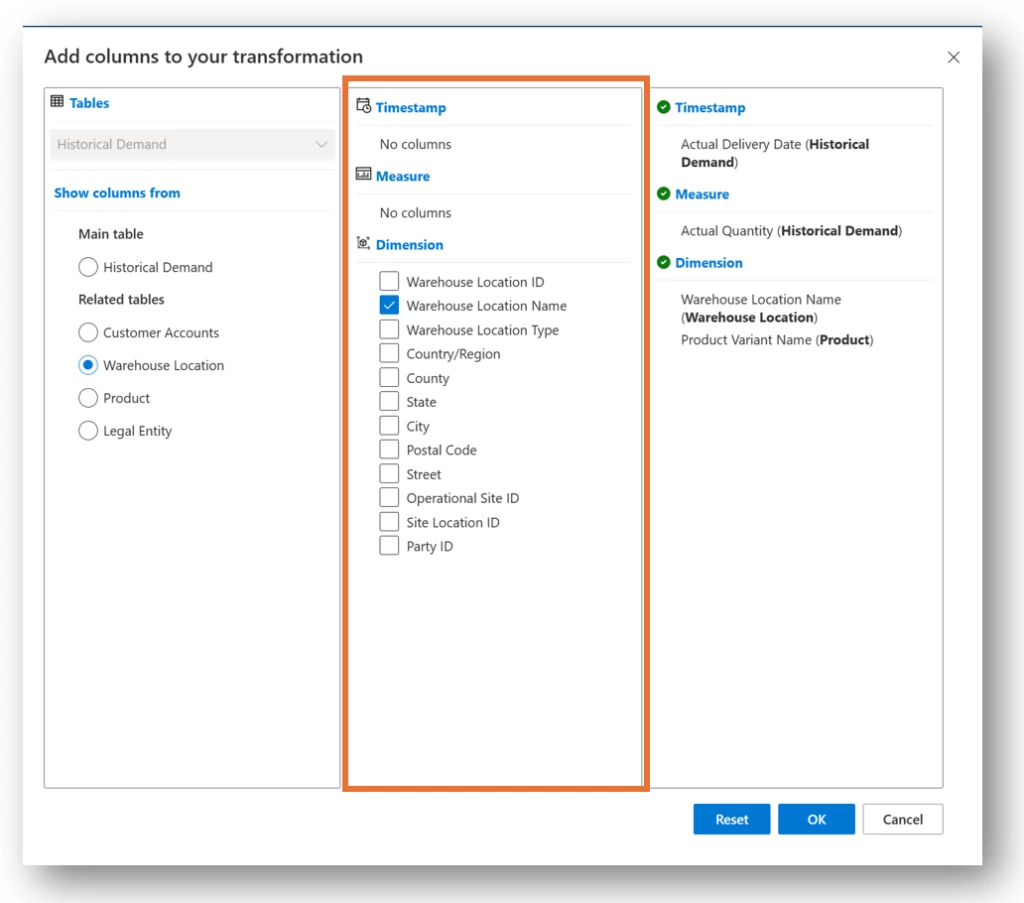
Data Hierarchy Management:
Efficient data hierarchy management is crucial for granular forecasting and optimizing supply chain operations. Demand planning in Microsoft Dynamics 365 Supply Chain Management provides comprehensive hierarchy management across products, locations, and time:
Product Hierarchy: A retail electronics company organizes its product catalog with a hierarchical structure, starting broadly with categories like smartphones and laptops and becoming more granular with specific brands and models. This detailed hierarchy enables the company to forecast demand patterns at a specific product level, enhancing inventory management.
Image: Product Hierarchy set up
Location Hierarchy: The company optimizes distribution based on a location hierarchy that spans global, regional, and local levels. Understanding variations in demand by region helps in strategic decision-making for supply chain management, ensuring efficient allocation of inventory to meet the unique demands of each location.
Image: Location Hierarchy set up
Time Hierarchy: Capturing seasonality and trends through time hierarchy management, the company analyzes daily, weekly, monthly, and yearly variations in demand. This temporal sensitivity enhances the accuracy of predictions, allowing the business to adjust inventory levels and marketing strategies to meet fluctuating consumer preferences throughout the year.
Image: Time Hierarchy set up
Enhanced Integration with data:
Demand planning in Dynamics 365 Supply Chain Management seamlessly integrates your data, further enhancing the capabilities of the demand forecasting solution:
Image: Data Integration options
Virtual Entities:
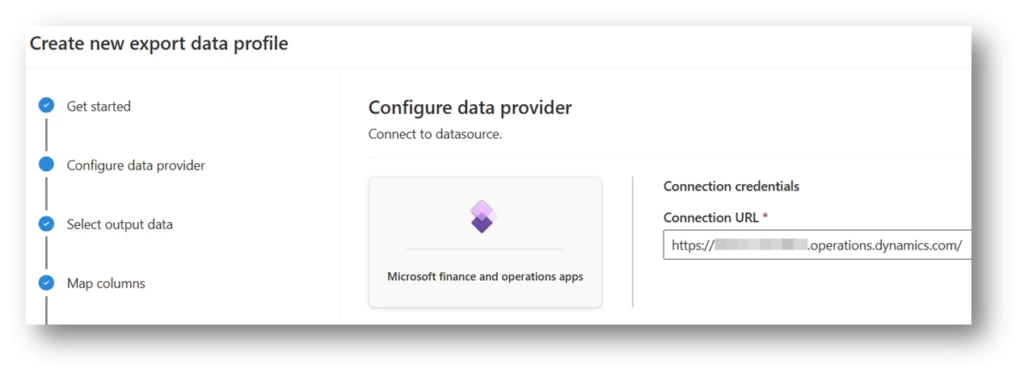
The platform supports the extension or creation of custom entities within Microsoft Finance and Operations, enabling integration with additional data sources. This flexibility ensures that businesses can incorporate diverse datasets into their demand forecasting models.
Finance and OperationsIntegration:
The smooth export of planned data back into Microsoft Finance and Operations marks the culmination of the supply chain planning cycle. This closed-loop integration guarantees that the generated demand forecasts are directly incorporated into the broader finance and operations context, promoting consistency and accuracy throughout the organization. Users have the flexibility to plan across various instances of Dynamics 365 Finance and Operations at a higher level and selectively export specific parts of the plan to designated locations.
Image: Finance and Operations integration
Azure Data Explorer (ADX):
Efficient data storage, aggregation, and disaggregation in Azure Data Explorer optimize performance. This integration allows businesses to harness the power of Azure’s data capabilities for more robust forecasting and analytics.
Conclusion:
Microsoft Dynamics 365 Supply Chain Management’s demand planning feature provides a comprehensive solution for demand forecasting. This solution incorporates outlier detection, advanced forecasting models, seasonality analysis, and robust scenario planning capabilities. The integrated approach enables businesses to make well-informed decisions, adapt to changing conditions, and maintain a competitive edge in a dynamic market environment. Demand planning and forecasting are crucial aspects of effective supply chain management, enhancing agility, responsiveness, and competitiveness in today’s dynamic marketplace.
The article explores various forecasting models and demonstrates their real-world applications. Dynamics 365’s features, such as built-in AI algorithms, advanced forecasting models, forecasting profiles, outlier detection, and data hierarchy management, are highlighted as key elements that improve accuracy.
Additionally, the platform’s integration capabilities with Azure Data Explorer and Dynamics 365 Supply Chain Management are emphasized, creating a closed-loop system that optimizes forecasting accuracy and extends its impact across the organization.
To navigate the complexities of supply chain management, businesses can strategically leverage Dynamics 365 Supply Chain Management. This proactive approach allows them to adapt to future challenges, gain a competitive edge, and foster sustained success in the ever-evolving landscape of modern business.
Learn More
Access the demand planning solution, Documentation, and Workshop:
To access the demand planning Application and learn more about its features, follow the provided links. Additionally, don’t miss the upcoming demand planning workshop in Denmark to dive deeper into this transformative tool.
Access the demand planning in Dynamics 365 Supply Chain Management:
To install the latest version of the demand planning application, ensure that you are using Dynamics 365 Supply Chain Management, and then visit the Power Platform Admin Center. Search for the Dynamics 365 demand planning Application and follow the installation process.
If you’re interested in learning more about our demand planning Application, we’ve prepared an extensive collection of highly informative documents for your review and easy access.
We’ve taken extra steps to create a series of informative demo videos that will not only guide you through the application but also showcase a multitude of features available in the demand planning Application.
The forthcoming demand planning Workshop, to be held at Microsoft’s facility in Lyngby, Denmark, is geared towards introducing the new demand planning application to both Customers and Partners. Furthermore, it will provide an in-depth exploration of the product’s features and capabilities.
The workshop will also cover various important topics, including:
Exploring the contents of the Public Preview October 21st and December update.
Engaging hands-on lab activities.
Participating in a user experience (UX) study or exercise.
Understanding how these developments align with the broader context of Supply Chain Planning.
An overview of Copilot for demand planning.
Customer insights and feedback.
Please note that a more detailed agenda will be provided to attendees as the workshop date approaches.
Join our Yammer group to stay updated with monthly evaluations, scripts, and videos related to the demand Planning Application. Your journey to supply chain transformation begins here.
Filter out CreateFile events from the event grid subscription.
This filtering reduces the traffic coming from Event Grid and optimizes the ingestion of events into Azure Data Explorer.
You can read more about how to use the SDK correctly and avoid empty file errors here.
Schedule & plan
Step 1: Existing clusters which do not use the functionality today will get the change immediately.
Step 2: Clusters created after end of December 2023 will get the change.
Step 3: Current flow users as well as new clusters created until end of December 2023 will receive the changes after end of February 2024.
Deprecating the metric “Events Processed (for Event/IoT Hubs)”
This metric represents the total number of events read from Event Hubs/ IoT hub and processed by the cluster. These events can be split by the status: Received, Rejected, Processed.
Required Change
Users can use the metrics “Event received”, “Events processed” and “Event dropped” to get the number of events that were received, processed, or dropped from each data connection respectively.
This article is contributed. See the original author and article here.
Author(s): Arun Sethia is a Program manager in Azure HDInsight Customer Success Engineering (CSE) team.
Co-Author: Sairam is a Product manager for Azure HDInsight on AKS.
Introduction
Azure Logic Apps allows you to create and run automated workflows with little to no code. These workflows can be stateful or stateless. Each workflow starts with a single trigger, after which you must add one or more actions. An Action specifies a task to perform. Trigger specifies the condition for running any further steps in that workflow, for example when a blob is added or updated, when http request is received, checks for new data in an SQL database table, etc. These workflows can be stateful or stateless, based on your Azure Logic App plan (Standard and Consumption).
Using workflows, you can orchestrate complex workflow with multiple processing steps, triggers, and interdependencies. These steps can involve certain Apache Spark and Apache Flink jobs, and integration with Azure services.
The blog is focused on how you can add an action to trigger Apache Spark or Apache Flink job on HDInsight on AKS from a workflow.
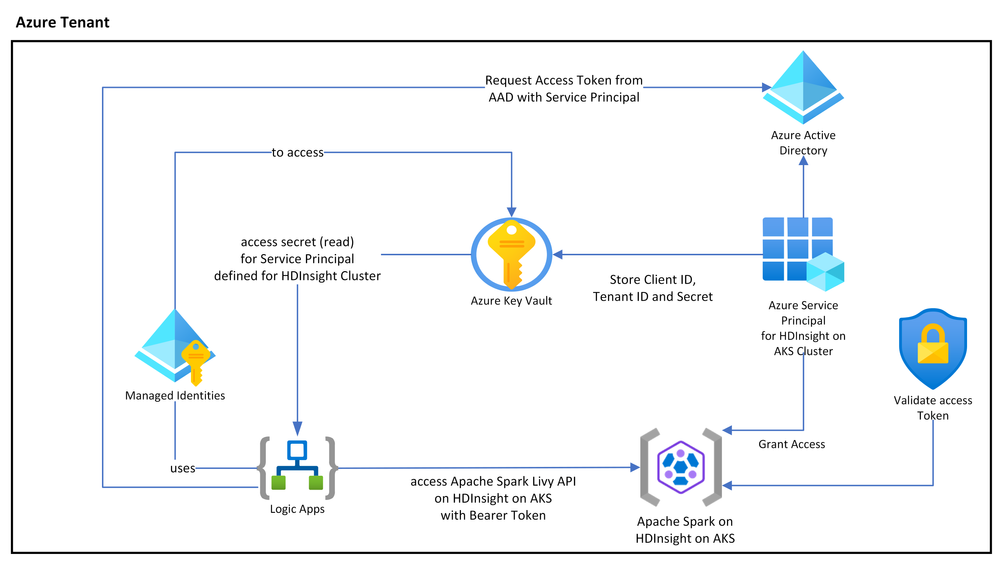
Azure Logic App – Orchestrate Apache Spark Job on HDInsight on AKS
In our previous blog, we discussed about different options to submit Apache Spark jobs to HDInsight on AKS cluster. The Azure Logic Apps workflow will make use of Livy Batch Job API to submit Apache Spark job.
The following diagram shows interaction between Azure Logic Apps, Apache Spark cluster on HDInsight on AKS, Azure Active Directory and Azure Key Vault. You can always use the other cluster shapes like Apache Flink or Trino for the same, with the Azure management endpoints.
HDInsight on AKS allows you to access Apache Spark Livy REST APIs using OAuth token. It would require a Microsoft Entra service principal and Grant access to the cluster for the same service principal to the HDInsight on AKS cluster (RBAC support is coming soon). The client id (appId) and secret (password) of this principal can be stored in Azure Key Vault (you can use various design pattern’s to rotate secrets).
Based on your business scenario, you can start (trigger) your workflow; in this example we are using “Http request is received.” The workflow connects to Key Vault using System managed (or you can use User Managed identities) to retrieve secrets and client id for a service principal created to access HDInsight on AKS cluster. The workflow retrieves OAuth token using client credential (secret, client id, and scope as https://hilo.azurehdinsight.net/.default).
The final workflow is as follows, the source code and sample payload are available on this GitHub
Azure Logic App – Orchestrate Apache Flink Job on HDInsight on AKS
HDInsight on AKS provides user friendly ARM Rest APIs to submit and manage Flink jobs. Users can submit Apache Flink jobs from any Azure service using these Rest APIs. Using ARM REST API, you can orchestrate the data pipeline with Azure Data Factory Managed Airflow. Similarly, you can use Azure Logic Apps workflow to manage complex business workflow.
The following diagram shows interaction between Azure Logic Apps, Apache Flink cluster on HDInsight on AKS, Azure Active Directory and Azure Key Vault.
To invoke ARM REST APIs, we would require a Microsoft Entra service principal and configure its access to specific Apache Flink cluster on HDInsight on AKS with Contributor role. (resource id can be retrieved from the portal, go to cluster page, click on JSON view, value for “id” is resource id).
az ad sp create-for-rbac -n --role Contributor --scopes
The client id (appId) and secret (password) of this principal can be stored in Azure Key Vault (you can use various design pattern’s to rotate secrets).
The workflow connects to Key Vault using System managed (or you can use User Managed identities) to retrieve secrets and client id for a service principal created to access HDInsight on AKS cluster. The workflow retrieves OAuth token using client credential (secret, client id, and scope as https://management.azure.com/.default).
The final workflow is as follows, the source code and sample payload is available on GitHub
Summary
HDInsight on AKS REST APIs lets you automate, orchestrate, schedule and allows you to monitor workflows with your choice of framework. Such automation reduces complexity, reduces development cycles and completes tasks with fewer errors.
You can choose what works best for your organization, let us know your feedback or any other integration from Azure services to automate and orchestrate your workload on HDInsight on AKS.
This article is contributed. See the original author and article here.
In today’s data-driven world, businesses rely on customer data to fuel their marketing strategies. They need to access, analyze, and act on this data to power personalized experiences that drive return on marketing investments. However, this comes with the challenges of (1) configuring systems like a Customer Data Platform correctly and (2) ensuring high data quality within these systems.
A Gartner research study1 reported that high quality data provides “better leads, better understanding of customers, and better customer relationships” and that “every year, poor quality data costs organizations an average of $12.9 million.” This is why it is crucial to understand the current configuration state of your Customer Insights – Data environment and the quality of your data; addressing these challenges is the key to unlocking the most relevant and impactful insights about your customers.
We recently shipped generative-AI powered features in D365 Customer Insights – Data to help organizations improve data quality and configuration with Copilot so they can empower business users with the best insights to deliver highly personalized customer experiences.
This blog post will share more information on how you can improve data quality and configuration with Copilot. With these features you can:
Review the current status of your Customer Insights – Data environment,
Understand the overall health of your data,
Consult which insights can be generated successfully from your data,
Act on recommendations to unlock more insights.
To illustrate how these features work, let’s see how they can be used to improve the speed and quality of an email marketing campaign to target high lifetime value customers with a ‘thank you’ discount on their next purchase.
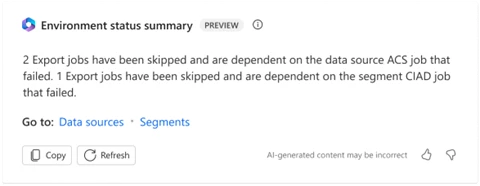
Quickly know if your jobs have run successfully, and where to go if not with Copilot
Contoso Coffee recently implemented Customer Insights – Data, which involved integrating source data from various systems and creating unified customer profiles. To ensure that everything was running smoothly, they checked the system settings. Environment Status Summary, a Copilot feature not only highlighted a recent issue, but also used AI to identify where the issue occurred and provided a direct link to investigate. Thanks to this feature, Contoso’s IT Team was able to quickly fix a skipped customer profile job that would have otherwise blocked them from generating insights for an upcoming email marketing campaign. With the problem resolved in minutes, they could focus on re-engaging high lifetime value customers in a timely manner.
Understand your overall data quality with Copilot
Now that Contoso’s environment is running smoothly, they want to quickly understand the general health of their data estate.
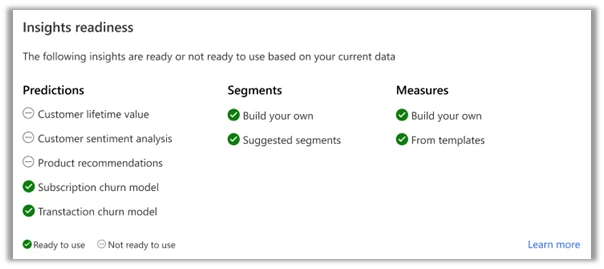
They review a summary of their data quality on the Home Page by the Data Prep Report, a Copilot feature. This summary includes a data quality grade, which insights are available, the most critical data quality issues, and a link to a detailed data prep report to learn more. Using this summary, Contoso can see that their data quality is medium with a 75% score. They are able to generate some insights, but not the customer lifetime value prediction they want for their email marketing campaign.
If not for this summary, Contoso would have attempted to configure, train, score, and run a customer lifetime value prediction that would have failed completely or had low-grade results. The summary show where their data stands. Thus they don’t have to go through the frustration of trying to generate insights based on unusable data.
See which insights can be generated successfully from your data
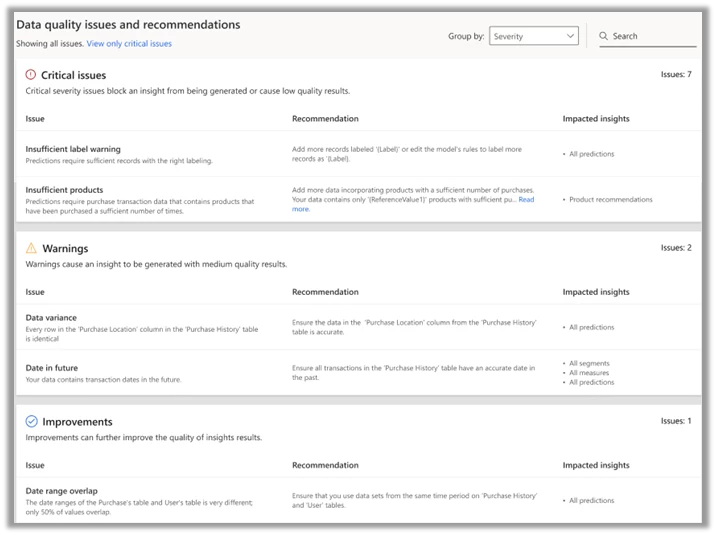
Next, Contoso wants to deep dive the report to understand the next steps to build their email campaign. They click into the full Data Prep Report, which informs them that they can generate churn predictions, segments, or measures based on their current data. However, they want to pursue a customer lifetime value prediction to support their campaign. They filter the report to review the detailed issues and recommendations specific to customer lifetime value and see the issues listed in priority order from highest to lowest severity. The report gives them the targeted, easy-to-digest information they need to know how to proceed.
Act on recommendations to unlock more insights
Finally, Contoso engages their IT Team to act on the detailed issues and recommendations. The IT Team follows the recommendations by taking the suggested actions such as adding more data incorporating products with a sufficient number of purchases. With minimal time, effort, and ambiguity they are able to improve their data and light up the customer lifetime value prediction they want for their marketing campaign.
Create and use high-impact insights in marketing campaigns
With the help of Environment Status Summary and Data Prep Report, Contoso Coffee is able to get their Customer Data Platform environment set up correctly and resolve their top data quality issues effectively. By improving data quality and configuration with Copilot they are able to instantly get rich insights, such as customer lifetime value predictions, which are conveniently available out-of-the box in Customer Insights – Data. This lets their marketing team focus on launching an effectiveemail campaign that provides relevant and in-the-moment offers to their highest value customers to drive business results. Consult our product documentation and start using these AI-powered features today to achieve similar results!
What are some ways to engage further with Customer Insights – Data?
If you’re a new user, or want to test with demo data: Start a trial of Customer Insights
This article is contributed. See the original author and article here.
We are constantly evolving the Microsoft 365 platform by introducing new experiences like Microsoft Clipchamp and Microsoft Loop—available now for Microsoft 365 Business Standard or Microsoft 365 Business Premium subscribers.
This article is contributed. See the original author and article here.
The Viva Engage Festival, hosted by Swoop Analytics, is an interactive virtual event that brings together Viva Engage thought leaders, communication innovators, and community enthusiasts from around the globe. This is not just another webinar; it’s an opportunity to dive deep into the future of employee engagement, learn about new tech, explore the latest Viva Engage experiences, and connect with a community passionate about driving change in their businesses.
Hear from leading customers and directly from Microsoft
Viva Engage Festival includes customer speakers and industry experts who will share knowledge and expertise on a wide range of topics around Viva Engage, from Comcast, NSW Government, Johnson and Johnson, Vestas and more. Join us for an exclusive look into Microsoft’s journey with Viva Engage and communities as we share our own experiences.
We hope you join us to connect with like-minded individuals who share a passion for driving meaningful engagement. Whether you’re a business leader, a professional, or an enthusiast, you’ll leave the festival with the inspiration and knowledge needed to take your Viva Engage investments to the next level.
Nominate Viva Engage Community Champion!
As part of our 2023 Viva Engage Festival, Microsoft and SWOOP Analytics will announce this year’s regional winners of the Community Champion Award. The Viva Engage Community Champion Award is an opportunity to recognize passionate community managers around the world who are committed to employee engagement, knowledge sharing, and collaboration in their Viva Engage networks. Can you think of anyone who deserves this title? Let us know who it might be! The 2023 Viva Engage Community Champion will be announced for each region during the festival. Nominations close November 30, 2023.
This article is contributed. See the original author and article here.
Ignite has come to an end, but that doesn’t mean you can’t still get in on the action!
Display Your Skills and Earn a New Credential with Microsoft Applied Skills
Advancements in AI, cloud computing, and emerging technologies have increased the importance of showcasing proficiency in sought-after technical skills. Organizations are now adopting a skills-based approach to quickly find the right people with the appropriate skills for specific tasks. With this in mind, we are thrilled to announce Microsoft Applied Skills, a new platform that enables you to demonstrate your technical abilities for real-world situations.
Microsoft Applied Skills gives you a new opportunity to put your skills center stage, empowering you to showcase what you can do and what you can bring to key projects in your organization. This new verifiable credential validates that you have the targeted skills needed to implement critical projects aligned to business goals and objectives.
There are two Security Applied Skills that have been introduced:
Learners should have expertise in Azure infrastructure as a service (IaaS) and platform as a service (PaaS) and must demonstrate the ability to implement regulatory compliance controls as recommended by the Microsoft cloud security benchmark by performing the following tasks:
Learners should be familiar with Microsoft Security, compliance, identity products, Azure portal, and administration, including role-based access control (RBAC), and must display their ability to set up and configure Microsoft Sentinelb by demonstrating the following:
Create and configure a Microsoft Sentinel workspace
Deploy a Microsoft Sentinel content hub solution
Configure analytics rules in Microsoft Sentinel
Configure automation in Microsoft Sentinel
Earn these two credentials for free for a limited time only.
View the Learn Live Sessions at Microsoft Ignite On-demand
Learn Live episodes guide learners through a module on Learn and work through it in real-time. Microsoft experts lead each episode, providing helpful commentary and insights and answering questions live.
The Microsoft Ignite Edition of Microsoft Learn Cloud Skills Challenge is underway. There are several challenges to choose from, including the security-focused challenge Microsoft Ignite: Optimize Azure with Defender for Cloud. If you complete the challenge, you can earn an entry into a drawing for VIP tickets to Ignite next year. You have until January 15th to complete the challenge. Get started today!
Keep up-to-date on Microsoft Security with our Collections
This article is contributed. See the original author and article here.
Have you ever wondered why some SQL queries take forever to execute, even when the CPU usage is relatively low? In our latest support case, we encountered a fascinating scenario: A client was puzzled by a persistently slow query. Initially, the suspicion fell on CPU performance, but the real culprit lay elsewhere. Through a deep dive into the query’s behavior, we uncovered that the delay was not due to CPU processing time. Instead, it was the sheer volume of data being processed, a fact that became crystal clear when we looked at the elapsed time. The eye-opener was our use of SET STATISTICS IO, revealing a telling tale: SQL Server Execution Times: CPU time = 187 ms, elapsed time = 10768 ms. Join us in our latest blog post as we unravel the intricacies of SQL query performance, emphasizing the critical distinction between CPU time and elapsed time, and how understanding this can transform your database optimization strategies.
Introduction
In the realm of database management, performance tuning is a critical aspect that can significantly impact the efficiency of operations. Two key metrics often discussed in this context are CPU time and elapsed time. This article aims to shed light on these concepts, providing practical SQL scripts to aid database administrators and developers in monitoring and optimizing query performance.
What is CPU Time?
CPU time refers to the amount of time for which a CPU is utilized to process instructions of a SQL query. In simpler terms, it’s the actual processing time spent by the CPU in executing the query. This metric is essential in understanding the computational intensity of a query.
What is Elapsed Time?
Elapsed time, on the other hand, is the total time taken to complete the execution of a query. It includes CPU time and any additional time spent waiting for resources (like IO, network latency, or lock waits). Elapsed time gives a more comprehensive overview of how long a query takes to run from start to finish.
Why Are These Metrics Important?
Understanding the distinction between CPU time and elapsed time is crucial for performance tuning. A query with high CPU time could indicate computational inefficiency, whereas a query with high elapsed time but low CPU time might be suffering from resource waits or other external delays. Optimizing queries based on these metrics can lead to more efficient use of server resources and faster query responses.
Practical SQL Scripts
Let’s delve into some practical SQL scripts to observe these metrics in action.
Script 1: Table Creation and Data Insertion
CREATE TABLE EjemploCPUvsElapsed (
    ID INT IDENTITY(1,1) PRIMARY KEY,
    Nombre VARCHAR(5000),
    Valor INT,
    Fecha DATETIME
);

DECLARE @i INT = 0;
WHILE @i < 200000
BEGIN
    INSERT INTO EjemploCPUvsElapsed (Nombre, Valor, Fecha)
    VALUES (CONCAT(REPLICATE('N', 460), @i), RAND()*(100-1)+1, GETDATE());
    SET @i = @i + 1;
END;
This script creates a table and populates it with sample data, setting the stage for our performance tests.
Script 2: Enabling Statistics
Before executing our queries, we enable statistics for detailed performance insights.
SET STATISTICS TIME ON;
SET STATISTICS IO ON;
Script 3: Query Execution
We execute a sample query to analyze CPU and elapsed time.
SELECT *
FROM EjemploCPUvsElapsed
ORDER BY NEWID() DESC;
Script 4: Fetching Performance Metrics
Finally, we use the following script to fetch the CPU and elapsed time for our executed queries.
SELECT
    sql_text.text,
    stats.execution_count,
    stats.total_elapsed_time / stats.execution_count AS avg_elapsed_time,
    stats.total_worker_time / stats.execution_count AS avg_cpu_time
FROM
    sys.dm_exec_query_stats AS stats
CROSS APPLY
    sys.dm_exec_sql_text(stats.sql_handle) AS sql_text
ORDER BY
    avg_elapsed_time DESC;
Conclusion
Understanding and differentiating between CPU time and elapsed time in SQL query execution is vital for database performance optimization. By utilizing the provided scripts, database professionals can start analyzing and improving the efficiency of their queries, leading to better overall performance of the database systems.


.png")
.png")

Recent Comments