This article is contributed. See the original author and article here.
Hi everyone! Brandon Wilson here once again with this month’s “Check This Out!” (CTO!) guide, and apologies for the delay!
These posts are only intended to be your guide, to lead you to some content of interest, and are just a way we are trying to help our readers a bit more, whether that is learning, troubleshooting, or just finding new content sources! We will give you a bit of a taste of the blog content itself, provide you a way to get to the source content directly, and help to introduce you to some other blogs you may not be aware of that you might find helpful.
From all of us on the Core Infrastructure and Security Tech Community blog team, thanks for your continued reading and support!
This blog post will assume that you have a fundamental understanding of Windows containers. If that isn’t the case, then then I highly recommend reading Get started: Run your first Windows container.
Many developers and IT Admins are in the midst of migrating long standing applications into containers to take advantage of the myriad of benefits made available with containerization.
NOTE: Not all applications are able to equally take advantage of the benefits of containerization. It is another tool for the toolbox to be used at your discretion.
But moving an existing application into a container can be a bit tricky. With this blog post I hope to help make that process a little bit easier for you.
At Microsoft, we’re committed to providing our customers with the tools they need to succeed wherever they are. By extending Azure services to the customer’s preferred environments like System Center, we empower customers with access to Azure’s potential along with a consistent experience across their hybrid estate. Today we’re excited to deliver on that commitment as we announce that System Center Virtual Machine Manager (SCVMM) enabled by Azure Arc is now generally available to manage SCVMM resources in Azure.
It’s been almost two weeks since the first post-End of Life Patch Tuesday for Windows Server 2012/R2. To receive that critical security patch from November’s Patch Tuesday, your servers must be enrolled in Extended Security Updates. Fortunately, it’s not too late. You can enroll in WS2012 ESUs enabled by Azure Arc anytime, with just a few steps!
Optimizing your Azure cloud investments is crucial for your organization’s success, helping you minimize unnecessary expenses, and ultimately drive better ROI. At Microsoft, we’re committed to optimizing your Azure environments and teaching you how to do it with resources, tools, and guidance, supporting continuous improvement of your cloud architectures and workloads, in both new and existing projects. We want you to gain confidence to reach your cloud goals, to become more effective and efficient when you have a better grasp of how to work in the cloud most successfully. To do that, our wide range of optimization skilling opportunities help you confidently achieve your cloud goals, resulting in more effectiveness and efficiency through a deeper knowledge of successful cloud operations.
I am excited to announce a comprehensive refresh of the Well-Architected Framework for designing and running optimized workloads on Azure. Customers will not only get great, consistent guidance for making architectural trade-offs for their workloads, but they’ll also have much more precise instructions on how to implement this guidance within the context of their organization.
Are you looking for a way to accelerate your cloud journey and optimize your IT infrastructure, data, and applications? If so, you might be interested in the Brand NewAzure Expert Assessment Offering! It is being launched as a new option within the Microsoft Solution Assessment Program. This is a free one-to-one offering from Microsoft that helps you plan your cloud adoption by collaborating with a Certified Azure Expert who will personally guide you through the assessment, and will make remediation recommendations for your organization.
We are excited to announce that Azure is making it easier for customers to reduce Compute costs by providing them the ability to hibernate Virtual Machines (VMs). Starting today, customers can hibernate their VMs and resume them at a later time. Hibernating a VM deallocates the machine while persisting the VM’s in-memory state. While the VM is hibernated, customers don’t pay for the Compute costs associated with the VM and only pay for storage and networking resources associated with the VM. Customers can later start back these VMs when needed and all their apps and processes that were previously running simply resume from their last state.
Ransomware attacks can cause significant damage to organizations and individuals, including data loss, security breaches, and costly business disruptions. When successful, they can disable a business’ core IT infrastructure, and cause destruction that could have a debilitating impact on the physical, economic security or safety of a business. And unfortunately, over the last few years, the number of ransomware attacks have seen a significant growth in their numbers as well as their sophistication. Having a sound BCDR strategy in place is essential to meeting your overall goals when it comes to ensuring security against ransomware attacks and minimizing their possible impact on your business. To make sure all customers are well protected against such attacks, Azure Backup provides a host of capabilities, some built-in while others optional, that significantly improve the security of your backups. In this article, we discuss some such capabilities offered by Azure Backup that can help you prepare better to recover from ransomware attacks as well as other data loss scenarios.
Reducing spend is more important than ever given today’s dynamic economy. Today’s businesses strive to create efficiencies that safeguard against unpredictable shifts in the economy, beat competitors, and prioritize what matters most. But accomplishing this is less about cutting costs and more about the ability to continuously optimize your cloud investments. Continuous optimization can help you drive innovation, productivity, and agility and realize an ongoing cycle of growth and innovation in your business.
In this article, we will see how Azure Site Recovery offers an automated way to help you ensure that all your DR data, to which you would fail over, is safe and free of any malware using Microsoft Defender for Cloud.
Azure Site Recovery helps ensure business continuity by keeping business apps and workloads running during outages. Site Recovery replicates workloads running on physical and virtual machines (VMs) from a primary site to a secondary location. After the primary location is running again, you can fail back to it. Azure Site Recovery provides Recovery Plans to impose order, and automate the actions needed at each step, using Azure Automation runbooks for failover to Azure, or scripts.
In July this year, weannounced the launch of Azure Migrate and Modernize, and Azure Innovate, our flagship offerings to help accelerate your move to the cloud. Azure Migrate and Modernize helps you migrate and modernize your existing applications, data and infrastructure to Azure, while Azure Innovate helps you with your advanced innovation needs such as infusing AI into your apps and experiences, advanced analytics, and building custom cloud native applications.
While there are multiple methods for obtaining explicit outbound connectivity to the internet from your virtual machines on Azure, there is also one method for implicit outbound connectivity – default outbound access. When virtual machines (VMs) are created in a virtual network without any explicit outbound connectivity, they are assigned a default outbound public IP address. These IP addresses may seem convenient, but they have a number of issues and therefore are only used as a “last resort”…
Azure DDoS Protection is a service that constantly innovates itself to protect customers from ever-changing distributed denial-of-service (DDoS) attacks. One of the major challenges of cloud computing is ensuring customer solutions maintain security and application availability. Microsoft has been addressing this challenge with its Azure DDoS Protection service, which was launched in public preview in 2017 and became generally available in 2018. Since its inception, Microsoft has renamed its Azure DDoS Protection service to better reflect its capabilities and features. We’ll discuss how this protection service has transformed through the years and provide more insights into the levels of protection offered by the separate tiers.
As the holiday season approaches, businesses and organizations should brace for an increase in Distributed Denial of Service (DDoS) attacks. Historically, this period has seen a spike in such attacks, targeting sectors like e-commerce and gaming that experience heightened activity. DDoS threats persist throughout the year, but the holiday season’s unique combination of increased online activity and heightened cyber threats makes it a critical time for heightened vigilance.
We are excited to announce that Personal Desktop Autoscale on Azure Virtual Desktop is generally available as of November 15, 2023! With this feature, organizations with personal host pools can optimize costs by shutting down or hibernating idle session hosts, while ensuring that session hosts can be started when needed.
In this post, I want to talk about Microsoft Assessments but more specifically Microsoft Assessments Milestones because they are a very useful tool which is not widely used.
In case you don’t know what Microsoft Assessments are, they are a free, online platform that helps you evaluate your business strategies and workloads. They work through a series of questions and recommendations that result in a curated guidance report that is actionable and informative.
In the following sections of this blog, I will provide a step-by-step guide to help you migrate away from MMA to AMA. This guide is designed to make the transition as smooth and seamless as possible, minimizing any potential disruptions to your monitoring workflow.
But that is not all. To make things even easier, there is a GitHub site that hosts the necessary binaries for this migration process. These binaries will be used to install a set of utilities in Azure, including a process dashboard. This dashboard will provide you with a visual representation of the migration process, making it easier to track and manage.
Ok, let’s get into today’s topic which is removing SMBv1 from domain controllers. Like my previous blog on NTLM, a lot of great content has already been written on SMBv1. My objective is to not to rehash the why but rather focus on how you can take action in a production environment.
For Post #1, I offer to you a quick’n’easy way to use Intune Remediations to get some info from Windows PCs.
Last reboot dates/times are frequently used as simple indicators of life for devices. I was asked if this is captured anywhere in Intune and oddly, I’d never looked – but as I went hunting through Intune (Portal and Graph), the more I looked, the more I couldn’t find it anywhere obvious. “Surely it can’t be THIS hard…?“
Azure Services and the solutions you deploy into Azure are connected to the Microsoft global wide-area network also known as the Microsoft Global Network or the Azure Backbone. There are a few different ways to connect to an Azure service from a subnet, depending on your requirements around securing access to these services. Your requirements should dictate which method you choose.There are some common misconceptions around connectivity, and the goal of this article is to provide some clarity around connecting to Azure Services.
Buenos días and welcome to número tres in the holiday ’23 series.
This one is sure to please the crowd – it’s the NEW AND IMPROVED easy to setup/deploy/use solution for when IT Ops/Support needs a local admin ID and password to perform some management task(s) on a Windows endpoint.
Server migrations to Azure Virtual Machines either through Azure Migrate or via a redeploy approach can benefit from Azure policies to accelerate adoption of Azure first party services across BCDR, Security, Monitoring and Management.
Our Cloud Adoption Framework’s guidance for Azure Landing Zones already provides a good baseline of recommended Azure policies. However, a variation to this baseline is described in this article with a focus on newly migrated Azure Virtual Machine resources.
How can a SOC team ingest and analyze Windows Logs with Microsoft Sentinel? What are the main options to ingest Windows Logs into a Log Analytics Workspace and use Microsoft Sentinel as a SIEM to manage security incidents from events recorded on these logs?
Traditionally, during the setup of an access package, you could specify who can request access, including users and groups in the organization’s directory or guest users. Now, you have the option to use an automatic assignment policy to manage access packages. This policy includes membership rules that evaluate user attribute values to determine access. You can create one automatic assignment policy per access package, which can assess built-in user attributes or custom attribute values generated by third-party HR systems and on-premises directories. Behind the scenes, Entitlement Management automatically creates dynamic security groups based on the policy rules, which are adjusted as the rules change.
When your Windows products reach the end of support, Extended Security Updates (ESUs) are there to protect your organization while you modernize your estate. To take advantage of this optional service, you’d purchase and download ESU product keys, install them, and finally activate the extended support.
You can now get three additional years of Extended Security Updates (ESUs) if you need more time to upgrade and modernize your Windows Server 2012, Windows Server R2, or Windows Embedded Server 2012 R2 on Azure. This also applies to Azure Stack HCI, Azure Stack Hub, and other Azure products.
Universal Print is a cloud-based print solution that enables a simple, rich, and secure print experience for users while also reducing time and effort for IT pros. By shifting print management to the cloud, IT professionals can simplify administration and end-users can easily print, reducing the expense of organizations’ print infrastructure.
Today, we start to roll out Copilot in Windows (in preview) for Windows 10, version 22H2 to Windows Insiders in the Release Preview Channel. Bringing Copilot to Windows 10enables organizations managing both Windows 11 and Windows 10 devices to continue considering a rollout of Copilot in Windows and provide this powerful productivity experience to more of their workforce.
This article is contributed. See the original author and article here.
Artificial Intelligence (AI) and Machine Learning (ML) have become essential tools for businesses to stay competitive in today’s data-driven world. Whether you’re working with traditional ML or generative AI, with Microsoft Azure Machine Learning, we strive to empower your data science and app developments teams to build, fine-tune, evaluate, deploy, and manage high-quality models at scale, with confidence. The platform is built to help organizations accelerate time to value with industry-leading MLOps, open-source interoperability, responsible AI practices, integrated tools, and built-in governance, security, and compliance for running machine learning workloads anywhere. We continually improve with the valued input of our customers.
Your voice matters—help other organizations learn about Azure Machine Learning
We humbly invite our customers to get rewarded for sharing your first-hand experience working with Azure Machine Learning by writing a review on Gartner Peer Insights. Your review will not only assist other developers, data scientists, and technical decision-makers in their platform evaluation process, but also help shape the future of our platform. Thank you for your time and feedback!
Write a review and claim your reward*
*Reward: You will receive a $25 gift card, a 3-month subscription to Gartner research, or a donation to a charitable cause as a token of our appreciation.
Writing a Review is Simple:
Highlight your experience using Azure Machine Learning.
Personal emails are not accepted, so please use your business email or sign in with LinkedIn.
You must attest to not being an employee, partner, consultant, reseller, or a direct competitor of Microsoft.
Gartner Peer Insights is a trusted online platform where IT professionals and technology decision-makers read and write reviews and ratings for various IT software and services. Your review holds immense value in helping others make informed decisions and finding solutions that meet their unique needs.
Terms and Conditions Apply:
Your privacy is paramount, as only your role, industry, and organization size will be displayed.
The reviewer must be an Azure AI customer and be a working enterprise professional including technology decision-makers, enterprise-level users, executives, and their teams (e.g., students and freelancers are not allowed to submit a review). The reviewer must: attest to the authenticity of the review by certifying that (i) he or she is not an employee of Microsoft a partner of Microsoft or a direct competitor of Microsoft; (ii) employed by an organization with an exclusive relationship with the product being reviewed (this includes exclusive partners, value-added resellers, system integrators, and consultants); and (iii) the feedback is based entirely on his or her own personal experience with Microsoft’s Azure AI.
The offer is good only for those who submit a product review on Gartner Peer Insights and receive confirmation their review has been approved by Gartner. Limited to one reward per person. This offer is non-transferable and cannot be combined with any other offer. The offer is valid while supplies last. It is not redeemable for cash. Taxes, if there are any, are the sole responsibility of the recipient. Any gift returned as non-deliverable will not be re-sent. Please allow 6-8 weeks for shipment of your gift. Microsoft reserves the right to cancel, change, or suspend this offer at any time without notice. This offer is not applicable in Cuba, Iran, North Korea, Sudan, Syria, Crimea, Russia, and China. For more information, please refer to Gartner Peer Programs Community Guidelines.
Your Privacy Matters:
Rest assured that the respondent’s information will only be used for the purpose of mailing the gifts to recipients. For more information, please review our Microsoft Privacy Statement.
This article is contributed. See the original author and article here.
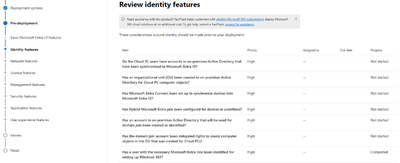
We’re excited to announce that we’ve just released an updated Windows 365 deployment checklist in the Microsoft 365 admin center (MAC).
What is Windows 365?
Windows 365 is a cloud-based Desktop as a service (DaaS) solution that automatically creates a new type of Windows virtual machine for your customer, known as a Cloud PC. A Cloud PC is a highly available, optimized, and scalable virtual machine that provides customers with a rich Windows desktop experience. Cloud PCs are hosted in the Windows 365 service and is accessible from anywhere, on any device (Learn more about Windows 365).
Windows 365 deployment is made to be simple (to see an end-to-end deployment overview, visit Overview of Windows 365 deployment). However, we understand that our customers have unique and complex environments.
What is the Windows 365 deployment checklist?
To help you integrate Windows 365 with your existing enterprise environment, we’ve compiled learnings and best practices from the Microsoft 365 FastTrack Team, which has worked with hundreds of enterprise customers. We’re excited to offer these in an updated Windows 365 deployment checklist experience as part of the Advanced Deployment Guides in the Microsoft 365 Admin Center. This checklist will guide you as you plan, deploy, and scale Windows 365 in your environment.
The Windows 365 deployment checklist guides admins through the considerations around Azure basics, identity, networking, licensing, management, security, applications, and end user experiences that are applicable to their deployment configuration. Admins can assign tasks for each area to the responsible stakeholders and define a target date of completion. Admins can also see a summary view with an overall status to track progress against their timelines.
How can I access the Windows 365 deployment checklist?
This article is contributed. See the original author and article here.
We continue to expand the Microsoft AppSource ecosystem. For this volume, 52 new offers successfully met the onboarding criteria and went live. See details of the new offers below:
Get it now in our marketplace
AdvAIsor: AdvAIsor from Tendencias Consultoria Integrada is an AI tool for text creation, proofreading, and translation. This LLM-powered add-in for the Microsoft Office suite brings enhanced proofreading and translation experience for your documents, with maximum integration. Through a docked dashboard, get quick, easy, and dynamic access to all features with just one click.
AI Perfect Assistant for Microsoft 365: Powered by ChatGPT, AI Perfect Assistant from OOO enhances Microsoft Word and other Microsoft 365 applications to help users with tasks such as ghostwriting, translation, and summarizing text. With AI Perfect Assistant, you can generate stunning PowerPoint slides, reply to messages in Outlook and Teams, craft elegant documents in Word, and more.
aMail: From Asite Solutions, aMail is a Microsoft Outlook plugin and add-in that connects your inbox and the Asite Cloud. This customizable email management tool enables users to save emails and attachments in project folders on Asite, providing a secure and central filing cabinet for project-related correspondence.
Anagrams by Frameable: A simple yet competitive word game for Microsoft Teams, Anagrams by Frameable presents a team-building activity for before meetings get started or any time during the workday for engaging activity between coworkers. Combine letters to guess the word blanks collaboratively, competitively, or just on your own.
Atlan: Get effortless metadata enrichment and lineage impact analysis in bulk with this Atlan Technologies add-in for Microsoft Excel. This integration allows you to document descriptions, certifications, ownership, tags, and announcements for columns and any list of upstream or downstream assets right from Excel and sync it all to Atlan with a single click.
BlueCargo: This AI-powered add-in for Microsoft Outlook analyzes and recoups per diem fees directly from your inbox. After a user opens a per diem invoice attached to any email, BlueCargo analyzes the invoice, audits your per diem charges, and finds any potential savings. BlueCargo includes templates for presenting supporting evidence in dispute emails.
Blueink: Blueink is a secure, cloud-based e-signature solution that allows you to prepare, send, track, save, and download important documents and contracts for electronic signatures using Microsoft Teams. Blueink’s certificate of evidence provides a detailed audit trail of the entire signing process, including the document, the signers, and the IP address of the signer.
Carousel Pro: Prakash Software Solutions’ Carousel Pro elevates your Microsoft SharePoint experience with interactive storytelling through eye-catching animations and seamless integration. With this powerful tool, you have the freedom to infuse life into your site’s homepage and other pages, effortlessly engaging your audience and delivering information in a captivating format.
ClearContract: ClearContract offers AI-powered contract analysis to help reduce legal risk, helping in-house counsel and contract managers analyze incoming contracts by highlighting missing clauses and clauses that are deviating from the market standard. ClearContract frees up time for legal departments while reducing and streamlining contract risk.
Corcentric Platform Add-in for Word Online: This Corcentric add-in features contract clause libraries and template management to improve the editing workflow of contract documents in the Microsoft 365 online. version of Microsoft Word. Users can collaborate directly on files without having to download and re-upload to the Corcentric Platform, and changes will be integrated into the final negotiated contract.
Data Simulator: Turn to Prakash Software Solutions’ Data Simulator for Microsoft SharePoint data testing and development. The SharePoint List View Data Simulator Command Set is your passport to a hassle-free, efficient data generation experience in which you can handpick columns, set record counts, define data types, and impose numeric boundaries.
dokublick Add-In: Digital document management is made easy with this offer from Buhl Data Service. dokublick is an add-in for Microsoft Outlook that automatically stores all documents and receipts in digital folders, giving users an overview of documents and access from anywhere at any time.
Domo: The Domo app allows you to find cards and datasets you have access to within the Domo platform. When discussing data in a Microsoft Teams chat or meeting, users can easily find and post Domo data without leaving Teams. Additionally, all KPI cards you post will display a snapshot of the data.
Don’t Interrupt: From Hootware Limited, Don’t Interrupt is a powerful tool designed to enhance productivity and work-life balance while using Microsoft Teams. With a subset of our full features, users can easily enable or disable Don’t Interrupt and manage overrides directly within Teams.
Donut: This offer from Donut Technologies makes strategic connections in Microsoft Teams to achieve common goals and better outcomes. Donut will pair everyone on the team and send a message prompting them to connect — they can open a chat or video call in Teams or find a time to meet using the Teams calendar.
ELIGO eVoting: ELIGO eVoting by ID Technology is a secure election management platform that digitizes and automates the entire process. Catering to public and private organizations, ELIGO eVoting meets legal requirements, ensuring legally valid election results. Microsoft Teams users will benefit from an integrated voting experience that’s secure and anonymous.
Enjo: From Troopr Labs, Enjo is a full-stack generative AI toolkit purpose-built for support teams. After being added to Microsoft Teams, Enjo assists in the resolution of employee requests by deeply embedding generative AI capabilities into your existing support workflow. Enjo understands user intent and retrieves relevant information from across all knowledge sources to craft human-like responses.
farBooking: From FAR Networks, farBooking helps users better organize their work, both remotely and in person, via Microsoft Outlook and Teams. Give your employees the ability to connect with colleagues, find spaces, desks, and resources, and increase productivity, all from one platform. A farBooking account is required to use this app.
GanttPRO App: GanttPRO from DPM Solutions is an online project management tool based on Gantt charts that transforms work through seamless collaboration without having to leave Microsoft Teams. Intuitive and visually appealing, GanttPRO has a short learning curve so even new team members can start working on a project in 10 to 15 minutes.
HGC UC Talk: From Deltapath Limited, HGC UC Talk allows you to call anywhere from Microsoft Teams with HGC Softphone or the HGC Mobile App. Outgoing calls launch the HGC UC Softphone or HGC UC Mobile App. A subscription to HGC UC Softphone or HGC UC Mobile App is required.
HiHello Email Signatures: Email signatures from HiHello allow organizations to ensure that every email sent presents a professional and consistent brand experience. Admins can create custom email signatures and instantly deploy them to everyone at your company for a consistent, beautiful email experience.
Jambo: Jambo for Microsoft Outlook enables fast and easy creation of new communication records for your Jambo projects, saving you time and effort. When you send emails, this add-in lets you easily log the interaction.
JobPts for Outlook Add-In: Designed to seamlessly integrate colleague appreciation into your email workflow, the JobPts add-in for Microsoft Outlook lets you choose the recognition type, recipient, and message with just a few clicks.
KeeperAI: The KeeperAI add-in for Microsoft 365, Teams, and Outlook enables you to build meaningful connections within your virtual workspace. KeeperAI does this by helping you understand colleagues’ personalities and soft skills. This add-in requires a KeeperAI account.
Lexter.ai: The Lexter.ai assistant for Microsoft Word empowers lawyers with AI-driven features enabling them to optimize daily practices. Lexter.ai simplifies the creation of legal documents, saving time and effort, while also providing enhanced search capabilities within its internal document repository.
Macroplot Link for Excel: Economists, macroeconomic analysts, and financial analysts can use Macroplot Link for Excel to easily import time series data FRED, New York Fed, BIS, World Bank, WITS, and ECB. It also supports national sources from Uruguay (BCU, INE, BEVSA, DNA), Argentina (BCRA, datos.gob.ar), and Brazil (BCB).
Maileva: Available in French, Maileva by Docaposte supports fast preparation of shipments for La Poste, France’s universal postal service provider. Maileva can take care of printing, preparing, and delivering traditional mail to the post office or send your registered mail 100% electronically.
mybrand.center: This add-in from RGN Brand Identity Services simplifies the selection and integration of uploaded and tagged assets from the mybrand.center application. With a paid subscription, users gain access to a beautiful library of branded images to effortlessly enhance Microsoft 365 documents.
News Scroller: This web part by Prakash Software Solutions turns your Microsoft SharePoint site into an engaging, information-rich hub. Enjoy dynamic, customizable, and interactive new updates that will captivate readers.
Overview by Frameable: This simple dashboard for Microsoft Teams surfaces your most important chats, channels, files, meetings, and ongoing calls. Save valuable time with a view of new messages, calls, and meetings, all on one page. Unlock total flexibility to add, move, or hide columns to fit your work style.
Peliqan.io: Paliqan.io syncs your data from business applications such as CRM, ERP, finance, and accounting tools into Microsoft Excel, centralizing it into a data warehouse. Get a complete view of your customers, products, and invoices, and analyze further and build reports with just a few clicks.
Pixel Art: This app from Digital Inspiration creates stunning pixel art using Microsoft Excel. Simply upload an image and watch as it’s transformed into a grid of colored pixels within your spreadsheet.
ProFile – Large File Exchange: This solution from Mevitco lets you send and receive large files that aren’t suitable for email. It features integrated and self-updated antivirus protection, configurable file extensions, and native Microsoft Entra ID integration. There’s no file size limit, and transfers auto-retry when connections are lost.
Rowsie AI: Rowsie helps you understand, build, and update Microsoft Excel modes with ease. Ask it anything about your spreadsheets, from model logic to deciphering complex formulas. Rowsie can craft formulas, clean up formatting, and even build new models from scratch.
Seleam: This fixed assets management platform manages physical assets and consumables. By providing accurate tracking and reducing waste, Seleam helps enterprises optimize spending. Employees can even view and manage fixed assets assigned to them and request repairs, apply for new assets, and initiate asset handover.
Sidekick: A companion app to the XOPS Control Center, XOPS Sidekick gives employees contextual notifications through Microsoft Teams channels from the XOPS platform delivering Autonomous IT. Sidekick gives you a heads-up for your action items and takes care of the rest.
SigningCloud eSign: This solution from Securemetric Technology lets you securely sign and manage documents in Microsoft Teams. Sign documents from almost any device and keep track of the signing process. Once signing is complete, download a tamper-proof, digitally signed document via Teams.
Simply Stakeholders for Outlook (Restricted): Simply Stakeholders from Darzin Software creates a comprehensive record of all your stakeholder engagements so you always know who important stakeholders are, and who has been meeting with and talking to them.
Skills Copilot: Skills Copilot by Lake Union Solutions lets you record your professional skills, acquire new skills, and set career goals, it provides access to more than 98,000 skill definitions and 1.25 million job-to-skill mappings. Use it to find skilled coworkers, learn about different roles, and access training resources.
SMS2GO: Send and receive SMS messages from Microsoft Outlook with SMS2GO by CIM-Mobility. It features message scheduling, templates, and the ability to send to users in more than 150 countries.
Sortino: Investment bankers and institutional investors use Sortino to automatically build fully linked comparable companies analysis, DCFs, 3-statement models, and more. It extracts and analyzes data from many sources such as company financials, SEC filings, earning call transcripts, news, and market data.
Squadify: More than just an opinion poll or engagement tool, Squadify analyzes, tracks, and develops teams to drive optimal outcomes in performance. It spotlights issues to remove barriers to team success quickly, and translates them into clear, actionable insights that enable constructive conversations and drive results.
Swarm Phishnet: Swarm Phishnet from Autnhive is an integrated email and data transfer security platform that combines multiple layers of protection and verification to safeguard your communications. Its primary goal is to detect fraud and phishing attacks while protecting data during transfer.
Tall Emu CRM: The Tall Emu CRM add-in lets you view, edit, and upload all your document templates directly into Microsoft Word. Give your business documents a cohesive, branded look and feel by editing logos, information, and layout.
TR Legal Communication Hub: Streamline your team’s approval process with the TR Legal Communication Hub from Thomson Reuters. It enhances collaboration and efficiency with quick and easy approval management right in Microsoft Teams. Say goodbye to decision making delays and endless emails.
Trusty: Trusty makes referrals easy, allowing any member of your organization to refer talent from their network or share personal referral links to boost your brand and communicate open positions. Trusty helps your recruiting team by automating many daily tasks like announcements, referral campaigns, and more.
Viva Announcements to SharePoint Connector: Cloudwell’s solution will help you stay informed and updated with a seamless announcements experience, bringing announcements from Microsoft Viva Connections into your SharePoint intranet as a web part.
VOXO Meet: Arrange online meetings efficiently with the VOXO Meet add-in for Microsoft Outlook. Designed for VOXO platform users, it automatically creates an online meeting room for every calendar event and email, no more manual scheduling or scrambling to set up online meeting rooms.
Waybook: Waybook lets you bring all your training, onboarding, documentation, and best practices together in one place. Assign team members policies they’re responsible for and empower employees with a searchable Waybook knowledge base available anywhere using Microsoft Teams.
WellB: The WellB platform infuses moments throughout the workday with curated content that empowers and rejuvenates. It brings together global content creators to provide desk optimized exercises, mindfulness tools, and more. The world of wellbeing is now available within Microsoft Teams.
XM Fax (CA): Send faxes securely, directly from Microsoft Teams with XM Fax from OpenText. XM Fax eliminates mishandling of sensitive information by allowing users to manage document transmission without leaving Teams; no printing or device switching required. Faxes are encrypted, with centralized traceability for easier audits. Optional zero-retention settings further ensure document protection.
XM Fax (EMEA): Send faxes securely, directly from Microsoft Teams with XM Fax from OpenText. XM Fax eliminates mishandling of sensitive information by allowing users to manage document transmission without leaving Teams; no printing or device switching required. Faxes are encrypted, with centralized traceability for easier audits. Optional zero-retention settings further ensure document protection.
This article is contributed. See the original author and article here.
Digital Marketing Content (DMC) OnDemand works as a personal digital marketing assistant and delivers fresh, relevant and customized content and share on social, email, website, or blog. It runs 3-to-12-week digital campaigns that include to-customer content and to-partner resources. This includes an interactive dashboard that will allow partners to track both campaign performance and leads generated in real time and to schedule campaigns in advance
NEW CAMPAIGNS
NOTE: To access localised versions, click the product area link, then select the language from the drop-down menu.
The world and how we work are rapidly changing. The opportunities for Microsoft partners—whether you build and sell services, software solutions, or devices—are significant. The capabilities that are required by our customers are evolving, and our partner programs are changing to meet that demand.
The Microsoft AI Cloud Partner Program is focused on simplifying our programs, delivering greater customer value, investing in your growth in new ways, and recognizing how you deliver customer value. Check out links below to learn more:
Admins can sign-in to Partner Center to see how your organisation is progressing towards a Solutions Partner designation and see the associated benefits.
Go to Training Gallery & Microsoft docs to learn about the requirements needed to attain a Solutions Partner designation.
If you’re still new to DMC, you can find program decks with links to recorded demos here. This collection of resources expands all of our digital services.
FEATURES & FUNCTIONALITY
If you’re just returning to DMC or just want a quick recap of the updates we’ve made, you can find them under ”Program Updates” of the Resources section in DMC, which can also be found by clicking the help icon on the top right.
In addition to English, the DMC user interface now supports additional languages. To update, go to your profile, click the edit button on the top right, and then select your preferred language from the drop down menu in the “your information” section.
CONNECT WITH US
If you’d like to speak with someone directly, please join our monthly office hours on January 4, 2024 (occurs the first Thursday of each month.) We offer morning and evening (PST) sessions to accommodate different time zones.
FEEDBACK AND SUPPORT
We’re always working on making DMC a better experience for you. If you have 5 minutes to review your current experience with DMC, we’d love to hear your thoughts. NOTE: All submissions are anonymous, so please reach out to us if you need support, or join our office hours the first Thursday of each month.
This article is contributed. See the original author and article here.
Earlier this year, we’ve introduced the public preview of Field Service Mobile’s refreshed user experience. As this year comes to a close, we are excited to announce a new set of updates to further enhance this new user experience.
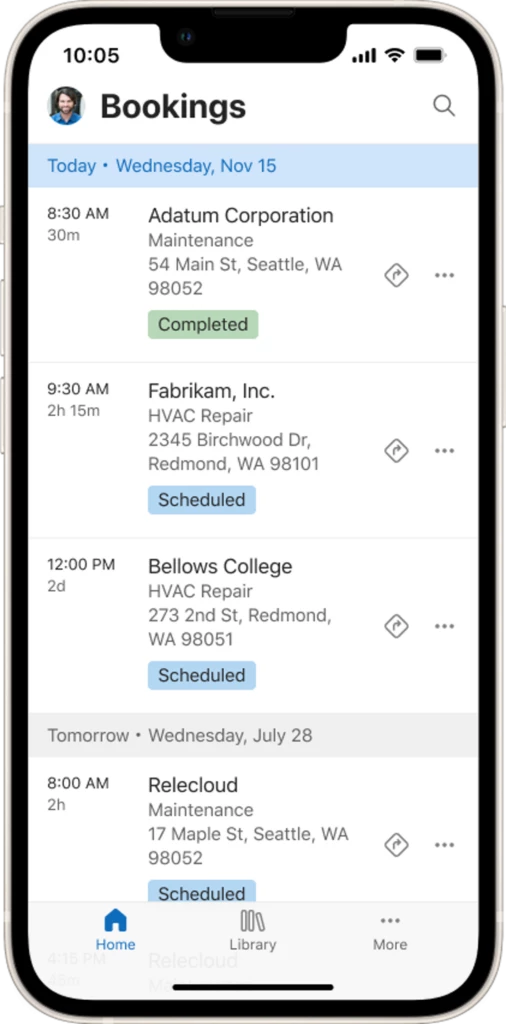
Agenda View Update
The Agenda View is the main landing experience for frontline workers using Field Service Mobile. In this wave, we are continuing to add to this experience to make it easier for your technicians to see and manage their bookings. In this wave, enhancements to the Agenda view include:
Bi-directional scroll of up to 90 days of bookings in the past or future.
Date separators that help your technicians better see the bookings of each day.
Makers can configure the data that gets shown in each row through existing view configuration experience.
These improvements will give your technicians more visibility and control over their schedule, and help them plan their work more effectively. To learn more about this feature, go here.
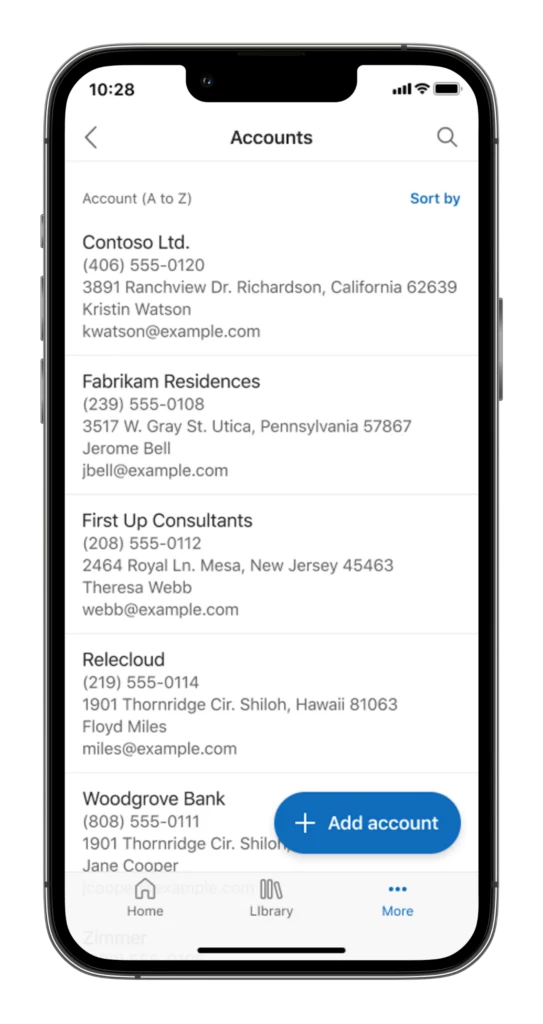
Configurable List View
Another heavily used part of Field Service Mobile is the list view. To improve the item browsing experience for your technicians, the team has built from the ground up a new mobile-first list view for the new Field Service Mobile experience:
Makers can choose up to five columns per table to display in the mobile list view.
The icon in the list view is removed, saving limited mobile screen real estate.
List view has smoother scrolling and is more performant with in-built lazy load.
These new capabilities will improve the productivity of your technicians by enabling them to see more data and at higher density on their mobile devices. To learn more about this feature, go here.
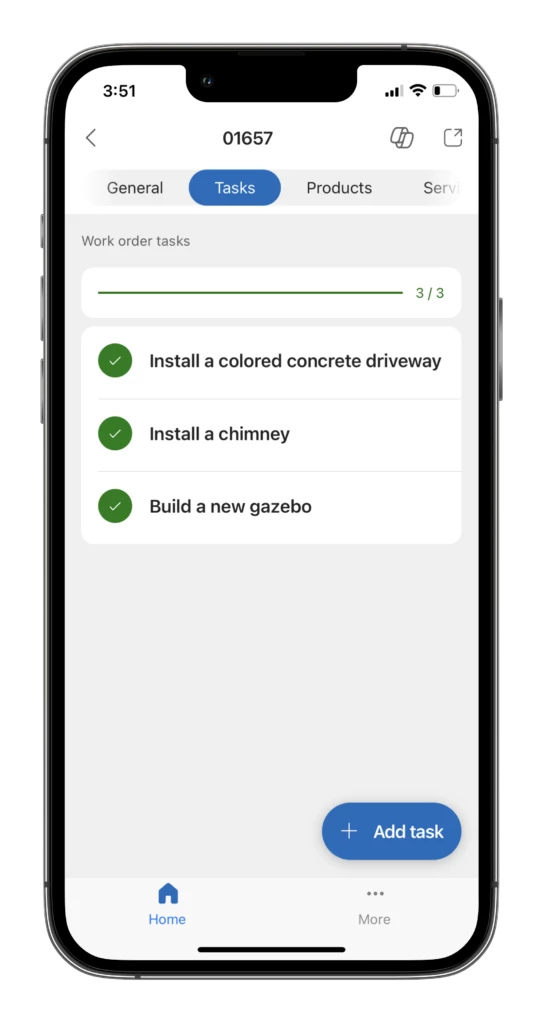
Copilot Work Order Summary and Update
To empower frontline workers with the latest AI advances, we’ve brought the power of Copilot to Field Service Mobile! With these new features, your technicians can both quickly get up to speed on a Work Order or update it using a speech-first Copilot experience.
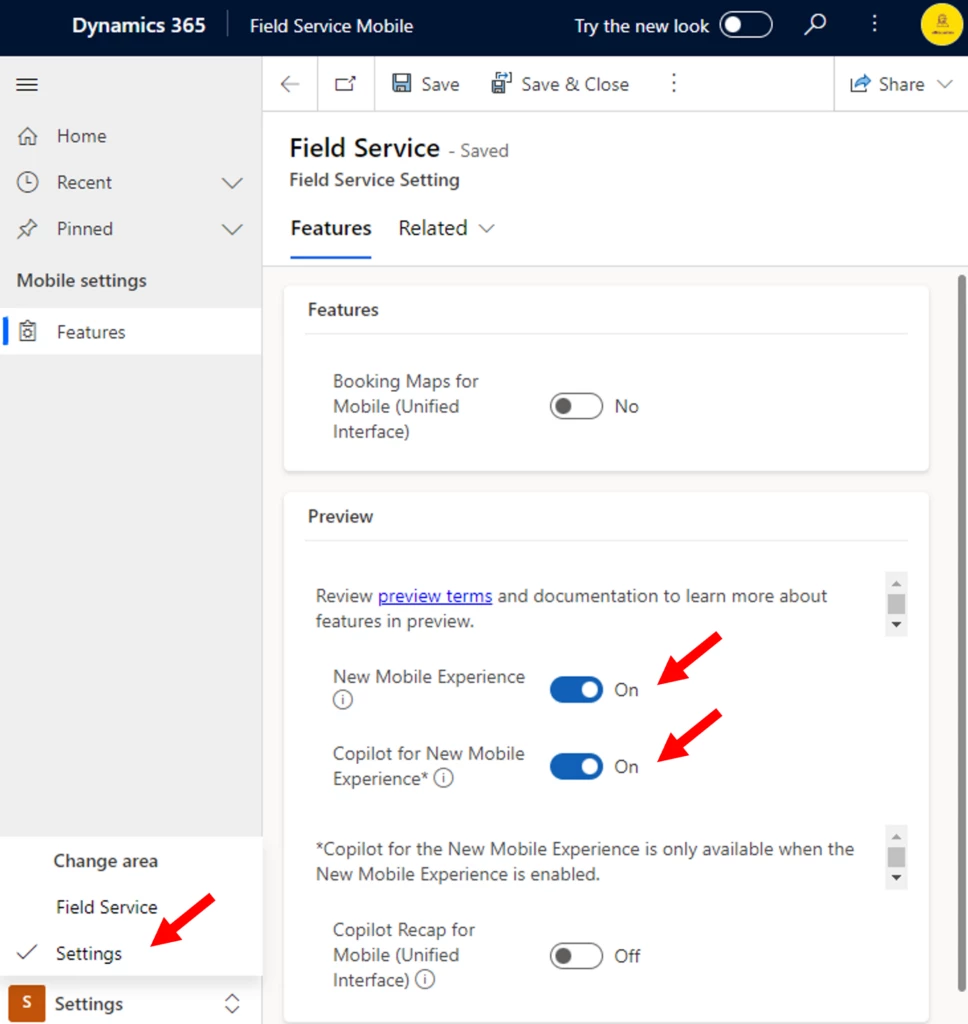
These are some of the features that we have delivered in the latest wave of the Field Service Mobile app. We hope that you will try them out and share your feedback with us. To enable these features, log in with an admin account and turn them on in the settings section in Field Service Mobile. Enable the “New Mobile Experience” and “Copilot for New Mobile Experience” options. For more information, please visit our documentation page here.
Thank you for choosing Dynamics 365 Field Service Mobile app. We are committed to delivering the best mobile service experience for you and your customers. Stay tuned for more updates and enhancements in the future.
We hope that these new enhancements in Field Service mobile will make your work even more productive. We would love to hear your feedback and suggestions on how to improve the product. Please feel free to leave comments in the Dynamics 365 Community Forum or Ideas portal. Thank you for using Field Service Mobile!
This article is contributed. See the original author and article here.
We’re thrilled to announce the public preview of the Error Logs feature for Azure Database for MySQL – Flexible Server! This feature empowers you to gain direct access to MySQL error logs, significantly enhancing your troubleshooting capabilities and providing transparency and independence in managing your database environment.
Note: The Server Logs feature, including Error Logs, is available for all new servers created after November 14th, 2023. For existing servers, this feature will be made available after their next scheduled maintenance estimated to be performed in January 2024.
Key Benefits
Key benefits associated with the Error Logs feature include:
Efficient troubleshooting: You can maintain MySQL error log files under Server Logs feature and download them for up to 7 days, enabling efficient issue identification and resolution.
Enhanced security: You can use Error Logs to proactively detect and respond to unauthorized access attempts, failed login attempts, and other security-related events.
Increased transparency: Enabling exposure of MySQL error logs in the Azure portal allows for a user-friendly interface to monitor your workload and troubleshoot issues.
Enabling the Error Logs feature:
To enable the Error Logs feature, perform the following simple steps:
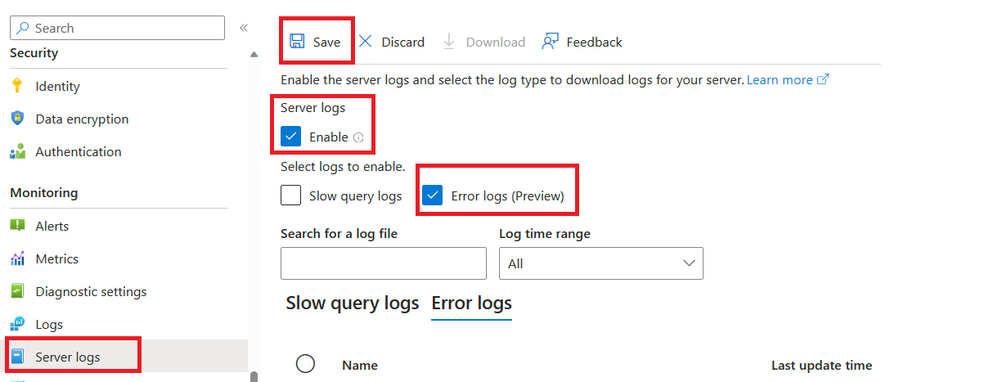
In the Azure portal, navigate to your instance of Azure Database for MySQL – Flexible Server.
On the Monitoring tab, select Server Logs.
On the Server Logs page, select the Enable andError Logs checkboxes, and then select Save.
Alternatively, you can enable Error Logs by configuring the following server parameters via the Azure portal or Azure CLI:
error_server_log_file: This server parameter, when set to ON, allows you to expose error logs as downloadable files from the Azure portal and Azure CLI.
log_output : Setting the value to FILE will enable the Server Logs feature on your MySQL flexible server.
Conclusion
Gain enhanced transparency, troubleshoot with ease, and proactively secure your database environment by leveraging the Error Logs feature. You can learn more about the feature, including limitations during public preview, in our service documentation.
We invite you to explore and provide your valuable feedback as we continue to refine this feature. If you have any questions or suggestions, feel free to leave a comment below or reach out to us at AskAzureDBforMySQL@service.microsoft.com.
This article is contributed. See the original author and article here.
Scenario: PowerShell script to disable Public Network access for Azure Relay
In today’s azure world, it is always better to do automations rather than do a Manual work. It becomes a headache for all of us to navigate to Azure Portal
Here is the simple way to disable Public Network access by using PowerShell script.
This article is contributed. See the original author and article here.
Introducing Copilot for the new Field Service mobile user experience
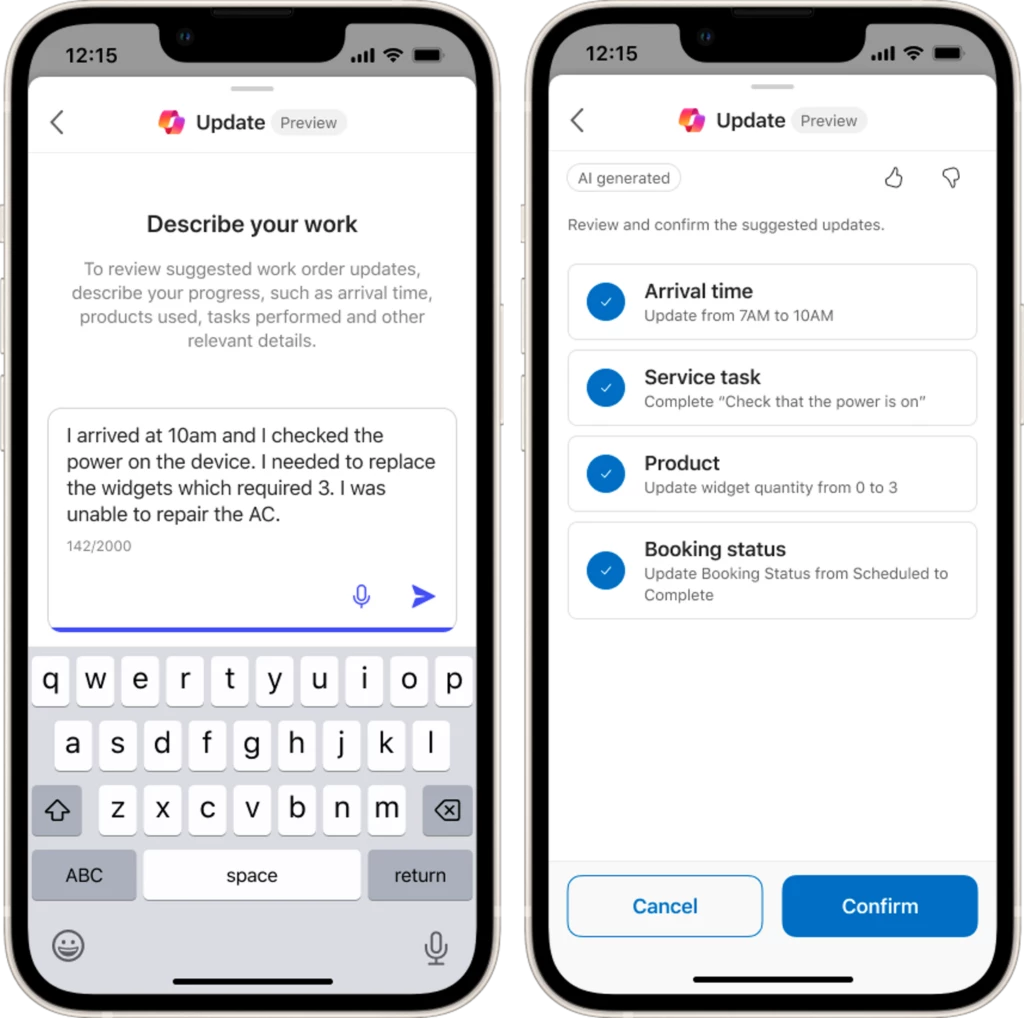
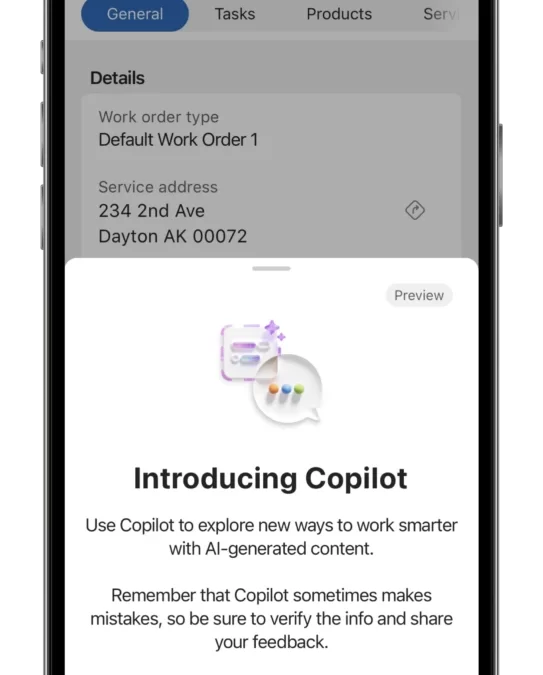
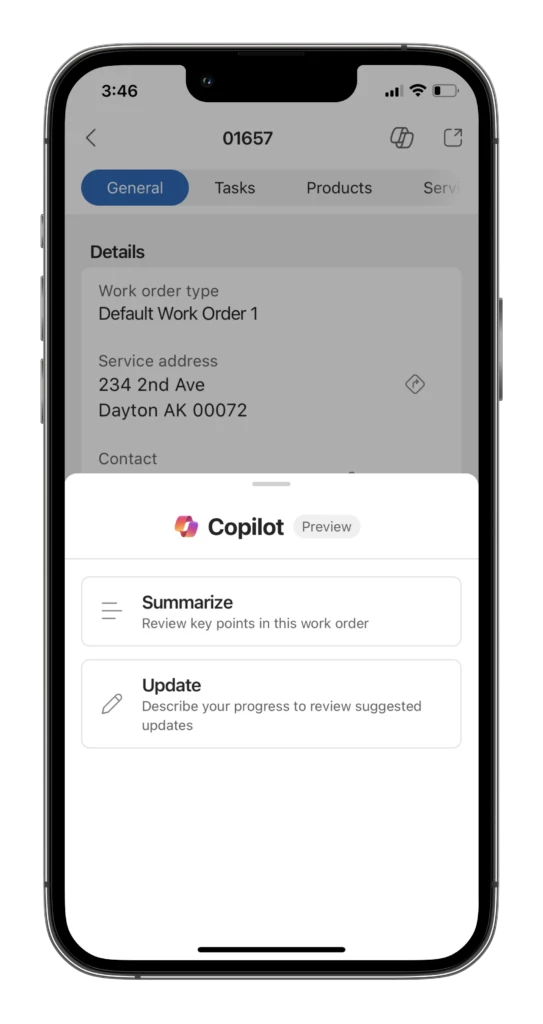
Field Service mobile is a powerful application that helps frontline workers manage their tasks, access information, and communicate updates with the back office. But we know that sometimes, using an app can be cumbersome or distracting, especially when you are busy with your hands-on work. That’s why we are excited to announce Copilot for the Field Service mobile app, a new feature that makes Field Service mobile even more user-friendly and efficient.
The new Field Service mobile (Preview) user interface has two Copilot skills that help to summarize and update work orders. Copilot update uses natural language processing and artificial intelligence to understand your input via text or voice command, then suggests form updates based on that input. While the Copilot summary provides the Frontline Worker a concise summary of their booking with the click of a button.
Let’s learn more about these features and how they work.
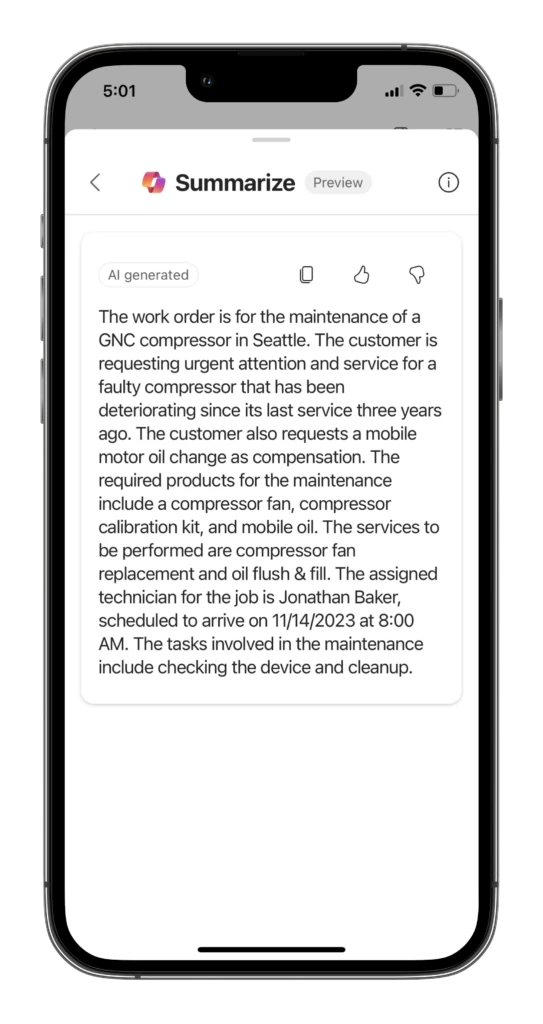
How Copilot Summarizes You Work
Copilot Summarize provides a quick overview of the scheduled booking for the frontline worker. This gives frontline workers a better understanding of the job to be done without needing to click through multiple forms to find the information. Copilot will summarize a booking based on the following fields related to that booking:
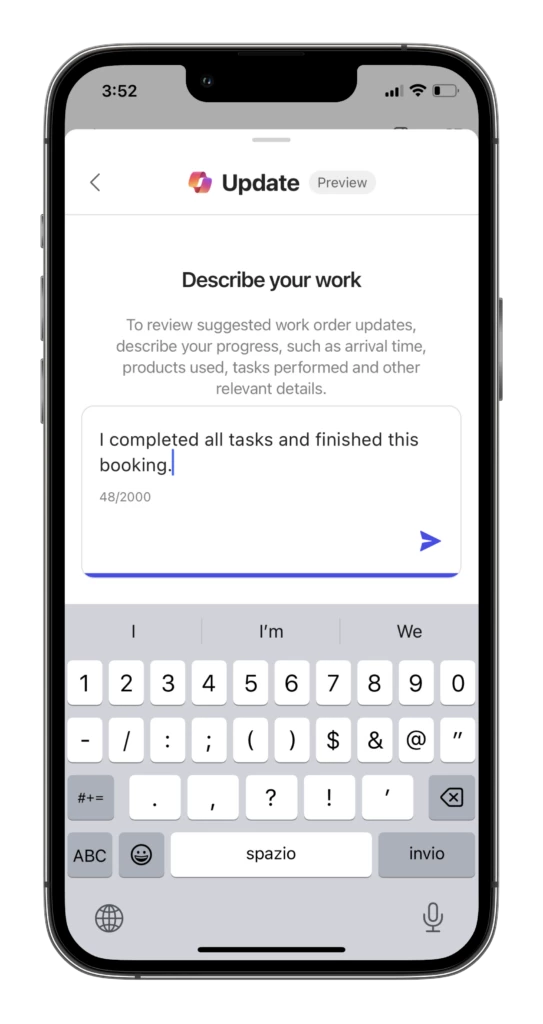
Another benefit of Copilot is that it can help you easily fill out forms. Instead of hunting for fields within the mobile app, you can simply tell Copilot what you want to update. Tell Copilot to update data with phrases such as:
I’ve completed all tasks and finished this booking at 10:00AM
I’ve used {product name} as part of my work to complete this booking.
I’ve completed {service task name}.
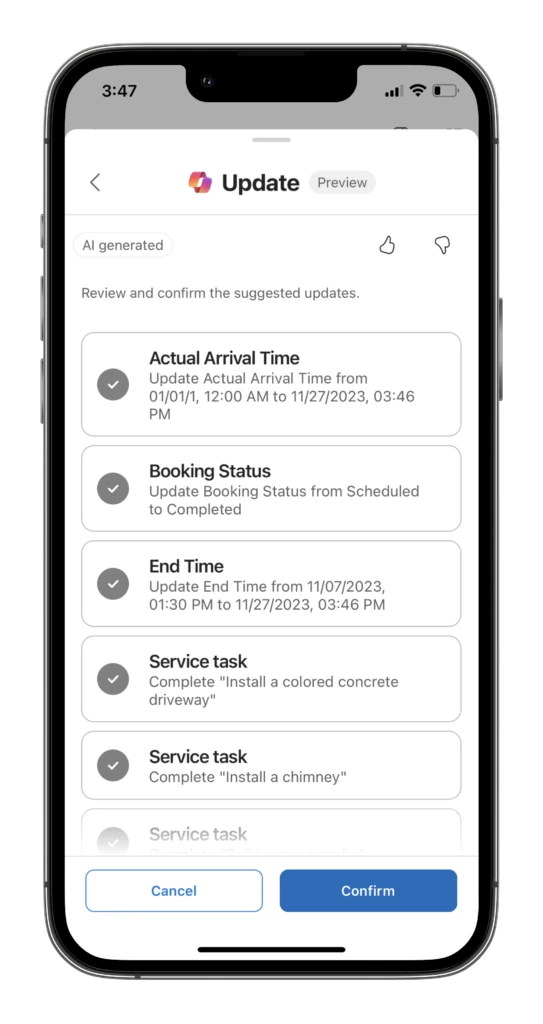
Copilot will understand your natural language input and propose updates to data on the form accordingly. All changes proposed by Copilot will be presented to the frontline worker where they can exclude or accept recommended updates.
Today the Copilot update is limited to updates of the forms within the new mobile UX only. Scope of these updates are:
Update your booking status and times
Change the state of at task to completed
Consume estimated products
Complete work order services
Complete service tasks assigned to the work order
Keep an eye out for additional enhancements and capabilities of this feature!
How to Get Started with Copilot for Field Service Mobile
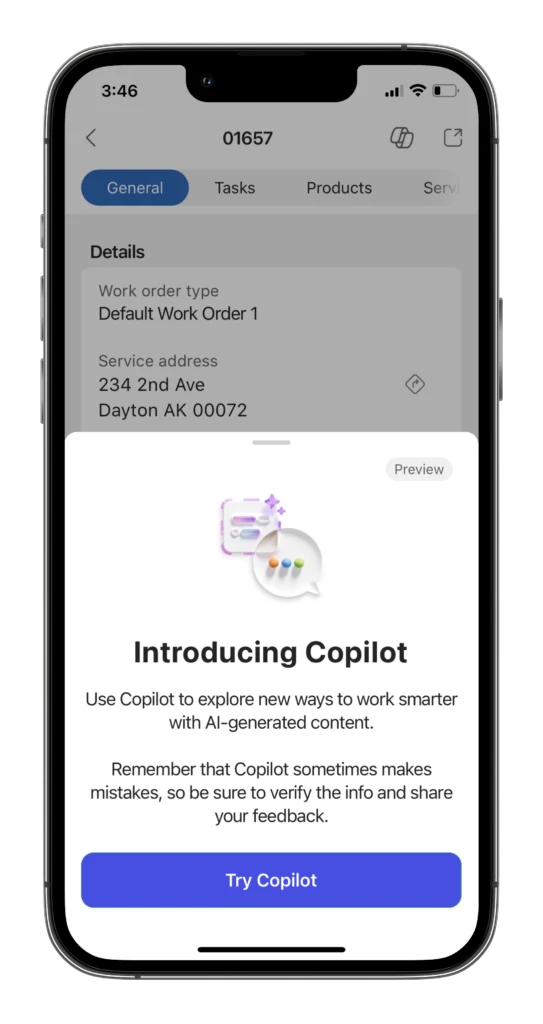
Copilot Summary and Update are available for the new Field Service mobile (Preview) experience today. To enable Copilot, the org admin will need to enable the features within Field Service Settings. Once enabled, app users will find the copilot entry point in their application under the Copilot logo located in the header of the booking form.
We hope that Field Service mobile with Copilot will make your work even more productive. We would love to hear your feedback and suggestions on how to improve Copilot. Please feel free to leave comments in the Dynamics 365 Community Forum or Ideas portal. Thank you for using Field Service Mobile!
This article is contributed. See the original author and article here.
Viva Engage enables employees to engage in meaningful dialogues, build network, and share insights on relevant organizational topics. In today’s hybrid work environments, Engage plays a key role in fostering a sense of belonging. Engage also empowers leaders and communicators to reach and engage employees, at scale, by bringing organizational news into the apps people use every day, including Outlook and Teams.
Balancing open dialogue with respectful and professional conversations is a priority for our customers, and they frequently seek guidance on the best ways to use Viva Engage’s governance capabilities, particularly for global and diverse workplaces. Viva Engage offers both employees and admins tools to ensure conversation and discussions remain focused, respectful, and conducive to knowledge-sharing. These moderation tools in Viva Engage can support an effective forum where employees trust the information shared and feel safe sharing their knowledge and experiences. Viva Engage admins can enable tools that help ensure balance between empowering employees to share perspectives and maintaining the organization’s code of conduct and usage policies.
Let’s delve into how moderation tools in Engage are designed to enhance and sustain a professional and connected community. These moderation tools are broadly categorized into content level and community level tools.
Content moderation
Content moderation is key to driving conversations that are respectful and are compliant with the organizational guidelines. The following tools provide mechanisms to moderators to monitor, review, and take corrective action as applicable on all content posted in Engage.
Keyword monitoring
Viva Engage provides an option to the admins to monitor keywords and to be alerted when a message contains the words that match defined keywords or regex expressions. When a message containing a keyword match is posted in Engage, an email alert is sent to a designated mailbox with the link to the message. The response team can then review and act on content that if it reflects a violation of expectations, guidelines, or policies. Admins can set keywords or RegEx format to monitor content for.
Example scenario: Contoso is planning to announce a major merger, a topic that requires careful internal communication and monitoring due to its sensitivity, legal regulations, and potential for rumors.
Feature in action: Prior to the announcement, the IT department at Contoso sets up keywords for monitoring (within network admin settings) for terms related to the merger on Viva Engage. This measure is taken to immediately flag any discussions that mention these keywords. When an employee posts a message containing any of the monitored keywords, an email alert is sent to the designated mailbox. This allows them to review the conversation in near real-time and address any misinformation or inappropriate discussions quickly. The use of this feature helps Contoso maintain control over the narrative around the merger, ensuring that internal discussions remain accurate and aligned with the company’s communication strategy.
Viva Engage also offers an enhanced version of keyword monitoring, through integrated support for Communication Compliance policies in Microsoft Purview. Refer to Communication Compliance section in this blog to learn more.
Additionally, Viva Engage provides the capability to allow the employees to report any message that they find to be inappropriate. Every reported conversation triggers an email to a designated mailbox with the link to the message that was reported. The response team can then review and respond appropriately to the reported post. Enabling employees to report conversation empowers them to actively contribute to maintaining a positive and respectful environment, ensuring that any concerns are addressed promptly and effectively.
To use report conversation capability, it must be enabled in network settings by network admins for the tenant.
Example scenario: Within a discussion in one of Contoso’s communities, an employee comes across a comment that they find disrespectful and not in line with the company’s values and communication guidelines.
Feature in action: The employee decides to use the ‘Report conversation’ feature in Viva Engage. By reporting the comment, they trigger an alert that is sent directly to the moderation team through the designated mailbox. The team promptly receives an email with a link to the reported message. The team reviews the content quickly and after assessing the comment, the moderation team takes appropriate action in line with Contoso’s policies on respectful and professional communication.
Viva Engage also offers an enhanced version of report conversation, through integrated support for Communication Compliance in Microsoft Purview. Refer to Communication Compliance section in this blog to learn more.
Note: For both keyword monitoring as well as report conversation capabilities, an alert is sent to an email address. We recommend using a shared inbox or email-enabled Microsoft 365 group to allow more than one stakeholder to respond to alerts. We recommend that organizations designate a response team and empower them with guidelines and procedures to ensure that response is programmatic and compliant with organizational policies, applicable laws, regulations, and agreements.
Communication Compliance
Communication Compliance, one of the newest offerings within Microsoft Purview, is the central incident management tool to define compliance policies for content across multiple Microsoft’s products, as well as receive, review, and respond to all communication that is reported to be non-compliant in regard to established organizational policies.
In Communication Compliance, designated admin roles can define multiple policies (such as sensitive information, profanity, keywords etc.) and apply to multiple Microsoft products including Teams and Viva Engage. When content published in Viva Engage is found to have matched a policy (or be in violation), it triggers an incident, surfacing it in the appropriate Communication Compliance policy dashboard. Designated investigators can then review such incidents and take one of many available actions from within the tool. This further complements Engage’s keyword monitoring capability, through application of stronger and smarter policies for automated content moderation.
Admins can also leverage Communication Compliance to review user reported conversations in Engage. This replaces the mailbox-oriented process with a more streamlined incident management experience. Starting mid-December 2023, we are rolling out the integration with Communication Compliance for user reported conversations in Engage worldwide, which will continue through CY24 Q1. (Refer to this blog for more details).
Closing conversations in Viva Engage disables any further comments or replies, but allows continued reactions (e.g. “likes”) to the root post or existing replies. This helps contain the conversation. While closing a conversation, we recommend that the moderator post a final message before the conversation is closed.
Example scenario: Contoso recently hosted a successful company-wide virtual innovation fair. The event’s community thread on Viva Engage was active with excitement, discussions, and feedback. As the event concludes and the conversations naturally slow down, there’s a need to formally close the discussion while retaining the valuable insights shared.
Feature in action: To neatly wrap up the event conversation, a community admin at Contoso utilizes the ‘Close Conversation’ feature. This action prevents new replies, while still preserving the thread as a record of the discussions and feedback. Before closing, the admin adds a thank-you note that informs employees where they can find more information.
The following roles can close a conversation:
1. Community conversations
a. Community admins can close any conversation in a community. b. The conversation’s author can close conversations they started.
2. Storyline conversations can be closed by the storyline owner.
Occasionally, someone posts a conversation in a community where it doesn’t belong. A conversation can be moved from one community to another to ensure that conversations stay relevant to the purpose of the community. Moving a conversation notifies the conversation author and adds a reply that the conversation was moved.
The following roles can move conversations:
Communities conversations:
• Anyone can move a conversation to a community where they have permissions to start conversations. • Community admins of a restricted community can move a conversation into the restricted community. • Network admins can move any conversation between any communities.
Example scenario: In Contoso’s retail workers’ community, an employee starts a conversation asking about employee benefits. While this may be a valid question, it would be more appropriate and could generate more focused discussion in the dedicated HR community.
Feature in action: Recognizing that the conversation is a better fit for the HR community, a community admin in the askhr community uses the ‘Move Conversations’ feature to transfer the entire conversation thread. This not only ensures that the conversation finds the right audience but also helps maintain the thematic integrity of both communities. The conversation continues in the new location, now with participants who are specifically interested in the topic. Moving conversation to a muted community will also ensure that non-members do not receive any content from it in their feeds.
• Be removed completely from the storyline or community if there are no replies under it • Be replaced with a deleted message notice if there are replies under it
This applies to all conversation starters, comments, and replies.
Deleting a conversation provides the option to delete a particular message or the entire conversation from a community or storyline.
Deleting entire conversation thread (including the initial post and subsequent replies.)
• Only a network admin can delete an entire conversation thread. Upon deleting, the entire conversation will be removed.
Deleting a specific message
• Community admins can delete any message from any conversation thread within that community. • Conversation author – one who authors the conversation starter can delete any message within that thread. • Storyline owners – employees can only delete messages from a conversation on their own storyline. • All employees – employees can delete their own message from within a conversation.
Note: While content deleted by users in Engage is removed from user-facing experiences, content will be retained in compliance with the organization’s data deletion and retention policies.
Example Scenario: An employee shares a photo of their children and the photo includes their address. The community admin spots this and informs the employee that they shared personal sensitive information, and it should be removed as per organizational policies. They can repost the image without including personal information.
Feature in action: The community admin sends a message to this employee, asking to repost the information without personal details. The employee goes ahead and deletes the post. Alternatively, the community admin could also delete the post. The user then goes ahead and makes another post, this time ensuring that the address is not included, and the post adheres to all organizational compliance guidelines.
Community-level moderation is essential for maintaining a focused and productive Viva Engage network, particularly ensuring that conversations within communities are true to the purpose, goals, and spirit of those communities.
Restrict community
Changing communities to ‘Restricted Communities’ restricts its members’ ability to start conversations in the communities. This limits the permission to start new conversations to only community admins (along with Network admins) in restricted communities. Members of restricted communities are also not able to move conversations to those communities. This capability is specifically useful to manage org-wide communities used for sharing important announcements.
Example scenario: Contoso’s “All Company” community is becoming filled with various employee posts, leading to important corporate messages being lost in the mix. This dilution makes it difficult for employees to identify and engage with critical organizational updates.
Feature in action: To tackle this challenge, the internal communications team at Contoso activates the ‘Restrict Posting’ feature for the “All Company” community. This means that only authorized individuals, like community admins and certain corporate communicators, can initiate new conversations. This shift dramatically cuts down the general post traffic, allowing corporate messages to stand out.
Muting a community ensures that non-members will not see that community’s content within their feeds or notifications. While individual users can mute any community for themselves, network admins can mute a community for the entire network, which restricts exposure of that community’s content in everyone’s home feed.
Example scenario: At Contoso, the diverse range of communities offers employees a rich and engaging experience. However, this can sometimes lead to an overload of notifications, especially from interest-based communities. For example, Jordan is part of the “Contoso Cooking Club” but finds that updates from this group can be distracting during busy workdays.
Feature in action: Contoso recommends that employees like Jordan use the ‘Mute a Community’ feature for managing their focus and productivity. Following this advice, Jordan decides to mute the “Contoso Cooking Club” community in Viva Engage. This action stops updates from the cooking club from appearing in his Home Feed and discovery emails, significantly reducing non-essential distractions.
In addition to content moderation capabilities in Viva Engage, organizations might also consider the following practices that can help foster respectful and open conversations, empowering everyone to contribute more, learn more, and achieve more.
Communicate policies, guidelines, and expectations
It is a best practice to inform and remind people of policies, guidelines, and expectations related to their use of Viva Engage. There are several ways to do so:
Viva Engage usage policy
When configured, the Viva Engage usage policy is shown to all users who visit Viva Engage. They must acknowledge the policy before being given access to Viva Engage. The usage policy is the best place to provided detailed information about policies, guidelines and expectations.
It’s best practice to review and re-prompt employees to accept the usage policy yearly or as necessary when policy or guidelines have changed. Admins can remind people of the policy, reinforce its message, and require renewed acknowledgement by republishing the policy.
Providing links to the policy guidelines can also make it easy for employees to quickly reference them.
Example scenario: Over recent months, Contoso’s internal communications team observes a gradual shift in the tone and nature of conversations on Viva Engage. There is an increase in informal and off-topic posts in professional communities, leading to discussions and some instances of misunderstanding or miscommunication. Additionally, a significant influx of new hires unfamiliar with the company’s digital communication standards highlights the need for clear guidelines.
Feature in action: This shift prompts Contoso’s Engage administrators to take proactive steps by republishing the organization’s communication and usage policies on the platform. The republished policies are not only a reminder but also serve as a reorientation for all employees, new and old, about the expected professional conduct on Viva Engage.
The message includes comprehensive links to the full policy documents and an acknowledgment requirement, ensuring all employees have read and agreed to the standards. This action reinforces the importance of maintaining a professional and respectful tone in digital communications. It also serves as a gentle reminder to all employees, especially the new hires, about the organizational culture and expectations of online interactions.
Community admins can reinforce policies, guidelines and expectations to their community members. This can be as simple as sharing a link to the Viva Engage usage policy, or reiterating policies and making them relevant to the members of a community.
Usage policies can be communicated within the community’s information panel – including description, info, and pinned url sections. Community admins can also use a post or announcement to share the usage policy with community members. Community admins can pin the post to the top of a community to raise its visibility.
Example scenario: With a significant policy overhaul underway, Contoso needs to ensure all employees are informed of the changes and can ask questions.
Feature in action: The HR department creates a comprehensive announcement about the policy change and shares it in the “AskHR” community on Viva Engage. By posting it as an announcement, all community members receive a notification, ensuring immediate awareness. Additionally, to facilitate ongoing awareness, the HR department uses the ‘Pin Conversation’ feature. This ensures that the announcement remains prominently at the top of the “askhr” community feed, making it easy for employees to find and refer to the information anytime they visit the community. This approach not only guarantees initial awareness but also ongoing visibility of the policy changes.
By featuring important threads, these posts (and their replies) appear directly in users’ home feeds, further ensuring that critical information reaches every employee effectively . This will help improving the visibility of essential updates and enhances the overall communication experience for employees, making it easier for them to stay appropriately informed.
Dedicated communities to host conversations for all employees
Organizations often leverage official communities (such as All Company) to disseminate important information to all the employees. Leaders, internal communicators, and admins often prefer to restrict such communities to host relevant conversations. However, it is equally important to offer spaces for employees to have open dialogues on topics of mutual interest. Organizations can create communities that are dedicated to a particular topic of interest. These communities can serve as open spaces where employees can initiate and engage in conversations with peers who have similar interests.
Keeping these communities private will provide access to only community members to the conversations hosted. Additionally, muting the communities will also help ensuring that non-members will not receive any content from these communities in their feeds or notification. This way, access to content in these dedicated spaces will be provided as per the employees’ intent. Conversations in these communities, however, should be monitored to ensure that they are compliant to organizational policies, through Engage’s content moderation tools. (as described in previous section)
Wrap up
We hope that your organization takes advantage of these moderation capabilities to help admins understand how Viva Engage can be a transformative tool for organizations and facilitate open communications while upholding the organization’s values and standards. Successful moderation helps ensure an informed, engaged, and cohesive digital workplace, ultimately contributing to organizational success, employee satisfaction and employee retention.
Interested to learn from others? Freja from Vestas shares how they are working to make Viva Engage a safe space where people can share openly and honestly, building stronger connections and communicating more effectively. Watch this presentation from the 2023 Viva Engage Festival.
Stay tuned to the M365 Roadmap as we continue to innovate and evolve our capabilities to meet our customers needs for moderation.


.png")


.png")
.png")


Recent Comments