This article is contributed. See the original author and article here.
A guide for sales managers and sellers who want to improve their customer engagement and collaboration with multiple sequences now available across Dynamics 365 Sales.
Productivity and efficiency are important to sales teams. Improving customer engagement, as well as collaboration when multiple team members work on an account, can be key to securing deals faster, and bringing better business results. With the support of multiple sequences in Dynamics 365 Sales, this now becomes easier than ever.
In this blog, we will show you how you can streamline parallel sales processes, coordinate your sales efforts, and optimize your customer interactions. You will also learn how to create, manage, and monitor multiple sequences in Dynamics 365 Sales. Whether you are a sales manager or a seller, we will cover some useful tips and best practice to make the most of this powerful feature.
Ready to boost your sales performance with multiple sequences? Sign up for a free trial of Dynamics 365 Sales today and discover how it can transform your sales organization.
What are sequences and why do you need them?
Sequences are a series of steps that sellers can follow to engage with customers and prospects in a consistent and effective way. They help sales managers provide guidance on best practices and ensure that every customer interaction is aligned with the sales strategy. Sequences can include various types of activities, such as emails, phone calls and tasks. In addition, sellers can utilize sequences as well, to automate their successful selling formulas and reduce manual work.
But what if you have multiple team members working on the same record (for example an account)? How can you ensure that they are not stepping on each other’s toes or sending conflicting messages to the customer? How can you leverage the expertise and skills of different sellers to create a better customer experience?
This is where multiple sequences come in handy. Multiple sequences allow you to connect more than one sequence to a record, so that different sellers can work simultaneously on the same record with different sequences. For example, you can have an account manager and a solution architect working on the same opportunity, each with their own set of activities. This way, you can optimize your customer engagement and collaboration to drive better business outcomes.
How to connect multiple sequences to a record?
There are two ways to connect multiple sequences to a record: manually and automatically.
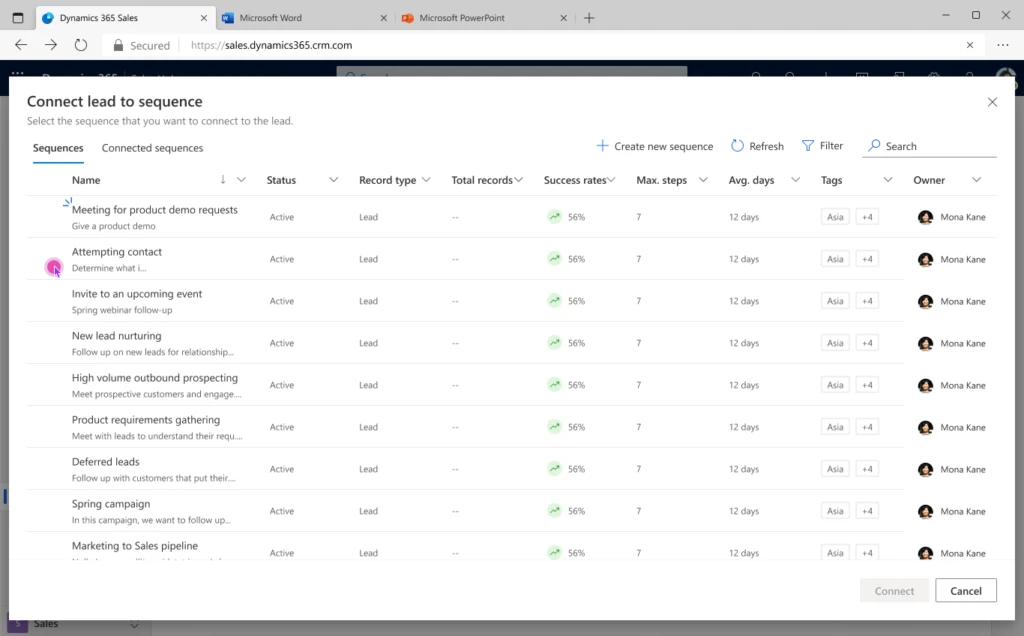
Manually connecting a record to a sequence: Connect a record to a sequence by using the connect sequence button on the record page to launch the connect sequence dialog. You can connect multiple sequences to a record at the same time, as long as the record owner or the sequence owner has the relevant permissions to do so. You can also disconnect a sequence from a record manually, by selecting the disconnect sequence button on the record page.
Automatically connecting a record to a sequence: Connect a record to a sequence by using the segmentation feature. Segmentation allows you to define criteria for a group of records that qualify for a sequence. For example, you can create a segment for all the opportunities that have a high probability of closing in the next quarter. You can then associate a sequence to that segment, so that whenever a record meets the criteria, it is automatically connected to the sequence.
Manually connect record to sequence
How to assign a sequence to a different user than the record owner?
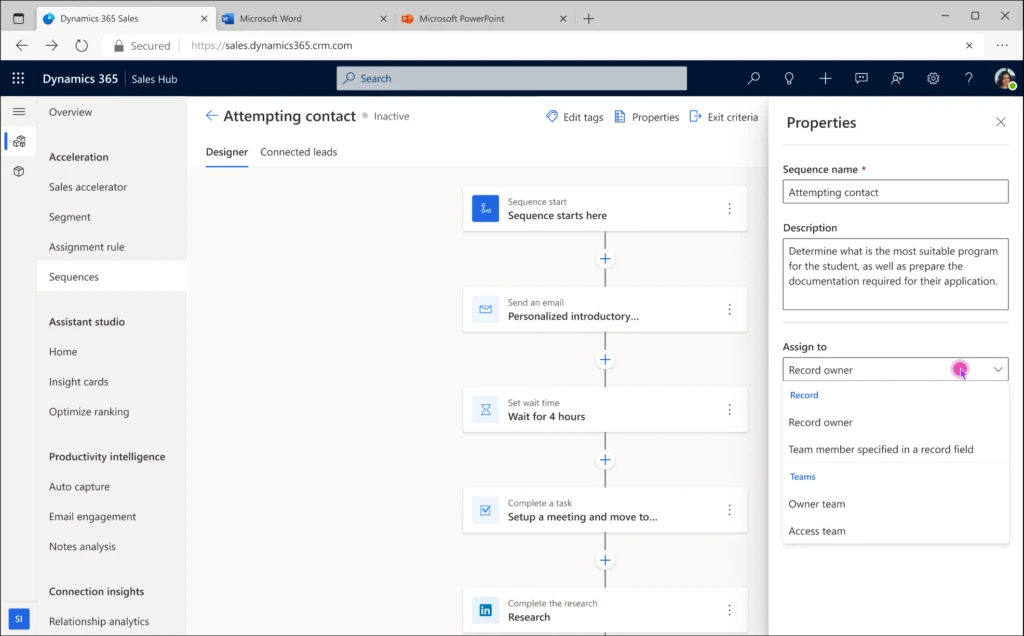
By default, when a record is connected to a sequence, the sequence is assigned to the record owner. However, you may want to assign a sequence to a different user, depending on their role and responsibilities. For example, you may want to assign a sequence to a specialist role for a record, such as a solution architect or a technical consultant.
To do this, you can use the sequence assignment feature. Sequence assignment allows you to select a field in the record entity or a related entity that can be used to assign the sequence. For example, if you have a field called opportunity_rep in the opportunity entity, you can assign the sequence to the user who is specified as the opportunity rep for that record. You can also use the properties pane to assign the sequence to the account owner, or owner/access team with capability to assign the sequence to a user with a specific role in the respective team.
Automatic assignment of Sequence
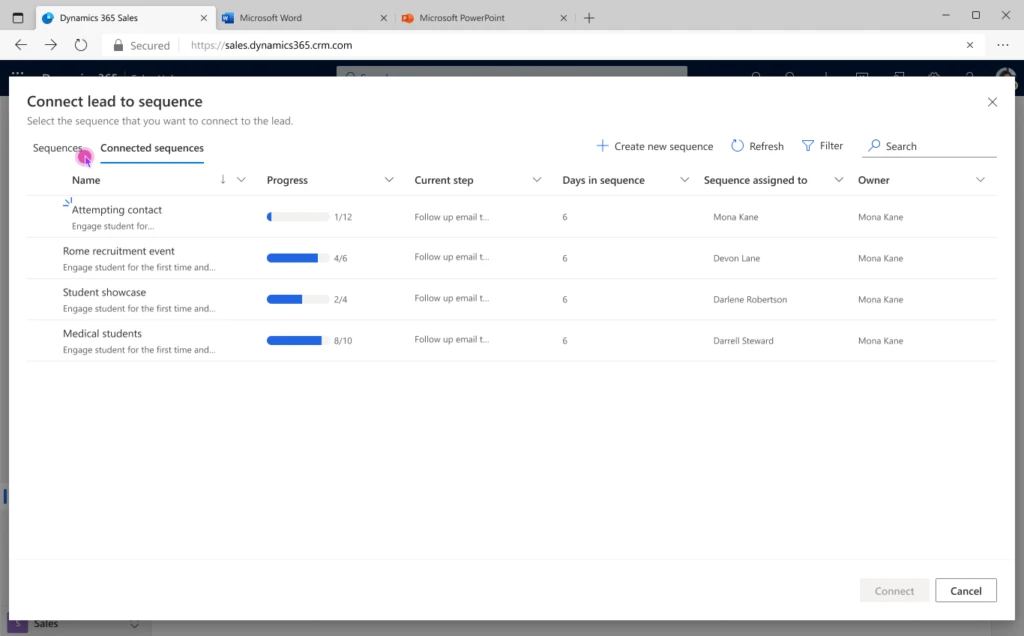
How to view the connected sequences and users for a record?
Once you have connected multiple sequences to a record, you may want to view the connected sequences and the users who are working on them. This can help you get a better understanding of the customer engagement and collaboration happening on the record and what work is left to execute.
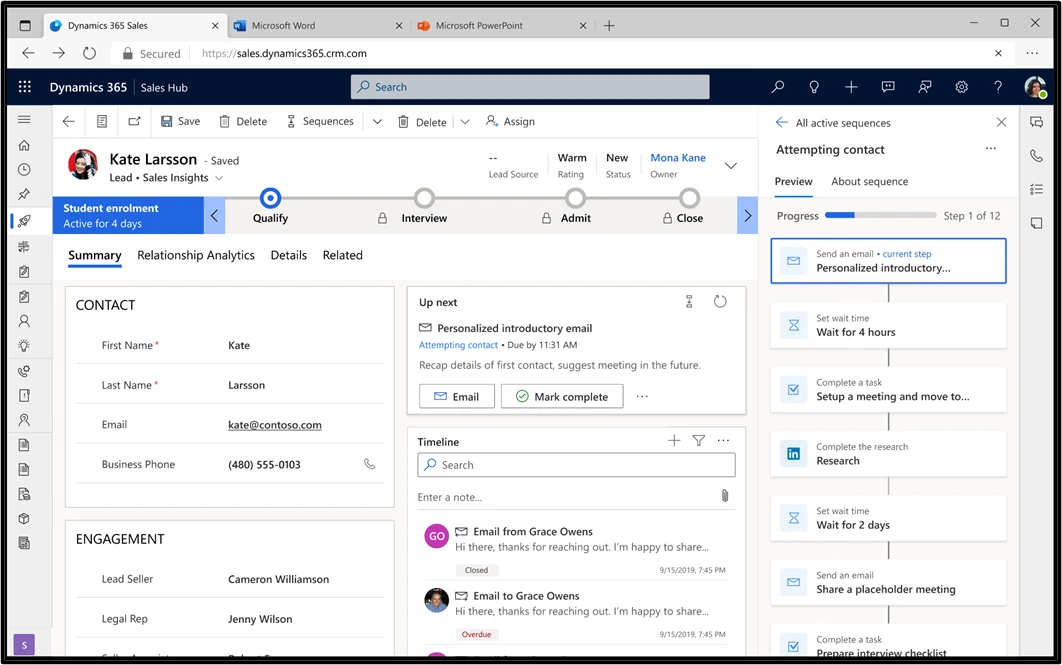
To see the sequences and users that are linked to a record, you can select the sequence title from the Up next widget which will take you to the preview pane that shows all the sequences that are related to the record. The sequence preview gives you a full overview of the sequence, including the progress and activities for different paths. To see a sequence, choose the name of the sequence in the Up next widget. The sequence opens in a pane showing the list of activities that have been set up within it.
You can also use the sequence stats report to see status, progress, and performance of each sequence. In addition, you can see the number of completed, overdue, and upcoming activities, as well as each email’s open rate, click rate, and conversion rate in the sequence.
View sequences connected to a Record.
How to view sequence steps in a record using the Up next widget?
In cases where a record is associated with multiple sequences, you may want to efficiently plan the execution by accessing all the available steps of these sequences. The new enhancements empower you to achieve precisely that! Now, the sequence name showcased on the Up next widget transforms into a clickable link. Upon clicking, it reveals a comprehensive list of all steps associated with that specific sequence. This feature facilitates the simultaneous viewing of both executed and upcoming steps in a single pane, streamlining the planning process for the subsequent steps.
View all sequence steps in preview pane by clicking on Sequence name in Up next widget
Conclusion
Multiple sequences in Dynamics 365 Sales are a powerful capability that can help you improve your customer engagement and collaboration:
By connecting multiple sequences to a record, you can optimize your sales process and leverage the skills and expertise of different sellers.
By assigning a sequence to a different user than the record owner, you can ensure that the right person is doing the right activity.
By viewing the connected sequences and users of a record, you can get a better insight into the customer communication and collaboration happening on the record.
With multiple sequences, you can drive better business outcomes and gain a competitive edge in the marketplace.
This article is contributed. See the original author and article here.
Since HCI 23h2 was announced, HCIBox users have been asking me and the Jumpstart team, “when will HCIBox be ready?” Some are interested in the new cloud deployment features, others are curious about a refreshed AKS on HCI. The wait is over. At last, HCIBox 23H2 is here and ready for you to get hands-on.
HCIBox now supports Azure Stack HCI 23H2 and is ready to offer the latest capabilities of Azure edge environments with native Azure Arc and AKS integration in a self-contained sandbox. This sandbox deploys easily into an Azure subscription, and uses nested virtualization to emulate an HCI cluster inside an Azure VM. This allows users to experience many Azure Stack HCI 23H2 features like the new cloud deployment featurewith minimal manual effort. HCIBox automatically generates a ready-to-go ARM template that can be used to deploy a new HCI cluster. The cloud deployment also automatically provisions Arc resource bridge and AKS components, and HCIBox comes with additional modules to showcase cloud VM management and AKS on HCI.
As part of this release, most aspects of the HCIBox codebase were refactored to simplify and streamline the deployment experience. The network configuration has also been redesigned, with dedicated subnets for both guest VM management and AKS.
In response to user feedback the HCIBox documentation has also been revised and simplified, with dedicated guides for deploying with either Azure Developer CLI(azd)or Azure CLI. This is a direct continuation of our investment in azd, following the release of azd support in Jumpstart Agora and the Retail industry scenario. But we aren’t stopping here! There is much more in store for HCIBox in the coming months. Join the discussion on the Azure Arc Jumpstart Github repositoryto contribute!
Many aspects of the HCIBox provisioning process have changed with this release and we encourage all users to thoroughly review the updated documentation. Be sure to also check out our new Jumpstart Lightning video where we discuss the new release. Get started with HCIBox today!
This article is contributed. See the original author and article here.
In today’s global marketplace, translating applications is not just a nice-to-have, it’s a necessity. Providing native language versions of your software not only enhances user experience but also ensures compliance with regional laws and regulations, including language requirements. For select products, partners have the flexibility to create their own translations in countries where Microsoft does not provide a translated or localized version.
Dynamics 365 Translation Service (DTS): Your partner in localization
If you’re a partner or an Independent Software Vendor (ISV) looking to expand your reach through localization and translation, look no further than Dynamics 365 Translation Service (DTS). Hosted within Dynamics 365 Lifecycle Services (LCS), DTS is a comprehensive solution that enables end-to-end translation workflows. With DTS, you can create and manage translation projects with ease. It also provides seamless integrations with Visual Studio, Visual Studio Code, Azure DevOps, and Power Platform. Trusted by over 1,800 companies worldwide, DTS is your reliable partner for all your Dynamics 365 translation needs.
High-quality translations with DTS
What sets DTS apart is its use of product-specific machine translation models. These models are custom trained with Microsoft-produced translations, ensuring high-quality outputs that match the style and terminology of the original product. For those seeking a more personalized touch, DTS offers the option to create a custom-trained machine translation models using your own translation memories. This feature allows you to obtain translations that are tailored to your business’ existing content, providing a truly customized experience.
Web Portal
The DTS web portal is the primary means for interacting with the service. Through the friendly interface, you can create and manage translation projects. Once a translation request is completed, DTS provides the translated native file along with an XLIFF translation memory (TM). This TM can be used to revise the machine translation output and regenerate translations with the updated content. You can also use those TMs during future requests. Matching strings will be recycled, alleviating the need to edit the known translation again whilst maintaining consistency across product versions.
Extensibility
DTS offers a range of extensions and an API to enhance accessibility and enable automation. With the IDE extensions, translations can be performed directly within the respective workspaces. These offerings save you time by bringing the DTS experience to your development environment along with allowing for automated translation workflows.
Visual Studio Extension – Translate Finance and Operations solutions from the developer environment.
In the realm of translation project management, the Dynamics 365 Translation Service (DTS) prioritizes ease of use and efficiency. The DTS web portal, along with its API and extensions streamline your translation workflow. With DTS, you can deliver fast high-quality translations with ease and at no additional cost. This service is available to Dynamics partners and ISVs. To get started, or learn more visit these pages:
This article is contributed. See the original author and article here.
This blog is the second of three that details our recommendation to adopt cloud native device management. Understand the lessons from various Intune customers in their journeys and how they achieved greater security, cost savings, and readiness for the future through their cloud transformations.
This article is contributed. See the original author and article here.
AnnounceBot Automated and Personalized Greetings, a solution published to Microsoft AppSource, helps companies celebrate special occasions like birthdays, work anniversaries, and welcoming new hires. With minimal setup and no calendars or manual work, AnnounceBot increases engagement, collaboration, and retention.
Microsoft interviewed Stephen Cornell, Service Director, Protected Trust, to learn what he had to say about the app.
What do you like best about AnnounceBot? We absolutely love how easy AnnounceBot is to use! It is user-friendly, and setting it up was quick. Before using AnnounceBot, social media was our only way to track birthdays, which means some folks got left out. And work anniversaries were out of the picture. Since we started using AnnounceBot, we have never missed a birthday or work anniversary. It’s all automatic now.
How has AnnounceBot helped your organization? Keeping the team engaged became challenging when we transitioned into working remotely. AnnounceBot helped us rebuild team connections by providing a centralized system to celebrate special events. Now, everyone engages in birthday and work anniversary posts, makes jokes, and tells stories about times we were all together in an office. It is a small gesture that has made a big difference in our company culture.
How is customer service and support? I wanted to know how to check birthdays that are getting tracked. The support team responded within an hour and provided the information I needed.
Any recommendations or insights for other users considering AnnounceBot? My suggestion would be to set it up in a small team first, just to get the hang of it. Test it out there before you go big and use it for the whole organization.
On a scale from 1 to 5 (5 being the highest), what is your overall rating for this AnnounceBot? I would give AnnounceBot a 4.5 only because I think they should support Microsoft Entra ID (formerly Azure Active Directory) integration to make birthdate and joining date collection even smoother.
This article is contributed. See the original author and article here.
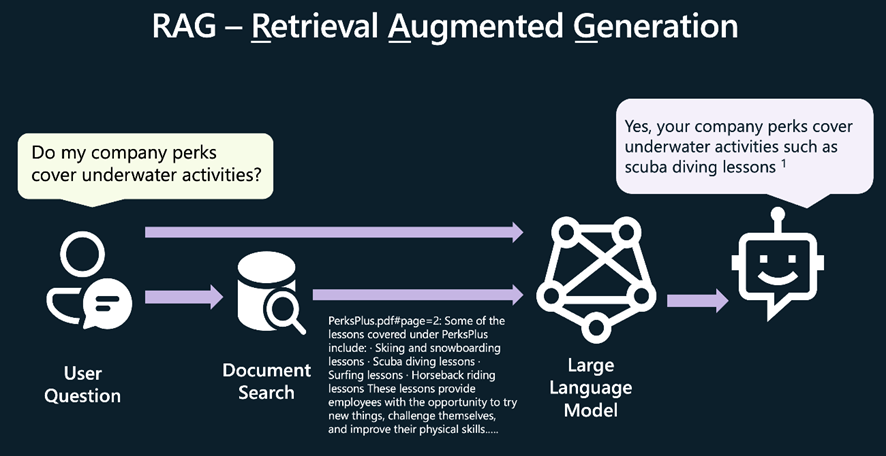
En los últimos seis meses, hemos conocido a cientos de desarrolladores que están utilizando Python para crear aplicaciones de chat de IA en sus propios campos de conocimiento, utilizandoRAG (Recuperación Aumentada de Generación)para enviar fragmentos de información a un modelo de LLM junto con la pregunta del usuario.
También hemos escuchado a muchos desarrolladores que les gustaría aprender a crear sus propias aplicaciones de chat con RAG, pero no saben por dónde empezar. Por eso, estamos organizando un hackathon virtual para ayudarte a aprender a construir tu propia aplicación de chat con RAG en Python.
Del 29 de enero al 12 de febrero, realizaremos transmisiones en vivo en inglés y los días 31 de enero y 2 de febrero en español, donde te mostraremos cómo construir ennuestro repositorio de ejemplo de chat con RAG más popular, al mismo tiempo que explicamos los conceptos clave detrás de todas las aplicaciones de chat con RAG modernas. Los temas de las transmisiones en vivo incluirán búsqueda vectorial, control de acceso, GPT-4 con visión y más.
Mantente conectado a tus sesiones locales de Reactor. Esperamos involucrar a desarrolladores de todo el mundo, así que también tendremos transmisiones en vivo en español, portugués y chino. Habrá premios para las mejores aplicaciones e incluso un premio para el miembro más útil de la comunidad. ¡Mantente atento a tus sesiones locales de Reactor!
Para obtener más información, visita lapágina de Reactorpara sintonizar tu evento local y visita la páginaAI Chat App Hack, donde podrás seguir los pasos para registrarte y unirte a la comunidad. ¡Te esperamos ya!
Más recursos de RAG para desarrolladores de Python:
This article is contributed. See the original author and article here.
The linked blog post was originally published on the Microsoft Security Blog on November 6th, 2023. We are sharing it again on the SMB Tech Community blog channel to ensure that all of our partners, who manage customer tenants and their conditional access policies, are informed about the upcoming policy changes.
Microsoft announced the automatic rollout of Conditional Access polices in Entra ID back in November 2023.
This feature automatically creates new Conditional Access policies in report-only mode for eligible customers of Microsoft Entra ID P1/P2 (M365 E3/M365 E5/M365 Business Premium). Between November 9th, 2023, and December 31st, 2023, policies were created in all eligible tenants. Customers will have at least 90 days to review the policy’s impact, manage exclusions, turn the policy on, or turn it off if necessary.
This 90-day period is ending soon, and enforcement will begin on a rolling basis in February and March 2024.
Recommended actions
To avoid any potential disruption to users’ access and to ensure these policies meet your organization’s needs, take the following actions within 90 days of their creation, before they’re moved to the On state:
Review the effects and benefits of the new policies. If you don’t want us to enable them automatically, set them to Off. Or, you may set them to On at any time.
Customize these policies according to your specific needs, such as excluding emergency access accounts. If you require more extensive customizations, you can clone a policy and then make as many changes as you want.
Verify that all users covered by these policies have enabled and registered at least one multifactor authentication method. If necessary, run a registration campaign to set up the Authenticator app.
This article is contributed. See the original author and article here.
Web application firewalls (WAFs) are essential tools for cyber security professionals who want to protect their web applications from malicious attacks. WAFs can filter, monitor, and block web traffic based on predefined as well as custom rules. Custom rules allow you to create your own unique rule that is evaluated for each request that passes through the WAF. These rules hold higher priority than rules in the managed rulesets and will be processed first. One of the most powerful features of Azure Web Application Firewall is the ability to create geomatch custom rules, which allow you to match web requests based on the geographic location of the source IP address. You may want to block requests from certain countries or regions that are known to be sources of malicious activity, or you may want to allow requests from specific locations that are part of your business operations. Geomatch custom rules can also help you comply with data sovereignty and privacy regulations, by restricting access to your web applications based on the location of the data subjects.
In this blog post, we will introduce you to the geomatch custom rules feature of Azure Web Application Firewall and show you how to create and manage them using the Azure portal, Bicep and PowerShell.
Geomatch Custom Rule Patterns
Geomatch custom rules can help you achieve various security objectives, such as blocking requests from high-risk regions and allowing requests from trusted locations. Geomatch custom rules can also be very useful for mitigating distributed denial-of-service (DDoS) attacks, which aim to overwhelm your web application with a large volume of requests from multiple sources. By using geomatch custom rules, you can quickly identify and block the regions that are generating the most DDoS traffic, while allowing legitimate users to access your web application. In this blog, we’ll cover different custom rule patterns that you can use to tune your Azure WAF using geomatch custom rules.
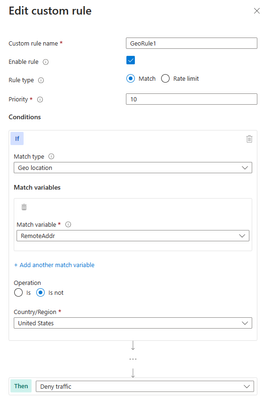
Scenario: Block traffic from all countries except “x”
One of the common scenarios where geomatch custom rules can be very helpful is when you want to block traffic from all countries except a specific one. For example, if your web application is only intended for users in the United States, you can create a geomatch custom rule that blocks all requests that do not originate from the US. This way, you can reduce the attack surface of your web application and prevent unauthorized access from other regions. This specific technique uses a negating condition for this traffic pattern to work. To create a geomatch custom rule that blocks traffic from all countries except the US, check out the Portal, Bicep, and PowerShell examples below:
Portal example – Application Gateway:
Portal example – Front Door:
*Note: You’ll notice on the Azure Front Door WAF, we are using SocketAddr as the Match variable and not RemoteAddr. The RemoteAddr variable is the original client IP that’s usually sent via the X-Forwarded-For request header. The SocketAddr variable is the source IP address the WAF sees.
Scenario: Block traffic from all countries except “x” and “y” that target the URI “foo” or “bar”
Another scenario where geomatch custom rules can be useful is when you want to block traffic from all countries except two or more specific ones, that target an explicit URI. For example, if your web application has specific URI paths that are only intended for users in the US and Canada, you can create a geomatch custom rule that blocks all requests that do not originate from either of these countries. With this pattern, request payloads from the US and Canada are still processed through the managed rulesets, catching any unwanted malicious attacks while still blocking requests from all other countries. This way, you can ensure that only your target audience can access your web application and avoid unwanted traffic from other regions. Furthermore, to reduce potential false positives, you can include the country code “ZZ” in the list to capture IP addresses that aren’t yet mapped to a country in Azure’s dataset. This specific technique also uses a negate condition for the Geo location type and a non-negate condition for our URI match. To create a geomatch custom rule that blocks traffic from all countries except the US and Canada to a specified URI, check out the Portal, Bicep, and PowerShell examples below:
Scenario: Block traffic specifically from country “x”
A similar scenario where geomatch custom rules can be helpful is when you want to block traffic from a specific country or multiple countries. For example, if your web application is facing a lot of malicious requests from country X, you can create a geomatch custom rule that blocks all requests that originate from that country. This way, you can protect your web application from potential attacks and reduce the load on your resources. You can use this pattern to block multiple countries that you have validated as malicious or hostile. This specific technique uses a match condition for this traffic pattern to work. To create a geomatch custom rule that blocks traffic from country X, check out the Portal, Bicep, and PowerShell examples below:
When using geomatch custom rules, it’s important to use the priority parameter wisely to avoid unnecessary processing or conflicts. The Azure WAF will determine the order that it evaluates the rules by using the priority parameter. This parameter is a numerical value that ranges from 1 to 100, with lower values indicating higher priority. The priority must be unique across all custom rules. You should assign higher priority to the rules that are more critical or specific for your web application security, and lower priority to the rules that are less essential or general. This way, you can ensure that WAF applies the most appropriate actions to your web traffic. Given our examples above, the scenario where we’ve identified an explicit URI path is the most specific and should have a higher priority rule than other types of patterns. This allows us to protect a critical path on the application with the highest priority while allowing more generic traffic to be evaluated across the other custom rules or managed rulesets.
Geomatch Custom Rule Anti-Patterns
On the other hand, there are some anti-patterns that you should avoid when using geomatch custom rules. These are scenarios where you set the custom rule action to allow instead of block. This can have unintended consequences, such as allowing a lot of traffic to bypass the WAF and potentially exposing your web application to other threats. Instead of using an allow action, you should use a block action with a negate condition, as shown in the previous patterns. This way, you can ensure that only traffic from the countries that you want is allowed, and all other traffic is blocked by the WAF.
Scenario: Allow traffic from country “x”
The first anti-pattern that you should be aware of is setting the geomatch custom rule to allow traffic from a specific country. For example, suppose you want to allow traffic from the United States because you have a large customer base there. You might think that creating a custom rule with the action “allow” and the value “United States” would achieve this. However, this is not the case. What this rule does is to allow all traffic that originates from the United States, regardless of whether it has a malicious payload or not, as the allow action bypasses further rule processing of the managed rulesets. Additionally, traffic from all other countries will still be allowed to be processed by the WAF, consuming resources. This exposes your web application to malicious requests from the United States that would otherwise be blocked by the WAF.
Scenario: Allow traffic from all counties except “x”
Another anti-pattern that you should avoid when using geomatch custom rules is to set the rule action to allow and specify a list of countries to exclude. For example, you might want to allow traffic from all countries except the United State, where the US is a country that you suspect of malicious activity. However, this approach can also have unintended consequences, such as allowing traffic from countries that you have not verified or validated as safe or legitimate or allowing traffic from countries that have low or no security standards, exposing your web application to potential vulnerabilities or attacks. As mentioned in the previous scenario, using the allow action for all countries except the US, indicates to the WAF to stop processing the request payloads against the managed rulesets. All rule evaluation will cease once the custom rule with allow is processed, thus exposing the application to unwanted malicious attacks.
Therefore, it is better to use a more restrictive and specific rule action, such as block, and specify a list of countries to allow with a negate condition. This way, you can ensure that only traffic from trusted and verified sources can access your web application, while blocking any suspicious or unwanted traffic.
The Azure Web Application Firewall is a powerful tool for protecting your web applications from common threats and attacks and by using geomatch custom rules, you can fine-tune your security controls based on the geographic location of the requests. The patterns outlined help to maintain the effectiveness and performance of the Azure WAF when utilizing geomatch custom rules. You should always test your rules before applying them to production and monitor their performance and impact regularly. By following these best practices, you can leverage the power of geomatch custom rules to enhance your web application security.
This article is contributed. See the original author and article here.
On January 25, 2024, we published the 2024 release wave 1 plans for Microsoft Dynamics 365 and Microsoft Power Platform, a compilation of new capabilities planned to be released between April 2024 and September 2024. This first release wave of the year offers hundreds of new features and improvements, showcasing our ongoing commitment to fueling digital transformation for both our customers and partners.
This release reinforces our dedication to developing applications and experiences that contribute value to roles by dismantling barriers between data, insights, and individuals. This wave introduces diverse enhancements across various business applications, emphasizing improved user experiences, productivity, innovative app development and automation, and advanced AI capabilities. Watch a summary of the release highlights.
Explore a heightened level of convenience when examining Dynamics 365 and Microsoft Power Platform release plans using the release planner. Enjoy unmatched flexibility as you customize, filter, and sort plans to align with your preferences, effortlessly sharing them. Maintain organization, stay informed, and remain in control while smoothly navigating through various active waves of plans. For more information, visit the release planner.
Highlights from Dynamics 365
Dynamics 365 release wave
Check out the 2024 release wave 1 early access features.
Microsoft Dynamics 365 Sales enhances customer understanding and boosts sales through data, intelligence, and user-friendly experiences. The 2024 release wave 1 focuses on providing sellers timely customer information, expediting deals with actionable insights, improving productivity, and empowering organizations through open configurability and expanded generative AI leadership. Check out this video about the most exciting features releasing this wave.
Microsoft Copilot for Sales continues to deliver and enhance cutting-edge generative AI capabilities for sellers by enriching the Copilot in Microsoft 365 capabilities with sales specific skills, data, and actions. Additionally, the team will focus on assisting sellers on the go within the Outlook and Microsoft Teams mobile apps.
Microsoft Dynamics 365 Customer Service will continue to empower agents to work more efficiently through Copilot, filtering response verification, diagnostic tools for admins and agents, and usability improvements to multi-session apps. Additionally, we’re making enhancements to the voice channel, and improving unified routing assignment accuracy and prioritization. Watch this video about the exciting new features in Customer Service.
Microsoft Dynamics 365 Field Service is a field service management application that allows companies to transform their service operations with processes and experiences to manage, schedule, and perform. In the 2024 release wave 1, we’re introducing the next generation of Copilot capabilities, modern experiences, Microsoft 365 integrations, vendor management, and Microsoft Dynamics 365 Finance and Microsoft Dynamics 365 Operations integration.
Microsoft Dynamics 365 Finance continues on its journey of autonomous finance, building intelligence, automation, and analytics around every business process, to increase user productivity and business agility. This release focuses on enhancing business performance planning and analytics, adding AI powered experiences, easing setup of financial dimension defaulting with AI rules guidance, increasing automation in bank reconciliation, netting, expanding country coverage, tax automation, and scalability. See how the latest enhancements to Dynamics 365 Finance can help your business.
Microsoft Dynamics 365 Supply Chain Management enhances business processes for increased insight and agility. Copilot skills improve user experiences, while demand planning transforms the forecast process, and warehouse processes are optimized for greater efficiency and accuracy. See how the latest enhancements to Dynamics 365 Supply Chain Management can help your business.
Microsoft Dynamics 365 Project Operations is focused on enhancing usability, performance, and scalability in key areas such as project planning, invoicing, time entry, and core transaction processing. The spotlight is on core functionality improvements, including support for discounts and fees, enhanced resource reconciliation, journals, approvals, and contract management, with added mobile capabilities to handle larger projects and invoices at an increased scale. See how the latest enhancements to Dynamics 365 Project Operations can help your business.
Microsoft Dynamics 365 Guides is bringing several new capabilities and enhancements including supporting high-detail 3D model support through Microsoft Azure Remote Rendering and greatly improved web content support that enable customers to build mixed reality workflows that are integrated with their business data. Additionally, support for Guides content on mobile will be generally available in the coming wave through a seamless integration with the Dynamics 365 Field Service mobile application.
Microsoft Dynamics 365 Human Resources will continue to improve recruiting experiences with functionality to integrate with external job portals and talent pools and offer management. We will continue to expand our human capital management ecosystem to include additional payroll partners and build better together experiences that span the gamut of what Microsoft can offer to improve employee experiences in corporations of any size and scale across the globe. See how the latest enhancements to Dynamics 365 Human Resources can help your business.
Microsoft Dynamics 365 Commerce continues to invest in omnichannel retail experiences through advancements in mobile point of sale experiences like Tap to Pay for iOS and offline capabilities for Store Commerce on Android. The business-to-business buying experience is enhanced with new capabilities, and a streamlined order management solution for buyers who work across multiple organizations.
Microsoft Dynamics 365 Business Central is delivering substantial enhancements, with a central emphasis on harnessing the power of Copilot. Available in more than 160 countries, the team is focused on Copilot-driven capabilities to streamline and enhance productivity through enhanced reporting and data analysis capabilities, elevated project and financial management, and simplified workflow automation. We have also upgraded our development and governance tools and introduced improvements in managing data privacy and compliance.
Microsoft Dynamics 365 Customer Insights – Data empowers every organization to unify and enhance customer data, using it for insightful analysis and intelligent actions. With this release, we’re making it easier and faster to ingest and manage your data. AI enables quick insights and democratized access to analytics. Real-time data ingestion, creation, and updates further enable the optimization of experiences in the moments that matter. Check out this video about the most exciting features releasing this wave.
Microsoft Dynamics 365 Customer Insights – Journeys brings the power of AI to revolutionize how marketers work, enabling businesses to optimize interactions with their customers with end-to-end journeys across departments and channels. With this release, we empower marketers with a deeper customer understanding, we enable them to create new experiences within minutes, reach customers in more ways, and continuously optimize results. Thanks to granular lead qualification, we continue to boost the synergy between sales and marketing to achieve superior business outcomes. Check out this video about the most exciting features releasing this wave.
Watch this video about the most exciting features releasing this wave in Microsoft Power Platform.
Microsoft Power Apps focuses on integrating Copilot to accelerate app development with AI and natural language, enhancing user reasoning and data insights in custom apps. The team is also simplifying the creation of modern apps through contemporary controls, responsive layouts, and collaboration features. Additionally, they’re facilitating enterprise-scale development, enabling makers and admins to expand apps across the organization with improved guardrails and quality assurance tools.
Microsoft Power Pages interactive Copilot now supports every step of site building to create intelligent websites—design, page layouts, content editing, data binding, learning, chatbot, accessibility checking, and securing the site. Connect to data anywhere with the out-of-the-box control library and secure the website with more insights at your fingertips.
Microsoft Power Automate is bringing Copilot capabilities across cloud flows, desktop flows and process mining. This will allow customers to use natural language to discover optimization opportunities, build automations, quickly troubleshoot any issues, and provide a delightful experience in managing the automation estate. For enterprise-scale solutions, maintenance is made easier with improved notifications on product capabilities.
Microsoft Copilot Studio brings native capabilities for extending Microsoft Copilot, general availability for generative actions, and geo-expansions to the United Arab Emirates, Germany, Norway, Korea, South America, and South Africa. We’re also introducing rich capabilities to integrate with OpenAI GPT models, along with new channels such as WhatsApp, and software lifecycle capabilities such as topic level import/export and role-based access control.
Microsoft Dataverse continues to make investments focusing on enhancing maker experience by improving app building productivity infused with Copilot experiences, seamless connectivity to external data sources, and AI-powered enterprise copilot for Microsoft 365.
AI Builder invests in three key areas: prompt builder for GPT prompts, intelligent document processing with new features and models, and AI governance improvements, including enhanced capacity management and data policies. These initiatives aim to empower users with advanced generative AI, streamline document processing, and strengthen governance across AI models within Power Apps.
Starting February 5, 2024, customers and partners will be able to validate the latest features in a non-production environment. These features include user experience enhancements that will be automatically enabled for users in production environments during April 2024. To take advantage of the early access period, try out the latest updates in a non-production environment and effectively plan for your customer rollout. Check out the 2024 release wave 1 early access features for Dynamics 365 and Microsoft Power Platform or visit the early access FAQ page. For a complete list of new capabilities, please check out the Dynamics 365 2024 release wave 1 plan and the Microsoft Power Platform 2024 release wave 1 plan, and share your feedback in the community forums via Dynamics 365 or Microsoft Power Platform.
This article is contributed. See the original author and article here.
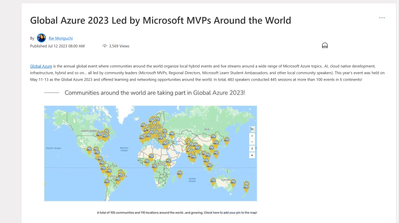
Global Azure, a global community effort where local Azure communities host events for local users, has been gaining popularity year by year for those interested in learning about Microsoft Azure and Microsoft AI, alongside other Azure users. The initiative saw great success last year, with the Global Azure 2023 event featuring over 100 local community-led events, nearly 500 speakers, and about 450 sessions delivered across the globe. We have highlighted these local events in our blog post, Global Azure 2023 Led by Microsoft MVPs Around the World.
Looking ahead, Global Azure 2024 is scheduled from April 18 to 20, and its call for organizer who host these local events has begun. In this blog, we showcase the latest news about Global Azure to a wider audience, including messages from the Global Azure Admin Team. This year, we will directly share the essence of Global Azure’s appeal through the words of Rik Hepworth (Microsoft Azure MVP and Regional Director) and Magnus Mårtensson (Microsoft Azure MVP and Regional Director). We invite you to consider becoming a part of this global initiative, empowering Azure users worldwide by stepping up as an organizer.
What’s New in Global Azure 2024?
For Global Azure 2024 we are doing multiple new things:
Last year we started a collaboration with the Microsoft Learn Student Ambassador program. This year we will build on this start to further expand the activation among young professionals to join Global Azure and learn about our beloved cloud platform. As experienced community leaders, no task can be more worthy than to nurture the next generation of community leaders. We are working with the MLSA program to help young professionals arrange their first community meetups, or to join a meetup local to them and become involved in community work. We are asking experienced community leaders to mentor these young professionals to become budding new community leaders, they need guidance in how to organize a successful first Azure learning event!
For the -24 edition of our event, we are working on a self-service portal for both event organizers and event attendees, to access and claim sponsorships that companies give to Global Azure. As a community leader you will sign in and see the list of attendees at your location. You can share sponsorships directly with the attendees and the people who attend your event can claim the benefits from our portal.
What benefits can the organizers gain from hosting a local Global Azure event?
There is no better way to learn about something, about anything, than to collaborate with like-minded people in the learning process. We have been in communities for tech enthusiasts for many years; some of our best friends are cloud people we have met through communities, and the way we learn the most is from deep discussions with people we trust and know. Hosting a Global Azure Community event for the first time could be the start of a new network of great people who know and like the same things and who also need to continuously want to and need to learn more about the cloud. For us, community is work-life and within communities we find the best and most joyful parts of being in tech.
Message to the organizers looking forward to hosting local Global Azure events
For community by community – that is our guiding motto for Global Azure. We are community, and learning happens here! As a hero, it is your job to set up a fun agenda full of learning, and to drive the event when it happens. It is hugely rewarding to be involved in community work, at least if we are to believe the people who approach us wherever we go – “I really like Global Azure, it is the most fun community event we host in our community in X each year”. This is passion, and this is tech-geekery when it is at its best. You are part of the crowd that drives learning and that makes people enthusiastic about their work and about technology. We hope that your Global Azure event is a great success and that it leads to more learners of Azure near you becoming more active and sharing with their knowledge – as our motto states!
Additional message from Rik and Magnus
Global Azure has global reach to Azure cloud tech people everywhere. We are looking for additional sponsors who want to have the potential to reach these people. You need to give something away, like licenses or other giveaways to become a sponsor. When you do we can in turn ensure that everyone sees that yours is a company that backs the community for tech and who supports learning.
This year, we are also particularly keen to hear from our MVP friends who have struggled in the past with finding a location for their event but have a Microsoft office, or event space nearby. We are keen to see if we can help, but we need people to reach out to us so we can make the right connections.
If anyone out there in the community is interested in stepping up to a global context, we are often looking for additional people to join the Global Azure Admins team.
Azure is big, broad, wide, and deep – there are so many different topics and technologies that are a part of Azure. Withing Global Azure anything goes! AI is a very valid Global Azure focus, because AI happens on the Azure platform and somehow data needs to be securely transported to, ingested, and stored in Azure. Compute can happen in so many ways in the cloud and you can be part of using the cloud as an IT Pro management/admin community as well as a developer community. We have SecOps, FinOps, DevOps (all the Ops!!). Global Azure is also very passionate about building an inclusive and welcoming community around the world that includes young people and anybody who is underrepresented in our industry.
To find out more, head to https://globalazure.net and read our #HowTo guide. We look forward to seeing everyone’s pins appear on our map.


Recent Comments