This article is contributed. See the original author and article here.
Overview
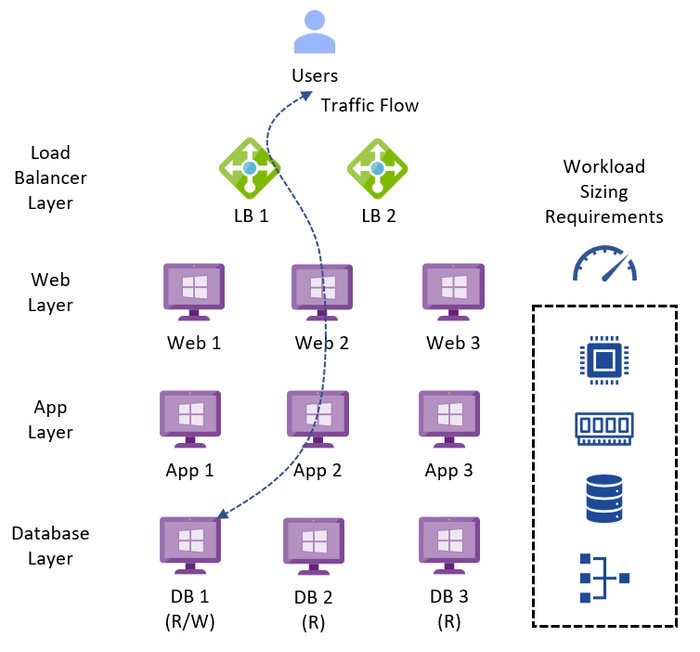
A global enterprise wants to migrate thousands of Nutanix AHV or VMware vSphere virtual machines (VMs) to Microsoft Azure as part of their application modernization strategy. The first step is to exit their on-premises data centers and rapidly relocate their legacy application VMs to the Nutanix Cloud Clusters on Azure (NC2 on Azure) service as a staging area for the first phase of their modernization strategy. How can they quickly size NC2 on Azure to meet their workload requirements?
NC2 on Azure is a third-party Azure service from Nutanix that provides private clouds containing Nutanix AHV clusters built from dedicated bare-metal Azure infrastructure. It enables customers to leverage their existing investments in Nutanix skills and tools, allowing them to focus on developing and running their Nutanix-based workloads on Azure.
In this post, I will introduce the typical customer workload requirements, describe the NC2 on Azure architectural components, and describe how to use Nutanix Sizer to quickly scope an NC2 on Azure solution.
In the next section, I will introduce the typical sizing requirements of a customer’s workload.
Customer Workload Requirements
A typical customer has multiple application tiers that have specific Service Level Agreement (SLA) requirements that need to be met. These SLAs are usually named by a tiering system such as Platinum, Gold, Silver, and Bronze or Mission-Critical, Business-Critical, Production, and Test/Dev. Each SLA will have different availability, recoverability, performance, manageability, and security requirements that need to be met.
For the initial sizing, customers will have CPU, RAM, Storage and Network requirements. This is normally documented for each application and then aggregated into the total resource requirements for each SLA. For example:
SLA Name
CPU
RAM
Storage
Network
Gold
Low vCPU:pCore ratio (<1 to 2),
Low VM to Host ratio (2-8)
No RAM oversubscription (<1)
High Throughput or High IOPS (for a particular I/O size), Low Latency, Low Capacity, RAID policy, Redundancy Factor
High Throughput, Low Latency
Silver
Medium vCPU:pCore ratio (5 to 8),
Medium VM to Host ratio (10-15)
Medium RAM oversubscription ratio (1.1-1.3)
Medium Latency, Medium Capacity
Medium Latency
Bronze
High vCPU:pCore ratio (10-15), High VM to Host ratio (20+)
High RAM oversubscription ratio (1.5-2)
High Latency, High Capacity
High Latency
Table 1 – Typical Customer SLA requirements for Performance
The concepts introduced in Table 1 have the following definitions:
CPU: CPU model and speed (this can be important for legacy single threaded applications), number of cores, vCPU to physical core ratios.
Memory: Random Access Memory size, Input/Output (I/O) speed and latency, oversubscription ratios.
Storage: Capacity, Read/Write Input/Output per Second (IOPS) with Input/Output (I/O) size, Read/Write Input/Output Latency, RAID policy, RF policy.
A typical legacy business-critical application will have the following application architecture:
Load Balancer layer: Uses load balancers to distribute traffic across multiple web servers in the web layer to improve application availability.
Web layer: Uses web servers to process client requests made via the secure Hypertext Transfer Protocol (HTTPS). Receives traffic from the load balancer layer and forwards to the application layer.
Application layer: Uses application servers to run software that delivers a business application through a communication protocol. Receives traffic from the web layer and uses the database layer to access stored data.
Database layer: Uses a relational database management service (RDMS) cluster to store data and provide database services to the application layer.
The application can also be classified as OLTP or OLAP, which have the following characteristics:
Online Transaction Processing (OLTP) is a type of data processing that consists of executing several transactions occurring concurrently. For example, online banking, retail shopping, or sending text messages. OLTP systems tend to have a performance profile that is latency sensitive, choppy CPU demands, with small amounts of data being read and written.
Online Analytical Processing (OLAP) is a technology that organizes large business databases and supports complex analysis. It can be used to perform complex analytical queries without negatively impacting transactional systems (OLTP). For example, data warehouse systems, business performance analysis, marketing analysis. OLAP systems tend to have a performance profile that is latency tolerant, requires large amounts of storage for records processing, has a steady state of CPU, RAM and storage throughput.
Depending upon the requirements for each service, the infrastructure design could be a mix of technologies used to meet the different application SLAs with cost efficiency.
Azure Virtual Network (VNet): Private network used to connect Azure services and resources together.
Azure Route Server: Enables network appliances to exchange dynamic route information with Azure networks.
Azure Virtual Network Gateway: Cross premises gateway for connecting Azure services and resources to other private networks using IPSec VPN, ExpressRoute, and VNet to VNet.
Azure ExpressRoute: Provides high-speed private connections between Azure data centers and on-premises or colocation infrastructure.
Azure Virtual WAN (vWAN): Aggregates networking, security, and routing functions together into a single unified Wide Area Network (WAN).
In the next section, I will describe how to use the Nutanix Sizer to quickly scope the NC2 on Azure service for a customer workload.
Using the Nutanix Sizer
The Nutanix Sizer is available to Nutanix Employees and Nutanix Partners. If you are a Nutanix Customer, please reach out to your Nutanix, Microsoft, or Partner account team to engage an architect to size your NC2 on Azure solution. Customers also have access to Nutanix Sizer Basic.
Unless specified, all other settings can be left at the default values. Once the scenario is built, it can be later tweaked to meet the customer requirements.
Step 1: Access My Nutanix and select the Nutanix Sizer Launch button.
Figure 3 – My Nutanix Dashboard
Step 2: Select the Create Scenario button.
Figure 4 – Nutanix Sizer My Scenarios
Step 3: Enter the Scenario Name, Install Country, and select the Create button.
Figure 5 – Nutanix Sizer Create New Scenario
Optionally, if you have a good understanding of the problem the customer is trying to solve, you can fill out the Scenario Objectives (Executive Summary, Requirements, Constraints, Assumptions, and Risks) to start building out the design. This will also allow you to use the advanced export features at the end of the sizing process.
Step 4: Press the Add button in the Create Workloads pane. If you want Import a Nutanix Collector or RVTools files as the source file for workload, select the Import button instead.
Figure 6 – Nutanix Sizer Create Workloads
Step 5: Define the Workload Name, Workload Type, Server Profile Size, and Number of VMs. Then select the Save & Review Cluster button.
Figure 7 – Nutanix Sizer Add Workload
Step 6: Select NC2 on Azure from the Vendor section of the Platform Settings. Then scroll down to the Cluster Settings.
Figure 8 – Nutanix Sizer Platform Settings
Step 7: Select the Environment Type from the Cluster Settings and press the Apply button.
Figure 9 – Nutanix Sizer Cluster Settings
Step 8: In the Workloads Summary page, select the Solution tab.
Figure 10 – Nutanix Sizer Workloads Summary
Step 9: In the Solution Summary page, verify the NC2 on Azure tag is present in each cluster.
Figure 11 – Nutanix Sizer Solution Summary
Step 10: In the Solution Summary page, scroll down to the Sizing Details for the detailed breakdown.
Figure 12 – Nutanix Sizer Solution Sizing Details
Step 11: To share the Scenario with others:
Select BOM, Download BOM
Select Quote, Generate Budgetary Quote or Generate Frontline Quote
In the following section, I will describe the next steps that need to be made to progress this high-level design estimate towards a validated detailed design.
Next Steps
The NC2 on Azure sizing estimate has been assessed using Nutanix Sizer. With large enterprise solutions for strategic and major customers, a Nutanix Solutions Architect from Azure, Nutanix, or a trusted Nutanix Partner should be engaged to ensure the solution is correctly sized to deliver business value with the minimum of risk. This should also include an application dependency assessment to understand the mapping between application groups and identify areas of data gravity, application network traffic flows, and network latency dependencies.
Summary
In this post, we took a closer look at the typical sizing requirements of a customer workload, the architectural building blocks, and the use of Nutanix Sizer to quickly scope the NC2 on Azure service. We also discussed the next steps to continue an NC2 on Azure design.
If you are interested in NC2 on Azure, please use these resources to learn more about the service:
René van den Bedem is a Principal Technical Program Manager at Microsoft. His background is in enterprise architecture with extensive experience across all facets of the enterprise, public cloud & service provider spaces, including digital transformation and the business, enterprise, and technology architecture stacks. René works backwards from the problem to be solved and designs solutions that deliver business value with the minimum of risk. In addition to being the first quadruple VMware Certified Design Expert (VCDX), he is also a Dell Technologies Certified Master Enterprise Architect, a Nutanix Platform Expert (NPX), an NPX Panelist, and a Nutanix Technology Champion.
This article is contributed. See the original author and article here.
Introduction
The recent unveiling of the D365 Warehouse Mobile App’s latest release, version 2.1.23, represents a significant stride forward in warehouse management technology. This update brings forth a plethora of enhanced features geared towards elevating user experience and streamlining processes. Notably, version 2.1.23 places a strong emphasis on authentication, stability, and user-friendliness, catering to the complex demands encountered by businesses striving to optimize their warehouse management practices. Here’s a closer look at the key enhancements introduced in this release cycle:
Enhanced Authentication
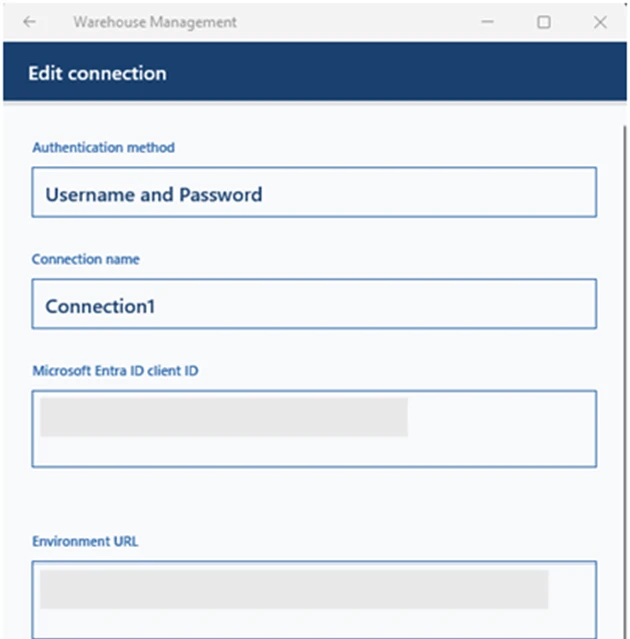
One of the key highlights of this version is the implementation of several authentication improvements. By adding support for username/password authentication and single sign-on (SSO), the app now offers more flexibility and security options for users. This not only simplifies the login process but also ensures that access to sensitive warehouse data is securely managed.
Image: Authentication Improvements
Improved Stability
With increased stability, users can rely on the app to perform consistently even in demanding warehouse environments. This means fewer interruptions and smoother operations, ultimately leading to higher productivity and efficiency.
Automatic Sign-In
The introduction of default mobile device user assignment enables automatic sign-in for workers, streamlining the authentication process further. This feature reduces the time spent on logging in, allowing employees to focus more on their tasks at hand.
Enhanced Support for Active Directory Federation Services (AD FS)
By improving support for AD FS, the app now offers better compatibility with Dynamics 365 Finance + Operations (on-premises) environments. This enables seamless authentication using device code flow, username/password, and SSO methods, ensuring compatibility with various IT infrastructures.
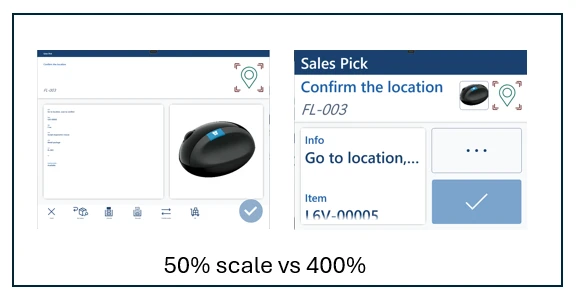
Usability Improvements
The update also brings several usability enhancements, including better support for scaling text and improved accessibility features. With text scaling, users can fit more information on the screen, enhancing readability and usability. Additionally, the app now supports the new “back” gesture in Android 13, providing a more intuitive navigation experience.
Image: Usability improvements
Business Benefits
Increased Efficiency
With smoother authentication processes and enhanced stability, employees can spend less time dealing with technical issues and more time on productive tasks. This leads to increased efficiency and throughput in warehouse operations.
Improved Security
The addition of authentication methods such as username/password and SSO enhances security, ensuring that only authorized personnel can access sensitive warehouse data. This helps mitigate the risk of data breaches and unauthorized access, safeguarding valuable business assets.
Enhanced User Experience
Usability improvements, such as text scaling and accessibility enhancements, contribute to a better overall user experience. Employees can navigate the app more easily and access information more quickly, leading to higher satisfaction and productivity.
Seamless Integration
With improved support for AD FS and Dynamics 365 Finance + Operations environments, the app seamlessly integrates with existing IT infrastructure. This ensures smooth deployment and compatibility, minimizing disruptions and facilitating adoption.
Conclusion
In conclusion, the release of D365 Warehouse Mobile App version 2.1.23 signifies a monumental leap forward in warehouse management technology. By prioritizing enhancements across authentication, stability, usability, and compatibility, this update revolutionizes the way businesses operate their warehouses. With streamlined authentication processes, bolstered stability, and intuitive usability features, users can expect a seamless experience that translates into heightened efficiency and productivity. Moreover, the fortified security measures instil confidence in data integrity, safeguarding valuable assets against potential threats. As businesses embrace these advancements, they pave the way for a future where warehouse operations are not only optimized but also poised for sustained growth and success.
This article is contributed. See the original author and article here.
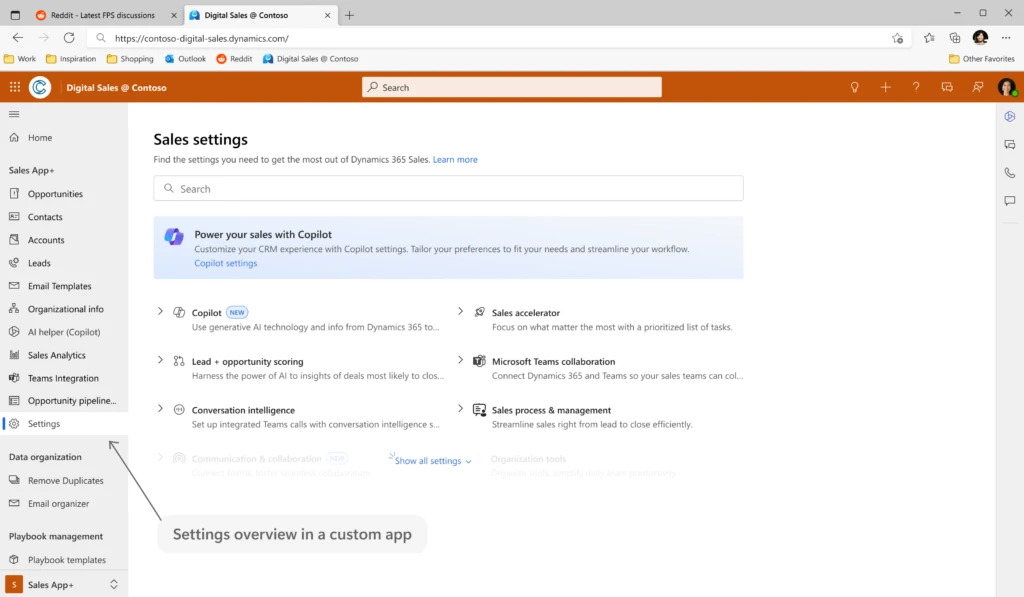
In the ever-growing world of Microsoft Dynamics 365 Sales, there is always a host of capabilities that could be enabled to support sellers, complemented by monthly releases packed with innovations. In our commitment to empowering admin teams, we’re streamlining the process of discovering and activating these capabilities. Introducing a new overview page, complete with advanced search functionalities and feature notifications, promises to simplify the journey of adopting new features, swiftly placing them at the fingertips of sellers.
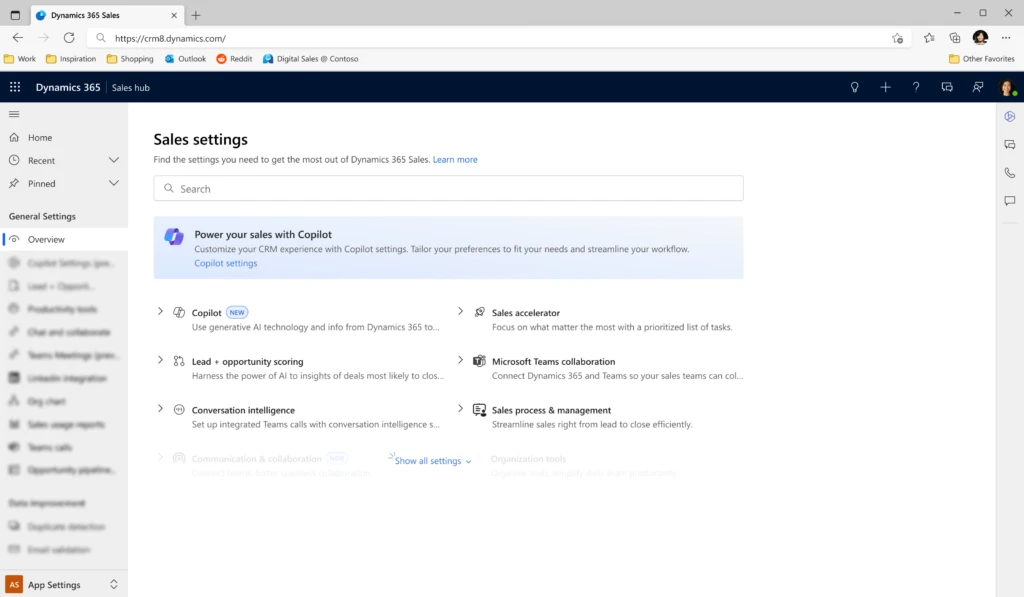
Navigating Dynamics 365 Sales admin settings
In a world of tight budgets and high sales team expectations on how technology can drive value we want to make sure there is every opportunity to make the most of the asset you have purchased. Frequently, we encounter overlooked opportunities where features could significantly enhance the sales process, often due to administrators being unaware of their existence. The revamped overview page, featuring a robust search function, paves the way for administrators to get started faster.
The new overview page experience
New overview page experience in Sales app
Empowering administrators with efficient tools is crucial. With the new overview page experience, administrators can experience the following immediate benefits:
The integrated search function enables administrators to quickly locate specific settings, reducing navigation time and enhancing efficiency.
The intuitive search functionality eases the learning curve for new administrators, reducing training time and costs.
The overview page now includes notifications for new features and settings, ensuring administrators are always aware of the latest updates to fully leverage the platform’s evolving capabilities.
This update not only enhances functionality but also improves user satisfaction through a more user-friendly interface and easy access to information, contributing to a more pleasant and productive administrative experience.
Enabling the new overview page in your custom app
New overview page experience in custom app
This update can even be applied to custom apps as well as to Sales hub as standard. To enable this new overview page into your custom app, follow these steps:
In the custom app edit page, from the Navigation section, hover over the group name for which you want to add the site map entry and then select New page.
In the New page dialog box, select an option according to your requirement. Here, we are adding the site map entry using a URL.
Select Next.
Enter the following URL information and a suitable title: /main.aspx?pagetype=control&controlName=MscrmControls.FieldControls.CCFadminsettings
Select Add.
Save and publish the custom app.
The site map entry is added to your custom app.
A leap in operational efficiency and productivity
The introduction of the new overview page in Dynamics 365 Sales marks a significant step forward in administrative efficiency and platform utilization. This update will simplify navigation and make it easier to access various features. It’s a straightforward yet effective change that will improve the day-to-day management of the platform and contribute to smoother operations and more effective use of its capabilities.
Embracing the future of Dynamics 365 Sales administration
As Dynamics 365 Sales continues to evolve, this update represents a commitment to continuous improvement and user-centric design. By simplifying navigation and enhancing feature discovery, Dynamics 365 Sales is set to become more accessible and powerful than ever before. For administrators, this means a future where managing the platform is less about tackling complexities and more about harnessing potential.
This article is contributed. See the original author and article here.
To thrive in today’s highly complex global business environment, organizations are increasingly relying upon the technological and strategic prowess of their financial leaders. We’re continually investing in Microsoft Dynamics 365 to enable finance leaders to monitor financial operations in real time, predict outcomes, and drive strategic decision-making that hinges on insight.
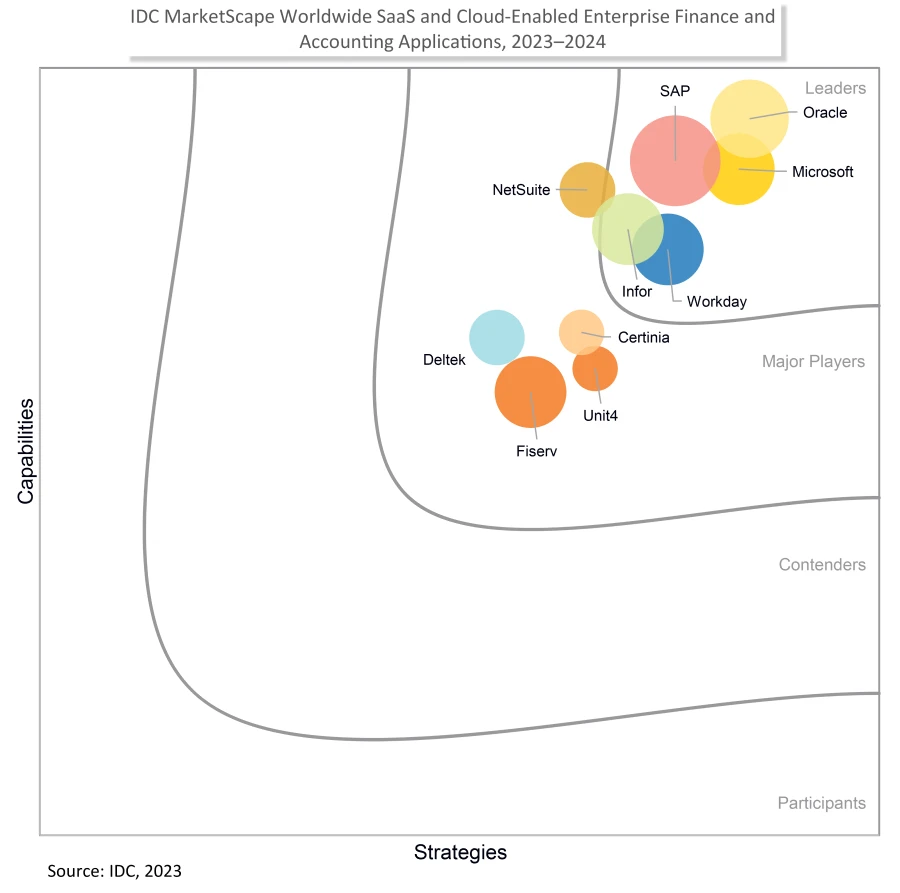
We are pleased to announce that Microsoft has been recognized as a Leader in three IDC MarketScape reports—IDC MarketScape: Worldwide SaaS and Cloud-Enabled Enterprise Finance and Accounting Applications 2023-2024 Vendor Assessment (doc #US51405823, December 2023); IDC MarketScape: Worldwide SaaS and Cloud-Enabled Midmarket Finance and Accounting Applications 2023-2024 Vendor Assessment (doc #US51405023, December 2023); and IDC MarketScape: Worldwide SaaS and Cloud-Enabled Small Business Finance and Accounting Applications 2023-2024 Vendor Assessment (doc #US48041222, December 2023).
Read the IDC excerpt
Dive deeper into the IDC MarketScape for Worldwide SaaS and Cloud-Enabled Enterprise Finance and Accounting Applications excerpt.
According to the IDC MarketScape for Enterprise Finance and Accounting Applications, “Consider Microsoft when you are searching for a well-established provider with the resources to innovate quickly and effectively.”
Source: IDC MarketScape: Worldwide SaaS and Cloud-Enabled Enterprise Finance and Accounting Applications 2023-2024 Vendor Assessment (doc #US51405823, December 2023). Copyright IDC 2023.*
Boost productivity with Copilot for Dynamics 365
As the pace of business accelerates, the role of finance leaders has shifted. They are called to navigate a range of new challenges and responsibilities: reporting on the past, managing the present, and creating the future.
Today, financial leaders are responsible for much more than finance, as they are increasingly accountable for the strategic direction of the company. The scale and pace of decision-making has increased compared to the previous generation, which was called on to help make quarterly decisions. Now, finance leaders make critical financial decisions weekly—and in some cases, daily.
According to the IDC MarketScape for Enterprise Finance and Accounting Applications, “We will see the demand for more analytics, reporting, and data visualization tools. This trend will continue to accelerate and shape buying decisions for financial leaders.”
Our answer to this is to provide simple solutions—focusing on collaboration, productivity, AI, and insights—to help finance leaders make data-driven decisions and drive business agility and growth. According to the IDC MarketScape for Enterprise Finance and Accounting Applications, “Microsoft Dynamics 365 Copilot brings together Azure OpenAI and ChatGPT. Copilot is embedded in Dynamics 365, working alongside business professionals to help them create ideas and content faster, complete time-consuming tasks, and get insights and next best actions. This enables users of all technical abilities to use AI to boost their productivity and focus on more important tasks.” A great example of this is HB Antwerp, a Belgian company redefining how natural diamonds are sourced, crafted, and sold.
In 2024, the company plans to up the value of diamonds tracked to USD 1 billion. In terms of continuing to use AI like Copilot, it said that 60% of emails are written with AI, suggesting the importance of AI to the future of the company. This enables users of all technical abilities to use AI to boost their productivity and focus on more important tasks.
“There’s an unprecedented level of maturity, collaboration, and relationship to new products like Copilot, which are crucial to growth.”
Optimize your operational workflow within Microsoft Power Automate
The IDC MarketScape for Enterprise Finance and Accounting Applications also noted, that, “These process mining capabilities simplify how work gets done by discovering workflow bottlenecks and further automation opportunities.” This is something that Microsoft customer, HB Antwerp, experienced firsthand. This Belgian diamond company set out to challenge the age-old opacity of the industry.
HB Antwerp turned to Microsoft and its Microsoft Dynamics 365 Finance, Microsoft Dynamics 365 Project Operations, and Microsoft Power Apps, using ledger technologies to record immutable data points across the diamond’s journey, ensuring sustainability and visibility every step of the way. Now HB Antwerp can predict its profit more accurately, reduce errors, increase communication, and ensure maximum value for everyone involved. Miners and governments reap the financial benefits and consumers can see how their diamond purchases contribute to transforming Botswana’s economy and the lives of its citizens.
HB Antwerp has embraced the move from being just a diamond company to a data company.
“It’s about how do you mine data and create scalability on it that attracts different humans, companies, and institutions who want to be a part of the story, and that’s how we aim to grow.”
From mining stones to mining data, Dynamics 365 embeds automation into the flow of work throughout, enabling business process optimization for business decision makers.
Contact your Microsoft representative to learn more about the value and return on investments, as well as the latest offers—including Dynamics 365 Finance Premium.
Notes:
* The IDC MarketScape vendor analysis model is designed to provide an overview of the competitive fitness of ICT suppliers in a given market. The research methodology utilizes a rigorous scoring methodology based on both qualitative and quantitative criteria that results in a single graphical illustration of each vendor’s position within a given market. The Capabilities score measures vendor product, go-to-market, and business execution in the short-term. The Strategy score measures alignment of vendor strategies with customer requirements in a three to five-year time frame. Vendor market share is represented by the size of the icons.
This article is contributed. See the original author and article here.
We are excited to announce the launch of multiple benchmarks access in the Viva Glint platform, one of our many exciting product enhancements slated for this year. Customers can now select and enable additional external comparisons in the platform for managers to toggle between when reviewing their results. Access to multiple benchmarks has been among the most-requested enhancements by our customers, and we’re thrilled to start 2024 by introducing this feature.
One of the most exciting benefits of this feature is the flexibility that this will provide to managers and administrators when reviewing results. Organizations previously had to select just one external benchmark to display in the platform, but they can now choose from our full suite of benchmark comparisons to tailor the reporting experience for their company.
For example, a multinational company using Glint’s global benchmark may decide to add access to the Japan benchmark so that their office in Tokyo can compare their results to a local comparison rather than global. Or, a company may choose to add access to one of Glint’s high-performing benchmarks so their executive leadership team can compare their results to a more aggressive benchmark.
In the past, additional comparisons could only be generated manually and offline; with this new functionality, administrators have the power to provide multiple benchmark comparisons to all managers with just a couple of clicks. Being able to access these comparisons directly in the platform helps managers take the next step in really understanding and owning their results.
The process of deciding which benchmark(s) to enable will not be that different than when companies could only choose one; we still recommend considering things like where the organization competes for talent, where large employee populations exist, or how aggressive you want the comparison to be. Administrators will still choose one primary, or default, benchmark that all managers will see when they log in, but now managers will be able to toggle to other external comparisons that have been enabled so they can see how their results stack up to these alternative benchmarks.
And though this new feature adds significant analytics power for managers, we all know that with great power comes great responsibility. It may be tempting to add dozens of benchmarks to give managers a wide variety of benchmarks to choose from, but it may be overwhelming and confusing for less-experienced managers who need a more curated experience. In general, we recommend choosing no more than the three most relevant external benchmarks to provide a good balance of flexibility with reasonable guardrails.
Also, think about the timing of when you choose to add additional benchmarks; you might consider launching multiple benchmarks availability with the rollout of your next survey cycle as you’re training (or refreshing) your managers on how to use the platform and interpret their results.
So how do you get started? This feature is available to our Viva Glint users starting on February 10, 2024 (and this is already available to our LinkedIn Glint customers). Your Viva Glint administrator will choose any new benchmarks to add, and they will then be immediately available to all managers. To enable this in your own platform, please click here for further instructions. For additional questions, please comment below or reach out to your Glint support team member.
This article is contributed. See the original author and article here.
We are pleased to announce the security review for Microsoft Edge, version 121!
We have reviewed the new settings in Microsoft Edge version 121 and determined that there are no additional security settings that require enforcement. The Microsoft Edge version 117 security baseline continues to be our recommended configuration which can be downloaded from theMicrosoft Security Compliance Toolkit.
Microsoft Edge version 121 introduced 11 new computer settings and 11 new user settings. We have included a spreadsheet listing the new settings in the release to make it easier for you to find them.
As a friendly reminder, all available settings for Microsoft Edge are documentedhere, and all available settings for Microsoft Edge Update are documentedhere.
This article is contributed. See the original author and article here.
In a rapidly changing business landscape, organizations face numerous challenges in meeting their customers’ expectations and staying relevant. With the COVID-19 pandemic driving a sudden shift to remote work and the introduction of new technologies, many struggled to keep up with the pace of change and financial pressures.
In this blog post, we’ll showcase some of our recent success stories with Microsoft Dynamics 365 Sales customers in the financial services and manufacturing industries. From improving client relationships to streamlining operations and reducing overhead costs, each of these organizations uses Dynamics 365 Sales to overcome unique challenges and achieve outstanding business outcomes. So, whether you’re in financial services or manufacturing, join us as we explore real-world examples of how Dynamics 365 Sales can help you succeed in today’s market.
Succeed with Dynamics 365 Sales
Streamline operations and achieve outstanding outcomes.
Revolutionizing the finance industry: How Dynamics 365 Sales is helping financial institutions build stronger client relationships
Customers and investors of banks and insurance companies expect a personalized experience that incorporates their unique needs. Long-term clients expect these institutions to know them, and proactively approach them with services that are relevant to them. However, large financial institutions tend to spread across the globe, and different divisions must offer different services and products based not only on local markets, but also on changing regulations.
To tackle these challenges, Investec, a global financial services company, uses conversation intelligence in Dynamics 365 Sales to transcribe sales calls accurately and analyze the content. This helped build stronger client relationships, identify appropriate next steps, and ultimately save time and reduce overhead costs.
Franklin Templeton is one of the largest asset management companies in the world and prides itself on effective stewardship of its clients’ capital. After recent acquisitions, it aimed to restructure its many inherited customer relationship management (CRM) systems under one do-it-all sales platform to gather customer data efficiently. Through proof-of-concept trials, the Franklin Templeton technology team found Dynamics 365 Sales to be the best CRM solution for its pre-built integrations and user-friendly interfaces, improving its relationships with customers and streamlining its operations.
Empowering the manufacturing industry with Dynamics 365 Sales
In the manufacturing industry, companies are required to coordinate their work with multiple internal departments, partners, and customers. At the same time, buyers are looking for consistent experiences. Traditional dealer networks have been key in this industry, but now, end customers are looking for direct contact with the manufacturer. Let’s have a look at some of the successful Dynamics 365 Sales customers in this industry.
Lexmark, a global provider of printing and imaging technology, needed a sustainable path to digital transformation by overhauling its sales and reporting processes. Lack of integration between different platforms within the company and its complex product and service ecosystem made it difficult to build configurations using its old configure, price, quote (CPQ) system. Using Dynamics 365 and Experlogix CPQ, the company integrated its CRM and CPQ system, resulting in a 43% drop in quote revisions and significant reduction in time-to-quote.
Andreas Stihl AG & Co. KG, a German-based company, develops, manufactures, and distributes power tools for professional and private users in the forestry and agriculture, landscape maintenance, and construction sectors. STIHL’s customers want consistent experiences across all touchpoints—online, print, or on-site at the dealer. However, STIHL didn’t have a unified CRM system. To overcome these challenges, STIHL adopted a central solution that would bring transparency to its business processes, combining dealer and customer data. STIHL rolled out its OneCRM, basing it on Dynamics 365 Sales and Customer Service. This solution provides a 360-degree view of customers and specialist dealers. By implementing this solution, STIHL significantly sped up its customer support response, and improved transparency within and between its sales subsidiaries worldwide.
As a premier supplier of transportation solutions, Siemens Mobility has been for 160 years handling complex solutions that require working with many departments, customers, and partners. In spring of 2020, the company had an urgent need for a CRM solution that could keep pace with its highly collaborative selling process and intricate customer journey. In just five months, Siemens transitioned fully to the new CRM solution. Since then, Siemens Mobility has been using Dynamics 365 to personalize and streamline marketing communication and to accelerate their tender-based sales processes. Dynamics 365 is used all the way from lead acquisition to deal closure including lead generation, lead qualification, and account and opportunity management. With all these processes in the same system, Siemens can easily follow process performance across all touchpoints and continue tuning the ways of working to keep equipping the world with seamless, sustainable, and reliable transport solutions.
Dynamics 365 provides visibility on all touchpoints within a sale or service at Siemens Mobility.
Looking ahead with Copilot in Dynamics 365 Sales
You’ve seen how Dynamics 365 Sales has helped five customers from the financial services and manufacturing industries achieve their sales goals. Each faced unique challenges, but they all shared a common vision: to deliver more value to their customers. They’re not done yet—some of them are already exploring Microsoft Copilot for Sales capabilities to gain further insights and guidance.
“At Investec, we are very excited to see how we can leverage Copilot and AI within the Microsoft stack to connect our internal teams and to enhance our understanding further of prospective and current clients to ensure we are providing a best-in-class experience.”
—Dan Speirits, CRM Product Manager at Investec
Join our customers on their continued journey, ensuring their success and their customers’ success with the use of Dynamics 365 Sales and Microsoft Copilot for Sales.
This article is contributed. See the original author and article here.
Over the past year, generative AI has seen tremendous growth in popularity and is increasingly being adopted by people and organizations. At Microsoft, we are deeply focused on minimizing the risks of harmful use of these technologies and are committed to keeping these tools even more reliable and safer.
This article is contributed. See the original author and article here.
Introduction
There are scenarios wherein customer want to monitor their transaction log space usage. Currently there are options available to monitor Azure SQL Managed Instance metrics like CPU, RAM, IOPS etc. using Azure Monitor, but there is no inbuilt alert to monitor the transaction log space usage.
This blog will guide to setup Azure Runbook and schedule the execution of DMVs to monitor their transaction log space usage and take appropriate actions.
Overview
Microsoft Azure SQL Managed Instance enables a subset of dynamic management views (DMVs) to diagnose performance problems, which might be caused by blocked or long-running queries, resource bottlenecks, poor query plans, and so on.
Using DMV’s we can also find the log growth – Find the usage in percentage and compare it to a threshold value and create an alert.
In Azure SQL Managed Instance, querying a dynamic management view requires VIEW SERVER STATE permissions.
GRANT VIEW SERVER STATE TO database_user;
Monitor log space use by using sys.dm_db_log_space_usage. This DMV returns information about the amount of log space currently used and indicates when the transaction log needs truncation.
For information about the current log file size, its maximum size, and the auto grow option for the file, you can also use the size, max_size, and growth columns for that log file in sys.database_files.
Solution
Below PowerShell script can be used inside an Azure Runbook and alerts can be created to notify the user about the log space used to take necessary actions.
# Ensures you do not inherit an AzContext in your runbook
Disable-AzContextAutosave -Scope Process
$Threshold = 70  # Change this to your desired threshold percentage

try
{
    "Logging in to Azure..."
    Connect-AzAccount -Identity
}
catch {
    Write-Error -Message $_.Exception
    throw $_.Exception
}

$ServerName = "tcp:xxx.xx.xxx.database.windows.net,3342"
$databaseName = "AdventureWorks2017"
$Cred = Get-AutomationPSCredential -Name "xxxx"
$Query="USE [AdventureWorks2017];"
$Query= $Query+ " "
$Query= $Query+ "SELECT  ROUND(used_log_space_in_percent,0) as used_log_space_in_percent FROM sys.dm_db_log_space_usage;"


$Output = Invoke-SqlCmd -ServerInstance $ServerName -Database $databaseName -Username $Cred.UserName -Password $Cred.GetNetworkCredential().Password -Query $Query

#$LogspaceUsedPercentage = $Output.used_log_space_in_percent
#$LogspaceUsedPercentage

if($Output. used_log_space_in_percent -ge $Threshold)
 {
        # Raise an alert
        $alertMessage = "Log space usage on database $databaseName is above the threshold. Current usage: $Output.used_log_space_in_percent%."
        Write-Output "Alert: $alertMessage"

        # You can send an alert using Send-Alert cmdlet or any other desired method
        # Send-Alert -Message $alertMessage -Severity "High" Via EMAIL - Can call logicApp to send email, run DBCC CMDs etc.
    } else {
        Write-Output "Log space usage is within acceptable limits."
    }
There are different alert options which you can use to send alert in case log space exceeds its limit as below.
If you have feedback or suggestions for improving this data migration asset, please contact the Data SQL Ninja Engineering Team (datasqlninja@microsoft.com). Thanks for your support!
Note: For additional information about migrating various source databases to Azure, see the Azure Database Migration Guide
This article is contributed. See the original author and article here.
As Microsoft continues to invest in AI technologies across Dynamics 365 and Power Platform, many enterprise organizations are rapidly adopting Copilot in Microsoft apps such as Dynamics 365 Customer Service. Unlike solutions in other business areas, customer service solutions are particularly sensitive for a couple of reasons.
First, the customer service team acts as the organization’s frontline, dealing directly with customer inquiries and issues. Moreover, most interactions between support agents and customers occur in real-time, leaving zero tolerance for error. Any customer frustration can easily impact the customer satisfaction rate.
Additionally, introducing a new tool like Copilot in Customer Service to customer service agents must be well-tested and validated. In the era of AI and generative AI, organizations face the critical question of how to build their testing strategy for these innovative tools.
Copilot business value
Before delving into Copilot test cases, let’s quickly discuss the business value of Copilot in Customer Service. Copilot and AI features in the customer service world act as an agent assistant. Copilot helps agents with tasks such as retrieving information from the knowledge base, drafting emails, or providing quick summaries of customer conversations or cases with long threads, multiple notes, and emails.
Leveraging Copilot in Customer Service brings quick wins to the business. For instance, reduced handle times for customer requests allow agents to focus on core tasks. And since agents can provide more accurate and timely responses, organizations see improved customer satisfaction levels.
A closer look at each Copilot feature reveals the need for agent review before presenting any information to the customer. Take, for example, the case summary feature. A disclaimer indicates that this is an AI-generated summary, emphasizing the need to “Make sure it’s appropriate and accurate before using it.” This highlights the critical role of human oversight in ensuring the accuracy and appropriateness of AI-generated content. It reinforces the value of Copilot as a supportive tool rather than a replacement for human judgment and expertise.
Defining success metrics
Having covered the basics, it’s crucial to establish a success matrix for implementing Copilot in Customer Service. Most enterprise customers follow a standard process for introducing new tools or features. While this approach is recommended and applicable to almost all new Dynamics 365 features, the success criteria for Copilot should address several specific factors, due to its unique functionalities and impact:
Time efficiency: Measure the amount of time Copilot saves agents in performing their tasks. This can be quantified by comparing the time taken to complete tasks with and without the assistance of Copilot.
Relevance and helpfulness of responses: Evaluating Copilot’s responses isn’t as straightforward as saying they’re right or wrong. Measure their effectiveness with a percentage that shows how relevant and helpful these responses really are. When it comes to measuring Copilot’s impact, we look at it like this:
Totally irrelevant: Assistance that does not address the agent’s inquiry at all, providing no useful information for handling customer queries.
Partially helpful: Responses that offer some relevant information but may not fully equip the agent to resolve the customer’s issue, possibly requiring further clarification or additional resources.
Mostly helpful: Assistance that is largely on point, providing substantial information and guidance towards resolving the inquiry, with minimal need for further action.
Completely helpful: Responses that fully equip the agent with the necessary information and resources to address and resolve the customer’s issue without any need for additional support or clarification.
Agent satisfaction and ease of use: Assess how user-friendly and intuitive Copilot is for customer service agents. Agent satisfaction with the tool can be a key indicator of its usability and effectiveness in a real-world setting.
Impact on customer satisfaction: Monitor changes in customer satisfaction metrics. You can do this through surveys or analyzing customer feedback. See if there is a noticeable improvement due to the implementation of Copilot.
Return on investment: Consider the overall costs versus the benefits of implementing Copilot. This evaluation is crucial, as it is important to test and evaluate any feature intended for user adoption. Remember, Copilot is not a new product but a feature within Dynamics 365 Customer Service. It incurs no extra cost for most customers.
Start your Copilot journey with confidence
The best way to test and measure Copilot’s success is through real scenarios, real agents, and real customers in a production environment. This is why we recommend starting quickly with a pilot or initial phase and gradually rolling out Copilot capabilities. You can closely monitor the results and feedback during the initial phase.
We use the name ‘Copilot’ and not ‘Autopilot’ for a good reason. Essentially, Copilot in Customer Service acts as an assistant to the agents. While it proves useful in some situations, there are instances when questions or requests become too complex, requiring human expertise. However, even in these scenarios, business operations continue seamlessly, thanks to the human agents.
In Customer Service, think of each Copilot feature as being in one of two categories: those that do not rely on the knowledge base and those that do.
The easiest way to begin is with the first category, which includes summarization features. This category has minimal risk and requires less change management effort. This article provides in-depth information on this.
Test and optimize Copilot
A pilot phase is vital for testing Copilot, where you will document the results and collect feedback from your agents. The best candidates for the pilot phase are the highly skilled agents. They have the expertise to deal with customer questions efficiently, allowing them to give thorough feedback without affecting the normal call center functions. Moreover, they help ensure the proper use of Copilot, avoiding any incorrect or unverified information being passed from Copilot to customers.
During the pilot phase, you need to keep track of your success metrics and aim for ongoing improvement. This mainly involves improving the knowledge base articles. Copilot in Customer Service is not a magic tool; its performance depends on the quality of the information it can access. Providing Copilot with clear and complete knowledge articles will help it to produce clear and correct results.
Microsoft is heavily investing in integrating AI capabilities into Dynamics 365. Organizations with live implementations of Dynamics 365 Customer Service should view this as an opportunity to enhance their customer service operations. While testing remains essential, they should not hesitate to deploy these native capabilities in production mode, especially since Copilot in Customer Service comes without any extra licensing costs.
Generative AI is evolving rapidly, and organizations that start to adopt and utilize it early will secure a competitive advantage in the future!


Recent Comments