This article is contributed. See the original author and article here.
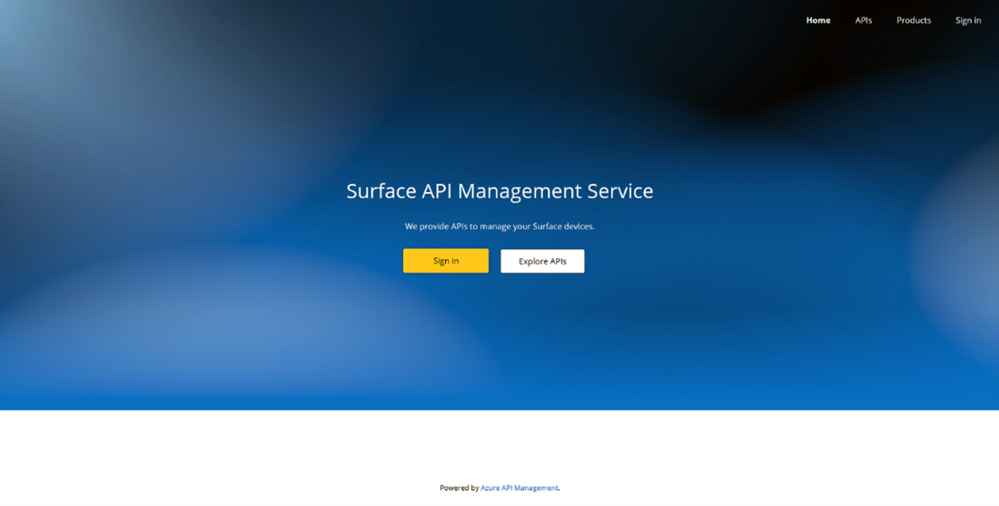
Our goal is to support our customers’ needs, wherever they might be. To this end, we’re introducing the Surface API Management Service, aimed at simplifying how you access information about your devices, coverage and insights.
Extend Surface Management Portal
This service builds on the familiar Surface Management Portal, enabling IT admins to directly access Microsoft coverage and entitlement information for their devices via API endpoints. It’s a practical enhancement for those already using the portal, designed to make device management more straightforward.
The service at a glance
The Surface API Management Service is an API management system that allows you to gain access to APIs that provide you with information about your devices.
These APIs serve as a direct conduit for customers seeking to streamline their asset management processes. By seamlessly connecting to the API, IT admins gain immediate access to critical device and warranty information, essential for effective asset oversight. Tailored specifically for Surface customers, this integration offers a hassle-free solution, eliminating the need for convoluted data acquisition methods. Now, with the simple integration of this API, customers can quickly retrieve pertinent details, empowering organizations to make informed decisions and optimize their asset management strategies.
Our first launch experience will allow current Surface Management Portal users to get their Microsoft coverage and entitlement information for their devices directly through API endpoints. Through our portal you can also see more of the performance and usage of the APIs across the globe with Surface API Management Service Reports.
Get access to Surface API Management Services
To access, you need an active Surface Management Portal Account and a completed customer validation check. (If you have access to create service requests within Surface Management Portal you have been approved.)
This article is contributed. See the original author and article here.
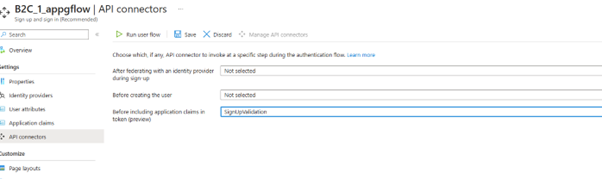
I was recently working with a customer who is using Azure AD B2C API Connector to enrich tokens with claims from external sources. They are using Azure Function App as the external source. As this setup demands, they exposed Azure Function App over public IP to work with B2C. But due to enterprise security restriction policy they must remove public endpoint from Function App and use private endpoints to VNET.
Initially I investigated on the error messages collected at the B2C, and APIM or Azure Application Gateway end. But later realized the main source of problem lies somewhere else. It is the ASP.NET Core framework used in building the Function App.
We need to modify default FowardedHeaders middleware settings. Otherwise, it will ignore the X-Forwarded headers being sent by APIM or Application Gateway because it isn’t in the list of KnownProxies and KnownNetworks. Please see the following links to understand the concept better:
This article is contributed. See the original author and article here.
Today, we’re announcing the first pricing update for Microsoft Dynamics 365 in more than five years. Since our last pricing update, Dynamics 365 has transformed customer relationship management (CRM) and enterprise resource planning (ERP) processes with connected applications across lines of business—from marketing, sales, customer and field service, to finance, operations, and supply chain—and each year, we release hundreds of new features and enhancements designed to help people work smarter, reclaim time, and collaborate seamlessly. You can read the official Dynamics 365 blog post here.
Below is the list of products for which prices are being updated with effect from October 1, 20241:
Product
Price before October 1, 2024
Price as of October 1, 20242
Microsoft Dynamics 365 Sales Enterprise
$95
$105
Microsoft Dynamics 365 Sales Device
$145
$160
Microsoft Dynamics 365 Sales Premium
$135
$150
Microsoft Microsoft Relationship Sales3
$162
$177
Microsoft Dynamics 365 Customer Service Enterprise
$95
$105
Microsoft Dynamics 365 Customer Service Device
$145
$160
Microsoft Dynamics 365 Field Service
$95
$105
Microsoft Dynamics 365 Field Service Device
$145
$160
Microsoft Dynamics 365 Finance
$180
$210
Microsoft Dynamics 365 Supply Chain Management
$180
$210
Microsoft Dynamics 365 Commerce
$180
$210
Microsoft Dynamics 365 Human Resources
$120
$135
Microsoft Dynamics 365 Project Operations
$120
$135
Microsoft Dynamics 365 Operations – Device
$75
$85
Prices for Dynamics 365 on-premises customer engagement and operations products will increase by the same percentage as the respective cloud versions. Pricing for cloud products not listed above, such as Microsoft Dynamics 365 Business Central, will remain unchanged.
These increases will apply globally to new and existing customers (upon renewal as of October 1, 2024), and the products will be priced comparably in other currencies. To comply with local regulations, US government list prices for the same products will increase by 10% effective October 1, 2024, followed by another smaller increase effective October 1, 2025, to bring parity with commercial pricing outlined above.
1 All prices are per user per month (or per device per month where noted). 2 Prices shown are for informational purposes only and may not be reflective of actual list price due to currency, country, region, and variant factors. Contact a Microsoft sales representative for additional information on pricing. 3 Pricing per user per month will increase by $15 in all tiers in Microsoft Relationship Sales. Only 10-99 user tier shown for simplicity.
This article is contributed. See the original author and article here.
Today, we’re announcing the first pricing update for Microsoft Dynamics 365 in more than five years. Since our last pricing update, Dynamics 365 has transformed customer relationship management (CRM) and enterprise resource planning (ERP) processes with connected applications across lines of business—from marketing, sales, customer and field service, to finance, operations, and supply chain—and each year, we release hundreds of new features and enhancements designed to help people work smarter, reclaim time, and collaborate seamlessly.
While a lot has changed in the world in the last five years, our vision has stayed true: ensuring the Dynamics 365 experience helps organizations adapt to change and proactively transform their business. We have delivered on this through innovations that have helped organizations supercharge customer experiences with AI-powered, real-time customer insights for marketers, sellers, and service agents; as well as by optimizing operations and mission-critical processes with data insights, supply chain visibility, and end-to-end automation of financial processes. And today, we are seeing organizations of all sizes across industries benefit from Microsoft Copilot in Dynamics 365.
As we look ahead, our commitment to our customers is to continue to offer the most value and highest return on your investment in business applications, helping to fuel digital transformation.
The price changes will be effective October 1, 2024, and the products will be priced comparably across different currencies. The full list of Dynamics 365 products for which prices are being updated can be found here. Cloud pricing for Microsoft Dynamics 365 Business Central will remain unchanged.
This article is contributed. See the original author and article here.
Today, we’re announcing the first pricing update for Microsoft Dynamics 365 in more than five years. Since our last pricing update, Dynamics 365 has transformed customer relationship management (CRM) and enterprise resource planning (ERP) processes with connected applications across lines of business—from marketing, sales, customer and field service, to finance, operations, and supply chain—and each year, we release hundreds of new features and enhancements designed to help people work smarter, reclaim time, and collaborate seamlessly. You can read the official Dynamics 365 blog post here.
Below is the list of products for which prices are being updated with effect from October 1, 20241:
Product
Price before October 1, 2024
Price as of October 1, 20242
Microsoft Dynamics 365 Sales Enterprise
$95
$105
Microsoft Dynamics 365 Sales Device
$145
$160
Microsoft Dynamics 365 Sales Premium
$135
$150
Microsoft Microsoft Relationship Sales3
$162
$177
Microsoft Dynamics 365 Customer Service Enterprise
$95
$105
Microsoft Dynamics 365 Customer Service Device
$145
$160
Microsoft Dynamics 365 Field Service
$95
$105
Microsoft Dynamics 365 Field Service Device
$145
$160
Microsoft Dynamics 365 Finance
$180
$210
Microsoft Dynamics 365 Supply Chain Management
$180
$210
Microsoft Dynamics 365 Commerce
$180
$210
Microsoft Dynamics 365 Human Resources
$120
$135
Microsoft Dynamics 365 Project Operations
$120
$135
Microsoft Dynamics 365 Operations – Device
$75
$85
Prices for Dynamics 365 on-premises customer engagement and operations products will increase by the same percentage as the respective cloud versions. Pricing for cloud products not listed above, such as Microsoft Dynamics 365 Business Central, will remain unchanged.
These increases will apply globally to new and existing customers (upon renewal as of October 1, 2024), and the products will be priced comparably in other currencies. To comply with local regulations, US government list prices for the same products will increase by 10% effective October 1, 2024, followed by another smaller increase effective October 1, 2025, to bring parity with commercial pricing outlined above.
1 All prices are per user per month (or per device per month where noted). 2 Prices shown are for informational purposes only and may not be reflective of actual list price due to currency, country, region, and variant factors. Contact a Microsoft sales representative for additional information on pricing. 3 Pricing per user per month will increase by $15 in all tiers in Microsoft Relationship Sales. Only 10-99 user tier shown for simplicity.
This article is contributed. See the original author and article here.
One of the biggest takeaways is that AI reinvention is a whole new way of working that involves both software and culture. It’s a cultural shift. Microsoft Viva empowers leaders and organizations to make that shift. We’re excited to announce new capabilities to help drive enterprise-wide adoption of Copilot, including the general availability of Microsoft Copilot Dashboard and Microsoft Copilot Academy, powered by Viva, which will be available to all Copilot for Microsoft 365 customers.
This article is contributed. See the original author and article here.
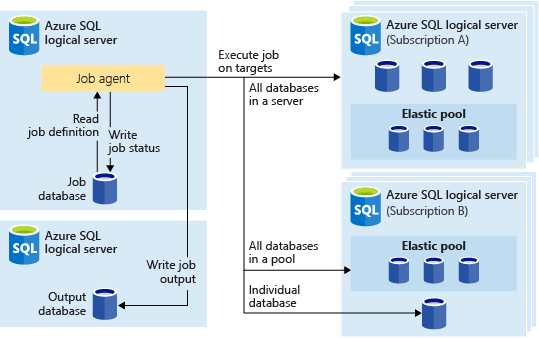
We are excited to announce the general availability (GA) of Elastic Jobs for Azure SQL Databases.
Elastic Jobs is a fully integrated Azure SQL database service that allows you to automate and manage administrative tasks across multiple SQL databases in a secure, scalable way. It can run one or more T-SQL job scripts in parallel using Azure portal, PowerShell, REST, or T-SQL APIs. Jobs can be run on a schedule or on-demand, targeting any tier of Azure SQL Database. Job target can include all databases in a server, in an elastic pool, across multiple servers and even databases across different subscriptions and geo regions on Azure. Servers and pools are dynamically enumerated at runtime, so jobs run against all databases that exist in the target group at the time of execution.
Where can you use Elastic Jobs?
Any database administration or management job that can be scripted with a T-SQL script is a good candidate for elastic jobs. Some of these example scenarios include:
Automate management tasks like deploy schema changes, index rebuilding, performance/telemetry data collection etc.
Configure jobs like query execution, collecting results across a collection of databases on a recurring basis.
Aggregate and collect data for processing and reporting.
Data movement, ETL processing to extract/process/insert data between tables in a database.
.. to name a few.
What are some significant capabilities of Elastic Jobs?
Elastic Jobs makes it easy and secure to manage large number of SQL databases across Aure. Some significant security and management capabilities of Elastic Jobs include:
Microsoft Entra ID (formerly Azure Active Directory) support for central administration of authentication and permissions
Service-managed Private Link support to securely connect to target databases.
Integration with Azure Alerts for job execution status notification.
Easily scale Job Agent’s tier to connect to hundreds of target databases concurrently across Azure.
Dynamic enumeration target databases in target servers and elastic pools
Jobs can be composed of multiple steps to customize the execution sequence.
All functionalities can be accessed through portal, PowerShell, T-SQL and REST APIs
How do you setup and use Elastic Jobs?
Setting up and using elastic jobs is simple as described here.
Job Agent and Job database creation
Job Agent and associated Job database creation experience in portal is similar to a SQL database creation. As part of job agent creation, its service tier can be chosen, and a user assigned managed identity can be added for Entra authentication. Once the job agent is created, its portal page allows easy access to all its capabilities.
Defining Jobs, their target groups and monitoring them through job agent’s portal page.
Jobs and job steps can be defined, edited and executed through portal page. These jobs can also be scheduled to run at regular intervals and their execution can be monitored.
Advanced security functionalities, alert notification and scaling are also easily accessed through Job Agent’s portal page.
Job agents Entra ID can be changed and private links to target databases established easily through portal page. Azure Alerts can be defined for getting alert notification on job executions status. Scaling the job agent’s compute tier to enable it to connect to hundreds of target databases concurrently is also easy through portal page links.
Steps described above for creating, configuring, and managing elastic jobs also be accomplished through using PowerShell, REST and T-SQL APIs.
Pricing
Billing for Job agents will start at GA time, April 11th, 2024. Billing cards in the Azure portal page will show estimated cost based on the provisioned job agent tier.
*Billing for the job agents in national clouds are expected to start a little later, depending on the billing pipeline deployment in those regions.
Regional availability
The Elastic Jobs is available in all the regions that Azure SQL Database is available.
This article is contributed. See the original author and article here.
The Copilot analytics report within Dynamics 365 Customer Service provides a good overview of the usage of Copilot features by agents. You can derive insights into the most frequently leveraged features, impact of Copilot on agent productivity, and agent satisfaction with Copilot responses. While this report provides a good summarization of the impact Copilot has on contact center KPIs, we are seeing interest from customers to drill into individual interaction data, especially around the interactions voted as negative by their agents.
This blog provides an overview of the underlying data that powers the Copilot dashboard, and the additional data points available to you. We hope that with this context, you can use model customization to modify these reports to better suit your organization’s needs.
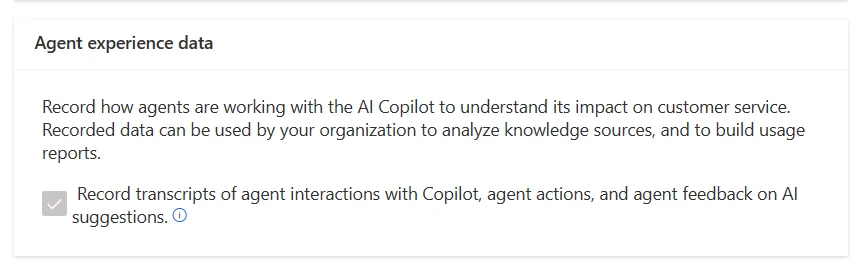
First, make sure your organization is storing agent experience data. You can ask your admin to validate this for you in the Customer Service admin center by making sure they select the Agent experience data checkbox in Copilot help pane. You can continue using Copilot with this setting turned off, but you won’t have historical interaction data to build analytics.
View and analyze agent experience data
When you turn on agent experience data, Dataverse stores the following:
Transcripts from when agents chat with Copilot
Agent actions such as copying a summary presented or using a suggested reply from Copilot
Agent feedback on responses in the form of thumbs up, thumbs down and verbatim feedback
You can use the transcript id stored in msdyn_interactioncontext to get the full transcript of this interaction from the msdyn_copilottranscriptdata entity.
Interaction 2: Agent provides feedback on Copilot’s responses
The agent wasn’t fully satisfied with Copilot’s response and is choosing to rate the response with a thumbs down and provides verbatim feedback.
Another entry in msdyn_copilotinteraction gets created with the same msdyn_scenariorequestid and msdyn_scenariotype, but with msdyn_interactiontypename set to “ThumbsDown”.
You can use the reference msdyn_interactiondataid to gather the verbatim feedback the agent provided from the msdyn_copilotinteractiondata entity.
Interaction 3: Agent asks Copilot to summarize a case
The agent picks up a case from a colleague and requests Copilot to generate a summary to catch up.
Another entry in msdyn_copilotinteraction gets created with a new msdyn_scenariorequestid and msdyn_scenariotype set to “Case summary”.
You can use the reference msdyn_interactiondataid to retrieve the summary that was generated from the msdyn_copilotinteractiondata entity.
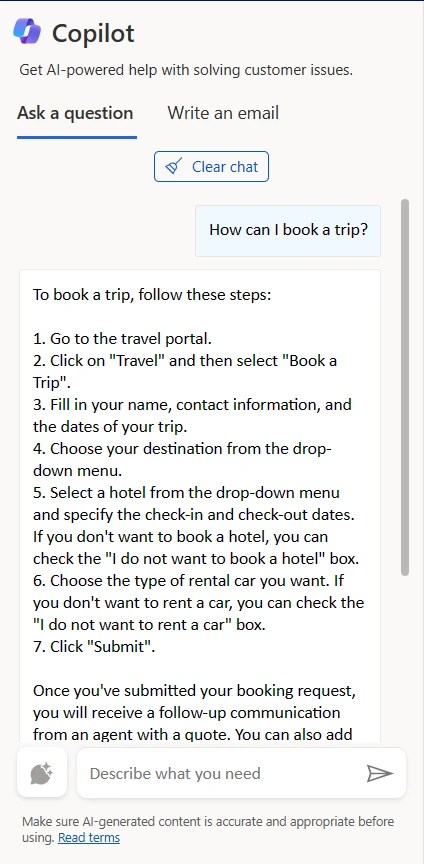
Interaction 4: Agent uses Copilot to write an email
Agent decides to leverage Copilot to generate an email with troubleshooting steps using write an email feature. They request an email of type “Resolve the customer’s problem”.
Another entry in msdyn_copilotinteraction gets created with a new msdyn_scenariorequestid and msdyn_scenariotype set to “Write an email”.
You can use the reference msdyn_interactiondataid to retrieve the email that was generated, along with the knowledge sources used from msdyn_copilotinteractiondata entity .
This article is contributed. See the original author and article here.
If you don’t Share, what’s the Point! The community motto, “Sharing is caring” is in full swing – and there’s a ton of sharing in preparation, and we, the SharePoint Team, want to invite you.
Join us in Orlando, Florida for the biggest Microsoft 365 Community Conference to date | April 30 – May 2, 2024. Microsoft is sending over 175 Microsoft product makers — to share and discuss innovation and real-world solutions across keynotes, sessions, and pre/post event deep-dive workshops to build your expertise.
Register today | Note: Use the MSCMTY discount code to save $100 USD.
Below is a subset of the event content, so you know what to expect to hear and see from the SharePoint team. Expect clarity on what SharePoint is today AND directions content management and communications for the future. To see all that Microsoft is planning for the event, please review our Microsoft 365 Community Conference event guide.
Join in: The Microsoft 365 Community Conference in Orlando, FL | April 30 – May 2, 2024 | aka.ms/M365Conf24 – Sponsored by Microsoft.
SharePoint content at the Microsoft 365 Community Conference
Join us to learn how AI-powered content management in Microsoft 365 enables content intelligence, optimizes critical business processes, improves governance, and prepares your content for Copilot. Below is a subset of content related to SharePoint:
Opening keynote | “The Age of Copilots” with Jeff Teper (President of Collaboration Apps and Platforms) | Tuesday, April 30th, 8:00am – 9:30am EDT
AMA | “Microsoft AMA” with Jeff Teper and numerous product leaders| Wednesday, May 3rd, 4:15pm – 5:15pm EDT
Register today | Note: Use the MSCMTY discount code to save $100 USD.
In addition to our main sessions and content, expect a lot of community time and networking with executives and product makers in the Expo Hall – Microsoft will have a booth with a stage for lightning talks, meet and greets throughout the week, day and evening activities – including the main attendee party at Universal Islands of Adventure, plus a variety of roundtable discussion with our researchers and product team members to listen and help share future product/feature direction.
We asked three Microsoft technology and event experts, @Sharon Weaver, @Sean Bugler, and Derek Cash Peterson — to share their in-person tips and tricks so you can best prepare to have an awesome and optimal Microsoft 365 Community Conference experience:
Join in! The Microsoft 365 Community Conference in Orlando, FL | April 30 – May 2, 2024 | aka.ms/M365Conf24 – Sponsored by Microsoft.
What: Microsoft 365 Community Conference 2024
Register today | Note: Use the MSCMTY discount code to save $100 USD.
Content: 1 Microsoft keynote + 1 AMA || 150+ overall sessions – 88Microsoft-led sessions (see all below in product-area buckets) | 18 full-day workshops (pre-day and post) – 4 supported by Microsoft
Microsoft is sending over 175+ product makers to present and engage.
This article is contributed. See the original author and article here.
Today we launched the 2024 release wave 1 for Microsoft Dynamics 365 and Microsoft Power Platform, a rollout of new features and enhanced capabilities slated for release between April and September 2024. These updates include new Microsoft Copilot capabilities across Dynamics 365 and Microsoft Power Platform—as well as role-based extensions of Copilot for Microsoft 365—that transform business processes with natural language processing, AI-generated insights, and assistance with time-consuming tasks.
This morning’s Microsoft Business Applications Launch Event, available to view on-demand, includes highlights and demonstrations of features from the release wave, as well as a firsthand look at how organizations like Lenovo, Sonepar, Ford, Omnicom Group, and G&J Pepsi are using these capabilities in transformative ways.
Extend Microsoft 365 with role-specific Copilot capabilities
The central theme across this release wave is how, across the business and productivity applications organizations depend on, Copilot is helping to better empower employees, improve business processes, and engage customers. In fact, 68% of surveyed Copilot users told us that it helps them jumpstart their creative process, and 70% said Copilot made them more productive so that they could do their job faster and easier.1
Since each role is unique, we have extended Copilot for Microsoft 365 even further to tailor Copilot experiences for specific business functions. This includes Microsoft Copilot for Sales, Microsoft Copilot for Service and the recently announced Microsoft Copilot for Finance—all integrated with the apps and data you use every day so that you can spend less time searching for data and more time engaging with customers and driving a strategic agenda for your organization.
Underpinning these Copilot extensions is Microsoft Copilot Studio, which makes it easy to customize and build your own customer and internal-facing copilots using your data and workflows. We are excited to dive deeper into Copilot this release wave and help you use it to transform your business.
Transforming customer and field service with generative AI
Release wave 1 introduces new Copilot capabilities to help customer service agents and frontline workers boost efficiency, reduce training costs, and deliver exceptional customer experiences.
New Copilot capabilities for Microsoft Dynamics 365 Customer Service and Microsoft Copilot for Service—which infuses generative AI into your existing contact center and customer relationship management (CRM) solutions—include Copilot-drafted knowledge articles to streamline the knowledge creation process, as well as proactive Copilot responses for conversations with customers.
At the launch event, we shared how Lenovo is integrating Dynamics 365 Customer Service, third-party solutions, and custom bots to scale its innovative service delivery solution, Premier Support Suite for PC devices. Thousands of agents can now provide omnichannel support to customers in 200 regions and in more than 40 languages globally.
We also spotlight how G&J Pepsi, the largest family-owned and operated Pepsi franchise bottler in the U.S., has reduced operating costs by 6.6% and increased revenue by 8% with Microsoft Dynamics 365 Field Service, Dynamics 365 Sales, and Microsoft Power Platform. They expect Copilot to further streamline work order management and enhance their best-in-class service by giving the field service teams access to a complete picture of their accounts in real time.
ERP is going through a once-in-a-generation transformation. For decades, employees across the globe have manually completed a significant amount of ERP processes daily to keep their companies running. Microsoft is pioneering a new vision for ERP—a world where ERP solutions powered by AI operate more independently, continually adjusting to evolving circumstances, involving users when necessary, and opening new possibilities for businesses.
At the launch event, we spotlighted how Omnicom Group, a global leader in marketing communications, envisions leveraging Dynamics 365 for a new, autonomous ERP model that will help it to accelerate growth, become more efficient, and power its ability to innovate. They can use the new Copilot to optimize their strategic decision-making and transform their operational processes, such as prompting Copilot to identify opportunities for growth expansion and gauge the performance of initiatives.
We also introduced new Copilot capabilities for Microsoft Dynamics 365 Business Central that help small and medium businesses to automate processes and complete tasks faster. A new Copilot chat pane allows users to quickly find and go to data, reveal insights, and get help with tasks. Users can prompt Copilot to create sales lines, match e-invoices with purchase orders, answer questions about data analyses, help with repetitive tasks, and more.
Other updates include sustainability tracking, the ability to connect Business Central with Shopify B2B (business-to-business), and developer tools for Copilot.
Accelerate development with Microsoft Power Platform
Microsoft Power Platform is the rapid modernization platform of choice of hundreds of thousands of organizations, providing AI-first, low-code tools to build enterprise-wide solutions and automations. Copilot is seamlessly integrated across Microsoft Power Platform, empowering you to create applications, automations, and analytics through simple, natural language and conversational interactions.
At the launch event, we demonstrate how Ford is leveraging Copilot to produce connected services to enhance the driving experience. Like Ford, organizations can take advantage of new Copilot capabilities in this release wave to transform workflows. Microsoft Power Automate introduces new ways to create cloud flows, desktop flows and process mining using natural language prompts. Microsoft Power Apps accelerates app development with enhanced user reasoning and data insights in custom apps. Microsoft Copilot Studio enables organizations to build custom copilots, with new ways to build custom prompts and generative actions, along with access to OpenAI’s custom GPTs and AI Builder models for extended scenarios.
Buyers expect businesses to cater to their unique set of needs. To do so, marketing and sales teams need a unified understanding of the customer and the ability to orchestrate experiences across marketing, sales, and service.
Sonepar is leveraging Copilot in Microsoft Dynamics 365 Sales to become the first global B2B electrical distributor to provide a fully digitized and synchronized omnichannel experience to every customer. With Copilot alongside sellers, Sonepar can personalize marketing content, improve the quality of leads, and enhance every engagement with customers.
New Copilot capabilities in release wave 1 provide recommendations, summarize data, retrieve information, and perform actions in context and within the flow of work—so they can stay productive and focus time on engaging customers.
Watch the virtual Microsoft Business Applications Launch Event
We invite you to tune into the launch event on-demand for more details and demos of new capabilities across Dynamics 365 and Microsoft Power Platform. In addition, you can explore several special topic presentations covering the evolution of generative AI, including small language models and AI experiences to help transform strategic, cross-domain business problems.


 Register today


Recent Comments