
by Contributed | Apr 23, 2021 | Technology
This article is contributed. See the original author and article here.
SharePoint Framework Special Interest Group (SIG) bi-weekly community call recording from April 22nd is now available from the Microsoft 365 Community YouTube channel at http://aka.ms/m365pnp-videos. You can use SharePoint Framework for building solutions for Microsoft Teams and for SharePoint Online.
Call summary:
Preview the new Microsoft 365 Extensibility look book gallery co-developed by Microsoft Teams and Sharepoint engineering. Download showcase apps, samples, and documentation. Register now for April trainings on Sharing-is-caring. Give us feedback, the Microsoft 365 developer community survey is now open. Announcing public preview of SharePoint Framework 1.12.1.
There were six PnP SPFx web part samples delivered in last 2 weeks. Great work!
Latest project updates include:
PnP Project
|
Current version
|
Release/Status
|
SharePoint Framework (SPFx)
|
v1.12.1 (beta)
|
GA by end-of-April
|
PnPjs Client-Side Libraries
|
v2.4.0
|
April 9th
|
CLI for Microsoft 365
|
v3.9 (beta)
|
Upgrading SPFx projects to v1.12.1-rc.2
|
Reusable SPFx React Controls
|
v2.6.0
|
v3.0.0 when SPFx v1.12.1 GA
|
Reusable SPFx React Property Controls
|
v2.5.0
|
v3.0.0 when SPFx v1.12.1 GA
|
PnP SPFx Generator
|
v1.16.0
|
|
PnP Modern Search
|
v3.19 and v4.1.0
|
April and March 20th
|
The host of this call is Patrick Rodgers (Microsoft) @mediocrebowler. Q&A takes place in chat throughout the call.
Jungle seating in a Pacific Northwest, Washington, US amphitheater! Truly unique like this Community!
Actions:
- Complete the Microsoft 365 Developer Community Survey – https://aka.ms/m365pnp/survey
- Reserve date – SharePoint Monthly community call – 13th of April 8 AM PDT | https://aka.ms/sp-call
- Register for Sharing is Caring Events:
- First Time Contributor Session – April 27th (EMEA, APAC & US friendly times available)
- Community Docs Session – April
- PnP – SPFx Developer Workstation Setup – April 29th
- PnP SPFx Samples – Solving SPFx version differences using Node Version Manager – May TBD
- AMA (Ask Me Anything) – Power Platform Samples – May 5th
- AMA (Ask Me Anything) – Tech Community – May 11th
- First Time Presenter – May TBD
- More than Code with VSCode – April 28th
- Maturity Model Practitioners – May TBD
- PnP Office Hours – 1:1 session – Register
- Download the recurrent invite for this call – https://aka.ms/spdev-spfx-call
Demos:
Running the CLI for Microsoft 365 in Azure Container Instances orchestrated by Logic Apps – or Flow in Power Automate. Step through how the Azure Container Instance is created with the specified managed identity. Docker enables you to bundle a pre-configured version of CLI for Microsoft 365 together with all its required dependencies and also is used to orchestrate containers. Purpose of configuration is to run scripts or reports against your tenant.
Advanced Page Properties web part solution – when the normal page properties web part is not enough, this new Advanced Page Properties web part delivers more. New properties supporting theme variants, capsule format for list options, support for image fields, for links, for currency, and for dates. Tour the code for tracking available properties for drop downs, tracking property selections and parameters for refreshing and rendering the data.
SharePoint Framework 1.12.1 new features – support for Node v12, Gulp 4, Microsoft Teams SDK v1.8 and for creating Microsoft Teams meeting apps. Demos – 1) Increased access to page structure and context to avoid DOM dependency (web part detects DOM structure and selects output size to fit allotted space) and 2) SPFx support for Complex Microsoft Teams solutions (manifest included in Package to synchronize with Teams App catalog).
SPFx web part samples: (https://aka.ms/spfx-webparts)
Thank you for your great work. Samples are often showcased in Demos.
Agenda items:
Demos:
Running the CLI for Microsoft 365 in Azure Container Instances orchestrated by Logic Apps – Albert-Jan Schot (Portiva) | @appieschot | deck – 18:04
Advanced Page Properties web part solution – Mike Homol (ThreeWill) | @homol | deck – 32:00
SharePoint Framework 1.12.1 new features – Vesa Juvonen (Microsoft) | @vesajuvonen
– 45:33
Resources:
Additional resources around the covered topics and links from the slides.
General Resources:
Other mentioned topics:
Upcoming calls | Recurrent invites:
PnP SharePoint Framework Special Interest Group bi-weekly calls are targeted at anyone who is interested in the JavaScript-based development towards Microsoft Teams, SharePoint Online, and also on-premises. SIG calls are used for the following objectives.
- SharePoint Framework engineering update from Microsoft
- Talk about PnP JavaScript Core libraries
- Office 365 CLI Updates
- SPFx reusable controls
- PnP SPFx Yeoman generator
- Share code samples and best practices
- Possible engineering asks for the field – input, feedback, and suggestions
- Cover any open questions on the client-side development
- Demonstrate SharePoint Framework in practice in Microsoft Teams or SharePoint context
- You can download a recurrent invite from https://aka.ms/spdev-spfx-call. Welcome and join the discussion!
“Sharing is caring”
by Contributed | Apr 22, 2021 | Technology
This article is contributed. See the original author and article here.
Debug Diag involves various methods of dump collection methods that can be incorporated. In this blog we would be dealing with one such method that helps to capture crash dumps on particular exception only when it contains a specific function in its call stack.
When can you use this type of data collection?
You can use this method to capture the dumps if you are facing the below challenges:
- Your application pool recycles very frequently making it difficult to monitor the process ID for procdump command to run
- The exception being targeted can occur in other scenarios as well, hence generating a lot of false positive dumps
- We know call stack of the exception or a specific function call where the exception comes from
Steps to capture dumps for an exception occurring from specific method :
- Download the latest Debug Diagnostic Tool v2 Update 3 from https://www.microsoft.com/en-us/download/details.aspx?id=58210
- Open the Debug diag collection
- Once you open this , you will automatically be prompted with Select Rule Type wizard, if not select Add Rule from the bottom pane
- Select Crash and chose A specific IIS web application pool
- Chose the required application pool and click Next
- Click on Exceptions and got to Add Exception in the following prompt that appears
- Chose the type of exception your require and select Custom from Action Type
- Once you chose Custom you will be presented with a page to add your script
- Add the following script :
If Instr(UCASE(Debugger.Execute("!clrstack")),ucase("Your function here")) > 0 Then

                                                      CreateDump "Exception",false

End If
- Alternatively if you want to capture a dump for an exception that might be coming from two different methods you can use this:
If Instr(UCASE(Debugger.Execute("!clrstack")),ucase("function 1")) > 0 Then

                                                       CreateDump "Exception",false

ElseIf  Instr(UCASE(Debugger.Execute("!clrstack")),ucase("function2 ")) > 0 Then

                                                      CreateDump "Exception",false

End If
- Set the Action Limit to number of dumps to be captured and hit OK
- Click Save and Close and Next in the following command prompt that appears
- Alter the Rule name and location in next prompt if required
- Chose Activate the rule now and Finish
For example, Let’s assume that we are getting the exception “System.Threading.ThreadAbortException” from method “EchoBot.dll!Microsoft.BotBuilderSamples.Controllers.BotController.PostAsync() Line 33”. In this scenario we will follow the below steps :
- Complete the steps from step 1 to step 6 as written above
- Chose the CLR Exception from the list of exceptions presented to you
- In Exception Type Equals column add : System.Threading.ThreadAbortException
- In Action Type , chose Custom from drop down menu
- In the Provide DebugDiag Script Commands For Custom Actions prompt that appears paste the following script :
If Instr(UCASE(Debugger.Execute("!clrstack")),ucase("Microsoft.BotBuilderSamples.Controllers.BotController.PostAsync")) > 0 Then

                                                      CreateDump "Exception",false

End If
- Follow the steps from 11 to 14 above to complete the configuration
This rule creates the dump on System.Threading.ThreadAbortException that occurs from Microsoft.BotBuilderSamples.Controllers.BotController.PostAsync.
More information:
The script indicates debug diag to capture the dump when it hits the exception you selected and involves the function call ( you mentioned in script ) in it’s call stack.
by Contributed | Apr 22, 2021 | Technology
This article is contributed. See the original author and article here.
Web Localization and Ecommerce
Using Microsoft Azure Translator service, you can localize your website in a cost-effective way. With the advent of the internet, the world has become a much smaller place. Loads of information are stored and transmitted between cultures and countries, giving us all the ability to learn and grow from each other. Powered by advanced deep learning, Microsoft Azure Translator delivers fast and high-quality neural machine-based language translations, empowering you to break through language barriers and take advantage of all these powerful vehicles of knowledge and data transfer.
Research shows that 40% of internet users will never buy from websites in a foreign language[1]. Machine translation from Azure, supporting over 90 languages and dialects, helps you go to market faster and reach buyers in their native languages by localizing your web assets: from your marketing pages to user-generated content, and everything in-between.
Up to 95% of the online content that companies generate is available in only one language. This is because localizing websites, especially beyond the home page, is cost prohibitive outside of the top few markets. As a result, localized content seldom extends one or two clicks beyond a home page. However, with machine translation from Azure Translator Service, content that wouldn’t otherwise be localized can be, and now most of your content can reach customers and partners worldwide.
How to localize your website in a cost-effective way?
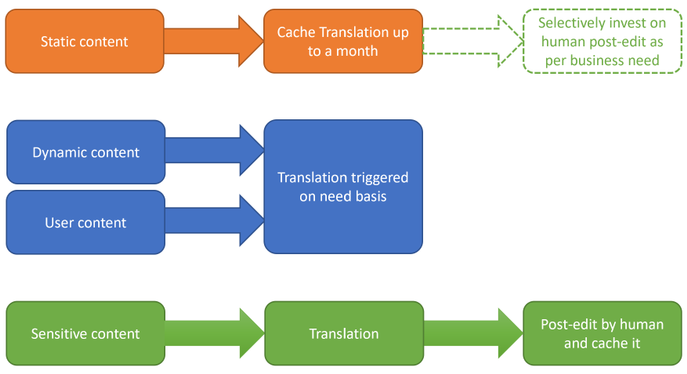
The first step is to understand the nature of your website content and classify them. It is critical as each of them needs different levels of localization. There are four types of content: a) static and dynamic, b) generated by you and posted by customer, c) sensitive like ‘Terms of Use’, d) part of UX elements.
Static content like about the organization, product or service description, user guides, terms of use, etc. can be translated once (or less frequently) offline into all required target languages. Translation results could be cached and served from your webserver. This could substantially reduce the cost of translation. Machine translation models which powers Azure Translator service are regularly updated to improve quality. Hence consider refreshing the translations once a quarter if not every month.
User generated content like customer reviews, information requests, etc. are dynamic in nature, not all of them requiring translations, and to be translated on need basis only. You could plan for an UX element in the webpage which could initiate translation on need basis. Target language for translation could be identified based on user browser language. Likewise, responses to customer could be translated back into the language of original request or comment.
Sensitive content like terms of use, company policies, are recommended to do a human review post-machine translation.
Text in UX elements of the webpage like menu, labels in forms, etc. are typically one or two words and have restricted space. Hence recommended to do a UX testing post translation for fit and finish. If necessitates look for alternate translation or human review.
Due to the speed and cost-effective nature that Azure Translator Service provides, you can easily test which localization option is optimal for your business and your users. For example, you may only have the budget to localize in dozens of languages and measure customer traffic in multiple markets in parallel. Using your existing web analytics, you will be able to decide where to invest in human translation in terms of markets, languages, or pages. For example, if the machine translated information passes a defined page view threshold, your system may trigger a human review of that content. In addition, you will still be able to maintain machine translation for other areas, to maintain reach.
By combining pure machine translation and paid translation resources, you can select different quality levels for the translations based on your business needs.
How to use Azure Translator service to translate static content
Pre-requisite:
- Create an Azure subscription
- Once you have an Azure subscription, create a Translator resource in the Azure portal.
- Once Translator resource it created, go to the resource, and select ‘Keys and Endpoint’ which is used to connect your application to the Translator service.


Translating static webpage content:
Below code sample shows how to translate an element in the webpage. You could use it and iterate for each element in your webpage requiring translation.
import os, requests, uuid, json
subscription_key = "YOUR_SUBSCRIPTION_KEY"
endpoint = "https://api.cognitive.microsofttranslator.com"
path = '/translate'
constructed_url = endpoint + path

params = {
    'api-version': '3.0',
    'to': ['de'], # target language
    'textType': 'html'
}

headers = {
    'Ocp-Apim-Subscription-Key': subscription_key,
    'Content-type': 'application/json',
    'X-ClientTraceId': str(uuid.uuid4())
}

# You can pass more than one object in body.
body = [{
    "text": "<p>The samples on this page use hard-coded keys and endpoints for simplicity.
    Remember to <strong>remove the key from your code when you're done</strong>, and
    <strong>never post it publicly</strong>. For production, consider using a secure way of
    storing and accessing your credentials. See the Cognitive Services security article
    for more information.</p>"
}]

request = requests.post(constructed_url, params=params, headers=headers, json=body)
response = request.json()
print (response[0]['translations'][0]['text']) # shows how to access the translated text from response
Localization is just a fraction of the things that you can do with Translator, so don’t let the learning stop here. Check out recent new Translator features, additional doc links to dive deeper, and join the Translator Ask Microsoft Anything session on 4/27.
Get started:
[1] CSA Research – Can’t Read, Won’t Buy – B2C Analyzing Consumer Language Preferences and Behaviors in 29 Countries https://insights.csa-research.com/reportaction/305013126/Marketing
by Contributed | Apr 22, 2021 | Technology
This article is contributed. See the original author and article here.
We are excited to announce that the GREATEST and LEAST T-SQL functions are now generally available in Azure Synapse Analytics (serverless SQL pools only).
This post describes the functionality and common use cases of GREATEST and LEAST in Azure Synapse Analytics, as well as how they provide a more concise and efficient solution for developers compared to existing T-SQL alternatives.
Functionality
GREATEST and LEAST are scalar-valued functions and return the maximum and minimum value, respectively, of a list of one or more expressions.
The syntax is as follows:
GREATEST ( expression1 [ ,...expressionN ] )
LEAST ( expression1 [ ,...expressionN ] )
As an example, let’s say we have a table CustomerAccounts and wish to return the maximum account balance for each customer:
CustomerID |
Checking |
Savings |
Brokerage |
1001 |
$ 4,294.10 |
$ 14,109.84 |
$ 3,000.01 |
1002 |
$ 51,495.00 |
$ 97,103.43 |
$ 0.02 |
1003 |
$ 10,619.73 |
$ 33,194.01 |
$ 5,005.74 |
1004 |
$ 24,924.33 |
$ 203,100.52 |
$ 10,866.87 |
Prior to GREATEST and LEAST, we could achieve this through a searched CASE expression:
SELECT CustomerID, GreatestBalance =
    CASE
        WHEN Checking >= Savings and Checking >= Brokerage THEN Checking
        WHEN Savings > Checking and Savings > Brokerage THEN Savings
        WHEN Brokerage > Checking and Brokerage  > Savings THEN Brokerage
    END
FROM CustomerAccounts;
We could alternatively use CROSS APPLY:
SELECT ca.CustomerID, MAX(T.Balance) as GreatestBalance
FROM CustomerAccounts as ca
CROSS APPLY (VALUES (ca.Checking),(ca.Savings),(ca.Brokerage)) AS T(Balance)
GROUP BY ca.CustomerID;
Other valid approaches include user-defined functions (UDFs) and subqueries with aggregates.
However, as the number of columns or expressions increases, so does the tedium of constructing these queries and the lack of readability and maintainability.
With GREATEST, we can return the same results as the queries above with the following syntax:
SELECT CustomerID, GREATEST(Checking, Savings, Brokerage) AS GreatestBalance
FROM CustomerAccounts;
Here is the result set:
CustomerID  GreatestBalance
----------- ---------------------
1001            14109.84
1002            97103.43
1003            33194.01
1004           203100.52

(4 rows affected)
Similarly, if you previously wished to return a value that’s capped by a certain amount, you would need to write a statement such as:
DECLARE @Val INT = 75;
DECLARE @Cap INT = 50;
SELECT CASE WHEN @Val > @Cap THEN @Cap ELSE @Val END as CappedAmt;
With LEAST, you can achieve the same result with:
DECLARE @Val INT = 75;
DECLARE @Cap INT = 50;
SELECT LEAST(@Val, @Cap) as CappedAmt;
The syntax for an increasing number of expressions is vastly simpler and more concise with GREATEST and LEAST than with the manual alternatives mentioned above
As such, these functions allow developers to be more productive by avoiding the need to construct lengthy statements to simply find the maximum or minimum value in an expression list.
Common use cases
Constant arguments
One of the simpler use cases for GREATEST and LEAST is determining the maximum or minimum value from a list of constants:
SELECT LEAST ( '6.62', 33.1415, N'7' ) AS LeastVal;
Here is the result set. Note that the return type scale is determined by the scale of the highest precedence argument, in this case float.
LeastVal
--------
6.6200

(1 rows affected)
Local variables
Perhaps we wish to compare column values in a WHERE clause predicate against the maximum value of two local variables:
CREATE TABLE dbo.studies (
    VarX varchar(10) NOT NULL,
    Correlation decimal(4, 3) NULL
);

INSERT INTO dbo.studies VALUES ('Var1', 0.2), ('Var2', 0.825), ('Var3', 0.61);
GO

DECLARE @PredictionA DECIMAL(2,1) = 0.7;
DECLARE @PredictionB DECIMAL(3,2) = 0.65;

SELECT VarX, Correlation
FROM dbo.studies
WHERE Correlation > GREATEST(@PredictionA, @PredictionB);
GO
Here is the result set:
VarX       Correlation
---------- -----------
Var2              .825

(1 rows affected)
Columns, constants and variables
At times we may want to compare columns, constants and variables together. Here is one such example using LEAST:
CREATE TABLE dbo.products (
    prod_id INT IDENTITY(1,1),
    listprice smallmoney NULL
);

INSERT INTO dbo.products VALUES (14.99), (49.99), (24.99);
GO

DECLARE @PriceX smallmoney = 19.99;

SELECT LEAST(listprice, 40, @PriceX) as LeastPrice
FROM dbo.products;
GO
And the result set:
LeastPrice
------------
     14.99
     19.99
     19.99
Summary
GREATEST and LEAST provide a concise way to determine the maximum and minimum value, respectively, of a list of expressions.
For full documentation of the functions, see GREATEST (Transact-SQL) – SQL Server | Microsoft Docs and LEAST (Transact-SQL) – SQL Server | Microsoft Docs.
These new T-SQL functions will increase your productivity and enhance your experience with Azure Synapse Analytics.
Providing the GREATEST developer experience in Azure is the LEAST we can do.
John Steen, Software Engineer
Austin SQL Team
by Contributed | Apr 22, 2021 | Technology
This article is contributed. See the original author and article here.
We are excited to announce that the GREATEST and LEAST T-SQL functions are now generally available in Azure SQL Database, as well as in Azure Synapse Analytics (serverless SQL pools only) and Azure SQL Managed Instance.
The functions will also be available in upcoming releases of SQL Server.
This post describes the functionality and common use cases of GREATEST and LEAST in Azure SQL Database, as well as how they can provide a more concise and efficient solution for developers compared to existing T-SQL alternatives.
Functionality
GREATEST and LEAST are scalar-valued functions and return the maximum and minimum value, respectively, of a list of one or more expressions.
The syntax is as follows:
GREATEST ( expression1 [ ,...expressionN ] )
LEAST ( expression1 [ ,...expressionN ] )
As an example, let’s say we have a table CustomerAccounts and wish to return the maximum account balance for each customer:
CustomerID |
Checking |
Savings |
Brokerage |
1001 |
$ 4,294.10 |
$ 14,109.84 |
$ 3,000.01 |
1002 |
$ 51,495.00 |
$ 97,103.43 |
$ 0.02 |
1003 |
$ 10,619.73 |
$ 33,194.01 |
$ 5,005.74 |
1004 |
$ 24,924.33 |
$ 203,100.52 |
$ 10,866.87 |
Prior to GREATEST and LEAST, we could achieve this through a searched CASE expression:
SELECT CustomerID, GreatestBalance =
    CASE
        WHEN Checking >= Savings and Checking >= Brokerage THEN Checking
        WHEN Savings > Checking and Savings > Brokerage THEN Savings
        WHEN Brokerage > Checking and Brokerage  > Savings THEN Brokerage
    END
FROM CustomerAccounts;
We could alternatively use CROSS APPLY:
SELECT ca.CustomerID, MAX(T.Balance) as GreatestBalance
FROM CustomerAccounts as ca
CROSS APPLY (VALUES (ca.Checking),(ca.Savings),(ca.Brokerage)) AS T(Balance)
GROUP BY ca.CustomerID;
Other valid approaches include user-defined functions (UDFs) and subqueries with aggregates.
However, as the number of columns or expressions increases, so does the tedium of constructing these queries and the lack of readability and maintainability.
With GREATEST, we can return the same results as the queries above with the following syntax:
SELECT CustomerID, GREATEST(Checking, Savings, Brokerage) AS GreatestBalance
FROM CustomerAccounts;
Here is the result set:
CustomerID  GreatestBalance
----------- ---------------------
1001            14109.84
1002            97103.43
1003            33194.01
1004           203100.52

(4 rows affected)
Similarly, if you previously wished to return a value that’s capped by a certain amount, you would need to write a statement such as:
DECLARE @Val INT = 75;
DECLARE @Cap INT = 50;
SELECT CASE WHEN @Val > @Cap THEN @Cap ELSE @Val END as CappedAmt;
With LEAST, you can achieve the same result with:
DECLARE @Val INT = 75;
DECLARE @Cap INT = 50;
SELECT LEAST(@Val, @Cap) as CappedAmt;
The syntax for an increasing number of expressions is vastly simpler and more concise with GREATEST and LEAST than with the manual alternatives mentioned above
As such, these functions allow developers to be more productive by avoiding the need to construct lengthy statements to simply find the maximum or minimum value in an expression list.
Common use cases
Constant arguments
One of the simpler use cases for GREATEST and LEAST is determining the maximum or minimum value from a list of constants:
SELECT LEAST ( '6.62', 33.1415, N'7' ) AS LeastVal;
Here is the result set. Note that the return type scale is determined by the scale of the highest precedence argument, in this case float.
LeastVal
--------
6.6200

(1 rows affected)
Local variables
Perhaps we wish to compare column values in a WHERE clause predicate against the maximum value of two local variables:
CREATE TABLE dbo.studies (
    VarX varchar(10) NOT NULL,
    Correlation decimal(4, 3) NULL
);

INSERT INTO dbo.studies VALUES ('Var1', 0.2), ('Var2', 0.825), ('Var3', 0.61);
GO

DECLARE @PredictionA DECIMAL(2,1) = 0.7;
DECLARE @PredictionB DECIMAL(3,2) = 0.65;

SELECT VarX, Correlation
FROM dbo.studies
WHERE Correlation > GREATEST(@PredictionA, @PredictionB);
GO
Here is the result set:
VarX       Correlation
---------- -----------
Var2              .825

(1 rows affected)
Columns, constants and variables
At times we may want to compare columns, constants and variables together. Here is one such example using LEAST:
CREATE TABLE dbo.products (
    prod_id INT IDENTITY(1,1),
    listprice smallmoney NULL
);

INSERT INTO dbo.products VALUES (14.99), (49.99), (24.99);
GO

DECLARE @PriceX smallmoney = 19.99;

SELECT LEAST(listprice, 40, @PriceX) as LeastPrice
FROM dbo.products;
GO
And the result set:
LeastPrice
------------
     14.99
     19.99
     19.99
Summary
GREATEST and LEAST provide a concise way to determine the maximum and minimum value, respectively, of a list of expressions.
For full documentation of the functions, see GREATEST (Transact-SQL) – SQL Server | Microsoft Docs and LEAST (Transact-SQL) – SQL Server | Microsoft Docs.
These new T-SQL functions will increase your productivity and enhance your experience with Azure Synapse Analytics, Azure SQL Database, and Azure SQL Managed Instance.
Providing the GREATEST developer experience in Azure is the LEAST we can do.
John Steen, Software Engineer
Austin SQL Team
by Contributed | Apr 22, 2021 | Technology
This article is contributed. See the original author and article here.
Initial Update: Thursday, 22 April 2021 20:45 UTC
We are aware of issues within Application Insights and are actively investigating. Some customers may experience intermittent inaccurate or missing data within the Live Diagnostics (also known as Live Metrics) experience.
- Work Around: None
- Next Update: Before 04/23 00:00 UTC
We are working hard to resolve this issue and apologize for any inconvenience.
-Saika
by Contributed | Apr 22, 2021 | Technology
This article is contributed. See the original author and article here.
Initial Update: Thursday, 22 April 2021 20:45 UTC
We are aware of issues within Application Insights and are actively investigating. Some customers may experience inaccurate or data gaps on Live Metrics Stream charts.
- Work Around: None
- Next Update: Before 04/23 00:00 UTC
We are working hard to resolve this issue and apologize for any inconvenience.
-Saika
![[Guest Blog] A Journey of Firsts in Mixed Reality](https://www.drware.com/wp-content/uploads/2021/04/fb_image-172-600x675.jpeg)
by Contributed | Apr 22, 2021 | Technology
This article is contributed. See the original author and article here.
This guest blog was written by Kimberly Castro, Program Manager in Microsoft’s Cloud + AI division. She shares about her career journey transitioning from the military into in the world of mixed reality as part of our Humans of Mixed Reality series.
I knew I wanted to be a part of Mixed Reality the first time I heard about it. I had just finished my interview loop with Microsoft when I heard that one more team wanted to talk to me before leaving. Shortly after, which actually felt like an eternity due to interview nerves, I was in a focus room with Miguel Sussffalich. After a few questions, he started telling me everything he could about the IVAS program.

Admittedly I was late to the game. I had never put on a VR/AR/MR headset, never heard of the HoloLens, and if I’m completely honest, I’d never used a Microsoft product aside from the Office Suite. You see, I grew up in an Apple household. You’re probably wondering how someone like me even managed to land an interview at Microsoft in the first place, especially coming from a rather non-traditional tech background.
After graduating from the University of Arizona in 2013, I enlisted in the Army as a Linguist. I spent the next two years learning Mandarin Chinese and eventually found myself in the Special Operations Command working Intelligence, Surveillance, and Reconnaissance (ISR) missions. After one more year, I started doing similar work at the NSA. At that point, I started seeing myself in a government contractor position once fulfilling my enlistment contract. It would’ve been an incredibly natural and easy transition to make. Not a whole year had passed when the Army said it was time for me to move again – my 7th move in 5 years. I was extremely frustrated to have to pack up my life and travel across the country again, but I had always wanted to spend time in the Pacific Northwest – and it ended up being my best move yet.
As the end of my contract was nearing, I received approval to participate in the Microsoft Software and Systems Academy (MSSA), a transition program for active duty military and veterans, which is essentially a C# bootcamp. Upon completing MSSA you are guaranteed a first-round interview in the form of a phone screening with Microsoft. I did well enough at the first round to be invited back to participate in a full interview loop.
I was sitting across from Miguel, learning about the IVAS program for the first time. He told me about a synthetic training environment where soldiers could practice clearing an enemy and a hostage-filled building safely and effectively. I was immediately transported back six years to basic training, where I first experienced the military’s Glass House training drill. Glass House is a generous term – in reality, it is just tape placed in a square on the ground, in a field, with a door-sized opening. “Rooms” were extended or added with more tape to alter the scenario, making an already limited training environment increasingly vague and less effective. You and your team members would have to imagine the walls, the roof, the enemy, the hostages, everything. The drill sergeants would yell out increasingly complex instructions, and eventually, your team would fail, reset, and try again. Of course, there was no way to know if you missed an enemy or pointed your weapon at a hostage or team member by accident, just whatever the drill sergeants could see. Additionally, with all the imagining that had to be done, it was impossible to realistically create the stress levels that an experience like that would entail in real-life. Essentially it wasn’t the best way to train, but it was all we had.
As soon as Miguel paused, I said, “Oh, this is going to save lives,” and from then on I was hooked.
I graduated from the MSSA program with offers from three different teams within Microsoft and an offer from another company. None of the other scopes of work came close to the experience I knew Mixed Reality was going to provide. So, in January of 2020, I joined the Delaware team as a program manager. I was just as excited as I was terrified. I was so sure people would quickly find out I was a fraud who tricked her way into Microsoft – over a year later, and I still have moments when I feel like this. I like to joke that it’s not imposter syndrome because I’m actually an imposter (I know, I know).
Within mere days of joining the team, I experienced my first hologram. A friend slapped a HoloLens 2 device on my head and showed me a bunch of cute animals dancing around. He explained that I could resize the figures and place them wherever I wanted in the physical space. I think I stayed in device for about an hour playing with everything I could; it felt like magic. I would’ve stayed for longer, but I suddenly remembered that I was in the middle of the dev space yelling out, “This is so cool!” every few minutes while people were working. To this day, one of my favorite things to do is run demonstrations to show off what is possible with Mixed Reality. I love seeing people experience the magic of their first hologram or surprising someone who has seen it all before by dropping them in the middle of New York City or the bottom of the Red Sea.
Another aspect I enjoy is customer focus and human-centered design. The infinite feedback loop and drive to figure out what someone needs, particularly when they themselves don’t know, really resonates with me. Accomplishing that gives me the same feeling as snapping the last puzzle piece into place; it’s a satisfying completion. This puzzle, however, is infinite.
The public sector has been the perfect place for me to dive in because I can really understand the user – after all, I used to be one. It’s incredibly comfortable to speak the same language as the customer, and I am so excited to have the opportunity to continue in this space. In the future, I would enjoy getting into the commercial and consumer or entertainment studios as well. I would love to help create something that furthers scientific research or builds something solely for a user’s enjoyment. Again, I love the public sector, it’s the perfect place for me to learn and grow, but I will want to take a step back from life and death situations one day.
It’s difficult to express how much I’ve learned over the last year and yet I know I’ve barely scratched the surface. I feel so privileged to work with artists, musicians, designers, and engineers every single day. I have never considered myself a creative type, but working in this space with these incredibly talented individuals has, for the first time, sparked a passion to create in my professional and personal life.
I hope you will discover an exciting new world with mixed reality too – the possibilities are endless!
#MixedReality #CareerJourneys
by Contributed | Apr 22, 2021 | Technology
This article is contributed. See the original author and article here.
By Masaki Iwamaru – Service Engineer | Microsoft Endpoint Manager – Intune
Box for EMM is an app for the iOS platform developed by Box Inc. The Box for EMM app is intended for enterprise customers with mobile device management (MDM) solutions such as Microsoft Endpoint Manager – Microsoft Intune. The app provides secure access to data in Box cloud storage workspace with iOS devices.
When you integrate Box for EMM app with Intune, you can apply app protection policies (APP). This will enable the data protection features of the app built with the Intune App SDK. You can control data transfer between apps, restrict copy-paste between apps, set access requirements, and force conditional launch settings.
This blog post provides you a step-by-step guide on integrating Box for EMM app with Intune.
Note
There is a separate Box app that can be used for both personal and enterprise use. This article focuses on the Box for EMM app, which has supported Intune since 2015. Both the Box for EMM and Box app can access the same cloud storage space provided by the Box EMM Enterprise workspace.
Steps to integrate Box for EMM with Intune
Step 1. Add and deploy Box for EMM app to your employees.
Deploy the app using Intune. If end users install Box for EMM from the App Store and you haven’t deployed it to users or devices, they will not be able to sign-in to the app because the required app configuration policy is not applicable (see step 2).
To add Box for EMM to Intune:
- Sign into the Microsoft Endpoint Manager admin center.
- Go to Apps > iOS/iPadOS.
- Select + Add, choose iOS store app from the dropdown list, and then Select.
- Select Search the App Store and enter Box for EMM.
- Select to add the app to Intune.
After you add the app to Intune, deploy it by assigning the app to users and devices. Learn more about deploying apps in this article.
Tip
You can also deploy the Box for EMM app that’s purchased through the Apple Volume Purchasing Program (VPP).
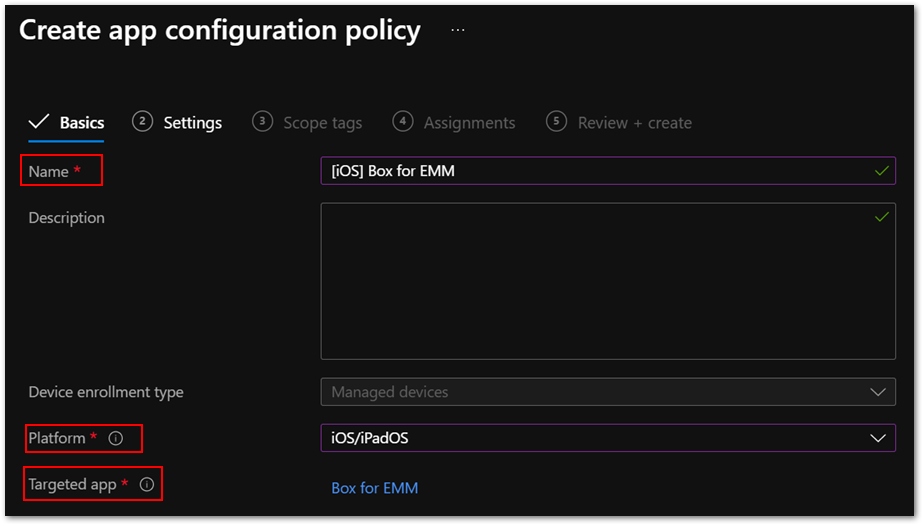
Step 2. Create and deploy an app configuration policy.
This is a required configuration for the Box for EMM app. Otherwise end users won’t be able to sign into the app.
- Go to Apps > App configuration policies to create an app configuration policy.
- Select + Add and choose Managed devices from the list.
Note
Be aware you need to create and deploy an app configuration policy using a managed device. Managed apps won’t work for the Box for EMM app.
- Enter a policy name in Name and choose iOS/iPadOS from the Platform list.
- For Targeted app, Select app, and then choose Box for EMM from the list.
Figure 1. Box for EMM policy in the Microsoft Endpoint Manager admin center
Go to the Settings tab.
Choose Use configuration designer from the Configuration settings format list and specify the following values from the XML property list.
Configuration key
|
Value type
|
Configuration value
|
Public ID
|
String
|
<The value provided by Box.com>
|
Management ID
|
String
|
AnyString
|
Intune Enterprise
|
String
|
1
|
com.box.mdm.oneTimeToken
|
String
|
AnyString
|
userprincipalname
|
String
|
{{userprincipalname}}
|
 Figure 2. App configuration policy settings
- Then deploy the policy to users and devices. These assignments are usually identical to the ones for the Box for EMM app.
Step 3. Create and deploy an app protection policy (APP) for the Box for EMM app.
You can create a new app protection policy for iOS and iPad operating systems (OS) or use an existing one. Here are a few best practices:
- Make sure that the Box for EMM app is included in the Targeted apps list of the policy.
- Set Target to apps on all device types to Yes in app protection policies to avoid misconfigurations. If you set it to No, you might need to deploy the IntuneMAMUPN key. This often overlooked by administrators, so I recommend setting it to Yes.
 Figure 3. App configuration policy settings
- Make sure the policy is assigned to the correct users. App protection policies should be assigned to users instead of devices.
Step 4. install the Box for EMM app to iOS/iPadOS using Intune.
Make sure both the app and the app configuration policy are deployed. You can check deployment status in the Microsoft Endpoint Manager admin center.
Step 5. Launch the Box for EMM app.
You will see the Microsoft Azure Active Directory (Azure AD) sign-in screen. The user name is automatically populated. It should be the same as the user who enrolled the device. Enter the password for the user and app protection policy will be applied. Then you will see an app restart request.
Step 6. Relaunch the app.
When you relaunch the app, it might ask you to set an app PIN. Then you will see a login screen for the Box for EMM app. Sign in with your Box account. Now you can use the app with Intune app protection.
Frequently asked questions (FAQs)
In summary, here are common issues to be aware of when you’re integrating Box for EMM app with Intune:
The Box for EMM app is not installed on iOS devices.
Make sure you assigned the app to the correct groups. You can check app installation status in Device install status in each app or Managed Apps in each device.
If you use VPP for app deployment, make sure the VPP token is valid, and you have enough app licenses.
App configuration policy for Box for EMM app shows Not applicable.
Ensure that the Box for EMM app is installed using Intune instead of the App Store.
Check that the app configuration policy targets the Box for EMM app that you are deploying. Sometimes it targets the incorrect applicationID of the same app name because you have multiple Box for EMM apps in the Microsoft Endpoint Manager admin center or you have deleted and re-added the app.
Note
The app configuration policy type should be Managed devices instead of Managed apps.
App protection policy is not applied after sign-in.
Make sure the policy is assigned to correct users. App protection policy should be assigned to users instead of devices.
Be sure that Target to apps on all device types is set to Yes.
It can take time for the policy to be applied if end users are signed-in to the app before the policy assignment. This article provides more information about expected policy delivery timing.
How can I get Public ID for my Box tenant?
Public ID is provided by Box, Inc. for your tenant. Contact Box support for this information
- Should I set up single sign-on (SSO) between Azure AD and Box service?
You can use Box for EMM features without SSO integration. While it is optional, SSO provides a simplified and excellent user experience. Check out this article to learn about SSO integration guidance.
I want to allow access with Box for EMM app only while blocking personal Box app.
You can use the iOS device restriction profile to hide and disable the Box for EMM app. The Show or hide apps setting is applicable only to supervised iOS devices.
There is also a setting for enabling and disabling Official Box Apps in Box Admin Console – Apps.
I want to disable Files app functionality on iOS devices to prevent unintended file sharing.
Intune doesn’t have this setting. There is a setting for disabling Files app functionality in Box Admin Console – Enterprise Settings – Mobile.
Are there recommended settings for the Box for EMM app?
The following recommended settings allow end users to open, modify, and save files directly in Box storage with Microsoft Office applications.
Setting name
|
Value
|
Send Org data to other apps
|
Policy managed apps with OS sharing
|
Receive data from other apps
|
All Apps with incoming Org Data
|
Save copies of Org data
|
Block
|
Allow user to save copies to selected services
|
Select locations you want to save org data into
|
We also recommend adding the following key/value pair in the app configuration policy.
Key
|
Value (is you’re using Intune as the MDM)
|
IntuneMAMUPN
|
{{UserPrincipalName}}
|
The actual value specified for the IntuneMAMUPN key depends on the MDM provider you are using. You can find examples of the value you should enter for a third-party MDM provider in this article.
More info and feedback
For further resources on this subject, please see the links below.
iOS/iPadOS app protection policy settings
Validate your app protection policy setup
Create and deploy app protection policies
Set up app protection policies for iOS devices
Let us know if you have any questions by replying to this post or reaching out to @IntuneSuppTeam on Twitter.
by Contributed | Apr 22, 2021 | Technology
This article is contributed. See the original author and article here.
Final Update: Thursday, 22 April 2021 17:34 UTC
We’ve confirmed that all systems are back to normal with no customer impact as of 04/22, 17:01 UTC. Our logs show that the incident started on 04/22, 16:11 UTC and that during the 50 minutes that it took to resolve the issue some of the customers might have experienced data access issues and delayed or missed Log Search Alerts in East US region.
- Root Cause: The failure was due to an issue in one of our backend services.
- Incident Timeline: 50 minutes – 04/22, 16:11 UTC through 04/22, 17:01 UTC
We understand that customers rely on Azure Log Analytics as a critical service and apologize for any impact this incident caused.
-Saika

Recent Comments