
by Contributed | Apr 27, 2021 | Business, Microsoft 365, Technology
This article is contributed. See the original author and article here.
Today, we’re pleased to announce that the Microsoft Office and OneNote apps are now available for Amazon Fire tablets in the Amazon Appstore. Combined with the Outlook and OneDrive apps already available for Amazon Fire tablets, these apps extend your Microsoft 365 benefits across even more devices. We’ve timed the release of these apps in…
The post Microsoft 365 apps now available for Amazon Fire tablets appeared first on Microsoft 365 Blog.
Brought to you by Dr. Ware, Microsoft Office 365 Silver Partner, Charleston SC.
by Contributed | Apr 27, 2021 | Technology
This article is contributed. See the original author and article here.
Today’s organizations are using multiple tools and environments for their day-to-day operation. As a result, many prefer a one central management system to operate their service across the stack. The integration of Azure Monitor Alerts with ITSM ticketing systems (e.g. ServiceNow) was created with this goal in mind.
Azure Monitor is a cloud-based offering that helps you to reliably monitor the performance and availability of your cloud services. Azure Monitor collects and analyzes telemetry from your cloud as well as on-premises environments. Azure Monitor alerts uses this data and gives proactively notifies you when a metric value or a log query result indicates a problem.
Why do we need integration between Azure Alerts and ITSM systems?
Integrating a monitoring and service management systems provides a single view of tickets/incidents in one central system regardless the underlying cloud technology. Thus, it enables a multi-cloud strategy of monitoring both cloud and on-premises services integrated with all the other monitored items in an organization.
When an organization has common processes and one unified KPI management system, they can operate across their stack view and improve per the operational and business needs.
How can we establish the integration between Azure Alerts and ITSM systems?
out of the various ways to integrate, in this article we will explore two integration options ITSM connector integration and logic app.
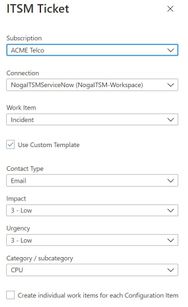
As a customer, you can select how you want to be notified about an alert using action group. Notification can go through email, SMS, Webhook or even an automated solution. You can also choose to use ITSM or a Logic app:
- ITSM Connector: ITSM connector lets you send alerts to an external ticketing system such as ServiceNow.
- Logic app: Logic apps let you write processing rules and use a built-in connector that will send the alerts to an external ticketing system such as ServiceNow.

What are the pros and cons for each option?
ITSM connector:
- Plug and Play: ITSM is a built-in solution within Azure Monitor, meaning that with a simple configuration you can send Azure alerts to the ticketing system.
- Bi-directional: The ITSM connector can also pull incidents and change requests from ServiceNow into an Azure Monitor Log Analytics workspace. This allows you to consume the data using Azure Monitor tools (for example using dashboard).
- Multi-Partners: The integration supports more than ServiceNow. It supports Microsoft System Center as well as BMC helix. The next generation of the integration is referred to as secure export.
Logic app:
- Flexible: Logic apps are more flexible. In the sense that you can define custom logic which builds a custom payload to send to ServiceNow when an alert fires.
- Complexity: The logic app rules can be very complex.
In conclusion, the main difference between the two is the robustness of the integration. ITSM is easy to use though albeit less flexible. Logic apps on the other hand are very flexible, but the configuration might be complex. As a customer, you need to define your priorities and evaluate which is the best solution for your organization.
by Contributed | Apr 27, 2021 | Technology
This article is contributed. See the original author and article here.
In Logic App, sometimes we need to merge two Json arrays into one based on reference ID.
The normal way is to iterate one array -> filter the items with same ID in another array -> insert the items.
But there’s another achievement to do it is using “Azure Monitor Logs” connector and pass arrays as dynamic content in the query which will be less time consumption and higher performance.
Background
In Azure Monitoring query, we can not only retrieve the data which stored in the database, but also pass dynamic content into it and convert it as data table.
https://docs.microsoft.com/en-us/azure/data-explorer/kusto/query/scalar-data-types/dynamic
Scenario
I have 2 Json arrays like following:
Array 1:
[
{
“@odata.type”: “#microsoft.graph.user”,
“id”: “e9b26715-b94e-xxxxxxxxxxxxxxxxx”,
“userPrincipalName”: “user2@xxx.onmicrosoft.com”
}
……
{
“@odata.type”: “#microsoft.graph.user”,
“id”: “8e98ee70-d769-xxxxxxxxxxxxxxxxx”,
“userPrincipalName”: “user3@xxx.onmicrosoft.com”
}
]
Array2:
[
{
“@odata.type”: “#microsoft.graph.user”,
“id”: “e9b26715-b94e-xxxxxxxxxxxxxxxxx”,
“displayName”: “user2”
},
……
{
“@odata.type”: “#microsoft.graph.user”,
“id”: “8e98ee70-d769-xxxxxxxxxxxxxxxxx”,
“displayName”: “user3”
}
]
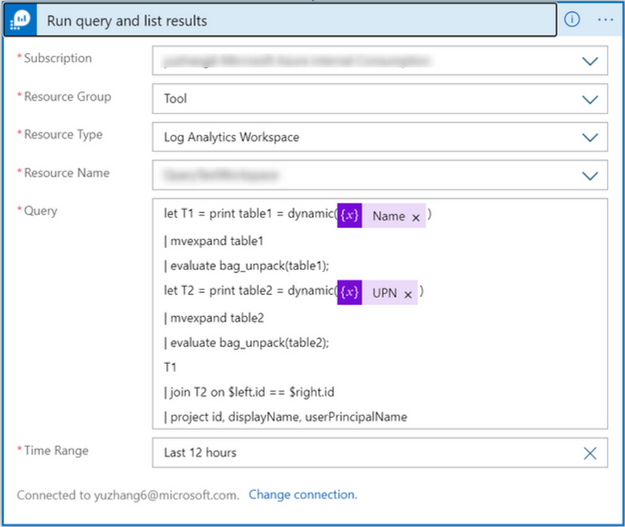
In this scenario, these 2 arrays need to be merged into one array which has id, displayName and userPrincipalName field.
We only need to create a Azure Monitor Log – Run query and list result action like following and pass these 2 json arrays as dynamic content:
After run the LA, we can get the merged array.

Limitation
The values of type dynamic is limited to 1MB, so this workaround not support for handling large size data.
by Contributed | Apr 27, 2021 | Technology
This article is contributed. See the original author and article here.
Guest post by Microsoft Customer Engineer, Daniele De Angelis.
It’s a pleasure to be here again on the ITOpsTalk.com  .
.
Recently I had the opportunity to try the Microsoft Universal Print, the new cloud printing service on Azure.
Today I want to share with you a possible scenario where you can implement and manage this new great Azure cloud service.
If you read multiple time this article here the fast link to the specifics steps:
UP Requirements.
STEP 1 – Assign Universal Print License to users.
STEP 2 – Install the UP Connector.
STEP 3 – Register the Printers.ms
STEP 4 – Share the Printers.
STEP 5 – Add Printers on W10 Clients.
Conclusions
SCENARIO DESCRIPTION
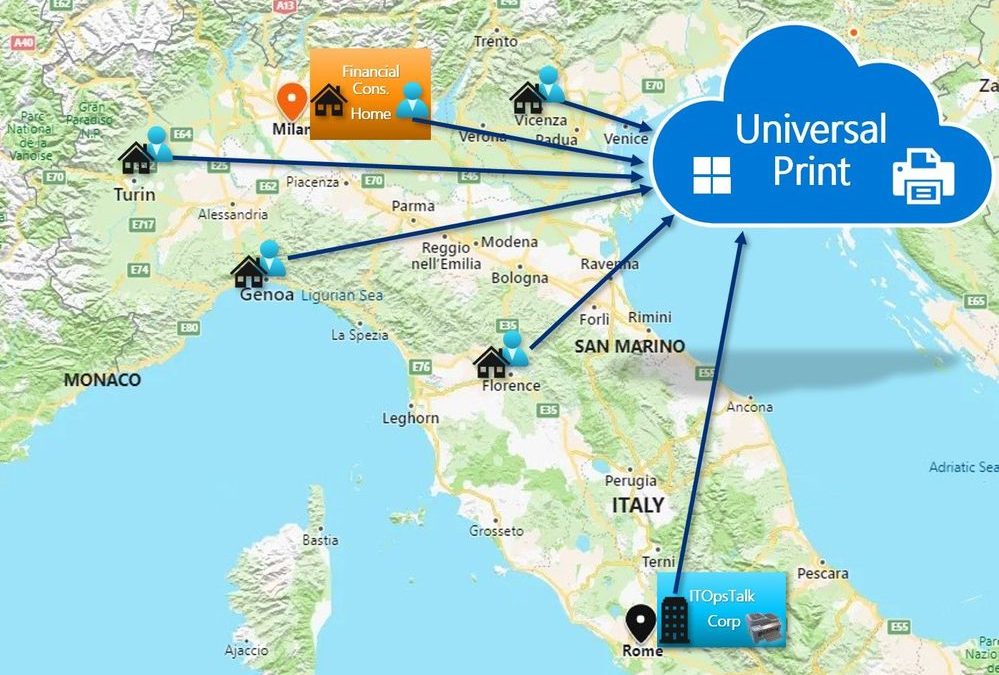
We have an enterprise company called “ITOpsTalk Corp.” located in Rome that actually have few peoples working onsite (the CEO is one of this peoples “the Capitan never leave the boat”) and many others instead are working from home. The IT department want to give the possibility to the remote users to print documents in the HQ in Rome by registering the printers located on the corporate print server to the cloud. Also the financial consultant of the company, located in Milan, is working from home and she is responsible to send to the CEO the Financial documents to sign, but how she can locate the printer in the CEO Office?
 Italy Map with the location of the remote users.
TECHNICAL DETAILS
The ITOpsTalk corp actually do not have Universal print compatible printers, but have standard network printers, also the IT department is using a Printer Server on Windows Server 2016 to centrally manage the the printers. All the remote users and the financial consultant are using a Windows 10 build 1909 joined to Azure AD in the ITOpsTalk Tenant.
 ITOpsTalk Copr Network Diagram.
UP REQUIREMENTS
- Cloud Requirements:
- W10 Clients Requirements:
- Build version 1903 or later required.
- An Internet Connection.
- Device can be AAD Joined or Hybrid AD Joined or AAD Registered.
- User Requirements:
- Connector Requirement:
Windows 10 64-bit, version 1809 or later (Pro or Enterprise)
Windows Server 2016 64-bit or later (Windows Server 2019 64-bit or later is recommended)
NET Framework 4.7.2 or later.
- A continuous connection to the internet.
Access to the following endpoints: *.print.microsoft.com ; *.microsoftonline.com ; *.azure.com ; *.msftauth.net ; go.microsoft.com ; aka.ms
Reference: Installing the Universal Print connector | Microsoft Docs
STEP 1 – Assign Universal Print License to users.
- Universal Print by default is included with business and educational Microsoft 365 and Windows 10 subscriptions, but you need to know that can also be purchased as a standalone license.
Subscription Type
|
Universal Print
|
Microsoft 365 Enterprise F3, E3, E5, A3, A5
|
Included
|
Windows 10 Enterprise E3, E5, A3, A5
|
Included
|
Microsoft 365 Business Premium
|
Included
|
Universal Print
|
Standalone
|
- In typical scenario the IT department can decide to create a Group or Dynamic Group to assign UP license to desired users in the company. To assign the UP (Universal Print) licenses you can use the Azure Portal or the Admin Portal or even the PowerShell.
From Azure portal ==> Azure Active Directory ==> Licenses ==> Select the desired licenses ==> Assign the Dynamic Group
 Assign license to Dynamic Group.
 Universal Print enable license.
- Remember: you need to assign also the UP license also to the Printer Administrators.
STEP 2 – Install the UP Connector.
Before we start this section, we need to answer to this questions:
- Why we need the connector? Because the customer do not have UP compatible printers but standard network printers.
- Were I need to place the connector? In this scenario the better place is the “Printer Server” because have the network visibility of the printers.
- I have a Linux Server can I install it on it? We ♥ Linux but some things need to done by Windows , so the answer is no.
Let’s start with the deploy of the Universal Connector:
- Download the Universal Print connector from https://aka.ms/upconnector. (this is a direct download link)
- Install the connector on the “Printer Server“:
 Universal Print Connector EULA.
 Universal Print Connector Installed Successfully.
- After the installation, we need to register the UP connector on Azure, and to do so we need a Global Admin or a Printer Administrator:
- Start the connector.
 UP Connector Desktop Icon
- Login with a Printer Administrator Credential in the tenant of the ITOpsTalk Corp.
 UP Connector Login.
- Insert a name for the connector and Register it on the Azure Tenant.
 UP Connector name.
- Now if we go to the azure portal, and from the global search we type “Universal print” under the resource menu we can find the connectors menu and here we can see the connector just registered.
 UP Connector on Azure Portal.
STEP 3 – Register the Printers.
- After complete the connector registration, we need to register the printers on the cloud by selecting it from the connector interface:
NOTE: You need to keep in mind that the connector is able to register only the printers that are visible as a “local printers“.  UP Connector register printers.
- Here you can see that one printers is registered and other two are in-progress.
 UP Connector register printer progress.
- After successfully complete the printer registration you need to remember to “Sign Out” from the connector but why?
The user account used to login in the connector, do not represent a service account used by the connector service visible in the Windows services, but will only be used to register the printers from the connector interface to the Azure tenant and managing it.
 UP Connector Register printers completed.
STEP 4 – Share the Printers.
- After completing successfully the printer registration, from the Azure Portal we are able to see in the Universal Print service, the registered printers:
 Registered printers on the Azure portal.
- Now we have two way to share the printers:
- Select multiple Printers and use the command “Share” to share immediately the printers with the same exact name of each printer and the same “Access Control” (this means the same users or groups that you will select will have access to the printers)
 Share multiple printers at the same time from the Azure portal.
- Or you can click on a printer name and from the command bar use the “Share Printer“:
 Share one single printer from the Azure portal.
In this way you can specify a different “Share Name” and specify different members for each printer share.
 Share Printer with a custom name.
As you can see with this share name “ITOpsTalk CEO Printer” the financial consultant is able to identify really fast the CEO Printer, but also only the Finance Team is able to print using this printer.
STEP 5 – Add Printers on W10 Clients.
Conclusions
Remember, we love the Azure Portal to configure printers/shares or even the access control, but when we have a huge numbers of printers we love much more the PowerShell module dedicated to Universal print:
Install-Module UniversalPrintManagement
PowerShell Module – Universal Print | Microsoft Docs
In my honest opinion I think that the Universal Print represent something really powerful for the customers that want to simplify the printing infrastructure (especially if you have Universal Print enabled printers), also I think that we are only at the beginning of this journey our Product Group is working really hard to expand the functionality of this service, and to provide us feedback please look below in the Reference section.
I really hope with that this article, if you already have subscription that include the Universal Print license, you will start from tomorrow to try to deploy this great service in your environment, starting always from a pilot and then expand it to all your enterprise.
Enjoy the Universal Print and please don’t have fear to ask me questions!
Official Reference.

by Contributed | Apr 27, 2021 | Technology
This article is contributed. See the original author and article here.
In this installment of the weekly discussion revolving around the latest news and topics on Microsoft 365, hosts – Vesa Juvonen (Microsoft) | @vesajuvonen, Waldek Mastykarz (Microsoft) | @waldekm are joined by MVP, PnP Team member, and Architect at US-based Sympraxis Consulting Emily Mancini |@EEMancini. Topics discussed in this session include: Sharing is Caring engagement model, Aligning and addressing the client’s business needs with capabilities of owned technologies, i.e., Microsoft 365 for making changes with the business and not to the business! Conscious/unconscious usage of the Microsoft 365 Maturity Model for business ROI maximization. Ideas for increasing diversity in IT personnel, Imposter Syndrome, Tech vs Outcome and Teams or Yammer.
Please remember to keep on providing us feedback on how we can help on this journey. We always welcome feedback on making the community more inclusive and diverse.
Covering also 23 articles from Microsoft and the Community.
This episode was recorded on Monday, April 26, 2021.
These videos and podcasts are published each week and are intended to be roughly 45 – 60 minutes in length. Please do give us feedback on this video and podcast series and also do let us know if you have done something cool/useful so that we can cover that in the next weekly summary! The easiest way to let us know is to share your work on Twitter and add the hashtag #PnPWeekly. We are always on the lookout for refreshingly new content. “Sharing is caring!”
Here are all the links and people mentioned in this recording. Thanks, everyone for your contributions to the community!
Events:
Microsoft articles:
Community articles:
Additional resources:
If you’d like to hear from a specific community member in an upcoming recording and/or have specific questions for Microsoft 365 engineering or visitors – please let us know. We will do our best to address your requests or questions.
“Sharing is caring!”
by Contributed | Apr 27, 2021 | Technology
This article is contributed. See the original author and article here.
Initial Update: Tuesday, 27 April 2021 07:04 UTC
We are aware of issues within Log Analytics and are actively investigating. Some customers may experience data access issues and delayed or missed Log Search Alerts in West US region.
- Work Around: None
- Next Update: Before 04/27 09:30 UTC
We are working hard to resolve this issue and apologize for any inconvenience.
-Soumyajeet

by Contributed | Apr 26, 2021 | Technology
This article is contributed. See the original author and article here.
As frontline workers increasingly interact with workplace applications using mobile devices, tablets, or other mobile form factors, organizations face higher risks of these devices being lost, stolen, or temporarily misplaced. Earlier this year, Microsoft announced new licensing options for organizations with frontline workers to address these potential risks and other security threats, while also helping improve compliance capabilities.
With these offers, organizations using Microsoft Surface devices can better protect their devices and data against attacks or accidents. With security capabilities built into the firmware, operating system, and Microsoft 365, Microsoft has taken a comprehensive chip-to-cloud approach to help organizations deliver more protection for employees using Surface devices with Microsoft 365.
Surface with Microsoft 365 provides unique protection at the front line. To provide a few illustrations of how devices may be vulnerable and how this new level of protection can support organizations and frontline workers, here are a few commonplace examples:
- Scenario 1: The device is stolen while it is momentarily unattended
- Scenario 2: A malicious actor gains access to a device for a short time
- Scenario 3: An employee accidentally visits a malicious website or unknowingly joins an unsecure Wi-Fi signal
Scenario 1: The device is stolen while it is momentarily unattended
A building inspector is on a job site and sets her Surface Pro 7+ down for a second while she checks a plumbing connection. Someone steals the device, hoping to find sensitive information or perhaps intending to sell the device to a highly capable hacker. The following protections built into Surface and in the cloud with Microsoft 365 help prevent a stolen device from compromising sensitive data:
- Data on the hard drive is encrypted. Surface devices ship with BitLocker drive encryption enabled by default, so the data on the hard drive cannot be accessed without credentials or the encryption key. Even if the hard drive is removed from the device and inserted into a new device, it cannot be decrypted.
- USB booting is prevented because the organization used Microsoft Endpoint Manager to proactively turned off the ability to boot from USB through the firmware-level control that the Surface device offers.
- There is zero access to data even if the SSD is removed. If a Surface’s removable SSD is tampered with, the device will shut off power, erasing any residual data in its memory. Since the device is cloud-managed, the organization can remote wipe all the machine’s contents .
Scenario 2: A malicious actor gains access to a device for a short time
A retail employee is helping a customer in the store when they both hear a loud crash. Another customer has knocked over a display accidentally. The employee puts down their Surface Pro X and rushes over to help. Seeing the device was not locked, someone takes the device. Later, they try to access data stored on the device. With Microsoft’s cloud security, the retail establishment’s data is protected.
- A Zero Trust approach means that even if a device is authenticated, the current user profile can only access data and content they have permissions for. The retail establishment assumes that a breach is always possible and maintains strict controls over data access. Conditional access capabilities in Microsoft 365 prevent data leakage from both internal and external actors.
- Any unusual behavior on the device is automatically detected and remediated with Microsoft Defender for Endpoint, which analyzes signals from the device to recognize any abnormal behavior, like an uncommon executable running on the device. As part of the remediation path, the device is automatically quarantined from the network until the situation is resolved.
Scenario 3: An employee accidentally visits a malicious website or unknowingly joins an unsecure Wi-Fi signal
An employee joins a public Wi-Fi network, which creates the potential for a malicious actor to collect sensitive information. Or maybe the employee accidentally clicks a link that installs malicious code on a device. Surface with Microsoft 365 can keep data secure in a few ways:
- Instead of worrying about encrypting data that could be shared on a public network, the organization takes a proactive approach to having a guaranteed secure connection, especially for employees in the field, by equipping frontline workers with LTE-enabled devices. The entire Surface 2-in-1 portfolio (Surface Go 2, Surface Pro 7+, Surface Pro X) has LTE available.
- Any websites, cloud resources, or internal networks not explicitly defined as “trusted” are contained with Microsoft Defender Application Guard. These untrusted sites or files are opened in a virtualized container – essentially a separate PC within the existing PC – to isolate those potentially harmful sites or files from the rest of the device.
In addition to the ways that Surface with Microsoft 365 can help keep frontline devices secure, with cloud management and Windows Autopilot, Surface devices can also be shipped directly to a worker’s location without IT ever touching the device, saving time and effort. As frontline workers increasingly use devices in public spaces, the need to protect sensitive information at the front line has never been more important.
To learn more about Surface for Business visit Surface.com/Business or connect with your local commercial reseller.

by Contributed | Apr 26, 2021 | Technology
This article is contributed. See the original author and article here.
Join us tomorrow Tuesday, April 27, 2021 from 10:00 AM – 1:00 PM PDT
This industry-focused CMMC readiness summit, part two in the series, is a 3-hour conference designed to bring together the defense industrial base and the greater government contracting community for new perspectives from leading technology vendors and government officials. It will include exclusive insights from Suzanne Spaulding, Senior Advisor to the Department of Homeland Security from CSIS, a “titan” cloud security panel that will address the need for transparency of CMMC controls, a DIY vs. managed solution approach, and leading government officials who stand at the forefront of cyber and national security. It is truly stellar packed with trusted advisors and industry experts who are leading the charge to educate toward early adoption.
PLUS, we’ll also have our trivia again which makes it all worthwhile!
Key Takeaways:
- How we are defending forward in 2021 with supply chain vulnerability and critical infrastructure in mind.
- How cloud adoption can accelerate your CMMC compliance strategy.
- “Who” to ask “what” and “when” for help – with the “why” and “how”: decisively and strategically making the necessary changes to align with CMMC, which is the foundation to defending your business.
- Key differences between soliciting a vendor and doing it yourself.
- What industry software giants advise in managed security tech stacks.
- Updated on key impacts of the Solar Winds and Microsoft Exchange attacks, and how we accelerate our readiness against future attacks of this magnitude.
Register and save a spot for this event here.
![[Guest Blog] Once an innovator, always an innovator](https://www.drware.com/wp-content/uploads/2021/04/fb_image-206.jpeg)
by Contributed | Apr 26, 2021 | Technology
This article is contributed. See the original author and article here.
This guest blog was written by Ivana Tilca, an Innovation Evangelist & Quality Manager at 3XM Group and Microsoft AI MVP from LATAM. She shares about her career journey, from aspiring to become a computer scientist, her experience at Microsoft, and how Mixed Reality changed her life.
This story is not just about a passion for technology, but also a story of grit and motivation.
Who am I? My Career Journey
My name is Ivana Tilca, from Latin America. I was born in Salta, Argentina, a city of five hundred thousand inhabitants located in the north of Argentina. As a child, I always felt an attraction for technology, which was not common in my city. At 16, it was clear that the career I wanted to pursue was computer science. In high school, my teachers used to ask me, “What career would you like to pursue when you grow up?”. My answer was always… “I want to study computer science and would like to work or be close to Microsoft.” Imagine the face of my teachers when a female student answered that. Well, why was that my answer? When I was 16 years old, my older brother showed me the movie “Pirates of Silicon Valley,” which tells the story of Bill Gates and Steve Jobs, and how they changed the world with technology despite all the rejection and problems they faced. I was deeply inspired by that story and how they overcome obstacles to solve problems and become successful.
I wanted to impact people’s lives, and I knew I could do it through technology.
My older brother, who was studying computer engineering at the time, suggested that I learn how to program and write code. In university, I started doing research about innovation, leading me to become a Microsoft student partner which gave me the wonderful opportunity to travel to events held in other universities and mentor students. I also competed at the Imagine Cup 2008 in Paris, France.
In 2011, to my excitement and delight, Microsoft Corp came to Brazil to recruit talent. One day, an email arrived inviting me to meet them in Rio de Janeiro and of course I accepted. In 2012, I fulfilled my great dream – I was able to finally experience working in Redmond at the Microsoft headquarters on the Office Web Apps team, and eventually ended up working for Microsoft back in Argentina as Technical Evangelist as well.
When I became a Manager
Finally, due to personal life situations, I made the difficult decision to leave Microsoft and started working as a developer in a company in the city of Còrdoba, Argentina. Then, I started to lead the quality area of 3XM Group and I put aside programming to focus on management. My passion for technology evolved into a passion for working with an amazing group of people.

I thought that the chapter on innovation had already finished in my life, but it turns out I was wrong.
During all that time I was in contact with who was always my role model, someone I like to call my “mentor”, Guadalupe Casuso Innovation Leader – Principal PM Autonomous Systems at Microsoft. At the beginning of 2019, she told me about a device that would completely transform my life.
How Mixed Reality changed my life
In January 2019, Guadalupe Casuso told me about Azure Kinect. She was testing the device with body tracking and depth. I also learnt a bit more about Microsoft’s vision for AI. At the time of having that conversation, Julia White had just presented at Microsoft Inspire 2019, where the creation of her hologram with real-time translation into another language was being spotlighted for the first time. I was hooked, listening carefully to digest all the details about how they managed to put together her hologram, using Azure Kinect, HoloLens 2, and Azure’s cognitive services.
I was so excited, and right there and then made it my personal goal to learn about this technology that was shown. I began to learn everything I could about this technology that was just emerging in Latin America. I remember that at that time, many people around me did not have much faith or believed that the world of holograms and AI existed. They saw it as something very distant or almost impossible to experience, especially due to the low availability of devices locally. I sought to become as skilled as I could in AI.
In February 2020, I received the Microsoft MVP award for Artificial Intelligence. I remember around the same time, I found Jesse McCulloch, Microsoft Program Manager of the Mixed Reality team on Twitter. He became a great resource for me from that moment on by introducing me the Mixed Reality Toolkit (MRTK). In 2020, the global pandemic and massive shift to working from home created the perfect excuse for me to finally devote more time to investigations and tests. This gave me the opportunity to participate in events worldwide, including the digital edition of Microsoft Ignite 2020. This visibility helped position me in the field of innovation, leading professionals and leaders from all over the world to contact me to help guide them in projects or research.
Companies worldwide also began to contact me to hire 3XM Group services to develop XR applications, which continues to surprise me. The field of application of XR is very broad – it includes health, safety, training, and there is more much to tapped on too. It really motivates me to keep working on this technology when a lot that companies begin to notice the potential of mixed reality and seek to apply it to positively impact and transform their business.
Finally this year, in 2021, I was given the opportunity to be interviewed live at Microsoft Ignite, and I was also named as Innovation Evangelist in 3XM Group. I fully credit all this to the fact that I regained my passion for innovation and for mixed reality technologies, where there is truly no limit for the imagination.

The future of Mixed Reality.
Extended reality is already here. I welcome you to connect with me on Twitter and share your experiences as well!
#MixedReality #CareerJourneys
by Contributed | Apr 26, 2021 | Technology
This article is contributed. See the original author and article here.
Need to share a video with AUDIO during a Microsoft Teams meeting? What used to only be possible in Windows, is now also possible in MacOS!
In this work from home tip, Jeremy Chapman, from the Microsoft 365 team, will show you how to “Include Computer Sound” while sharing your desktop or app windows using a Mac or PC. At the time of release, this is a Public Preview feature in Microsoft Teams for MacOS, so we’ll also show how to get that enabled if you don’t see the options demonstrated.
QUICK LINKS:
00:34 — Demo in Teams to Include Computer Sound
01:40 — Demo of Including Computer Sound after sharing desktop
02:20 — What to do if you don’t see the Include Computer Sound options
02:56 — Enabling Preview Features in the Teams Admin Center
03:21 — Closing remarks
Link References:
Find more shows in our work from home series at https://aka.ms/WFHmechanics
Unfamiliar with Microsoft Mechanics?
We are Microsoft’s official video series for IT. You can watch and share valuable content and demos of current and upcoming tech from the people who build it at Microsoft.
Keep getting this insider knowledge, join us on social:
Video Transcript:
Need to share a video with AUDIO during a Microsoft Teams meeting? Well, what used to only be possible in Windows is now also possible in MacOS. What I’ll show you today is currently in Public Preview, but depending on when you’re watching this, there is a pretty good chance you’ll see the controls I’ll demonstrate today in your Teams experience. If not, keep watching, and I will show you how to enable Public Preview, and if you don’t even see that, I’ll show you what your Teams admin needs to configure to make Public Preview available to you.
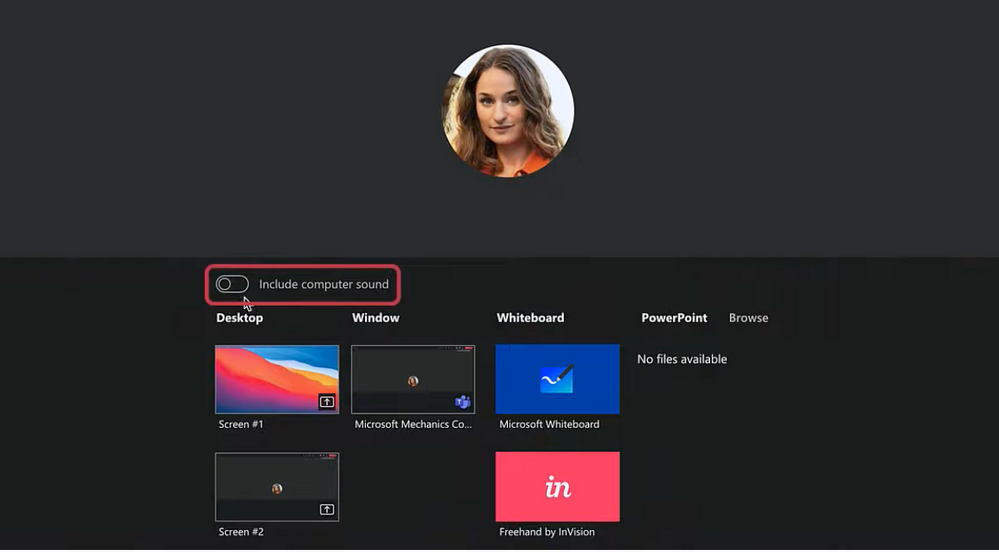
With that, let’s get started. I’m on a MacBook in a Teams meeting and I want to share a video running in YouTube, but this could anything or any app with sound running in a Mac or PC. When I hit the share tray, you’ll see I have the new option to “Include computer sound” that I can toggle on before sharing my desktop. So I’ll enable it, select my desktop in this case and hit play on my previous video explaining this process using Windows, which is by the way still more or less the same. Now let me switch over to Adele’s view and sound with the incoming audio, and you’ll hear the sound coming through.
One note here about my previous video, I said that MacOS will share audio without using this capability. That was true if audio is coming out of your Mac’s speakers. MacOS in this case is different from Windows, where Windows will usually succeed in noise-canceling speaker sound completely out. But this approach of sharing speaker audio doesn’t always work, if you’re wearing headphones, or just want the sound to be better than what you can achieve using the speakers and microphone pick-up. So, let’s switch back over to the Mac, and I’ll show you the second option to share or un-share computer sound during the meeting. If I move my cursor to the top of the screen, you’ll see another couple of screen sharing controls, I’ll pin this for now. Here I can use this little button between “Give control” and “Stop Presenting” to turn off or turn on sharing computer sound. The diagonal slash means it’s off and no slash means it’s on. Using that control means you don’t need to stop sharing, enable computer sound, then re-share your screen. Both of these control types are available in Windows and MacOS, so the same steps I just demonstrated apply to Windows as well. So now I’ll Leave the meeting.
OK, if you’ve made it this far and have realized this option isn’t available in your Teams app on MacOS, let me show you how to enable it. In Teams, click on your image in the upper right corner. Go to about, then if you DON’T have this checkmark next to Public Preview, click on it. Teams will ask to you restart the Teams app. Once you log back in, you’ll be on the Public Preview, then you should see the option to “Include computer sound” when sharing content. The very first time you try out that option on your Mac, it will ask you to install a driver, and after that it will work like I demonstrated earlier.
Finally, if you don’t even see the Public Preview option from before, that’s because your Teams admin doesn’t have this enabled in the Teams Admin Center. If you’re the Teams admin, you’ll find it under Teams, Update Policies, and “Show preview features”. Just turn that on, and you can scope it to only the users who really need it if you want — maybe that is your group of MacOS users — and they’ll see the options for enabling Public Preview appear soon.
So that was just another quick working from home tip, and to see more like this, check out aka.ms/WFHMechanics for more. Be sure to subscribe to our channel. And as always, thanks for watching!


Recent Comments