
by Grace Finlay | Apr 29, 2021 | Uncategorized
When developing a new website, your first consideration should be the website design. A good website design covers the functional as well as aesthetic aspects of a site. While there are many options for designing a website, choosing the right one is crucial to ensuring that your customers enjoy your website from the first time they see it.
A website design that offers a clean layout and consistent content will help customers maintain a positive user experience. In addition, a clean design makes it easier to follow your site’s progress and promotes the look of professionalism while appealing to the senses. A clean design also allows you to add additional functionality such as shopping carts and news feeds.
Responsive websites are gaining in popularity because they provide the best overall value proposition. By offering an expandable and versatile design that adjusts itself to the screen size of every user, you are offering a solution to two of the biggest frustrations of web admins today: namely, not enough space for content and too much space for advertising. Therefore, when choosing your website design partner, it is crucial to ensure that they offer your ideal content management solutions, including fully integrated SEO and fully-featured responsive web design and development. Your partner should be able to incorporate both SEO and responsive design seamlessly into your website design and development solution.
Another excellent website design tip is to choose a partner that offers full integration with social media platforms such as LinkedIn, Twitter and Facebook. Social media has exploded in popularity over the past few years and is now one of the most popular ways to reach potential customers. In addition, today’s social media platforms have millions of users globally. By having a social media interface integrate into your website’s design and development, you can significantly increase your exposure to prospective customers while at the same time optimizing your social media pages for search engines. Furthermore, by offering links to your social media pages on your website’s design and development pages, you can improve your overall search engine rankings and get great returns on investment.
The latest trends are focused on mobile devices such as tablets and smartphones. Smartphones have opened up a whole new world of connectivity and mobility, allowing users to access websites via their cellular phones wherever they may go. With this in mind, you should make every effort to ensure that your websites are accessible on these devices through a fully integrated or fully responsive web design and development. By doing so, you will give your current customers better usability and a more extensive base from which to explore your business and establish a positive brand presence.
When it comes to brands and promoting your products or services, social media is fast becoming the wave of the future. With the vast reach of social media, businesses can connect with their consumers in a completely natural way, thereby allowing them to form a unique bond. However, creating an online brand does not end at publishing blogs, uploading pictures, and sharing social media sites. The next step is to engage your audience and build a strong relationship through social media networking. To ensure that your website design and development optimize for social media, you should hire a professional SEO company to ensure that your brand stands out through a well-designed website design and development.

by Contributed | Apr 29, 2021 | Dynamics 365, Microsoft 365, Technology
This article is contributed. See the original author and article here.
Even with 195 countries across the globe, today, our world can feel like a small place. We live in a time when you can instantaneously communicate with people who are on the other side of the planet. The digitalization of commerce means that we can quickly buy goods from all over the world. And with teleconferencing, we can even purchase services globally without the additional cost of travel. As consumers, the web has drastically changed our expectations of how and where we can transact business. Whereas global expansion used to be for big multinational brands who had the resources to address the complexities of serving local markets, the internet has made globalization a must for companies of all sizes.
While global expansion has many strategic advantages, such as a broader reach, new suppliers, and more revenue streams, it also introduces significant complexity. Trying to compete online in foreign markets or open offices in new countries can make you quickly realize the vastness of our world. With different languages, currencies, date formats, time zones, regulations, laws, taxes, banking requirements, and cultural differencesyou need the right adaptation strategies to seize the opportunities provided by effective global operations. Learn what’s new in Microsoft Dynamics 365 Finance and Globalization in our product updates.
Simplify global operations
At Microsoft, we are helping companies by making it easier for businesses to manage complex global operations, expand more efficiently, and operate more effectively around the world. The Microsoft operations apps include built-in localization and regulatory support for 43 countries and regions and are translated into 48 languages, with partners worldwide providing additional localization solutions (over 50 plus localization extensions have been published on Microsoft AppSource). And with the 2021 release wave 1, we are doing even more to help organizations manage their global operations with global expansion support, new electronic invoicing, and tax calculation services.
Expand globally with more out-of-the-box localizations
We extended support to five new countries and regions in October 2020, and we will be adding support for Egypt in May. We will continue to expand our support for country localizations, targeting regulatory requirements and languages based on demand and market opportunities.
Go paperless with electronic invoicing
Many governments now require electronic invoicing as it reduces tax fraud and accelerates the invoicing process. Businesses are also moving to electronic invoicing as it lowers costs and reduces manual data entry while also improving traceability and reducing end-to-end processing time.
Electronic invoicing also allows companies to quickly adapt systems and processes to what can often be an ever-changing regulatory environment. As a means of digitizing tax and minimizing tax evasion and fraud, governments are increasingly implementing mandatory e-invoicing, forcing buyers and sellers to register invoices with tax authorities electronically when a transaction occurs. Whether you are entering new markets or evolving software to meet new government regulations, e-invoicing provides substantial benefits to your business.
The updated electronic invoicing will roll out for Dynamics 365 Finance, Dynamics 365 Supply Chain Management, and Dynamics 365 Project Operations with other applications to follow in subsequent releases. The new hyper-scalable multitenant service enables configurable formats, processing of electronic invoice documents, and configurable document exchange. The new service allows companies to:
- Provide a consistent experience in electronic invoice processing and exchange across different geographies.
- Quickly and cost-effectively configure and exchange electronic invoices in the required local formats for business-to-business and business-to-government transactions.
- Accelerate invoice delivery by going paperless, speeding up processes, and improving traceability with configurable electronic invoice documents and exchanges.
- Simplify adherence to the latest electronic invoicing standards in different countries and regions.
Learn more about how electronic invoicing expands capabilities for Dynamics 365 business applications, or visit our electronic invoicing overview.
Improve compliance with tax calculation
The digitalization of tax and the steady stream of indirect tax regulations that global businesses encounter, such as VAT and GST, have further complicated existing processes by introducing new industry and compliance risks that challenge leaders in every global enterprise.
Tax calculation allows you to improve compliance with associated local regulations. The new configurable microservice (preview) enhances the tax determination and calculation capabilities in Dynamics 365 Finance and Dynamics 365 Supply Chain Management. Tax calculation is fully integrated out-of-the-box and enables you to:
- Automate and standardize tax determinations and calculations across countries or regions.
- Utilize a configurable tax determination matrix and flexible calculation designer to configure and execute complex tax determination rules and calculations using formulae and conditions.
- Simplify compliance maintenance for local tax regulations.
Learn more about the tax calculation features in our tax calculation overview.
Meet changing global and local requirements
In addition to the e-invoicing and tax calculation requirements mentioned above, a multinational company must meet other country-specific laws and business rules in the areas of tax reporting, banking, business document formats, etc. Some of these are legally required, while others are adopted based on local business practices. Legal requirements are frequently changed by tax authorities, often with very tight law enforcement dates. The existing configurable Electronic Reporting and Business Document Management capabilities in the Dynamics 365 operations apps make it easy for companies to handle these types of requirements on a global scale. And because document and report template configurations for both inbound and outbound transactions are no-code or low-code, users can create customizations based on the industry-standard data models and adapt to changing legal or other local requirements quickly.
Easily support custom configurations
In the 2021 release wave 1, we also enhanced the Regulatory Configuration Service (RCS), our configuration authoring and lifecycle management service. This no-code or low-code service extends Electronic Reporting authoring and lifecycle management capabilities so that users can now:
- Create custom configurations for the new electronic invoicing and tax calculation microservices.
- More simply configure, set up, and manage multi-component globalization features.
- Publish, store, and share custom configurations in the global repository to simplify configuration management without requiring the use of the Microsoft Dynamics Lifecycle Services (LCS).
Better manage global operations and expansion
With expanded out-of-the-box global coverage and no-code or low-code globalization services within Dynamics 365 operations apps, businesses can manage the challenges of global operations and expansion more effectively. This enhanced flexibility allows you to quickly adapt to the unique needs of different markets at scale. Our customers and partners are using these services and capabilities to extend the standard functionality and have already created several thousand configurations for over 100 countries and regions.
Learn more about what’s new in Dynamics 365 Finance and Globalization in our product updates.
The post Reduce complexity across global operations with Dynamics 365 appeared first on Microsoft Dynamics 365 Blog.
Brought to you by Dr. Ware, Microsoft Office 365 Silver Partner, Charleston SC.
by Contributed | Apr 29, 2021 | Technology
This article is contributed. See the original author and article here.
The popular response to our call for stories at #ProudToBeCertified has been inspiring. Anyone who’s taken a certification exam knows that passing takes dedication and an intensive time commitment. That’s just one of the reasons why these personal stories are worth sharing. In the coming weeks, we’ll be highlighting how Microsoft Certification has encouraged and empowered so many people around the world.
The perks of certification
When you expand and maintain your career by getting Microsoft-certified, the opportunities that become available are enough to make anyone proud. It increases confidence, income, professional credibility, and happiness. A study by Pearson VUE found that 67% of technical professionals say certification builds confidence; about 35% of technical professionals say getting certified led to salary or wage increases; and 41% said they’re happier in their jobs.1
Organizations also benefit from continuous learning. IDC has found that trained and certified teams responsible for core IT activities are almost 20% more productive than less proficient staff, with Microsoft-certified IT professionals performing 26% better across all roles than uncertified IT professionals with the same responsibilities.2
In other words, certification is a great investment in yourself, and in your team. It’s a game-changer. As Microsoft MVP and Microsoft Certified Trainer Heather Serverino said in her Proud to be Certified story, “I can’t imagine what my journey would have been like had I not started with that first Microsoft Certification.”
Microsoft Certification benefits
When you, your team, and your organization maintain a culture that celebrates learning and achievement, everyone wins. Certification supports a forward-looking culture that values up-to-date knowledge and a constant striving for the next, most useful capabilities, not only as proof of skills and expertise, but with real benefits to individuals and companies.
Microsoft Certification helps you:
- Get recognized. Build confidence and be recognized as a leader, unlock new opportunities, and share your credentials with your professional network.
- Get ahead. Stay ahead of the curve, increase your productivity, and take your career to the next level.
- Get hired. Certified technical skills help you prepare for job opportunities by proving to employers you have the skills they want.
Microsoft Certification helps your organization:
- Increase performance. Certified employees are more productive, more efficient in their roles, and bring more creative solutions to complex technical problems.
- Increase value. Organization’s benefits include improved productivity, faster troubleshooting, and fewer skills gaps.
- Increase the talent pool. By simplifying talent identification and recruiting through certification you make your screening process easier.

This is just the start
When you check out the #ProudToBeCertified videos and stories, you’ll see that certification is a continual and rewarding journey. You might even be surprised by the opportunities certification has provided for individuals around the world. IT Consultant, MVP, and Microsoft Certified Trainer Akah Mandela Munab said in his story that certifications “opened doors to a large community where I could share my ideas and help others on their Microsoft Certification path.”
This is the first in a series of posts where we’ll be sharing the personal stories, business benefits, and latest insights on creating and maintaining a personal attitude of continual learning. Plus, we’ll highlight how organizational culture encourages and supports the extra effort and time it takes for every team member to keep advancing.
Already certified? We want to hear from you – because we believe the more professionals who share their accomplishments, the more encouraged others will be to join Microsoft’s growing community dedicated to continuous improvement. You are our certification community. Now, it’s time to celebrate it.
Watch more #Proud to be Certified videos and submit your story as a video or post on Twitter, LinkedIn, or your preferred platform with #ProudToBeCertified.
Related posts:
1Pearson VUE, “2018 Value of IT Certification”
2IDC white paper sponsored by Microsoft, “Benefits of Role-based Certifications,” June 2020
by Contributed | Apr 29, 2021 | Technology
This article is contributed. See the original author and article here.
As we approach the retirement of Skype for Business Online, we want to take a moment to appreciate the efforts organizations are making to complete their transitions to Teams prior to July 31, 2021, as well as those who have already upgraded to Teams. Thank you! If you still have Skype for Business Online users, keep working your upgrade plan. Regardless of the technical and change management dynamics with your upgrade, you can accomplish so much over the next three months.
What to expect as Skype for Business Online retires?
Skype for Business Online will be fully functional through July 31, 2021 to allow customers time to transition users to Teams or to an instance of Skype for Business Server. Here are some other details you should know about the Skype for Business Online service retirement:
Microsoft-assisted upgrades to Teams
In coming weeks, we’ll begin scheduling Microsoft-assisted upgrades to Teams for Skype for Business Online customers with cloud-only or hybrid deployments. Assisted upgrades help with last-mile technical steps of the transition to Teams. Customers will be notified through the Teams admin center and the Microsoft 365 Message Center, 90 days prior to the scheduled date of their assisted upgrade. Customers tracking to complete their transitions to Teams Only prior to their scheduled automated upgrade date are encouraged to do so for better control over the timing of their upgrade experience.
The duration of each customer’s upgrade will vary by volume of users and characteristics of their deployment, but generally users within a tenant will be upgraded within 24 hours from the start of the upgrade. During this time, users will still be able to access Skype for Business Online. Once the upgrade has completed and users log out of Skype for Business Online, they will only be able to use Teams to initiate and receive messages and calls as well as to schedule and host meetings. These users will be able to join a Skype for Business meeting scheduled by a user on Skype for Business Server or in a federated organization.
When the assisted upgrade completes, the coexistence mode for upgraded users is set to Teams Only. Admins should review Teams Only mode considerations prior to upgrade. Learn more about Microsoft-assisted upgrades to Teams.
Teams upgrade resources
Whether you’re at the start of your upgrade journey or are wrapping up, these resources can help guide your organization through its transition to Teams:
Additional guidance for customers with hybrid configurations
In the coming weeks, we will be sharing more retirement guidance for Skype for Business customers with hybrid (server + online) configurations.
See you in Teams!
by Contributed | Apr 29, 2021 | Technology
This article is contributed. See the original author and article here.
Click here to learn more about the agenda and presenters, and to register for this Microsoft Business Applications Summit (MBAS) event scheduled for May 4th, 2021.
https://mymbas.microsoft.com/sessions/777efc99-8bb4-48b1-a9fb-461375360b52?source=sessions
by Contributed | Apr 29, 2021 | Technology
This article is contributed. See the original author and article here.
Today we are very pleased to announce a new Windows Server base OS container image preview built from Windows Server 2022 with Desktop Experience. To try it out, on a Windows Server 2022 Insider Build 20344 as the container host, run this command to start:
docker pull mcr.microsoft.com/windows/server/insider:10.0.20344.1
The direct link of the image repo on Docker Hub is here https://hub.docker.com/_/microsoft-windows-server-insider/.
Why did we build this new image?
There are 3 Windows Base OS container images today that nicely cover the broad spectrum of customer needs: Nano Server – ultralight, modern Windows offering for new app development; Server Core – medium size, best fit for Lift and Shift Windows Server apps; Windows – largest size, almost full Windows API support for special workloads. Nano Server and Server Core container image adoption has been steadily growing and widely used for a while. In the last year or so, we are also seeing uptake of the Windows image adoption. Meanwhile, in the Windows Container community on GitHub and through our Customer Support, we have received feedback regarding constraints when using that Windows base OS container image. For example,
Some of the constraints are by design because that Windows container image is built from a full Windows Client edition and enabled to run on Windows Server. As we are committed to invest in the Windows containers business, we believe it is a right thing at this right time to build a new image based on a “full” Windows Server edition to enable more capabilities. “Full” in the sense that we choose to use the Windows Server 2022 with Desktop Experience edition. Some of you may refer this as “Server Core” + “Desktop UI” informally. That’s how this new container image was born and built. It will be added to all the relevant repos on Microsoft Container Registry (MCR) and Docker Hub pages. I should note, though this image is built from an edition with Desktop Experience, Windows containers today by design do not have GUI. That’s not changed with this new image.
What’s the name again?
Windows containers by themselves are not stand-alone products. They are considered features of Windows Server. Whatever name we choose needs to show that connection but also avoid potential confusion or duplication. That leaves us limited room for creativity  . As you can see, with the path on MCR, “mcr.microsoft.com/windows/server”, this image is referred as “Windows Server base OS image”, or just short like this, “Server base image”, or “Server image”.
What about this new image?
This new image will be available with Windows Server 2022 release only. For those of you who are using the Windows images from previous releases that are still in support such as Windows Server SAC v1809, SAC v1909, SAC v2004 and SAC v20H2, those images are not changed and have their respective support cycles. This new image is not available with those previous releases. We encourage you to adopt Windows Server 2022 and move to use this new Server image.
Here is a quick comparison between all the 4 images:
Container Image
|
Main Use Case
|
Compressed Size
|
Supported Versions today *
|
Windows Server 2022
|
Windows Server 2016, 2019
|
Windows Server SAC v1809**, v1909, v2004, v20H2
|
Nano Server
|
Mainly for modern apps such as .NET Core apps;
Limited App Compatibility
|
112MB
|
X
|
|
X
|
Server Core
|
Mainly for .NET Framework apps;
Better App Compatibility
|
1.2GB
|
X
|
X
|
X
|
Windows
|
Mainly for .NET Framework apps;
Best App Compatibility with by-design constraints
|
3.4GB
|
|
|
X
|
Server
|
Mainly for .NET Framework apps;
Best App Compatibility
|
3.1GB
|
X
|
|
|
Note:
* “Supported Version today” lists the Windows Server releases that the container image was or will be released and is or will be supported. For example, with the first row, it means, Nano Server image was released with Windows Server SAC v1809, v1909, v2004 and v20H2 releases and will be in Windows Server 2022 release. That list can change as some releases reach their end of support.
**In the release wave of Windows Server 2019 and SAC v1809, Nano Server container and Windows container images were only shipped as an SAC with 18 months support cycle. Based on customer feedback, last year we have extended Nano Server container in the SAC v1809 release to be supported for 5 years. This Windows container image currently will reach its end-of-life support (EOL) in May hence we will be sure to share the update on the extension in May before the EOL. On the other hand, Server Core container image in that release wave was shipped both as an LTSC and an SAC. In an oversimplified way, you can think all the 3 images released during Windows Server 2019 and SAC v1809 wave are now being made aligned to be supported for 5 years to Jan 2024. We understand this is a confusing topic. We’ll come back with details in future blogs.
What are the key benefits and capabilities of the new image?
Compared to the current Windows image:
- Size Smaller: slightly smaller, from 3.4GB down to 3.1GB.
- Performance and Reliability Improved: Over the years we have improved performance and reliability of the Server Core container images thanks to the large adoption internally and externally. This image inherits all the improvements from Server Core.
- LTSC Support from the get-go: we are planning to support this image as an LTSC with 5 years mainstream support.
- Server functionality: we are still validating so the list here is not complete but we expect this image will enable more Server scenarios/features.
- IIS Connection: as mentioned earlier, there was a 10 connection limit. This new image should no longer have this limit. We have customers validating with their scenarios.
- Web APIs e.g. Web Management Services (WMSVC): in that same GitHub issue related to IIS, it was reported this feature is not supported. We are yet to validate but we believe this should be supported.
- Fuller API support
OK, that’s interesting. How do I get started?
Step 1: Install a Windows Server 2022 Insider
To get started, you’ll need a Windows Server 2022 installation based on the Insiders preview build 20344. You can download the bits from the Insiders page here: Download Windows Server Insider Preview. Once you download the ISO (or VHD), create a new VM based on this image.
Step 2: Install Docker
Once you have a working Windows Server 2022 Preview deployment, follow this to install Docker:
Install-Module -Name DockerMsftProvider -Repository PSGallery -Force
Install-Package -Name docker -ProviderName DockerMsftProvider
Restart-Computer -Force
Once the machine is restarted, run ‘docker info’ to ensure Docker was correctly installed.
Step 3: Pull the new image
docker pull mcr.microsoft.com/windows/server/insider:10.0.20344.1
Step 4: Run the new image
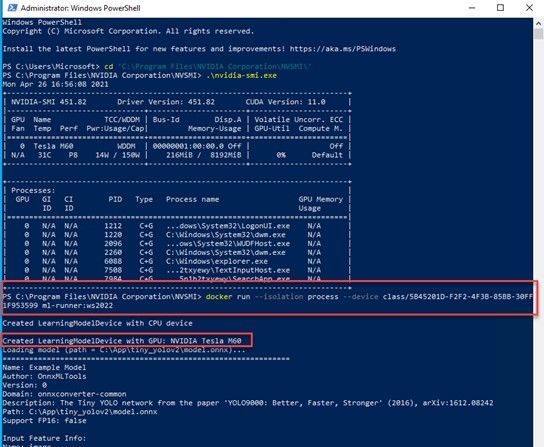
docker run -it mcr.microsoft.com/windows/server/insider:10.0.20344.1 cmd
Here is a screenshot for your reference:

Note:
- On a Windows Server host, containers are by default run in the process-isolation mode. You can find more at this doc page Windows Server Container Isolation Modes.
- If you would like to try out on a Windows 10 machine, please follow the instructions here Use Containers with Windows Insider Program. Be sure to use the latest Insider release. For example, I used a Windows 10 21364 Insider build. On a Windows 10 host, containers are by default run in the Hyper-V isolation mode.
References:
Closing
It’s been such a great journey since we started working on making this new image early this year. Your feedback really propelled us on the direction and innovations. We are so excited to share this with the community. We may get it right or we may get it wrong. Fail fast if needed. But we are in !
As always, we love to see you try it out, and give us feedback. You can share your feedback at our GitHub community, or contact us directly.
Weijuan
Twitter: @WeijuanLand
Email: win-containers@microsoft.com
by Contributed | Apr 29, 2021 | Technology
This article is contributed. See the original author and article here.
Hi all,
A customer of mine recently reported an issue that some workstations sporadically lock while the user is working and asked if we could figure out the culprit. Here is the story.
First let me mention that Konstantin Chernyi, a Microsoft CE colleague from Russia, contributed greatly here. So credits also go to him (thanks, Konstantin).
Before we start you need to understand a few basics. A workstation is usually locked by calling the User32.dll function User32dll!LockWorkStation (https://docs.microsoft.com/en-us/windows/win32/api/winuser/nf-winuser-lockworkstation). There may be other options but most applications rely on this function. LockWorkStation creates the LogonUI.exe process to display the Logon Screen and the Lock Screen (if configured). It’s also important to know the Lock events can be traced using the Microsoft-Windows-WinLogon provider. You can get a list of all installed providers by running the command
XPerf.exe -providers i
XPerf is a good choice to narrow down this type of sporadic issue. It supports circular file mode, which means it can overwrite old events to keep the file size at a specified maximum (important for long runs). It can also capture the stack to support stackwalking, so we can see functions that processes call (if symbols are loaded). XPerf is part of the Windows Performance Toolkit, which in turn is part of the Windows Assessment and Deployment Kit (Windows ADK). You can download the ADK here: https://docs.microsoft.com/en-us/windows-hardware/get-started/adk-install.
In Windows 10, Windows Performance Recorder (wpr.exe) is built-in and could be an alternative to XPerf (https://docs.microsoft.com/en-us/windows-hardware/test/wpt/author-a-custom-recording-profile). In this blog, however, I’m going with XPerf.
1. Create the trace
I asked the customer to run the following command in an elevated command prompt on a client that was affected by the sporadic locks:
xperf -on proc_thread+loader+profile+interrupt+dpc+dispatcher+cswitch -stackwalk profile+cswitch+readythread -buffersize 1024 -minbuffers 256 -maxbuffers 256 -maxfile 256 -filemode circular -start wl -on microsoft-windows-winlogon -buffersize 1024 -minbuffers 256 -maxbuffers 256 -maxfile 32 -filemode circular
This starts two ETW sessions: A kernel trace with some kernel providers to capture process and thread creation, image load and unload events, CPU samples, and the stack. The output file should stay at 256 MB (-maxfile, -filemode circular). The second trace captures events of the Microsoft-Windows-WinLogon provider which includes the Lock event.
After that the customer created a scheduled task, which triggers on the lock workstation event (luckily, we have this predefined trigger) with a delay of 3 seconds. This task runs the command to stop the trace and merge the trace files.
XPerf -stop -stop wl -d %TEMP%Lock.etl
Note that the two subsequent “-stop” are not a mistake. Remember that we created two ETW sessions?
2. Analyze the trace
To open the Lock.etl file, I use Windows Performance Analyzer (WPA). I originally worked with the Lock.etl file uploaded by the customer, but for this blog post I simulated this issue to avoid posting screenshots with customer data. The simulation was done by calling RunDLL32.exe User32.dll,LockWorkStation, which makes RunDLL32.exe the “evil” process.
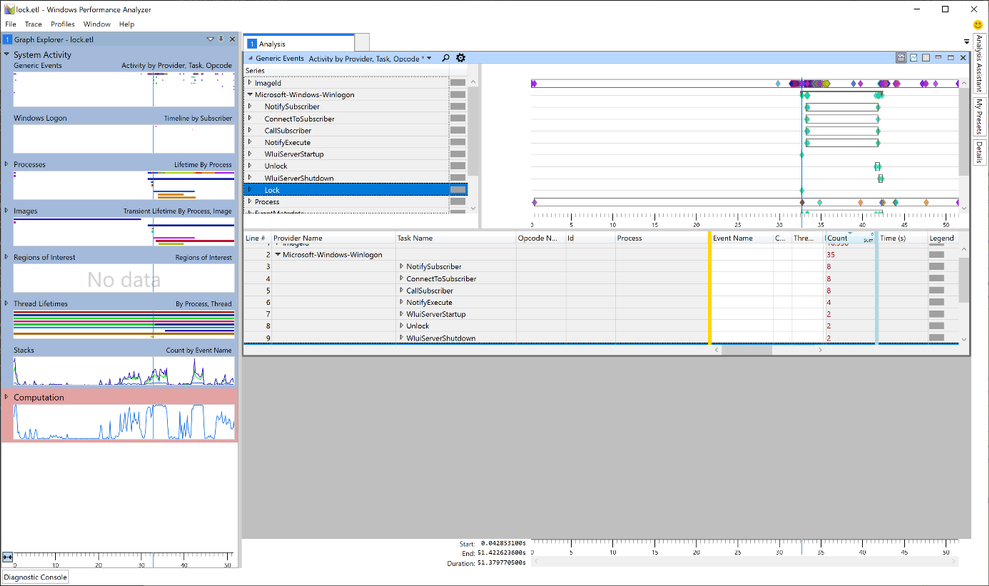
In WPA, I started with the Generic Events graph. Here we can find the event providers we traced next to the kernel trace (in our case the Microsoft-Windows-Winlogon provider).
Taking a closer look, we can see that the Lock event is also part of the trace (Yeah, we caught the fish). Now, as we learned earlier, we know that a workstation lock triggers the LogonUI.exe process so I tried to find the start of this process in WPA. For this, I needed another graph: Lifetime by Process.

The image shows the LoginUI.exe process in the timeline. The call to the LockWorkStation function must have happened shortly before the LogonUI.exe process was created. To get rid of unnecessary information we Zoom to the area starting at approx. 3 seconds before and ending about a second after the start of LogonUI.exe. I highlighted those 4 seconds in the graph, right-clicked in the highlighted section and selected “Zoom”.

Somewhere in this section the call to LockWorkStation happens. The “Transient” process list showed five processes were started within those 4 seconds. But it’s possible that a process started earlier than this zoomed-in-view made the call to User32!LockWorkStation. The processes started before the beginning of the zoomed area, are grouped into the “Permanent” Lifetime.

To finally find the caller to LockWorkStation I need to search the stack of all running processes (Permanent and Transient) for the expression LockWorkStation. To do this, I added another graph to view the stack: CPU Usage (Sampled). This new graph automatically adopts to the zoomed timeline and only displays processes running in those 4 seconds.

Now it’s time to load the debug symbols to. Otherwise we cannot search for the function name. I made sure that my PC had an Internet connection and, in the menu bar of the Windows Performance Analyzer, I clicked Trace -> Load Symbols. It could take a while when symbols are first loaded.

I highlighted the first line of the process table in the CPU Usage (Sampled) graph (to make sure to search all processes) and clicked on the small magnifier icon to open the search dialog. After that I clicked the three dots to expand the dialog and typed “LockWorkStation” into the field after “contains” (the query is constructed automatically so this box can be left empty).

Clicking “Find All” unmasked our culprit.

Rundll32.exe was quickly identified as the calling process. Handcuffs, conduct under escort. Case closed.
by Contributed | Apr 29, 2021 | Technology
This article is contributed. See the original author and article here.
Today, we are happy to announce that the Exchange Health Checker PowerShell script has a new home: it is now part of the Microsoft CSS-Exchange repository on GitHub!
With the new home comes a new versioning specification. Before the move, the version schema was structured like this:
MAJOR.MINOR.PATCH (e.g. 3.1.2)
The new version uses the following specification:
YEAR.MONTH.DAY.HOURMINUTE (e.g. 21.04.21.1135)
We auto generate the version number during our script build process. This will be updated every time we change any file that the Health Checker uses, to show the latest commit. Because the Health Checker is within a large collection of scripts, each release that is posted might not include a new change for the Health Checker.
We strongly recommend checking for a new version before running the Health Checker script to make sure to benefit from the latest checks and improvements. The script does the update check automatically in case the system has connectivity to the internet and tries to update itself independently.
If your system does not have any connectivity to the internet, simply download the latest version from: https://aka.ms/ExchangeHealthChecker.
We did lots of code optimizations with the latest version (initially released in November 2020). This code optimization makes it easier to add things to the main report output and the HTML report and helps keep them in sync. If you were running older versions of Health Checker, you (hopefully) noticed a large difference in the formatting output to help make the report look more organized and cleaner.
Please note that Health Checker no longer supports Exchange 2010 (End of Life since 10/13/2020). So, if you still running Exchange 2010 (or Exchange 2013 on Windows Server 2008 R2, talking about EOL products), you should move to a supported Exchange and/or operating system version or consider moving to Exchange Online.
A long-term goal is to have Pester testing being built with the script. The breakout of the script and new organization of code provides the foundation for unit testing with Pester. Results will be more efficient checks and fewer False-Positives (FP) / False-Negatives (FN), or bugs.
If you are interested to track our open work items, you can find them here.
Last but not the least, all scripts on Microsoft CSS-Exchange repository are digitally signed when they are released. You can verify the signature by running the Get-AuthenticodeSignature cmdlet. Example:
Get-AuthenticodeSignature -FilePath “C:TempHealthChecker.ps1”
Some of the checks performed by the Exchange Health Checker script
- General information about the server
- Server name
- Exchange version
- Build number
- Support state of the Exchange version in use
- Server role
- MAPI/HTTP status
- DAG Name
- AD Site
- Server maintenance state
- Operating system information
- Version
- Uptime
- Time zone
- Dynamic daylight time status
- .NET Framework version in use and recommended version
- Page file size and recommended size
- Power plan
- HTTP proxy settings
- Processor/Hardware Information
- Multiple information and recommendations for physical or virtual environments
- Processor recommendations
- Memory recommendations
- Network interface controller (NIC) settings, grouped by adapter
- Check if Visual C++ redistributable is current
- TCP KeepAliveTime configuration
- RPC minimum connection timeout settings
- LmCompatibilityLevel
- FIPS algorithm policy status
- CtsProcessorAffinityPercentage settings
- Credential Guard state
- TLS settings for TLS 1.0, 1.1 and 1.2 and check if the configuration is correct
- Certificates on the system and their validity (for example: lifetime, revocation status…)
- Certificate used in Auth configuration
- We check if Exchange Web App Pools GC server mode is enabled or not and display the state of each App Pool
- Exchange vulnerabilities and weak server configuration (for example: SMBv1 settings)
Roadmap… features to come
We are working on more features to make the Exchange Health Checker even better. Here are some of our major improvements which are in development right now and will be available in the Exchange Health Checker in near future:
- Include more documentation on GitHub pages as a one-stop shop (work in progress). GitHub pages will contain information about every check and cover the why, how the check is done, and how to resolve the issue (if applicable). They will also provide links to relevant Microsoft resources for each specific topic.
- Unit tests by using Pester framework.
- Provide the ability to pass multiple servers to the script (aka Pass Server List) instead of running the script for each server.
- Ability to write out a HTML load balancing report.
- Check for Exchange hybrid setup.
- Continue to add checks for additional cases that can be quickly collected.
I have some feedback for you. How can I get in contact with the developer team?
There are several ways to provide feedback. The best one is to file a work item (issue) on GitHub. Just go this way and let us know.
You can also drop us an email to: extoolsfeedback [AT] Microsoft [DOT] com
Finally, there is the comment section at the bottom of this blog post. In case of a feature request or issue report, options above are the fastest/best to bring those to our attention.
We hope you like our script, and we are looking forward to your feedback!
David Paulson and Lukas Sassl
by Contributed | Apr 29, 2021 | Technology
This article is contributed. See the original author and article here.
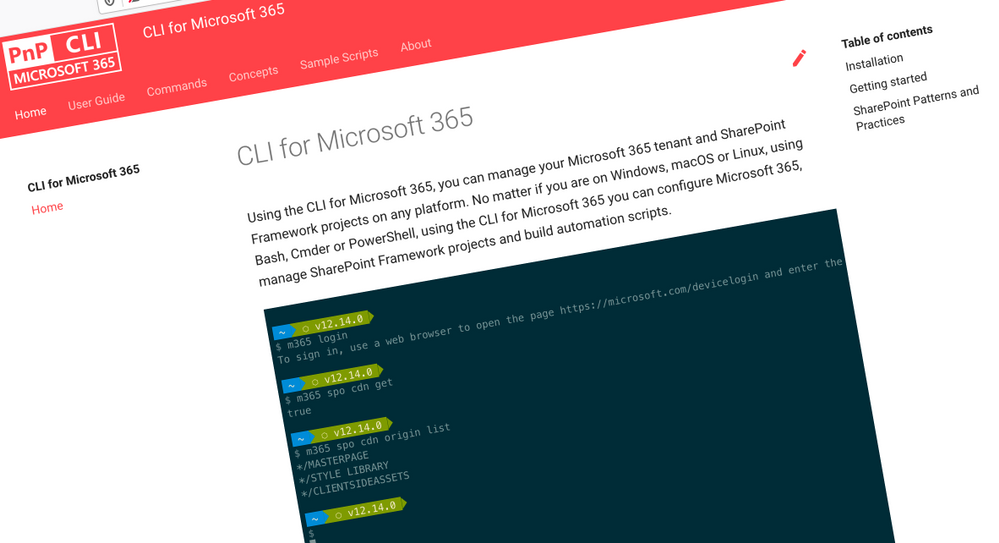
CLI for Microsoft 365
Manage Microsoft 365 and SharePoint Framework projects on any platform
CLI for Microsoft 365 is a cross-platform CLI that allows you to manage various configuration settings of Microsoft 365 and SharePoint Framework projects no matter which operating system or shell you use.
While building solutions for Microsoft 365 expands beyond the Windows operating system, managing many of the platform settings is possible only through PowerShell on Windows. As more and more users work on non-Windows machines, it’s inconvenient for them to have to use a Windows virtual machine to configure their tenants. With the CLI for Microsoft 365, you can configure your tenant no matter which operating system you use. Additionally, using CLI for Microsoft 365, you can manage your SharePoint Framework projects.
New version of CLI for Microsoft 365 – v3.9
Following our monthly release cadence, we’ve released a new version of the CLI for Microsoft 365 with some new capabilities. Here are a few of the most noteworthy additions.
Changes
We’ve continued improving CLI building upon the changes we’ve introduced in the previous version.
Support for upgrading SharePoint Framework (SPFx) projects to beta versions
With the new
public preview release of SharePoint Framework 1.12.1 and a new public quality assurance model that was announced with it, we are delighted to announce that we have added support for upgrading your SharePoint Framework projects to the latest beta release candidate.
To upgrade your SharePoint Framework project to the latest preview version, execute:
m365 spfx project upgrade –preview
As part of our beta release cadence, when new release candidates are made available in npm, we will release support for upgrading to that new version as soon as they are available.
Support for creating Azure Active Directory (AAD) applications from a manifest
As part of our efforts to make development easier in Microsoft 365, we have released support for creating Azure Active Directory application registrations from an app manifest file.
A typical scenario for developers and administrators is to create app registrations in the Azure Portal manually through the friendly user interface, however this can be time-consuming and error prone to repeat for multiple environments.
This update will enable you to copy the app manifest file that is generated in the Azure Portal and pass it into the command to confidently recreate app registrations.
m365 aad app add –manifest @manifest.json
Support for using relative URLs in SharePoint Online (SPO) commands
CLI for Microsoft 365 contains a number of commands for managing SharePoint Online. Each of these commands requires you to specify the site or web on which you want to execute the command. For example, to get information about a site collection located at https://contoso.sharepoint.com/sites/contoso, you’d execute:
m365 spo site get --url https://contoso.sharepoint.com/sites/contoso
If you executed an spo command previously, CLI for Microsoft 365 already knows the hostname of your SharePoint Online tenant. In such case, you can use a server-relative URL as well:
m365 spo site get --url /sites/contoso
If you try to use a server-relative URL but CLI for Microsoft 365 doesn’t know of your SharePoint Online URL yet, you will see an error prompting you to either use an absolute URL or set the SPO URL using the spo set command:
m365 spo set --url https://contoso.sharepoint.com
You can also execute a command like m365 spo site list that will automatically detect your SharePoint Online tenant URL for you.
To check if CLI detected the SPO URL previously, use the m365 spo get command.
Moved from adal-node to msal-node
CLI for Microsoft 365 up to this point has been using the Microsoft Azure Directory Authentication Library for nodejs (adal-node) for handling authentication requests between the CLI and Microsoft 365, however the ADAL library was put into maintenance mode and stopped receiving updates on June 30th 2020.
With this release we have moved to use the Microsoft Authentication Library for nodejs (msal-node) which replaces adal-node, ensuring that the CLI for Microsoft 365 is able to receive updates and take advantage of new authentication features added to msal-node going forwards.
New Commands
Add a role to a specified Azure Active Directory (AAD) app registration
Role-based access control (RBAC) is a popular mechanism to enforce authorization in applications. When using RBAC, an administrator grants permissions to roles, and not to individual users or groups. The administrator can then assign roles to different users and groups to control who has access to what content and functionality.
To add a role to the Azure AD application registration specified by its name, execute:
m365 aad app role add --appName "My app" --name Managers --description "Managers" --allowedMembers usersGroups --claim managers
Add a new Microsoft Planner plan
All teams need to track tasks, a quick and easy way to do that in Microsoft 365 is to create a shared plan in Planner to manage and assign those tasks to team members.
To add a new Microsoft Planner plan to a Microsoft 365 Group, execute:
m365 planner plan add --title "My Planner Plan" --ownerGroupName "My Planner Group"
Add a specific application permissions to a SharePoint Online site
On Feb 11, Microsoft announced support for resource-specific consent in SharePoint via Microsoft Graph in this release we have added a new command to support adding permissions to SharePoint Online sites.
To add a specific application permissions to a SharePoint Online site, execute:
m365 spo site apppermission add –siteUrl https://contoso.sharepoint.com/sites/project-x –permission read –appDisplayName Foo
Return the User Profile properties of a specific SharePoint Online user
To return the user profile properties of specific user, execute:
m365 spo userprofile get --userName 'john.doe@mytenant.onmicrosoft.com'
Create the Microsoft Viva Connections desktop app package to upload to Microsoft Teams
Microsoft Viva Connections was the first part of the Viva Employee Experience features to be be made Generally Available to all Microsoft 365 tenants on 31st March 2020, however to enable Viva Connections in your tenant a number of deployment steps that needed to be followed, which includes the creation of the desktop app package that is deployed to Microsoft Teams. So we have added a new command which simplifies the creation of this app package for you.
To create the app package, execute:
m365 viva connections app create --portalUrl https://contoso.sharepoint.com --appName Contoso --description "Contoso company app" --longDescription "Stay on top of what's happening at Contoso" --companyName Contoso --companyWebsiteUrl https://contoso.com --coloredIconPath icon-color.png --outlineIconPath icon-outline.png
To upload the app package to your Microsoft Teams app catalog, execute:
m365 teams app publish --filePath ./contoso.zip
New script samples
CLI for Microsoft 365 is a great tool both for quick adjustments to the configuration of your Microsoft 365 tenant as well as automating more complex tasks. Because CLI for Microsoft 365 is cross-platform you can use it on any OS and in any shell. To help you get started using the CLI for Microsoft 365 for automation scenarios, we started gathering some sample scripts.
If you have any scripts that you use frequently, please share them with us so that we can learn more about the common automation scenarios.
Cleanup completed Microsoft To Do tasks
Microsoft To Do is the go to personal task management tool of choice in Microsoft 365, however completed tasks can sometimes get in the way.
Create a Microsoft Teams team and bulk add members from CSV file
Microsoft Teams is core to collaboration in Microsoft 365, but creating several teams and adding new members to those Teams can be time consuming.
Setup an example SharePoint Online site
When creating SharePoint Online sites, generally you want to make some immediate changes after its creation.
Upload local files and folders to SharePoint Online
Bulk add members to Microsoft Teams team from CSV file
Copy files to another SharePoint Library in another site
This script helps you copy files across different sites in SharePoint Online, it shows you how you can copy all files and folders from source library to a different library in different SharePoint site keeping the same folder and subfolder structure and copy all files from all folders and subfolders from source library to a different library to a root folder in different SharePoint
Remove a Site Collection Admin User from all Site Collections
When employees leave organisations or change job roles it is important that access is removed where it is no longer required.
Replace an owner in a Microsoft 365 Group or Microsoft Team
Add a SharePoint Site Collection Administrator using CSV file
Contributors
This release wouldn’t be possible without the help of (in alphabetical order)
Thank you all for the time you chose to spend on the CLI for Microsoft 365 and your help to advance it!
Work in progress
Here are some things that we’re currently working on.
More commands, what else
Microsoft 365 is evolving and new capabilities are being released every day. With CLI for Microsoft 365, we aim to help you manage your tenant on any platform in a consistent way, no matter which part of Microsoft 365 you interact with. While we keep adding new commands to CLI for Microsoft 365 each release, we still barely scratched the surface with what’s possible in Microsoft 365. In the upcoming versions of the CLI for Microsoft, you can expect us to add more commands across the different workloads in Microsoft 365.
Improved managing SharePoint pages
Microsoft keeps investing in modern SharePoint pages continuously introducing new capabilities to let us publish rich content. We’re looking into extending our support for managing modern SharePoint pages to let you use them to their full potential.
Improved creating Azure AD apps
Recently, we’ve introduced a command to easily create Azure AD app registrations. Because they’re backbone of every app you’d build on Microsoft 365, we think you should be able to create them as easily as possible. So with CLI for Microsoft 365, you can create a fully configured Azure AD app for the most common scenarios with just one line of code.
In the future versions of CLI for Microsoft 365 you can expect us extend the capabilities with additional scenarios and features supported by Azure AD.
Script examples
In every release of the CLI for Microsoft 365, we introduce new commands for managing Microsoft 365. With over 350 commands across the different Microsoft 365 services, the CLI for Microsoft 365 has become a powerful tool, not just for managing your tenant but also for automating your daily work.
We’d love to show you how you can use the CLI for Microsoft 365 to build automation scripts in PowerShell Core and Bash. If you have any scripts using SPO or PnP PowerShell that you use frequently, please share them with us so that we can learn more about the common automation scenarios.
‘ensure’ commands
We’ve just shipped our first ensure command – an easy way to help you that a site with specific settings exists. If it doesn’t, CLI creates it for you, if it does, CLI ensures it has the right properties. All in one line of code. We’d love to hear from you how you like it and if it’s something you’d like us to implement for other commands as well.
Try it today
Get the latest release of the CLI for Microsoft 365 from npm by executing:
npm i -g @pnp/cli-microsoft365
Alternatively, you can get the latest release from Docker by executing:
docker run --rm -it m365pnp/cli-microsoft365:latest
If you need more help getting started or want more details about the commands, the architecture or the project, go to aka.ms/cli-m365.
If you see any room for improvement, please, don’t hesitate to reach out to us either on GitHub or twitter.
by Contributed | Apr 29, 2021 | Technology
This article is contributed. See the original author and article here.
It is always interesting to hit the wall with limitations when you are working with Power Automate. Some limits are due to licensing but some are due to other good reasons. I was running a PoC where a person interacting with a Power Virtual Agent bot required to do actions on behalf of that person. And after digging some information out (Thank you @Tomasz for helping there! ) it was clear that I had reached the wall when I was trying to make my little bot to set up Out of Office for the interacting user. Using the Office 365 Set Automatic Replies action always works on the connection user only. And since you can not act on behalf of that user it required to go beyond the wall and say “there is no spoon”. And I found it there wasn’t a spoon- just the miracle world of Graph API.
From that phase I advanced to create
- Azure Logic Apps that uses Graph API to set the Out of Office / Automatic replies to a specific user.
- Setting up a Azure API Management service so that Azure Logic App can be called from the Cloud Flow running inside Power Virtual Agent – and still keep on using standard licensing (no need to go to premium)
First it was necessary to create the Azure App Registration (applicationid, secret) with suitable set of API permissions. After that it was all about figuring out the Graph API call & JSON to set the Automatic Reply / Out of Office. Read the documentation (& about permissions) from Docs here.
Next I built a Azure Logic Apps that uses HTTP Request trigger (get) to retrieve user email and number of away days in parameters.

This is the format to exclude parameters from the GET request. triggerOutputs()[‘queries’][‘FileID’]
After those steps I have user email and number of days that needs to be set Out of Office. I returned the HTTP-request and prepared variables with Application ID, TenantID and App Secret information to be able to call Graph API with application permissions.

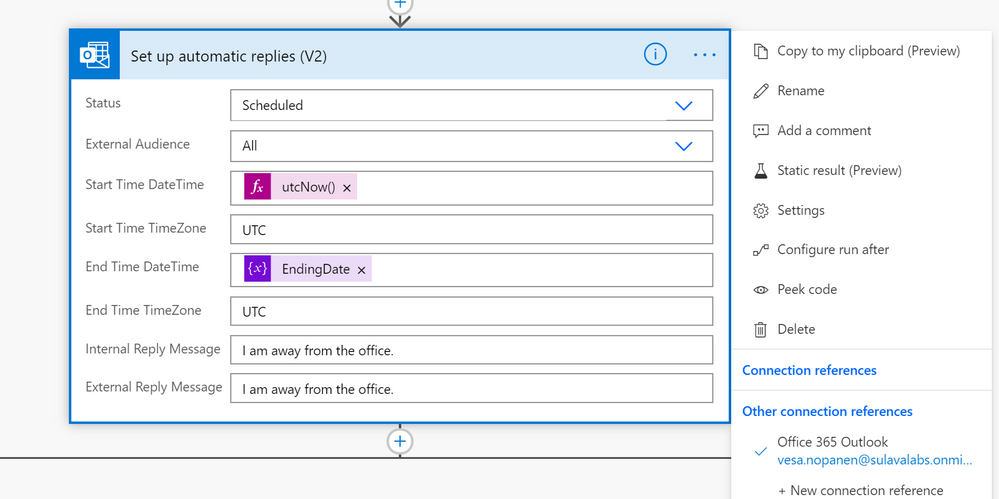
The key is of course setting the Out of Office information JSON.

The Graph API call URL and example JSON I used to test this are:
https://graph.microsoft.com/v1.0/users/useremail/mailboxsettings

{
    "@odata.context": "https://graph.microsoft.com/v1.0/$metadata#Me/mailboxSettings",
     "automaticRepliesSetting": {
     "externalAudience": "all",
      "externalReplyMessage": "I am away from the office. ",
      "internalReplyMessage": "I am away from the office. ",
      "status": "Scheduled",
      "scheduledStartDateTime": {
          "dateTime": "2021-04-17T18:00:00.0000000",
          "timeZone": "UTC"
        },
       "scheduledEndDateTime": {
          "dateTime": "2021-04-18T18:00:00.0000000",
          "timeZone": "UTC"
        }
  }
}
Then it was just the case of patching the information

The next step was to create the Azure API Management Service and define the API call there. There are two ways to handle the information transportation: in the body (as JSON) or as parameters. I put the Username and Days in this Proof of Concept to parameters.

For how to create and set up Azure API Management you can find information in this URL. It is good to keep in mind that Azure API Management has a cost involved – it is not a free one. I created the one with Developer (No SLA) tier to keep costs lower. And it still estimated to be over 40€ per month. For production use the price will be higher.
Another alternative would have been to put the “set these to Out of Office” information to a SharePoint List (for example) and use a Azure Logic Apps trigger to read that list and make those API Calls. That would have some delay, but since Out of Office is rarely requiring an instant response it would be a better one for the real world scenario in this case. However if you are already using Azure API management then using it for this as well is a good idea. But setting it up solely for a single purpose does not get a good ROI for most cases.
After setting the API up into the Azure you can export it directly to the Dataverse for Teams environment – so it is there for the bot to use without any Premium licensing.


When adding an action to your Cloud Flow in the Dataverse for Teams environment where your bot runs you can find the custom action in the menu.


Cool – what about the test-run side?
And when running this one from the PVA of the acting user I can see the results via Teams easily


There are of course other steps as well in that PoC conversation & flow but setting up the Out of Office proved to require a bit more steps than I originally thought. I have to say that this was also a great learning experience about updating user mailbox settings via Graph API and as well about using Azure API management to create a custom connector to Power Automate.
With Azure API Management & Graph API you can quite easily go beyond the walls what you have with Dataverse for Teams bots and applications.
This article is a repost of my blog post in my own blog at MyTeamsDay.Com.

Recent Comments