by Contributed | May 18, 2021 | Technology
This article is contributed. See the original author and article here.
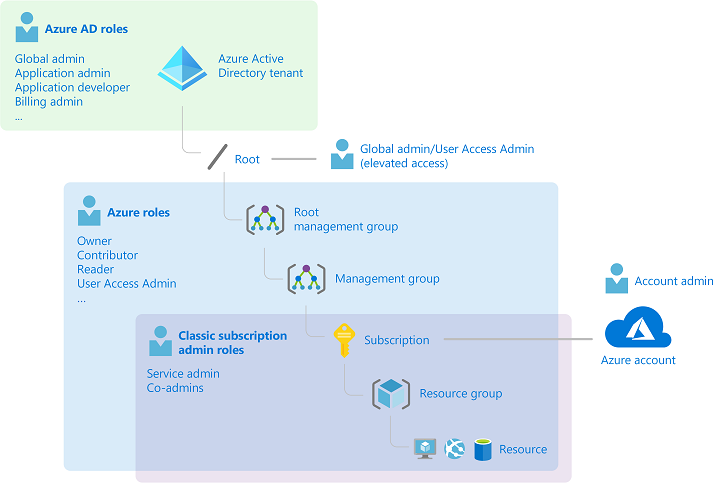
If you peek inside your Microsoft Azure environment, you’ll see two different kinds of roles – Azure roles and Azure AD roles. Lets see how Tailwind Traders matches these roles to maintain their “least privilege” security principle.
Understanding the Microsoft Azure environment
When Tailwind Traders creates their first Microsoft Azure account, they receive an environment (also known as a tenant or tenancy) which contains:
- One Azure Active Directory, with the user account for the owner of the environment.
- One subscription, which is the billing entity for the resources they will create. This could be a trial or free subscription, an offer subscription like the Azure benefit for Visual Studio, an organization’s Enterprise Agreement subscription or a Pay-as-you-go subscription with your nominated credit card.
From here, they will create other Azure users inside Azure Active Directory, as well as other types of identities such as service principals, and they’ll add their domain name to this directory. They might even use this directory to synchronize accounts from an existing on-premises Active Directory environment. And they’ll create Azure resources (virtual machines, storage and networking, functions, AI & machine learning applications etc.) inside their subscription.
They may also create other directories and other subscriptions, but for now we’ll keep it simple at just one of each.
Organizational decisions regarding roles and access
Tailwind Traders always works on a “least privilege” principle – that is, all users have the lowest access rights needed to do their jobs. If someone works in a Helpdesk, they should be able to check that Azure resources are functioning and healthy, to help them troubleshoot problem calls, but they shouldn’t be able to create new resources inside Azure. In addition, some people in the Helpdesk are allowed to reset user passwords. Mapping these job functions to access requirements may be something that Tailwind Traders has already completed for their existing non-Cloud systems, that needs extending into Microsoft Azure.
Exploring the roles and their functions
AD roles
Starting with access to their Azure resources, Tailwind Traders reviews which of the built-in roles will give their Helpdesk staff the appropriate level of access. A role is made up of a name and a set of permissions. Each resource contains an Access Control (Identity and Access Management) blade which lists who (user or group, service principal or managed identity) has been assigned to which role for that resource. Resources can also inherit these role-based access control settings from their parent resource group, subscription, management group, Azure policy or blueprint.
The four fundamental roles are:
Owner – Full rights to change the resource and to change the access control to grant permissions to other users.
Contributor – Full rights to change the resource, but not able to change the access control.
Reader – Read-only access to the resource
User Access Administrator – No access to the resource except the ability to change the access control.
There’s also an extensive range of other, more detailed built-in roles that Tailwind Traders can use for specific resource types and work tasks. For example, the Virtual Machine Contributor can only manage Azure virtual machine resources and cannot change storage accounts. Tailwind Traders can also create their own custom roles.
For our Helpdesk scenario, Tailwind Traders will assign the Helpdesk Staff group to the Reader role.
For a full list of the built-in roles and their permissions, visit Azure built-in roles.
Learn more about custom roles.
Note: Role-based access control applies when someone tries to action a task against a resource using a method that hits the Azure Resource Manager. This does not apply to settings inside a virtual machine operating system or to application access.
Azure AD roles
Azure Active Directory has its own, unique set of roles, specific to identity and billing management. This means that Tailwind Traders can control who has permission to make changes to these tenant-wide components, without needed to grant them access to other Azure resources. There’s also a cross-over here with Microsoft 365, which uses Azure Active Directory as its Identity directory. These roles will be familiar to users of the Microsoft 365 Admin Center.
The Azure AD roles include:
Global administrator – the highest level of access, including the ability to grant administrator access to other users and to reset other administrator’s passwords.
User administrator – can create and manage users and groups, and can reset passwords for users, Helpdesk administrators and User administrators.
Helpdesk administrator – can change the password for users who don’t have an administrator role and they can invalidate refresh tokens, which forces users to sign back in again.
Billing Administrator – can make purchases and manage subscriptions.
For Tailwind Traders, the built-in Helpdesk administrator role is perfect. An advantage of using a built-in role is that it is maintained by Microsoft – if a detailed permission has a name change, for example, Microsoft will update all the built-in roles that have it listed, to match. In addition, users can have both Azure roles and Azure AD roles, giving them access to user administration and to Azure resources.
For a full list of Azure AD built-in roles visit Azure AD roles or learn how to create and assign a custom role in Azure Active Directory.
Azure roles and Azure AD roles mapped to Azure components
What about temporary elevated access?
Late one night, the helpdesk gets a call that a system is unavailable. On checking, there are some monitoring alerts that point to an Azure virtual machine that is currently stopped. A quick phone call to the sleepy Level 3 support tech and “try starting it” is the suggested approach. It would be great if the Helpdesk person could start the VM but that would require access that’s greater than their current Reader role, but only for the time needed to try starting this virtual machine.
This is possible, if Tailwind Traders uses a feature of Azure AD Privileged Identity Management (or PIM) known as Just in time administrator access (JIT). Learn about the license requirements to use Azure AD Privileged Identity Management. This process looks like:
- Determine which roles will be protected by PIM
- Assign users to those roles as “eligible” users
- The user can then activate the role and either provide Multi Factor Authentication, request manual approval or enter a business reason for the activation.
- The user is then granted the role assignment and its associated permissions for a pre-configured time period.
In this case, Tailwind Traders could protect the Virtual Machine Contributor role with PIM, enabling on-call Helpdesk staff to elevate their access so they can start the Virtual Machine. This needs to be configured in advanced, but can be activated when required by the Helpdesk staff entering a business reason to justify it (which could include an internal support ticket number, for example). Or, Tailwind Traders could create a custom role with a subset of the Virtual Machine Contributor permissions (for example, Microsoft.Compute/virtualMachines/start/action) and protect that role with PIM, further refining what the Helpdesk staff would have access to do in their elevated role.
To learn more about Privileged Identity Management, visit Examine Privileged Identity Management.
Summary:
Regardless of how your organization is structured, take a look at Azure roles, Azure AD roles and Privileged Identity Management to remove widespread, high levels of access to your cloud resources and identities.
Learn more:
Classic subscription administrator roles, Azure roles and Azure AD roles
What is Azure role-based access control?
Overview of role-based access control in Azure Active Directory
Administrator roles by admin task in Azure Active Directory

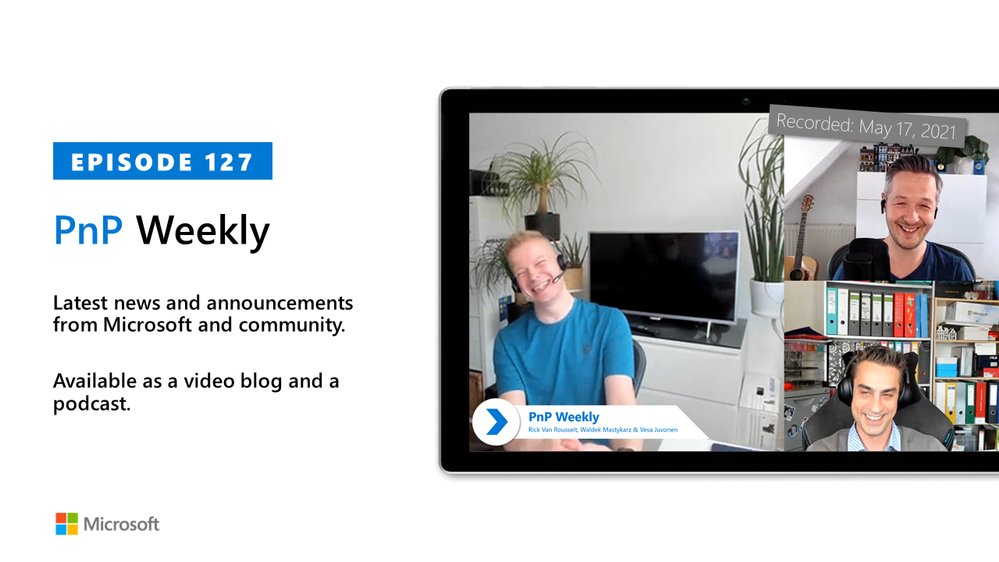
by Contributed | May 17, 2021 | Technology
This article is contributed. See the original author and article here.
Microsoft Teams steals the spotlight in this week’s MidDay Café podcast. First up the panel discusses the release of Microsoft Teams Large Events (Webinars) and what it brings to large organizations. The panel closes out with a discussion of the newly announced Microsoft Teams for Home and its features for bring together friends and family.
Resources:
Keep up to date with MidDay Café:
Thanks for visiting – Michael Gannotti LinkedIn | Twitter
 Michael Gannotti
Session Auto Transcript:
00:00:00.000 –> 00:00:24.500
Michael Gannotti
And welcome to mid day Cafe episode 10. This Monday, 5/17/2021. Today we’re going to be discussing Microsoft Teams large meetings as well as Microsoft Teams for home. I want to welcome our panelists to the podcast today, so if we can start with Scott and we’ll kind of do a round Robin Scott, you want to introduce yourself.
00:00:25.890 –> 00:00:30.920
Scott Moore
Sure, I’m Scott warm teams techno technical specialist here with it off and life Sciences.
00:00:31.860 –> 00:00:34.130
Michael Gannotti
Excellent and Sue.
00:00:34.870 –> 00:00:42.100
Sue Vencill
I see wenzel. I am also a teams technical specialist on the team with these crazy cats. Happy to be here.
00:00:43.030 –> 00:00:46.160
Michael Gannotti
And last but never least, Pete.
00:00:47.620 –> 00:00:54.170
Pete Anello
Pete Anello, I’m also a teams technical specialist within the healthcare or on the East, so.
00:00:54.820 –> 00:00:57.390
Pete Anello
Raw Royal peers and in this together.
00:00:58.790 –> 00:01:16.390
Michael Gannotti
And I’m your host Michael Gannotti, and I’m the same as them, so we’re all the same. We’re like the compadres here, so I want to welcome everybody. We have a lot to cover today for mid day Cafe, so why don’t you go ahead? Grab your Cup of techno goodness.
00:01:16.950 –> 00:01:21.800
Michael Gannotti
Caffeinate up and let’s get ready to ride. So for our first topic.
00:01:22.750 –> 00:01:26.150
Michael Gannotti
We’re bringing up this. Why saved you for last, Pete?
00:01:27.000 –> 00:01:37.790
Michael Gannotti
It’s now you go. First we’re going to bring up Mr. Pete and now low to talk about large meetings and what they are and why you want to know.
00:01:29.090 –> 00:01:29.600
Pete Anello
Yeah.
00:01:39.380 –> 00:01:39.620
Pete Anello
Yeah.
00:01:39.770 –> 00:01:40.620
Pete Anello
Thanks, Mike.
00:01:41.910 –> 00:02:12.570
Pete Anello
We announced last week we’ve been talking about it for a long time in our customers have been really anxious, you know, chomping at the bit for large meeting, support for pretty much as long as I can remember. We finally committed to it, and we’ve been waiting patiently, almost day by day, week by week, and ultimately it led to on the 11th. We announced that large meeting support was rolling out within teams within the Web, and R space so.
00:02:12.950 –> 00:02:21.220
Pete Anello
That’s a interactive meeting up to 1000 participants and then it can scale up to 10,000.
00:02:17.400 –> 00:02:17.790
Michael Gannotti
Well, well.
00:02:19.000 –> 00:02:20.470
Michael Gannotti
Woah woah woah.
00:02:21.890 –> 00:02:23.600
Michael Gannotti
Whoa, how many?
00:02:24.200 –> 00:02:25.150
Pete Anello
1000
00:02:26.920 –> 00:02:29.360
Michael Gannotti
I just had to do that ’cause.
00:02:28.810 –> 00:02:32.470
Pete Anello
is that did I? Is that what I said or did I say something else?
00:02:31.400 –> 00:02:36.940
Michael Gannotti
Yes, because but a lot of folks have no idea. We were rolling that out.
00:02:31.760 –> 00:02:32.060
Sue Vencill
He’s
00:02:32.180 –> 00:02:32.720
Sue Vencill
shop.
00:02:38.690 –> 00:02:50.870
Pete Anello
Yeah, a lot of our customers a lot of my customers hound me almost weekly on when this feature is coming out, but many may not know that it is coming out. But yeah, 1000.
00:02:51.500 –> 00:02:55.920
Pete Anello
Active participants and then it has the ability to scale.
00:02:57.490 –> 00:03:28.350
Pete Anello
Additional night an additional 19,000 participants to be view only, so that’s 20,000 users can be within a web web and are the first thousand are interacting just like the four of us are here. You know. Obviously you want presenter attendee controls and policies in place, but it can scale up to 20,000 and those additional people will be able to experience that webinar, but interview only capacity.
00:03:29.940 –> 00:03:35.030
Michael Gannotti
That is awesome. Comments questions from the Gallery here.
00:03:37.890 –> 00:03:38.780
Michael Gannotti
It’s quiet.
00:03:39.260 –> 00:03:46.590
Pete Anello
I want to test one. It’s hard, it’s hard to get a test of those together ’cause not many of us know 1000 people that can.
00:03:47.580 –> 00:03:52.220
Pete Anello
Or 1002 who can help on a call at a specific time?
00:03:52.580 –> 00:03:52.780
Sue Vencill
Yeah.
00:03:52.680 –> 00:03:52.930
Michael Gannotti
Yeah.
00:03:52.830 –> 00:03:53.110
Sue Vencill
Yeah.
00:03:53.970 –> 00:03:54.900
Michael Gannotti
No, you’re right.
00:03:55.630 –> 00:04:21.640
Michael Gannotti
Stand up, but some of the things oh I thought was interesting. Not only the scale but the controls that it brings in some of the features that I actually have a meeting right after this to talk about this with the customer because they want to do like for certain events and stuff they want to have a registration page you want to track and do all that. So anybody want to speak to that piece?
00:04:23.570 –> 00:04:25.070
Michael Gannotti
You may be educate me.
00:04:26.940 –> 00:04:34.550
Pete Anello
I mean, you definitely have the ability to register the Wet Wet web and are now put in specific questions and.
00:04:31.150 –> 00:04:31.350
Michael Gannotti
Yeah.
00:04:35.500 –> 00:04:47.400
Pete Anello
Fields that are required to answer and then when that webinars over there’s there’s a report that you can run to see you know who joined when they joined, how long they joined for.
00:04:48.560 –> 00:05:01.780
Michael Gannotti
Nice so all that tracking capability. How about some of the advanced controls that it kind of brings front and center around the because thousand people can be. That’s a lot of interactive people.
00:05:02.470 –> 00:05:03.140
Pete Anello
Yep.
00:05:02.590 –> 00:05:07.850
Michael Gannotti
Right, So what are some of the things you seen that it does with that?
00:05:09.070 –> 00:05:25.080
Pete Anello
Yeah, so it’s important that you know when you are going to have an event like that to identify who’s gonna be your you know presenters or your you know. And who’s going to be your attendees and identify them out of the gate.
00:05:24.560 –> 00:05:24.580
Scott Moore
Uh.
00:05:25.710 –> 00:05:54.590
Pete Anello
At that point, you know you can do things like hard mute, everyone, hard mute peoples cameras, right? So you know thousand people. You might only want a specific group of people to be able to show their camera because of just the sheer volume. So those controls are there and there is some thought that needs to go into manage in an event that size. And having those sort of pre defined roles ahead of time is important.
00:05:36.550 –> 00:05:36.930
Michael Gannotti
Yeah.
00:05:56.980 –> 00:06:03.930
Michael Gannotti
Yeah, I think for when I looked at it, for me it was the the really cool thing we’ve got. We’ve had meetings.
00:06:04.580 –> 00:06:05.690
Michael Gannotti
Right, forever.
00:06:07.970 –> 00:06:12.810
Michael Gannotti
He’s going to attend to the Weed, Wacker disappeared into the jungle. There he goes.
00:06:08.460 –> 00:06:08.810
Sue Vencill
Yes.
00:06:13.700 –> 00:06:14.590
Pete Anello
Sorry.
00:06:14.160 –> 00:06:29.020
Michael Gannotti
But you know, we’ve had the meetings forever. We have live events, which is a very controlled experience, typically delivered by people with domain expertise around webcast. But this kind of fall squarely in the middle of those two.
00:06:30.360 –> 00:06:50.790
Pete Anello
It brings them together, right? It’s like Reeses peanut buttercup, right? Like 2 great taste it. You just have it all in one right there. So and then it gives you flexibility. You know where before with the smaller meeting limit. You know you might not expect to hit that target and then you do, and you’re kind of like stuck.
00:06:41.120 –> 00:06:41.590
Michael Gannotti
Yeah.
00:06:51.310 –> 00:06:51.860
Michael Gannotti
Uh-huh
00:06:51.480 –> 00:06:56.190
Pete Anello
This allows it to be elastic, so you don’t. You don’t have to worry as much.
00:06:52.780 –> 00:06:52.800
Scott Moore
Uh.
00:06:57.210 –> 00:07:17.510
Michael Gannotti
yeah I I think it’s great. It’s a you got those controls you have the you know the big thing with setting the mute and unmute and we’ve played with it a bit where you know setting up that meeting an you can have them already pre muted so they join the audio video working but then you have the ability.
00:07:18.210 –> 00:07:23.050
Michael Gannotti
To release that so if they you know if they say in chat and you want to have them speak.
00:07:24.000 –> 00:07:28.610
Michael Gannotti
That’s all presenter controlled, and that’s pretty awesome.
00:07:29.840 –> 00:07:40.230
Pete Anello
So one of the things that they put it in the announcement last week was a getting started guide for teams webinars where it covers all these things in details.
00:07:38.180 –> 00:07:38.610
Michael Gannotti
Nice.
00:07:40.480 –> 00:07:40.970
Michael Gannotti
Uh-huh
00:07:42.470 –> 00:07:49.170
Pete Anello
We can share it at the end, but it’s aka Ms slash teams web and R slash guide.
00:07:49.930 –> 00:07:50.930
Michael Gannotti
so what’s that again?
00:07:50.000 –> 00:07:50.350
Pete Anello
Uh.
00:07:51.930 –> 00:07:53.830
Pete Anello
AKA dot Ms.
00:07:54.920 –> 00:07:56.960
Pete Anello
Slash teams web and R.
00:07:58.210 –> 00:07:59.530
Pete Anello
Slash guide.
00:07:59.910 –> 00:08:01.000
Michael Gannotti
Slash guide.
00:08:02.470 –> 00:08:12.130
Michael Gannotti
Cool, yeah, we’ll definitely will share the link in the post afterwards. Anybody else been seeing discussion? People asking for this kind of stuff?
00:08:13.210 –> 00:08:14.520
Michael Gannotti
Some use cases.
00:08:18.490 –> 00:08:29.550
Pete Anello
One of the earliest. An first, an probably one of the more valid use cases I heard of early on, was from one of our provider customers.
00:08:27.090 –> 00:08:27.110
Scott Moore
Uh.
00:08:30.200 –> 00:08:36.310
Pete Anello
Who has clinics over 20,000 clinics in the US and clinics across the globe?
00:08:37.470 –> 00:08:38.310
Pete Anello
They.
00:08:39.120 –> 00:08:44.850
Pete Anello
Cooperate with one another when there are disasters and catastrophes worldwide.
00:08:45.990 –> 00:09:16.770
Pete Anello
You know, so there may be severely plugging in a certain part of the Saphir flooding in certain parts of the country and things like sterilized gloves, equipment like that, some basic fundamental provisions are ruined so they work as a cooperative and they have essentially these very long 1220 hour calls that go on that can sometimes have 100 to 800 people on him.
00:08:59.860 –> 00:09:00.290
Michael Gannotti
Yeah.
00:09:16.940 –> 00:09:27.470
Pete Anello
Where it’s essentially like a freed live auctioneers block, right like hey, we have a design disaster on X. We need XY and Z. Who has it?
00:09:28.310 –> 00:09:28.750
Michael Gannotti
Wow.
00:09:28.390 –> 00:09:42.730
Pete Anello
Uh, so their their main thing was we don’t know when they’re coming in there. We don’t know when their joining, but it can get very large and we’re talking about a disaster situation, right? So we can think about a lot of stuff. We just need to be able to spin it up.
00:09:44.100 –> 00:09:51.190
Pete Anello
And I thought that was a really solid use case, and we brought that back to engineering. Probably like 3, three and a half years ago.
00:09:52.910 –> 00:09:53.540
Sue Vencill
Is the one.
00:09:53.130 –> 00:09:57.360
Michael Gannotti
Very cool that is need anything from anybody else.
00:09:58.240 –> 00:09:58.930
Michael Gannotti
On this.
00:10:01.180 –> 00:10:05.690
Sue Vencill
One day you won’t be able to shut me up one day, alright?
00:10:04.980 –> 00:10:14.880
Michael Gannotti
That’s alright, and I see Scott. He’s been like reading over our next topic intently. ’cause it just released like Scott, are you there?
00:10:10.850 –> 00:10:11.720
Sue Vencill
Yeah he is.
00:10:21.230 –> 00:10:22.530
Scott Moore
They teams for home.
00:10:23.250 –> 00:10:46.190
Scott Moore
So this is now a consumer version of teams that we have out there today where anyone with an email address they can register and they can download teams with that identity. So you can now use teams features you know associated with that identity so you can instant message you can peer to peer call, you can have meetings, well, peer to peer meetings that is.
00:10:47.830 –> 00:10:56.280
Scott Moore
But there’s it. It does definitely extends all these capabilities now and through the consumer space. You know there’s even some use cases out there where you can assign task.
00:10:56.880 –> 00:11:15.390
Scott Moore
In a shared To Do List in teams, you can even do instant polling. So you could you know schedule a pole with the participants in the in that perpetual chat and say hey, what do you guys wanna do this weekend? You guys want to go camping or you know go to the race track or.
00:11:16.090 –> 00:11:27.140
Scott Moore
Or whatever you know you can do those type of things inside of teams you know in the consumer you know version you can schedule and share meeting invites there. That really opens up a lot of different capabilities.
00:11:27.820 –> 00:11:31.990
Scott Moore
It’s really cool ’cause it you know some of the use cases that are being shown in the public website.
00:11:33.330 –> 00:11:42.670
Scott Moore
Or really around, you know, giving it to your kids, you know and using that as a as a communications. You know mechanism with your kids. Everybody has their own teams identity.
00:11:43.250 –> 00:11:48.770
Scott Moore
Yeah, you can keep track of your kids you know. Assign them to clean their room. Wash the dishes.
00:11:49.580 –> 00:11:54.980
Scott Moore
You know, and they can keep keep track of them there. So it’s really interesting.
00:11:50.380 –> 00:11:51.320
Sue Vencill
Somebody is thinking.
00:11:55.420 –> 00:12:00.900
Sue Vencill
I think it’s a lot of value to. You can have an hour long call with up to 100 people.
00:11:55.550 –> 00:11:56.010
Michael Gannotti
Well.
00:12:01.110 –> 00:12:01.420
Michael Gannotti
Wow.
00:12:02.000 –> 00:12:09.150
Sue Vencill
So, and this is all free. And then if it’s a 101 furry free.
00:12:05.540 –> 00:12:06.390
Michael Gannotti
Wait, how much?
00:12:09.790 –> 00:12:11.210
Scott Moore
Free, free, free free.
00:12:09.870 –> 00:12:10.410
Sue Vencill
Free.
00:12:11.600 –> 00:12:29.480
Sue Vencill
And then if it’s a one on one up to 24 hours, I don’t. There’s not a soul out there. I would want to talk to you for 24 hours, but it’s there. It’s it’s in there and Pete posted the link at 12:15. If you all want to scroll up and take a look that’s a nice public link, send it out to your friends and family and check it out.
00:12:30.240 –> 00:12:45.000
Michael Gannotti
Yeah, will include that in the post as well. One of the other things I thought was interesting so you can register with that email right and download that. And I like the scenario or talking about with you know parents and kids.
00:12:30.250 –> 00:12:30.700
Sue Vencill
It’s fun.
00:12:45.990 –> 00:12:58.410
Michael Gannotti
Especially as kids are returning back to school parents going back to work and they are physically disparate. But for the parent, when they go back to work, they’re probably using teams.
00:12:59.030 –> 00:13:00.950
Michael Gannotti
Do they gotta download two clients?
00:13:03.820 –> 00:13:04.720
Scott Moore
Same client.
00:13:04.000 –> 00:13:04.520
Sue Vencill
Now.
00:13:04.160 –> 00:13:04.700
Michael Gannotti
So how did it?
00:13:05.590 –> 00:13:06.450
Michael Gannotti
What do they do?
00:13:07.810 –> 00:13:10.510
Sue Vencill
Yeah, do you want to cover that, Scott?
00:13:11.530 –> 00:13:17.020
Scott Moore
Well, that would be the mobile client coming out of the out of your mobile device most likely.
00:13:17.740 –> 00:13:18.930
Scott Moore
So Android.
00:13:17.880 –> 00:13:38.930
Sue Vencill
That and and they made it so easy to switch between the two profiles, so I I’m sure all of us probably have a personal account and a work account. You know I’ve had my personal account for awhile, so I don’t have to have the app installed twice. I can just switch in between and. I like that I can keep it separate my personal life and my work like I like that and keep that separate.
00:13:36.220 –> 00:13:36.450
Michael Gannotti
Yeah.
00:13:36.500 –> 00:13:36.820
Michael Gannotti
Yes.
00:13:40.400 –> 00:13:53.310
Michael Gannotti
Yeah, I like that being able to add that personal one and then do that flip and it does. It provides a clear you know switch, but you’ll still see like the little alerts in the numbers popping up.
00:13:53.870 –> 00:13:54.300
Scott Moore
This.
00:13:55.080 –> 00:14:03.050
Michael Gannotti
Yeah, I mean to me that’s like ideal ’cause you get the separation and then you also get the controls from the enterprise space.
00:14:03.770 –> 00:14:17.880
Michael Gannotti
But the ability you know for to flip to your kids and do stuff from there, and I think that’s pretty cool. Anything else that stood out to anybody? Any cool features? I think so you are showing some.
00:14:18.980 –> 00:14:25.140
Sue Vencill
Oh well, I I was playing around with the standout presentation. I can do that real quick.
00:14:24.440 –> 00:14:24.990
Michael Gannotti
What’s that?
00:14:26.590 –> 00:14:29.370
Sue Vencill
Let you know what sent you ask. Let me show you.
00:14:34.190 –> 00:14:59.960
Sue Vencill
So here it is. This is being able to, you know, be like the weather person where I can show up. This is the actual page. See I can point to it, click here. This is the link that Pete posted at 12:15, but what Scott didn’t mention is check this out. It’s like a live virtual lounge so you can feel like you’re actually at a bar with your people. Pretty fun.
00:14:48.330 –> 00:14:49.040
Michael Gannotti
Nice.
00:14:59.160 –> 00:14:59.680
Michael Gannotti
So.
00:14:59.400 –> 00:15:00.130
Scott Moore
Together my.
00:15:00.610 –> 00:15:10.080
Michael Gannotti
Yeah, so can you go back to that one Seck for those who are on the audio, it’s actually looking like kind of like a bar like atmosphere.
00:15:03.040 –> 00:15:03.640
Sue Vencill
Sure.
00:15:11.620 –> 00:15:21.700
Michael Gannotti
Looks to me like a more personal homie version of that together mode, but focusing more on the friends and family kind of scenario and social.
00:15:22.170 –> 00:15:41.100
Sue Vencill
I think thanks for spelling it out for listening only people I forgot about that, but yeah, so there’s this one. So again, it looks like a bar and everyone sitting at it an when I was with another company an Microsoft came out with the Together mode. I really made fun of it. I was like.
00:15:42.080 –> 00:15:53.970
Sue Vencill
You know who’s going to deal with that, but then when I came on board and got to actually use the feature, it it doubles my smile. I actually felt like I can’t believe it. I fell for it. I felt like I was in the same room with the team.
00:15:55.250 –> 00:15:57.680
Michael Gannotti
Soccer you fell for it.
00:15:55.640 –> 00:15:55.960
Sue Vencill
This is.
00:15:57.940 –> 00:16:00.100
Sue Vencill
Soccer I know and I loved it.
00:16:01.860 –> 00:16:24.220
Sue Vencill
The next screen here and if you Scroll down everything Scott talked about is all in this web page. This is showing about how you can do it. Instant poll, hike. Do you guys want to hike or barbecue? Which would be my vote. But anyway so. But also the main reason I’m showing you is because this is the standout mode and it allows me to be more interactive with my presentations.
00:16:11.390 –> 00:16:12.230
Michael Gannotti
All right?
00:16:25.480 –> 00:16:33.980
Michael Gannotti
Very cool, now we were down below it says organize your life all in one place and I see like a little Excel file icon where they talking about here.
00:16:25.730 –> 00:16:26.120
Sue Vencill
It’s cool.
00:16:30.860 –> 00:16:31.540
Sue Vencill
Yes.
00:16:34.100 –> 00:16:57.630
Sue Vencill
So there’s a dashboard so you got. You can chat. So right now I’m looking. I’m showing a little mock demo of the teams client. There’s a chat up at the top or you can hit on the dashboard and the dashboard is where it keeps all your your tasks, your ongoing messages, your calendar, you can keep it all in one place to help you stay organized.
00:16:36.610 –> 00:16:36.980
Michael Gannotti
So.
00:17:00.180 –> 00:17:10.230
Scott Moore
Whole thing there is also there says there’s a digital safe, so think of that as a collection area for where you can save content that everybody can share and collaborate on.
00:17:11.500 –> 00:17:13.340
Sue Vencill
Yeah, yeah.
00:17:11.560 –> 00:17:12.260
Michael Gannotti
Nice.
00:17:13.990 –> 00:17:14.640
Sue Vencill
It’s good stuff.
00:17:14.080 –> 00:17:14.700
Michael Gannotti
So.
00:17:15.340 –> 00:17:16.740
Michael Gannotti
Go ahead, I’m sorry.
00:17:17.150 –> 00:17:20.530
Sue Vencill
Yeah, I think. I think we we talked all to it.
00:17:20.080 –> 00:17:28.020
Michael Gannotti
Yeah no, I think that’s cool. So I mean it Monday it seems to be teams day today for Monday Monday.
00:17:28.370 –> 00:17:31.680
Sue Vencill
Teams Day every day. Mike G. Some well now.
00:17:30.090 –> 00:17:49.070
Michael Gannotti
Every day, so we’ve got the large large meetings. If yeah, if you haven’t talked to urithi about him, if you’re not seeing him yet, you want to do that, and then the personal one. I think that’s great because it gives you a lot of flexibility and.
00:17:49.640 –> 00:17:50.080
Michael Gannotti
Yeah.
00:17:50.780 –> 00:18:03.580
Sue Vencill
And I would just want to want to the whole single. You know, if we’re already using teams, it just makes my life easier that I can now use teams in my personal life as well. We don’t. We don’t need zoom.
00:18:00.690 –> 00:18:01.020
Michael Gannotti
Right?
00:18:04.730 –> 00:18:12.500
Sue Vencill
We can just use Microsoft. Yeah yeah, so you know that’s out and when I know I I confused you guys, there’s no excuse.
00:18:04.980 –> 00:18:06.440
Michael Gannotti
See what no?
00:18:11.480 –> 00:18:11.980
Michael Gannotti
But
00:18:13.170 –> 00:18:26.440
Michael Gannotti
yeah, and it’s again, you’re on a common platform now, right with your family. So all these folks working with teams during the day, now you can have an easy to use common experience for everybody.
00:18:13.460 –> 00:18:13.770
Sue Vencill
To.
00:18:17.870 –> 00:18:18.350
Sue Vencill
Yep.
00:18:26.720 –> 00:18:27.150
Sue Vencill
Yeah.
00:18:28.140 –> 00:18:33.440
Michael Gannotti
So any last thoughts call outs by anybody? Anything else going on?
00:18:28.340 –> 00:18:28.870
Sue Vencill
That’s my.
00:18:33.810 –> 00:18:40.150
Scott Moore
I think the the big play here really is around, you know, extending these capabilities into the consumer space you know.
00:18:40.850 –> 00:18:41.270
Michael Gannotti
Yeah.
00:18:42.080 –> 00:18:44.410
Scott Moore
That’s the biggest thing is really, really cool.
00:18:42.220 –> 00:18:42.580
Sue Vencill
Yep.
00:18:44.920 –> 00:19:01.850
Sue Vencill
I think just to put a shout out there just for topics from our listeners, you know if there’s anything you guys want us to cover, we try to share what we’ve learned in the past five days at work. You know, somehow Mike finds a way to pull it out of us, but what do you all want to hear? Let us know.
00:19:01.360 –> 00:19:01.750
Michael Gannotti
Yeah.
00:19:03.320 –> 00:19:23.730
Michael Gannotti
Yeah, absolutely. I mean, this is only our second episode. I mean episode 10. But really, the 2nd of this new format, so we’re just finding our way. And as you know, there are topics that are hot buttons for you. Please come to the post at you know. And this is where you’ll find the video version an all the resources. So if you’re listening.
00:19:24.300 –> 00:19:54.150
Michael Gannotti
Video you know video and resource links you go to AKA dot Ms Slash HLS blog that’s AKA dot Ms Slash HLS blog and there you’ll be able to find the post. You can make comments. You can leave suggestions. We monitor all that you can also reach out to us on LinkedIn were all on LinkedIn, so feel free to harass all of us, Scott said. He specially appreciates that.
00:19:54.360 –> 00:19:58.620
Michael Gannotti
When people get him on LinkedIn and you know.
00:19:59.220 –> 00:20:03.100
Michael Gannotti
Find this there and then. Also. Lastly take.
00:20:03.690 –> 00:20:28.930
Michael Gannotti
As you start to find some value and things that we’re talking about, you can take us on the go. You can find us on Apple, iPod, iTunes. I’m sorry, Apple, iTunes podcasts. Google podcast. An on Spotify. So ran all three of the biggies and you can take mid day cafe on the go with you and we encourage that and let us know what we can do for you. What we can talk about.
00:20:29.720 –> 00:20:31.630
Michael Gannotti
So at that this is Mike.
00:20:32.450 –> 00:20:33.390
Sue Vencill
Sue Ansel
00:20:34.660 –> 00:20:35.510
Scott Moore
Scott Moore
00:20:36.220 –> 00:20:37.640
Pete Anello
And Pete anello
00:20:38.930 –> 00:20:49.350
Michael Gannotti
Pete Anello were reading it. We all bid you good day. Have a great day and great rest of the week and will be back this next Monday with mid day Cafe by everyone.
00:20:49.800 –> 00:20:50.550
Pete Anello
see you guys.
00:20:50.890 –> 00:20:51.460
Sue Vencill
bye.
00:20:51.030 –> 00:20:51.430
Scott Moore
yeah.


![[Guest Blog] How to take your company to the next level using Mixed Reality](https://www.drware.com/wp-content/uploads/2021/05/fb_image-124-999x675.jpeg)


Recent Comments