On July 16, 2024, we published the 2024 release wave 2 plans for Microsoft Dynamics 365 and Microsoft Power Platform. These plans are a compilation of the new capabilities planned to be released between October 2024 to March 2025. This release introduces a wealth of new features designed to enhance customer understanding and improve overall user experience, showcasing our dedication to driving digital transformation for our customers and partners.
The upcoming wave is centered around utilizing advanced AI and Microsoft Copilot technologies to enhance user productivity and streamline operations across diverse business applications. These enhancements include intelligent automation, AI-powered insights, and immersive user experiences that are designed to break down barriers between data, insights, and individuals. Watch a summary of the release highlights.
Discover the latest features that empower organizations to operate more efficiently and adaptively. From AI-driven sales insights and customer service enhancements to predictive analytics in supply chain management and autonomous financial processes, the new capabilities enable businesses to proactively address challenges and capitalize on opportunities.
Highlights from Dynamics 365
Dynamics 365 release wave
Check out the 2024 release wave 2 Dynamics 365 and Microsoft Copilot for business features
Microsoft Dynamics 365 Sales continues to enhance customer understanding and boost sales through data, intelligence, and user-friendly experiences. In this release, we are focused on including natural language copilot for summarizing information, creating a new full-screen Copilot Home with curated insights and role-specific actions, and using AI-powered insights to find leads. Watch this video to discover the new and enhanced features included in this release wave.
Microsoft Copilot for Sales continues to deliver and enhance cutting-edge generative AI capabilities for sellers by enriching Copilot in Microsoft 365 capabilities with sales-specific workflows, data, and actions. We will focus on using AI-powered insights to create leads, deepen the integration into Copilot in Microsoft 365, and use natural language capabilities to allow sellers to ask data-related questions of their CRM. View this video to learn more about the features releasing in this wave.
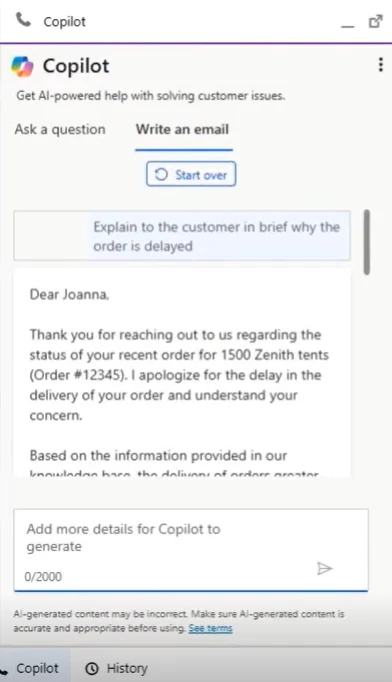
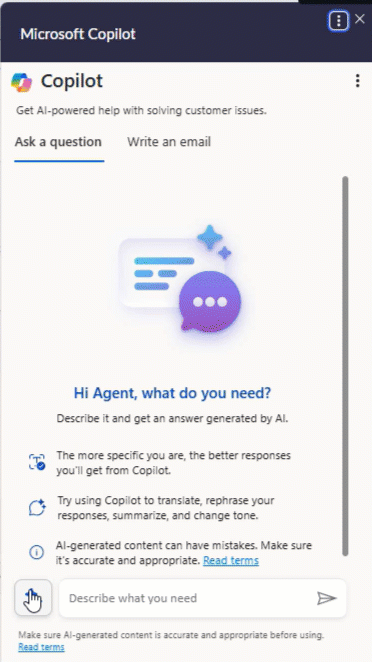
Microsoft Dynamics 365 Customer Service will continue to empower agents to work more efficiently through new copilot capabilities such as proactive prompting, ability to access data from external systems securely with plugins, email enhancements, and AI-infused routing. Watch this video to discover how the latest enhancements to Customer Service can benefit your business.
Microsoft Copilot for Service is now generally available, bringing new capabilities to enhance user experiences. These features will be integrated across Outlook, Teams, Microsoft 365 Chat, and Copilot embedded in third-party CRMs. View this video about the features launching in this wave for Copilot for Service.
Microsoft Dynamics 365 Contact Center will add new features for voice, messaging, Copilot, AI-infused routing, and contact center operations including out of box support for additional CRMs. Watch this video to learn about the new features releasing in Dynamics 365 Contact Center this wave.
Microsoft Dynamics 365 Field Service enables a shift from reactive to proactive and predictive service, empowering digital transformation and innovative business models. Using Copilot, frontline workers will be able to retrieve critical information and initiate mixed-reality remote assist calls within Teams through Copilot. Managers will be able to create, update, and manage work orders effortlessly across web, Outlook, and Teams interfaces. View this video to learn more about the features releasing in this wave.
Microsoft Dynamics 365 Finance continues its journey of leading in autonomous finance, using AI to transform common end-to-end financial processes. This release focuses on in-app copilot capabilities, immersive persona-based user experiences, expanding country coverage, electronic invoicing enhancements, business performance analytics and planning enhancements, and autonomous reconciliation capabilities. Discover how the latest enhancements to Finance can benefit your business in this video.
Microsoft Copilot for Finance is expanding data reconciliation capabilities in Excel with assisted data sanitization and preparation routines. Extending variance analysis capabilities with support from additional data sources and enabling collaboration on findings with stakeholders will also be a focus in the upcoming wave. Additionally, the Teams integration will facilitate collections calls with suggested scripts and automated recording of action items in the financial system. Check out this video to see the exciting new features releasing in Microsoft Copilot for Finance.
Microsoft Dynamics 365 Supply Chain Management is advancing along the path of an autonomous supply chain by integrating intelligence, automation, and analytics into every facet of business procedures, thereby improving user productivity and enhancing organizational adaptability. In this update, the spotlight is on improving order-promising capabilities for manufacturers. Demand planning is upgraded to incorporate forecasting with external signals, and the inclusion of Copilot weaves insights and analyses directly into workflows, identifying trends and irregularities, while also allowing for specific data inquiries at the cell level. Additionally, Traceability Copilot keeps track of actual products in production and compiles a comprehensive historical record of related activities. Watch this video to discover the exciting features launching in this release wave.
Microsoft Dynamics 365 Project Operations is focused on enhancing usability, performance, and scalability in key areas such as project planning, invoicing, time entry, and core transaction processing. The spotlight is on AI-assisted core functionality improvements in estimation, proposal generation, journals, approvals, and contract management, with added mobile capabilities and scale improvements to handle larger projects and invoices at an increased scale. Watch this video to learn about the new features releasing in Project Operations this wave.
Finance and Operations cross-app capabilities will continue to invest in capabilities applying to Finance, Supply Chain Management, Microsoft Dynamics 365 Commerce, Microsoft Dynamics 365 Human Resources, and Project Operations. We are infusing copilot experiences across applications, including natural language chat, embedded AI, and intelligent process automation, and enabling extensibility for copilot scenarios. We will also bring more value and insights to finance and operations apps data and enhancements to ensure continued enterprise-grade security and compliance at scale.
Microsoft Dynamics 365 Human Resources continues to build intelligence, develop automation and analytics around the hire-to-separate process, increase user productivity, and empower business agility. We are enhancing recruiting with AI-driven assessments and offer management, improving experiences for employees and HR business partners in benefits and performance management, and advancing analytics, insights, and planning through business performance planning and analytics capabilities. View this video to learn more about the features releasing in this wave.
Microsoft Dynamics 365 Commerce is using the power of AI to empower retailers to streamline their operations and drive increased customer loyalty and conversions. With Copilot, retail managers, sales associates, and merchandisers will gain new AI-powered insights into customer buying patterns and preferences, recommendations for positioning and selling products, and business intelligence on store performance. Improvements to the self-checkout POS make customer checkouts more efficient, and user experience updates to Store Commerce app streamline daily tasks for faster, more efficient sales and service. Watch this video to see the new features releasing in Microsoft Dynamics 365 Commerce.
Microsoft Dynamics 365 Business Central is focused on maintaining service reliability performance and security standards. We’ll continue enhancing productivity by optimizing core processes with Copilot, expanding to cover more than 170 countries, and offering enhanced reporting with more than 80 Microsoft Power BI reports. Additionally, integration with Field Service will be expanded, along with new financial management features. We will also enhance development tools and governance, along with improved data privacy and compliance management.
Microsoft Dynamics 365 Remote Assist will bring significant improvements to the quality of Mixed Reality (MR) annotations in Teams mobile for both iOS and Android users. The update will enhance the accuracy of MR ink on irregular and complex surfaces, making it easier for remote experts and technicians to collaborate seamlessly. Mixed Reality annotations in Teams mobile will be generally available in the next wave, along with ongoing investments in stability, performance optimization, and usability improvements across HoloLens 2 and iOS and Android applications.
Microsoft Dynamics 365 Customer Insights—Data empowers every organization to unify and enhance customer data, leveraging it for insightful analysis and intelligent actions. This release enables you to streamline data integration by using Microsoft Dataverse and Microsoft Fabric, attach your data in OneLake to Customer Insights, accelerate time to insights with data in Data Lake format, increase control when attaching to data in Dataverse, and seamlessly generate insights from marketing. Discover how these latest enhancements can benefit your business in this video.
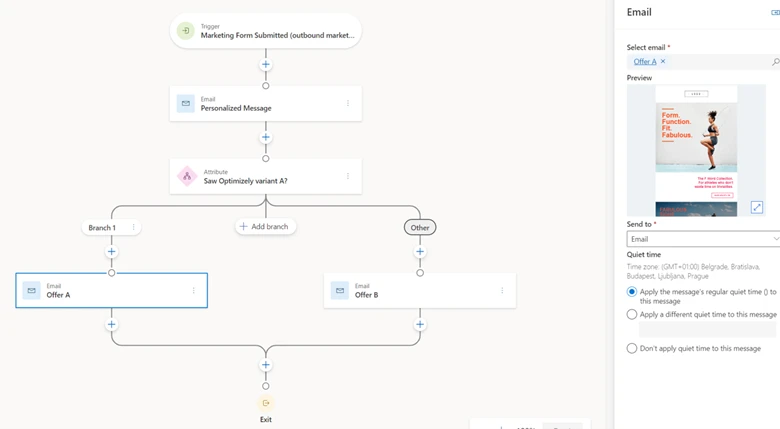
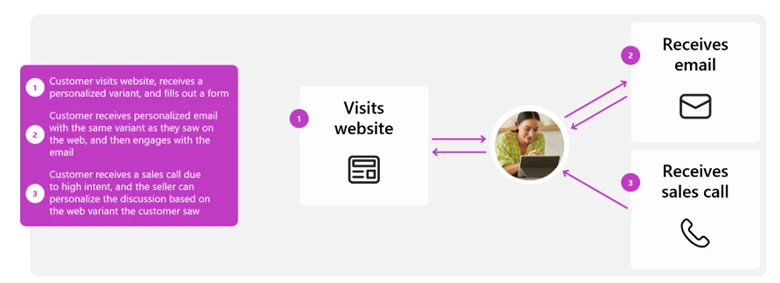
Microsoft Dynamics 365 Customer Insights—Journeys brings the power of AI to redefine the workflow for marketers, enabling them to be more productive than ever before. Businesses can optimize every interaction with their customers with end-to-end journeys across departments and channels. With this release, you will have more flexibility and control when it comes to journeys, managing your web forms and tailoring Copilot to your business. Watch this video to learn about the new features releasing in this wave.
Microsoft Power Platform
Check out the 2024 release wave 2 Microsoft Power Platform features
Watch this video to explore the exciting new features releasing across Microsoft Power Platform.
Microsoft Power Apps will continue to transform app experiences with infused intelligence, enabling users to be more productive by using Copilot to work with data, get insights, and improve their apps. Makers will continue to benefit from AI-assisted development, enabling rich and complex applications to be built with monitoring, control, and unmatched governance for admins, ensuring organizations can adopt low-code and AI transformation at scale.
Microsoft Power Pages will expedite site building for a low-code maker or pro developer to build intelligent sites that reimagine the way you interact with your employees, customers, and partners.
Microsoft Power Automate will continue to make it easier to build flows by using natural language and multi-modal generative AI capabilities across cloud flows and desktop flows, troubleshooting runs, and managing your automation estate with an end-to-end view. This, along with improvements in process mining to jumpstart creation of automation through Microsoft 365 integration and ongoing improvements to scaling, means it’ll be easier than ever for new users to get started and scale.
Microsoft Copilot Studio is advancing copilot capabilities and IVR support with Customer Service and will expand geographically to the United Arab Emirates and Germany. Additionally, the team is improving software lifecycle management capabilities with topic-level import/export and role-based access control (RBAC), as well as enhancing governance and administration functionalities.
AI Builder is investing in Prompt Builder for creating and deploying GPT prompts with enterprise data to enhance flows, apps, data tables, and copilots. We are also enhancing Intelligent Document Processing with a new validation station in Power Automate, application lifestyle management (ALM) support, and pre-built AI models for translation, classification, and personally identifiable information (PII) detection. Lastly, we’ll improve AI governance through capacity management, data policies, and including AI Builder capacity in the Power Apps developer plan.
Microsoft Dataverse is enhancing the maker experience by boosting app building productivity with Copilot, ensuring seamless connectivity to external data and knowledge sources, and integrating AI-powered Enterprise Copilot in Microsoft 365. These investments aim to streamline development and use AI for more efficient and intelligent solutions.
Governance and administration continues to advance via tools and insights that empower Microsoft Power Platform admin to easily get their job done. This wave focuses on governing Copilot adoption and easily securing low-code assets, helping enterprises boost adoption of Microsoft Power Platform solutions in their organization while keeping their digital environment safe.
Early access period
Starting July 29, 2024, customers and partners can validate the latest features in a non-production environment. These updates include user experience enhancements that will be automatically enabled in production environments by October 2024. Take advantage of the early access period to test these updates and effectively plan for your customer rollout. Explore the 2024 release wave 2 early access features for Dynamics 365 and Microsoft Power Platform or visit the early access FAQ page for more information.
For a complete list of new capabilities, please refer to the Dynamics 365 2024 release wave 2 plan and the Microsoft Power Platform 2024 release wave 2 plan. We also encourage you to share your feedback in the community forums for Dynamics 365 or Microsoft Power Platform.
The post 2024 release wave 2 plans for Microsoft Dynamics 365 and Microsoft Power Platform now available appeared first on Microsoft Dynamics 365 Blog.
Brought to you by Dr. Ware, Microsoft Office 365 Silver Partner, Charleston SC.


Recent Comments