by Contributed | Jun 9, 2021 | Technology
This article is contributed. See the original author and article here.
We are excited to announce the public preview of change data capture (CDC) in Azure SQL Databases, a feature that has been requested by multiple customers.
What is change data capture?
Change data capture (CDC) provides historical change information for a user table by capturing both the fact that Data Manipulation Language (DML) changes (insert / update / delete) were made and the changed data. Changes are captured by using a capture process that reads changes from the transaction log and places them in corresponding change tables. These change tables provide a historical view of the changes made over time to source tables. CDC functions enable the change data to be consumed easily and systematically.
Learn more here: About CDC.
Why use change data capture?
CDC is a widely used feature by enterprise customers for a variety of purposes:
- Tracking data changes for audit purposes
- Propagate changes to downstream subscribers, which is backend of other system in the organization
- Perform analytics on change data
- Execute ETL operations to move all the data changes in the OLTP system to data lake or data warehouse
- Event based programing that provides instantaneous responses based on data change (E.g.: Dynamic Product pricing)
Change data capture in Azure SQL Database (Preview)
CDC is now available in public preview in Azure SQL, enabling customers to track data changes on their Azure SQL Database tables in near real-time. Now in public preview, CDC in PaaS offers a similar functionality to SQL Server and Azure SQL Managed Instance CDC, providing a scheduler which automatically runs change capture and cleanup processes on the change tables. These capture and cleanup processes used to be run as SQL Server Agent jobs on SQL Server on premises and on Azure SQL Managed Instance, but now they are run automatically throughout the scheduler in Azure SQL Databases.
Enabling Change data capture on an Azure SQL Database
Customers will be able to use CDC on Azure SQL databases higher than the S3 (Standard 3) tier.
Enabling CDC on an Azure SQL database is similar to enabling CDC on SQL Server or Azure SQL Managed Instance. Learn more here: Enable CDC.
Sending CDC Change Data to Other Destinations
Multiple Microsoft technologies such as Azure Data Factory can be used to move CDC change data to other destinations (e.g. other databases, data warehouses). Other 3rd party services also offer streaming capabilities for change data from CDC. For instance, Striim and Qlik offer integration, processing, delivery, analysis, or visualization capabilities for CDC changes.
“Real-time information is vital to the health of the enterprises,” says Codin Pora, VP of Technology and partnership at Striim. “Striim is excited to support the new change data capture (CDC) capabilities of Azure SQL Database and help companies drive their digital transformation by bringing together data, people, and processes. Striim, through its Azure SQL Database CDC pipelines, provides real-time data for analytics and intelligence workloads, operational reporting, ML/AI implementations and many other use cases, creating value as well as competitive advantage in a digital-first world. Striim builds continuous streaming data pipelines with minimal overhead on the source Azure SQL Database systems, while moving database operations (inserts, updates, and deletes) in real time with security, reliability, and transactional integrity.”
“Joint customers are excited about the potential of leveraging Qlik Data Integration alongside CDC in Azure SQL DB and CDC for SQL MI to securely access more of their valuable data for analytics in the cloud,” said Kathy Hickey, Vice President, Product Management at Qlik. “We are happy to announce that in addition to support for Azure SQL MI as a source, the newly available MS-CDC capabilities will also allow us to support Azure SQL DB sources via our Early Access Program. We look forward to partnering with Microsoft on helping customers leverage these capabilities to confidently create new insights from their Azure managed data sources.”
Stay up to date with the change data capture blog series
We are happy to start a bi-weekly blog series for customers who’d like to learn more about enabling CDC in their Azure SQL Databases! This series will explore different features/services that can be integrated with CDC to enhance change data functionality.
Some of the upcoming CDC blog series:
- Deep Dive into Change Data Capture in Azure SQL Databases
- Using Azure Data Factory to send Change Data Capture Data to Other Destinations

by Contributed | Jun 9, 2021 | Technology
This article is contributed. See the original author and article here.
This series highlights Microsoft Learn Student Ambassadors who achieved the Gold milestone and have recently graduated from university. Each blog features a different student and highlights their accomplishments, their experience with the Student Ambassadors community, and what they’re up to now.
Today we’d like to introduce Daniel Gomez Jaramillo, who is from Colombia and just completed his Systems Engineering studies at the University of Cuenca in Ecuador.
Responses have been edited for clarity and length.
When you became a Student Ambassador in 2018, did you have any specific goals you wanted to reach, like attain a skill or work on a particular quality? What were they, and did being a Student Ambassador help you achieve them? How has being in the community impacted you in general?
I had no clear goals at the time, however, I decided to apply to become a Student Ambassador with the aim of acquiring new knowledge and being able to share it with my local community. I also wanted to meet other members so that I could learn from them because back then I was and always will remain passionate about technology. I was accepted into this wonderful community, and from that moment on, my life changed radically in every way, at the student, professional, and personal levels.
The program has helped me a lot in different ways. I was able to acquire new knowledge about Microsoft Azure and web application development with .NET. As time went on, I was able to share that acquired knowledge with others through tutorial articles, online sessions, in-person workshops, and at special events of Microsoft and Student Ambassadors as well.
Thanks to the events, I have been able to improve my skills when making a presentation, and the quality of my writing. In the professional field, this has helped me a lot, as I have received job offers as a result of being in the program. One was to work in the field of software development and content dissemination at RIGANTI, a company in the Czech Republic responsible for providing a framework on .NET for web application development. To this day, I am still working with them as a part-time employee.
I was able to meet amazing people from all over the world and have been able to form strong friendships that I am sure will be for life.
What were some of the accomplishments that you’re proudest of and why?
Talking about a single achievement within the program is impossible. Microsoft Learn Student Ambassadors has been like my second career, full of learning and amazing experiences. Anyway, here I can mention those I will never forget:
I organized the Virtual Summit of the Microsoft Communities of Ecuador in 2020 with other Student Ambassadors, Microsoft Most Valuable Professionals (MVPs), and others, including Pablo Veramendi, the Student Ambassador Global Program Director. Around 2000 people from all over Latin America participated in the event, where we were able to exchange knowledge about Microsoft’s different technologies through 37 hours of live streaming spread over 3 days. There were 43 virtual sessions in total, and I was able to present several technology sessions about Azure and .NET.
In 2021, I organized HackLatam 2021, a virtual hackathon, again with Student Ambassadors, Microsoft employees, and MVPs from all over Latin America. About 350 students from different countries were able to generate projects with Microsoft technology solutions to contribute to the education sector.
An additional event that I will mention is Microsoft Ignite of 2020, where I was invited as a Student Ambassador to present a session to around 350 people in my native language for Spanish speakers.
What do you have planned after graduation? What’s next for you?
In addition to my work with Riganti, I am working at a medical specialty center in Ecuador as a Software Engineer managing the system that supports the place.
In about a year, I plan to study my masters’ degree, as I’m also very passionate about the research area. Finally, in the middle future, I would love to form a space or a kind of foundation so that people from vulnerable sectors can acquire new knowledge and generate technological solutions.
If you could redo your time in the Student Ambassador community, is there anything you would have done differently?
I don’t think I’d change anything. Everything I have lived through–the experiences, the process of self-discovery, learning and sharing with others, has allowed me to be the person I am today. I am very grateful to Microsoft for everything they have done for me as a Student Ambassador, and I will be grateful forever, as they allowed me to achieve amazing things, develop my potential, and above all, allow me to meet amazing people whom I consider my true friends.
If you were to describe the community to a student who is considering joining, what would you say to convince them to join?
Do you want your life to change radically in all aspects? The Microsoft Learn Student Ambassadors program is for you! In addition to having the opportunity to be associated with one of the most important technology companies on the planet, you can acquire new knowledge with a myriad of benefits, participate as a community according to your interests, and meet wonderful people from all over the world.
And what advice would you give to new Student Ambassadors?
You all have the ability to accomplish amazing things, and thanks to your passion for technology, today you are part of this wonderful program. When you start, it’s normal to have doubts or want to know more about something in particular, so you can always ask another Student Ambassador for help for whatever you need, or you can also contact the Community Program Managers. Take advantage of all the opportunities that come your way. At first it can be a little scary to meet many people, but this community is amazing, and everyone is willing to help others. Feel free to propose initiatives, and events. Other Student Ambassadors will help you on your way.
Also, discover the things that you are passionate about within the community and develop your potential. Connect with others, and we’ll achieve amazing things among all. All the energy you share will always come back to you. Student Ambassadors for life!
Do you have a motto in life, a guiding principle that drives you?
Do what you love! For me, success is doing what you want to do, with the people you want to be with. I was able to learn this as a Student Ambassador, and I will apply it forever.
Lastly, on a lighter note, can you share a random fun fact about yourself that few people are aware of?
I use PowerPoint for everything–to make posters, rollup banners, image editing, video materials, and much more.
Thank you, Daniel, and good luck to you in all your future endeavors!
by Scott Muniz | Jun 9, 2021 | Security
This article was originally posted by the FTC. See the original article here.
Scammers often disguise themselves as people working for the government and might pretend to offer help. But, really, they’re after your money or personal information.
Government imposters may call to “verify your Social Security number,” or say your Social Security number or Medicare benefits have been “suspended” due to a mix-up. Scammers may say your tax returns must be done differently because of a name change — and they need your Social Security number to fix it. But wait right there. Scammers are just phishing for personal information they can use to steal your identity or take your money.
So how do you spot it and stop it? Here’s what to know:
- Scammers call, email, or text you for money or information. But the government won’t. Anyone who calls, emails, or texts, asking for money or personal information and claims to be from the government is a scammer. Hang up and don’t respond to messages.
- Scammers tell you how to pay — usually by wiring money, cryptocurrency, or gift card. Nobody legit will ever tell you to pay in any of those ways. If they call, hang up the phone. If they email, text, or message you, don’t click on any links. It’s a scam.
- Even if your caller ID says it’s from the government, it could be a scam. Caller ID can be faked. Even if it shows the government agency’s real phone number, or even if it says something like “Social Security Administration,” it could be anyone calling from anywhere in the world. Don’t trust it.
If you spot a government imposter, tell the FTC at ReportFraud.ftc.gov.
Brought to you by Dr. Ware, Microsoft Office 365 Silver Partner, Charleston SC.
by Contributed | Jun 9, 2021 | Dynamics 365, Microsoft 365, Technology
This article is contributed. See the original author and article here.
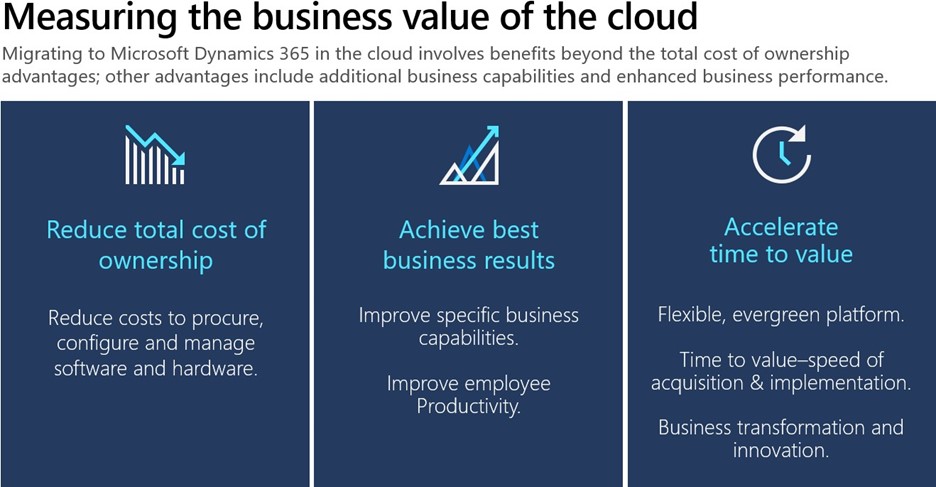
Migrating your on-premises business applications to the cloud can be like building your very own dream home. It’s incredibly exciting and will be perfect for your unique needs but can feel daunting when going at it alone. Ensuring you have a strong plan is crucial. Let’s explore this metaphor a bit more as we examine three critical components in your cloud journey and how you can leverage the Microsoft Dynamics 365 Migration Program all along the way.
Much like a top-notch architect and contractor makes building your dream home easier, the Dynamics 365 Migration Program enables on-premises customers to simplify and accelerate their move to the cloud. It offers end-to-end migration support working directly with Microsoft cloud architects and specialized migration partners. The program offers access to a no-charge migration assessment, pricing offers, tools, and migration support for qualified customers. Get expert help through the Dynamics 365 Migration Program to move from Dynamics AX or Dynamics CRM to the cloud.
Before you “break ground” on your cloud migration, however, there are three core aspects to considerbudget, requirements, and location.
1. Budget:
When building a dream home, ensuring you have a good understanding of your true budget is usually a good place to start. A reasonable place to begin is to compare your housing costs today with your future costs. Maybe you are renting or making mortgage payments on an existing house and you want to compare your current payments to your dream home mortgage. Chances are this new mortgage cost along with the one-time down payment may look overwhelming compared to your current rent or mortgage, but this is an incomplete view. It is incredibly important to factor in all of the service costs involved in maintenance, upgrades, and repairs of your current residence. This applies to on-premises costs as wellit is crucial to calculate the total cost of ownership, including IT costs, upgrade costs, and server costs to avoid any surprises. See the Forrester TEI study for Dynamics AX and Dynamics CRM to learn what other customers have found when making the cost comparison.
2. Requirements:
Once you have a clear line of sight to the budget requirements, next comes the fun partthe design and specifications of your new house. When you are thinking about your future needs, why limit yourself to old ways of doing things? What about your partner’s, kids’, and pets’ changing needs? Your toddler will grow up to be a teenager in no time and will need a study room, or maybe your partner wants to start working from home and needs a quiet office space. Is all of your old stuff going to your new house, or might it make sense to get rid of the old boxes that you haven’t opened in the last 10 years? Likewise, when migrating to the cloud, it is an opportunity to refresh, evolve, or completely get rid of your old business practices that don’t make sense anymore. Do you still want that big file cabinet when you can store things securely online? To fully understand what it will take for you to migrate your existing on-premises data, customizations, integrations, and functionality to the cloud, you should sign-up for a no-charge, no-obligation Microsoft migration assessment. The assessment will give you deep insights into what it will take in terms of time and effort to migrate to the cloud. Apply today for the Microsoft migration assessment to get started.
3. Location:
Your ideal dream house should be in a spot where you feel safe and have the option to expand your living space when needed. Some neighborhoods, for example, are simply preferred because of the safety they offer in addition to the flexible zoning laws that allow future expansion. Maybe you want to build that second floor or mother-in-law suite in the future when your family grows or add those privacy hedges you have always wanted. Isn’t it great to always have that option and only invest when you are ready? With Dynamics 365 you can access cutting-edge technology, control costs, and improve IT productivity by migrating to the cloud. Dynamics 365 offers physical, infrastructure, and operational security with Microsoft Azure. It also offers scaling to the desired capacity to accommodate a variable number of users. Learn more about all the benefits of migrating from Dynamics AX and Dynamics CRM to Dynamics 365 in the cloud.

Finally, when considering building that future dream house, it can be exciting and nerve-wracking at the same time. Migrating your on-premises enterprise resource planning (ERP) or customer relationship management (CRM) to the cloud is no different with the same or more anxiety associated. It is very important to fully consider all the costs, design aspects, and platform features before you can determine the best migration path for your company. With Dynamics 365 Migration Program hundreds of customers like you have already benefitted from our no-charge, no-obligation Microsoft Standard Migration Assessment.
“I was impressed about the information I got out of this migration assessment. It will give us confidence for the next steps” – Senior Business Analyst
The Microsoft Standard Migration Assessment is the first step to help you understand the value of cloud migration and how to get there. This Microsoft-managed assessment is delivered virtually, typically requiring four to eight hours of a customer’s time. The Microsoft Standard Migration Assessment is available worldwide for users of Dynamics AX and Dynamics CRM. Download handouts for the Dynamics AX and Dynamics CRM Standard Migration Assessment.
Join the Dynamics 365 Migration Program
Get in touch with us today: Dynamics 365 Migration Program and join the Dynamics 365 Migration Community to connect with experts and fellow customers. Migration is an important decisiondo it right to minimize risk. Microsoft is here to guide you throughout the entire process.
The post 3 aspects to consider when migrating to Dynamics 365 in the cloud—it’s like building your next dream house appeared first on Microsoft Dynamics 365 Blog.
Brought to you by Dr. Ware, Microsoft Office 365 Silver Partner, Charleston SC.
by Contributed | Jun 9, 2021 | Technology
This article is contributed. See the original author and article here.
Two years ago Microsoft acquired one of the most deployed RTOS products in the embedded market, proven across a vast range of industries and use cases – from mobile phones and fitness trackers, to security systems and spacecraft. According to VDC Research, Azure RTOS ThreadX has been deployed in more than 10 billion devices worldwide. Many of these 10 billion devices fall into the category of “safety critical” – where device failure could result in serious injury to people and/or severe damage to property and the surrounding environment. From inception, Azure RTOS is designed to meet the needs of safety critical devices and is rigorously tested and reviewed to ensure such safety critical requirements are fully realized. This process is memorialized through functional safety certification of Azure RTOS core components.
TÜV Off-the-shelf Certification
Azure RTOS core components have been certified by SGS-TÜV Saar for use in safety-critical systems, according to IEC-61508, IEC-62304, ISO 26262 and EN 50128. As part of the certification process, SGS-TÜV Saar has reviewed the extensive test suites for Azure RTOS core components. The Azure RTOS core component test suites, comprised of a large number of application simulations, effectively performs functional black box testing over each Azure RTOS core component code base. Each test suite exercises 100 percent of the generic Azure RTOS core component C code, which is validated by using code coverage analysis tools. Azure RTOS core component Safety Manuals provide quality assurance information along with guidance on the safe usage of Azure RTOS. This enables developers to use Azure RTOS in safety-critical software development for even the most rigorous Safety Integrity Level (SIL 4, Class C, ASIL D), according to IEC 61508, IEC 62304, ISO 26262 or EN 50128 without further qualification.
Reducing the time-to-market for building safety critical IoT devices
In many cases, industrial, medical, and automotive applications require compliance with safety and reliability standards to protect people and the environment. Reliable, real-time performance is especially critical for systems involving human transport, medical monitoring, and industrial operations that could release hazardous materials or pose potential safety risk. Regulatory authorities pre-certify software to help ensure that it won’t become unavailable due to reduced quality or system inefficiency. We now offer off-the-shelf functional safety certification artifact packages for Azure RTOS core components to help developers get to market faster. These artifact packages include a safety manual and formal reports of test results from internationally recognized organizations, certifying that the code behind Azure RTOS core components have met rigorous industrial functional safety standards. By using these artifact packages, developers can focus solely on their firmware functional safety certification.
Reliability for non-safety critical IoT devices
The functional safety certifications apply to the standard Azure RTOS core components code base available on GitHub. Because of this, even IoT devices that are not safety critical still benefit from the improved quality and reliability that results from the overall functional safety certification process. In addition, this also helps “future proof” Azure RTOS IoT devices if regulatory authorities down the road require functional safety certification.
Learn more
Azure RTOS
Azure RTOS C SDK
Azure RTOS Documentation
by Contributed | Jun 9, 2021 | Technology
This article is contributed. See the original author and article here.
Customers using the cloud today are experiencing new challenges, such as rapidly changing workloads and insecure configurations, increasingly sophisticated attacks, and limited visibility into security and compliance. Rapidly changing workloads are both a strength and a challenge of the cloud. On the one hand, end-users are empowered to do more. On the other, how do you ensure that the ever-changing services people are using and creating are up to your security standards and follow security best practices? On top of this, no matter where you run your workloads, attacks are getting more sophisticated. making end-to-end visibility into your security and compliance and staying up to date with the latest threats more important than ever. Given the shortage of security professionals, organizations are consistently doing more with fewer resources, which is increasingly complicated as resources become specialized and focus on different aspects of the threat protection story. Microsoft works to empower all security professional with the right tools to act quickly and efficiently.
Given the dynamic nature of the cloud and the constantly evolving threat landscape, we need intelligent, automated, integrated security to close the gaps, providing visibility and proactive response across the organization.
Microsoft provides SIEM and extended detection and response (XDR) tools that emphasize integration to help your security teams stay ahead of attacks. Microsoft Defender, our XDR, manifests itself in two tailored experiences: Azure Defender and M365 Defender.
Azure Defender, part of Azure Security Center, provides advanced threat protection across many resource types, including Servers, Kubernetes, Key Vault, and more.
Azure Sentinel, our cloud native SIEM, is deeply integrated with our XDR and provides security information event management and security orchestration automated response.
As a starting point, refresh your understanding of Azure Security Center, Azure Defender, and Azure Sentinel by checking out this article: What’s the difference between Azure Security Center, Azure Defender and Azure Sentinel? – Microsoft Tech Community
Many customers are currently using Azure Security Center and Azure Sentinel but are looking to get the most out of both products to enhance protection and visibility across their enterprise.
Azure Security Center continuously scans your hybrid cloud environment and provides recommendations to help you harden your attack surface against threats. When Azure Defender does detect attempts to compromise your system, it will surface an alert in Azure Defender. You can conduct investigation and remediation from the Azure Defender blade all from the same pane of glass. You can review the alert and understand what resources were affected, what severity the alert is, and more. Directly from the Azure Defender alert, you can also mitigate the threat or prevent future attacks by resolving relative ASC recommendations. To reduce the burden on your security team, you can also set up workflow automation, triggering an automated response for similar future alerts. By setting up a logic app to respond to similar alerts in the future, you can react faster and focus more time on remediating alerts.
Cloud workload owners who manage a cloud workload and its related resources are responsible for implementing and maintaining protections by the organization’s security policies. These personas find value in ASC’s recommendations based on out-of-the-box security initiatives and the Azure Security Benchmark. These initatives are customized through features like secure score exemption or adding custom policies. Cloud workload owners are typically not focused on alerts, as this is the responsibility of the Security Operations team, who monitor and respond to security alerts. The Cloud Workload owners concentrate on securing the infrastructure while the SecOps team responds to threats where they do occur. As such, these teams leverage different tools in support of their missions.
Cloud Workload owners will frequently leverage ASC’s recommendations blade to reduce the attack surface and harden against threats. SecOps teams will focus on monitoring alerts that do come in and working toward expedient remediation. This integration is where the Azure Security Center and Azure Sentinel better together story begins. Azure Sentinel comes with several connectors for Microsoft solutions, available out of the box and providing real-time integration. With Azure Sentinel’s built-in connector for Azure Security Center, you can stream Azure Defender alerts to Sentinel in just a few clicks. You can even stream information around security recommendations, secure score, and regulatory compliance through continuous export. Streaming updates will send information about changes in one of these categories, such as an increase in your secure score or a change in your compliance posture relative to a regulatory compliance metric.
But what if your SecOps team is interested in evaluating other sources of threats beyond Azure Defender? Beyond connectors to Microsoft solutions, Azure Sentinel has built-in connectors to the broader security ecosystem for non-Microsoft solutions.
By aggregating seemingly disparate alerts into a centralized source, Sentinel connects these alerts and builds a story. Once the data flows to Sentinel, we leverage a feature called fusion to employ scalable machine learning algorithms to correlate many low-fidelity alerts and events across multiple products into high-fidelity, actionable incidents. When we think about cloud security challenges, this feature provides the needed visibility and allows your security team to prioritize their time.
Note for our customers in Azure Government: Fusion is now available in Azure Government!
Once we have onboarded alerts to Sentinel through our connectors, SecOps teams can use playbooks, automation rules, and Kusto queries for further investigation, threat hunting, and automation. Graphical and AI-based analysis will reduce the time it takes to understand the full scope and its impact. You can visualize the attack and take quick actions in the same dashboard.
Automation rules help you triage incidents in Azure Sentinel. You can use them to automatically assign incidents to the right personnel, close noisy incidents or known false positives, change their severity, and add tags. They are also the mechanism by which you can run playbooks in response to incidents.
Playbooks are collections of procedures triggered from Azure Sentinel in response to an alert or incident. A playbook can help automate and orchestrate your response and are configured to run automatically when specific alerts or incidents are generated by being attached to an analytics rule or an automation rule, respectively.
Write Kusto Query Language (KQL) statements to query log data to perform detections, analysis, and reporting in Azure Sentinel. Simple actions like querying the log data allow Sentinel to bring value and turn the multiple data sources into meaningful, actionable information. These intelligent response and automation methods enable your team to quickly and efficiently address alerts and allow you to focus your time on high-priority items, which is increasingly important as we continue to do more with fewer resources in this space.
When we couple these two great products is an integrated end-to-end detection, investigation, and response platform for protecting cloud workloads. With Azure Security Center, we can gain visibility into our cloud environment and address recs to help us harden our attack surface. Azure Defender provides visibility where we do see threats or attempts to compromise our system. From here, we can stream these alerts to Sentinel for further investigation and threat hunting. Automated responses in Sentinel facilitate risk mitigation and focus on what’s important.
Integrating these tools also allows the different personas focused on defending workloads in an organization to have visibility into what matters to them. For example, even if a Cloud Workload owner suppresses an alert, it will still create an incident in Sentinel which surfaces in a dismissed state. This process facilitates focus on various aspects of the threat protection story. This integrations enables security analysts to receive actionable information reducing time to action and enabling decision-making.
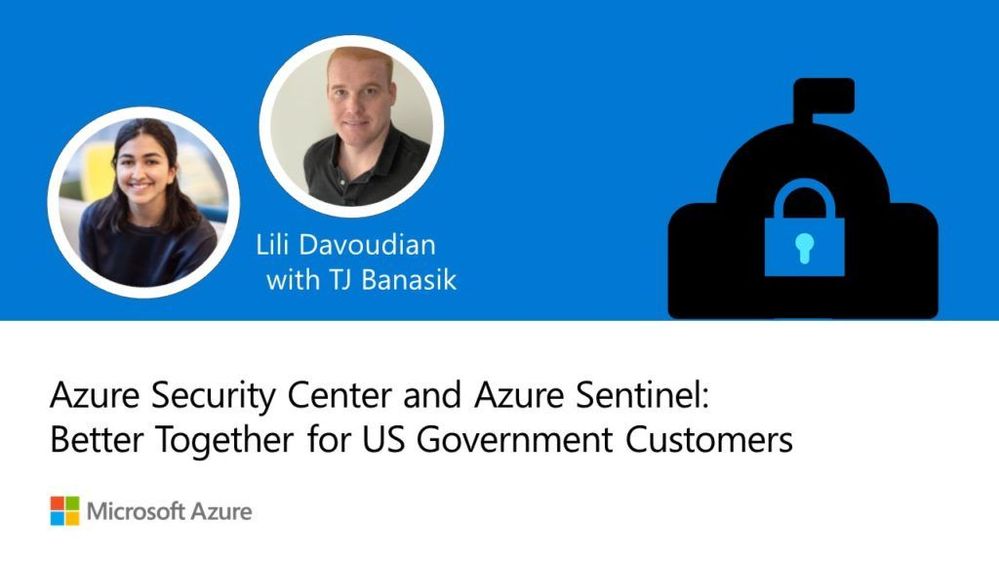
Check out this video for more: Video | Better together for US government: Azure Security Center + Azure Sentinel | Azure Government (microsoft.com)
https://www.youtube-nocookie.com/embed/gADITMKYuSA
Get Started with Azure Security Center and Azure Sentinel and Learn More About Security with Microsoft
Below are additional resources for learning more about security with Microsoft. Bookmark the Security blog to keep up with our expert coverage on security matters and follow us at @MSFTSecurity or visit our website for the latest news and cybersecurity updates.
by Contributed | Jun 9, 2021 | Technology
This article is contributed. See the original author and article here.
As hybrid and remote work continue, many organizations are giving employees flexibility to choose not only where they work but also the devices they use to get work done. We have been working closely with Apple to ensure we’re providing a great user experience in OneDrive on Apple products, whether people are using OneDrive to keep their work files synced and protected or to store and share their personal files and photos in the cloud.
Today, we’re excited to share some of the updates and improvements we’re in the process of making to OneDrive running on Apple products to help people be more productive no matter where they are.
OneDrive support for M1-powered Macs
You asked and we listened! 
We are thrilled to announce that later this year, we will be updating OneDrive for Mac to run natively on M1-powered Macs. This means that OneDrive will take full advantage of the performance improvements on M1, making you even more productive on the latest iMac, MacBook Air, 13-inch MacBook Pro, and Mac mini.
Note: OneDrive is currently available using Rosetta 2 on M1 -powered Macs.
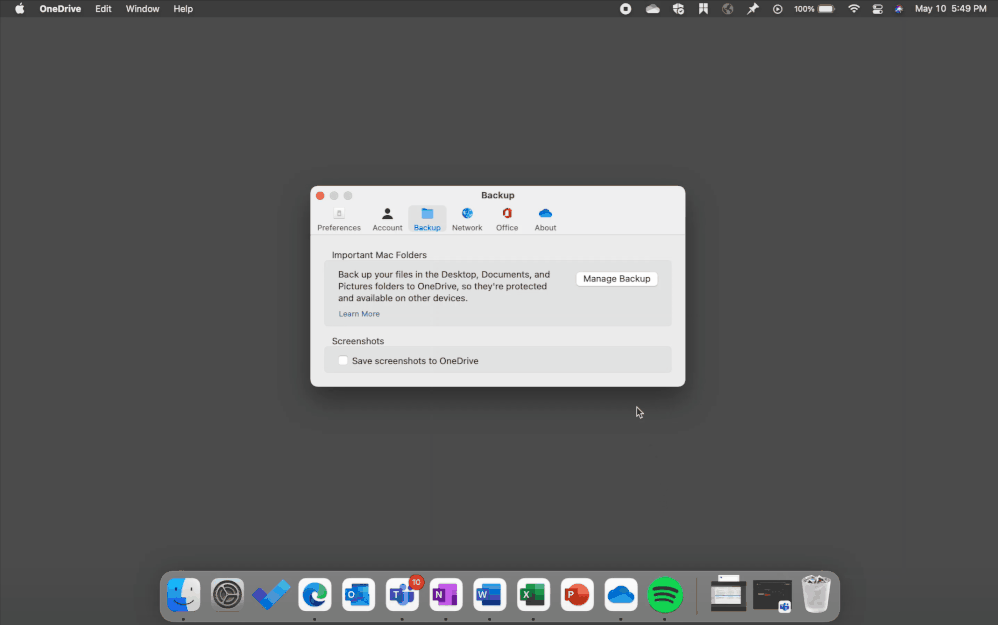
Known Folder Move
We have been actively working to address your request to enable Known Folder Move (KFM) support for macOS, and we’re thrilled to announce that soon you’ll be able to roll out KFM for your macOS users and redirect their Desktop, Documents, and Pictures folders to OneDrive.
This means that people using OneDrive on the latest version of macOS can continue using folders they’re familiar with to do their daily work and be assured that their data is backed up and secure.
KFM will also enable your macOS users to access their most important files across different devices and applications with no disruption to productivity, because their content is automatically synced to OneDrive. In addition, your users will be able to securely share their data within and outside their organization, increasing collaboration.
Redirect your important Mac folders (Desktop, Documents and Pictures) to OneDrive with KFM for Mac.
And if you decide to perform a device refresh, you don’t need to worry about losing user data. For new machines, you can configure KFM from the start, so all new files are uploaded to the cloud. This is great for your organization as it increases user engagement with OneDrive, and you can easily protect files with enterprise-level security and compliance that comes built in. IT admins will be able to use preferences to encourage Mac users to perform KFM to keep their files backed up and protected, or they can use a silent property to automatically move content in the Desktop, Documents, and Picture folders to OneDrive.
This update will be available to all Mac users, enabling you to also keep your personal files and family photos in your important folders (Desktop, Documents, and Pictures) synced, protected, and available on other devices, and there’s no extra cost for macOS folder backup (up to 5 GB of files without a subscription). So even if your device gets lost or damaged, you won’t lose your important documents and favorite pictures when they are synced to OneDrive.
For organizations, KFM should be available for private preview later this year. To sign up, please enroll here.
Note:
- Files On-Demand and the latest version of macOS would be required for KFM.
- KFM will be available for the Standalone app, followed by the App Store app soon after.
Files On-Demand and Finder updates
Later this year we will be revamping the OneDrive sync experience on the latest version of macOS based on Apple’s new File Provider platform to improve the Finder experience for OneDrive. With this update, the OneDrive folder will be visible under Locations in the Finder sidebar, providing easy and quick access to all your OneDrive files.
 OneDrive folder will be visible under Locations in the Finder sidebar providing a native experience.
We will also be updating the Files On-Demand experience. OneDrive Files On-Demand, which is enabled by default, helps you view and access all your files, individual or shared, without having to download them and use device storage.
This update will provide refreshed file status iconography in OneDrive:

- Online-only files will be represented by a cloud icon
- When you open an online-only file, it downloads to your device as a locally-available file
- Locally downloaded files that require device space will display the always-available file icon
This redesign is aimed at rendering a seamless OneDrive experience that feels native on the latest version of macOS. Deeply integrated with Finder, this refresh anchors on simplicity to improve ease of use while providing all the same benefits and functionality you have with your current version of Files On-Demand in OneDrive for macOS.
 Updated OneDrive Files On-Demand experience for Macs.
Regardless of which macOS version you are running, OneDrive Files On-Demand helps you:
- Save space on your device by making certain files available online only and access them just as you would any other file on your device.
- Set files and folders to be always available on the device for offline access.
- See important information about files, such as whether they are shared.
- See thumbnails of more than 300 file types even if the necessary application to access a file isn’t installed.
.png") Save space on your device by making certain files available online only
Save space on your device by making certain files available online only
Read more about Files On-Demand for macOS here.
Sync Admin Reports support for macOS
Last month, we announced OneDrive Sync Admin Reports for Windows in the Microsoft 365 Apps admin center.
We are thrilled to announce that soon we will be bringing the same functionality to macOS as well.
These reports will give IT admins more visibility into macOS users in their organization running OneDrive Sync and any errors they might be experiencing. With an at-a-glance view of OneDrive Sync across their organization, IT admins can quickly and proactively resolve issues to help people stay productive while improving OneDrive adoption and user experience.
 OneDrive admin reports will give IT admins more visibility into macOS users in their organization .
Performance and reliability improvements
We’ve been working diligently to improve performance and reliability for OneDrive running on macOS. Last month, the team rolled out updates that reduced the amount of CPU usage by 40 percent, helping save battery power and speed up performance for multi-tasking. We’re excited to roll out additional improvements over the next few months that further optimize performance and reliability to improve the user experience.
Exclude syncing of specific file types
Last month, we enabled functionality in OneDrive for macOS that allows IT admins to prevent the OneDrive sync app from uploading certain files to OneDrive or SharePoint. IT admins who are managing macOS devices in their organizations can enable this setting using the prescribed plist file entry to prevent users from uploading specific file types such as .exe or .mp3 when they sync their OneDrive files.
When this setting is enabled, the sync app doesn’t upload new files that match the specified keywords, and the files remain in the local OneDrive folder.
In Finder, the files will appear with an “Excluded from sync” icon in the Status column, and users will see a notification in the OneDrive activity center explaining why the files aren’t syncing.
 Exclude files notification in Finder and Activity center.
Offline editing with Office Apps in iOS
We are glad to announce that later this month iOS and iPadOS users will be able to edit Office documents that they have marked for offline use in the OneDrive mobile app. When they are offline, they only have to tap Edit or Open in Word or PowerPoint to start editing. When they’re online again, they can pick up right where they left off.
Offline editing will be available with the Office mobile app as well as the standalone Word and PowerPoint apps on iOS and iPadOS.
 iOS and iPadOS users will be able to edit Office documents that they have marked for offline use in the OneDrive mobile app
Learn more and stay engaged..
We continue to evolve OneDrive as a place to access, share, and collaborate on all your files in Office 365, keeping them protected and readily accessible on all your devices, anywhere.
To learn more about OneDrive:
Thank you again for your support of OneDrive. We look forward to your continued feedback and hope to connect with you at another upcoming Microsoft or community-led event.
Thanks for your time reading all about OneDrive,
OneDrive Team | Microsoft
by Contributed | Jun 9, 2021 | Technology
This article is contributed. See the original author and article here.
Do you love using Dynamics 365 to empower your organization to deliver operational excellence and delight customers? Have you considered earning a certification that validates your ability to strengthen your team’s digital foundation and to use technology to innovate and adapt? To help you plan your career journey, we’re presenting a new series of blog posts that explore the value and benefits of Dynamics 365 certifications.
In this post, we’ll focus on some of the highlights of our certification portfolio, which spans from fundamentals to role-based certifications that validate key Dynamics 365 skills.
We’re here to help you discover the career path that’s right for you—whether you’re just starting out with Dynamics 365, looking to advance, or wanting to change to a new focus. When you pass an exam and earn your Microsoft Certification, that’s a validation of your skills and experience. The combination of your skills and a globally recognized, industry-endorsed Microsoft Certification sends a career-building message to employers. Your certification can even give you a boost of confidence and recognition in your career.
In later posts in this series, we’ll dive deeper into each of the certifications that we highlight here, to help you further explore and choose the certifications that are right for you and your career journey. Microsoft Power Platform and Dynamics 365 certifications often complement each other. To learn more about Microsoft Power Platform certifications, go to Finding the right Microsoft Power Platform certification for you.
The benefits of certification
Dynamics 365 offers many avenues for professionals to deepen their skills. Let those skills guide you as you investigate the different Dynamics 365 certifications available to you. A Microsoft Certification validates that you have the skills that organizations are looking for when they hire and advance employees. Plus, Microsoft keeps certifications up to date based on market and industry demands.
Many respondents in the 2020–2021 Microsoft Dynamics Salary Survey from Nigel Frank consider that years of experience with Dynamics 365 is the most important factor associated with a professional’s earning potential. Added to that, 61 percent of that survey’s respondents believe that certifications give you an edge in the job market. Many reported a salary increase (a 22 percent increase, on average) after they achieved a certification. Just as you use certifications to prove your skills, organizations can use them to identify the talent they’re looking for. They can even help you achieve promotions and raises.
Certifications can give your self-confidence and your career a boost. They’re an indication to employers that you’re willing to invest the time to build essential skills. The Global Knowledge 2020 IT Skills and Salary Report found that IT professionals with certifications, on average, earn more than their peers without them. Interestingly, the survey found that the more certifications a professional holds, the higher their average salary. Certification, combined with your drive and abilities, can help to open career doors for you.
The fundamentals certifications
Consider a fundamentals certification as the first milepost on your certification journey. These very popular technical certifications are held by professionals all over the globe. They build foundational skills and provide a pathway for earning certifications based on deeper technical skills required to perform industry roles.
There are two fundamentals certifications for Dynamics 365. The first is for those who are familiar with customer relationship management (CRM) and are IT savvy—either generally or through work experience. If you have this basic experience, look into Microsoft Certified: Dynamics 365 Fundamentals (CRM) certification (pass Exam MB-910). To start exploring your journey to certification, check out the Dynamics 365 Fundamentals (CRM) journey map.
The other fundamentals certification is for those who have a broad exposure to the enterprise resource planning (ERP) capabilities of Dynamics 365 and who understand the basics of how finance and operations apps fit in within the overall Microsoft ecosystem. If this sounds like you, consider the Microsoft Certified: Dynamics 365 Fundamentals (ERP) certification (pass Exam MB-920). The Dynamics 365 Fundamentals (ERP) journey map can help you get started.
These two certifications that focus on CRM and ERP skills are replacing the older Dynamics 365 Fundamentals certification, which retires on June 30, 2021.
The functional consultant certifications
Functional consultants understand the value of collaborative work between business and technology. There are many possible career paths for those in this role. We have a wide variety of Dynamics 365 certifications for functional consultants who seek to validate their skills and broaden their career options.
If you’re a professional with expertise in marketing, sales, field service, or customer service, consider exploring the following Dynamics 365 associate certifications. Professionals who achieve these certifications also have skills configuring Microsoft Power Platform solutions and apps.
Marketers who use their technical expertise with both Dynamics 365 and Microsoft Power Platform to implement marketing solutions for their organization might consider the Microsoft Certified: Dynamics 365 Marketing Functional Consultant Associate certification (pass two exams: Exam PL-200 and Exam MB-220). To start your journey to certification, check out the Dynamics 365 Marketing Functional Consultant journey map.
Sales professionals who use their technical expertise with both Microsoft Power Platform and Dynamics 365 to implement and extend sales solutions for their organization should explore the Microsoft Certified: Dynamics 365 Sales Functional Consultant Associate certification (pass two exams: Exam PL-200, linked to earlier in this post, and Exam MB-210). The Dynamics 365 Sales Functional Consultant journey map can help you get started.
Field service professionals who have technical expertise using both Dynamics 365 and Microsoft Power Platform to implement intelligent planning solutions for their organization to help ensure consistent and dependable operations should consider Microsoft Certified: Dynamics 365 Field Service Functional Consultant Associate certification (pass two exams: Exam PL-200 and Exam MB-240). To start your journey to certification, explore the Dynamics 365 Field Service Functional Consultant journey map.
Customer service professionals who have strong applied knowledge of customer service and experience using Microsoft Power Platform and Dynamics 365 to implement omnichannel solutions that focus on service, quality, reliability, efficiency, and customer satisfaction should investigate the Microsoft Certified: Dynamics 365 Customer Service Functional Consultant Associate certification (pass two exams: PL-200 and Exam MB-230). To start your journey to certification, check out the Dynamics 365 Customer Service Functional Consultant journey map.
If you’re a functional consultant with applied knowledge of Dynamics 365 Business Central, Commerce, Finance, or Supply Chain Management, consider exploring the following Dynamics 365 associate certifications.
Functional consultants who implement core Dynamics 365 Business Central processes for small and medium-sized businesses might be interested in Microsoft Certified: Dynamics 365 Business Central Functional Consultant Associate (pass Exam MB-800). The Dynamics 365 Business Central Functional Consultant journey map can help you get started.
Functional consultants, developers, information workers, or business professionals who use Dynamics 365 Commerce to support their teams might consider Microsoft Certified: Dynamics 365 Commerce Functional Consultant Associate (pass two exams: Exam MB-300 and Exam MB-340). To start your journey to certification, check out the certification page on Learn.
Functional consultants with experience working in finance departments analyzing business requirements and translating them into business processes and solutions should explore Microsoft Certified: Dynamics 365 Finance Functional Consultant Associate (pass two exams: Exam MB-300, linked to earlier in this post, and Exam MB-310). The Dynamics 365 Finance Functional Consultant journey map can help you start your journey to certification.
Business users and functional consultants with a fundamental understanding of supply chain management industry standards should consider Microsoft Certified: Dynamics 365 Supply Chain Management Functional Consultant Associate (pass two exams: Exam MB-300 and MB-330). To start your journey to certification, check out the Dynamics 365 Supply Chain Management Functional Consultant journey map.
Functional consultants or business users with a deep understanding of industry and manufacturing standards with experience configuring Dynamics 365 supply chain management should look into Microsoft Certified: Dynamics 365 Supply Chain Management, Manufacturing Functional Consultant Associate (pass two exams: Exam MB-300 and MB-320). To start your journey to certification, get more information on the Dynamics 365 Supply Chain Management, Manufacturing Functional Consultant journey map.
The developer certification
Developers who are responsible for translating requirements into critical system functionality for finance and operations apps in Dynamics 365 should look into Microsoft Certified: Dynamics 365 Finance and Operations Apps Developer Associate certification (pass two exams: Exam MB-300 and Exam MB-500). You need to have experience providing solutions using standardized application coding patterns, extensible features, and external integrations. To get started on your journey to certification, explore the Dynamics 365 Finance and Operations Apps Developer journey map.
The solution architect certification
This expert certification is for highly qualified professionals with years of experience, such as solution architects, functional or technical consultants, or IT or business professionals who have a deep understanding of Dynamics 365 Finance and Operations apps. You fit the profile for the Microsoft Certified: Dynamics 365: Finance and Operations Apps Solution Architect Expert certification (complete a prerequisite and pass Exam MB-700) if you’re a trusted advisor for stakeholders and you design cohesive solutions for your customers. The Dynamics 365 Finance and Operations Apps Solution Architect journey map can help get you started on your journey to certification.
Dynamics 365 resources
These resources can help you get started on your journey and connect with others:
Ready to discover your career path?
Training is available for every Dynamics 365 certification, whether you want to review before an exam or brush up on your skills to prepare. Go to Microsoft Learn for Dynamics 365 (linked to earlier in this post) to decide how you want to learn and which platform best fits your learning style. You have access to a breadth of options to help grow your confidence and expertise—from self-paced learning, training events, instructor-led training, and more. It’s time to take the next step to discover your career path!
And stay tuned for the next blog posts in this series to learn more about the certifications that interest you.
Related posts
by Contributed | Jun 9, 2021 | Technology
This article is contributed. See the original author and article here.
Get ready to take your diagramming skills to the next level!
In this episode, Chris and I talk with Mukul Kumar (Senior product manager) and Nishant Kumar (Product manager) from the Visio team at Microsoft. They have some exciting news that’s ‘goodness at no cost’ to a lot of people in Microsoft 365. We’ll dig into this and all things Visio – its place in the world of productivity, use cases for beginners to experts – web to desktop, and more.
The goal after finishing this episode: to be so fluent, you diagram in your sleep.
Listen to podcast below:
https://html5-player.libsyn.com/embed/episode/id/19387808/height/90/theme/custom/thumbnail/yes/direction/backward/render-playlist/no/custom-color/247bc1/
Subscribe to The Intrazone podcast! And listen to episode 66 now + show links and more below.
Intrazone guests: Nishant Kumar (product manager | Microsoft) and Mukul Kumar (senior product manager | Microsoft).
Links to important on-demand recordings and articles mentioned in this episode:
- Hosts, guests, and related products
- Articles and sites
- Events
Subscribe today!
Listen to the show! If you like what you hear, we’d love for you to Subscribe, Rate and Review it on iTunes or wherever you get your podcasts.
Be sure to visit our show page to hear all the episodes, access the show notes, and get bonus content. And stay connected to the SharePoint community blog where we’ll share more information per episode, guest insights, and take any questions from our listeners and SharePoint users (TheIntrazone@microsoft.com). We, too, welcome your ideas for future episodes topics and segments. Keep the discussion going in comments below; we’re hear to listen and grow.
Subscribe to The Intrazone podcast! And listen to episode 66 now.
Thanks for listening!
The SharePoint teams want you to unleash your magic, creativity, and productivity – and visualize it all. And we will do this, together, one diagram at a time.
The Intrazone links
+ Listen to other Microsoft podcasts at aka.ms/microsoft/podcasts.
![Left to right [The Intrazone co-hosts]: Chris McNulty, director (SharePoint/Viva – Microsoft) and Mark Kashman, senior product manager (SharePoint – Microsoft).](https://www.drware.com/wp-content/uploads/2021/04/fb_image-89.jpeg "Chris-Mark_in-studio.jpg") Left to right [The Intrazone co-hosts]: Chris McNulty, director (SharePoint/Viva – Microsoft) and Mark Kashman, senior product manager (SharePoint – Microsoft).
Left to right [The Intrazone co-hosts]: Chris McNulty, director (SharePoint/Viva – Microsoft) and Mark Kashman, senior product manager (SharePoint – Microsoft).
 The Intrazone, a show about the Microsoft 365 intelligent intranet (aka.ms/TheIntrazone)

by Contributed | Jun 9, 2021 | Business, Microsoft 365, Technology, Visio
This article is contributed. See the original author and article here.
With the shift to hybrid work comes the need for business leaders to create a new, flexible operating model spanning people, places, and processes. Every business process will need to be transformed and diagrams are often the starting point for many process updates. They enable leaders across the organization to improve and visually communicate processes…
The post Bringing Visio to Microsoft 365: Diagramming for everyone appeared first on Microsoft 365 Blog.
Brought to you by Dr. Ware, Microsoft Office 365 Silver Partner, Charleston SC.

Recent Comments