This article is contributed. See the original author and article here.
Question Description: A customer has designed a database schema for a Terabyte-level Azure SQL database, but the original design lacks a unique key. As the data volume increases, performance issues become more pronounced.
To address these performance issues, Azure SQL uses a hidden index with uniqueifier identifiers, which have a maximum limit of 2,147,483,648.
When the number of data rows in a table exceeds 2.1 billion, any insert or update operations will result in the following error:
Msg 666, Level 16, State 2, Line 25
This error can lead to partial or complete database outages, severely impacting business operations.
It isn’t a good idea to create a clustered index on a uniqueidentifier column and generate your GUIDs with NEWID(). The reason for this is that NEWID()generates GUIDs in non-sequential order and SQL Server orders a clustered index sequentially. It will work – SQL Server will let you build a clustered index around a uniqueidentifier column, however it will cause the SQL Server to do unnecessary work and cause performance slowdowns. The reason for this is that to insert data into the middle of a clustered index (out of sequential order) causes SQL Server to make room for the data by rearranging the cluster.
Mitigation Strategies:
1. Quick Workaround:
Make index creation online and resumable by specifying ONLINE=ON and RESUMABLE=ON. This allows the operation to use smaller transactions, making it possible to resume from the failure point if it fails for any reason.
2. Permanent Fix:
Rebuild the clustered index with a unique key by adding a new column. The steps are as followed:
I: Create the index with the new definition offline.
II: Use the DROP_EXISTING option for online index creation. This keeps both indexes up-to-date, and once the new index is built, it will replace the existing one.
III: Use the resumable option to break the creation into smaller transactions, reducing transaction log bloat. Note that there is some performance impact.
IV: Manually create a new copy of the table, copying all cold data, then rename the table. This involves scanning the source table, adding a small additional load to the system. Use a shorter outage and a merge statement for the new data.
V: Create a partitioned view that is a union of the old and new tables with different index schemes. Ensure that insert statements supply values for every field in the table. This method can be complex and may require taking the database offline, with the rebuilding process taking anywhere from a few hours to several days.
Best Practice: Planning early and carefully designing the clustered index is crucial to avoid these issues.
This article is contributed. See the original author and article here.
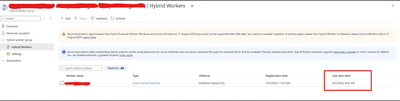
As you may be aware, Azure Automation Agent-based User Hybrid Runbook Worker (Windows and Linux) was retired on 31 August 2024, and support has been discontinued.
Nonetheless, users might want to verify whether their runbooks and jobs are utilizing the extension or agent-based system when they transition. It’s worth noting that versions V1 and V2 of the same hybrid worker machine can be registered simultaneously with Azure Automation but will have different names.
If the V1 agent wasn’t uninstalled before the V2 extension was installed, this would lead Azure to detect both versions on the same machine.
The “last seen time” suggests V1 and V2 are communicating with Azure Automation if both exist.
It’s also worth noting that some automation tasks are still being performed by the V1 worker, which accounts for its continued activity. Runbook jobs can be executed on any machine within the Hybrid Worker Group. Currently, this group includes both V1 and V2 versions, so the tasks are distributed between them.
The installation of V2 does not mean that the Hybrid Worker Group will disregard V1 and exclusively use V2.
This article is contributed. See the original author and article here.
In my previous blog posts of containerising .NET apps and Function apps, I discussed how to containerise .NET apps and Azure Functions apps with and without Dockerfile. However, deploying these containerised apps to Azure Container Apps (ACA) is a different story.
Since its release in May 2023, Azure Developer CLI (azd) has evolved significantly. azd nowadays even automatically generates Bicep files for us to immediately provision and deploy applications to Azure. With this feature, you only need the azd up command for provisioning and deployment.
Throughout this post, I’m going to discuss how to provision and deploy .NET apps including Azure Functions to ACA through just one command, azd up.
Let’s make sure those apps running properly on your local machine. In order to run those apps locally, open three terminal windows and run the following commands on each terminal:
# Terminal 1 – ASP.NET Core Web API
dotnet run –project ./ApiApp
# Terminal 3 – Blazor app
dotnet run –project ./WebApp
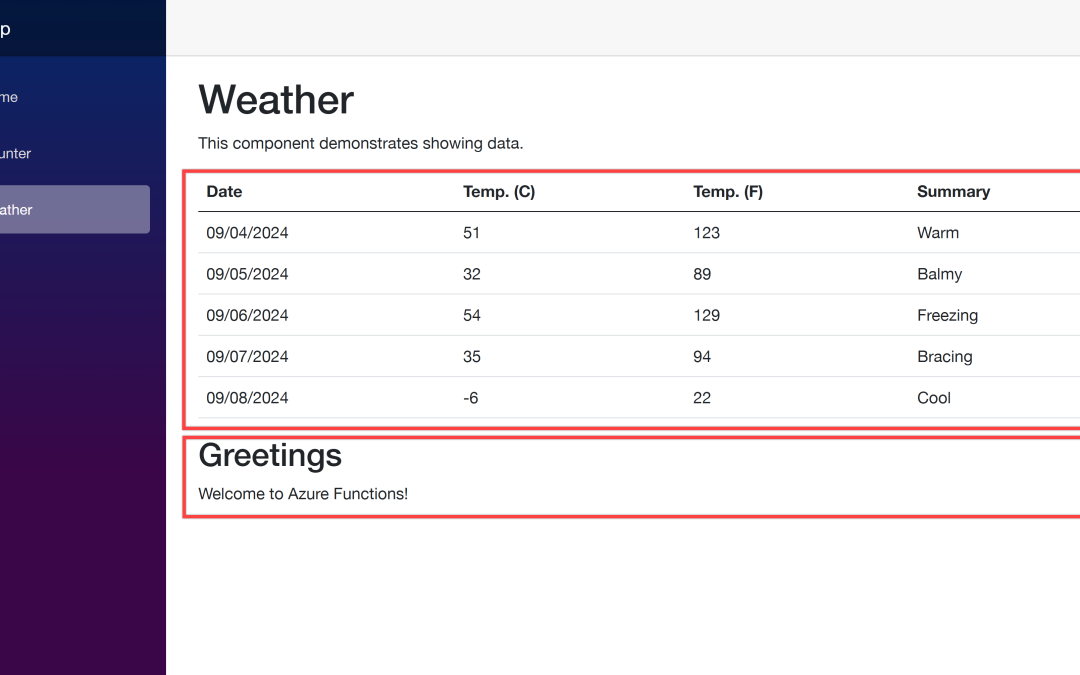
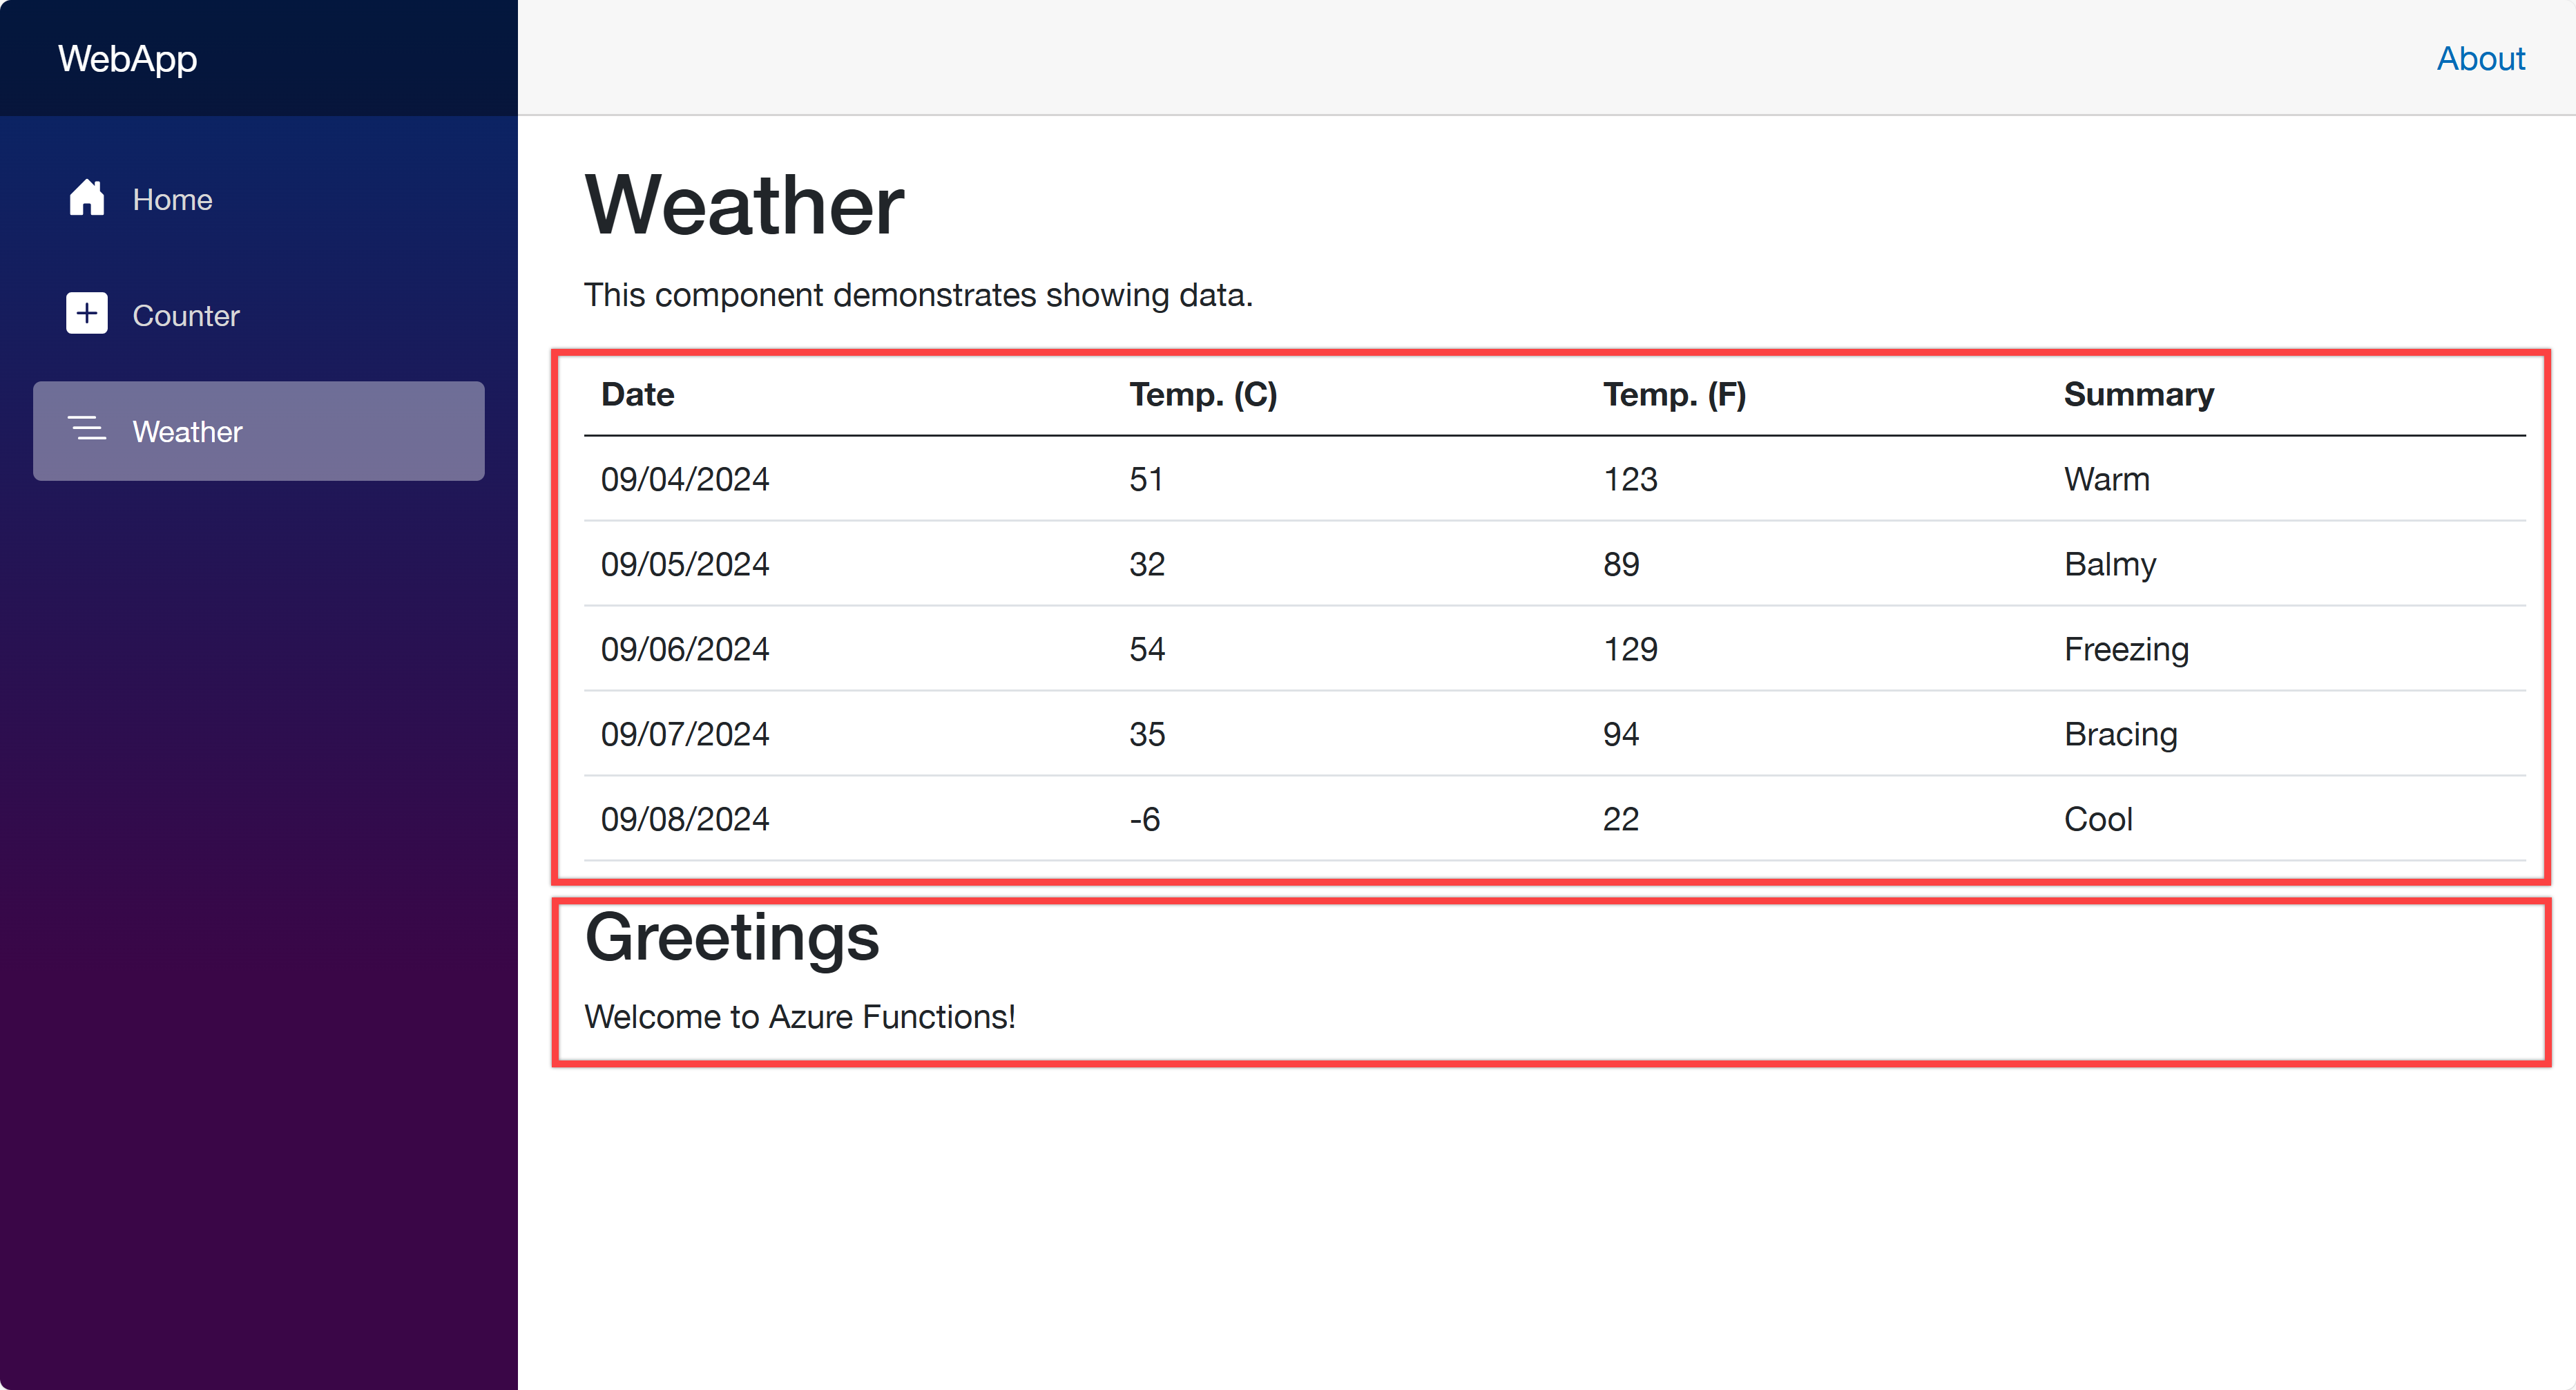
Open your web browser and navigate to https://localhost:5001 to see the Blazor app running. Then navigate to https://localhost:5001/weather to see the weather data fetched from the ApiApp and the greetings populated from the FuncApp.
Now, let’s start using azd to provision and deploy these apps to ACA. Make sure that you’ve already logged in to Azure with the azd auth login command.
azd init – Initialisation
In order to provision and deploy the apps to ACA, you need to initialise the azd configuration. Run the following command:
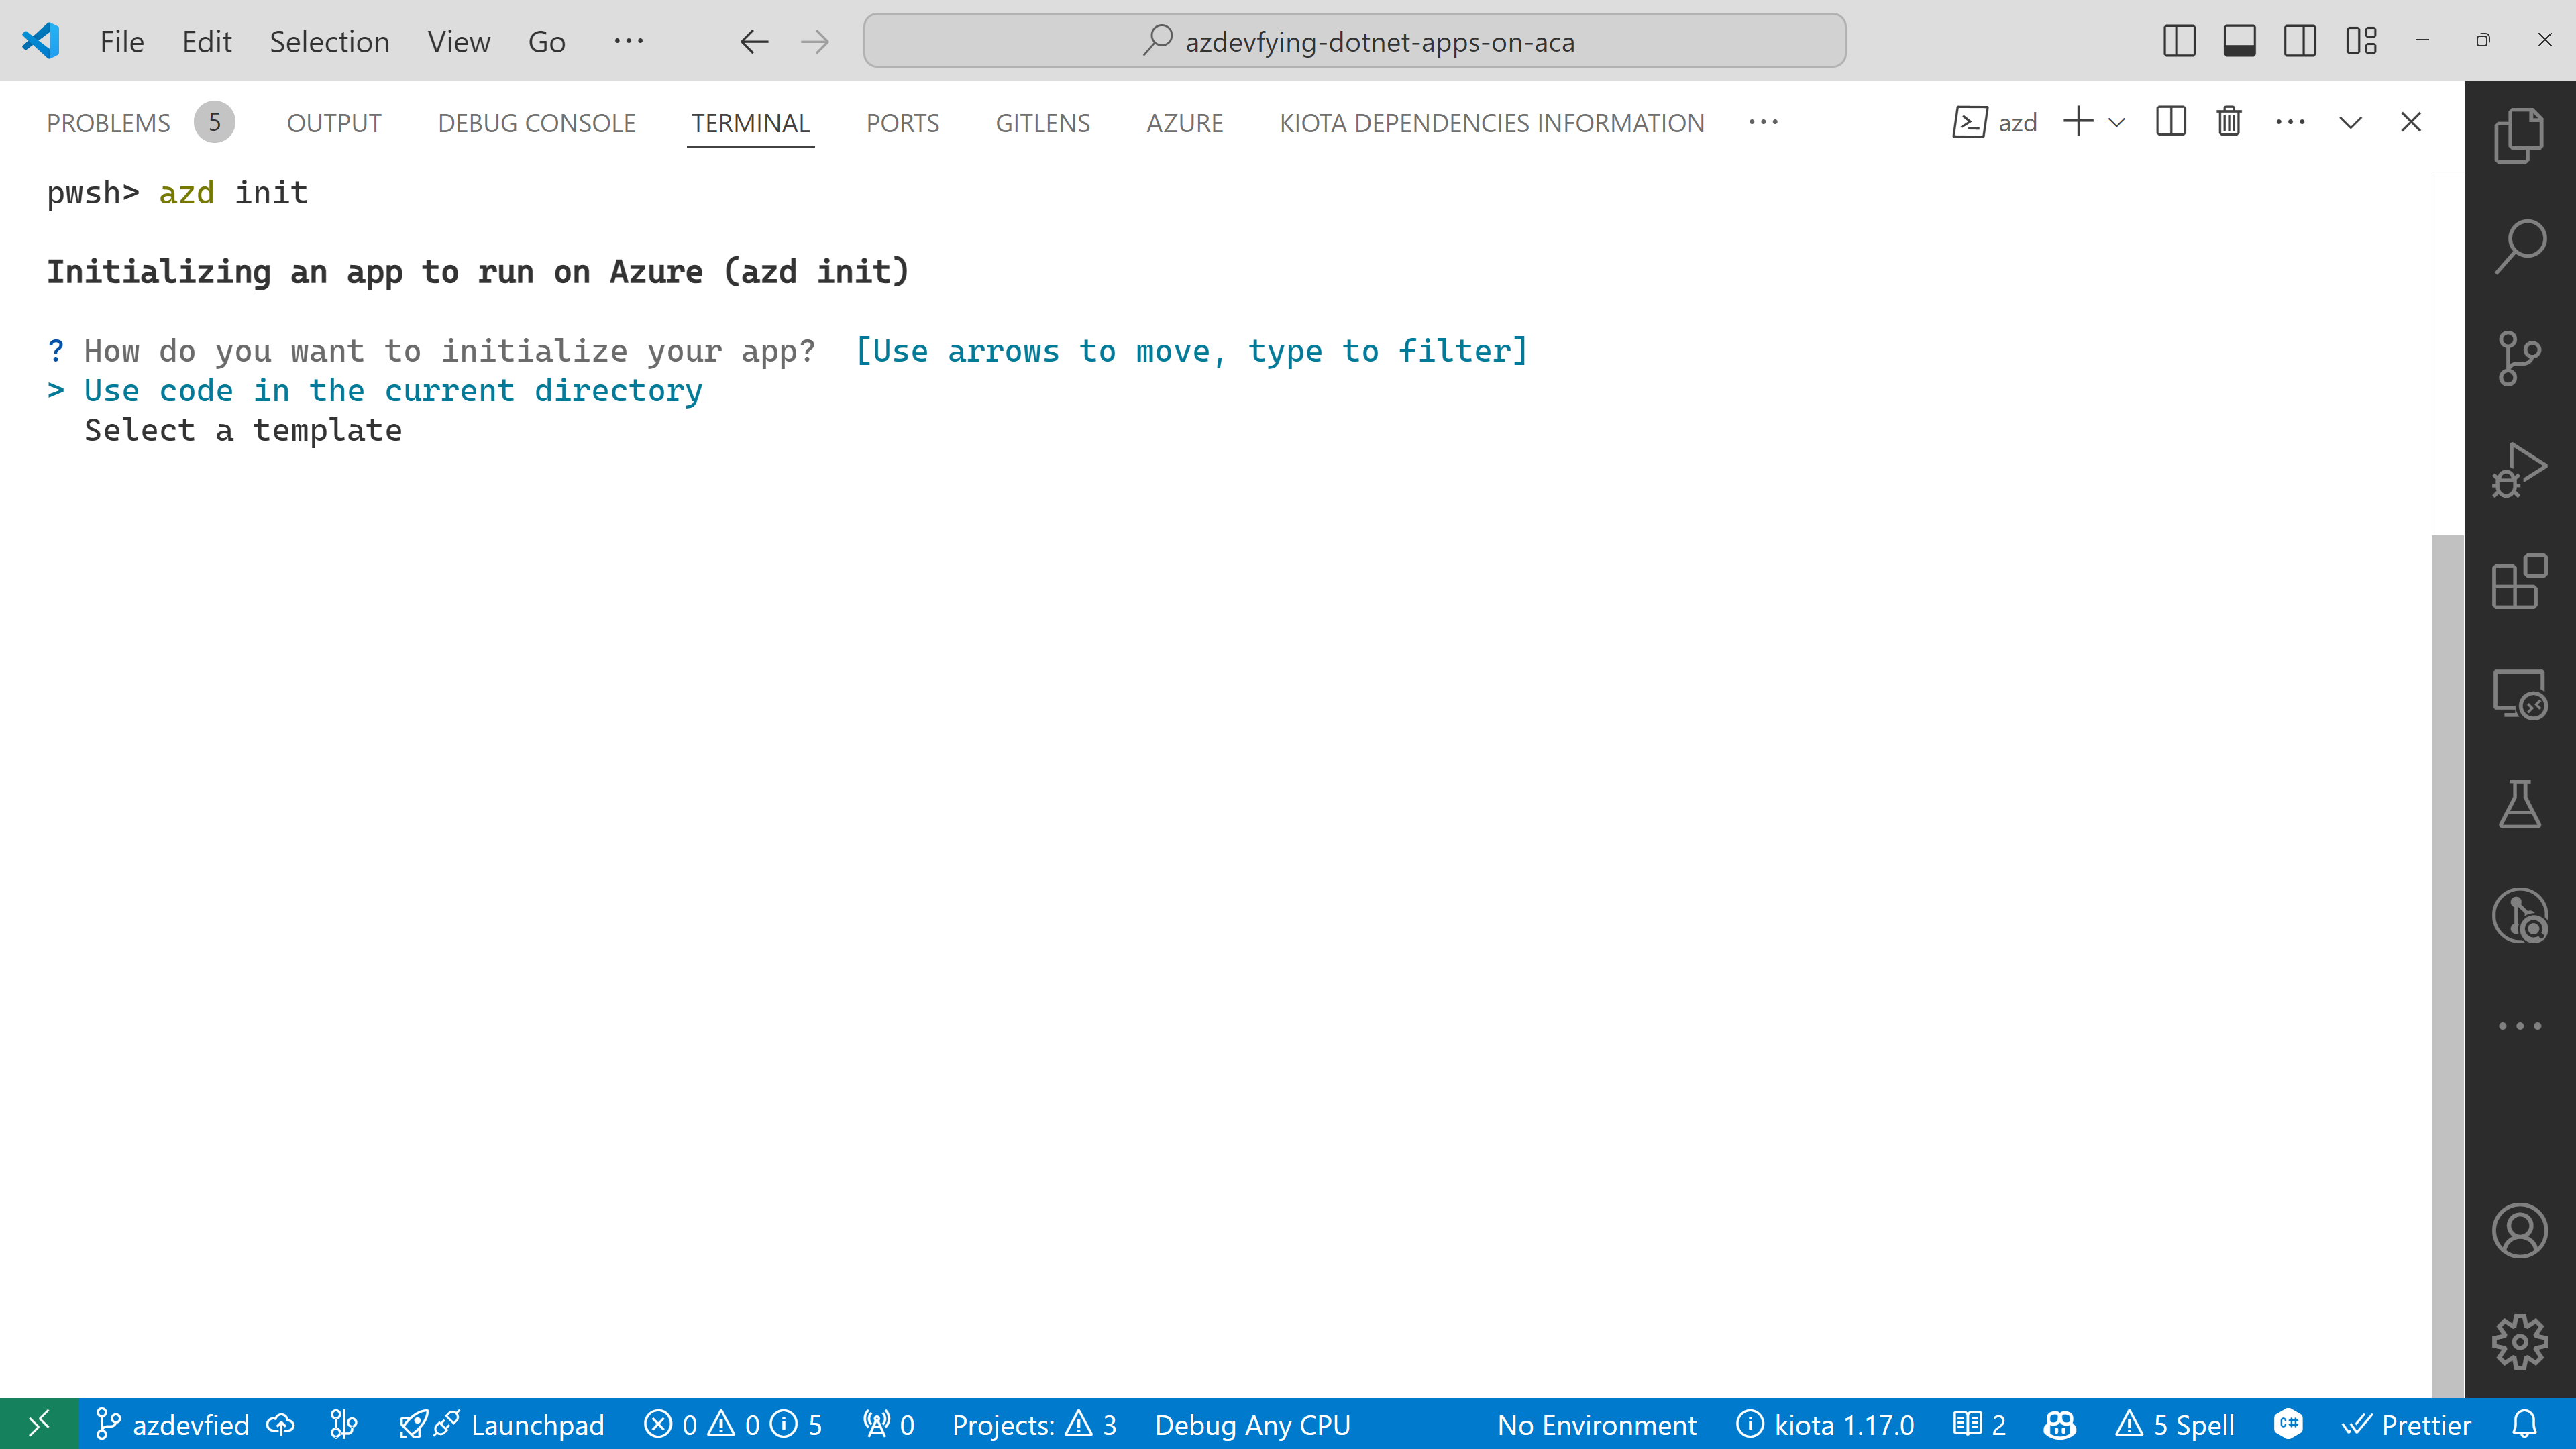
azd init
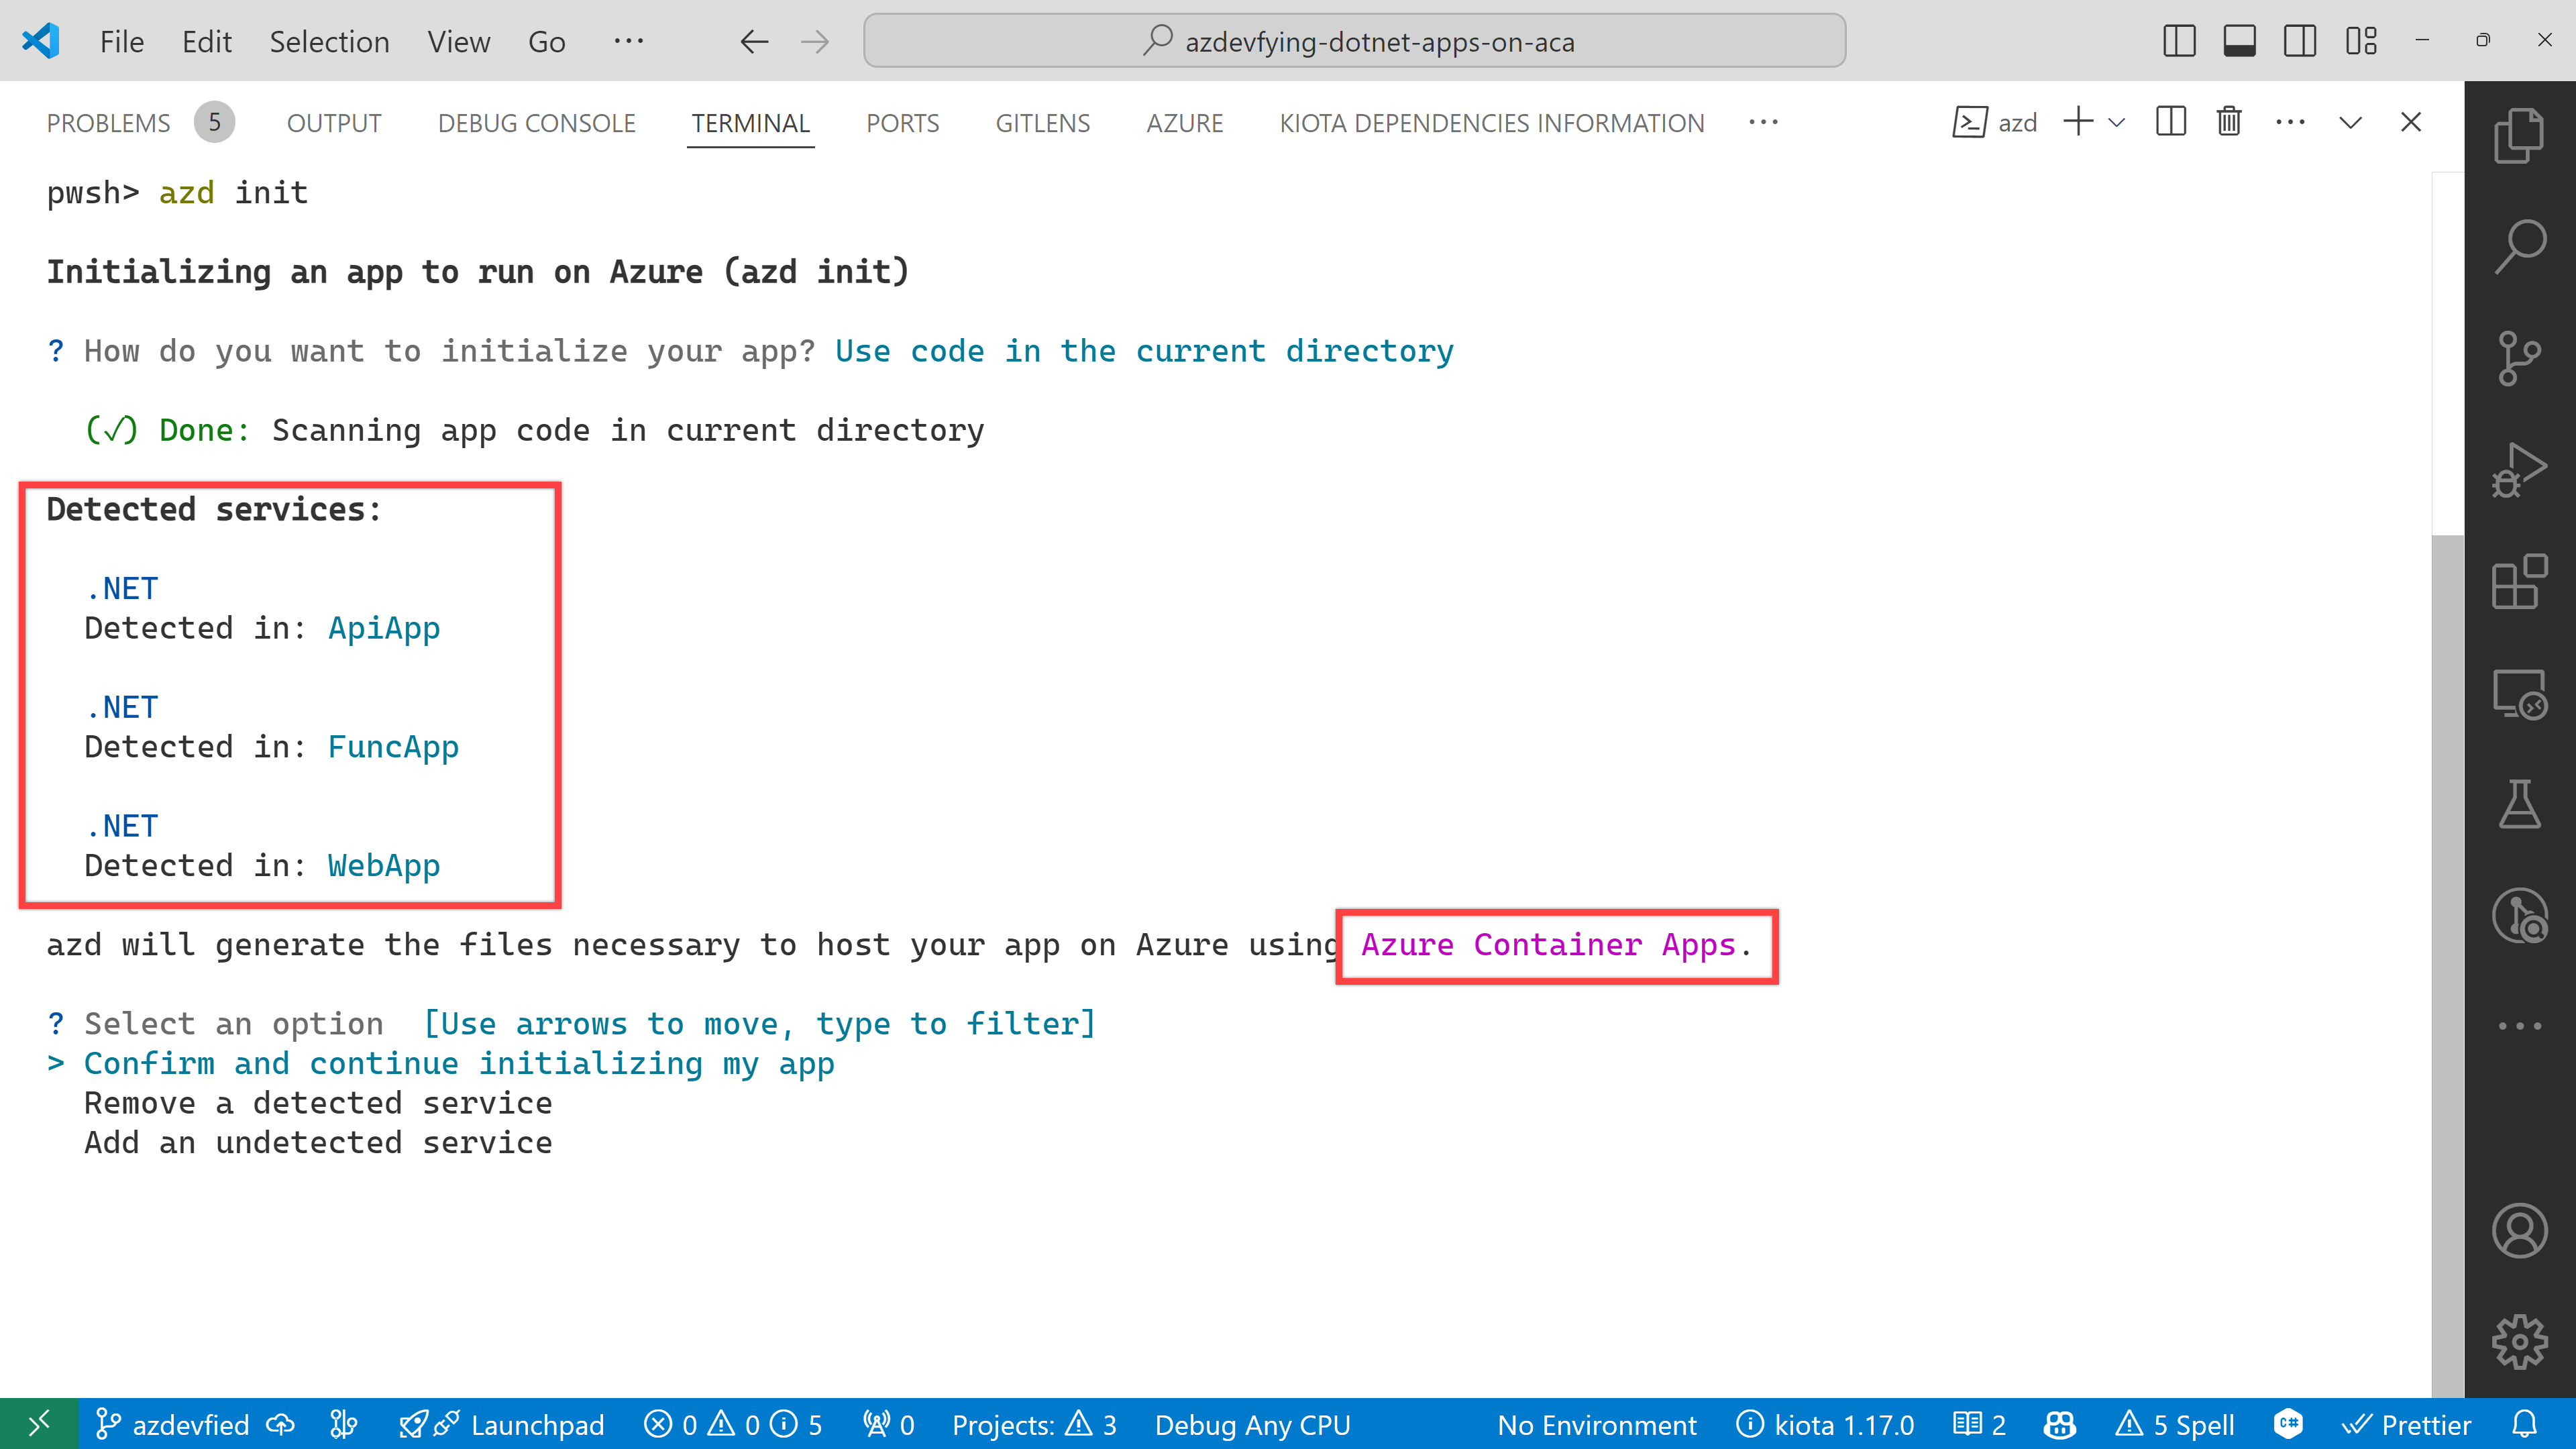
You’ll be prompted to initialise the app. Choose the Use code in the current directory option.
azd automatically detects your three apps as shown below. In addition to that, it says it will use Azure Container Apps. Choose the Confirm and continue initializing my app option.
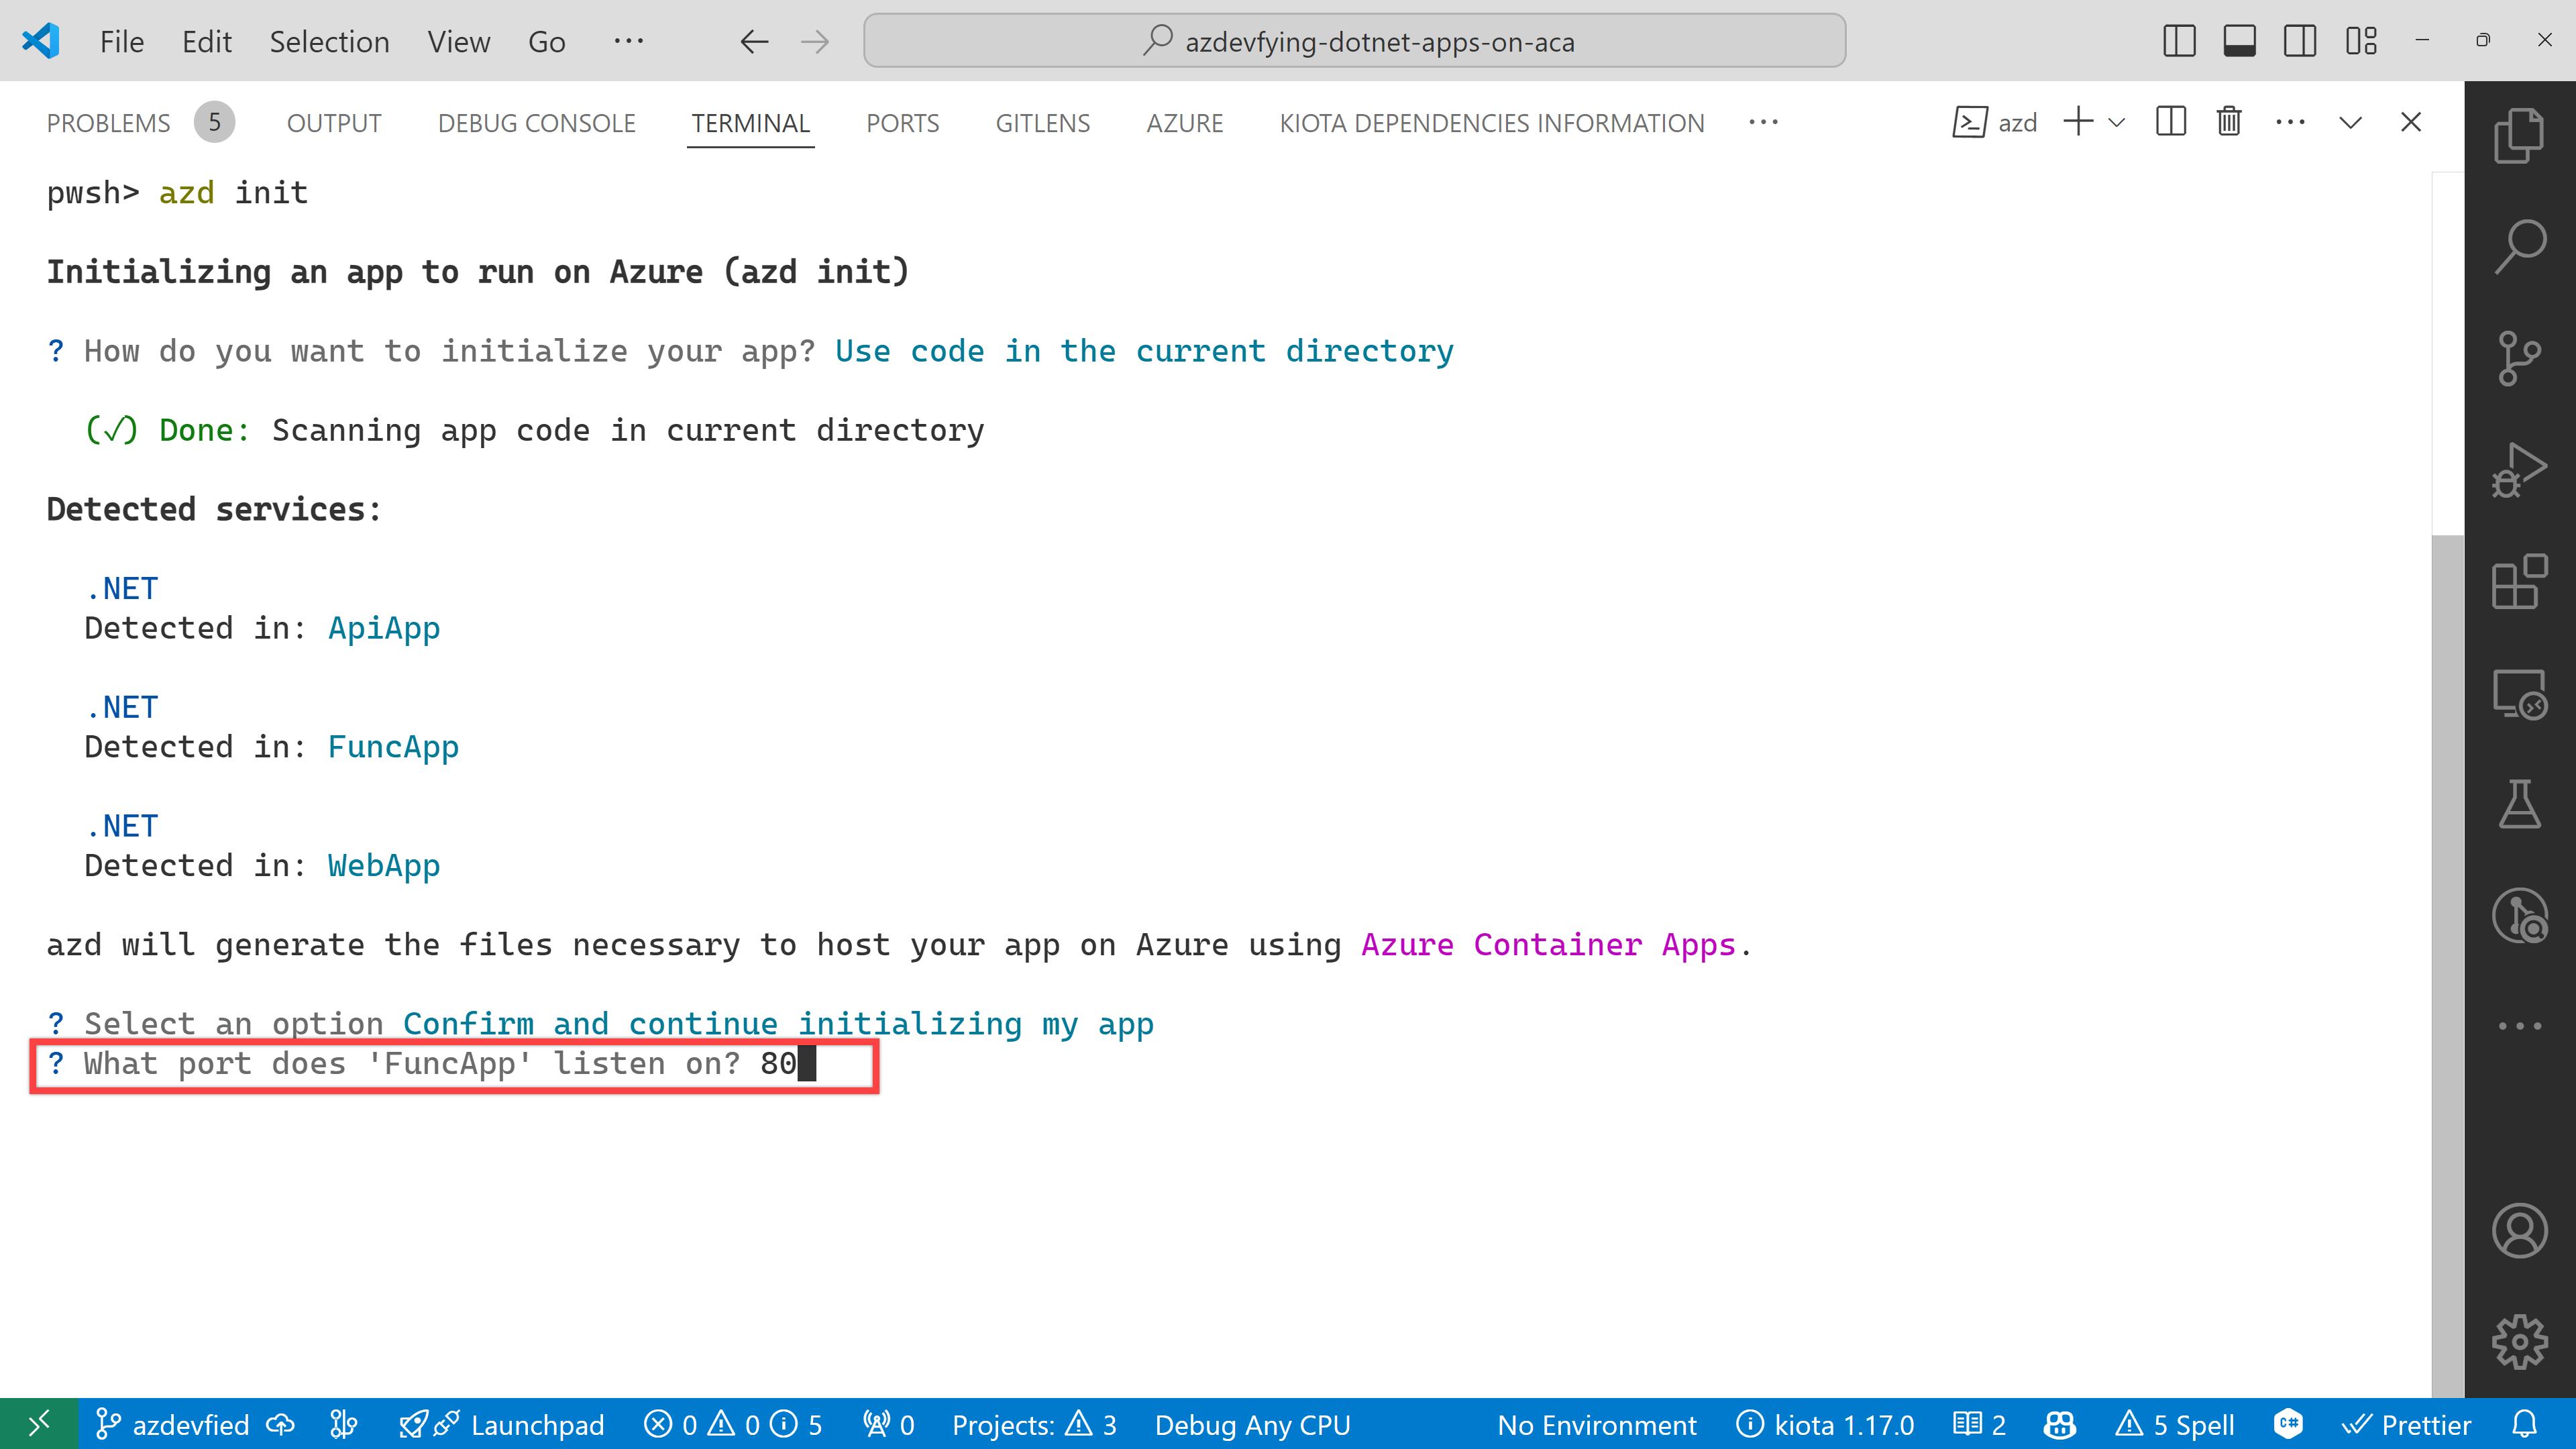
The function app asks the target port number. Enter 80.
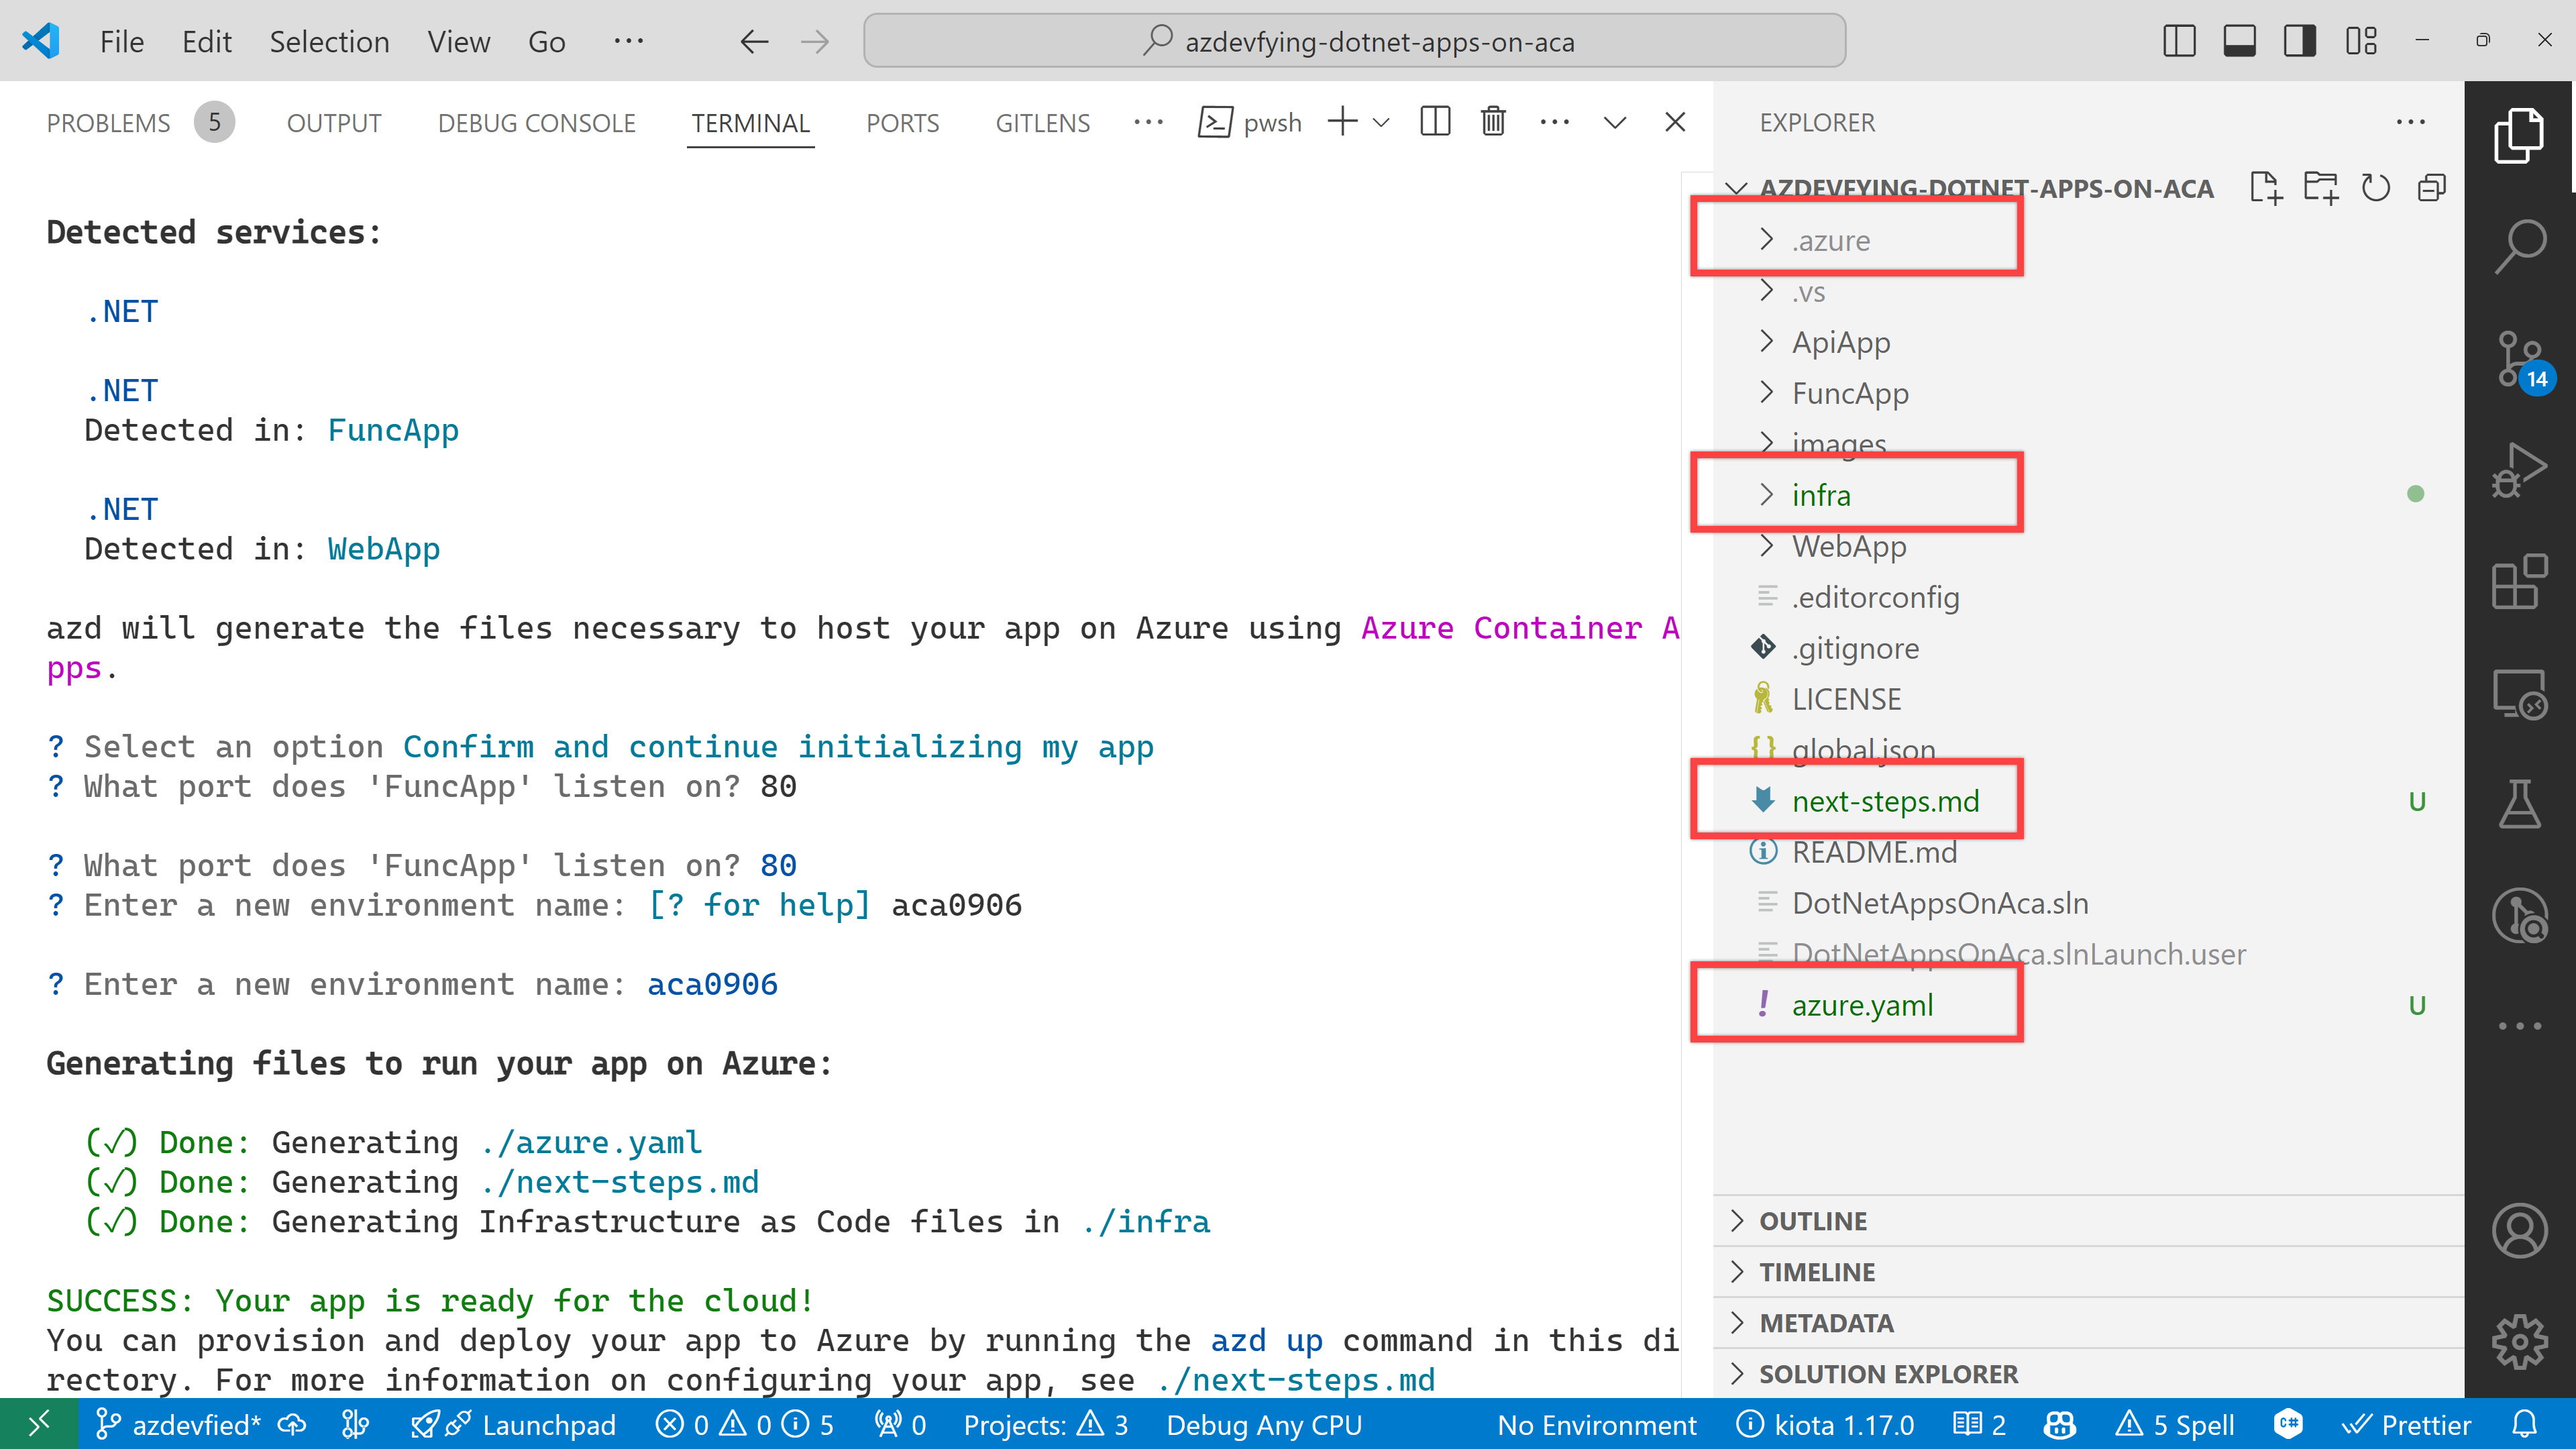
And finally, it asks the environment name. Enter any name you want. I just entered aca0906 for now.
Now, you’ve got two directories and two files generated:
.azure directory
infra directory
next-steps.md file
azure.yaml file
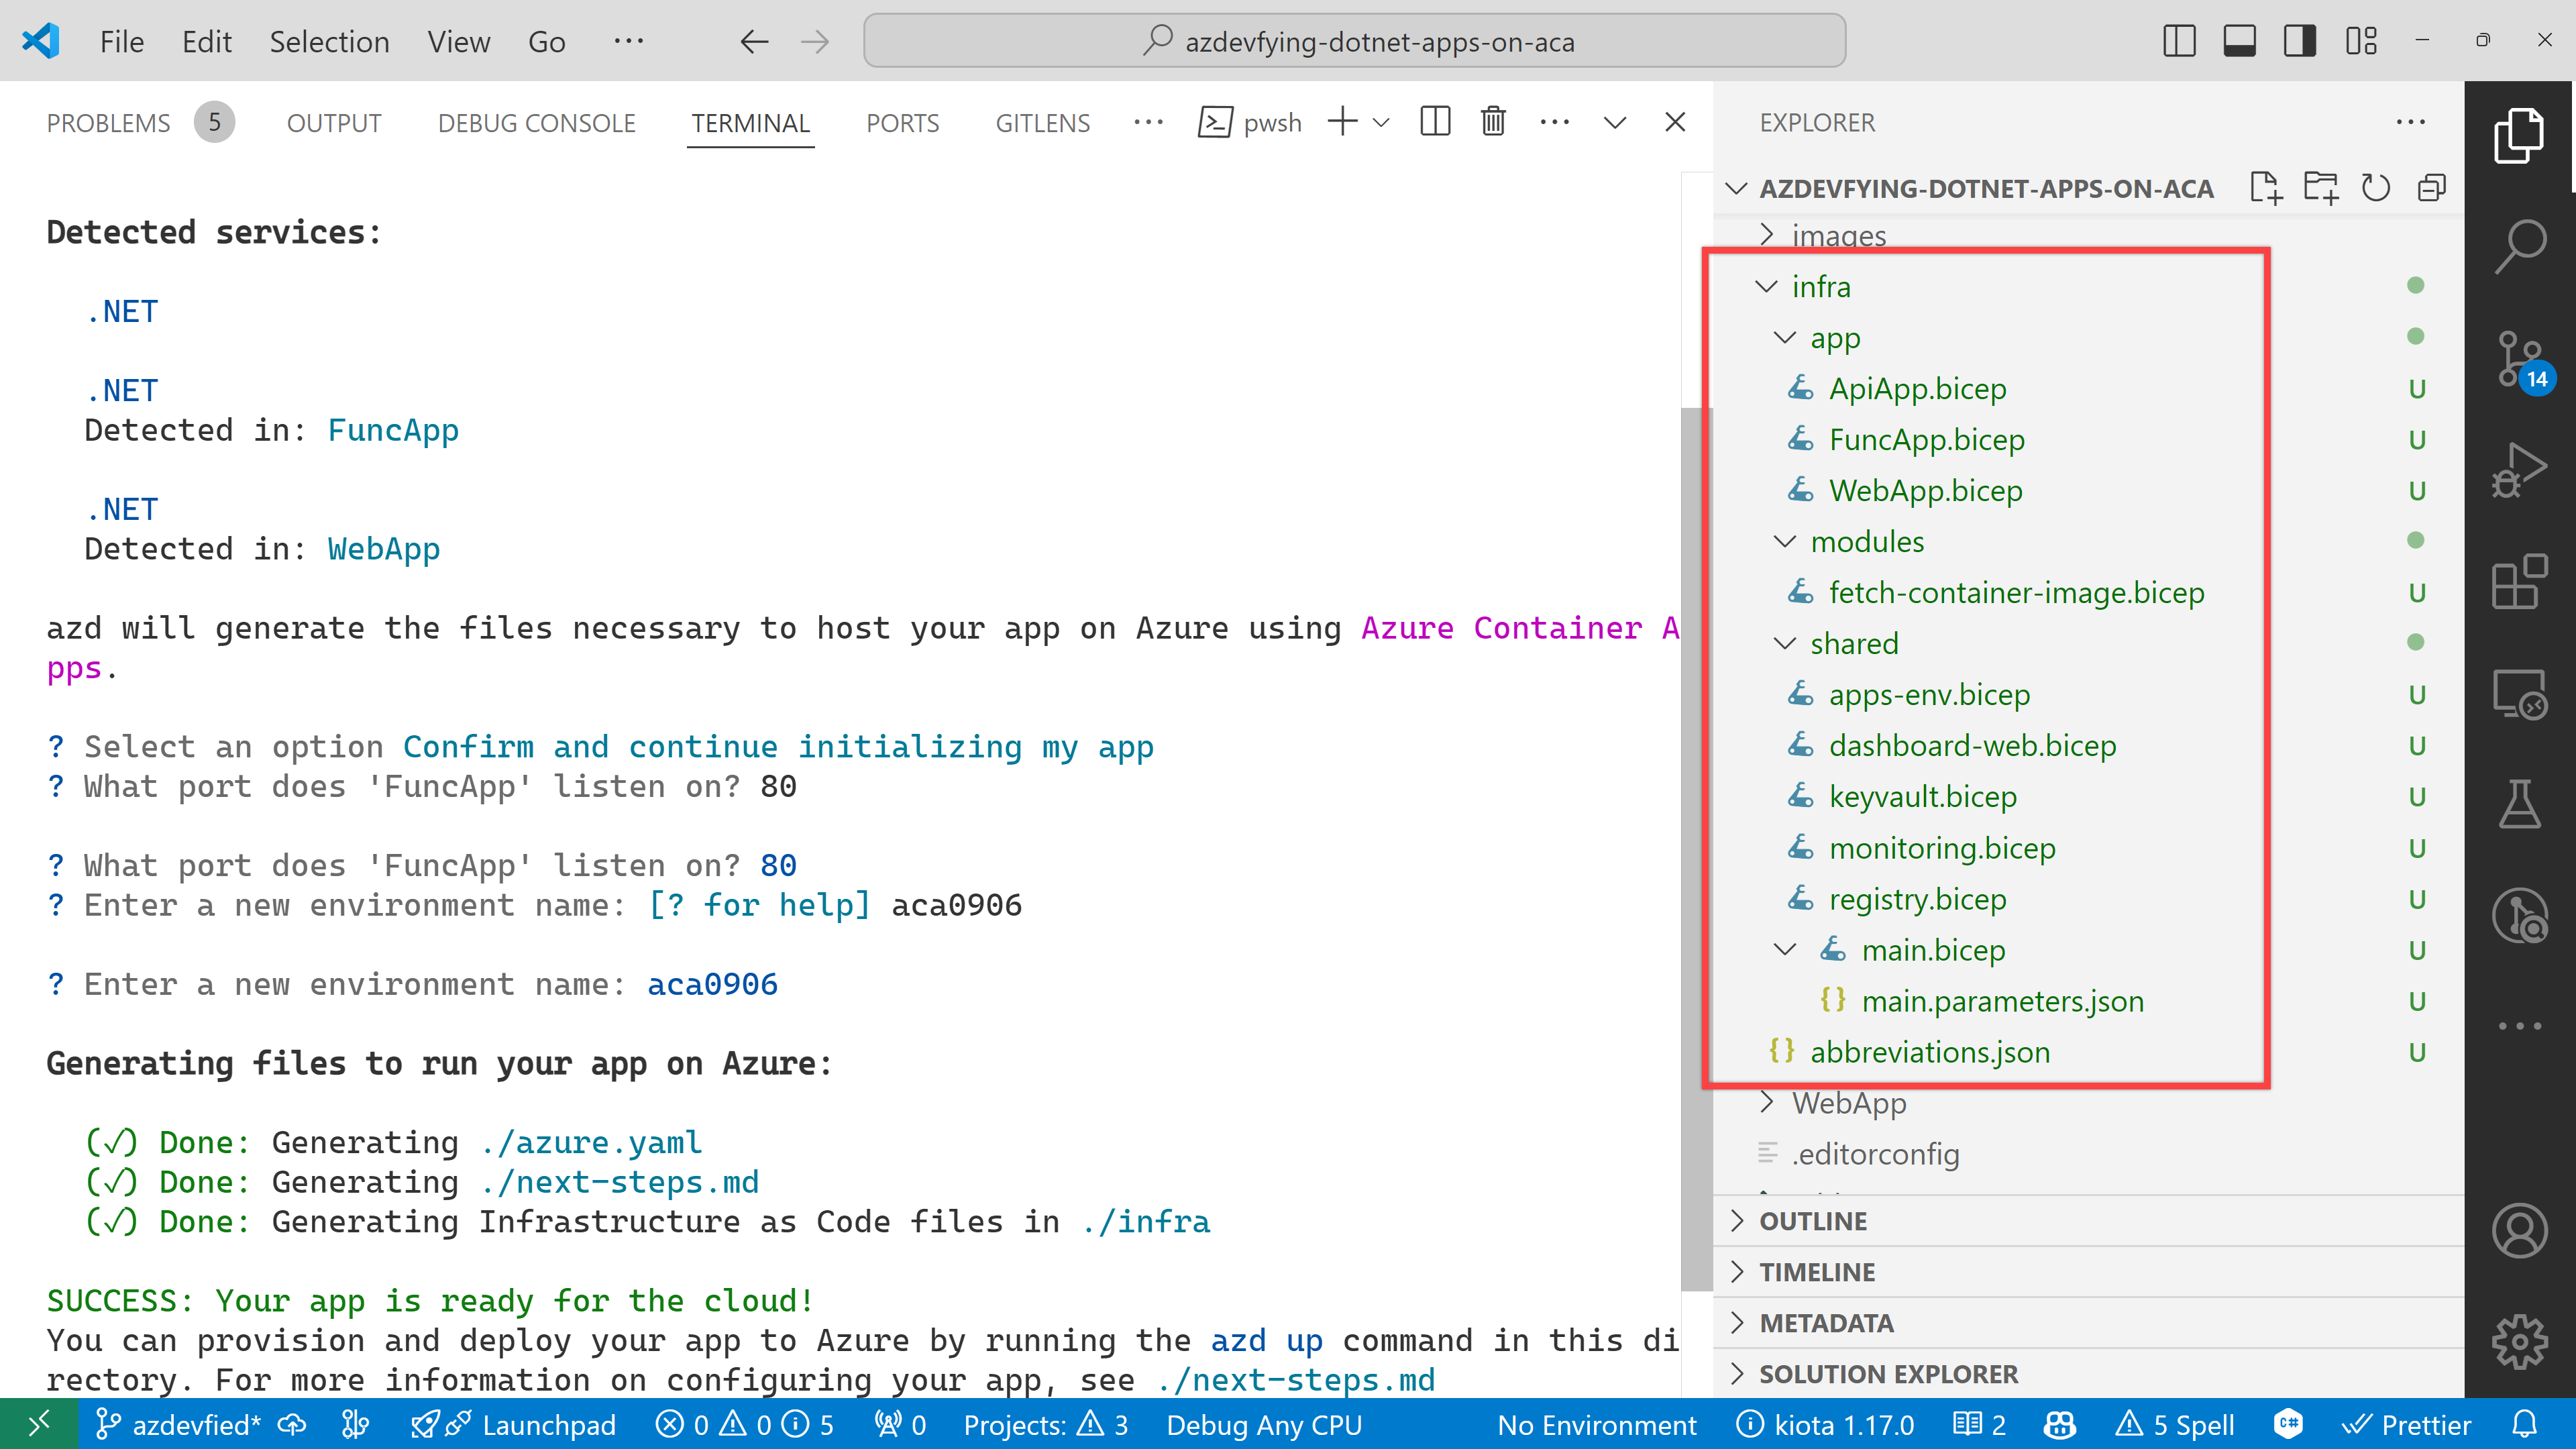
Under the infra directory, there are bunch of Bicep files automatically generated through azd init.
As a result of running the command, azd init, you don’t have to write all necessary Bicep files. Instead, it generates them for you, which significantly reduces the time for infrastructure provisioning. Now, you’re ready to provision and deploy your apps to ACA. Let’s move on.
azd up – Provision and deployment
All you need to run at this stage is:
azd up
Then, it asks you to confirm the subscription and location to provision the resources. Choose the appropriate options and continue.
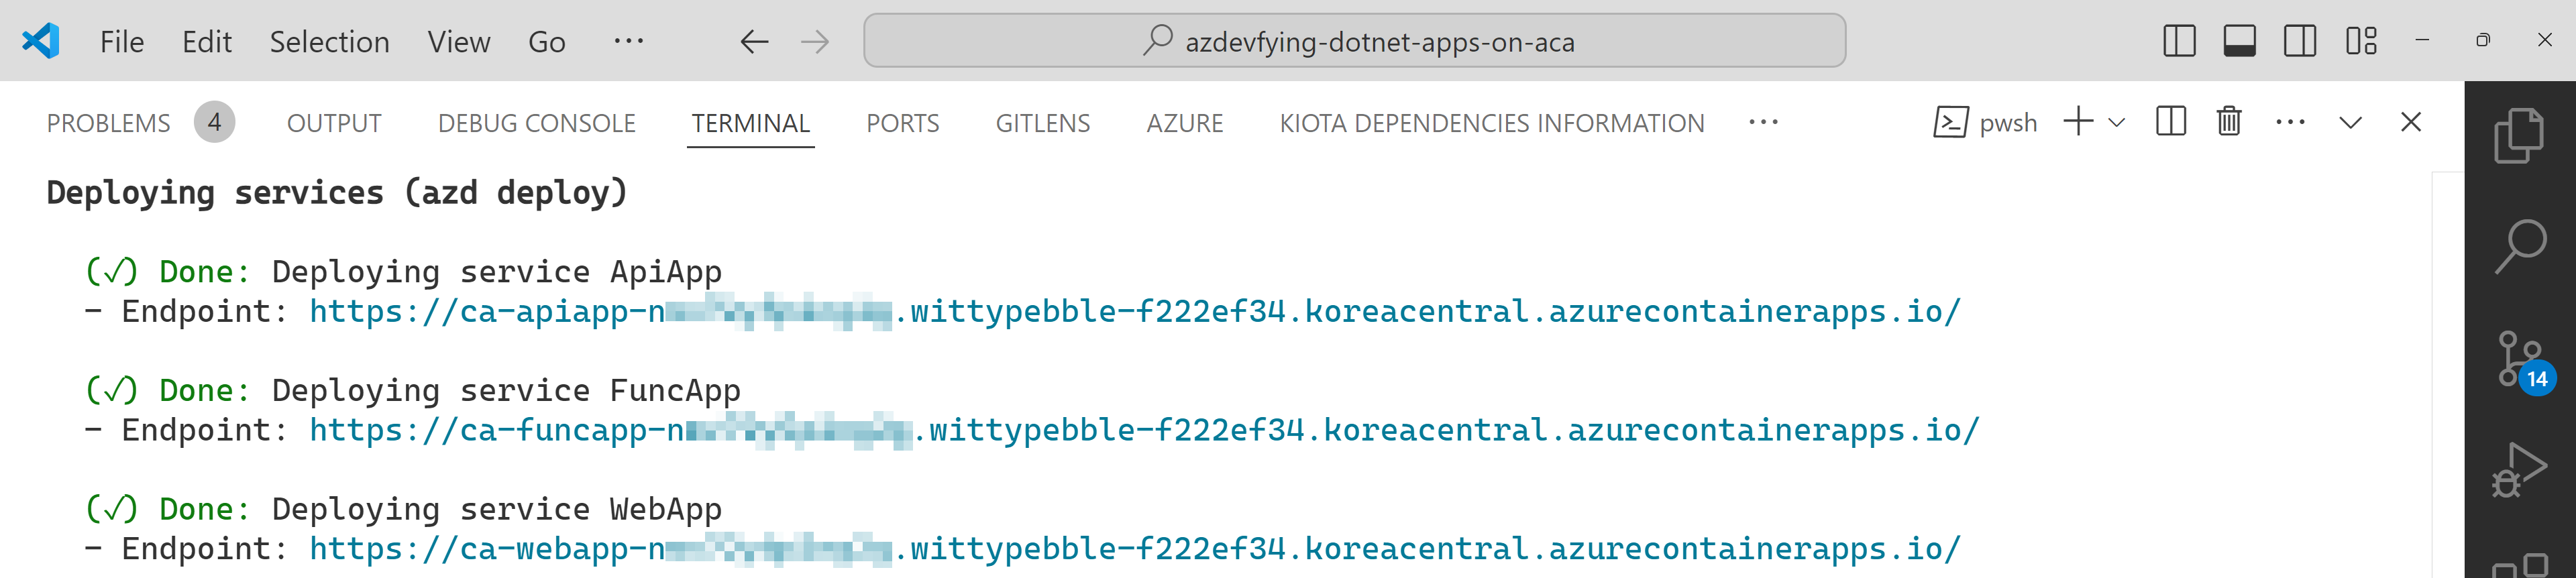
All apps are containerised and deployed to ACA. Once the deployment is done, you can see the output as shown below:
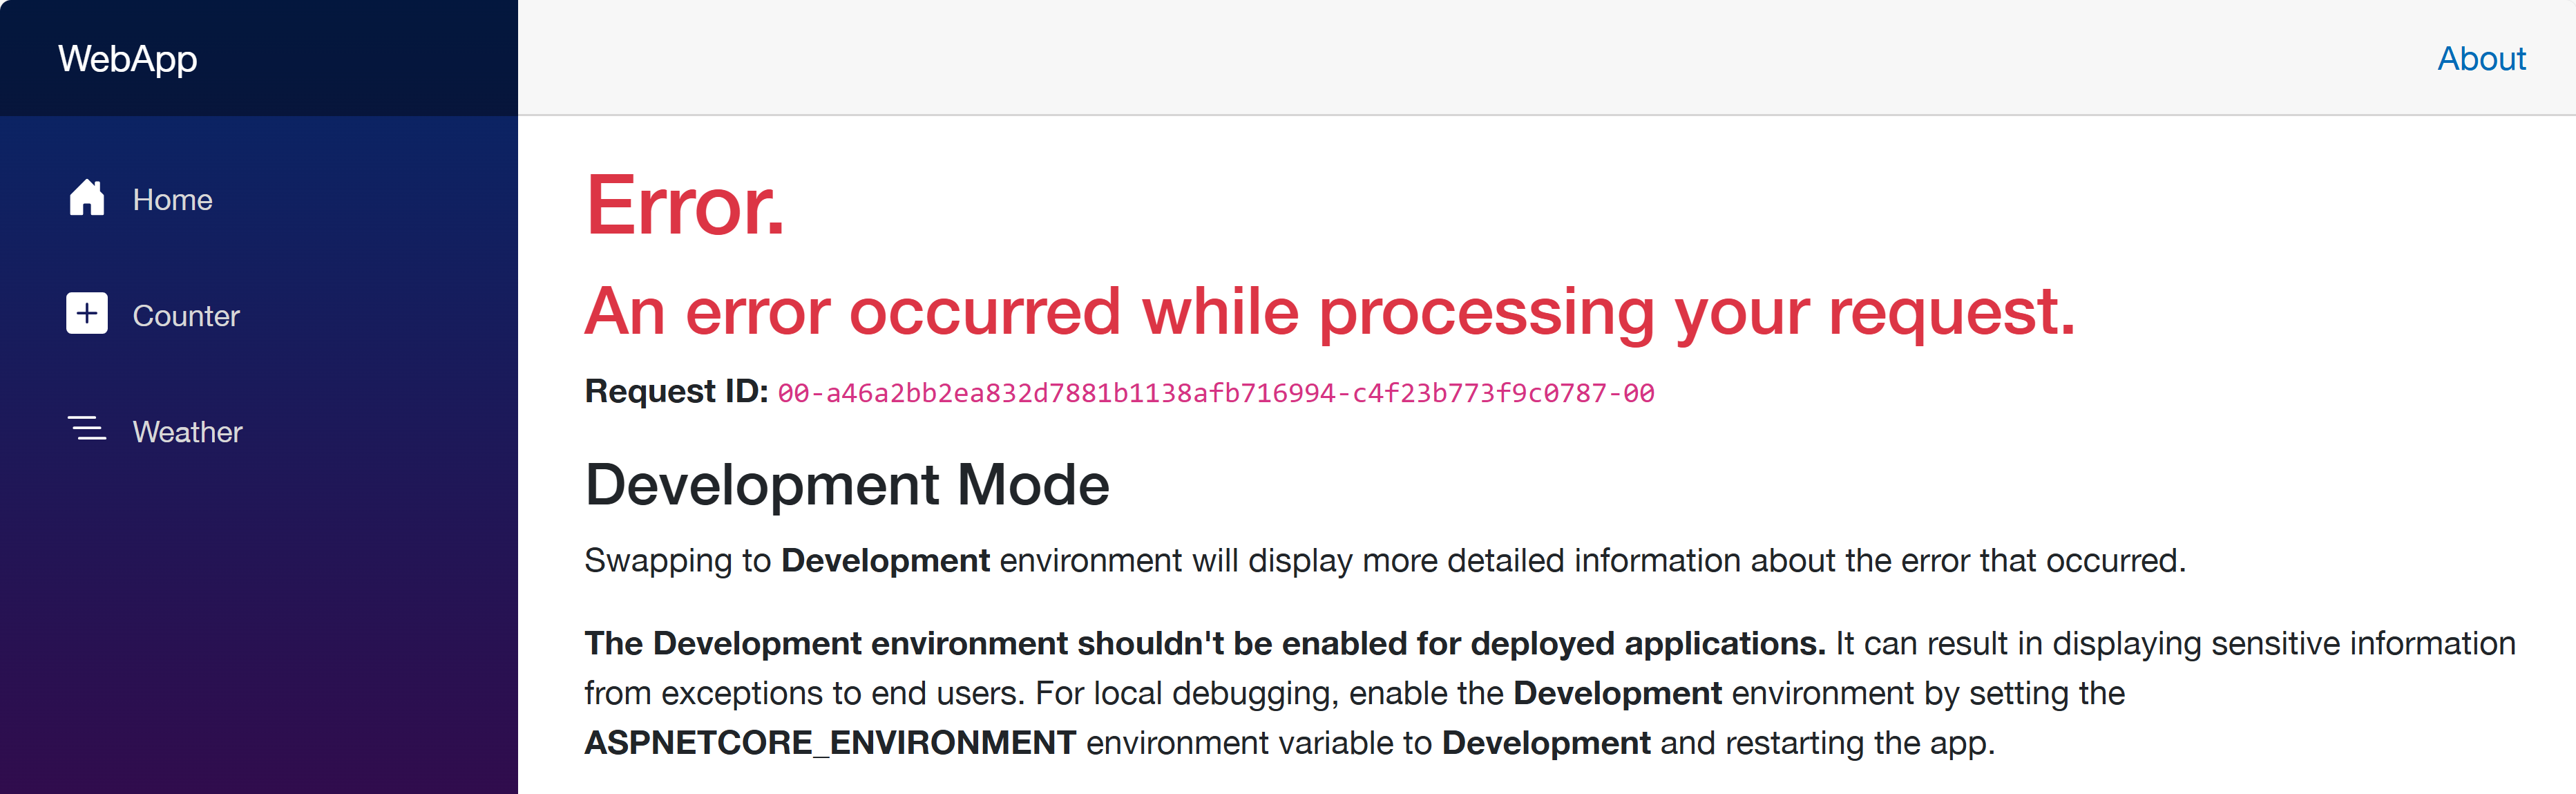
Click the web app URL and navigate to the /weather page. But you will see the error as shown below:
This is because each app doesn’t know where each other is. Therefore, you should update the Bicep files to let the web app know where the other apps are.
Update Bicep files – Service discovery
Open the infra/main.bicep file and update the webApp resource:
Then, open the infra/app/WebApp.bicep file and add both apiAppEndpoint and funcAppEndpoint parameters:
…

@secure()

param appDefinition object
// Add these two lines

param apiAppEndpoint string

param funcAppEndpoint string

…
In the same file, change the env variable:
// Before

var env = map(filter(appSettingsArray, i => i.?secret == null), i => {

  name: i.name

  value: i.value

})
// After

var env = union(map(filter(appSettingsArray, i => i.?secret == null), i => {

  name: i.name

  value: i.value

}), [

  {

    name: ‘API_ENDPOINT_URL’

    value: apiAppEndpoint

  }

  {

    name: ‘FUNC_ENDPOINT_URL’

    value: funcAppEndpoint

  }

])
This change passes the API and Function app endpoints to the web app as environment variables, so that the web app knows where the other apps are.
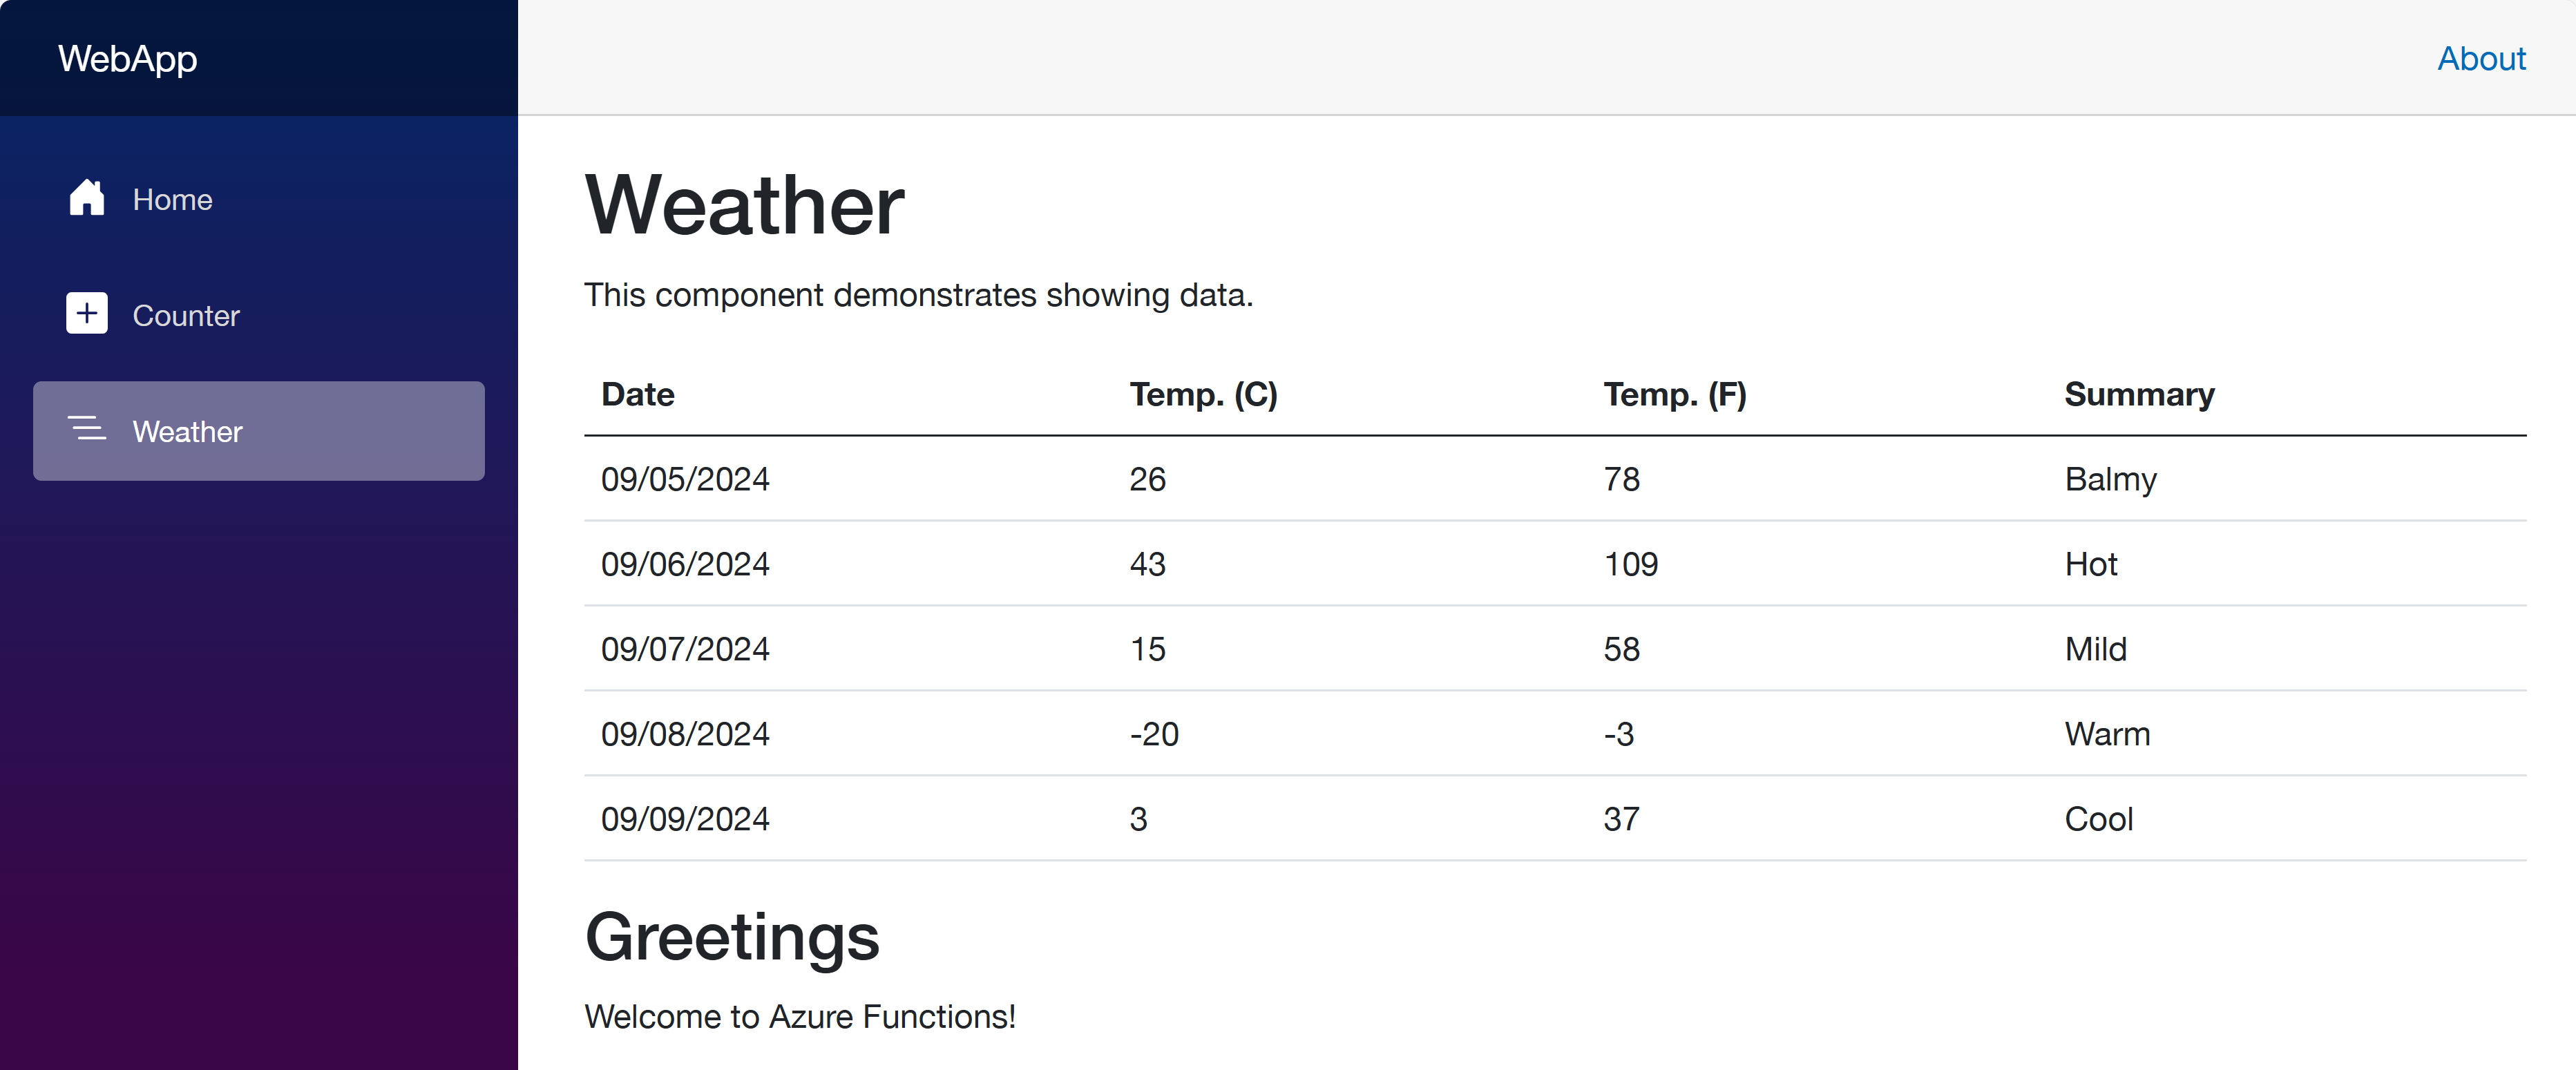
Once you’ve made the changes, run the azd up command again. It will update the resources in ACA. After that, go to the web app URL and navigate to the /weather page. You will see the weather data and greetings fetched from the API and Function apps.
So far, I’ve discussed how to provision and deploy .NET apps including Azure Functions to ACA with just one command, azd up. This is a very convenient way to deploy apps to Azure. However, to let the apps know each other, you should slightly tweak the auto-generated Bicep files. With this little tweak, all your .NET apps will be seamlessly provisioned and deployed to ACA.
One more thing I’d like to mention here, though, is that, if you use .NET Aspire, this sort of service discovery is automatically handled.
More about deploying .NET apps to ACA?
If you want to learn more options about deploying .NET apps to ACA, the following links might be helpful.
This article is contributed. See the original author and article here.
In today’s digital era, where data breaches and cyber threats are increasingly sophisticated and pervasive, the need for robust data security measures has never been more critical. Traditional security approaches are proving insufficient against the complex and evolving nature of modern cyber threats. This has led to a growing consensus among security experts and industry leaders on the imperative to incorporate Generative AI (GenAI) into data security frameworks. GenAI’s ability to analyze vast amounts of data in real-time, identify patterns, and predict potential threats offers a transformative approach to safeguarding sensitive information. According to a recent report by Gartner, the use of AI in cybersecurity is expected to reduce the number of data breaches by up to 20% by 2025, underscoring the industry’s recognition of AI’s vital role in enhancing data security (Gartner, 2022). This blog explores how Microsoft is leveraging GenAI to revolutionize data security, providing organizations with the tools they need to protect their digital assets effectively.
Leverage the power of Copilot to secure your organization
Human ingenuity and expertise will always be an irreplaceable component of defense, so we need technology that can augment these unique capabilities with skill sets, processing speeds, and rapid learning of AI. Technology that can work alongside us, detect hidden patterns and behaviors, and inform response at machine speed with the latest and most advanced security practices.
In this scenario, Microsoft Copilot for Security helps professionals across the many cybersecurity disciplines to be more effective and efficient at all the roles they play. It helps you enhance and grow your capabilities and skills, while also supporting the workflows and teams you collaborate with to solve security challenges. Since Copilot for Security uses GenAI to analyze data from many sources, including other Microsoft Security solutions, it can also help analysts catch what they might have otherwise missed. Copilot for Security synthesizes data and detects those important signals better than ever before, all in a single pane of glass, without having to jump between different solutions to get additional context.
Boost your data protection efficiency with Copilot for Security embedded in Purview
An important application of Copilot for Security is to empower and strengthen data security and data compliance teams in securing data with more efficiency and agility. Data security admins are often challenged by the high volume and complexity of alerts, and the integration between Microsoft Purview and Copilot for Security enables these tools to work together to protect your data at machine speed.
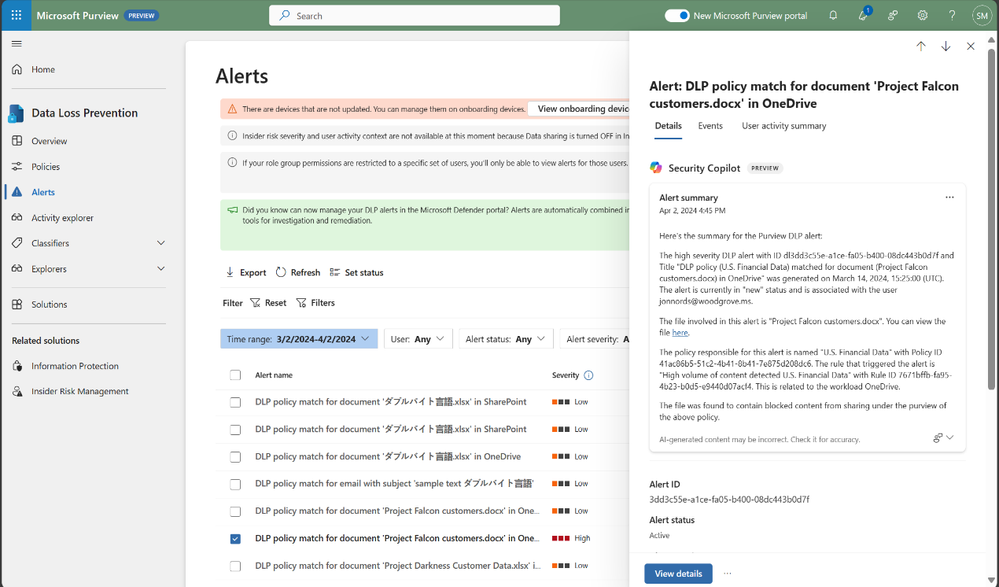
The speed at which data security investigations are conducted is crucial to preventing data loss. However, the task of analyzing a vast array of sources can pose a significant challenge for analysts at any experience level. With Copilot-powered comprehensive summaries of Microsoft Purview Data Loss Prevention (DLP) alerts, data security admins can identify, act on alerts and prevent data risks much faster and effectively. When an alert is summarized, it includes details such as policy rules, the source, and the files involved, as well as user risk level context pulled from Insider Risk Management (IRM).
Figure 1: embedded Copilot summarization into Data Loss Prevention
Your team can also leverage summaries in Microsoft Purview Insider Risk Management alerts, which enables faster understanding of potentially risky activity, user context, behavior sequences. and intent present in an alert. Moreover, we’re excited to announce the public preview of the Copilot for Security-powered enhanced hunting in IRM, where admins will be able to use GenAI-driven analytics to deepen investigations and double-click into a user’s risk profile and activities, beyond the alert summary.
Figure 2: embedded Copilot summarization into Insider Risk Management
Compliance admins, forensic investigators, legal, and other teams can also strongly benefit from GenAI being incorporated into their workflows. Not only do they spend most of their time reviewing lengthy content and evidence; but admins need to invest time to learn complex technical capabilities like keyword query language to conduct a search, with 60% of admin time spent reviewing evidence collected in review sets.
Compliance teams are subject to regulatory obligations, like industry regulations or corporate policies related to business communications. This requires teams to review communication violations that contain lengthy content like meeting transcripts, group chats, long email threads and attachments. With concise and comprehensive contextual summaries on Microsoft Purview Communication Compliance, content can be evaluated against relevant compliance polices and investigators are able to get a summary of the policy match and better identify risky communication.
Figure 3: embedded Copilot summarization into Communication Compliance
These contextualized summaries are also invaluable in Microsoft Purview eDiscovery, where they help simplify the exploration of large about of evidence data, which can take hours, days, even weeks to do. This process often requires costly resources like an outside council to manually go through each document to determine relevancy to the case, and this embedded Copilot for Security capability enables reducing days of legal investigations into seconds, by allowing an investigator to use Copilot to summarize items in a review set.
Figure 4: embedded Copilot summarization into eDiscovery
Search is one of the most difficult and time-intensive workflows in an eDiscovery investigation. Now, you can simplify investigation by leveraging Copilot for Security to translate inquiries from natural to keywork query language. This feature allows organizations to take Natural Language and convert that into assertive evidence queries, in doing so this can correct possible errors, boost team expertise, and enable analysts at all levels to carry out advanced investigations.
Figure 5: embedded Copilot search with Natural Language on eDiscovery
All these recent developments are just the beginning of the Copilot for Security journey into Microsoft Purview, and we’ll continue to share new advancements and GenAI-powered capabilities that will take your data security program to the next level.
Learn more about Copilot for Security in Purview with Microsoft Documentation.
If you are a security partner interested in using Microsoft Security Copilot with your solutions, please sign up to join the Security Copilot Partner Ecosystem.
Learn more about these solutions in the Microsoft Purview compliance portal. Visit your Microsoft Purview compliance portal to activate your free trial and begin using our new features. An active Microsoft 365 E3 subscription is required as a prerequisite to activate the free trial.
Download Microsoft Data Security Index report to learn more about the trends and best practices for effective data security .
This article is contributed. See the original author and article here.
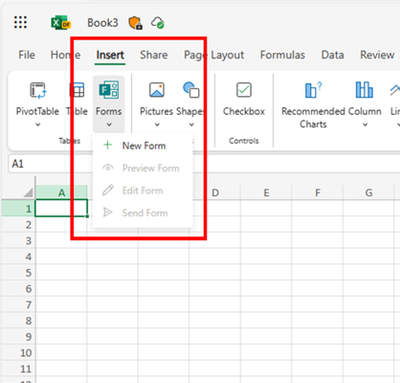
With the new semester just around the corner, we’re excited to introduce some fantastic new features in Forms to enhance your teaching and learning experience. Now, you can enjoy an improved data sync function to stay up to date, set rules to collect more accurate responses, pre-fill forms and quizzes, and easily manage response notifications. Let’s dive in and check more details. You can also try out from this template.
Let’s create a science club registration together to explore how we can make the most of these new features. Imagine you are a high school science teacher and trying to establish a science club where students from all grades can dive into fascinating topics beyond the curriculum and participate in fun, hands-on activities.
Improved Excel data sync function
You can start with Excel for the web to create the registration form, no need to visit Forms. This process will automatically generate a new form in Forms where you can add your questions. All the questions you add and responses you receive will seamlessly sync with Excel. (check more details: Forms data sync to Excel is now fully available with more functionality – Microsoft Community Hub)
Create forms from Excel for the web
Prefill answers for forms/quizzes
In this science club registration, you can use prefilled answers for fields like grade and class, creating unique links for each grade and class. This allows you to easily track and differentiate student distribution across different groups in the club. (check more details: Pre-fill Responses in Your Microsoft Forms – Microsoft Community Hub)
Set prefilled answer
Validation for open text question
To make sure students provide correct contact information and receive timely updates, you can set restriction for open text questions to only accept email formats. (Other types of restriction are also supported in Forms, check more details here: Validate open text responses in Microsoft Forms – Microsoft Community Hub)
Set validation on email address
Manage recipients of new response notification
You can set multiple key individuals to receive the notification when a new registration comes in, such as the club coordinator and an assistant. This allows them to quickly review and confirm new members, update the membership list, and prepare welcome materials. (check more details: Add or remove people from your form response notification emails – Microsoft Community Hub)
Add recipients for new response notification
Hope you find these new features useful for the new semester. If you’re interested in trying them out, simply start with this template.
This article is contributed. See the original author and article here.
All in on AI is a series featuring interviews from Microsoft executives across the company about what transforming work with AI means to their teams. Through these conversations, we’ll highlight the challenges each industry faces and the lessons we learned that our customers can use in their own AI journeys. In this episode, Colette Stallbaumer, General Manager, Microsoft 365 and Future of Work sits down with Mala Anand, Corporate Vice President, Customer Experience and Success at Microsoft to explore the integration of AI in customer service.
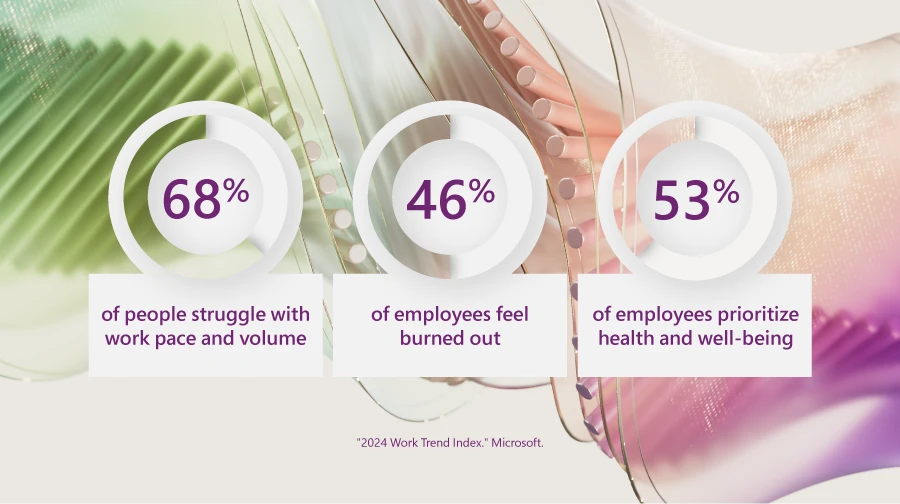
According to the 2024 Work Trend Index, a study exploring into the global trends affecting employee work and wellness, employees are struggling to keep up with the pace and volume of work. Many employees report feeling burned out and as a result, staff turnover is on the rise.
These trends have profound implications, underscoring a crucial shift: employees are now prioritizing their health and well-being over work. This is a pressing concern for all business leaders, particularly in customer service.
At Microsoft, we recognize the vital role our customer service agents play in delivering world-class care. As the front line between our business and our customers, the quality of our customer care directly impacts customer satisfaction.
Recently, Colette Stallbaumer, General Manager, Microsoft 365 and Future of Work joined Mala Anand, Corporate Vice President, Customer Experience and Success at Microsoft to discuss how our customer service teams are using AI solutions like Microsoft Copilot to ensure our customer service employees are empowered to focus on the most meaningful parts of their jobs. Here’s what she had to say:
Adapting to the customer service surge with the power of AI
Since 2019, Microsoft’s customer service teams, like many in the industry, have been managing a rising surge in calls from customers with complex needs.
As a service industry veteran and leader of our customer service organization, Mala and her team realized that just adding more call-handling capacity wouldn’t suffice. Their goal was to help teams at scale—to empower them to manage more inquiries, address more complex customer needs, and to more rapidly onboard new employees to help with the surge. They also saw an opportunity to reduce case volumes by introducing self-service options for customers.
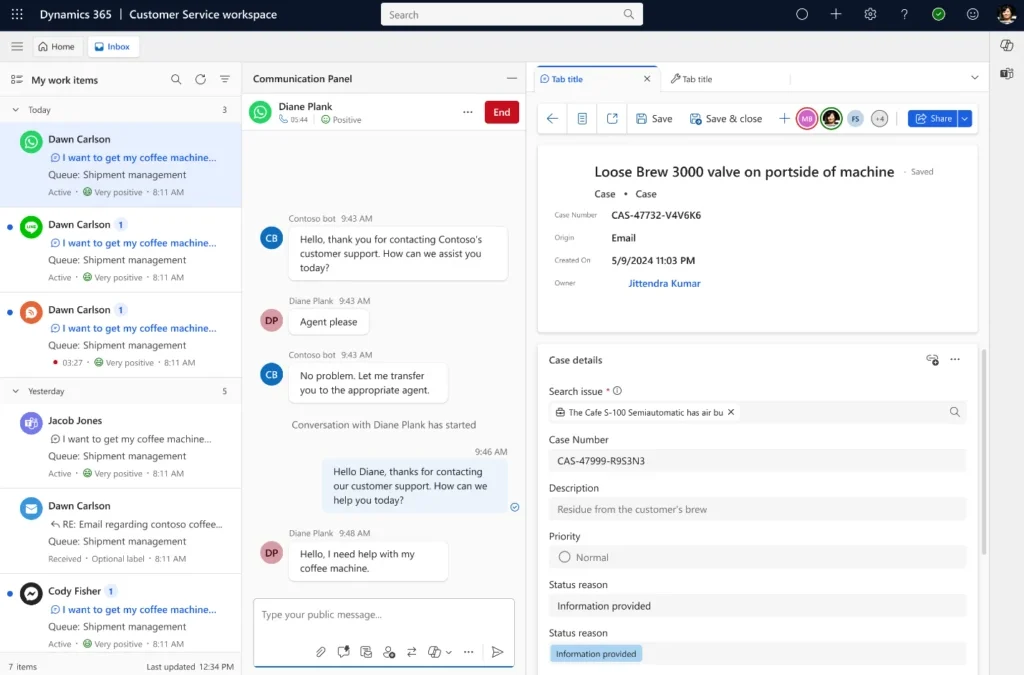
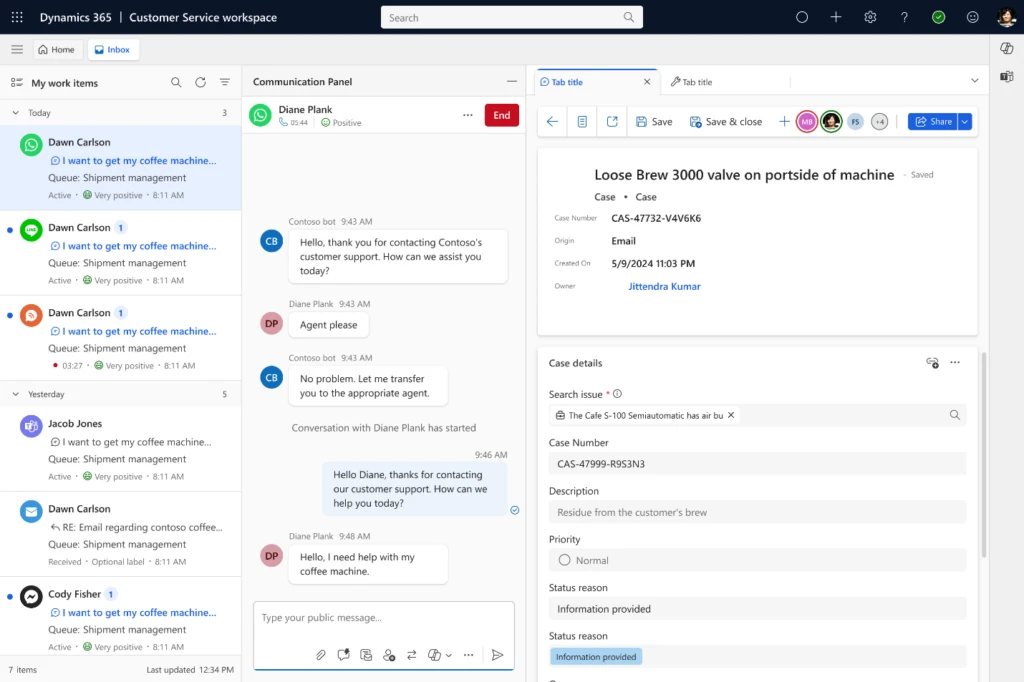
The team began exploring the use of generative AI to enable a more consistent and seamless experience. Already one of the world’s largest support organizations using Dynamics 365 Customer Service, harnessing new AI capabilities could help the organization to automate and augment common support scenarios. As customer zero for our products, turning to Microsoft Copilot and Dynamics 365 Customer Service would enable us to quickly adopt the transformative power of generative AI, and share those learnings with business leaders to implement and improve their own customer support experience at scale.
Reimagining the customer experience with the power of AI
Transforming the employee experience with generative AI
As Mala explains in the interview, adopting Copilot in Dynamics 365 Customer Service and Copilot Studio created an opportunity to transform work across four key areas of Microsoft’s customer service landscape.
First, the Customer Service and Success team needed to speed up how quickly new hires could start helping existing customer service agents. Second, they wanted all support teams to access accurate information quickly and spend less time working across tools and data sources to collect customer and incident details. Third, they aimed to cut down on mundane tasks like data entry and paperwork so that customer service agents could focus more on complex issues that require empathy and judgment. Lastly, they aimed to improve self-help options for customers to handle their own questions, reducing the need for support requests.
AI has the potential to drive operational excellence, nurture customer loyalty, and grow value through the entire customer journey—making it one of the most valuable tools for enterprises to create a consistent, differentiated experience, build meaningful relationships, and deliver better customer care.
Mala Anand, Corporate Vice President, Customer Experience and Success at Microsoft
1. Supporting new hires with better onboarding
The Microsoft Customer Service team introduced Copilot’s case summarization feature to break down complex information into simple summaries, helping new hires understand customer issues more quickly. By surfacing relevant information from diverse sources such as internal documentation, knowledge bases, and websites, Copilot accelerates the learning curve, enabling agents to resolve customer queries faster and deliver superior service.
What’s more, Copilot supports new hires with ongoing learning and skill development by providing real-time assistance and insights. By using AI capabilities integrated into platforms like Dynamics 365 Customer Service, agents can more easily access tools and diagnostics and recommend optimal solutions. This empowers agents to deliver highly personalized customer experiences across all customer support needs, at a global scale.
2. Helping employees find the right information faster
With Copilot, agents can now find important information quickly, even if it was spread across different systems. Dynamics 365 Knowledge Assist helps agents zero in on the relevant information and articles faster than traditional search. It not only can suggest relevant information but provides context about the specific relevance of content and cites the source.
Having a more comprehensive and streamlined method to seek information not only helps agents solve issues more quickly—it gives them a more complete understanding of information relevant to the issue they’re trying to solve. Agents can now use this context, with Copilot, to craft a more thorough and accurate response to customers.
Before Copilot, creating detailed case summaries could take up to 30 to 40 minutes. Now, with Copilot, it’s done in 15 minutes or less. This not only speeds up how quickly customer service agents can handle customer requests but also lets them manage more cases without sacrificing quality.
Automating summaries and common email and communication tasks allows agents to spend much less time on repetitive tasks, giving them more time to focus on the more meaningful and often more rewarding aspects of their job.
Prioritizing self-service by integrating Copilot Studio into our customer-facing experiences is starting to make a big difference in how Microsoft handles customer service. Now, customers can use the power of generative AI in Copilot Studio to access self-help resources.
This change has reduced the amount of work customer service teams have to do and lets agents concentrate on more complex issues where customers require assistance. As a result, they’re getting things done more efficiently, working together better, and feeling more satisfied with their jobs.
Improved collaboration:Collaboration required among customer support agents decreased by 13%, making case resolution smoother and operations more efficient.
Enhancing efficiency: With Copilot, average chat case handling time reduced by up to 16%, giving agents better access to knowledge and improving overall efficiency.
Increasing productivity: Agents using Copilot became more productive, handling up to 12% more cases, which allowed them to serve more customers effectively.
And that’s just the start. Mala sees a future for Copilot that will revolutionize the customer services industry, making it more efficient, responsive, and customer-centric.
These include things like automatically connecting customers with appropriate experts, helping customers solve complex problems on their own, predicting issues before they happen, and personalizing interactions based on customer information and preferences.
Copilot learning hub
Learn how to use Microsoft Copilot based on your role
By automating routine tasks and helping teams find information faster, Copilot helps our employees focus on what really matters to them, allowing them to dive deeper into the parts of their jobs they love.
The speed at which AI is transforming business today is unprecedented, reimagining the way we work. We envision a future where AI alongside human expertise reduces and eliminates the seams in the support experience.
Mala Anand, Corporate Vice President, Customer Experience and Success at Microsoft
Today, the power of AI is revolutionizing how companies innovate and create large-scale impact in all areas. Leveraging generative AI throughout the customer journey enables businesses to foster enduring customer loyalty by improving the overall experience, adding value at each interaction.
This interview is part of our All in on AI series that explores how Microsoft is adopting AI across different areas of our business. Next, Kathleen Hogan, Microsoft Chief People Officer, sits down with Jared Spataro to share how AI is helping human resource teams do more with less and to share the transformative best practices she used to drive some of the highest, fastest AI adoption rates Microsoft has ever seen.
This article is contributed. See the original author and article here.
In today’s digital landscape, the success of customer service on social media hinges on the quality of care provided to customers. It’s essential for communications from agents to be timely, accurate, sensitive, brief, and friendly to enhance customer satisfaction and foster brand loyalty. To support this, we are excited to introduce the first-party WhatsApp channel seamlessly integrated with Azure Communication Services, now available in public preview for Dynamics Contact Center.
Why WhatsApp?
WhatsApp is a leading choice for contact centers worldwide, celebrated for its ease of use and extensive global reach. With billions of users, WhatsApp provides businesses with an unparalleled opportunity to connect with customers in a medium they trust and prefer. Now, with our first-party solution, integrating WhatsApp into your contact center has never been easier.
Seamless integration with Microsoft’s ecosystem
One of the key advantages of this new integration is its direct tie-in with Microsoft’s ecosystem. By leveraging Azure Communication Services, our solution eliminates the need for third-party connectors. This results in a simplified IT footprint, enhanced reliability, and more secure communication for your business. No more juggling multiple vendors or worrying about potential integration issues. Our solution is designed to work seamlessly within your existing Microsoft infrastructure.
Key capabilities
With the first-party WhatsApp channel, your contact center can benefit from a range of powerful features:
Easy Configuration: Administrators can easily configure the WhatsApp channel powered by Azure Communication Services, making setup straightforward.
Customer Engagement: Customers can reach out to your business through WhatsApp, engaging in an asynchronous manner that respects their time and preferences. Whether it’s a quick question or a detailed inquiry, your customers can connect with you when it’s convenient for them.
Unified Interface for Agents: Agents will have access to a unified, contextual, and productive interface. Subsequently, they can engage with customers and resolve issues more efficiently. This streamlined workflow reduces the time to resolution and enhances overall customer satisfaction.
Rich Reporting for Supervisors: Supervisors and managers can access detailed reports to monitor and optimize contact center performance. This data-driven approach ensures that your team is operating at peak efficiency, with insights that drive continuous improvement.
Enhancing customer engagement
The integration of WhatsApp with Azure Communication Services is more than just a new channel—it’s a step toward more meaningful and contextual customer interactions. By leveraging WhatsApp, businesses can provide a seamless and personalized experience that resonates with customers, ultimately driving satisfaction and loyalty.
Get started today
To sign up to use this feature, fill out this form. We invite you to explore the new first-party WhatsApp integration in Dynamics 365 Contact Center. Whether you’re addressing product inquiries or managing customer service scenarios, this integration empowers your agents to deliver exceptional customer care.
Join us in this exciting journey of enhancing customer communication. With this new channel, experience the benefits of a simplified, reliable, and powerful customer service tool.
Stay tuned for more updates as we continue to expand the capabilities of Dynamics 365 Contact Center. Also, don’t hesitate to provide feedback during this public preview period. We’re here to support your success.
This article is contributed. See the original author and article here.
Explore Azure AI Services: Prebuilt Models and Demos
Azure AI services provide a comprehensive suite of prebuilt models and demos designed to address a wide range of use cases. These models are readily accessible and allow you to implement AI-powered solutions seamlessly. We have curated and catalogued prebuilt demos available across Azure AI services. We hope this helps you infuse AI seamlessly into your products and services.
Speech Recognition
Speech to Text Scenarios
Scenario
Description
Link
Real-time speech to text
Quickly test your audio on a speech recognition endpoint without writing any code.
Use our sample application to learn how to use Azure Speech to automatically caption your content in real-time and offline by transcribing the audio of films, videos, live events, and more. Display the resulting text on a screen to provide an accessible experience. In this example, we leverage features like speech to text and phrase list.
Batch transcribe call center recordings and extract valuable information such as Personal Identifiable Information (PII), sentiment, and call summary. This demonstrates how to use the Speech and Language services to analyze call center conversations.
Seamlessly translate and generate videos in multiple languages automatically. With its powerful capabilities, you can efficiently localize your video content to cater to diverse audiences around the globe.
Extract invoice details including customer and vendor details, totals, and line items.
Receipts
Extract transaction details from receipts including date, merchant information, and totals.
Identity Documents
Extract details from passports and ID cards.
US Health Insurance Cards
Extract details from US health insurance cards.
US personal tax
Classify then extract information from documents containing any number of W2s, 1040s, 1098s and 1099s.
US mortgage
Extract information from a variety of mortgage
US pay stubs
Extract employee information, payment information including earnings, deductions, net pay and more.
US bank statements
Extract bank statements
US checks
Extract amount, date, pay to order MICR numbers, name and address of the player, and more.
Marriage Certificates
Extract details from marriage certificates.
Credit Cards
Extract details from credit cards including card number and cardholder name.
Contracts
Extract title and signatory parties’ information from contracts.
Business Cards
Extract contact details from business cards.
Gen-AI Safety Solutions
Safeguard your image content
Scenario
Description
Link
Moderate image content
This is a tool for evaluating different content moderation scenarios. It takes into account various factors such as the type of content, the platform’s policies, and the potential impact on users. Run moderation tests on sample content. Use Configure filters to rerun and further fine tune the test results. Add specific terms to the block list that you want detect and act on.
This will display your API usage, moderation results, and their distributions per category. You can customize the severity threshold for each category to view the updated results and deploy the new threshold to your end. Additionally, you can edit the blocklist on this page to respond to any incidences.
This article is contributed. See the original author and article here.
Hey! Rob Greene again. Been on a roll with all things crypto as of late, and you are not going to be disappointed with this one either!
Background
Many know that Remote Desktop Services uses a self-signed certificate for its TLS connection from the RDS Client to the RDS Server over the TCP 3389 connection by default. However, Remote Desktop Services can be configured to enroll for a certificate against an Enterprise CA, instead of continuing to use those annoying self-signed certificates everywhere.
I know there are other blogs out there that cover setting up the certificate template, and the group policy, but what if I told you most of the blogs that I have seen on this setup are incomplete, inaccurate, and do not explain what is happening with the enrollment and subsequent renewals of the RDS certificate!? I know… Shocker!!!
If you are a pretty regular consumer of the AskDS blog content you know how we love to recommend using one certificate on the server for a specific Enhanced Key Usage (EKU), and make sure that you have all the information required on the certificate so that it works with all applications that need to use the certificate.
This certificate is no different. I would recommend that the certificate that is used ONLY has the EKU for Remote Desktop Authentication and DOES NOT have an EKU of Server Authentication at all. The reason for this is that this certificate should not be controlled / maintained via Autoenrollment/renewal behaviors. This needs to be maintained by the Remote Desktop Configuration service, and you do not want certificates being used by other applications being replaced by a service like this as it will cause an issue in the long run.
There is a group policy setting that can be enabled to configure the Remote Desktop Service to enroll for the specified certificate and gives the NT AuthorityNetworkService account permission to the certificates private key which is a requirement for this to work.
The interesting thing about this is that you would think that the Remote Desktop Service service would be the service responsible for enrolling for this certificate, however it is the Remote Desktop Configuration (SessionEnv) service that is responsible for initial certificate requests as well as certificate renewals.
It is common to see the RDS Authentication Certificate template configured for autoenrollment, however this is one of the worse things you can do, and WILL cause issues with Remote Desktop Services once the certificate renewal timeframe comes in. Autoenrollment will archive the existing certificate causing RDS to no longer be able to find the existing certificate; then when you require TLS on the RDS Listener, users will fail to connect to the server. Then, at some point, Remote Desktop Configuration service will replace the newly issued certificate with a new one because it maintains the Thumbprint of the certificate that RDS should be using within WMI. When it tries to locate the original thumbprint and cannot find it, it will then attempt to enroll for a new one at the next service start. This is generally when we see the cases rolling in to the Windows Directory Services team because it appears to be a certificate issue even though this is a Remote Desktop Services configuration issue.
What we want to do is first make sure that all the steps are taken to properly configure the environment so that the Remote Desktop Configuration service is able to properly issue certificates.
The Steps
Like everything in IT (information technology), there is a list of steps that need to be completed to get this setup properly.
Configure the certificate template and add it to a Certification Authority to issue the template.
Configure the Group Policy setting.
Configuring the Certificate Template
The first step in the process is to create and configure the certificate template that we want to use:
Log on to a computer that has the Active Directory Certificate Services Tools Remote Server Administration Tools (RSAT) installed or a Certification Authority within the environment.
Launch: CertTmpl.msc (Certificate Template MMC)
Find the template named Computer, right click on it and select Duplicate Template.
On the Compatibility tab, select up to Windows Server 2012 R2 for Certification Authority and Certificate recipient. Going above this might cause issues with CEP / CES environments.
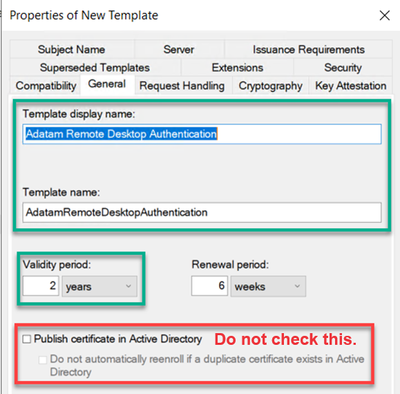
On the General tab, we need to give the template a name and validity period.
Type in a good descriptive name in the Template display name field.
If you would like to change the Validity period, you can do that as well.
You should NOT check the box Publish certificate in Active Directory.
NOTE: Make sure to copy the value in the Template name field, as this is the name that you will need to type in the group policy setting. Normally it will be the display name without any spaces in the name, but do not rely on this. Use the value you see during template creation or when looking back at the template later.
6. On the Extensions tab, the Enhanced Key Usage / Application Policies need to be modified.
a. Select Application Policies, and then click on the Edit button.
b. Multi select or select individually Client Authentication and Server Authentication and click the Remove button.
c. Click the Add button, and then click on the New button if you need to create the Application Policy for Remote Desktop Authentication. Otherwise find the Remote Desktop Authentication policy in the list and click the OK button.
d. If you need to create the Remote Desktop Authentication application policy, click the Add button, and then for the Name type in Remote Desktop Authentication, and type in 1.3.6.1.4.1.311.54.1.2 for the Object identifier value, and click the OK button.
e. Verify the newly created Remote Desktop Authentication application policy, and then click the OK button twice.
7. Remote Desktop service can use a Key Storage Provider (KSP). So, if you would like to change over from a Legacy Cryptographic Service Provider (CSP) to using a Key Storage Provider this can be done on the Cryptography tab.
8. Get the permissions set properly. To do this click on the Security tab.
a. Click the Add button and add any specific computer or computer groups you want to enroll for a certificate.
b. Then Make sure to ONLY select Allow Enroll permission. DO NOT select Autoenroll.
NOTE: Please keep in mind that Domain Controllers DO NOT belong to the Domain Computers group, so if you want all workstations, member server and Domain Controllers to enroll for this certificate, you will need Domain Computers and Enterprise Domain Controllers or Domain Controllers groups added with the security permission of Allow – Enroll.
9. When done making other changes to the template as needed, click the OK button to save the template.
Configure the Group Policy
After working through getting the certificate template created and configured to your liking, the next step in the process is to setup the Group Policy Object properly.The group policy setting that needs to be configured is located at: Computer ConfigurationPoliciesAdministrative TemplatesWindows ComponentsRemote Desktop ServicesRemote Desktop Session HostSecurity
With the Policy “Server authentication certificate template“
When adding the template name to this group policy it will accept one of two things:
Certificate template name, again this is NOT the certificate template display name.
Certificate templates Object Identifier value. Using this is not common, however some engineers will recommend this over the template name.
If you use the certificate template display name, the Remote Desktop Configuration service (SessionEnv) will successfully enroll for the certificate, however the next time the policy applies it will enroll for a new certificate again. This causes enrollments to happen and can make a CA very busy.
Troubleshoot issues of certificate issuance
Troubleshooting problems with certificate issuance is usually easy once you have a good understanding of how Remote Desktop Services goes about doing the enrollment, and there are only a few things to check out.
Investigating what Certificate Remote Desktop Service is configured to use.
The first thing to investigate is figuring out what certificate, if any,the Remote Desktop Services is currently configured to use. This is done by running a WMI query and can be done via PowerShell or good’ol WMIC. (Note: WMIC is deprecated and will be removed at a future date.)
WMIC: wmic /namespace:rootcimv2TerminalServices PATH Win32_TSGeneralSetting Get SSLCertificateSHA1Hash
We are interested in the SSLCertificateSHA1Hash value that is returned. This will tell us the thumbprint of the certificate it is attempting to load.
Keep in mind that if the Remote Desktop Service is still using the self-signed certificate, it can be found by:
launch the local computer certificate store (CertLM.msc).
Once the Computer store opened look for the store named: Certificates – Local ComputerRemote DesktopCertificates.
We would then double click on the certificate, then click on the Details tab, and find the field named Thumbprint.
Then validate if this value matches the value of SSLCertificateSHA1Hash from the output.
If there is no certificate in the Remote Desktop store, or if the SSLCertificateSHA1Hash value does not match any of the certificates in the store Thumbprint field, then it would be best to visit the Certificates – Local ComputerPersonalCertificates store next. Look for a certificate that has the Thumbprint field matching the SSLCertificateSHA1Hash value.
Does the Remote Desktop Service have permission to the Certificate private key
Once the certificate has been tracked down, we then must figure out if the certificate has a private key and if so, does the account running the service have permission to the private key?
If you are using Group Policy to deploy the certificate template information and the computer has permissions to enroll for the certificate, then the permissions in theory should be configured properly for the private key and have the NT AuthorityNetworkService with Allow – Read permissions to the private key.
If you are having this problem, then more than likely the environment is NOT configured to deploy the certificate template via the group policy setting, and it is just relying on computer certificate autoenrollment and a certificate that is valid for Server Authentication. Relying on certificate autoenrollment is not going to configure the correct permissions for the private key and add Network Service account permissions.
To check this, follow these steps:
launch the local computer certificate store (CertLM.msc).
Once the Computer store opened look for the store named: Certificates – Local ComputerPersonalCertificates.
Right click on the certificate that you are interested in, then select All Tasks, and click on Manage Private Keys.
4. Verify that Network Service account has Allow – Read Permissions. If not, then add it.
a. Click the Add button.
b. In the Select Users or Groups, click the Locations button, and select the local computer in the list.
c. Type in the name “Network Service”
d. Then click the Check Names button, and then click the OK button.
5. If the certificate does not appear to have a private key associated with it in via the Local Computer Certificate store snapin, then you may want to run the following CertUtil command to see if you can repair the association. CertUtil -RepairStore My [* / CertThumbprint].
How to change the certificate that Remote Desktop Services is using
If you have determined that Remote Desktop Services is using the wrong certificate, there are a couple of things that we can do to resolve this.
We can delete the certificate from the Computer Personal store and then cycle the Remote Desktop Configuration (SessionEnv) service. This would cause immediate enrollment of a certificate using the certificate template defined in the group policy.
PowerShell:
     $RDPSettings = Get-WmiObject -Class “Win32_TSGeneralSetting” -Namespace Rootcimv2Terminalservices -Filter “TerminalName=’rdp-tcp'”
     CertUtil -DelStore My $RDPSettings.SSLCertificateSHA1Hash
     Net Stop SessionEnv
     Net Start SessionEnv
2. We could update the Thumbprint value in WMI to reference another certificates thumbprint.
WMIC: wmic /namespace:rootcimv2TerminalServices PATH Win32_TSGeneralSetting Set SSLCertificateSHA1Hash = “CERTIFICATETHUMBPRINT”
Conclusion
The first thing to remember is deploying certificates for Remote Desktop Services is best done by the Group Policy setting and to NOT setup the certificate template for autoenrollment. Setting the template up for autoenrollment will cause certificate issuance problems within the environment from multiple angles.
Unless you modify the certificate templates default Key Permissions setting found on the Request Handling tab, the account running the Remote Desktop Service will not have permission to the private key if the certificate is acquired via autoenrollment. This is not something that we would recommend.
This will cause a scenario where even if the SSLCertificateSHA1Hash value is correct, it will not be able to use the certificate because it will not have permission to use the private key. If you do have the template configured for custom Private Key permissions, you could again still have issues with the WMI SSLCertificateSHA1Hash value not being correct.
2. Configure the group policy setting properly as well as the certificate template. It is best to manage this configuration via group policy and you can ensure consistent experience for all RDS connections.
I know that a lot of you might have deeper questions about how the Remote Desktop Configuration service does this enrollment process, however, please keep in mind that the Remote Desktop Service is really owned by the Windows User Experience team in CSS, and so us Windows Directory Services engineers may not have that deeper level knowledge. We just get called in when the certificates do not work or fail to get issued. This is how we tend to know so much about the most common misconfigurations for this solution.
Rob “Why are RDS Certificates so complicated” Greene
This article is contributed. See the original author and article here.
Mv3 High Memory General Availability
Executing on our plan to have our third version of M-series (Mv3) powered by 4th generation Intel® Xeon® processors (Sapphire Rapids) across the board, we’re excited to announce that Mv3 High Memory (HM) virtual machines (VMs) are now generally available. These next-generation M-series High Memory VMs give customers faster insights, more uptime, lower total cost of ownership and improved price-performance for their most demanding workloads. Mv3 HM VMs are supported for RISE with SAP customers as well. With the release of this Mv3 sub-family and the sub-family that offers around 32TB memory, Microsoft is the only public cloud provider that can provide HANA certified VMs from around 1TB memory to around 32TB memory all powered by 4th generation Intel® Xeon® processors (Sapphire Rapids).
Key features on the new Mv3 HM VMs
The Mv3 HM VMs can scale for workloads from 6TB to 16TB.
Mv3 delivers up to 40% throughput over our Mv2 High Memory (HM), enabling significantly faster SAP HANA data load times for SAP OLAP workloads and significant higher performance per core for SAP OLTP workloads over the previous generation Mv2.
Powered by Azure Boost, Mv3 HM provides up to 2x more throughput to Azure premium SSD storage and up to 25% improvement in network throughput over Mv2, with more deterministic performance.
Designed from the ground up for increased resilience against failures in memory, disks, and networking based on intelligence from past generations.
Available in both disk and diskless offerings allowing customers the flexibility to choose the option that best meets their workload needs.
During our private preview, several customers such as SwissRe unlocked gains from the new VM sizes. In their own words:
“Mv3 High Memory VM results are promising – in average we see a 30% increase in the performance without any big adjustment.”
SwissRe
Msv3 High Memory series (NVMe)
Size
vCPU
Memory in GiB
Max data disks
Max uncached Premium SSD throughput: IOPS/MBps
Max uncached Ultra Disk and Premium SSD V2 disk throughput: IOPS/MBps
Max NICs
Max network bandwidth (Mbps)
Standard_M416s_6_v3
416
5,696
64
130,000/4,000
130,000/4,000
8
40,000
Standard_M416s_8_v3
416
7,600
64
130,000/4,000
130,000/4,000
8
40,000
Standard_M624s_12_v3
624
11,400
64
130,000/4,000
130,000/4,000
8
40,000
Standard_M832s_12_v3
832
11,400
64
130,000/4,000
130,000/4,000
8
40,000
Standard_M832s_16_v3
832
15,200
64
130,000/ 8,000
260,000/ 8,000
8
40,000
Msv3 High Memory series (SCSI)
Size
vCPU
Memory in GiB
Max data disks
Max uncached Premium SSD throughput: IOPS/MBps
Max uncached Ultra Disk and Premium SSD V2 disk throughput: IOPS/MBps
Max NICs
Max network bandwidth (Mbps)
Standard_M416s_6_v3
416
5,696
64
130,000/4,000
130,000/4,000
8
40,000
Standard_M416s_8_v3
416
7,600
64
130,000/4,000
130,000/4,000
8
40,000
Standard_M624s_12_v3
624
11,400
64
130,000/4,000
130,000/4,000
8
40,000
Standard_M832s_12_v3
832
11,400
64
130,000/4,000
130,000/4,000
8
40,000
Standard_M832s_16_v3
832
15,200
64
130,000/ 8,000
130,000/ 8,000
8
40,000
Mdsv3 High Memory series (NVMe)
Size
vCPU
Memory in GiB
Temp storage (SSD) GiB
Max data disks
Max cached* and temp storage throughput: IOPS / MBps
Max uncached Premium SSD throughput: IOPS/MBps
Max uncached Ultra Disk and Premium SSD V2 disk throughput: IOPS/MBps
Max NICs
Max network bandwidth (Mbps)
Standard_M416ds_6_v3
416
5,696
400
64
250,000/1,600
130,000/4,000
130,000/4,000
8
40,000
Standard_M416ds_8_v3
416
7,600
400
64
250,000/1,600
130,000/4,000
130,000/4,000
8
40,000
Standard_M624ds_12_v3
624
11,400
400
64
250,000/1,600
130,000/4,000
130,000/4,000
8
40,000
Standard_M832ds_12_v3
832
11,400
400
64
250,000/1,600
130,000/4,000
130,000/4,000
8
40,000
Standard_M832ds_16_v3
832
15,200
400
64
250,000/1,600
130,000/ 8,000
260,000/ 8,000
8
40,000
Mdsv3 High Memory series (SCSI)
Size
vCPU
Memory in GiB
Temp storage (SSD) GiB
Max data disks
Max cached* and temp storage throughput: IOPS / MBps
Max uncached Premium SSD throughput: IOPS/MBps
Max uncached Ultra Disk and Premium SSD V2 disk throughput: IOPS/MBps
Max NICs
Max network bandwidth (Mbps)
Standard_M416ds_6_v3
416
5,696
400
64
250,000/1,600
130,000/4,000
130,000/4,000
8
40,000
Standard_M416ds_8_v3
416
7,600
400
64
250,000/1,600
130,000/4,000
130,000/4,000
8
40,000
Standard_M624ds_12_v3
624
11,400
400
64
250,000/1,600
130,000/4,000
130,000/4,000
8
40,000
Standard_M832ds_12_v3
832
11,400
400
64
250,000/1,600
130,000/4,000
130,000/4,000
8
40,000
Standard_M832ds_16_v3
832
15,200
400
64
250,000/1,600
130,000/ 8,000
130,000/ 8,000
8
40,000
*Read iops is optimized for sequential reads
Regional Availability and Pricing
The VMs are now available in West Europe, North Europe, East US, and West US 2. For pricing details, please take a look here for Windows and Linux.
We are thrilled to unveil the latest and largest additions to our Mv3-Series, Standard_M896ixds_32_v3 and Standard_M1792ixds_32_v3 VM SKUs. These new VM SKUs are the result of a close collaboration between Microsoft, SAP, experienced hardware partners, and our valued customers.
Key features on the new Mv3 VHM VMs
Unmatched Memory Capacity: With close to 32TB of memory, both the Standard_M896ixds_32_v3 and Standard_M1792ixds_32_v3 VMs are ideal for supporting very large in-memory databases and workloads.
High CPU Power: Featuring 896 cores in the Standard_M896ixds_32_v3 VM and 1792 vCPUs** in the Standard_M1792ixds_32_v3 VM, these VMs are designed to handle high-end S/4HANA workloads, providing more CPU power than other public cloud offerings. Enhanced Network and Storage Bandwidth: Both VM types provide the highest network and storage bandwidth available in Azure for a full node VM, including up to 200-Gbps network bandwidth with Azure Boost.
Optimal Performance for SAP HANA: Certified for SAP HANA, these VMs adhere to the SAP prescribed socket-to-memory ratio, ensuring optimal performance for in-memory analytics and relational database servers.


Recent Comments