by Contributed | Jun 29, 2021 | Technology
This article is contributed. See the original author and article here.
Today we are announcing the availability of quarterly Cumulative Updates (CUs) for Exchange Server 2016 and Exchange Server 2019. These CUs include fixes for customer reported issues, all previously released security updates, and a new security feature.
A full list of fixes is contained in the KB article for each CU, but we wanted to highlight the new security feature.
Exchange Server AMSI Integration
As mentioned in our recent blog post, the June 2021 CUs include new Exchange Server integration with AMSI (Antimalware Scan Interface). AMSI exists in Windows Server 2016 and Windows Server 2019, and the new integration is available in Exchange 2016 and Exchange 2019 when running on either of those operating systems. For Exchange 2016, AMSI integration is available only when running on Windows Server 2016. It is not available for Exchange 2016 running on Windows Server 2012 or Windows Server 2012 R2.
AMSI integration in Exchange Server provides the ability for an AMSI-capable antivirus/antimalware solution to scan content in HTTP requests sent to Exchange Server and block a malicious request before it is handled by Exchange Server. The scan is performed in real-time by any AMSI-capable antivirus/antimalware solution that runs on the Exchange server as the server begins to process the request. This provides automatic mitigation and protection that compliments the existing antimalware protection in Exchange Server to help make your Exchange servers more secure.
Because we know that some of our customers modify the web.config file on their Exchange Server, we wanted to let you know that installation of the June 2021 CUs will add a new section in the web.config of every HTTP service under <Modules>. The entry will be called “HttpRequestFilteringModule” and it must be present for AMSI integration to work.
Release Details
The KB articles that describe the fixes in each release and product downloads are as follows:
Additional Information
Microsoft recommends all customers test the deployment of any update in their lab environment to determine the proper installation process for your production environment.
These updates contain schema and directory changes and so require you prepare Active Directory (AD) and all domains. You can find more information on that process here. Schema changes can be tracked here. For best practices for successful installation, please see this document.
If updating from an older version of the CU, please see Exchange Update Wizard for detailed steps to follow.
Also, to prevent installation issues you should ensure that the Windows PowerShell Script Execution Policy is set to Unrestricted on the server being upgraded or installed. To verify the policy settings, run the Get-ExecutionPolicy cmdlet from PowerShell on the machine being upgraded. If the policies are NOT set to Unrestricted you should use these resolution steps to adjust the settings.
If you plan to install the update with the unattended install option using either PowerShell or a command prompt, make sure you specify either the full path to the setup.exe file or use a “.” in front of the command if you are running it directly from the folder containing the update. If you do not, Exchange Setup may indicate that it completed successfully when it did not. Read more here.
Note: Customers in Exchange hybrid deployments and those using Exchange Online Archiving with an on-premises Exchange deployment are required to deploy a supported CU for the product version in use.
For the latest information on the Exchange Server and product announcements please see What’s New in Exchange Server and Exchange Server Release Notes.
Note: Documentation may not be fully available at the time this post is published.
The Exchange Server team
by Contributed | Jun 29, 2021 | Technology
This article is contributed. See the original author and article here.
Since the beginning of the Azure Arc Jumpstart project, our team has been devoted to providing our tech community an easy, efficient, and fun way of deploying various Azure Arc scenarios in an automated fashion.
With the announcement of Azure Arc-enabled data services general availability, we are also excited to share with you the evolution of the related Jumpstart scenarios around it.
The Jumpstart project is an extension to the core Azure Arc products suite and as such, it is our core mission to provide our users with the most up-to-date deployment scenarios.
Support for directly connected mode
With directly connected mode, Azure Arc-enabled data services can now be projected as Azure resources in the portal and have 1st class API representation. For this release, we’ve updated both the Azure Kubernetes Service (AKS) and the Google Kubernetes Engine (GKE) scenarios to support directly connected mode.
As we continue to invest more efforts in creating Cluster API (CAPI) scenarios that leverage the Cluster API Azure Provider (CAPZ), in addition to the AKS and GKE updates mentioned above, 3 new scenarios were created using CAPI/CAPZ. These scenarios are great for those who want to deploy data services on an unmanaged Kubernetes environment to have more control but also to stimulate a closer “on-premises Kubernetes” experience.
Modular automation
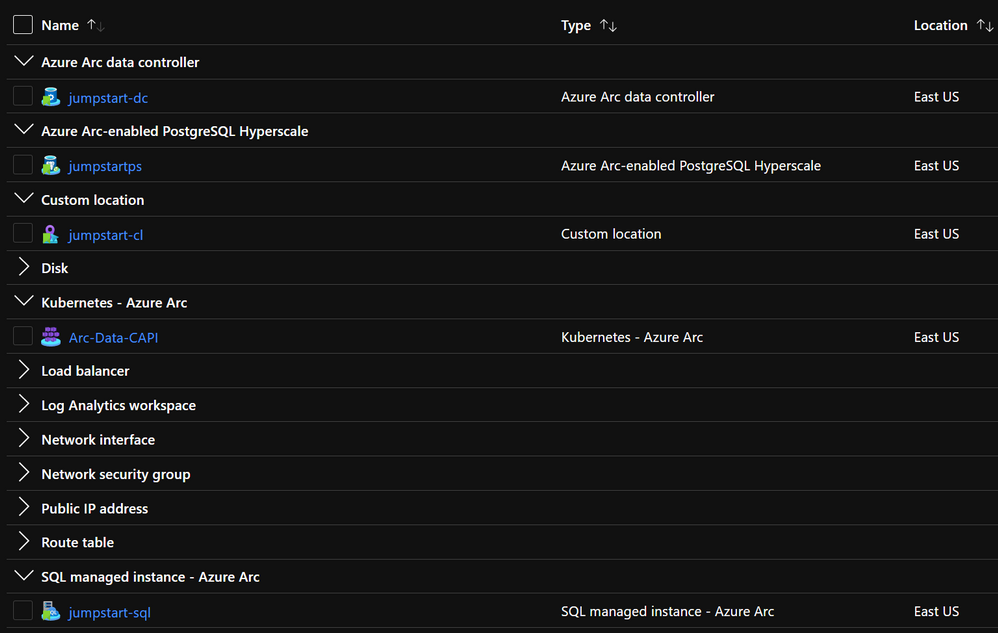
As you already may know, Azure Arc-enabled data services support SQL Managed Instance and PostgreSQL Hyperscale. With our new and updated scenarios, we now allow for a parametrized deployment. A user can now use the same code base and choose if he wants to deploy just the Azure Arc data controller, SQL Managed Instance, PostgreSQL Hyperscale, or both.
Although we provide 3 distinct scenarios to make things clean and easy to follow, a user can simply choose the deployment environment with just a couple of parameters.

[Note] We will be updating the AWS EKS scenario in our upcoming future releases.
ArcBox updates
At our Microsoft Build event last month, we announced the Jumpstart ArcBox solution. A super easy to deploy a full sandbox environment for you to get going with Azure Arc. We are happy to share that ArcBox now also supports Azure Arc-enabled data services in a directly connected mode so in a single ArcBox resource group you will now get both SQL Managed Instance and PostgreSQL Hyperscale deployed and projected as Azure Arc resources.
Azure Arc Partners
Microsoft partners are a critical part of the overall Azure Arc success! For many months now, the different engineering, marketing, and sales organizations within Microsoft have been working hard on building the right messaging, technical content, and strategy for Azure Arc and for our partners. In this new blog post, you can read all about our work and the Azure Arc partners available so you can make your organization successful with the technology.
We hope you will enjoy these cool updates and please reach out for any questions.
Lior

by Contributed | Jun 29, 2021 | Technology
This article is contributed. See the original author and article here.
The Azure Arc partner ecosystem offers customers validated, enterprise grade solutions to run Azure on-premises and at the edge. Launched at Microsoft Ignite 2021 with support from industry-leading OEMs, hardware providers, platform providers, and ISVs, we are happy to announce the expansion of the Azure Arc network of trusted partners and validated platforms to data services.
Azure Arc validation program
The Azure Arc validation program ensures customers can adopt from a wide range of partner solutions to fit their needs with the confidence that they have been designed, engineered, configured, and tested to run Azure data services and Kubernetes distributions.
With these validated solutions, customers receive the benefits of enterprise performance and scale to deploy and operate their data services across their entire estate, as well as the assurance of enterprise grade support.
Technology partners & platforms
Our partnership with industry leading OEMs and storage providers delivers HCI and hardware-as-a-service (HaaS) solutions that combine hardware and software platforms that are optimized to run hybrid data workloads.
Partner |
Solution |
Description |
Link |

Azure Kubernetes Service (AKS)
|
Azure Kubernetes Service |
Deploy and manage containerized applications more easily with a fully managed Kubernetes service. |
azure.microsoft.com/en-ca/services/kubernetes-service/ |
 |
Charmed Kubernetes |
The Azure Arc dashboard combined with Charmed Kubernetes’ full lifecycle automation tooling to drastically simplify multi-cloud deployments and operations traceability with GitOps. |
ubuntu.com/blog/gitops-with-azure-arc-and-charmed-kubernetes |
 |
Storage Solutions |
Get the scalability, intelligence, and cloud integration you need to unlock the value of your data.
- Dell EMC PowerFlex
- Dell EMC PowerStore
- Dell EMC PowerMax
|
delltechnologies.com/storage |
|
Hyperconverged Solutions |
Benefit from an HCI portfolio that allows for choice based on infrastructure, operational models and desired IT outcomes.
- Dell EMC PowerFlex
- Dell EMC Integrated System for Microsoft Azure Stack HCI
|
delltechnologies.com/hci
|
|
as-a-Service Solutions |
Experience the ease and agility of as-a-Service combined with the power and control of leading technology infrastructure.
- Dell Technologies APEX Data Storage Services
|
delltechnologies.com/apex |

|
Hybrid cloud Kubernetes with Nutanix HCI + Karbon and Azure Arc
|
Fast-track your cloud native journey! Make hybrid cloud Kubernetes a reality by extending Microsoft Azure and Azure Arc Data Services to Karbon Kubernetes clusters on Nutanix’s industry-leading Hyperconverged Infrastructure (HCI).
|
nutanix.com/solutions/cloud-native/hybrid-cloud-kubernetes |

|
FlashArray and PX-Backup |
Pure Storage and PX-Backup delivers an enterprise-grade point-and-click , container-native, backup and disaster recovery solution with fine grained protection, security, and audit capabilities.
|
purestorage.com/azure-arc |
 |
Rancher |
Together, Azure Arc and SUSE Rancher (SUSE’s GitOps-enabled Kubernetes management platform) provides a complete, open, and interoperable software stack for DevOps to deploy, secure, and manage their Kubernetes clusters.
|
suse.com/solutions/cloud-native-transformation/
|
 |
Azure Red Hat OpenShift
|
Azure Red Hat OpenShift provides highly available, fully managed Red Hat OpenShift clusters on-demand, monitored and operated jointly by Microsoft and Red Hat with an integrated support experience.
|
azure.microsoft.com/en-us/services/openshift/ |
 |
Red Hat OpenShift |
Red Hat OpenShift is for innovation without limitation — bringing big ideas to life through intelligent applications with the security-focused hybrid cloud platform open to any team or infrastructure.
|
openshift.com
|
 |
SUSE Linux Enterprise Server
SUSE Manager |
Supported by Microsoft Azure Arc for servers, SUSE Linux Enterprise Server simplifies an enterprise’s journey to a hybrid cloud infrastructure. In concert with Azure Arc, SUSE Manager orchestrates the deployment and lifecycle of the systems, while Azure Arc manages policy compliance.
|
suse.com/c/suse-accelerates-transformation-in-the-cloud-with-solutions-for-microsoft-azure/ |
 |
VMware Tanzu Kubernetes Grid |
Run your containerized applications and Azure Arc-enabled data services anywhere, at enterprise-scale with VMware Tanzu Kubernetes Grid.
|
tanzu.vmware.com/kubernetes-grid |
Featured service partners
Whether you are just getting started with migration and modernization efforts or in the middle of a multi-year smart factory rollout, our consulting services partners can help you choose the validated infrastructures and applications that are specifically configured and tested to work with Azure Arc.
Partner |
Solution |
Description |
Link |
 |
Azure Governance Solution |
AHEAD created the Azure Governance Framework to allow enterprises to develop and maintain a fully optimized, and secure environment.
|
AHEAD Azure Governance Solution
|
 |
Cloud and Application Services |
Avanade provides a turnkey, managed Azure Stack solution.
Through a single provider, you get a Microsoft certified
hardware platform, Azure Stack software setup and
configuration, a hybrid cloud foundations workshop, and then
we run and manage it for you. |
Accelerating Cloud Migrations And Extending Cloud Services | Avanade Insights Blog |
 |
AzCOP |
The power of automation on a unified platform providing benefits of self-services cloud. Consolidates all aspects of sourcing, managing and delivering cloud services across matrix teams while managing cloud risk and compliance |
AzCOP – Cloud Orchestration & Provisioning | BrainScale Inc
|
 |
Azure Arc
|
Learn how Microsoft and ClearDATA together can provide a comprehensive view into both your on-premises and cloud PHI data security and compliance by using Azure Arc. |
Healthcare Compliance
|

|
Cognizant Cloud Operate |
Accelerated, factory-based, agile framework for migrating and transforming enterprise data center workloads to cloud using best of breed tools, custom blueprints, governance and optimization. |
Cloud Managed Services—Cloud Operate | Cognizant
|
|
Azure Cloud Economics Assessment and Migration |
Undergoing the Cloud Economics Assessment will allow for effective forecasting of Azure Infrastructure usage, ensuring a well defined migration plan and transition to the cloud. |
Azure Accelerate – Core BTS
|
 |
Azure Arc Datacenter Management Assessment |
**Cloud-first hybrid management** Simplify the management of complex and distributed environments across private & public clouds, datacenters, and edge.
|
Azure Arc Datacenter Management Assessment: 5-day – Microsoft Azure Marketplace |
 |
Do it hybrid |
Azure Arc enables Everis to help organizations design and achieve business goals extending the Azure’s capabilities and having unified operations. Do it hybrid streamlines the management of distributed environments anywhere.
|
everis cloud adoption journey > cloud implementation > cloud hybrid
|
 |
Azure Validation & Optimization |
An Azure validation and optimization project is for customers seeking a professional review of cloud usage, services consumed, architecture, subscriptions and workloads to validate and identify areas of optimization.
|
App Modernization “Smart Start”: 2-Hr Briefing – Microsoft Azure Marketplace
|
 |
Azure Arc Fast Start |
Azure Arc Fast Start helps organizations adopt Azure Arc to drastically simplify management and operation with a clients hybrid cloud. Microsoft® Azure Arc was designed with hybrid solutions at the core to simplify workload management and operational burden across resources, no matter where they live. |
Hybrid Container Management With Azure Arc Strategy Workshop | Insight
|
 |
Managed Cloud Services for Azure |
KoçSistem MCS for Azure is a portal to manage cloud licenses and monitors usage/consumption for Microsoft Cloud Customers.
|
KoçSistem Teknolojiyi Türkiye’nin Lider Markaları ile Buluşturuyor! (kocsistem.com.tr)
|
 |
Cloud Next |
Cloud Next is a multi and hybrid cloud platform built by KPMG Ignition Tokyo (KIT). The goals of Cloud Next are to provide a secure, low-cost, and 24×7 supported environment where clients and KPMG member firms can host their digital solutions. |
KPMG Ignition Tokyo
|
 |
Database Modernization |
Azure DB and Cosmos DB Migration Accelerator Pack helps organizations understand and plan on-prem data estate migration and modernization to Azure. |
Nous Azure Arc based Hybrid Solution
|
 |
Azure Governance Services for a Fully Governed Cloud Environment |
SNP’s Azure Adoption Framework is designed to help customers create and implement the business and technology |
Hybrid Cloud Solutions- 4 Week Implementation – Microsoft Azure Marketplace |
 |
Azure Migration & Managed Service |
We help enterprises distribute workloads based on criticality & functionality between private & public clouds. |
TCS’ Services for Cloud Migration to Azure for Digital Transformation
|
 |
Azure Arc Hybrid Cloud |
A new management tool for hybrid cloud application infrastructures. It’s designed to manage resources in a cloudlike manner wherever they are, treating Azure’s resource tooling as your control plane. |
Managed Services | UniSystems
|
Getting started resources
by Contributed | Jun 29, 2021 | Technology
This article is contributed. See the original author and article here.
Introduction
SKF, a leading global supplier of bearings, seals and lubrication systems operating 91 manufacturing sites in 28 countries, wanted to transform from a traditional manufacturing organization to a ‘Factory of the Future’ vision. SKF provides reliable rotation to industries all over the world, offering products and services around the rotating shaft including bearings, seals, lubrication management, artificial intelligence and wireless condition monitoring.
SKF has been on a journey to digitally transform the company’s backbone through harnessing the power of technology, interconnecting processes, streamlining operations and delivering industry-leading digital products and services for customers. As part of this transition, they wanted to modernize their factories to transform from a reactive to more predictive workflows using data driven methodology and cloud native operating models in the hybrid cloud environment. Using Azure Arc infrastructure and services, SKF has reduced costs, improved effectiveness, streamlined management and is able to make real-time decisions within the constraints of performance and availability expectations.
In this blog, @svollbehr and I will outline the hybrid cloud architecture, the use of Azure Arc-enabled data services, Azure Stack HCI and applications SKF deployed to realize this vision.
A data driven hybrid cloud approach
As SKF looked for a solution that supported their data-driven manufacturing vision for the Factories of the Future, they wanted a solution that was able to support distributed innovation and development, high availability, scalability and ease of deployment. They wanted each of their factories to be able to collect, process, analyze data to make real-time decisions autonomously while being managed centrally. At the same time, they had constraints of data latency, data resiliency and data sovereignty for critical production systems that could not be compromised.
The drivers behind adopting a hybrid cloud model came from factories having to meet customer performance requirements, many of which depend on ability to analyze and synthesize the data. Recently, the Data Analytics paradigms have shifted from Big Data Analysis in the cloud to more Data-Driven Manufacturing at the machine, production line and factory edge. Adopting cloud native operating models but in such capacity where they can execute workloads physically on-premises at their factories turned out to be the right choice for SKF.
The Azure Hybrid Cloud solution offered them a unique value proposition that is aligned with SKF’s Digital Manufacturing vision. It allowed them to reduce implementation and operating costs by using it as standardized IT/OT platform across all factories, with fit for purpose configurations for every factory, while facilitating for distributed innovation and development for competitive advantage.
Azure Arc – platform for digital transformation and application modernization
SKF’s challenge was the need to able to provide over 90 factories with a platform that provides speed, reliability and low cost, while providing support for critical production systems. The platforms and solutions that they wanted to adopt had to be operated both in cloud and on-premises, and ideally be cloud-controlled centrally while enabling a local control point of execution on-premises with elastic scale and high availability using cloud services at the edge.
SKF chose Azure Kubernetes Service on Azure Stack HCI, and Azure Arc-enabled Kubernetes, as the primary hosting platform for modern workloads. The fact that Microsoft has also chosen this strategy, allow them to deploy Azure Arc-enabled data services and Azure Edge/IoT Services virtually on any of their new or existing environments in a consistent automated fashion.
Cloud managed, locally executed services on the edge
SKF has manufacturing plants worldwide that will be automated using their modern cloud-native applications as part of SKF’s Manufacturing Execution System harmonization strategy. Deployed in each manufacturing plant, these applications collect data from machines and sensors in the production lines over to be stored on-premises in the factory location as well as selectively in Azure cloud. This allows for ease of use for applications, analytics, and visualization of data in the factory with low latency and in the cloud for visibility across factories and locations.
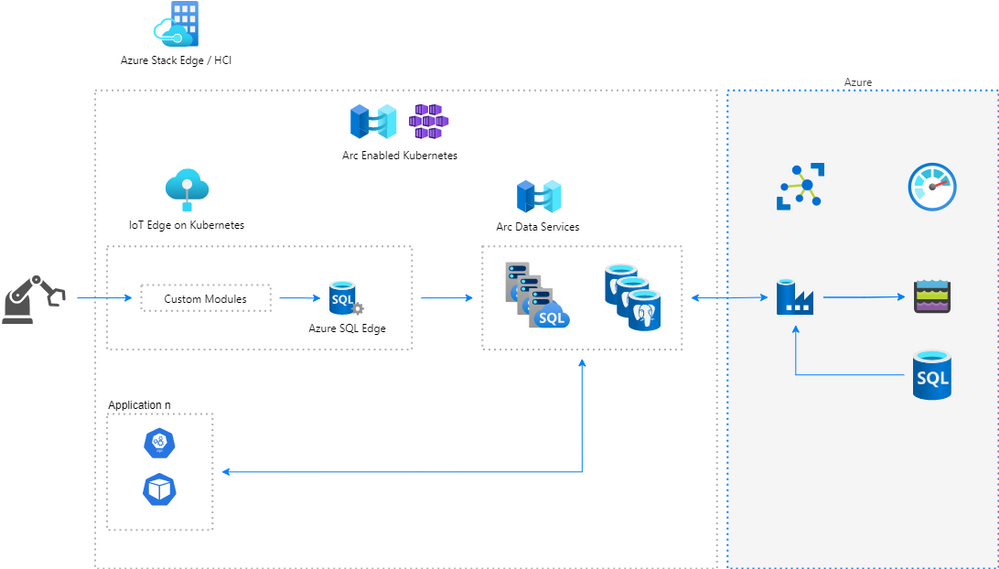
This architecture consists of the following Azure hybrid components:
Azure Stack HCI: Azure Stack Edge or Hyper Converged Infrastructure cluster solutions host virtualized Windows and Linux workloads in a hybrid on-premises environment. Azure Stack Edge and HCI are both running Kubernetes making it easy to manage applications using Open-source tools, such as ArgoCD. This gave SKF the ability to run compute intensive workloads and build intelligence at the edge.
Azure Arc-enabled Kubernetes: Azure Kubernetes Service and Azure Arc for Kubernetes allow ease of operations and control along with cloud connectivity to be centrally managed from Azure. Kubernetes is used as the container infrastructure platform in the Digital Manufacturing architecture. Kubernetes also meets the requirements for scalability and availability for the databases in the architecture.
Azure SQL Edge on Kubernetes: Azure SQL Edge hosts a lightweight SQL database that allows for rapid ingestion, store and forward to the node where applications can make use of time series functions in the architecture.
Azure Arc-enabled data services on Kubernetes: is the foundation for the factory and acts as the central point of data aggregation and persistence. It can be configured to host multiple numbers of either Azure SQL Managed Instances or PostgreSQL Hyperscale. These instances can be scaled up or down dynamically, configured to be high available, always current with the regular updates and monitored centrally in the Azure cloud.
Azure IoT Edge Hub on Kubernetes: Azure IoT Edge Hub enables the data routing on Edge as well as data streaming to the cloud.
This platform makes it easier for SKF to run its business-critical containerized applications in the cloud as well as factory edge.
Declarative infrastructure deployment in hybrid cloud
The ability to automate deployments in a consistent manner across its factories globally was an important factor to SKF to scale out the solution with speed. SKF used Git repository to store declarative infrastructure descriptions and integrated that into their Continuous integration/Continuous deployment (CI/CD) pipelines. ArgoCD, an open-source tool, was used as a GitOps operator for central application deployments to Kubernetes clusters across all factories. Secrets were stored in Azure KeyVault and are retrieved into Kubernetes clusters to operate the applications. Azure portal was used to monitor these applications centrally from the cloud.
This architecture allowed infrastructure management to be fully automated. The application, SQL database or other infrastructure resource updates could be applied with zero downtime to factories.
Low latency data flow from IIoT devices to processing nodes
The factory machines and sensors are connected using a Brown Field Connector (BFC). These connectors collect manufacturing process metrics and sensor data that are streamed in real time to the application platform running on top of either Azure Stack Edge or Azure Stack HCI. The application platform is based on Kubernetes and running for example on Azure Kubernetes Service on HCI (AKS-HCI). Azure IoT Edge Hub and Azure SQL Edge on Kubernetes are used for aggregating the streaming data from all the Industrial IoT (IIoT) devices. This timeseries data containing readings from the machines and sensors is then processed and transformed by Azure Functions and then forwarded to the HCI for storage. The data is stored in a SQL Managed Instance (SQL MI) operated in Azure Arc-enabled data services running in the AKS-HCI. Here, the cloud native applications process the data and drive actions to keep the factories running efficiently.
This architecture not only meets several business and compliance goals by processing data locally on-premises but also gives improved performance due to low data latency. The critical production applications in the factory are deployed in a scalable and high available architecture for Azure Arc-enabled data services using Availability Groups with a cloud connected on-premises Kubernetes. The Azure Arc-enabled data service is a central component in the hybrid architecture and used in every factory as the primary database solution for modern workloads. The data in SQL MI is exposed by a set of APIs running as containers in AKS. Finally, to visualize for example Operational Equipment Efficiency (OEE) they have implemented dashboards to display data real-time on this architecture.
The Dataflow architecture built on top of Kubernetes and Arc gives the capability of managing through a unified control plane as follows:
- Custom OPC-UA configurator module is running on the IoT Edge for Kubernetes that configures the custom OPC-UA data collector module. The custom module reads configurations from the SQL MI database.
- Custom OPC-UA data collector module connects to an OPC-UA server on a Brown Field Connector (BFC) to collect, transform and route signal data from all the endpoints. Data is routed using IoT Edge Hub to other modules like SQL Edge or IoT Hub in Azure cloud.
- Data is stored in Azure SQL Edge enables application to make use of SQL Edge unique time series functions to clean and aggregate the data. It also allows for running machine learning models deployed on top of SQL Edge.
- Data is transferred to Azure Arc-enabled data services where it is stored in SQL MI. Here is where data can be joined with other information which is business critical for the factory. These databases act as the central source of information in the factory applications help drive dashboards and applications.
- Data can further be exchanged and synchronized with Azure cloud using Azure Data Factory to be ingested in either Azure Data Lake or Azure SQL Databases.
Real-time decisions using intelligence at the edge
Business critical applications use the data stored in the SQL MI databases to process and drive manufacturing dashboards for the factory staff to closely monitor the factory operations. Azure Arc-enabled SQL MI running on AKS-HCI delivers low latency high compute performance at the edge to run data analytics workloads that is also highly available. This approach future proofs the platform for adding ML and other data analytics in future. The entire solution is delivered through Microsoft providing better integration, consistency, flexibility at lower cost.
‘Factory of the Future’ is here
As SKF rolls out the solution to its global factories using Azure Hybrid, it is already on path to implement its ‘Factory of the Future’ vision with the benefits of AKS-HCI, Azure Arc-enabled SQL to run their factories at scale. These are some of the most important benefits that SKF has realized using Arc-enabled Data Services.
- Facilitate for distributed innovation and development for competitive advantage
- Reduce implementation and operating costs of their highly available IT/OT platform
- Scale out easily with single pane of glass management and continuous rollout of the latest features and benefits for intelligent edge.
As new Azure Arc services like Azure Arc-enabled ML, Azure Arc-enabled App services, SKF has future proofed their factories using the Azure Arc and Azure Hybrid Cloud services.
Conclusion
SKF is a visionary manufacturer who is rapidly adopting cloud to transform the business using data driven methodology and cloud native operating models in a hybrid cloud environment. Azure Hybrid platform with Azure Arc-enabled data services, SQL MI, AKS-HCI on Azure Stack HCI and Azure SQL Edge with Azure IoT hub have been the cornerstone of this transformation. It has been possible to get this alignment due to a productive partnership between two global leaders – SKF and Microsoft to deliver industry-leading digital products and services to customers.
To know more about Azure Arc, Azure Hybrid and SKF’s journey please sign up to watch the Azure Hybrid and Multicloud Digital Event.
by Contributed | Jun 29, 2021 | Technology
This article is contributed. See the original author and article here.
Byline: @blakeknight and @dhanMMS
In support of the upcoming general availability of Azure Arc-enabled Azure SQL we are happy to announce expansion of the Azure Arc ecosystem of trusted partners and validated hardware and software platforms to help customers get started.
The “anywhere” solution for Azure data services at scale
Businesses today are increasingly adopting hybrid and multicloud technologies for their data workloads. Complexity grows as they adopt modernization and migration principles while also responding to data sovereignty, industry regulation, and on-premises latency constraints.
To meet the needs of customers today and solve their complicated hybrid scenarios, Azure Arc-enabled data services integrates across a wide choice of platforms. We have collaborated with industry-leading OEMs, cloud solution providers (CSP), Kubernetes and OS distribution providers, and independent software vendors (ISVs) to validate their Azure Arc hybrid solutions and deliver the latest innovations and unified management tools for data workloads in any environment.
“Azure Arc is the glue that brings the power of Azure – time to market, innovation, security – to all cloud environments. Arc allows us to fully realize multi-cloud – from on-prem, to hybrid, to the edge, and even connect services in other public cloud providers. It’s a game changer, especially as organizations push more solutions towards the intelligent edge.” – Brandon Ebken, CTO, Insight
A customer-centric, solutions-focused approach
With Azure Arc, customers can now have a unified Azure experience across their entire infrastructure – and we have worked with a network of trusted partners to support customers with their migration and modernization efforts. Whether you are just getting started with migration and modernization efforts or in the middle of a multi-year smart factory rollout, our consulting services partners can help you choose the validated infrastructures and applications that are specifically configured and tested to work with Azure Arc.
Azure offers the entire infrastructure – from the network, compute, power, and cooling, all the way up through the software layer – and have worked with a network of trusted partners to help customers get started. Azure Arc-enabled data services helps customers extend the same cloud benefits and data services they receive in Azure to their own infrastructure, such as automated or self-service de/provisioning, scaling, updates, backup/restore, and high availability.
We are working with a broad network of managed service providers (MSPs) and solution integrators (SIs) to help customers deploy and operate Azure data services in multi-cloud and on-prem environments. With the help of our partners, customers can use Azure Arc to:
- Manage cloud-native app development at scale and across multi-cloud environments
- Integrate with cloud native platforms and/or deliver solutions for data and AI
- Accelerate data modernization and create hyperconverged infrastructure (HCI) solutions by combining highly optimized hardware and software platforms
Validated platforms for trusted performance
The Azure Arc validation program ensures customers can adopt from a wide range of partner solutions to fit their needs with the confidence that they have been designed, engineered, configured, and tested to run Azure data services.
With Arc validated solutions, customers receive the benefits of enterprise performance, scale, and support to deploy and operate their data services, like Azure SQL Managed Instance, across any cloud. Arc validated solutions are tested for both hardware and software platforms to optimize hybrid data workloads, and our partnership with industry leading OEMs, like Dell Technologies, delivers HCI and hardware-as-a-service (HaaS) for full stack solutions.
For a consistent experience from cloud to edge, popular infrastructure platforms and Kubernetes distributions have been tested and validated to work with Azure Arc. Current validated solutions include Dell EMC PowerFlex, Dell EMC PowerMax, Dell EMC PowerStore, Dell EMC Integrated System for Microsoft Azure Stack HCI, Dell EMC VxRail, Dell Technologies APEX Data Storage Services, Red Hat Openshift, Portworx by Pure Storage, Nutanix Karbon, and VMware Tanzu. See a full list of technology and service partners here.
“Building upon our long history of close collaboration with Microsoft, Dell Technologies infrastructure is now validated to work with Azure Arc,” said Travis Vigil, senior vice president of product management, Dell Technologies. “We’ve optimized Dell storage and hyperconverged infrastructure offerings, including APEX Data Storage Services, with Azure Arc-enabled data services to vastly simplify the deployment, management and governance of database management systems across private clouds, public clouds and edge locations.”
Read more about Dell validated platforms for Azure Arc here.
“With Red Hat OpenShift, users can run Azure data services across the entirety of the hybrid cloud, including on-premise datacenters, at the edge and in multiple public cloud environments. Whether extending a self-deployed cluster or a managed container service, customers can elastically scale data operations and applications while trusting their container-based data infrastructure is up to date.” – Mike Evans, VP Technical Business Development, Red Hat
For data workloads running SQL, storage is an important component of the overall infrastructure. Our partners deliver purpose-built solutions that optimize hardware and software interlock. Customers can build cloud native infrastructure on cost-effective tiered virtualized storage to receive best of class performance for their data applications.
“Azure Arc simplifies multicloud deployments by bringing Azure management and security to any infrastructure. Paired with Portworx, customers can accelerate application development and app reliability across on-premises, cloud, and edge by automating container storage and data management.” – Shawn Rosemarin, Global VP, Emerging Technology Sales, Pure Storage
Cloud solutions that simplify the most complex hybrid scenarios
Many customers are adjusting to rapid technology advances and responding by adapting their infrastructure, applications, and operations to be cloud native. Our network of managed service providers (MSPs) and solution integrators (SIs) are here to deliver comprehensive platforms that integrate with your existing infrastructure, deploying cloud native tools, GitOps configurations, and applications to one or more Kubernetes clusters at scale.
“We see massive value with Azure Arc and the ability to bring the features and capabilities of Azure to on-premise datacenters, retail stores, and manufacturing facilities, while simultaneously centralizing operations and modernizing technical capabilities across hosting platforms.” – Nick Colyer, Director of Cloud & DevOps, AHEAD
“Azure Arc enabled data services provides a Database-as-a-Service model for us to better serve our customers, like OPET; they now can run data workloads outside of Azure, and yet enjoy all the Azure innovation and cloud benefits.” – Evren Dereçi, Chief Marketing Officer, Koç Sistem
Get started today with an Azure Arc partner
The Azure Arc partner program offers customers validated, enterprise grade solutions to run Azure at the edge. Launched at Microsoft Ignite 2021 with support from industry-leading OEMs, hardware providers, platform providers, and ISVs, we continue to expand coverage into data services to meet the needs of our customers.
by Contributed | Jun 29, 2021 | Technology
This article is contributed. See the original author and article here.
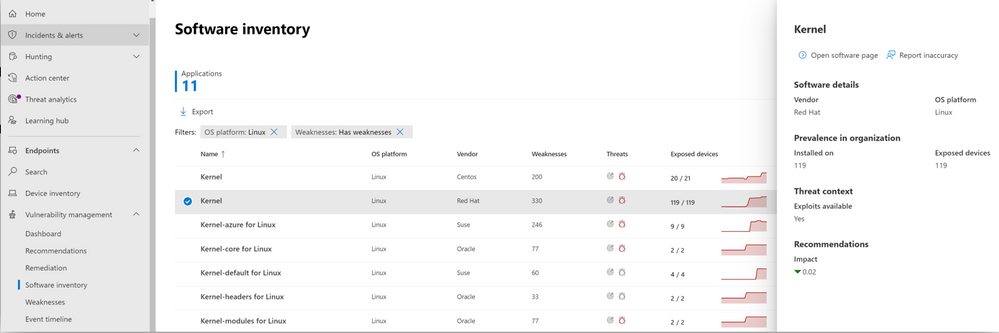
In May we announced the support for Linux across our threat and vulnerability management capabilities in Microsoft Defender for Endpoint. Today, we are excited to announce that threat and vulnerability management for Linux is now generally available across Red Hat, Ubuntu, CentOS, SUSE, and Oracle, with support for Debian coming soon. In addition to Linux, the threat and vulnerability management capabilities already support macOS and Windows, with support for Android and iOS coming later this summer to further expand our support of third party platforms.
Vulnerability Management plays a crucial role in monitoring an organization’s overall security posture. That’s why we continue to expand our cross-platform support to equip security teams with real-time insights into risk with continuous vulnerability discovery, intelligent prioritization, and the ability to seamlessly remediate vulnerabilities for all their platforms. With the general availability of support for Linux, organizations can now review vulnerabilities within installed apps across the Linux OS and issue remediation tasks for affected .
Image 1: Software inventory page in the vulnerability management console, showing various Linux platforms
 Image 2: Software inventory page in the vulnerability management portal, showing glibc across various Linux systems
Support for the various Linux platforms in threat and vulnerability management closely follows what is available across our Endpoint Detection and Response (EDR) capabilities. This alignment ensures a consistent experience for Microsoft Defender for Endpoint customers, as we continue to expand our cross-platform support.
More information and feedback
The threat and vulnerability management capabilities are part of Microsoft Defender for Endpoint and enable organizations to effectively identify, assess, and remediate endpoint weaknesses to reduce organizational risk.
Check out our documentation for a complete overview of supported operating systems and platforms.
We want to hear from you! If you have any suggestions, questions, or comments, please visit us on our Tech Community page.
by Contributed | Jun 29, 2021 | Technology
This article is contributed. See the original author and article here.
Credit and thanks to Alexandru Jercaianu and Vladimir Cernov for implementation work
Over the last year, we have been improving the DNS over HTTPS (DoH) functionality in the Windows DNS client. Now we are pleased to introduce you to the different features now available through the Windows Insider program.
To start with, we want to note that the registry key controls documented in our original DoH testing blog post are no longer applicable. As stated there, those instructions were time limited to the initial DoH test rollout. If you did ever set that key, please delete it then reboot your machine before proceeding with the rest of this blog post.
Next, we will be reviewing the new configuration behavior, how Windows will know if a DNS server supports DoH, and what our next steps are in advancing encrypted DNS discovery.
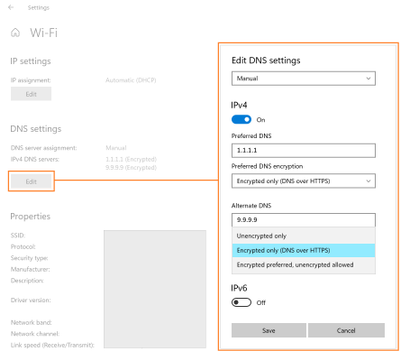
UI
The first control you should try out is the new UI fields in the Settings app, originally announced on the Insider blog. When Windows knows a given DNS server’s IP address has a corresponding DoH server, it will unlock a dropdown that lets you decide whether to require encryption always be used, use encryption but fall back to plain-text DNS when encryption fails, or not to use encryption (the default value).
GPO
For enterprise administrators, we have provided a new GPO for controlling DoH behavior. This will allow the use of DoH to be allowed, required, or prohibited system-wide.
- Allowed will defer the use of DoH to local settings available in the UI per network adapter.
- Required will prevent the use of configured DNS servers if they do not support DoH and will disable fallback to plain-text DNS.
- Prohibited will prevent any local DoH settings from taking effect, ensuring Windows functions as it did before the DoH client using plain-text DNS only.

NRPT
The Name Resolution Policy Table (NRPT) allows administrators to specify rules for name resolution by namespace. For example, you can create an NRPT rule that specifies all queries for “*.microsoft.com” must be sent to a specific DNS server.
If Windows knows that a DNS server provided in an NRPT rule supports DoH (see the next section for how this works), then the traffic affected by the NRPT rule will inherit the benefits of using DoH. This allows admins who want to use DoH for some namespaces and not others to configure that behavior.
Knowing a server supports DoH
All these mechanisms rely on Windows already knowing a given DNS server IP address supports DoH. We ship a few definitions of known DoH servers in Windows:
Server Owner
|
Server IP addresses
|
Cloudflare
|
1.1.1.1
1.0.0.1
2606:4700:4700::1111
2606:4700:4700::1001
|
Google
|
8.8.8.8
8.8.4.4
2001:4860:4860::8888
2001:4860:4860::8844
|
Quad9
|
9.9.9.9
149.112.112.112
2620:fe::fe
2620:fe::fe:9
|
Other definitions need to be added using the netsh command. To start with, you can check to see what DoH server definitions we already know by retrieving them:
Using netsh
netsh dns show encryption
Using PowerShell
Get-DnsClientDohServerAddress
Then you can add another server definition to the list and ensure it never falls back to plain-text DNS:
Using netsh
netsh dns add encryption server=<resolver-IP-address> dohtemplate=<resolver-DoH-template> autoupgrade=yes udpfallback=no
Using PowerShell
Add-DnsClientDohServerAddress -ServerAddress ‘<resolver-IP-address>’ -DohTemplate ‘<resolver-DoH-template>’ -AllowFallbackToUdp $False -AutoUpgrade $True
If you prefer to allow fallback so that when encryption fails you can still make DNS queries, you can run the same commands with the fallback flag toggled to add a new server:
Using netsh
netsh dns add encryption server=<resolver-IP-address> dohtemplate=<resolver-DoH-template> autoupgrade=yes udpfallback=yes
Using PowerShell
Add-DnsClientDohServerAddress -ServerAddress ‘<resolver-IP-address>’ -DohTemplate ‘<resolver-DoH-template>’ -AllowFallbackToUdp $True -AutoUpgrade $True
The `-AutoUpgrade` and `-AllowFallbackToUdp` flags together represent the values present in the Setting app per-server dropdown. If for some reason you want to add these DoH server definitions but leave them to use unencrypted DNS for now, you can set the `-AutoUpgrade` flag to false instead of true as in the examples above.
If you want to edit an existing list entry rather than adding a new one, you can use the `Set-DnsClientDohServerAddress` cmdlet in place of the `Add-DnsClientDohServerAddress` cmdlet.
It would be easier for users and administrators if we allowed a DoH server to have its IP address determined by resolving its domain name. However, we have chosen not to allow that. Supporting this would mean that before a DoH connection could we established, we would have to first send a plain-text DNS query to bootstrap it. This means a node on the network path could maliciously modify or block the DoH server name query. Right now, the only way we can avoid this is to have Windows know in advance the mapping between IP addresses and DoH templates.
Coming up next
Going forward, we want to be able to directly discover DoH server configuration from the DNS server. This would mean DoH servers could be used without having to include it in Windows or manually configure the IP address to DoH template mapping. We are currently contributing to two proposals in the IETF ADD WG to enable this: Discovery of Designated Resolvers (DDR) and Discovery of Network-designated Resolvers (DNR). We look forward to updating you with our first tests in supporting DoH discovery!
by Scott Muniz | Jun 29, 2021 | Security, Technology
This article is contributed. See the original author and article here.
In a blog post by Executive Assistant Director (EAD) Eric Goldstein, CISA announced the creation of a catalog to document bad cybersecurity practices that are exceptionally risky for any organization and especially dangerous for those supporting designated Critical Infrastructure or National Critical Functions.
While extensive guidance on cybersecurity “best practices” exists, additional perspective is needed. Ending the most egregious risks requires organizations to make a concerted effort to stop bad practices.
CISA encourages cybersecurity leaders and professionals to review EAD Goldstein’s blog post and the new Bad Practices webpage and to monitor the webpage for updates. CISA also encourages all organizations to engage in the necessary actions and critical conversations to address bad practices.
by Contributed | Jun 29, 2021 | Technology
This article is contributed. See the original author and article here.
Updates to SQL Server, Reporting Services, and Analysis Services Management Packs are available (7.0.32.0). We also released an update to SQL Server Dashboards MP. You can download the MPs from the links below. Majority of the changes are based on your direct feedback. Thank you.
Microsoft System Center Management Pack for SQL Server
Microsoft System Center Management Pack for SQL Server Reporting Services
Microsoft System Center Management Pack for SQL Server Analysis Services
Microsoft System Center Management Pack for SQL Server Dashboards
Another change we’ve done recently is to move operations guides for all SQL Server family of management packs from download center to docs.microsoft.com. This unifies the content viewing experience for the user as the rest of the SCOM and SQL Server documentation is already there. Further more, it allows us to present you with the most up to date and accurate content online. The link to the operation guide for each MP can be found on the MP download page. Here are the links that show what’s new in these MPs:
Features and Enhancements in Management Pack for SQL Server
Features and Enhancements in Management Pack for SQL Server Analysis Services
Features and Enhancements in Management Pack for SQL Server Reporting Services
by Contributed | Jun 29, 2021 | Technology
This article is contributed. See the original author and article here.
Introduction
In this article, we will see a step-by-step implementation of how to break and change list item permission using Power Automate. and for this, we will use REST API.
Implementation
Create a SharePoint List
Create a Power Automate – We will create an Automated Cloud Flow
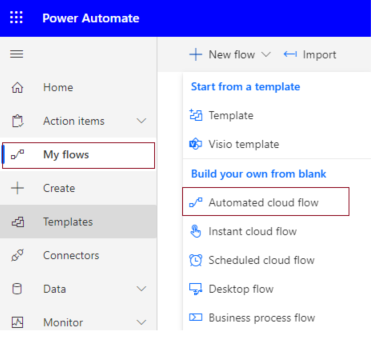
1. Go to Power Automate > My flows > Click on New flow > Select Automated Cloud Flow
2. It will ask for the flow name and trigger.
Add flow name and choose a trigger when an item is created.

3. Click on Cerate.
4. Now set Site name and list name in when an item is created in list action.

For all API Calling, we will use Send an HTTP request to SharePoint action.
5. Now we will call REST API to break role inheritance.
Set all properties as below.
Site Address |
Select Site Name from Dropdown |
Method |
POST |
Uri |
_api/lists/getByTitle(‘ListTitle’)/items(ID)/breakroleinheritance(copyRoleAssignments=false,clearSubscopes=true) |
Headers |
{
“Accept”: “application/json”,
“Content-type”: “application/json”
} |

6. Now we will set new permission so for that we need a user id to whom we have to give permission and need a role definition ID.
User ID: You can directly use User ID if you have or if you have a user name or login name then we have to find user id from the particular user so for that we will call REST API.
Role definition ID: You can use id based on permission.
Role Definition Name |
Role Definition Id |
Limited Access |
1073741825 |
View Only |
1073741924 |
Design |
1073741828 |
Edit |
1073741830 |
Contribute |
1073741827 |
Read |
1073741826 |
Full Control |
1073741829 |
1. Create a variable and set User Title or if you have any list column then you can use it.

2. Call API to get a user ID and filter it by the above-declared user name.

It will return an object as below,
{
  "d": {
    "results": [
      {
        "__metadata": {
          "id": "https://sitename.sharepoint.com/_api/Web/GetUserById(2)",
          "uri": "https://sitename.sharepoint.com/_api/Web/GetUserById(2)",
          "type": "SP.User"
        },
        "Id": 2,
        "Title": "Chandani Prajapati"
      }
    ]
  }
}
Now we want to use the only id from this so we will use an expression as below,
outputs(‘Send_an_HTTP_request_to_SharePoint_-_Get_user_id’)?[‘body’][‘d’][‘results’]?[0][‘Id’]
And we will set it in a variable called UserId.

3. Now we will set contribute permission for the above UserId.

Now we can test the flow.
Output
We can see contribute permission for an item as below,

Summary
In this article, we have seen how to break and change list item permission using power automate.
Hope this helps!
Sharing is caring!

Recent Comments