
by Scott Muniz | Jul 1, 2021 | Security
This article was originally posted by the FTC. See the original article here.
July is Military Consumer Month! This annual initiative highlights the FTC’s collaboration with the Department of Defense’s Office of Financial Readiness, the Consumer Financial Protection Bureau’s Office of Servicemember Affairs, and our many other partners in federal and state agencies, consumer advocacy groups, and industry associations. Servicemembers and military families risk their lives and livelihoods to defend our country, yet far too many are targeted with sophisticated frauds and predatory practices.
This year, we’ll focus on frauds proliferating online. Many families rely on social media to stay connected, but scammers weaponize these platforms to target servicemembers and their families. Working with our partners, we shine a light on how these scams can spread, and how families can stay safe online.
Sign up for email updates and learn about the latest scams all year round. Engage with your military and veteran communities and share advice from the FTC, DoD, CFPB, and all the other military consumer partners. Visit MilitaryConsumer.gov to learn more.
Brought to you by Dr. Ware, Microsoft Office 365 Silver Partner, Charleston SC.

by Contributed | Jun 30, 2021 | Technology
This article is contributed. See the original author and article here.
SharePoint Syntex brings advanced AI-powered content management to SharePoint and Microsoft 365. We’re excited to share the latest set of updates to Syntex in addition to new “how-to” documentation. This month we’re spotlighting new Content Center site templates for SharePoint, model publishing updates, accelerators for contract management, and more.
Content Center site template for non-licensed users
The Content Center provides creation and management interfaces for Syntex document understanding models. To increase awareness of these product capabilities and the time to train and evaluate a model’s effectiveness with your own content, we’re enabling this site template to all licensed SharePoint tenants. Users without a Syntex license will be able to build and test models in the Content Center but will not be able to publish models for live usage.
“Any” trained models cannot be applied to document libraries unless licenses are purchased; however, you’ll be able to use “anything” models trained prior to purchase. This feature is being tracked on the Microsoft 365 public roadmap as roadmap ID 82080 and will start targeted release in June 2021.
Note: This new site template must be created by SharePoint admins in the Admin Center and can be accessed in the “other options” menu.
Form processing model improvements
Form processing models trained using AI Builder allow you to automatically extract and save information from structured files (like invoices for tax documents) stored in a document library. We’re updating our experience to support collections (a named group of documents sharing a similar layout – a new feature in preview allowing you to compose several models into one) and extractable table item data. A library column stores the collection name in the library where the model is applied, allowing users to distinguish different file layouts processed by the same model.
 Table extract in Syntex form processing
Then, Syntex saves extracted table data to a specified list and associates it with the uploaded file for easy viewing or additional automation. This feature is being tracked on the Microsoft 365 public roadmap as roadmap ID 82064 and will start targeted release in June 2021.
Developer support: SharePoint Syntex REST APIs
Earlier this year, we introduced the new features available for developers to distribute and work with document understanding models in Syntex. As developer support is top of mind for the SharePoint Syntex product team, we have documented the available Syntex REST calls/operations in Microsoft Docs. Also in these documents, we included how to create and apply two “classify & extract” Power Automate flows – one for single file processing, the other for all files in library processing. With these documents, you’ll be able to more easily integrate Syntex.
Contract management guidance
In addition to these new features, we’ve also published a Microsoft Docs how-to article on creating contracts management solutions with Syntex and other components of Microsoft 365. This how-to provides guidance and a framework that you can use to plan and create the right solution for your unique business needs.
Roadmap
We’re continuing to improve and enhance Syntex and we’ll share new features with you as they become available. To stay current on Knowledge and Content Services, and products updates like those listed here, subscribe to the Microsoft Viva newsletter.

by Contributed | Jun 30, 2021 | Technology
This article is contributed. See the original author and article here.
Microsoft Viva Topics is a key tool for knowledge workers – helping you organize and discover knowledge and expertise throughout your organization. As a new offering, we’re continuing to collaborate with our partners and listen to our customers to evolve our solution. We’re excited to announce our latest updates to Viva Topics.

Refinements to related sites displayed on topic pages
You will now be able to distinguish sites pinned by an expert from sites suggested by AI on a topic page. Prior to this update, all associated sites appeared as “related” sites.
Original user experience

Updated user experience

This feature will begin roll out imminently, and is being tracked on the Microsoft 365 public roadmap under ID 82042.
Accessibility Improvements
Over a billion people worldwide experience some form of disability. But only 1 in 10 have access to the assistive technology they need. As part of Microsoft’s ongoing commitment to helping bridge the disability divide, our products build in accessibility by design. This month, Viva Topics has released improvements to support scenarios where low vision users who need to magnify the screen to 400% now have a better experience.
 Viva Topics resized at 400% screen size
Early Adopter Program
We’re excited to continue the journey with our customers who are actively implementing Viva Topics in their organizations with a new program to support adoption. Our goal with Topics is to create a system that builds a knowledge sharing culture within your organization. We’re currently working with some of the world’s largest companies and we’re also looking forward to connecting with smaller organizations in different industries. This is a great opportunity to collaborate directly with the product team and get early access to new experiences as well as learnings and best practices. If your organization is actively implementing Viva Topics with more than 10% of your employees, we invite you to apply to be part of this Early Adopter Program.
Roadmap
We’re continuing to listen to and work with our customers to deliver new features and drive transformational user experiences. This month, we’ve added a few new items to our roadmap beyond June including:
MSETS-ID
|
Title
|
Public Description
|
82045
|
Accelerated publishing for topic curation
|
Edits on topics or new, manually added topics will appear for end users to discover within minutes.
|
82047
|
Select sensitivity label to exclude files from topic discovery
|
Use MIP sensitivity labels to control which files should not be included in topic discovery
|
82048
|
Select sensitivity label to exclude sites from topic discovery
|
Use MIP sensitivity labels to control which sites should not be included in topic discovery
|
82049
|
Use Syntex taxonomy to generate topics
|
Select terms from the taxonomy service to initiate creation of Viva topics, using the term definitions and tagged files.
|
82046
|
Integrate Microsoft Search bookmarks with topic cards and pages
|
Many organizations have already used bookmarks in search results to direct users to authoritative content for query results. With this new feature, you’ll be able to integrate the search bookmarks into topic cards and pages – allowing users to continue to find those sources augmented with the topical content on the page or card.
|
82050
|
Control visibility of suggested topics
|
This update will empower knowledge managers to enable or prevent general visibility of AI-suggested topics.
|
All of these will be available for Viva Topics customers to preview by September 30. Check back with us next month to see what new capabilities and features we’ve added to Viva Topics. You can also visit the Microsoft 365 Public Roadmap for a full view of what’s coming soon to Microsoft Viva.
And to read about recent enhancements to SharePoint Syntex, check out our SharePoint Syntex Blog.
by Contributed | Jun 30, 2021 | Technology
This article is contributed. See the original author and article here.
With the announcement that the future of Internet Explorer on Windows 10 is in Microsoft Edge, you might be thinking, how do I start moving from Internet Explorer 11 (“IE11”) to Microsoft Edge? Whether you rely on IE11 exclusively or use it in tandem with another browser to specifically access older legacy websites and applications, Microsoft is committed to helping you prepare and move to its replacement: Microsoft Edge with Internet Explorer mode (IE mode).
Editor’s note: Welcome to the IE to Edge blog series, an ongoing series of articles designed to help you move from Internet Explorer 11 to Microsoft Edge! Each will focus on a different relevant topic to help you in your journey, from what to expect when setting up IE mode to what to expect for end users after the IE11 desktop application retires. Look out for more of these blogs as we journey towards June 15, 2022!
|
The IE11 desktop application will be retired and go out of support next year on June 15, 2022, for certain versions of Windows 10. As part of our commitment, we’ve created helpful online setup guides in the Microsoft 365 admin center to clarify the process and make it easier to move to Microsoft Edge. These guides are based on experiences from thousands of customer engagements and are the same guides we use daily with customers around the world. We’re thrilled to make these available to you directly to help accelerate your onboarding and adoption of Microsoft Edge. With just a few pieces of information, these guides provide simple automated tools with tailored step-by-step guidance:
- Microsoft Edge setup guide aka “Edge Advisor”. Use this online guide for end-to-end deployment or if there is a particular area, such as the use of policies, that you need further guidance on.
- Discover and configure sites that require IE mode. Use this online guide if you’ve deployed Microsoft Edge and are specifically looking to build your site list and configure IE mode. (Note: These steps are also included as part of the Microsoft Edge Setup Guide aka Edge Advisor.)
Additional Microsoft 365 setup guides are also available to you in the Microsoft 365 admin center.
Requirements for Microsoft 365 admin center guides
Permissions
To access the Microsoft Edge guides, you will need global reader admin permissions in the Microsoft 365 admin center.
We understand that some administrators responsible for their organization’s browsers may not have the needed permissions for these tools in the Microsoft 365 admin center. If you see the following error screen when you try to start a Microsoft Edge guide, you don’t have the required permissions. Don’t worry; we have you covered!
Tip: What to do if you can’t access the Microsoft 365 admin center:
If you are unable to obtain the global reader admin permissions, you can access the guides from an alternate tenant since the activities completed in these setup guides do not depend on making changes in your production tenant. In some cases, organizations use a test or development tenant with the correct permissions. Alternatively, you can request a new trial tenant—such as the Office 365 E5 trial—to use these guides; the trial will provide you 30-day access to the Microsoft 365 admin center.
|
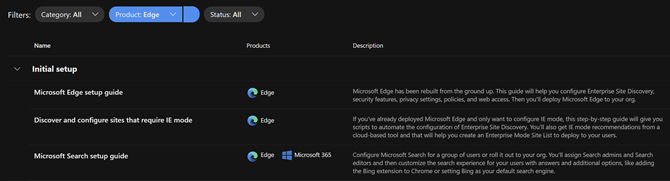
Navigation
Open the setup guidance page in the Microsoft 365 admin center to find the complete inventory of setup guides. You can easily find the Microsoft Edge guides using the product filter. The top two guides are detailed in the sections below.
You can also navigate directly to the guides using the direct links listed in the intro of this post.
Microsoft Edge setup guide (Edge Advisor)
Overview
The Microsoft Edge Setup Guide is available at https://aka.ms/EdgeAdvisor. We refer to this guide as the “Edge Advisor” as it provides end-to-end deployment and adoption guidance for Microsoft Edge. The Edge Advisor starts by asking for a few pieces of information to help tailor the experience and provides guidance for customers planning deployments using Microsoft Intune, Configuration Manager, or Group Policy.

Capabilities and benefits
- Customized guidance for your selected operating systems and management tool.
- Review and understand the available Microsoft Edge channels.
- Setup conditional access with Microsoft Edge (if required).
- Review security baselines for Microsoft Edge using the Security Compliance Toolkit.
- Recommendations for additional protection and security features, such as Microsoft Endpoint Data Loss Prevention.
- Understand the many Microsoft Edge security settings and review configuration details.
- Enable or disable site discovery data collection, as well as Enterprise site list curation and creation, for Internet Explorer mode. For more details see the next section, Discover and configure sites that require IE mode (Configure IE mode guide).
- Note: The steps to configure IE mode in the Edge Advisor are the same steps outlined in the next section (Discover and configure sites that require IE mode). If you’re only looking to configure IE mode, we recommend using that guide.
- Get started configuring a subset of the most widely used Microsoft Edge policies and download a script to configure them using group policy.
- Deploy Microsoft Edge to your organization using the option that best fits your needs.
- Additional guidance to communicate the roll-out of Microsoft Edge to users and setup Microsoft Search.
Discover and configure sites that require IE mode (Configure IE mode guide)
Overview
The Configure IE mode guide, available at https://aka.ms/configureiemode, takes the site discovery and enterprise site list tasks available in the Edge Advisor and provides them as a standalone experience to help you set up IE mode in Microsoft Edge. This experience simplifies the steps outlined in the article titled “Enterprise Site Discovery Step by Step Guide” and automates some of them with a customized script for use with either Configuration Manager or Group Policy.

Capabilities and benefits
- Enable or disable site discovery data collection to build an Enterprise site list for IE mode. Collect sites more easily and efficiently with a customized script specific to your environment that can filter on specific zones (like Intranet) and/or on specific sites and their subsites (such as contoso.com and its subsites).
- Curate and create your Enterprise site list. Review sites discovered during data collection to easily see compatibility issues, group by zones, or specify how URLs open in IE mode (such as in specific doc modes or as neutral sites).

- Export your site list as an XML and receive guidance to deploy the site list for IE mode.
Additional tools for Microsoft Edge
The Edge Advisor and Configure IE mode guide are the primary guides needed to successfully roll out Microsoft Edge. Pick the guide that best fits your situation. Once deployed, we offer additional guides for more advanced needs:
What’s next for Microsoft Edge tools
The team is continuously improving the tools to better meet your requirements and support new features rolling out in Microsoft Edge. A few tools coming soon include:
- (Q3 2021) In-product education for Microsoft Edge – The ability to opt your tenant into Windows 10 lock screen messages to assist in moving users to Microsoft Edge. This will be added to the Adoption step in the Microsoft Edge setup guide (Edge Advisor).
- (Q3 2021) Enhanced Intune configuration support – A new process for starting Enterprise site discovery for IE mode on Intune-managed Windows devices and the ability to easily deploy common Microsoft Edge policies (including IE integration) via Intune directly within the guide.
Next steps
We encourage you to get started today and choose the right Microsoft Edge setup guide for your needs.
We’re always looking to improve and develop the best tools for our customers. Your feedback on these tools—or for tools that would be helpful to your organization—is highly valued, so we encourage you to leave your feedback in the comments section. Thank you and we hope these tools help you in your move to Microsoft Edge.
Frequently asked questions
I tried to launch the Microsoft Edge guide but got an error?
Ensure the account you’re using has Microsoft 365 admin center permissions, and optimally, has the global reader permission. If you do not have global reader permission, please see the Permissions section above.
Do the Microsoft Edge guides store my site details in the service?
No. The guides don’t store your site discovery or site list information in the service.
What languages are supported by the Microsoft Edge tools in the Microsoft 365 admin center?
The tools are currently available in English. Localized versions in French, German, Japanese, and Spanish are on track for July of 2021.
I’ve found a site that won’t work with Microsoft Edge. Can Microsoft provide help?
If you find a site that won’t work with IE mode, we first recommend watching the Microsoft Edge | Internet Explorer mode and compatibility video for tips. If that doesn’t help with your issue, there’s the App Assure program. The App Assure promise is this: if your web apps and sites work in IE11, supported versions of Google Chrome, or Microsoft Edge Legacy, those web apps and sites should work in Microsoft Edge. If not, contact App Assure at no additional cost for remediation support. You can either submit a request for assistance through their website or reach out via email (ACHELP@microsoft.com). To learn more about App Assure and Microsoft Edge, see Dual engine advantage: Legacy sites and Microsoft Edge.
by Contributed | Jun 30, 2021 | Technology
This article is contributed. See the original author and article here.
Customer Challenge
The customer wanted to use Azure NetApp Files (ANF) for their SAP app-tier shared storage (i.e. /sapmnt, /usr/sap/SID/SYS, etc.) but not for HANA database data. They have their primary instances in US East, and their disaster recovery environment in US West 2. Normally we would use ANF cross-region-replication (CRR) to replicate between these regions; unfortunately ANF CRR doesn’t support replication between two different subscriptions at this time – this customer is using a different subscription in each region.
Potential Solutions
There are several potential solutions for this, including NetApp CloudSync and Linux rsync; the solution we decided on is to use rsync since it is included with Linux, and we were on a very short timeframe for this project. rsync is a very versatile file copying tool that can copy between directories or volumes on a single host, between two hosts over ssh, or to a remote rsync daemon. It uses a “delta-transfer” algorithm that sends only the differences between the source files and the files in the destination.
One downside of the configuration described below is that we need a VM in each region to run and receive the rsync replication data, since ANF does not support mounting volumes located in one region from VMs in another region. The two machines need to be able to communicate over the network – in this case the two regional vnets were connected via Azure global vnet peering. If the volumes were in the same region, we would be able to mount the volumes to a single VM and use rsync for the data transfer.
We considered using one of the existing machines in the architecture (eg. the ERS machine) to do the replication, but that would increase complexity on those machines. We decided to use a dedicated virtual machine in each region to support this replication. Each VM mounts the ANF volume(s) in their own region, and use the rsync command between the VMs to do the actual data replication.
There are two ways that rsync can actually replicate the data in this scenario:
- Over the ssh protocol. This requires setting up ssh keys so that the replication user can ssh between the machines without a linux password.
- By connecting to a remote rsync daemon (i.e. Linux system process). This requires setting up & managing the rsync system service daemon.
We decided on the first option, since ssh was already set up for their configuration management system (eg. chef).
Solution Caveats
rsync is a file-level copy/replication solution (as opposed to real-time block level replication) and operates periodically – it will traverse through all of the files in the replicated directories or volume and copy the different or new files to the destination volume. Due to this process, there will clearly be some time delay between the time a file is written and when the file appears on the destination volume.
rsync is single threaded – this will limit the overall throughput between the two different volumes/VMs. This wasn’t a concern for this particular application, but it would be wise to test throughput in your own scenario. A very simple way to address this limitation would be to configure rsync to run on specific subdirectories of the volume, rather than the root directory. This would allow those rsync processes to run in parallel.
The first time rsync is run on the volume will take significantly longer than subsequent runs, due to the initial data transfer.
Solution Configuration
In our case, here are the mounts that we set up (for initial testing of the solution):
Region |
Virtual machine |
Mount on virtual machine |
|---|
US West 2 |
anf-client-west2 (primary) |
/vol-west2 |
US East |
anf-client-east (replica) |
/vol-east |
To actually copy the data, we used this command on the primary anf-client-west2 machine:
rsync -azP –delete –exclude=.snapshot –log-file=/var/log/rsync.log /vol-west2/ root@anf-client-east:/vol-east
The options we used above are these:
option |
description |
|---|
-a |
Archive mode – rsync will do a recursive copy, and preserve modification times, links, file ownership and permissions. |
-z |
Compress data over the network |
-P |
keep partially transferred files, and show the progress during transfer |
–exclude=.snapshot |
Exclude the ANF .snapshot directory |
–log-file=/var/log/rsync.log |
Create log file in /var/log/rsync.log |
To schedule rsync via chron, we put this in the root cron configuration using the sudo crontab -e command, which lets you edit the root crontab:
* * * * * rsync -azP –delete –exclude=.snapshot –log-file=/var/log/rsync.log /vol-west2/ root@anf-client-east:/vol-east
The initial asterisks tell cron to run this every minute – this may be excessive depending on requirements.
To run every 5 minutes, this would be the configuration:
*/5 * * * * rsync -azP –delete –exclude=.snapshot –log-file=/var/log/rsync.log /vol-west2/ root@anf-client-east:/vol-east
For a more complete solution, it is recommended to run rsync from a shell script that checks whether rsync is running already, for example:
#!/bin/bash

lockfile=/var/anf-sync/lockfile

mkdir -p /var/anf-sync

if test -f “$lockfile”;

then

       echo “rsync currently running, exiting”

       exit

else

       touch “$lockfile”

       rsync -azP –delete –exclude=.snapshot –log-file=/var/log/rsync.log /vol-west2/ root@anf-client-east:/vol-east

       rm “$lockfile”

fi
Of course in an actual DR event, the replication would have to be stopped, and (presumably) resumed in the other direction. This should be included in the DR runbook.
NFS Volume Consolidation
When using the ANF for NFS volumes, the customer wanted to optimize the volume size, performance and the overall cost. For this scenario, we had less than 100GB (the minimum volume size) for each SAP SID. For that reason we suggested consolidation in the manner documented here.
The ANF volume path is <IP Address>:/vol-west2. In that volume we will create a directory for each SID (in this example, QAS and NW1) , and under each of those there will be an ASCS, ERS, sapmnt and SYS directory. These directories have to be created via a VM, after the volume is created. Here are the sample directories that we created:
<IP>:/vol-west2/usrsapQAS/sapmntQAS

<IP>:/vol-west2/usrsapQAS/sapmntQASascs

<IP>:/vol-west2/usrsapQAS/sapmntQASsys

<IP>:/vol-west2/usrsapQAS/sapmntQASers
<IP>:/vol-west2/usrsapNW1/sapmntNW1

<IP>:/vol-west2/usrsapNW1/sapmntNW1ascs

<IP>:/vol-west2/usrsapNW1/sapmntNW1sys

<IP>:/vol-west2/usrsapNW1/sapmntNW1ers
These directories would be mounted either by the mount command, automounter configuration or the cluster filesystem resource configuration. There are really three differences (that I can think of) between this and having a separate volume for each mount:
- The export policy would be for the volume as a whole, so all of the VMs for all SIDs using the volume would need access. There was some concern that this reduces security across SIDs somewhat. However, the root user is the one that can mount volumes, and root should be trusted.
- If one of the SIDs were to fill up the volume, it could impact the others. It would be wise to put in monitoring or processes to grow the volume when needed.
- The performance tier/quality of service will be for the consolidated volume. Since these aren’t used all that much this should give better performance overall, but it would be possible for one SID to consume all of the IOPS/throughput, causing impacts on the others.
This is an example for the QAS instance – replace with the actual ip address for your volume, in the /etc/auto.direct file:
/sapmnt/QAS -nfsvers=3,nobind <anf-vol-ip addr>:/vol-west2/usrsapQAS/sapmntQAS

/sapmnt/QAS/SYS -nfsvers=3,nobind <anf-vol-ip addr>:/vol-west2/usrsapQAS/sapmntQASsys
Single region configuration
For scenarios that are within a single region, the configurations above will work fine – however it’s also possible to mount both the source and replica volumes from a single Azure VM, and use rsync on that VM to replicate the data between the two volumes.
Mounting Options
For mounting NFS volumes on Linux VMs, it is preferred to use either the Linux automounter, or to use cluster FS resources (when applicable). This is recommended because there is a timing issue in the Linux boot process where the /etc/fstab can sometimes be processed before the network stack is fully available. If the /etc/fstab is used to mount the NFS volumes on boot, it is possible for the boot to hang, or for the VM to boot and have the NFS mounts fail. This happens intermittenly, and it isn’t a customer specific situation.
For systems in a cluster, there are two advantages to having the volumes be cluster filesystem resources:
- The fstab and network availability issue discussed above is resolved, because cluster resources would always be started after cluster communications have been established.
- The resource agent for a cluster filesystem resource agent monitors the availability of the mounted volume.
However, for systems that are not in a cluster, the automounter will mount the desired volumes on demand, rather than at boot time.
Also, when preparing the mount point directories, it’s important to use the chattr +i <mountpoint> command – this will make the actual mount point immutable, so that any attempted writes to the mountpoint will fail if the NFS volume is not mounted on top of it.
by Scott Muniz | Jun 30, 2021 | Security, Technology
This article is contributed. See the original author and article here.
The CERT Coordination Center (CERT/CC) has released a VulNote for a critical remote code execution vulnerability in the Windows Print spooler service, noting: “while Microsoft has released an update for CVE-2021-1675, it is important to realize that this update does not address the public exploits that also identify as CVE-2021-1675.” An attacker can exploit this vulnerability—nicknamed PrintNightmare—to take control of an affected system.
CISA encourages administrators to disable the Windows Print spooler service in Domain Controllers and systems that do not print. Additionally, administrators should employ the following best practice from Microsoft’s how-to guides, published January 11, 2021: “Due to the possibility for exposure, domain controllers and Active Directory admin systems need to have the Print spooler service disabled. The recommended way to do this is using a Group Policy Object.”
by Contributed | Jun 30, 2021 | Technology
This article is contributed. See the original author and article here.
Starting January 1st 2022, Microsoft and Azul will no longer provide updates or support for the Zulu for Azure build of OpenJDK. While Java applications in production can continue to run without interruptions on these open source binaries – licensed under GPLv2 with Classpath Exception – quarterly bug fixes and security updates, and support will end on December 31, 2021. In addition, repositories, and the user download site for Zulu for Azure binaries may no longer be available after July 1st, 2022.
Read more

by Contributed | Jun 30, 2021 | Technology
This article is contributed. See the original author and article here.
If you work for or support the US Federal Government, this is the session for you! In this session we will cover an overview of how we deliver Power Platform and D365 to meet US Federal Government regulations for both FedRAMP and DOD compliance. We will cover timelines and roadmaps of what we have coming available. We will then jump into demos some new features rolling out this summer including Power Virtual Agents, AI Builder and RPA.
When: Wednesday, July 14 at 5:00 PM EST
Where: Register here on Meetup.com!
Presenters:
Steve Winward, Technical Director for Business Applications
Steve Winward | LinkedIn
by Contributed | Jun 30, 2021 | Technology
This article is contributed. See the original author and article here.
This article summarizes various options that can be taken to modernize SQL Server Reporting Services and then provides a detailed step-by-step guide to bringing report server databases to Azure SQL Managed Instance.
Different Options for Modernization
If you run SQL Server Reporting Services for Business Intelligence capabilities on-premises, you may want to draw benefits by modernizing it in various ways based on the requirements in your enterprise. To achieve this, you have the following options to consider:
- If you want to leverage modern cloud approaches you can modernize SSRS combining various Infrastructure and Platform services. Here you can use SQL Managed Instance as a Platform Service in the backend for certain reporting services components, i.e., your report server databases, which is also the main discussion in this blogpost.
- Migrating SSRS directly to the Power BI Service is a great option if you have the ability to look into modernizing your actual reports.
- If you are required to stay on-premises, you can still modernize your BI landscape by moving from SSRS to Power BI Report Server.
This blogpost gives a very good overview for the different options.
Before getting into details regarding how Azure SQL Managed Instance can add value to your existing SSRS deployment and how you can migrate your report server databases onto this platform service, let’s briefly discuss the other options (i.e., the second and the third option above).
Enhancing your reporting capability with Power BI and promoting yourself to a full-fledged business analytics service
For sure, the most interesting modernizing approaches are the ones which are backed up with cloud functionalities within the Microsoft universe.
Here the best option could be moving to the Power BI Service that has the capability of hosting your paginated reports that you can migrate from your SSRS instance if you are licenced for Power BI Premium or have Power BI Premium per user license.
Hosting your existing paginated reports in Power BI requires a low-effort migration process. Please see this link for a detailed explanation how migration works for the paginated reports. This way you will be able to co-locate your highly formatted, pixel-perfect reports with the content that is generated via simplified self-service data analysis on the same platform. More than this, a complex semantic model can be defined as the report data source for paginated reports using the newly introduced XMLA Read/Write endpoint in Power BI Premium. This is one of the recent major features making Power BI a superset of Azure Analysis Services and would enhance the abilities around enterprise reporting scenarios even more when used together with paginated reports.
After bringing your SSRS reports to Power BI, you can also embed paginated reports into existing applications within your organization. So your former SSRS reports which you would be modernizing to Power BI paginated reports will also be enabled for embedding. Please take a look at this link to understand how this could be achieved.
With its ever growing capabilities and high pace of innovation, Power BI could well be the best service to be of greatest use for your current SSRS user base.
The “on-premises” option for modernization
If you have to stay on-premises, a good approach could be migrating Reporting Services to “Power BI Report Server“. This may be something particularly interesting especially if it is not currently viable to go to Azure, but you still desire to enable Self Service Reporting on-premise and offer interactive dashboarding with great visualization and reporting capabilities to your users.
Keeping SSRS and still drawing benefits from cloud
If you require staying with SSRS for some commercial or technical reason, you can bring your on-premise SSRS instances onto Azure VM’s and still draw benefits from being on the cloud in many different ways.
A Virtual Machine (VM) on Azure is a scalable computing resource giving the flexibility of virtualization without having to buy and maintain the physical hardware which runs it. Since this is an IaaS (Infrastructure as a service) approach, in this setup, you will need to maintain your VM by performing tasks for configuration, patching, and installing the software (SSRS) that runs on it.
On the Azure marketplace you can find pre-configured virtual machine images for Reporting Services. You can leverage additional benefits from moving to the cloud by selecting these. This enables you to easily see your different virtual machine workloads and manage them. It can also help make your workloads more efficient and enables an easier onboarding experience to the cloud.
With this IaaS setup you can host both your “report server” – stateless engine of the SSRS, and report server databases which are responsible for storing the metadata (ReportServer) and temporary report results (ReportServerTempDB) on the same machine. This can offer a good solution in terms of cost effectiveness, however you could be missing out on a higher performance for your reports by taking the next step in the journey which involves hosting the report server databases on Azure SQL Managed Instance which is a Azure SQL managed platform service (PaaS) !
To go to this stage you need to be using SQL Server 2017 Reporting Services or SQL Server 2019 Reporting Services. By moving to cloud for the report server databases you would be seizing advantages which comes from a fully managed service. Although offering near 100% compatibility with the latest SQL Server (Enterprise Edition) database engine, SQL Managed Instance preserves a very wide variety of PaaS capabilities such as automatic patching, version updates, built-in high availability with 99,99%-availably -SLA for critical workloads. This kind of setup would drastically reduce management overhead and the total cost of ownership and even protects you from losing data and reporting content due to human errors with its built in Point In Time Restore and through automated backups.
By moving your report server databases to an Azure SQL Managed Instance and separating your report server from the report server databases, you would not only be gaining the PaaS benefits stated above, but also achieving a better performance in most cases. In addition to this, if you already have business data on Azure SQL Managed Instance Databases, having SSRS using it, means no-extra cost solution with minimum migration effort.
How to migrate report server databases of an existing SSRS instance to Azure SQL Managed Instance
Assuming you already have an SSRS environment on-premise, the focus would be on the migration scenario in this blogpost rather than a green-field SSRS deployment, whereas the steps would be similar.
As the report server databases preserve metadata and intermediary results during runtime, an online migration doesn’t make much sense for a SSRS backend data migration. An offline migration would be the simplest way to go. After this migration has been completed, with an easy configuration change, you will be able to point your SSRS instance to your newly migrated SSRS databases on Azure SQL Managed Instance with a minimal downtime.
Step 1: Provision necessary resources in the cloud:
The first thing that you need to do is the provisioning of the necessary cloud services on Azure:
You can create a SQL Managed Instance using the Azure Portal or create via Powershell. Using ARM templates for provisioning is the other option.
To provision a storage account on Azure you can again use the portal, powershell and the template options. Here the Azure CLI based creation is another alternative.
Step 2: Locate your report server databases:
After you have Azure SQL Managed Instance and the Azure Storage Account ready, connect to the machine running your SSRS instance. This could be an On-Premise server or an Azure VM.
Via SQL Server Management Studio (SSMS), you need to connect to the SQL Server instance currently hosting your report server databases. This can be the same SQL Server hosting the stateless engine of your SSRS or a separate SQL Server instance that you have used to host your report server databases.
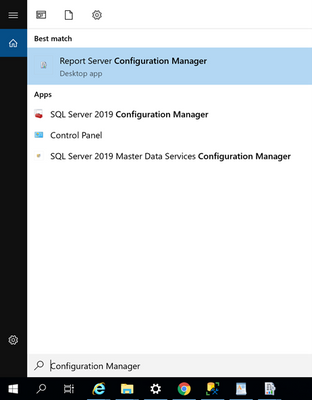
To find out where the current location of your of report server databases are, start the “Report Server Configuration Manager” on Windows from the desktop computer/server with the SSRS installation:
In “Report Server Configuration Manager” , switch to the “Databases” tab. You will see there where your current report server databases are located:

Using SSMS, connect to the SQL Server Instance and you will see the report server databases:

Step 3: Take a backup of your report server databases directly to Azure
First we need to take a backup of your databases to your storage account directly, using the SQL Server BackUp To URL functionality. This way your backup files in .bak format will be ready to be restored from your Managed Instance in the subsequent step:
(In order to gain access to your storage account, you need to generate a SAS (Shared Access Signature) token for your storage account. This can easily be done on the Azure Portal. Please take a look at this blog post to see how it works. This will be used as your key, when you want to access to the storage account from your local SQL Server during the backup process. Once you have your SAS token generated, you can carry on with the following steps.)
/*Create Credential to access Blob Storage*/
IF NOT EXISTS
(SELECT * FROM sys.credentials
WHERE name = 'https://<yourstorageaccountname>.blob.core.windows.net/<yourstorageaccountcontainername>')

CREATE CREDENTIAL [https://<yourstorageaccountname>.blob.core.windows.net/<yourstorageaccountcontainername>]
-- this name must match the container path, start with https and must not contain a trailing forward slash.
WITH IDENTITY = 'SHARED ACCESS SIGNATURE' ,
-- this is a mandatory string for the identity.
SECRET = <Your SAS token for the storage account that you can find on the Azure Portal>
-- This is the shared access signature token you need to generate and must start with ‘sv=’

/*Backup ReportServer Database*/
BACKUP DATABASE ReportServer
TO URL = 'https:// <yourstorageaccountname>.blob.core.windows.net/<yourstorageaccountcontainername>/ReportServer.bak';
GO

/*Backup ReportServerTempDB Database*/
BACKUP DATABASE ReportServerTempDB
TO URL = 'https:// <yourstorageaccountname>.blob.core.windows.net/<yourstorageaccountcontainername>/ReportServerTempDB.bak';
GO
After you see that the “BACKUP DATABASE“ operation successfully processed, you can simply check the .bak files on your storage account. You will be finding the files on your Azure Storage Account in the respective container you named above. In my case it looked like this:

Step 4: Restore the report server databases in your Azure Managed Instance
The next step should be restoring these backup files to the Azure SQL Managed Instance that you have created for hosting the report server databases.
To accomplish this, connect to your Managed Instance via SSMS with public endpoints. If you don’t want your database to have public IP’s which is likely for an enterprise-scenario, an alternative to this would be configuring a VM to connect to Managed Instance or connecting from any machine which can access the Azure SQL Managed Instance vNet.
Since at the end you already would need to allow access to this SQL Managed Instance from your SSRS machine, you may also want to enable this communication now, For this:
- If SSRS is installed on a machine in your local datacenter, you need to allow connections from the local network hosting the SQL Server on Premise to your Managed Instance. (Please note that this kind of deployment – having SSRS Databases on a Managed Instance and SSRS itself on-premise – might result with the risk of a low performance during report viewing and consumption.)
- Or if you run SSRS on Azure VM you need to allow connections from this Azure VM (or from the VNet hosting this Azure VM) to the VNet hosting the Managed Instance.
There are multiple ways to enable this connection, however this is more of a networking topic which is out of the scope for this post. Please take a look at Connectivity architecture for Managed Instance and Azure networking documentation to understand this procedure and some common workarounds for potential issues.
After you establish a connection to your Managed Instance you need to restore the Reportserver.bak and ReportserverTempDB.bak files.
You need access to your Storage Account for these steps also. So you need to create credentials with the configured Shared Access Signature here as well. This is exactly the same step we have taken in the previous section on the local SQL Server when taking the backups. Then you need to Restore your databases:
/*Create Credential to access Blob Storage*/
IF NOT EXISTS
(SELECT * FROM sys.credentials
WHERE name = 'https://<yourstorageaccountname>.blob.core.windows.net/<yourstorageaccountcontainername>')

CREATE CREDENTIAL [https://<yourstorageaccountname>.blob.core.windows.net/<yourstorageaccountcontainername>]
-- this name must match the container path, start with https and must not contain a trailing forward slash.
WITH IDENTITY = 'SHARED ACCESS SIGNATURE',
-- this is a mandatory string. Do not change it.
SECRET = <Your SAS token for the storage account that you can find on the Azure Portal>
-- This must start with ‘sv=’ and is the shared access signature token

/*Restore ReportServer Database*/
RESTORE DATABASE ReportServer FROM URL = 'https://<yourstorageaccountname>.blob.core.windows.net/<yourstorageaccountcontainername>/ReportServer.bak'

/*Restore ReportServerTempDB Database*/
RESTORE DATABASE ReportServerTempDB FROM URL = 'https://<yourstorageaccountname>.blob.core.windows.net/<yourstorageaccountcontainername>/ReportServerTempDB.bak'
After you successfully do this, refresh your connection within SSMS to see the newly restored databases. You should see both of the databases on your SQL managed instance:

Step 5: Change Report Server Databases using Report Server Configuration Manager
Now that we have the content database and the temporary database available on the SQL Managed Instance, we can make the switch for these report server databases using the “Reporting Services Configuration Manager”. For this, open “Reporting Services Configuration Manager” again, switch to the Database tab and click the “Change Database” button:

In the next screen select “Choose an existing report server database” and click next:

Provide the name for your SQL Managed Instance that you can find on the Azure portal under the Overview Tab:

Insert this name to “Server Name” field in the Report Server Database Configuration Wizard and select “SQL Server Account Authentication” since within Azure SQL Managed Instance Windows Authentication is not yet supported and SSRS does not support Azure AD Authentication:

Click on “Test Connection” to see if you can connect with the provided details.
(If you encounter a connection error, you need to check the connectivity from the current machine to your Managed Instance. Please check the network configuration as we discussed before.)
If the connection succeeds, click next. In the next screen you need to select the report server database that you have restored on your managed instance:

After your selection, credentials will be asked that report server will use to connect to the report server databases. Permission to access the ReportServer database should be granted to the account you specify. Here you need to provide “SQL Server Credentials” again and select next button. With other authentication methods, you would get an error, since the remote database will be a platform service in the cloud and Windows Authentication or Local Service Credentials won’t work in this case:

In the coming screen click “next” where you will see the summary for the connection information you provided.
If you click “next” in this screen, you will see the changes are applied in a couple of seconds and if you did everything correctly, you will see all the changes have been applied successfully.
If you click finish, you will see the report server being restarted and the current report server database will be changed in a way pointing to your Managed Instance now!

If you access your SSRS web Page on your browser using the URL provided for you SSRS environment, you will see that the whole content is still there, whereas in the backend your SSRS instance is reaching out to a cloud database for your report server databases that are now supported by the PaaS capabilities discussed above:

Hosting your business data on Managed Instance
You can take your modernizing efforts one step further and also migrate your application data or analytical workloads (such as your datawarehouses, datamarts etc.) to Managed Instance, since managed instance offers many comprehensive capabilities to host analytical and transactional workloads.
This move could potentially be even more promising if you look at all the values that you would get by using Azure SQL Managed Instance without sacrificing what you currently have with SQL Server, since you will still be dealing with the same SQL Server surface area that you are familiar with. You can even think of consolidating your databases with the report server databases on the same SQL Managed instance to create a cost-effective solution.
Summary
The most interesting modernizing approaches for SQL Server Reporting Services (SSRS) are the ones which are backed up by cloud functionality.
As mentioned at the start the best option could be moving directly to the Power BI Service that has the capability of directly hosting your paginated reports which you can easily migrate from your existing SSRS instance.
However if this is not an option for you, you can still leverage modern cloud approaches to modernize your existing SSRS architecture by combining various Infrastructure and Platform services within Azure. Here, using SQL Managed Instance as a Platform Service in the backend for your report server databases could be a great option for you. We have discussed the potential benefits of doing this, incl. how to bring the existing report server databases of SSRS to a SQL Managed Instance.
I hope you found this topic interesting and are exciting to try out the options of using modern Azure SQL Managed Instance for your SSRS backend needs.

by Contributed | Jun 30, 2021 | Technology
This article is contributed. See the original author and article here.
It’s hot in many parts of the world these days. We hit a sweltering 108° Fahrenheit here in the Pacific Northwest of the US. And the action isn’t cooling down for SharePoint and related technology in Microsoft 365. Grab a cool glass of water, June was a busy month.
Yes, June 2021 brought great new offerings: SharePoint Auto News Digest updates, SharePoint admin center updates (dashboard and new site information columns), Microsoft Lists – @mentions in comments, Power Apps can now display images from Microsoft Lists, Delete from within page details, Headspace mindfulness content comes to Microsoft Viva Insights, and more. Details and screenshots below, including our audible companion: The Intrazone Roadmap Pitstop: June 2021 podcast episode – all to help answer, “What’s rolling out now for SharePoint and related technologies into Microsoft 365?” Note: you might also hear a sea shanty tune from the OneDrive team in the mix – baton down the hatches and have ye a listen!
In the podcast episode, I chat with Rk Menon (LinkedIn), program manager on the SharePoint team focused on the SharePoint admin center experience and capabilities in Microsoft 365. We chat about the overall design goals of the SharePoint admin center, what new capabilities are rolling out for SharePoint admins, and how things align over time to ensure consistency across all admin user interfaces across Microsoft 365.
Rk Menon, program manager at Microsoft [Intrazone guest].
All features listed below began rolling out to Targeted Release customers in Microsoft 365 as of June 2021 (possibly early July 2021).
Inform and engage with dynamic employee experiences
Build your intelligent intranet on SharePoint in Microsoft 365 and get the benefits of investing in business outcomes – reducing IT and development costs, increasing business speed and agility, and up-leveling the dynamic, personalized, and welcoming nature of your intranet.
SharePoint Auto News Digest updates
Time to up your game when keeping everyone informed. This feature just keeps getting better, making it more efficient to convert news-to-views while requiring less manual effort.
You can now brand your news digest with your organization’s theme colors and logo. If your organization site is already branded, that branding will automatically be applied to automatic news digests. The news digest uses built-in Intelligent ranking so that users see the news most relevant to them. The news digest is sent on a weekly basis, displaying only published news posts. If there are no news posts that are relevant for the user then no email gets sent to the user.
 The SharePoint auto-news digest sends an automated, customized email to users about the latest news posts that are relevant to them, but that they may not have viewed yet.
If users want to opt-out of receiving the automatic digest, they can click the unsubscribe button at the bottom of the email.
- Roadmap ID: 70606
- Learn more.
- If your organization wants to turn off the feature at the tenant level, please use the following PowerShell command: Set-SPOTenant -EnableAutoNewsDigest $true | $false. To learn more about the PowerShell options, click here.
SharePoint admin center – new information columns on Active sites page
It’s time to see more information about your sites and be able to troubleshoot easier.
In the SharePoint admin center, the Active sites page will provide new informational columns. The “Created from” column will show the apps that were used to create sites. And the “Teams” column will show which sites are connected to Microsoft Teams. The “Created from” and “Teams” information will also be available in the details panel when you select an individual site.
 The ‘Created from’ and ‘Teams’ status columns provide key information for admins directly on the Active sites page.
Both new columns help narrow down troubleshooting and highlight actions admins might prescribe to their own customer base.
SharePoint admin center: new homepage insights dashboard
Take an administration-at-a-glance approach with actionable charts and insights as cards on the SharePoint admin center homepage. And it’s customizable—you can add, remove, and rearrange cards to suit your needs.
 Examine OneDrive and SharePoint usage and activity via insightful cards on the SharePoint admin home page.
As a SharePoint or Global admin, you can choose to see and use new cards such as:
- SharePoint storage usage
- SharePoint site usage
- SharePoint file activity
- OneDrive usage
- OneDrive file activity
- Search active sites
- Sensitivity labels
- Term store operations
You can also add relevant cards from the Microsoft 365 admin center, such as:
- Service health
- Message center
- Microsoft 365 active users report
Last, you’ll find recommendations tailored to each organization to guide you through improvement tasks that you may not know about – to help better manage and control your SharePoint environment in Microsoft 365 without require deep analysis or clicking to too many places to get the information.
A reminder: Prepare your SharePoint and OneDrive environment for end of support for Internet Explorer 11
Microsoft 365 apps and services will no longer support Internet Explorer 11 (IE 11) after August 17, 2021. This means SharePoint and OneDrive will not be supported on IE 11. After this date, customers will have a degraded experience or will be unable to connect to Microsoft 365 apps and services on IE 11.
While we know this change may be difficult for some, we believe that they will get the most out of Microsoft 365 apps when using the Microsoft Edge browser. Microsoft 365 users will be well served with this change through faster and more responsive web access to greater sets of features in everyday toolsets.
Teamwork updates across SharePoint team sites, OneDrive, and Microsoft Teams
Microsoft 365 is a universal toolkit for teamwork – to give you the right tools for the right task, along with common services to help you seamlessly work across applications. SharePoint is the intelligent content service that powers teamwork – to better collaborate on proposals, projects, and campaigns throughout your organization – with integration across Microsoft Teams, OneDrive, Yammer, Stream, Planner and much more.
Microsoft Lists – @mentions in comments
“Mention” people you work with while adding a new comment to a list Item. As a result, the person will receive an email notification with a direct link to the list item. It’s a terrific way to notify, share and collaborate directly from within the list itself.
 In the list item’s Comments box, type @ and a name, then pick the name you want.
Power Apps can now display images from Microsoft Lists
This is an improved experience so that images stored in Image columns in Microsoft Lists can be displayed when designing custom forms in the Power Apps design canvas. You can choose to display the images in four sizes: small, medium, large, or full.
 If you add one or more images to your list, you can show individual images directly in Power Apps – here using a Power Apps app to customize the view form.
- Roadmap ID: 81986.
- Learn more:
Delete from within page details
This is a simple one, and one that’s been met with a lot of joy from my purview – mainly due to the time-to-click ratio for performing this action. Instead of going several clicks in beyond the site contents page and into the Pages library, now you can click the Page details button at the top of the page or news article and delete in one click from within the page details pane.
 Click the Page details button at the top of the page or news article and delete in one click from within the page details pane.
Related technology
Headspace mindfulness content comes to Microsoft Viva Insights
You’ll start to see a curated set of guided meditations and focus music from Headspace. The goal is to help disconnect from work in the evening, relax your mind before a big meeting, or find focus before starting an important project. In just a few minutes a day, meditation and mindfulness with Headspace can help users lower stress, increase focus and ease teamwork.
Headspace integration with Viva Insights is rolling out default on and, unless disabled by admin, the curated set of Headspace mindfulness content will be available to any user with the Viva Insights app installed.
- Roadmap ID: 68748.
- Learn more.
- Note: To disable (admin control) the Headspace feature for select users, use the PowerShell cmdlets VivaInsightsSettings with feature name as Headspace.
Create trackable tasks from your ad hoc Teams messages
Tasks happen everywhere – in an email threads, working on files, or within team chats. And before you forget to make a note of a task, simply click in, and create tasks from Microsoft Teams messages on desktop and web. Like you’ve seen for emails in Outlook and comments in Word, Excel, and PowerPoint docs.
 Converting a Teams message into a task on desktop or web is super easy: hover over the message, select the ellipses (…) from the pop-out menu > More actions > Create task.
Note: This update is native to the Teams experience – no longer requiring custom work with Power Automate.
Microsoft Whiteboard updates within Microsoft Teams to support hybrid work
The new Whiteboard is now integrated into more areas across Microsoft 365 – now available in Teams channels and chats. Start a collaborative whiteboard for everyone in the meeting with just one click. You can also pre-prep or reuse whiteboards across multiple Teams meetings.
This update brings a lot of great user interface capabilities: improved real-time collaboration to make it easier to follow along with what others are doing, new interactive content with sticky notes, fluid components, and insert images and documents via new sharing controls connected to OneDrive. Plus, a lot more.
Ink in your ideas, together, during your next team meeting.
July 2021 teasers
Psst, still here? Still scrolling the page looking for more roadmap goodness? If so, here is a few teasers of what’s to come to production next month…
- Teaser #1: Microsoft Lists – take your lists offline plus performance improvements [Roadmap ID: 68809]
- Teaser #2: Change a SharePoint page URL [Roadmap ID: 81994]
… shhh, tell everyone.
Helpful, ongoing change management resources
- Follow me to catch news and interesting SharePoint things: @mkashman; warning, occasional bad puns may fly in a tweet or two here and there, plus my new blog on Substack: The Kashbox.
Thanks for tuning in and/or reading this episode/blog of the Intrazone Roadmap Pitstop – June 2021 (blog/podcast). We are open to your feedback in comments below to hear how both the Roadmap Pitstop podcast episodes and blogs can be improved over time.
Engage with us. Ask those questions that haunt you. Push us where you want and need to get the best information and insights. We are here to put both our and your best change management foot forward.
Stay safe out there on the road’map, and thanks for listening and reading.
Avast ye mateys,
Cap’n Mark “Arrrr” Kashman – senior product manager (SharePoint/Lists) | Microsoft)
 The Intrazone Roadmap Pitstop – June 2021 graphic showing some of the highlighted release features.


Recent Comments