by Scott Muniz | Jul 12, 2021 | Security, Technology
This article is contributed. See the original author and article here.
| a-stage.inc — sct-40cm01sr_and_at-40cm01sr |
Improper authentication vulnerability in SCT-40CM01SR and AT-40CM01SR allows an attacker to bypass access restriction and execute an arbitrary command via telnet. |
2021-07-07 |
not yet calculated |
CVE-2021-20776
MISC |
accusoft — imagegear
|
An out-of-bounds write vulnerability exists in the TIF bits_per_sample processing functionality of Accusoft ImageGear 19.9. A specially crafted malformed file can lead to memory corruption. An attacker can provide a malicious file to trigger this vulnerability. |
2021-07-08 |
not yet calculated |
CVE-2021-21794
MISC |
accusoft — imagegear
|
A stack-based buffer overflow vulnerability exists in the PDF process_fontname functionality of Accusoft ImageGear 19.9. A specially crafted malformed file can lead to code execution. An attacker can provide a malicious file to trigger this vulnerability. |
2021-07-08 |
not yet calculated |
CVE-2021-21821
MISC |
accusoft — imagegear
|
An out-of-bounds write vulnerability exists in the JPG sof_nb_comp header processing functionality of Accusoft ImageGear 19.8 and 19.9. A specially crafted malformed file can lead to memory corruption. An attacker can provide a malicious file to trigger this vulnerability. |
2021-07-08 |
not yet calculated |
CVE-2021-21793
MISC |
arcgis — server_manager
|
A stored Cross Site Scripting (XXS) vulnerability in ArcGIS Server Manager version 10.8.1 and below may allow a remote unauthenticated attacker to pass and store malicious strings in the ArcGIS Server Manager application. |
2021-07-10 |
not yet calculated |
CVE-2021-29107
CONFIRM |
arcgis — server_manager
|
A reflected Cross Site Scripting (XXS) vulnerability in ArcGIS Server version 10.8.1 and below may allow a remote attacker able to convince a user to click on a crafted link which could potentially execute arbitrary JavaScript code in the user’s browser. |
2021-07-10 |
not yet calculated |
CVE-2021-29106
CONFIRM |
| aruba — clearpass_policy_manager |
A remote arbitrary command execution vulnerability was discovered in Aruba ClearPass Policy Manager version(s): Prior to 6.10.0, 6.9.6 and 6.8.9. Aruba has released updates to ClearPass Policy Manager that address this security vulnerability. |
2021-07-08 |
not yet calculated |
CVE-2021-34616
MISC |
| aruba — clearpass_policy_manager |
A remote arbitrary command execution vulnerability was discovered in Aruba ClearPass Policy Manager version(s): Prior to 6.10.0, 6.9.6 and 6.8.9. Aruba has released updates to ClearPass Policy Manager that address this security vulnerability. |
2021-07-08 |
not yet calculated |
CVE-2021-34614
MISC |
aruba — clearpass_policy_manager
|
A remote denial of service (DoS) vulnerability was discovered in Aruba ClearPass Policy Manager version(s): Prior to 6.10.0, 6.9.6 and 6.8.9. Aruba has released updates to ClearPass Policy Manager that address this security vulnerability. |
2021-07-08 |
not yet calculated |
CVE-2021-29152
MISC |
aruba — clearpass_policy_manager
|
A remote authentication bypass vulnerability was discovered in Aruba ClearPass Policy Manager version(s): Prior to 6.10.0, 6.9.6 and 6.8.9. Aruba has released updates to ClearPass Policy Manager that address this security vulnerability. |
2021-07-08 |
not yet calculated |
CVE-2021-29151
MISC |
aruba — clearpass_policy_manager
|
A remote insecure deserialization vulnerability was discovered in Aruba ClearPass Policy Manager version(s): Prior to 6.10.0, 6.9.6 and 6.8.9. Aruba has released updates to ClearPass Policy Manager that address this security vulnerability. |
2021-07-08 |
not yet calculated |
CVE-2021-29150
MISC |
aruba — clearpass_policy_manager
|
A remote arbitrary command execution vulnerability was discovered in Aruba ClearPass Policy Manager version(s): Prior to 6.10.0, 6.9.6 and 6.8.9. Aruba has released updates to ClearPass Policy Manager that address this security vulnerability. |
2021-07-08 |
not yet calculated |
CVE-2021-34613
MISC |
aruba — clearpass_policy_manager
|
A remote arbitrary command execution vulnerability was discovered in Aruba ClearPass Policy Manager version(s): Prior to 6.10.0, 6.9.6 and 6.8.9. Aruba has released updates to ClearPass Policy Manager that address this security vulnerability. |
2021-07-08 |
not yet calculated |
CVE-2021-34612
MISC |
aruba — clearpass_policy_manager
|
A remote arbitrary command execution vulnerability was discovered in Aruba ClearPass Policy Manager version(s): Prior to 6.10.0, 6.9.6 and 6.8.9. Aruba has released updates to ClearPass Policy Manager that address this security vulnerability. |
2021-07-08 |
not yet calculated |
CVE-2021-34611
MISC |
aruba — clearpass_policy_manager
|
A remote arbitrary command execution vulnerability was discovered in Aruba ClearPass Policy Manager version(s): Prior to 6.10.0, 6.9.6 and 6.8.9. Aruba has released updates to ClearPass Policy Manager that address this security vulnerability. |
2021-07-08 |
not yet calculated |
CVE-2021-34610
MISC |
aruba — clearpass_policy_manager
|
A remote arbitrary command execution vulnerability was discovered in Aruba ClearPass Policy Manager version(s): Prior to 6.10.0, 6.9.6 and 6.8.9. Aruba has released updates to ClearPass Policy Manager that address this security vulnerability. |
2021-07-08 |
not yet calculated |
CVE-2021-34615
MISC |
aruba — clearpass_policy_manager
|
A remote SQL injection vulnerability was discovered in Aruba ClearPass Policy Manager version(s): Prior to 6.10.0, 6.9.6 and 6.8.9. Aruba has released updates to ClearPass Policy Manager that address this security vulnerability. |
2021-07-08 |
not yet calculated |
CVE-2021-34609
MISC |
| autodesk — autodesk |
A maliciously crafted TIFF file in Autodesk 2018, 2017, 2013, 2012, 2011 can be forced to read and write beyond allocated boundaries when parsing the TIFF file. This vulnerability can be exploited to execute arbitrary code. |
2021-07-09 |
not yet calculated |
CVE-2021-27039
MISC |
| autodesk — autodesk |
A maliciously crafted PNG, PDF or DWF file in Autodesk 2018, 2017, 2013, 2012, 2011 can be used to attempt to free an object that has already been freed while parsing them. This vulnerability can be exploited by remote attackers to execute arbitrary code. |
2021-07-09 |
not yet calculated |
CVE-2021-27037
MISC |
| autodesk — autodesk |
A heap-based buffer overflow could occur while parsing PICT or TIFF files in Autodesk 2018, 2017, 2013, 2012, 2011. This vulnerability can be exploited to execute arbitrary code. |
2021-07-09 |
not yet calculated |
CVE-2021-27034
MISC |
autodesk — autodesk
|
A Type Confusion vulnerability in Autodesk 2018, 2017, 2013, 2012, 2011 can occur when processing a maliciously crafted PDF file. An attacker can leverage this to execute arbitrary code. |
2021-07-09 |
not yet calculated |
CVE-2021-27038
MISC |
autodesk — autodesk
|
A maliciously crafted PDF, PICT or TIFF file can be used to write beyond the allocated buffer while parsing PDF, PICT or TIFF files in Autodesk 2018, 2017, 2013, 2012, 2011. This vulnerability can be exploited to execute arbitrary code. |
2021-07-09 |
not yet calculated |
CVE-2021-27036
MISC |
autodesk — autodesk
|
A maliciously crafted TIFF, PDF, PICT or DWF files in Autodesk 2018, 2017, 2013, 2012, 2011 can be forced to read beyond allocated boundaries when parsing the TIFF, PDF, PICT or DWF files. This vulnerability can be exploited to execute arbitrary code. |
2021-07-09 |
not yet calculated |
CVE-2021-27035
MISC |
autodesk — design_review
|
A Double Free vulnerability allows remote attackers to execute arbitrary code on PDF files within affected installations of Autodesk Design Review. User interaction is required to exploit this vulnerability in that the target must visit a malicious page or open a malicious file. |
2021-07-09 |
not yet calculated |
CVE-2021-27033
MISC |
baigo — cms
|
A cross site scripting vulnerability in baigo CMS v4.0-beta-1 allows attackers to execute arbitrary web scripts or HTML via the form parameter post to /public/console/profile/info-submit/. |
2021-07-08 |
not yet calculated |
CVE-2020-20584
MISC
MISC
MISC
MISC |
| blackcat_cms — blackcat_cms |
A stored cross site scripting (XSS) vulnerability in the ‘Admin-Tools’ feature of BlackCat CMS 1.3.6 allows authenticated attackers to execute arbitrary web scripts or HTML via crafted payloads entered into the ‘Output Filters’ and ‘Droplets’ modules. |
2021-07-09 |
not yet calculated |
CVE-2020-25878
MISC
MISC |
blackcat_cms — blackcat_cms
|
A stored cross site scripting (XSS) vulnerability in the ‘Add Page’ feature of BlackCat CMS 1.3.6 allows authenticated attackers to execute arbitrary web scripts or HTML via a crafted payload entered into the ‘Title’ parameter. |
2021-07-09 |
not yet calculated |
CVE-2020-25877
MISC
MISC |
cisco — adaptive_security_device_manager
|
A vulnerability in the Cisco Adaptive Security Device Manager (ASDM) Launcher could allow an unauthenticated, remote attacker to execute arbitrary code on a user’s operating system. This vulnerability is due to a lack of proper signature verification for specific code exchanged between the ASDM and the Launcher. An attacker could exploit this vulnerability by leveraging a man-in-the-middle position on the network to intercept the traffic between the Launcher and the ASDM and then inject arbitrary code. A successful exploit could allow the attacker to execute arbitrary code on the user’s operating system with the level of privileges assigned to the ASDM Launcher. A successful exploit may require the attacker to perform a social engineering attack to persuade the user to initiate communication from the Launcher to the ASDM. |
2021-07-08 |
not yet calculated |
CVE-2021-1585
CISCO |
cisco — asyncos
|
A vulnerability in the configuration management of Cisco AsyncOS for Cisco Web Security Appliance (WSA) could allow an authenticated, remote attacker to perform command injection and elevate privileges to root. This vulnerability is due to insufficient validation of user-supplied XML input for the web interface. An attacker could exploit this vulnerability by uploading crafted XML configuration files that contain scripting code to a vulnerable device. A successful exploit could allow the attacker to execute arbitrary commands on the underlying operating system and elevate privileges to root. An attacker would need a valid user account with the rights to upload configuration files to exploit this vulnerability. |
2021-07-08 |
not yet calculated |
CVE-2021-1359
CISCO |
cisco — broadworks_application_server
|
A vulnerability in the XSI-Actions interface of Cisco BroadWorks Application Server could allow an authenticated, remote attacker to access sensitive information on an affected system. This vulnerability is due to improper input validation and authorization of specific commands that a user can execute within the XSI-Actions interface. An attacker could exploit this vulnerability by authenticating to an affected device and issuing a specific set of commands. A successful exploit could allow the attacker to join a Call Center instance and have calls that they do not have permissions to access distributed to them from the Call Center queue. At the time of publication, Cisco had not released updates that address this vulnerability for Cisco BroadWorks Application Server. However, firmware patches are available. |
2021-07-08 |
not yet calculated |
CVE-2021-1562
CISCO |
cisco — business_process_automation
|
Multiple vulnerabilities in the web-based management interface of Cisco Business Process Automation (BPA) could allow an authenticated, remote attacker to elevate privileges to Administrator. These vulnerabilities are due to improper authorization enforcement for specific features and for access to log files that contain confidential information. An attacker could exploit these vulnerabilities either by submitting crafted HTTP messages to an affected system and performing unauthorized actions with the privileges of an administrator, or by retrieving sensitive data from the logs and using it to impersonate a legitimate privileged user. A successful exploit could allow the attacker to elevate privileges to Administrator. |
2021-07-08 |
not yet calculated |
CVE-2021-1574
CISCO |
cisco — business_process_automation
|
Multiple vulnerabilities in the web-based management interface of Cisco Business Process Automation (BPA) could allow an authenticated, remote attacker to elevate privileges to Administrator. These vulnerabilities are due to improper authorization enforcement for specific features and for access to log files that contain confidential information. An attacker could exploit these vulnerabilities either by submitting crafted HTTP messages to an affected system and performing unauthorized actions with the privileges of an administrator, or by retrieving sensitive data from the logs and using it to impersonate a legitimate privileged user. A successful exploit could allow the attacker to elevate privileges to Administrator. |
2021-07-08 |
not yet calculated |
CVE-2021-1576
CISCO |
| cisco — identity_services_engine |
Multiple vulnerabilities in the web-based management interface of Cisco Identity Services Engine (ISE) could allow an authenticated, remote attacker to conduct a stored cross-site scripting (XSS) attack against a user. These vulnerabilities exist because the web-based management interface does not sufficiently validate user-supplied input. An attacker could exploit these vulnerabilities by injecting malicious code into specific pages of the interface. A successful exploit could allow the attacker to execute arbitrary script code in the context of the affected interface or access sensitive, browser-based information. To exploit these vulnerabilities, the attacker would need valid administrative credentials. |
2021-07-08 |
not yet calculated |
CVE-2021-1607
CISCO |
cisco — identity_services_engine
|
Multiple vulnerabilities in the web-based management interface of Cisco Identity Services Engine (ISE) could allow an authenticated, remote attacker to conduct a stored cross-site scripting (XSS) attack against a user. These vulnerabilities exist because the web-based management interface does not sufficiently validate user-supplied input. An attacker could exploit these vulnerabilities by injecting malicious code into specific pages of the interface. A successful exploit could allow the attacker to execute arbitrary script code in the context of the affected interface or access sensitive, browser-based information. To exploit these vulnerabilities, the attacker would need valid administrative credentials. |
2021-07-08 |
not yet calculated |
CVE-2021-1606
CISCO |
cisco — identity_services_engine
|
Multiple vulnerabilities in the web-based management interface of Cisco Identity Services Engine (ISE) could allow an authenticated, remote attacker to conduct a stored cross-site scripting (XSS) attack against a user. These vulnerabilities exist because the web-based management interface does not sufficiently validate user-supplied input. An attacker could exploit these vulnerabilities by injecting malicious code into specific pages of the interface. A successful exploit could allow the attacker to execute arbitrary script code in the context of the affected interface or access sensitive, browser-based information. To exploit these vulnerabilities, the attacker would need valid administrative credentials. |
2021-07-08 |
not yet calculated |
CVE-2021-1605
CISCO |
cisco — identity_services_engine
|
Multiple vulnerabilities in the web-based management interface of Cisco Identity Services Engine (ISE) could allow an authenticated, remote attacker to conduct a stored cross-site scripting (XSS) attack against a user. These vulnerabilities exist because the web-based management interface does not sufficiently validate user-supplied input. An attacker could exploit these vulnerabilities by injecting malicious code into specific pages of the interface. A successful exploit could allow the attacker to execute arbitrary script code in the context of the affected interface or access sensitive, browser-based information. To exploit these vulnerabilities, the attacker would need valid administrative credentials. |
2021-07-08 |
not yet calculated |
CVE-2021-1604
CISCO |
cisco — identity_services_engine
|
Multiple vulnerabilities in the web-based management interface of Cisco Identity Services Engine (ISE) could allow an authenticated, remote attacker to conduct a stored cross-site scripting (XSS) attack against a user. These vulnerabilities exist because the web-based management interface does not sufficiently validate user-supplied input. An attacker could exploit these vulnerabilities by injecting malicious code into specific pages of the interface. A successful exploit could allow the attacker to execute arbitrary script code in the context of the affected interface or access sensitive, browser-based information. To exploit these vulnerabilities, the attacker would need valid administrative credentials. |
2021-07-08 |
not yet calculated |
CVE-2021-1603
CISCO |
| cisco — video_surveillance_7000_ip_cameras |
Multiple vulnerabilities in the Link Layer Discovery Protocol (LLDP) implementation for Cisco Video Surveillance 7000 Series IP Cameras could allow an unauthenticated, adjacent attacker to cause a memory leak, which could lead to a denial of service (DoS) condition on an affected device. These vulnerabilities are due to incorrect processing of certain LLDP packets at ingress time. An attacker could exploit these vulnerabilities by sending crafted LLDP packets to an affected device. A successful exploit could allow the attacker to cause the affected device to continuously consume memory, which could cause the device to crash and reload, resulting in a DoS condition. Note: LLDP is a Layer 2 protocol. To exploit these vulnerabilities, an attacker must be in the same broadcast domain as the affected device (Layer 2 adjacent). |
2021-07-08 |
not yet calculated |
CVE-2021-1598
CISCO |
cisco — video_surveillance_7000_series_ip_cameras
|
Multiple vulnerabilities in the Link Layer Discovery Protocol (LLDP) implementation for Cisco Video Surveillance 7000 Series IP Cameras could allow an unauthenticated, adjacent attacker to cause a memory leak, which could lead to a denial of service (DoS) condition on an affected device. These vulnerabilities are due to incorrect processing of certain LLDP packets at ingress time. An attacker could exploit these vulnerabilities by sending crafted LLDP packets to an affected device. A successful exploit could allow the attacker to cause the affected device to continuously consume memory, which could cause the device to crash and reload, resulting in a DoS condition. Note: LLDP is a Layer 2 protocol. To exploit these vulnerabilities, an attacker must be in the same broadcast domain as the affected device (Layer 2 adjacent). |
2021-07-08 |
not yet calculated |
CVE-2021-1597
CISCO |
cisco — video_surveillance_7000_series_ip_cameras
|
Multiple vulnerabilities in the Link Layer Discovery Protocol (LLDP) implementation for Cisco Video Surveillance 7000 Series IP Cameras could allow an unauthenticated, adjacent attacker to cause a memory leak, which could lead to a denial of service (DoS) condition on an affected device. These vulnerabilities are due to incorrect processing of certain LLDP packets at ingress time. An attacker could exploit these vulnerabilities by sending crafted LLDP packets to an affected device. A successful exploit could allow the attacker to cause the affected device to continuously consume memory, which could cause the device to crash and reload, resulting in a DoS condition. Note: LLDP is a Layer 2 protocol. To exploit these vulnerabilities, an attacker must be in the same broadcast domain as the affected device (Layer 2 adjacent). |
2021-07-08 |
not yet calculated |
CVE-2021-1595
CISCO |
cisco — video_surveillance_7000_series_ip_cameras
|
Multiple vulnerabilities in the Link Layer Discovery Protocol (LLDP) implementation for Cisco Video Surveillance 7000 Series IP Cameras could allow an unauthenticated, adjacent attacker to cause a memory leak, which could lead to a denial of service (DoS) condition on an affected device. These vulnerabilities are due to incorrect processing of certain LLDP packets at ingress time. An attacker could exploit these vulnerabilities by sending crafted LLDP packets to an affected device. A successful exploit could allow the attacker to cause the affected device to continuously consume memory, which could cause the device to crash and reload, resulting in a DoS condition. Note: LLDP is a Layer 2 protocol. To exploit these vulnerabilities, an attacker must be in the same broadcast domain as the affected device (Layer 2 adjacent). |
2021-07-08 |
not yet calculated |
CVE-2021-1596
CISCO |
cisco — virtualized_voice_browser
|
A vulnerability in the web-based management interface of Cisco Virtualized Voice Browser could allow an unauthenticated, remote attacker to conduct a cross-site scripting (XSS) attack against a user of the interface. This vulnerability exists because the web-based management interface does not properly validate user-supplied input. An attacker could exploit this vulnerability by persuading a user of an affected interface to click a crafted link. A successful exploit could allow the attacker to execute arbitrary script code in the context of the affected interface or access sensitive, browser-based information. |
2021-07-08 |
not yet calculated |
CVE-2021-1575
CISCO |
| codoforum — codoforum |
A stored cross site scripting (XSS) vulnerability in the ‘Manage Users’ feature of Codoforum v5.0.2 allows authenticated attackers to execute arbitrary web scripts or HTML via a crafted payload entered into the ‘Username’ parameter. |
2021-07-09 |
not yet calculated |
CVE-2020-25879
MISC
MISC |
codoforum — codoforum
|
A stored cross site scripting (XSS) vulnerability in the ‘Smileys’ feature of Codoforum v5.0.2 allows authenticated attackers to execute arbitrary web scripts or HTML via crafted payload entered into the ‘Smiley Code’ parameter. |
2021-07-09 |
not yet calculated |
CVE-2020-25875
MISC
MISC |
codoforum — codoforum
|
A stored cross site scripting (XSS) vulnerability in the ‘Pages’ feature of Codoforum v5.0.2 allows authenticated attackers to execute arbitrary web scripts or HTML via crafted payload entered into the ‘Page Title’ parameter. |
2021-07-09 |
not yet calculated |
CVE-2020-25876
MISC
MISC |
| csz-cms — csz-cms |
A cross site scripting vulnerability in CSZ CMS 1.2.9 allows attackers to execute arbitrary web scripts or HTML via a crafted payload entered into the ‘New Pages’ field under the ‘Pages Content’ module. |
2021-07-09 |
not yet calculated |
CVE-2020-25391
MISC |
csz-cms — csz-cms
|
A cross site scripting (XSS) vulnerability in CSZ CMS 1.2.9 allows attackers to execute arbitrary web scripts or HTML via a crafted payload entered into the ‘New Article’ field under the ‘Article’ plugin. |
2021-07-09 |
not yet calculated |
CVE-2020-25392
MISC |
dotAdmin/#/c/containers — dotAdmin/#/c/containers
|
A stored cross site scripting (XSS) vulnerability in dotAdmin/#/c/c_Images of dotCMS 21.05.1 allows authenticated attackers to execute arbitrary web scripts or HTML via a crafted payload entered into the ‘Title’ and ‘Filename’ parameters. |
2021-07-09 |
not yet calculated |
CVE-2021-35358
MISC |
dotAdmin/#/c/containers — dotAdmin/#/c/containers
|
A reflected cross site scripting (XSS) vulnerability in dotAdmin/#/c/containers of dotCMS 21.05.1 allows attackers to execute arbitrary commands or HTML via a crafted payload. |
2021-07-09 |
not yet calculated |
CVE-2021-35360
MISC |
dotAdmin/#/c/containers — dotAdmin/#/c/containers
|
A reflected cross site scripting (XSS) vulnerability in dotAdmin/#/c/links of dotCMS 21.05.1 allows attackers to execute arbitrary commands or HTML via a crafted payload. |
2021-07-09 |
not yet calculated |
CVE-2021-35361
MISC |
ecplise — tinydtls
|
Eclipse TinyDTLS through 0.9-rc1 relies on the rand function in the C library, which makes it easier for remote attackers to compute the master key and then decrypt DTLS traffic. |
2021-07-08 |
not yet calculated |
CVE-2021-34430
CONFIRM |
edgex — foundry
|
EdgeX Foundry is an open source project for building a common open framework for internet-of-things edge computing. A vulnerability exists in the Edinburgh, Fuji, Geneva, and Hanoi versions of the software. When the EdgeX API gateway is configured for OAuth2 authentication and a proxy user is created, the client_id and client_secret required to obtain an OAuth2 authentication token are set to the username of the proxy user. A remote network attacker can then perform a dictionary-based password attack on the OAuth2 token endpoint of the API gateway to obtain an OAuth2 authentication token and use that token to make authenticated calls to EdgeX microservices from an untrusted network. OAuth2 is the default authentication method in EdgeX Edinburgh release. The default authentication method was changed to JWT in Fuji and later releases. Users should upgrade to the EdgeX Ireland release to obtain the fix. The OAuth2 authentication method is disabled in Ireland release. If unable to upgrade and OAuth2 authentication is required, users should create OAuth2 users directly using the Kong admin API and forgo the use of the `security-proxy-setup` tool to create OAuth2 users. |
2021-07-09 |
not yet calculated |
CVE-2021-32753
MISC
CONFIRM |
elecom — multiple_products
|
WRC-1167FS-W, WRC-1167FS-B, and WRC-1167FSA all versions allow an unauthenticated network-adjacent attacker to obtain sensitive information via unspecified vectors. |
2021-07-07 |
not yet calculated |
CVE-2021-20738
MISC
MISC |
emissary-ingress — emissary-ingress
|
Emissary-Ingress (formerly Ambassador API Gateway) through 1.13.9 allows attackers to bypass client certificate requirements (i.e., mTLS cert_required) on backend upstreams when more than one TLSContext is defined and at least one configuration exists that does not require client certificate authentication. The attacker must send an SNI specifying an unprotected backend and an HTTP Host header specifying a protected backend. |
2021-07-09 |
not yet calculated |
CVE-2021-36371
MISC |
ether_logs — ether_logs
|
Ether Logs is a package that allows one to check one’s logs in the Craft 3 utilities section. A vulnerability was found in versions prior to 3.0.4 that allowed authenticated admin users to access any file on the server. The vulnerability has been fixed in version 3.0.4. As a workaround, one may disable the plugin if untrustworthy sources have admin access. |
2021-07-09 |
not yet calculated |
CVE-2021-32752
CONFIRM
MISC |
fork — fork
|
Arbitrary file upload vulnerability in Fork CMS 5.9.2 allows attackers to create or replace arbitrary files in the /themes directory via a crafted zip file uploaded to the Themes panel. |
2021-07-07 |
not yet calculated |
CVE-2021-28931
MISC
MISC |
fortinet — fortiap
|
An improper neutralization of special elements used in an OS Command vulnerability in FortiAP’s console 6.4.1 through 6.4.5 and 6.2.4 through 6.2.5 may allow an authenticated attacker to execute unauthorized commands by running the kdbg CLI command with specifically crafted arguments. |
2021-07-09 |
not yet calculated |
CVE-2021-26106
CONFIRM |
fortinet — fortimail
|
Multiple improper neutralization of special elements of SQL commands vulnerabilities in FortiMail before 6.4.4 may allow a non-authenticated attacker to execute unauthorized code or commands via specifically crafted HTTP requests. |
2021-07-09 |
not yet calculated |
CVE-2021-24007
CONFIRM |
fortinet — fortimail
|
A missing cryptographic step in the implementation of the hash digest algorithm in FortiMail 6.4.0 through 6.4.4, and 6.2.0 through 6.2.7 may allow an unauthenticated attacker to tamper with signed URLs by appending further data which allows bypass of signature verification. |
2021-07-09 |
not yet calculated |
CVE-2021-24020
CONFIRM |
fortinet — fortimail
|
A missing cryptographic step in the Identity-Based Encryption service of FortiMail before 7.0.0 may allow an unauthenticated attacker who intercepts the encrypted messages to manipulate them in such a way that makes the tampering and the recovery of the plaintexts possible. |
2021-07-09 |
not yet calculated |
CVE-2021-26100
CONFIRM |
fortinet — fortimail
|
Multiple instances of incorrect calculation of buffer size in the Webmail and Administrative interface of FortiMail before 6.4.5 may allow an authenticated attacker with regular webmail access to trigger a buffer overflow and to possibly execute unauthorized code or commands via specifically crafted HTTP requests. |
2021-07-09 |
not yet calculated |
CVE-2021-22129
CONFIRM |
fortinet — fortisandbox
|
A concurrent execution using shared resource with improper synchronization (‘race condition’) in the command shell of FortiSandbox before 3.2.2 may allow an authenticated attacker to bring the system into an unresponsive state via specifically orchestrated sequences of commands. |
2021-07-09 |
not yet calculated |
CVE-2020-29014
CONFIRM |
foxit — reader
|
Foxit Reader before 10.1.4 and PhantomPDF before 10.1.4 produce incorrect PDF document signatures because the certificate name, document owner, and signature author are mishandled. |
2021-07-09 |
not yet calculated |
CVE-2021-33795
MISC |
foxit — reader
|
Foxit Reader before 10.1.4 and PhantomPDF before 10.1.4 have an out-of-bounds write via a crafted /Size key in the Trailer dictionary. |
2021-07-09 |
not yet calculated |
CVE-2021-33792
MISC |
google — android
|
Improper input validation vulnerability in AR Emoji Editor prior to version 4.4.03.5 in Android Q(10.0) and above allows untrusted applications to access arbitrary files with an escalated privilege. |
2021-07-08 |
not yet calculated |
CVE-2021-25441
MISC |
google — android
|
Improper authorization in handler for custom URL scheme vulnerability in GU App for Android versions from 4.8.0 to 5.0.2 allows a remote attacker to lead a user to access an arbitrary website via the vulnerable App. |
2021-07-07 |
not yet calculated |
CVE-2021-20777
MISC |
hms — ewon_ecatcher
|
In HMS Ewon eCatcher through 6.6.4, weak filesystem permissions could allow malicious users to access files that could lead to sensitive information disclosure, modification of configuration files, or disruption of normal system operation. |
2021-07-09 |
not yet calculated |
CVE-2021-33214
MISC
MISC
MISC
MISC |
ibm — app_connect_enterprise_certified_container
|
IBM App Connect Enterprise Certified Container 1.0, 1.1, 1.2, and 1.3 could allow a privileged user to obtain sensitive information from internal log files. IBM X-Force ID: 202212. |
2021-07-07 |
not yet calculated |
CVE-2021-29759
XF
CONFIRM |
ibm — guardium_data_encryption
|
IBM Guardium Data Encryption (GDE) 3.0.0.2 and 4.0.0.4 does not perform any authentication for functionality that requires a provable user identity or consumes a significant amount of resources. |
2021-07-07 |
not yet calculated |
CVE-2021-20474
CONFIRM
XF |
ibm — infosphere_information_server
|
IBM InfoSphere Information Server 11.7 is vulnerable to SQL injection. A remote attacker could send specially crafted SQL statements, which could allow the attacker to view, add, modify or delete information in the back-end database. IBM X-Force ID: 201164. |
2021-07-09 |
not yet calculated |
CVE-2021-29730
XF
CONFIRM |
ibm — infosphere_information_server
|
IBM InfoSphere Information Server 11.7 is vulnerable to cross-site scripting. This vulnerability allows users to embed arbitrary JavaScript code in the Web UI thus altering the intended functionality potentially leading to credentials disclosure within a trusted session. IBM X-Force ID: 200966. |
2021-07-09 |
not yet calculated |
CVE-2021-29712
CONFIRM
XF |
ibm — urbancode_deploy
|
IBM UrbanCode Deploy (UCD) 6.2.7.3, 6.2.7.4, 6.2.7.8 , 6.2.7.9, 7.0.3.0, 7.0.4.0, 7.0.5.4, 7.1.0.0, 7.1.1.0, 7.1.1.1, and 7.1.1.2 could allow an authenticated user with certain permissions to initiate an agent upgrade through the CLI interface. IBM X-Force ID: 200965. |
2021-07-08 |
not yet calculated |
CVE-2021-29711
CONFIRM
XF |
iobit — advanced_systemcare_ultimate
|
A privilege escalation vulnerability exists in the way IOBit Advanced SystemCare Ultimate 14.2.0.220 driver handles Privileged I/O write requests. During IOCTL 0x9c40a0dc, the first dword passed in the input buffer is the device port to write to and the word at offset 4 is the value to write via the OUT instruction. The OUT instruction can write one byte to the given I/O device port, potentially leading to escalated privileges of unprivileged users. A local attacker can send a malicious IRP to trigger this vulnerability. |
2021-07-07 |
not yet calculated |
CVE-2021-21788
MISC |
iobit — advanced_systemcare_ultimate
|
A privilege escalation vulnerability exists in the way IOBit Advanced SystemCare Ultimate 14.2.0.220 driver handles Privileged I/O write requests. During IOCTL 0x9c40a0d8, the first dword passed in the input buffer is the device port to write to and the byte at offset 4 is the value to write via the OUT instruction. The OUT instruction can write one byte to the given I/O device port, potentially leading to escalated privileges of unprivileged users. |
2021-07-07 |
not yet calculated |
CVE-2021-21787
MISC |
iobit — advanced_systemcare_ultimate
|
A privilege escalation vulnerability exists in the way IOBit Advanced SystemCare Ultimate 14.2.0.220 driver handles Privileged I/O write requests. During IOCTL 0x9c40a0e0, the first dword passed in the input buffer is the device port to write to and the dword at offset 4 is the value to write via the OUT instruction. A local attacker can send a malicious IRP to trigger this vulnerability. |
2021-07-07 |
not yet calculated |
CVE-2021-21789
MISC |
iobit — advanced_systemcare_ultimate
|
A privilege escalation vulnerability exists in the IOCTL 0x9c406144 handling of IOBit Advanced SystemCare Ultimate 14.2.0.220. A specially crafted I/O request packet (IRP) can lead to increased privileges. An attacker can send a malicious IRP to trigger this vulnerability. |
2021-07-07 |
not yet calculated |
CVE-2021-21786
MISC |
| kaseya — vsa |
Local file inclusion exists in Kaseya VSA before 9.5.6. |
2021-07-09 |
not yet calculated |
CVE-2021-30121
MISC |
| kaseya — vsa |
Cross Site Scripting (XSS) exists in Kaseya VSA before 9.5.7. |
2021-07-09 |
not yet calculated |
CVE-2021-30119
MISC |
kaseya — vsa
|
Kaseya VSA through 9.5.7 allows attackers to bypass the 2FA requirement. |
2021-07-09 |
not yet calculated |
CVE-2021-30120
MISC |
kaseya — vsa
|
SQL injection exists in Kaseya VSA before 9.5.6. |
2021-07-09 |
not yet calculated |
CVE-2021-30117
MISC |
kaseya — vsa
|
Kaseya VSA before 9.5.5 allows remote code execution. |
2021-07-09 |
not yet calculated |
CVE-2021-30118
MISC |
kaseya — vsa
|
An XML External Entity (XXE) issue exists in Kaseya VSA before 9.5.6. |
2021-07-09 |
not yet calculated |
CVE-2021-30201
MISC |
| keycloak — keycloak |
A flaw was found in keycloak-model-infinispan in keycloak versions before 14.0.0 where authenticationSessions map in RootAuthenticationSessionEntity grows boundlessly which could lead to a DoS attack. |
2021-07-09 |
not yet calculated |
CVE-2021-3637
MISC |
lavalite-cms — lavalite-cms
|
Cross Site Scripting (XSS) vulnerability in LavaLite-CMS 5.8.0 via the Menu Links feature. |
2021-07-07 |
not yet calculated |
CVE-2020-23700
MISC |
libxml2 — libxlm2
|
A flaw was found in libxml2. Exponential entity expansion attack its possible bypassing all existing protection mechanisms and leading to denial of service. |
2021-07-09 |
not yet calculated |
CVE-2021-3541
MISC |
linux — linux_kernel
|
An out-of-bounds memory write flaw was found in the Linux kernel’s joystick devices subsystem in versions before 5.9-rc1, in the way the user calls ioctl JSIOCSBTNMAP. This flaw allows a local user to crash the system or possibly escalate their privileges on the system. The highest threat from this vulnerability is to confidentiality, integrity, as well as system availability. |
2021-07-09 |
not yet calculated |
CVE-2021-3612
MISC
MISC |
linux — linux_kernel
|
kernel/module.c in the Linux kernel before 5.12.14 mishandles Signature Verification, aka CID-0c18f29aae7c. Without CONFIG_MODULE_SIG, verification that a kernel module is signed, for loading via init_module, does not occur for a module.sig_enforce=1 command-line argument. |
2021-07-07 |
not yet calculated |
CVE-2021-35039
MISC
CONFIRM
CONFIRM
MLIST |
linuxptp — linuxptp
|
A flaw was found in the ptp4l program of the linuxptp package. A missing length check when forwarding a PTP message between ports allows a remote attacker to cause an information leak, crash, or potentially remote code execution. The highest threat from this vulnerability is to data confidentiality and integrity as well as system availability. This flaw affects linuxptp versions before 3.1.1, before 2.0.1, before 1.9.3, before 1.8.1, before 1.7.1, before 1.6.1 and before 1.5.1. |
2021-07-09 |
not yet calculated |
CVE-2021-3570
MISC |
linuxptp — linuxptp
|
A flaw was found in the ptp4l program of the linuxptp package. When ptp4l is operating on a little-endian architecture as a PTP transparent clock, a remote attacker could send a crafted one-step sync message to cause an information leak or crash. The highest threat from this vulnerability is to data confidentiality and system availability. This flaw affects linuxptp versions before 3.1.1 and before 2.0.1. |
2021-07-09 |
not yet calculated |
CVE-2021-3571
MISC |
ljcms — r60321
|
A SQL injection vulnerability in /question.php of LJCMS Version v4.3.R60321 allows attackers to obtain sensitive database information. |
2021-07-08 |
not yet calculated |
CVE-2020-20583
MISC |
metinfo — metinfo
|
A blind SQL injection in /admin/?n=logs&c=index&a=dode of Metinfo 7.0 beta allows attackers to access sensitive database information. |
2021-07-08 |
not yet calculated |
CVE-2020-20585
MISC
MISC
MISC |
mikrotik — routeros
|
Mikrotik RouterOs before 6.47 (stable tree) suffers from an uncontrolled resource consumption vulnerability in the /nova/bin/route process. An authenticated remote attacker can cause a Denial of Service due to overloading the systems CPU. |
2021-07-08 |
not yet calculated |
CVE-2020-20217
MISC
MISC |
mipcms — mipcms
|
A server side request forgery (SSRF) vulnerability in /ApiAdminDomainSettings.php of MipCMS 5.0.1 allows attackers to access sensitive information. |
2021-07-08 |
not yet calculated |
CVE-2020-20582
MISC |
mozilocms — mozilocms
|
A stored cross site scripting (XSS) vulnerability in moziloCMS 2.0 allows authenticated attackers to execute arbitrary web scripts or HTML via a crafted payload entered into the “Content” parameter. |
2021-07-09 |
not yet calculated |
CVE-2020-25394
MISC |
octopus — server
|
When configuring Octopus Server if it is configured with an external SQL database, on initial configuration the database password is written to the OctopusServer.txt log file in plaintext. |
2021-07-08 |
not yet calculated |
CVE-2021-31816
MISC |
octopus — server
|
When configuring Octopus Server if it is configured with an external SQL database, on initial configuration the database password is written to the OctopusServer.txt log file in plaintext. |
2021-07-08 |
not yet calculated |
CVE-2021-31817
MISC |
panasonic — fpwin_pro
|
Panasonic FPWIN Pro, all Versions 7.5.1.1 and prior, allows an attacker to craft a project file specifying a URI that causes the XML parser to access the URI and embed the contents, which may allow the attacker to disclose information that is accessible in the context of the user executing software. |
2021-07-09 |
not yet calculated |
CVE-2021-32972
MISC |
pbootcms — pbootcms
|
Crossi Site Scripting (XSS) vulnerability in PbootCMS 2.0.3 in admin.php. |
2021-07-08 |
not yet calculated |
CVE-2020-20363
MISC
MISC
MISC |
pbootcms — pbootcms
|
Incorrect Access Control vulnerability in PbootCMS 2.0.6 via the list parameter in the update function in upgradecontroller.php. |
2021-07-09 |
not yet calculated |
CVE-2020-22535
MISC |
pbootcms — pbootcms
|
Remote Code Execution vulnerability in PbootCMS 2.0.8 in the message board. |
2021-07-08 |
not yet calculated |
CVE-2020-23580
MISC |
php-fusion — php-fusion
|
Cross Site Scripting (XSS) vulnerability in PHP-Fusion 9.03.60 via ‘New Shout’ in /infusions/shoutbox_panel/shoutbox_admin.php. |
2021-07-07 |
not yet calculated |
CVE-2020-23702
MISC
MISC |
pimcore — pimcore
|
This affects the package pimcore/pimcore before 10.0.7. This issue exists due to the absence of check on the storeId parameter in the method collectionsActionGet and groupsActionGet method within the ClassificationstoreController class. |
2021-07-09 |
not yet calculated |
CVE-2021-23405
MISC
MISC |
prusa_research — prusaslicer
|
An out-of-bounds write vulnerability exists in the Admesh stl_fix_normal_directions() functionality of Prusa Research PrusaSlicer 2.2.0 and Master (commit 4b040b856). A specially crafted AMF file can lead to code execution. An attacker can provide a malicious file to trigger this vulnerability. |
2021-07-08 |
not yet calculated |
CVE-2020-28598
MISC |
publiccms — publiccms
|
Cross Site Scripting (XSS) vulnerability in PublicCMS 4.0 to get an admin cookie when the Administrator reviews submit case. |
2021-07-09 |
not yet calculated |
CVE-2020-21333
MISC |
putty — putty
|
PuTTY through 0.75 proceeds with establishing an SSH session even if it has never sent a substantive authentication response. This makes it easier for an attacker-controlled SSH server to present a later spoofed authentication prompt (that the attacker can use to capture credential data, and use that data for purposes that are undesired by the client user). |
2021-07-09 |
not yet calculated |
CVE-2021-36367
MISC
MISC |
qnap — hbs_3
|
An improper access control vulnerability has been reported to affect certain legacy versions of HBS 3. If exploited, this vulnerability allows attackers to compromise the security of the operating system.QNAP have already fixed this vulnerability in the following versions of HBS 3: QTS 4.3.6: HBS 3 v3.0.210507 and later QTS 4.3.4: HBS 3 v3.0.210506 and later QTS 4.3.3: HBS 3 v3.0.210506 and later |
2021-07-08 |
not yet calculated |
CVE-2021-28809
MISC
MISC |
realtek — had
|
Realtek HAD contains a driver crashed vulnerability which allows local side attackers to send a special string to the kernel driver in a user’s mode. Due to unexpected commands, the kernel driver will cause the system crashed. A vulnerability in ____COMPONENT____ of Realtek HDA driver allows ____ATTACKER/ATTACK____ to cause ____IMPACT____. This issue affects: Realtek HDA driver 8155 version 9150 and prior versions. |
2021-07-07 |
not yet calculated |
CVE-2021-32537
CONFIRM |
rockwell_automation — micrologix_1100
|
Rockwell Automation MicroLogix 1100, all versions, allows a remote, unauthenticated attacker sending specially crafted commands to cause the PLC to fault when the controller is switched to RUN mode, which results in a denial-of-service condition. If successfully exploited, this vulnerability will cause the controller to fault whenever the controller is switched to RUN mode. |
2021-07-09 |
not yet calculated |
CVE-2021-33012
MISC |
ruby — ruby
|
Addressable is an alternative implementation to the URI implementation that is part of Ruby’s standard library. An uncontrolled resource consumption vulnerability exists after version 2.3.0 through version 2.7.0. Within the URI template implementation in Addressable, a maliciously crafted template may result in uncontrolled resource consumption, leading to denial of service when matched against a URI. In typical usage, templates would not normally be read from untrusted user input, but nonetheless, no previous security advisory for Addressable has cautioned against doing this. Users of the parsing capabilities in Addressable but not the URI template capabilities are unaffected. The vulnerability is patched in version 2.8.0. As a workaround, only create Template objects from trusted sources that have been validated not to produce catastrophic backtracking. |
2021-07-06 |
not yet calculated |
CVE-2021-32740
CONFIRM
MISC |
| rukovoditel — rukovoditel |
A stored cross site scripting (XSS) vulnerability in the ‘Entities List’ feature of Rukovoditel 2.7.2 allows authenticated attackers to execute arbitrary web scripts or HTML via a crafted payload entered into the ‘Name’ parameter. |
2021-07-09 |
not yet calculated |
CVE-2020-35987
MISC |
rukovoditel — rukovoditel
|
A stored cross site scripting (XSS) vulnerability in the ‘Global Lists” feature of Rukovoditel 2.7.2 allows authenticated attackers to execute arbitrary web scripts or HTML via a crafted payload entered into the ‘Name’ parameter. |
2021-07-09 |
not yet calculated |
CVE-2020-35985
MISC |
rukovoditel — rukovoditel
|
A stored cross site scripting (XSS) vulnerability in the ‘Users Access Groups’ feature of Rukovoditel 2.7.2 allows authenticated attackers to execute arbitrary web scripts or HTML via a crafted payload entered into the ‘Name’ parameter. |
2021-07-09 |
not yet calculated |
CVE-2020-35986
MISC |
rukovoditel — rukovoditel
|
A stored cross site scripting (XSS) vulnerability in the ‘Users Alerts’ feature of Rukovoditel 2.7.2 allows authenticated attackers to execute arbitrary web scripts or HTML via a crafted payload entered into the ‘Title’ parameter. |
2021-07-09 |
not yet calculated |
CVE-2020-35984
MISC |
rust — hyper
|
hyper is an HTTP library for Rust. In versions prior to 0.14.10, hyper’s HTTP server and client code had a flaw that could trigger an integer overflow when decoding chunk sizes that are too big. This allows possible data loss, or if combined with an upstream HTTP proxy that allows chunk sizes larger than hyper does, can result in “request smuggling” or “desync attacks.” The vulnerability is patched in version 0.14.10. Two possible workarounds exist. One may reject requests manually that contain a `Transfer-Encoding` header or ensure any upstream proxy rejects `Transfer-Encoding` chunk sizes greater than what fits in 64-bit unsigned integers. |
2021-07-07 |
not yet calculated |
CVE-2021-32714
CONFIRM |
rust — hyper
|
hyper is an HTTP library for rust. hyper’s HTTP/1 server code had a flaw that incorrectly parses and accepts requests with a `Content-Length` header with a prefixed plus sign, when it should have been rejected as illegal. This combined with an upstream HTTP proxy that doesn’t parse such `Content-Length` headers, but forwards them, can result in “request smuggling” or “desync attacks”. The flaw exists in all prior versions of hyper prior to 0.14.10, if built with `rustc` v1.5.0 or newer. The vulnerability is patched in hyper version 0.14.10. Two workarounds exist: One may reject requests manually that contain a plus sign prefix in the `Content-Length` header or ensure any upstream proxy handles `Content-Length` headers with a plus sign prefix. |
2021-07-07 |
not yet calculated |
CVE-2021-32715
MISC
CONFIRM |
| samsung — bluetooth |
Improper privilege management vulnerability in Bluetooth application prior to SMR July-2021 Release 1 allows untrusted application to access the Bluetooth information in Bluetooth application. |
2021-07-08 |
not yet calculated |
CVE-2021-25429
MISC |
samsung — bluetooth
|
SQL injection vulnerability in Bluetooth prior to SMR July-2021 Release 1 allows unauthorized access to paired device information |
2021-07-08 |
not yet calculated |
CVE-2021-25427
MISC |
samsung — bluetooth
|
Improper access control vulnerability in Bluetooth application prior to SMR July-2021 Release 1 allows untrusted application to access the Bluetooth information in Bluetooth application. |
2021-07-08 |
not yet calculated |
CVE-2021-25430
MISC |
| samsung — caeralyzer |
Improper access control vulnerability in Cameralyzer prior to versions 3.2.1041 in 3.2.x, 3.3.1040 in 3.3.x, and 3.4.4210 in 3.4.x allows untrusted applications to access some functions of Cameralyzer. |
2021-07-08 |
not yet calculated |
CVE-2021-25431
MISC |
samsung — factorycamerafb
|
Improper access control vulnerability in FactoryCameraFB prior to version 3.4.74 allows untrusted applications to access arbitrary files with an escalated privilege. |
2021-07-08 |
not yet calculated |
CVE-2021-25440
MISC |
samsung — knox_manage
|
Improper MDM policy management vulnerability in KME module prior to KCS version 1.39 allows MDM users to bypass Knox Manage authentication. |
2021-07-08 |
not yet calculated |
CVE-2021-25442
MISC |
samsung — members
|
Information exposure vulnerability in Samsung Members prior to versions 2.4.85.11 in Android O(8.1) and below, and 3.9.10.11 in Android P(9.0) and above allows untrusted applications to access chat data. |
2021-07-08 |
not yet calculated |
CVE-2021-25432
MISC |
samsung — members
|
Improper access control vulnerability in Samsung Members prior to versions 2.4.85.11 in Android O(8.1) and below, and 3.9.10.11 in Android P(9.0) and above allows untrusted applications to cause arbitrary webpage loading in webview. |
2021-07-08 |
not yet calculated |
CVE-2021-25439
MISC |
samsung — members
|
Improper access control vulnerability in Samsung Members prior to versions 2.4.85.11 in Android O(8.1) and below, and 3.9.10.11 in Android P(9.0) and above allows untrusted applications to cause local file inclusion in webview. |
2021-07-08 |
not yet calculated |
CVE-2021-25438
MISC |
samsung — message
|
Improper component protection vulnerability in SmsViewerActivity of Samsung Message prior to SMR July-2021 Release 1 allows untrusted applications to access Message files. |
2021-07-08 |
not yet calculated |
CVE-2021-25426
MISC |
samsung — packagemanager
|
Improper validation check vulnerability in PackageManager prior to SMR July-2021 Release 1 allows untrusted applications to get dangerous level permission without user confirmation in limited circumstances. |
2021-07-08 |
not yet calculated |
CVE-2021-25428
MISC |
| samsung — tizen |
Improper input validation vulnerability in Tizen FOTA service prior to Firmware update JUL-2021 Release allows arbitrary code execution via Samsung Accessory Protocol. |
2021-07-08 |
not yet calculated |
CVE-2021-25436
MISC |
| samsung — tizen |
Improper access control vulnerability in Tizen FOTA service prior to Firmware update JUL-2021 Release allows attackers to arbitrary code execution by replacing FOTA update file. |
2021-07-08 |
not yet calculated |
CVE-2021-25437
MISC |
| samsung — tizen |
Improper input validation vulnerability in Tizen bootloader prior to Firmware update JUL-2021 Release allows arbitrary code execution using recovery partition in wireless firmware download mode. |
2021-07-08 |
not yet calculated |
CVE-2021-25435
MISC |
samsung — tizen
|
Improper input validation vulnerability in Tizen bootloader prior to Firmware update JUL-2021 Release allows arbitrary code execution using param partition in wireless firmware download mode. |
2021-07-08 |
not yet calculated |
CVE-2021-25434
MISC |
samsung — tizen
|
Improper authorization vulnerability in Tizen factory reset policy prior to Firmware update JUL-2021 Release allows untrusted applications to perform factory reset using dbus signal. |
2021-07-08 |
not yet calculated |
CVE-2021-25433
MISC |
smartertools — smartermail
|
SmarterTools SmarterMail before Build 7776 allows XSS. |
2021-07-06 |
not yet calculated |
CVE-2021-32233
MISC |
sonicwall — switch
|
Multiple Out-of-Bound read vulnerability in SonicWall Switch when handling LLDP Protocol allows an attacker to cause a system instability or potentially read sensitive information from the memory locations. |
2021-07-09 |
not yet calculated |
CVE-2021-20024
CONFIRM |
| suse — security_incidents |
golang/go in 1.0.2 fixes all.bash on shared machines. dotest() in src/pkg/debug/gosym/pclntab_test.go creates a temporary file with predicable name and executes it as shell script. |
2021-07-09 |
not yet calculated |
CVE-2012-2666
MISC
MISC
MISC
MISC |
suse — security_incidents
|
Avahi 0.8 allows a local denial of service (NULL pointer dereference and daemon crash) against avahi-daemon via the D-Bus interface or a “ping .local” command. |
2021-07-07 |
not yet calculated |
CVE-2021-36217
MISC
MISC |
| swift — swift |
LengthPrefixedMessageReader in gRPC Swift 1.1.0 and earlier allocates buffers of arbitrary length, which allows remote attackers to cause uncontrolled resource consumption and deny service. |
2021-07-09 |
not yet calculated |
CVE-2021-36155
MISC
MISC
MISC |
swift — swift
|
Mismanaged state in GRPCWebToHTTP2ServerCodec.swift in gRPC Swift 1.1.0 and 1.1.1 allows remote attackers to deny service by sending malformed requests. |
2021-07-09 |
not yet calculated |
CVE-2021-36153
MISC
MISC
MISC |
swift — swift
|
HTTP2ToRawGRPCServerCodec in gRPC Swift 1.1.1 and earlier allows remote attackers to deny service via the delivery of many small messages within a single HTTP/2 frame, leading to Uncontrolled Recursion and stack consumption. |
2021-07-09 |
not yet calculated |
CVE-2021-36154
MISC
MISC
MISC |
thinksaas — thinksaas
|
Improper Authorization in ThinkSAAS v2.7 allows remote attackers to modify the description of any user’s photo via the “photoid%5B%5D” and “photodesc%5B%5D” parameters in the component “index.php?app=photo.” |
2021-07-08 |
not yet calculated |
CVE-2020-18741
MISC |
| trend_micro — password_manager |
Trend Micro Password Manager (Consumer) version 5.0.0.1217 and below is vulnerable to an Exposed Hazardous Function Remote Code Execution vulnerability which could allow an unprivileged client to manipulate the registry and escalate privileges to SYSTEM on affected installations. Authentication is required to exploit this vulnerability. |
2021-07-08 |
not yet calculated |
CVE-2021-32462
MISC
MISC |
| trend_micro — password_manager |
Trend Micro Password Manager (Consumer) version 5.0.0.1217 and below is vulnerable to an Integer Truncation Privilege Escalation vulnerability which could allow a local attacker to trigger a buffer overflow and escalate privileges on affected installations. An attacker must first obtain the ability to execute low-privileged code on the target system in order to exploit this vulnerability. |
2021-07-08 |
not yet calculated |
CVE-2021-32461
MISC
MISC |
ubuntu — atom_perl
|
It was discovered that the XML::Atom Perl module before version 0.39 did not disable external entities when parsing XML from potentially untrusted sources. This may allow attackers to gain read access to otherwise protected resources, depending on how the library is used. |
2021-07-09 |
not yet calculated |
CVE-2012-1102
MISC
MISC |
| vapor — vapor |
Vapor is a web framework for Swift. In versions 4.47.1 and prior, bug in the `Data.init(base32Encoded:)` function opens up the potential for exposing server memory and/or crashing the server (Denial of Service) for applications where untrusted data can end up in said function. Vapor does not currently use this function itself so this only impact applications that use the impacted function directly or through other dependencies. The vulnerability is patched in version 4.47.2. As a workaround, one may use an alternative to Vapor’s built-in `Data.init(base32Encoded:)`. |
2021-07-09 |
not yet calculated |
CVE-2021-32742
CONFIRM
MISC |
webkit — graphicscontext
|
A use-after-free vulnerability exists in the way Webkit’s GraphicsContext handles certain events in WebKitGTK 2.30.4. A specially crafted web page can lead to a potential information leak and further memory corruption. A victim must be tricked into visiting a malicious web page to trigger this vulnerability. |
2021-07-08 |
not yet calculated |
CVE-2021-21779
MISC |
webkitgtk — webkitgtk
|
An exploitable use-after-free vulnerability exists in WebKitGTK browser version 2.30.3 x64. A specially crafted HTML web page can cause a use-after-free condition, resulting in remote code execution. The victim needs to visit a malicious web site to trigger the vulnerability. |
2021-07-08 |
not yet calculated |
CVE-2021-21806
MISC |
winwaste.net — winwaste.net
|
WinWaste.NET version 1.0.6183.16475 has incorrect permissions, allowing a local unprivileged user to replace the executable with a malicious file that will be executed with “LocalSystem” privileges. |
2021-07-08 |
not yet calculated |
CVE-2021-34110
MISC
MISC
MISC
MISC
MISC |
wordpress — wordpress
|
Directory traversal in the CM Download Manager (aka cm-download-manager) plugin 2.7.0 for WordPress allows authorized users to delete arbitrary files and possibly cause a denial of service via the fileName parameter in a deletescreenshot action. |
2021-07-07 |
not yet calculated |
CVE-2020-24146
MISC
MISC |
wordpress — wordpress
|
Server-side request forgery (SSR) vulnerability in the WP Smart Import (wp-smart-import) plugin 1.0.0 for WordPress via the file field. |
2021-07-07 |
not yet calculated |
CVE-2020-24147
MISC
MISC |
wordpress — wordpress
|
Server-side request forgery (SSRF) in the Podcast Importer SecondLine (podcast-importer-secondline) plugin 1.1.4 for WordPress via the podcast_feed parameter in a secondline_import_initialize action to the secondlinepodcastimport page. |
2021-07-07 |
not yet calculated |
CVE-2020-24149
MISC
MISC |
xyhcms — xyhcms
|
A cross site request forgery (CSRF) vulnerability in the /xyhai.php?s=/Auth/editUser URI of XYHCMS V3.6 allows attackers to edit any information of the administrator such as the name, e-mail, and password. |
2021-07-08 |
not yet calculated |
CVE-2020-20586
MISC
MISC
MISC |
by Contributed | Jul 9, 2021 | Technology
This article is contributed. See the original author and article here.
This blog is part of the Change Data Capture in Azure SQL Databases Blog Series, which started with the announcement on releasing CDC in Azure SQL Databases in early June 2021. You can view the release announcement here: https://aka.ms/CDCAzureSQLDB
In this tutorial, you will create an Azure Data Factory pipeline that copies change data from Change Data Capture tables in an Azure SQL database to Azure Blob Storage.
Change Data Capture
Change Data Capture (CDC) is currently available in SQL Server (all supported versions), Azure SQL Managed Instance, and Azure SQL Database (Preview). CDC records insert, update, and delete activity that applies to a table. This makes the details of the changes available in an easily consumed relational format. Column information and the metadata that is required to apply the changes to a target environment is captured for the modified rows and stored in change tables that mirror the column structure of the tracked source tables. Table-valued functions are provided to allow systematic access to the change data. Learn more about CDC here.
Azure Data Factory
Azure Data Factory is a cloud-based data integration service that orchestrates and automates the movement and transformation of data. You can create data integration solutions using the Data Factory service that can ingest data from various data stores, transform/process the data, and publish the result data to the data stores. Learn more about Azure Data Factory here.
Azure Blob Storage
Azure Blob storage is Microsoft’s object storage solution for the cloud. Blob storage is optimized for storing massive amounts of unstructured data. Unstructured data is data that doesn’t adhere to a particular data model or definition, such as text or binary data. Learn more about Azure Blob Storage here.
Using Azure Data Factory to send Change Data Capture data from an Azure SQL Database to Azure Blob Storage
Prerequisites:
Steps:
- Create a data source table in Azure SQL:
- Launch SQL Server Management Studio and connect to your Azure SQL database.
- In Server Explorer, right-click your database and choose the New Query.
- Run the following SQL command against your Azure SQL database to create a table named “customers” as data source store.
create table customers
(
customer_id int,
first_name varchar(50),
last_name varchar(50),
email varchar(100),
city varchar(50), CONSTRAINT “PK_Customers” PRIMARY KEY CLUSTERED (“customer_id”)
);
- Enable Change Data Capture on your database and source table.
EXEC sys.sp_cdc_enable_db
EXEC sys.sp_cdc_enable_table
@source_schema = ‘dbo’,
@source_name = ‘customers’,
@role_name = ‘null’,
@supports_net_changes = 1
- Insert some data into the customers table.
INSERT INTO customers (customer_id, first_name, last_name, email, city)
VALUES
(1, ‘Chevy’, ‘Leward’, ‘cleward0@mapy.cz’, ‘Reading’),
(2, ‘Sayre’, ‘Ateggart’, ‘sateggart1@nih.gov’, ‘Portsmouth’),
(3, ‘Nathalia’, ‘Seckom’, ‘nseckom2@blogger.com’, ‘Portsmouth’);
- Create an Azure Data Factory pipeline
- Launch the Azure Portal. In the left menu, go to Create a resource -> Data + Analytics -> Data Factory.
- Select your Azure subscription in which you want to create the data factory.
- For the Resource Group, do one of the following steps:
- Select Use existing and select an existing resource group from the drop-down list.
- Select Create new and enter the name of a resource group.
- Select the region for the data factory. Only locations that are supported are displayed in the drop-down list. The data stores (Azure Storage, Azure SQL Database, etc.) and computes (HDInsight, etc.) used by data factory can be in other regions.
- Enter ADFCDCTutorial in name. Note that this name must be globally unique.
- Select V2 for version.
- Click Review + Create.
- Once the deployment is complete, click on Go to resource.
- Click Author and monitor tile to launch the Azure Data Factory user interface (UI) in a separate tab.
- In the get started page, switch to the Author tab in the left panel.
- Create an Azure Storage linked service
- In Manage, click Linked services and click + New.
- In the New Linked Service window, select Azure Blob Storage, and click Continue.
- In the New Linked Service window, do the following steps:
- Enter AzureStorageLinkedService for Name.
- Select your Azure Storage account for Storage account name.
- Click Create.
- Create an Azure SQL Database linked service
- Click Linked services and click + New.
- In the New Linked Service window, select Azure SQL Database, and click Continue.
- In the New Linked Service window, do the following steps:
- Enter AzureSqlDB for the Name field.
- Select your SQL server for the Server name field.
- Select your SQL database for the Database name field.
- Enter name of the user for the User name field.
- Enter password for the user for the Password field.
- Click Test connection to test the connection.
- Click Create to save the linked service.
- Create a dataset to represent source data
- In Author, click + (plus) and Dataset
- Select Azure SQL Database and continue.
- In the Set properties tab, set the dataset name and connection information:
- Insert AzureSQLCDCCustomers for Name.
- Select AzureSqlDB for Linked service.
- Select [dbo].[dbo_customers_CT] for Table name. Note: this table was automatically created when CDC was enabled on the customers table. Changed data is never queried from this table directly but is instead extracted through the CDC functions.
- Click OK.
- Create a dataset to represent data copied to sink data store
- In the treeview, click + (plus), and click Dataset.
- Select Azure Blob Storage, and click Continue.
- Select DelimitedText, and click Continue.
- In the Set Properties tab, set the dataset name and connection information:
- Select AzureStorageLinkedService for Linked service.
- Enter raw for container part of the filePath.
- Enable First row as header
- Click Ok
- Create a pipeline to copy the change data
- In the treeview, click + (plus), and click Pipeline.
- Change the pipeline name to IncrementalCopyPipeline
- Expand General in the Activities toolbox, and drag-drop the Lookup activity to the pipeline designer surface. Set the name of the activity to GetChangeCount. This activity gets the number of records in the change table for a given time window.
- Switch to the Settings in the Properties window:
- Specify the SQL DB dataset name for the Source Dataset field.
- Select the Query option and enter the following into the query box:
DECLARE @from_lsn binary(10), @to_lsn binary(10);
SET @from_lsn =sys.fn_cdc_get_min_lsn(‘dbo_customers’);
SET @to_lsn = sys.fn_cdc_map_time_to_lsn(‘largest less than or equal’, GETDATE());
SELECT count(1) changecount FROM cdc.fn_cdc_get_all_changes_dbo_customers(@from_lsn, @sto_lsn, ‘all’)
3. Enable First row only
- Click the Preview data button to ensure a valid output is obtained by the lookup activity.
- Expand Iteration & conditionals in the Activities toolbox, and drag-drop the If Condition activity to the pipeline designer surface. Set the name of the activity to HasChangedRows.
- Switch to the Activities in the Properties window:
- Enter the following Expression: @greater(int(activity(‘GetChangeCount’).output.firstRow.changecount),0)
- Click on the pencil icon to edit the True condition.
- Expand General in the Activities toolbox and drag-drop a Wait activity to the pipeline designer surface. This is a temporary activity in order to debug the If condition and will be changed later in the tutorial.
- Click on the IncrementalCopyPipeline breadcrumb to return to the main pipeline.
- Run the pipeline in Debug mode to verify the pipeline executes successfully.
- Next, return to the True condition step and delete the Wait activity. In the Activities toolbox, expand Move & transform, and drag-drop a Copy activity to the pipeline designer surface. Set the name of the activity to IncrementalCopyActivity.
- Switch to the Source tab in the Properties window, and do the following steps:
- Specify the SQL dataset name for the Source Dataset field.
- Select Query for Use Query.
- Enter the following for Query.
DECLARE @from_lsn binary(10), @to_lsn binary(10);
SET @from_lsn =sys.fn_cdc_get_min_lsn(‘dbo_customers’);
SET @to_lsn = sys.fn_cdc_map_time_to_lsn(‘largest less than or equal’, GETDATE());
SELECT * FROM cdc.fn_cdc_get_all_changes_dbo_customers(@from_lsn, @to_lsn, ‘all’)
4. Click preview to verify that the query returns the changed rows correctly.
5. Switch to the Sink tab, and specify the Azure Storage dataset for the Sink Dataset field.
6. Click back to the main pipeline canvas and connect the Lookup activity to the If Condition activity one by one. Drag the green button attached to the Lookup activity to the If Condition activity.
7. Click Validate on the toolbar. Confirm that there are no validation errors. Close the Pipeline Validation Report window by clicking >>.
8. Click Debug to test the pipeline and verify that a file is generated in the storage location.
9. Publish entities (linked services, datasets, and pipelines) to the Data Factory service by clicking the Publish all button. Wait until you see the Publishing succeeded message.
This process is very similar to moving change data from Azure SQL MI to Blob Storage, which is documented here: Incrementally copy data using Change Data Capture – Azure Data Factory | Microsoft Docs
Blog Series for Change Data Capture in Azure SQL Databases
We are happy to continue the bi-weekly blog series for customers who’d like to learn more about enabling CDC in their Azure SQL Databases! This series explores different features/services that can be integrated with CDC to enhance change data functionality.
by Contributed | Jul 8, 2021 | Technology
This article is contributed. See the original author and article here.
Mithun Prasad, PhD, Senior Data Scientist at Microsoft
“I don’t have enough relevant data for my project”! Nearly every data scientist has uttered this sentence at least once. When developing robust machine learning models, we typically require a large amount of high-quality data. Obtaining such data and more so, labelled or annotated data can be time-consuming, tedious and expensive if we have to rely on experts. Hence, there is a compelling need to generate data for modelling using an automated or a semi-automated way. Specifically, in this work, we explore how we can utilize Open AI’s Generative Pre-trained Transformer 3 (GPT-3) for generating data to build models for identifying how credible news articles are.
GPT-3
GPT-3 is a language model that leverages deep learning to generate human-like text. GPT-3 was introduced by Open AI in May 2020 as a successor to their previous language model (LM) GPT-2. It is considered to be better than GPT-2. In fact, with around 175 billion trainable parameters, OpenAI GPT-3’s full version is one of the largest models trained so far.
Fake News Generation
In this blog post, we discuss the collaborative work between Microsoft’s ACE team and the Dataclair AI lab of O2 Czech Republic, where the goal is to identify fake news. Fake news is defined as a made-up story with an intention to deceive or to mislead. The general motive to spread such news is to mislead the readers, damage the reputation of any entity, or gain from sensationalism. The creation of a dataset for identifying credible news requires skilled annotators and moreover, the task of comparing proposed news articles with the original news articles itself is a daunting task as it’s highly subjective and opinionated. This is where the recent advances in natural language modelling and those in text generation capabilities can come to the rescue. We explore how new language models such as GPT-3 can help by generating new data.
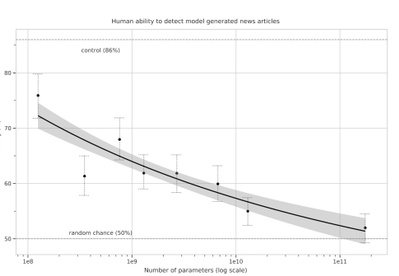
We generate fake news data using GPT-3 by providing prompts that contain a few sample fake news articles in the Czech language. Doing something like this would have been unthinkable a few years ago, but the massive advancement of text generation through language models opened doors to such experiments. As the research paper describing GPT-3 shows, GPT-3 is very good at generating news articles of high quality that even humans are not capable of detecting as computer-generated:
Source: https://arxiv.org/pdf/2005.14165.pdf
The plot also shows how text generating models improved via having access to more parameters. GPT-3 is the furthest to the right and the plot conveys how accurately people were able to recognize generated articles from those written by humans.
Prompt Engineering
“Prompts” are a way to get the model to produce text by specifying an instruction in natural language and showing some demonstrations of how to follow the instructions well. GPT-3 has an incredible capacity to mimic writing styles. When the prompt is set up correctly, GPT-3 adheres to the example just enough to copy those underlying elements (for example: includes or excludes citations, etc.) and introduce a new twist to the generated text. It is even capable of creating its own complex arguments. Thus, it is not just a replication of pre-existing data, but a creation of new and original articles from which the model can learn.
An example of a prompt and parameters used to generate fake news are as follows in bold. The generated text is in italics.
Generate a news article based on the headline and with the same style of writing as given in the example.
Headline: Where do leftist extremists get the audacity to speak for the nation?
Text:
My fellow Czechs, we must shake off the shame that the USA, Brussels and other countries have been forced on us with the help of our own “experts” and “journalists”. The same people who are now digging into our nation with the help of a genuine community of the USA and Brussels – the Pekarová and other forces…
Parameters:
Temperature: 0.7, Max tokens: 1000, Top p: 1, Frequency penalty: 0, Presence penalty 0
From these parameters, the most important ones are temperature and max tokens. Temperature controls randomness in the text. Therefore, a temperature of 0.7 was chosen to produce less deterministic results that still follow the structure and writing style of the example. Max token value was set to 1000 tokens (~4000 characters) because this is the average length of a news article. It should be noted that when working with GPT-3, the process of finding the right parameters is about experimentation.
Admittedly, there are still challenges to deal with. One of them is the need to manually inspect if GPT-3 returns articles that are relevant and in the right credibility category. Due to the sensitivity of the topic of article credibility, data quality checks will need to be implemented. Another minor limitation is that while GPT-3 understands many articles that it has been trained on, it has problems when analysing newer topics. For example, it is unable to fully grasp the significance of COVID-19 and it usually avoids writing about it due to not having enough knowledge about the global pandemic. Thus, it generates less realistic articles when faced with such a topic.
Nevertheless, if those obstacles are kept in mind, GPT-3 can help make dataset creation faster and more reliable. This is something that the O2 CZ team plans to utilize for their disinformation recognition AI model. “Our model extracts different features (aggressivity, clickbait etc.) from the article via smaller extraction modules. Those features are then evaluated by the deep learning classification module and subsequently transformed into one number by the ensemble method. For the system to work, we need as many articles as possible for training the classification module, which we hope to obtain with the help of GPT-3,” described by Filip Trhlik, a Data Scientist at the Dataclair AI lab.

Disinformation recognition AI model diagram
In conclusion, artificially generating new data is a very exciting use case of language models and even though the data generated requires a small amount of manual inspection, it is very beneficial for downstream modelling tasks. The ability to generate a large amount of synthetic data in a short time is very promising.


Recent Comments