by Contributed | Oct 10, 2024 | Technology
This article is contributed. See the original author and article here.
Welcome to the October 2024 edition of our Microsoft Credentials roundup, where we highlight the latest portfolio news and updates to inspire and support your training and career journey.
In this article
What’s new with Microsoft Applied Skills?
- Explore the latest Applied Skills scenarios
- Take the Microsoft Learn AI Skills Challenge
What’s new with Microsoft Certifications?
- Announcing the new Microsoft Certified: Fabric Data Engineer Associate Certification (Exam DP-700)
- New pricing for Microsoft Certification exams effective November 1, 2024
- Microsoft Certifications to be retired
- Build your confidence with exam prep resources
Let’s talk about Applied Skills
Want to have a bigger impact in your career? Explore Microsoft Applied Skills credentials to showcase your skills. According to a recent IDC study*, 50% of organizations find that micro-credentials like Microsoft Applied Skills help employees get promoted faster!
*Source: IDC InfoBrief, sponsored by Microsoft, Skilling Up! Leveraging Full and Micro-Credentials for Optimal Skilling Solutions, Doc. #US52019124, June 2024
Explore the latest Applied Skills scenarios
We’re all about keeping you up to date with in-demand, project-based skills? Here are the new scenarios we’ve launched:
Coming soon
Stay tuned for the following Applied Skills and more at aka.ms/BrowseAppliedSkills:
- Implement retention, eDiscovery, and Communication Compliance in Microsoft Purview
- Develop data-driven applications by using Microsoft Azure SQL Database
Applied Skills updates
We ensure that Applied Skills credentials stay aligned with the latest product updates and trends. Our commitment to helping you build relevant, in-demand skills means that we periodically update or retire older assessments as we introduce new ones.
Now available
These assessments have been updated and are now back online:
If you have been preparing for these credentials, go ahead and take the assessment today!
Retirements
Keep an eye out for new credentials in these areas.
- Retired: Build collaborative apps for Microsoft Teams
- Retiring on October 31st: Develop generative AI solutions with Azure OpenAI Service
Take the Microsoft Learn AI Skills Challenge
Dive into the latest AI technologies like Microsoft Copilot, GitHub, Microsoft Azure, and Microsoft Fabric. Explore six curated topics designed to elevate your skills, participate in interactive community events, and gain insights from expert-led sessions. Take your learning to the next level with a selection of the topics to earn a Microsoft Applied Skills Credential and showcase your expertise to potential employers. Start your AI journey today!
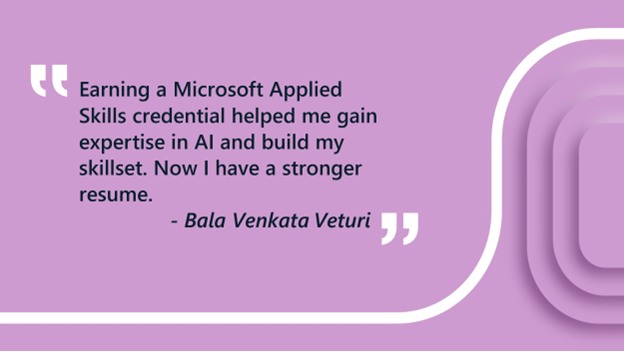
Share Your Story
Have you earned an Applied Skills credential that has made a difference in your career or education? Bala Venkata Veturi (see below) earned an Applied Skills credential through the #WICxSkillsReadyChallenge.
We’d love to hear from you! Share your story with us and inspire others with your journey. We could feature your success story next!
What’s new with Microsoft Certifications?
Announcing the new Microsoft Certified: Fabric Data Engineer Associate Certification (Exam DP-700)
These days, as organizations strive to harness the power of AI, data engineering skills are indispensable. Data engineers play a pivotal role in designing and implementing the foundational elements for any successful data and AI initiative. To support learners who want to build and validate these skills, Microsoft Learn is pleased to announce the new Microsoft Certified: Fabric Data Engineer Associate Certification, along with its related Exam DP-700: Implementing data engineering solutions using Microsoft Fabric (beta), both of which will be available in late October 2024. Read all about this exciting news and explore other Microsoft Credentials for analytics and data science, in our blog post Prove your data engineering skills, and be part of the AI transformation.
New pricing for Microsoft Certification exams effective November 1, 2024
Microsoft Learn continually reviews and evolves its portfolio of Microsoft Certifications to help learners around the world stay up to date with the latest technologies, especially as AI and cybersecurity skills become increasingly important in the workplace. We also regularly update our exam content, format, and delivery. To reflect their current market value, we’re updating pricing for Microsoft Certification exams, effective November 1, 2024. The new prices will vary depending on the country or region where you take the exam. For most areas, there will be no change in the price. For some areas, the price will decrease to make the exams more affordable. For a few areas, the price will increase to align with global and regional standards. The goal is to make Microsoft Certification exam pricing simpler and more consistent across geographies while still offering a fair and affordable value proposition. Check out all the details in New pricing for Microsoft Certification exams effective November 1, 2024.
Microsoft Certifications to be retired
As announced in Evolving Microsoft Credentials for Dynamics 365, the following Certifications will be retired on November 30, 2024:
If you’re currently preparing for Exam MB-210, Exam MB-220, or Exam MB-260, we recommend that you take the exam before November 30, 2024. If you’ve already earned one of the Certifications being retired, it will remain on the transcript in your profile on Microsoft Learn. If you’re eligible to renew your certification before November 30, 2024, we recommend that you consider doing so.
Build your confidence with exam prep resources
To better prepare you to earn a new Microsoft Certification, we’ve added new Practice Assessments on Microsoft Learn, including:
Watch this space for the next Microsoft Credentials roundup as we continue to evolve our portfolio to help support your career growth.
Follow us on X and LinkedIn, and make sure you’re subscribed to The Spark, our LinkedIn newsletter.
Previous editions of the Microsoft Credentials roundup
by Contributed | Oct 9, 2024 | Technology
This article is contributed. See the original author and article here.
The Microsoft Security team is excited to connect with you next week at Authenticate 2024 Conference, taking place October 14 to 16 in Carlsbad, CA! With the rise in identity attacks targeting passwords and MFA credentials, it’s becoming increasingly clear that phishing resistant authentication is critical to counteract these attacks. As the world shifts towards stronger, modern authentication methods, Microsoft is proud to reaffirm our commitment to passwordless authentication and to expanding our support for passkeys across products like Microsoft Entra, Microsoft Windows, and Microsoft consumer accounts (MSA).
To enhance security for both consumers and enterprise customers, we’re excited to showcase some of our latest innovations at this event:
We look forward to demonstrating these new advancements and discussing how to take a comprehensive approach to modern authentication at Authenticate Conference 2024.
Where to find Microsoft Security at Authenticate 2024 Conference
Please stop by our booth to chat with our product team or join us at the following sessions:
Session Title
|
Session Description
|
Time
|
Passkeys on Windows: Paving the way to a frictionless future!
|
UX Fundamentals
Discover the future of passkey authentication on Windows. Explore our enhanced UX, powered by Microsoft AI and designed for seamless experiences across platforms. Join us as we pave the way towards a passwordless world.
Speakers:
Sushma K. Principal Program Manager, Microsoft
Ritesh Kumar Software Engineer, Microsoft
|
October 14th
12:00 – 12:25 PM
|
Passkeys on Windows: New platform features
|
Technical Fundamentals and Features
This is an exciting year for us as we’re bringing some great passkey features to Windows users. In this session, I’ll discuss our new capabilities for synced passkeys protected by Windows Hello, and I’ll walk through a plugin model for third-party passkey providers to integrate with our Windows experience. Taken together, these features make passkeys more readily available wherever users need them, with the experience, flexibility, and durability that users should expect when using their passkeys on Windows.
Speaker:
Bob Gilbert Software Engineering Manager, Microsoft
|
October 14th
2:30 – 2:55 PM
|
We love passkeys – but how can we convince a billion users?
|
Keynote
It’s clear that passkeys will be core component of a passwordless future. The useability and security advantages are clear. What isn’t as clear is how we actually convince billions of users to step away from a decades-long relationship with passwords and move to something new. Join us as we share insights on how to accelerate adoption when users, platforms, and applications needs are constantly evolving. We will share practical UX patterns and practices, including messaging, security implications,
and how going passwordless changes the concept of account recovery.
Speakers:
Scott Bingham Principal Product Manager, Microsoft
Sangeeta Ranjit Group Product Manager, Microsoft
|
October 14th
5:05 – 5:25 PM
|
Stop by our booth #402 to speak with our product team in person!
Stop counting actors… Start describing authentication events
|
Vision and Future
We began deploying multifactor authentication because passwords provided insufficient security. More factors equal more security, right? Yes, but we continue to see authentication attacks such as credential stuffing and phishing! The identity industry needs to stop thinking in the quantity of authentication factors and start thinking about the properties of the authentication event. As we transition into the era of passkeys, it’s time to consider how we describe the properties of our authentication event. In this talk, we’ll demonstrate how identity providers and relying parties can communicate a consistent, composable collection of authentication properties. To raise the security bar and provide accountability, these properties must communicate not only about the authentication event, but about the security primitives underlying the event itself. These properties can be used to drive authentication and authorization decisions in standalone and federated environments, enabling clear, consistent application of security controls.
Speakers:
Pamela Dingle Director of Identity Standards, Microsoft
Dean H. Saxe Principal Engineer, Office of the CTO, Beyond Identity
|
October 16th
10:00 – 10:25 AM
|
Bringing passkeys into your passwordless journey
|
Passkeys in the Enterprise
Most of our enterprise customers are deploying some form of passwordless credential or planning to in the next few years, however, the industry is all abuzz with excitement about passkeys. What do passkeys mean for your organization’s passwordless journey? Join the Microsoft Entra ID product team as we explore the impact of passkeys on the passwordless ecosystem, share insights from Microsoft’s own passkey implementation and customer experiences.
Speakers:
Tim Larson – Senior Product Manager, Identity Network and Access, Security, Microsoft
Micheal Epping – Senior Product Manager, Microsoft
|
October 16th
11:00 – 11:25 AM
|
We can’t wait to see you in Carlsbad, CA for Authenticate 2024 Conference
Jarred Boone, Senior Product Marketing Manager, Identity Security
Read more on this topic
Learn more about Microsoft Entra
Prevent identity attacks, ensure least privilege access, unify access controls, and improve the experience for users with comprehensive identity and network access solutions across on-premises and clouds.
by Contributed | Oct 8, 2024 | Technology
This article is contributed. See the original author and article here.
In our continued effort to equip developers and organizations with advanced search tools, we are thrilled to announce the launch of several new features in the latest Preview API for Azure AI Search. These enhancements are designed to optimize vector index size and provide more granular control and understanding of your search index to build Retrieval-Augmented Generation (RAG) applications.
MRL Support for Quantization
Matryoshka Representation Learning (MRL) is a new technique that introduces a different form of vector compression, which complements and works independently of existing quantization methods. MRL enables the flexibility to truncate embeddings without significant semantic loss, offering a balance between vector size and information retention.
This technique works by training embedding models so that information density increases towards the beginning of the vector. As a result, even when using only a prefix of the original vector, much of the key information is preserved, allowing for shorter vector representations without a substantial drop in performance.
OpenAI has integrated MRL into their ‘text-embedding-3-small’ and ‘text-embedding-3-large’ models, making them adaptable for use in scenarios where compressed embeddings are needed while maintaining high retrieval accuracy. You can read more about the underlying research in the official paper [1] or learn about the latest OpenAI embedding models in their blog.
Storage Compression Comparison
Table 1.1 below highlights the different configurations for vector compression, comparing standard uncompressed vectors, Scalar Quantization (SQ), and Binary Quantization (BQ) with and without MRL. The compression ratio demonstrates how efficiently the vector index size can be optimized, yielding significant cost savings. You can find more about our Vector Index Size Limits here: Service limits for tiers and skus – Azure AI Search | Microsoft Learn.
Table 1.1: Vector Index Size Compression Comparison
Configuration
|
*Compression Ratio
|
Uncompressed
|
–
|
SQ
|
4x
|
BQ
|
28x
|
**MRL + SQ (1/2 and 1/3 truncation dimension respectively)
|
8x-12x
|
**MRL + BQ (1/2 and 1/3 truncation dimension respectively)
|
64x – 96x
|
Note: Compression ratios depend on embedding dimensions and truncation. For instance, using “text-embedding-3-large” with 3072 dimensions truncated to 1024 dimensions can result in 96x compression with Binary Quantization.
*All compression methods listed above, may experience slightly lower compression ratios due to overhead introduced by the index data structures. See “Memory overhead from selected algorithm” for more details.
**The compression impact when using MRL depends on the value of the truncation dimension. We recommend either using ½ or 1/3 of the original dimensions to preserve embedding quality (see below)
Quality Retainment Table:
Table 1.2 provides a detailed view of the quality retainment when using MRL with quantization across different models and configurations. The results indicate the impact on Mean NDCG@10 across a subset of MTEB datasets, showing that high levels of compression can still preserve up to 99% of search quality, particularly with BQ and MRL.
Table 1.2: Impact of MRL on Mean NDCG@10 Across MTEB Subset
Model Name
|
Original Dimension
|
MRL Dimension
|
Quantization Algorithm
|
No Rerank (% Δ)
|
Rerank 2x Oversampling (% Δ)
|
OpenAI text-embedding-3-small
|
1536
|
512
|
SQ
|
-2.00% (Δ = 1.155)
|
-0.0004% (Δ = 0.0002)
|
OpenAI text-embedding-3-small
|
1536
|
512
|
BQ
|
-15.00% (Δ = 7.5092)
|
-0.11% (Δ = 0.0554)
|
OpenAI text-embedding-3-small
|
1536
|
768
|
SQ
|
-2.00% (Δ = 0.8128)
|
-1.60% (Δ = 0.8128)
|
OpenAI text-embedding-3-small
|
1536
|
768
|
BQ
|
-10.00% (Δ = 5.0104)
|
-0.01% (Δ = 0.0044)
|
OpenAI text-embedding-3-large
|
3072
|
1024
|
SQ
|
-1.00% (Δ = 0.616)
|
-0.02% (Δ = 0.0118)
|
OpenAI text-embedding-3-large
|
3072
|
1024
|
BQ
|
-7.00% (Δ = 3.9478)
|
-0.58% (Δ = 0.3184)
|
OpenAI text-embedding-3-large
|
3072
|
1536
|
SQ
|
-1.00% (Δ = 0.3184)
|
-0.08% (Δ = 0.0426)
|
OpenAI text-embedding-3-large
|
3072
|
1536
|
BQ
|
-5.00% (Δ = 2.8062)
|
-0.06% (Δ = 0.0356)
|
Table 1.2 compares the relative point differences of Mean NDCG@10 when using different MRL dimensions (1/3 and 1/2 from the original dimensions) from an uncompressed index across OpenAI text-embedding models.
Key Takeaways:
- 99% Search Quality with BQ + MRL + Oversampling: Combining Binary Quantization (BQ) with Oversampling and Matryoshka Representation Learning (MRL) retains 99% of the original search quality in the datasets and embeddings combinations we tested, even with up to 96x compression, making it ideal for reducing storage while maintaining high retrieval performance.
- Flexible Embedding Truncation: MRL enables dynamic embedding truncation with minimal accuracy loss, providing a balance between storage efficiency and search quality.
- No Latency Impact Observed: Our experiments also indicated that using MRL had no noticeable latency impact, supporting efficient performance even at high compression rates.
For more details on how MRL works and how to implement it, visit the MRL Support Documentation.
Targeted Vector Filtering
Targeted Vector Filtering allows you to apply filters specifically to the vector component of hybrid search queries. This fine-grained control ensures that your filters enhance the relevance of vector search results without inadvertently affecting keyword-based searches.
Sub-Scores
Sub-Scores provide granular scoring information for each recall set contributing to the final search results. In hybrid search scenarios, where multiple factors like vector similarity and text relevance play a role, Sub-Scores offer transparency into how each component influences the overall ranking.
Text Split Skill by Tokens
The Text Split Skill by Tokens feature enhances your ability to process and manage large text data by splitting text based on token countsThis gives you more precise control over passage (chunk) length, leading to more targeted indexing and retrieval, particularly for documents with extensive content.
For any questions or to share your feedback, feel free to reach out through our Azure Search · Community
Getting started with Azure AI Search
References:
[1] Kusupati, A., Bhatt, G., Rege, A., Wallingford, M., Sinha, A., Ramanujan, V., Howard-Snyder, W., Chen, K., Kakade, S., Jain, P., & Farhadi, A. (2024). Matryoshka Representation Learning. arXiv preprint arXiv:2205.13147. Retrieved from https://arxiv.org/abs/2205.13147{2205.13147}
by Contributed | Oct 7, 2024 | Technology
This article is contributed. See the original author and article here.
Introduction
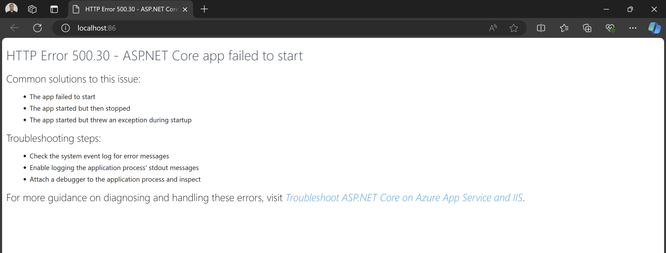
When deploying an ASP.NET Core application, encountering the “HTTP Error 500.30 – ASP.NET Core app failed to start” is the most common error. This error typically indicates an issue within the application startup process, often triggered by misconfigurations, dependencies or environment mismatches.
Problem
The HTTP 500.30 error occurs when the ASP.NET Core application fails to launch successfully. Unlike other HTTP errors that might relate to client-side or application issues, this error signifies that the server was unable to initiate the application due to a problem during startup. This failure may result from misconfigurations in the hosting environment, incorrect settings in the app configuration, or missing dependencies required for the application to run.
Solution
Since the issue could stem from various factors, it’s essential to verify all aspects. First, ensure that the correct ASP.NET Core runtime is installed. The ASP.NET Core Hosting Bundle includes everything needed to run web or server apps. It contains the .NET runtime, ASP.NET Core runtime and if installed on a machine with IIS, it also adds the ASP.NET Core IIS Module. If it is not installed, download and install the correct Hosting Bundle from this link – Download ASP.NET Core 8.0 Runtime (v8.0.8) – Windows Hosting Bundle Installer (microsoft.com) If you are using previous version, use this link to get the list of relevant versions download. Download .NET 8.0 (Linux, macOS, and Windows) (microsoft.com)
Note: If the Hosting Bundle is installed before IIS, the bundle installation must be repaired. Run the Hosting Bundle installer again after installing IIS.
You should also review the application event logs. These can often reveal more specific errors, such as missing configuration files, connection string issues, or runtime errors. To access these logs, go to: Event Viewer -> Windows Logs -> Application. An error you might encounter could look something like this –

Here the application startup failed to load coreclr. CLR worker thread exited prematurely. This issue commonly occurs when an application is built for a 32-bit runtime, but the application pool is set to 64-bit. To resolve this, set the “Enable 32-Bit Applications” option to true. For more details on this setting, you can refer to this article – How to Host 32-Bit Applications in IIS: Complete Step-by-Step Guide & In-Depth Analysis (microsoft.com)

Also be mindful while you are publishing your application. Make sure to select the correct configurations (Debug/Release). Always choose “Release” unless you special debugging need.

The target framework should match with the installed hosting bundle version. Also, ensure you select the appropriate target runtime and deployment mode.
Lastly, if your ASP.NET Core application relies on dependencies or third-party libraries, verify that they are installed on the server. If your application is 64-bit but the dependencies are 32-bit, enable the “Enable 32-Bit Applications” setting in the application pool.
Other Potential Causes
The failure to load corclr is one possible cause of the 500.30 exception. In the context of hosting ASP.NET Core applications on IIS, a 500.30 – Start Failure generally indicates that the application was unable to start correctly. There are many other factors that could contribute to this exception. Some of these include –
Missing or Incorrect .NET Runtime
The required ASP.NET Core runtime may not be installed on the server. Ensure that the correct version of the runtime is installed. This is already discussed above.
Startup Errors in the Application
Issues in the Startup.cs or Program.cs files e.g., incorrect configurations, middleware issues, dependency injection failure or exceptions could prevent the application from starting.
App Misconfiguration
Incorrect configurations in the appsettings.json or web.config or environment-specific settings files could lead to startup failures, such as invalid database connection strings or service misconfigurations etc.
File Permission
The application may not have sufficient file system permissions to access required directories or files.
Environment Variable Issues
Missing or misconfigured environment variables e.g., ASPNETCORE_ENVIRONMENT can cause the app to crash or behave unexpectedly during startup.
Conclusion
HTTP Error 500.30 signifies a failure in the ASP.NET Core application’s startup process. By investigating the stdout logs, windows application and system event logs, validating the environment, checking dependency versions, and ensuring proper configurations and tracing the startup process, you can better identify the specific cause of the 500.30 error.
by Contributed | Oct 4, 2024 | Technology
This article is contributed. See the original author and article here.
Copilot brings the power of AI right into OneDrive to help you work more efficiently and effectively. And it’s now available on OneDrive for the web to all our Copilot licensed commercial users, marking a significant milestone in the way you work with files in OneDrive. So, it’s time to get to know Copilot in OneDrive and what it can do for you. This article brings together a playlist of important recent resources to give you both the what, how, and why of bringing Copilot into the OneDrive experience.
To start, here is a nice, short demo video from Mike Tholfsen (Principal Group Product Manager – Microsoft Education) showcasing “4 new Copilot in OneDrive features” (within Microsoft 365). Watch now:
A few use cases to discover what Copilot in OneDrive can do:
- Generate summaries for large documents.
- Compare differences between multiple documents.
- Answer complex questions using files you have access to.
- Generate ideas for new documents.
Now, let’s go behind the scenes with Sync Up and hear from OneDrive designer, Ben Truelove.
In this episode of the Sync Up podcast, hosts Stephen Rice and Arvind Mishra dive into the design of Copilot in OneDrive with special guest Ben Truelove, a veteran designer at Microsoft. Ben shares insights from his 27-year journey at Microsoft, including how the team designed and iterated to deliver the best Copilot experience to our customers. Tune in to learn about the innovative features and user-centric design that make Copilot a game-changer for OneDrive users.
“Designing OneDrive for Copilot” | Latest video episode from Sync Up – The OneDrive podcast. Watch now:
Listen to and subscribe: Sync Up – The OneDrive podcast. And explore other Microsoft podcasts.
OK, let’s move into the finer details with the recent general availability (GA) blog.
Copilot isn’t just a tool; it’s a productivity companion that works alongside you, making everyday tasks easier and empowering you to achieve more. Arjun Tomar (Principal Product Manager on the OneDrive web team) published a recent blog to dig deeper into what you can do with Copilot in OneDrive. He shares how you can get started – including the new getting started guide. And last, the OneDrive team wants your feedback, in-app and a nice set of FAQs just a link away.
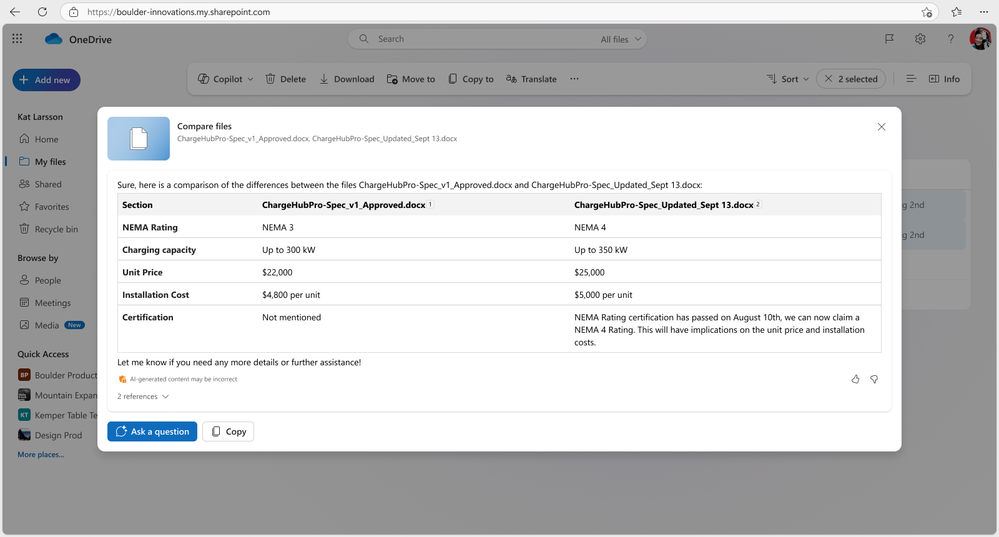
You can now select up to five files―even mixing formats such as Word docs, PowerPoints, and PDFs―and have Copilot offer a detailed comparison across all the files.
Review Arjun Tomar‘s full blog, “Introducing Copilot in OneDrive: Now Generally Available.”
To get a broader perspective, watch the “OneDrive: AI at your Fingertips” training video.
Learn about and see demos of new and important capabilities coming to OneDrive — giving you the best file experiences across Microsoft 365: Enhancing collaboration, powered by AI and Copilot, fast, reliable sync, and more. You’ll get the latest news, roadmap, plus a few tips and tricks along the way.
Take time to get to know all aspects of how the OneDrive team is leveraging AI. Arjun Tomar and Ben Truelove co-present “OneDrive: AI at your fingertips.” Watch now:
Before it’s too late, register for the upcoming OneDrive webinar (Oct. 8th, 10am PDT)
Discover what’s here and coming for Copilot in OneDrive, new enhancements to the mobile app, photos experience, and more!
Register for their upcoming webinar | Oct 8, 2024, 10am PDT | “OneDrive: AI Innovations for a New Era of Work and Home“ presented by Jeff Teper– President – Collab Apps & Platform, Jason Moore- VP – Product Management, Arwa Tyebkhan – Principal Product Group Manager, Carlos Perez– Principal Design Director, Gaia Carini-Principal Group Product Manager, and Arjun Tomar-Senior Product Manager.
 “OneDrive: AI Innovations for a New Era of Work and Home” co-presenters: Jeff Teper (President, Collaboration Apps and Platform), Jason Moore (VP, Product Management), Arwa Tyebkhan (Principal Product Group Manager), Carlos Perez (Principal Design Director), Gaia Carini (Principal Group Product Manager), and Arjun Tomar (Senior Product Manager).
BONUS | Copilot Wave 2 – AI innovations for OneDrive and SharePoint.
Adam Harmetz and Jason Moore – Microsoft VPs for SharePoint and OneDrive respectively – recently posted a related blog that highlights the public preview of Copilot agents in SharePoint, a new experience that enables any user to quickly create and share agents right from within SharePoint for specific purposes. Plus, they included insights about Copilot in OneDrive – highlighting numerous use cases like summarize, get answers from, and compare your files in OneDrive faster than ever.
Review their full blog, “Microsoft 365 Copilot Wave 2: AI Innovations in SharePoint and OneDrive“; scroll below to see two of the highlighted Copilot in OneDrive innovations:
 With Copilot in OneDrive, you can summarize one or multiple files in your OneDrive web app without opening each file.
 ask Copilot questions about the information you need from the documents you choose to gain insights and do your best work.
If you’re new to Copilot or want to learn more, check out our get started with Copilot in OneDrive (support.microsoft.com) for detailed instructions and tips on how to make the most of this AI-powered assistant designed to revolutionize the way you interact with your files and streamline your workflow.
Follow the OneDrive community blog, subscribe to Sync Up – The OneDrive podcast, stay up to date on Microsoft OneDrive adoption on adoption.microsoft.com, see what they’re tweeting, and join the product team for their monthly OneDrive Office Hours | Register and join live: https://aka.ms/OneDriveCommunityCall.
Cheers, Mark “OneAI” Kashman
by Contributed | Oct 4, 2024 | Technology
This article is contributed. See the original author and article here.
I was working with a customer who was trying to connect their ASP.NET application to Azure Cache for Redis, and in particular wanted to be able to connect from their developer workstation to the resource in Azure Government.
There are a couple of ways to connect to Azure Cache for Redis, either by using Access Keys or via Entra ID. Like with storage accounts and Azure Database for SQL, using static access keys or username/password authentication presents potential vulnerabilities, and using Entra ID via either Service Principals or Managed Identities provides a more robust, manageable authentication and authorization mechanism.
The Azure.Identity library provides a class called DefaultAzureCredential, which does some interesting things around chained credentials. You can read the full article here, but put simply, when using DefaultAzureCredential it will try several authentication mechanisms in order until it is able to successfully obtain a token. The order of the chain is as follows:
- Environment (Essentially an Entra App Service client ID/secret or certificate)
- Workload Identity
- Managed Identity
- Visual Studio
- Azure CLI
- Azure PowerShell
- Azure Developer CLI
- Interactive browser
What this means is that, using the same authentication code, I can authenticate in an App Service using a Managed Identity, or locally in my Visual Studio development environment using an account configured in Azure Service Authentication. I don’t have to necessarily worry about how my app will authenticate in my environment so long as one of the options above is available.
Following the guidance in the Azure Cache for Redis Samples repo, the customer configured their Azure Cache for Redis connection as follows:
var configurationOptions = await ConfigurationOptions.Parse($"{_redisHostName}:6380").ConfigureForAzureWithTokenCredentialAsync(new DefaultAzureCredential());
However, when they tried stepping through the code, they would get the following error: “Failed to acquire token’ – CredentialUnavailableException: EnvironmentCredential authentication unavailable. Environment variables are not fully configured. See the troubleshooting guide for more information. https://aka.ms/azsdk/net/identity/environmentcredential/“
I took a look at it and the first thing that jumped out is that we probably need to be specifying the AuthorityHost value, i.e. pointing the credential at the Azure Government cloud, like so:
var configurationOptions = await ConfigurationOptions.Parse($"{_redisHostName}:6380").ConfigureForAzureWithTokenCredentialAsync(new DefaultAzureCredential(new DefaultAzureCredentialOptions() { AuthorityHost=AzureAuthorityHosts.AzureGovernment}));
However, this did not change my error at all. So, what’s going on?
It turns out, that looking in the Microsoft.Azure.StackExchangeRedis library, the ConfigureForAzureWithTokenCredentialAsync method does not yet have a way to specify a sovereign cloud endpoint (and if I’m reading the code correctly, also does not allow a ManagedIdentity to specify a sovereign cloud either). So, what now?
As it turns out, the option to use a Service Principal DOES allow you to specify a sovereign cloud to authenticate against. Creating a service principal in Entra is well documented, either in the portal as documented here, or via a simple az cli command:
az ad sp create-for-rbac --name "myredissp"
Once you have the service principal created, you can create a Redis user with the service principal in the Redis resource and connect to it in code with the following:
var configurationOptions = await ConfigurationOptions.Parse($"{_redisHostName}:6380").ConfigureForAzureWithServicePrincipalAsync(clientId, tenantId, clientSecret, null, Microsoft.Identity.Client.AzureCloudInstance.AzureUsGovernment, null);
Hopefully in the future, the option to specify a target sovereign cloud will be included to be able to use the DefaultAzureCredential to connect to Redis, but for now we can use the Service Principal.

by Contributed | Oct 4, 2024 | Technology
This article is contributed. See the original author and article here.
Surface devices are crafted to deliver a premium and versatile experience, whether you’re working from home, in the office, or on the go. Each environment presents unique challenges for display readability, particularly due to reflections and glare from ambient light sources.
Based on feedback and extensive user testing, we set out to develop a solution to minimize unwanted reflections while maintaining the clarity and contrast of your display.
We wanted to design an experience that minimized distracting reflections and delivered on key experiences that our users expect including:
- Integrating anti-reflective (AR) technology with touch and pen experiences without compromising responsiveness and accuracy.
- Ensuring the durability of the AR technology and to protect against scratches, fingerprints and other environmental factors.
- Maintaining the color fidelity and uniformity of the display across the entire screen and calibrating it to industry standards.
- Optimizing the optical performance of the AR coating and avoid any interference with the IR and RGB cameras used for Windows Hello and other features.
In this blog post, we’ll explore these challenges in more detail and show how we addressed them with solutions in Surface Pro 10 for Business and Surface Laptop 6 for Business.
What is anti-reflective technology?
There are different types of glare suppression technology, such as anti-glare and anti-reflective (AR) solutions.
- Anti-glare technology works by creating a microscale uneven display surface, scattering light that hits the display, reducing harsh reflections and creating a matte finish.
- Anti-reflective technology reduces the amount of light bouncing off the display by applying a thin coating that minimizes reflections. By minimizing reflections, anti-reflective technology can enhance the visibility and clarity of the screen content, especially in bright or variable lighting conditions.
Surface Pro 10 showing the results of AR coating on the right side
Benefits of anti-reflective technology on Surface Pro 10 & Surface Laptop 6
With Surface Pro 10 and Surface Laptop 6, we sought to bring even more value to our commercial customers by adding AR technology to the displays. This new technology improved the experience in using our devices by delivering:
- Improved readability: AR technology enhances display readability by reducing reflections and glare, making it easier to see in various lighting conditions—whether it’s bright daylight, cloudy skies, office lighting, or at night in your bedroom or on an airplane. Readability largely depends on contrast, a key quality factor that we meticulously measure and optimize.
- Enhanced color perception: By reducing the reflections and glare, anti-reflective technology improves the perceived color of the display, as the ambient light can alter the hue, saturation and brightness of the screen content. Color perception is another critical quality factor that we strive to deliver.
- Compliance with regulations: Some organizations have specific regulations and standards that require the control of screen reflectivity to ensure the health and safety of the users and workers. By using anti-reflective technology, Surface devices can help meet these standards, contributing to a safer and more comfortable working environment.
Designing for innovation in anti-reflective technology
Designing the AR coating for Surface devices was not a simple task. We aimed to reduce reflections in a meaningful way without sacrificing picture quality and brightness or compromising the user experience. It involved multiple rounds of trials, tests and evaluations, with different suppliers, materials and processes. We had to consider many factors, such as the optical performance, the reliability, the process control, the yield and cost. We also had to consider the impact of the AR coating on the other components of the display, such as the black mask, IR ink, touch layers, polarizer, adhesives and the display panel itself.
We started by defining the target specifications for the AR coating, based on a benchmark analysis and user studies of multiple AR solutions. Our goal was to reduce overall reflectance by 50% and improve transmittance at the glass level. We also wanted neutral reflection for all light sources and a high transmission in the IR spectrum range for the Windows Hello feature. Balancing all aspects of the displays was essential for delivering a premium experience.
Once the target outcome was identified, we worked closely with our manufacturer to align their AR coating designs with our specifications and verify their performance at both the cover glass level and touchscreen display module (TDM) levels. We used different equipment and materials to deposit the AR coating on the glass surface. We also applied an anti-fingerprint (AF) coating over the AR coating to protect it from scratches and abrasion.
We measured and evaluated the optical and reliability performance of the AR-coated cover glass and TDM samples, using various methods. We assessed reflection color, reflection intensity and transmission as well as evaluating the impact of the AR coating on the IR ink and various cameras/sensors. Reliability tests such as abrasion, adhesion, chemical resistance, thermal shock, humidity and UV exposure ensured the AR coating met our quality standards. Finally, we conducted user studies and demos to assess the visual experience and gather feedback.
Results you can see
We’ve created an incredible experience that allows users to be more productive in almost any lighting condition.
- Reduced reflections: Our advanced anti-reflective technology reduces reflections by up to 50%, making it easier to see your screen in bright light or even outdoors. This ensures that your work is always readable, no matter where you are.
- Individually calibrated displays: Each Surface Pro 10 and Surface Laptop 6 display is individually calibrated to minimize unwanted reflections while preserving exceptional picture quality. This attention to detail ensures touch and pen interactions remain precise and responsive, providing a seamless user experience.
- Enhanced brightness and contrast: Surface Pro 10 features our latest PixelSense display, which is 33% brighter and boasts a 15% higher contrast ratio than its predecessor, the Surface Pro 9. With support for brightness levels ranging from 2 to 600 NITS, users can enjoy vibrant visuals in any lighting condition.
- Certified excellence: Our displays have been certified by TÜV SÜD, a globally recognized testing and certification organization, to meet the stringent requirements of ISO 9241-307, which ensures high-quality display performance and user safety.1
- Eye comfort and longevity: To improve eye comfort, we’ve engineered the displays on Surface Pro 10 and Surface Laptop 6 to reduce blue light exposure. This not only improves eye comfort but also allows users to work longer without experiencing eye strain. Our displays are certified by TÜV SÜD for their low blue light ratio, ensuring a healthier viewing experience.1
- Flicker-free experience: Additionally, our displays have been rigorously tested to be flicker-free, further enhancing eye comfort and reducing eye strain. This certification by TÜV SÜD underscores our dedication to user well-being.1

At Surface, we are committed to creating premium hardware and experiences that enable our customers to work more efficiently and comfortably. The displays on Surface Pro 10 for Business and Surface Laptop 6 for Business are not only stunning and responsive, but also designed to reduce eye strain, glare and reflections in any lighting condition. We achieve this by applying advanced anti-reflective technologies and by individually calibrating each display to ensure optimal picture quality. Our displays have been certified by TÜV SÜD for their flicker-free, low blue light and high-quality performance, demonstrating our adherence to rigorous industry standards.
With our displays, you can focus on what matters most, without being distracted or fatigued by your screen. For more information, head to the links below:
Make sure to subscribe to the Surface IT Pro Blog and come back to discover more about our innovative designs that boost productivity and elevate user experience.
References
1. Testing and certification has been performed by TÜV SÜD and only applies to Surface Pro 10 for Business and Surface Laptop 6 for Business.
by Contributed | Oct 3, 2024 | Technology
This article is contributed. See the original author and article here.
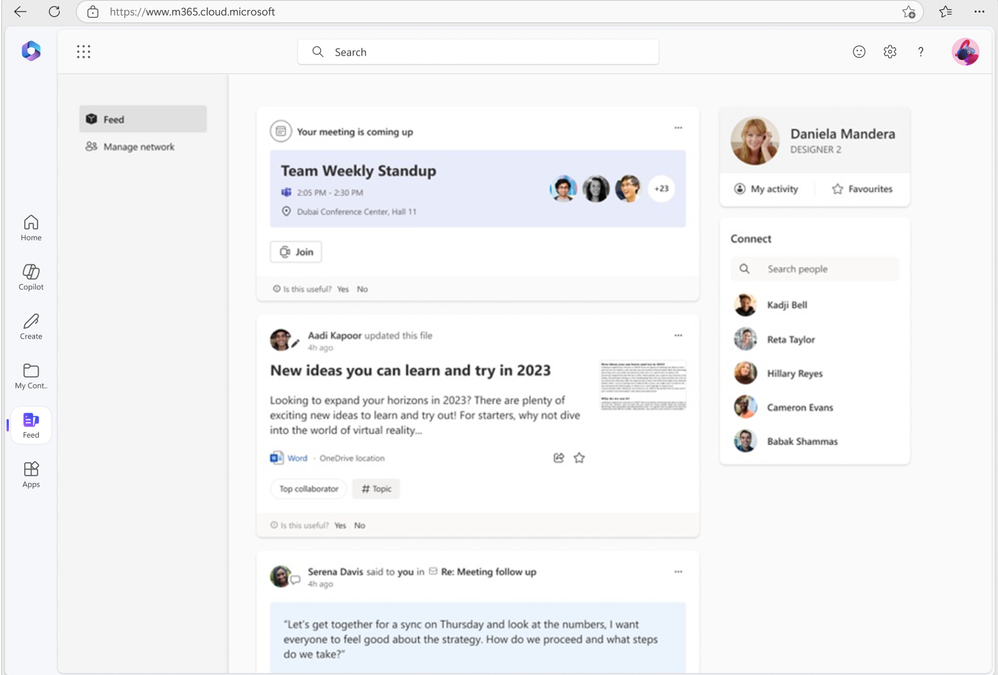
As part of our ongoing efforts to streamline and enhance user experiences, we will be retiring the Feed feature (shown in figure 1 below) on the Microsoft 365 app. This change will affect web endpoints (www.microsoft365.com, www.office.com) and the Windows app (“Microsoft 365 (Office)”).
We are committed to ensuring that your existing workflows remain unaffected. Launched in 2022, Feed was designed to help users explore the latest content and team activities. Over time, we have integrated all the essential features of Feed into a more accessible surface within the Microsoft 365 app: the “Recommended” files on the Home tab (shown in figure 2 below).
Deprecation timeline: Feed will no longer be accessible from the Microsoft 365 app starting November 1, 2024.
 Figure 1: Feed as seen on Microsoft 365
 Figure 2: Recommended files on Microsoft 365

by Contributed | Oct 3, 2024 | Business, Microsoft 365, Technology
This article is contributed. See the original author and article here.
The path to IT modernization involves the integration of technology to optimize processes and elevate experiences for customers and employees alike. Microsoft recognizes that customers have many tech and vendor choices on this journey to help solve their biggest workplace challenges.
The post Microsoft recognized as a Leader in the 2024 Gartner® Magic Quadrant™ for Desktop as a Service for the second year in a row appeared first on Microsoft 365 Blog.
Brought to you by Dr. Ware, Microsoft Office 365 Silver Partner, Charleston SC.
by Contributed | Oct 2, 2024 | Technology
This article is contributed. See the original author and article here.
Join us in Reston, VA, on October 15th, 16th, or 17th for our Microsoft 365 Copilot GCC Readiness Days!
This exclusive in-person event is your chance to learn how AI and Microsoft 365 Copilot GCC can address the unique challenges of public sector missions. Tailored for IT professionals, administrators, and decision-makers in government agencies, these readiness days offer practical, actionable insights to help you drive secure productivity, efficiency, and innovation in your organization.
Reserve Your Spot Today!
Spaces are limited for these in-person readiness days to ensure personalized, in-depth discussions. Register now to secure your spot and be among the first to explore how Microsoft 365 Copilot GCC can empower your teams to work more effectively.
Why You Should Attend
Microsoft 365 Copilot GCC is set to revolutionize government workspaces, bringing AI-powered productivity into secure, compliant environments. At this event, you will uncover how Copilot can automate routine tasks, enhance collaboration, and help your team focus on higher-priority activities—all while meeting the stringent regulations of government operations.
What You’ll Gain from the Event:
- In-Depth, Actionable Learning: Sessions will provide detailed, step-by-step guides on how to implement Copilot GCC within your agency’s existing workflows.
- Transparency and Trust: Gain insights from candid discussions about the strengths and limitations of AI in government settings, addressing your concerns around compliance, security, and data privacy.
- Real-World Solutions: Learn directly from AI thought leaders and engineers on how to navigate integration challenges and leverage responsible AI practices.
What to Expect:
- Prepare to Become an AI-Powered Public Sector Organization: Learn how to ready your workforce for a seamless transition to Microsoft 365 Copilot GCC, with practical tips tailored to government environments.
- Responsible AI: Discover how Microsoft partners with government agencies to implement AI responsibly, ensuring compliance, security, and ethical considerations.
- Gov AI Integration Challenges and Opportunities: Engage in transparent discussions with product experts and engineers to explore best practices for deploying Copilot GCC in your agency’s environment.
Event Agenda:
- 09:00 AM – 09:15 AM: Keynote
- 09:15 AM – 10:00 AM: Roadmap
- 10:00 AM – 10:50 AM: How Copilot Works
- 11:00 AM – 11:50 AM: How to Get Ready: Technology
- 12:00 PM – 01:00 PM: Lunch
- 01:00 PM – 01:50 PM: Microsoft 365 Business Chat Conversation
- 02:00 PM – 02:50 PM: How to Get Ready: People
- 03:00 PM – 03:50 PM: Art of the Possible Demos
Note: The agenda is identical for each day, so select the date that best fits your schedule.
Is Lunch Provided?
Yes! Lunch is provided each day, thanks to our spectacular sponsoring partners:
Be sure to learn more about our sponsoring partners’ Copilot offerings during the Partner Lunch & Learn session!
Venue Details:
- Where: The Microsoft Garage, Reston – DC, 11955 Freedom Drive, Reston, VA 20190
Engage and Share!
Have questions or want to share your thoughts on Microsoft 365 Copilot in GCC? Join the conversation in the comments below and connect with your peers!

Recent Comments