by Contributed | Oct 25, 2024 | Technology
This article is contributed. See the original author and article here.
SharePoint Online
Teams
Microsoft 365
The Cloud Policy service allows Microsoft 365 administrators to configure policies for Microsoft 365 Apps for enterprise and assign these policies using Microsoft 365 groups or Entra ID groups. Once configured, these policies are automatically enforced as users sign in and use Microsoft 365 apps.
This article is the second of a series in the Microsoft Tech Community Public Sector Blog and touches on several key principles for compliance, including data residency versus data sovereignty.
If you work in smartcard federated authentication environments, here’s a much-anticipated security feature for you. Starting with the September 10, 2024 Windows security update, you can use strong name-based mapping on Windows Server 2019 and newer. This feature helps you with the hardening changes for certificate-based authentication on Windows domain controllers.
Azure OpenAI Service is FedRAMP High and Microsoft Copilot for Microsoft 365 GCC High and DOD targeting Summer 2025.
We’re thrilled to announce the upcoming Oct 2024 anticipated General Availability of Microsoft Copilot for Microsoft 365 GCC subject to US Government authorization. This powerful tool combines large language models (LLMs) with your organization’s data to enhance productivity and innovation in the public sector.
Customers in our Office 365 government clouds, GCC, GCCH, and DoD, are continuing to evolve how they do business in the hybrid workplace. As Microsoft Teams is the primary tool for communication and collaboration, customers are looking to improve productivity by integrating their business processes directly into Microsoft Teams via third-party party (3P) applications or line-of-business (LOB)/homegrown application integrations.
Watch past episodes of Jay Leask and other members of the Government Community on LinkedIn!
Empowering US public sector organizations to transition to Microsoft 365
References and Information Resources
|
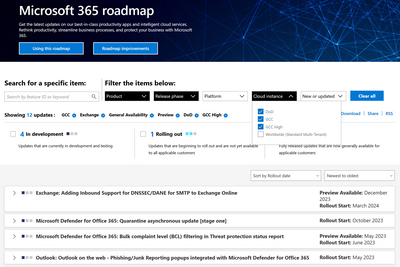
Microsoft 365 Public Roadmap
This link is filtered to show GCC, GCC High and DOD specific items. For more general information uncheck these boxes under “Cloud Instance”.
Stay on top of Microsoft 365 changes
Here are a few ways that you can stay on top of the Office 365 updates in your organization.
Microsoft Tech Community for Public Sector
Your community for discussion surrounding the public sector, local and state governments.
Microsoft 365 for US Government Service Descriptions
· Office 365 Platform (GCC, GCCH, DoD)
· Office 365 U.S. Government GCC High endpoints
· Office 365 U.S. Government DoD endpoints
· Microsoft Purview (GCC, GCCH, DoD)
· Enterprise Mobility & Security (GCC, GCCH, DoD)
· Microsoft Defender for Endpoint (GCC, GCCH, DoD)
· Microsoft Defender for Cloud Apps Security (GCC, GCCH, DoD)
· Microsoft Defender for Identity Security (GCC, GCCH, DoD)
· Azure Information Protection Premium
· Exchange Online (GCC, GCCH, DoD)
· SharePoint (GCC, GCCH, DoD)
· OneDrive (GCC, GCCH, DoD)
· Teams (GCC, GCCH, DoD)
· Office 365 Government (GCC, GCCH, DoD)
· Power Apps (GCC, GCCH, DoD)
· Power Automate US Government (GCC, GCCH, DoD)
· Power BI (GCC, GCCH, DoD)
· Planner (GCC, GCCH, DoD)
· Outlook Mobile (GCC, GCCH, DoD)
· Viva Insights (GCC)
· Dynamics 365 US Government

Public Sector Center of Expertise
We bring together thought leadership and research relating to digital transformation and innovation in the public sector. We highlight the stories of public servants around the globe, while fostering a community of decision makers. Join us as we discover and share the learnings and achievements of public sector communities.
|

|
Microsoft Teams for US Government Adoption Guide
|

|
 |
Message Center Highlights
|
Please note: This section is for informational purposes only. It is presented as is and as available with no warranty and no supportability given expressly or implied. Questions, comments, concerns and all other feedback must be presented in the comment section below the post, thank you!
SharePoint Online
MC898388 — Specifying client ID and secret when creating an Azure ACS principal via AppRegNew.aspx will be removed
When using the AppRegNew.aspx page to create Azure ACS (Access Control Service) principals today, you can generate a new client ID (default flow) and secret, but you can also specify the client ID or secret yourselves. Going forward, the option to specify the client ID and secret yourself will be removed. Each created Azure ACS principal will have a unique client ID (a GUID) and a system-generated secret. After the creation of the Azure ACS principal, you’ll be redirected to a page showing the created client ID and secret.
How this will affect your organization:
If you used to specify a specific client ID as a way to renew the associated service principal secret then please switch the recommended model for renewing secrets for Azure ACS service principals.
We will gradually roll out this change in early October 2024, and we expect to complete by early November 2024.
Reminder: Azure ACS in Microsoft 365 is being retired with a final end date of April 2, 2026. You can learn more via the retirement announcement or via MC693863.
What you need to do to prepare:
This change will happen automatically by the specified date. No admin action is required.
MC891238 — (Updated) Microsoft SharePoint and Microsoft Teams: Update on new Microsoft Lists rollout
Updated September 26, 2024: We have updated the content. Thank you for your patience.
Coming soon to Microsoft SharePoint and Lists in Microsoft Teams: An updated Microsoft Lists. This rollout introduces new features to users, including the ability to add ratings to any list, drag and/or paste images directly into a list, see who is collaborating with you in real time, switch views by clicking tabs, and more.
This is an update to MC600726: (Updated) Microsoft Lists User Experience Update (updated October 2023) and MC709979 (Updated) Microsoft SharePoint: Updated Lists in Team Sites, Lists progressive web app (PWA), and Teams (January 2024).
When this will happen:
General Availability (Worldwide, GCC, GCC High, DoD): We will begin rolling out late September 2024 and expect to complete by late October 2024.
How this will affect your organization:
Before this rollout, Lists do not have features like visible real time collaborators, easy access to views via tabs, and applied filters at the top of a list. Note: Some features described in the May 2023 blog Microsoft Lists: Easier, Better, Faster, Stronger – Microsoft Community Hub, such as new forms to collect information easily, have started to roll out or have fully rolled out.
After this rollout, users in active tenants will see the remaining Lists feature updates described in the May 2023 blog when browsing lists on SharePoint sites, the Lists progressive web app (PWA), the Lists app on the web, and the Lists app in Teams. All Lists in SharePoint sites will retain the SharePoint site’s theme and navigation.
Existing lists configured with these features will be updated after this rollout:
- SharePoint Framework (SPFx) command extensions
- Power Apps forms
- Approvals
Note: Extensions that depend directly on DOM (Document Object Model) structure or CSS (cascading style sheets) are not supported and may break. We recommend using Microsoft SharePoint Framework, which provides a rich API to customize the SharePoint experience.
These Lists components are not included in the new rollout:
- SharePoint Framework (SPFx) field customizers
- The Playlist template integrated with Microsoft Stream
All new and updated List features are on by default.
What you need to do to prepare:
No admin action is needed to prepare for this change. You may want to notify your users about this change and update any relevant documentation as appropriate.
Learn more
MC752513 — (Updated) SharePoint Online: New heading level options for web parts
Updated September 25, 2024: We have updated the rollout timeline below. Thank you for your patience.
Coming soon: When authoring pages in Microsoft SharePoint, authors will be able to choose the heading level for titles in web parts to help define the hierarchy of information on a page. As we’re introducing this new capability, we’re also using it as an opportunity to align to the default heading font size in the Text web part. This means that all headings for both Text web part and titles in web parts will be as follow. Note: with this change we’re not changing the default headings sizes for the Text web part:
- Heading 2 will be 28
- Heading 3 will be 24
- Heading 4 will be 20
MC670896 Accessibility Improvements to Page Authoring (August 2023) and with Roadmap ID 387500
When this will happen:
Targeted Release: We will begin rolling out early April 2024 and expect to complete by mid-August 2024.
General Availability (Worldwide, GCC, GCC High, DoD): We will begin rolling out mid-August 2024 and expect to complete by late October 2024 (previously early September).
How this will affect your organization:
Authors will now have the ability to set their own heading level. If not set, the default will continue to be Heading 2. New and existing pages and news posts will see the new default heading font sizes.
What you need to do to prepare:
This rollout will happen automatically by the specified date with no admin action required. You may want to notify your SharePoint authors about this change and update any relevant documentation as appropriate.
OneDrive for Business
MC888872 — Microsoft OneDrive: New prompt to confirm deletion of shared items and updated prompt for local mass item deletions
Microsoft 365 Roadmap ID 415705
Coming soon for Microsoft OneDrive Sync: When users are about to delete shared items, a new prompt will ask users to confirm the deletion. When users are about to mass delete local items, an updated prompt will ask users to confirm the deletion. This message applies to OneDrive on Windows desktop.
When this will happen:
General Availability (Worldwide, GCC, GCC High, DoD): We will begin rolling out mid-September 2024 and expect to complete by early October 2024.
How this will affect your organization:
Before this rollout, users are able to delete shared items in File Explorer without being asked to confirm the deletion. Users are prompted to confirm deletion before they mass delete local items, which might have included shared items.
After this rollout, when users are running OneDrive and OneDrive is not paused, and users are about to delete shared items or mass delete local items (more than 200 items by default) in File Explorer, users will be asked to confirm the deletion of shared items in a new prompt or the deletion of mass items in an updated prompt in File Explorer:

Prompt to confirm the mass deletion of local items:

In the Microsoft admin center, admins can set a value for the Group policies (SharedContentDeleteConfirmation and LocalMassDeleteFileDeleteThreshold) to prevent users from opting out of seeing the confirmation prompts. Admins can also set the threshold for mass delete (the default is 200 items). If admins do not set a value for the Group policies, users will be able to opt out of the confirmation messages.
This feature is on by default.
What you need to do to prepare:
This rollout will be applicable in builds later than One Drive 24.091.0505.0001. No admin action required before the rollout. You may want to notify your users about this change and update any relevant documentation.
Admins who set a value for the Group policies should be aware of these features in case internal support is needed for users who are not able to opt out of the confirmation dialogs.
MC806523 — (Updated) Microsoft OneDrive: Change to shared folder experience
Microsoft 365 Roadmap ID 395378
Updated September 17, 2024: We have updated the images below. Thank you for your patience.
We’re making a change to the shared folder experience in Microsoft OneDrive. Currently, when a user opens a shared folder in OneDrive, they are taken to a view of that folder within the sharer’s OneDrive. In the new experience, opening a shared folder will take the user to the shared folder within the People view of their own OneDrive. This view, organized by people, shows and allows access to all the files and folders that have been shared with the user.
When this will happen:
General Availability (Worldwide, GCC): We will begin rolling out late July 2024 and expect to complete by mid-September 2024 (previously late August).
How this will affect your organization:
With this feature update, opening a shared folder will take the user to the shared folder within the People view of their own OneDrive, as follows.


What you need to do to prepare:
This rollout will happen automatically with no admin action required. You may want to notify your users about this change and update any relevant documentation as appropriate.
Microsoft Viva
MC894580 — (Updated) Microsoft Viva Engage: Subscribe to notifications for followed topics (GCC)
Microsoft 365 Roadmap ID 395940
Updated September 26, 2024: After further review we have decided not to proceed with this change at this time. We apologize for any inconvenience.
Coming soon to Microsoft Viva Engage: This feature will allow users to subscribe to receive notifications after following Viva Engage topics. Users will receive an Engage notification on the bell icon on the left side of Viva Engage when a new post is tagged with a topic they are subscribed to, or the topic is added to an existing post.
When this will happen:
General Availability (GCC): We will begin rolling out mid-September 2024 and expect to complete by late September 2024. – We will not be proceeding with this change at this time.
How this will affect your organization:
Before this rollout, users are not able to subscribe to a topic after following a topic in Engage. Instead, they can only follow a topic.
After this rollout, users will be able to subscribe to a topic after following the topic on the Viva Engage topic page. After users subscribe, they will receive notifications for those topics they are subscribed to.
This feature will be on by default.
User adds tags to a post and Viva prompts the user to subscribe to the topics:

Viva confirms that notifications are enabled:

The bell icon on the left side of the screen with an active notification:

What you need to do to prepare:
This rollout will happen automatically by the specified date with no admin action required before the rollout. You may want to notify your users about this change and update any relevant documentation.
Learn more: Follow or subscribe to topics – Microsoft Support (will be updated before rollout begins).
MC867656 — (Updated) Microsoft Viva Connections news notifications in GCC, GCC High, and DoD
Microsoft 365 Roadmap ID 410198
Updated September 13, 2024: We have updated the rollout timeline below. Thank you for your patience.
With this feature update, existing news notifications in Microsoft Viva Connections will now be available in GCC, GCC High, and DoD.
When this will happen:
General Availability (GCC): We will begin rolling out late September 2024 (late August) and expect to complete by early October 2024 (early September).
General Availability (GCC High, DoD): We will begin rolling out early October 2024 (early September) and expect to complete by mid-October 2024 (mid-September).
How this will affect your organization:
News notifications are delivered via Microsoft Teams in the desktop, mobile, and web environments in the following scenarios:
- News is published to a SharePoint team or communication site that a user follows or by someone that a user works closely with.
- News is boosted.
- Someone comments on a new News post.
- Someone “Likes” a News post.
- Someone is @mentioned in a comment on a news post.
End users can control which notifications they want to see in the following ways:
- On Teams desktop and web, specific notification types can be selectively enabled or disabled under Settings > Notifications and activity > Viva Connections. These settings are respected on Teams mobile as well.
- On Teams mobile, notifications can’t be selectively enabled or disabled, but users can toggle all push notifications (including Viva Connections) in the Teams mobile app under Settings > Notifications > General Activity > Apps on Teams. Notifications will still be visible under the Microsoft Teams activity feed.
- There is no tenant level setting to turn off Viva Connections News notifications.
For more information, see Viva Connections News notifications.
What you need to do to prepare:
This rollout will happen automatically with no admin action required. You may want to notify your users about this change and update any relevant documentation as appropriate.
Microsoft Teams
MC899937 — Microsoft Teams in VDI: Rollout schedule of “New Teams only” policy (GCCH, DOD)
As we approach October 1, 2024, when support ends for classic Teams in VDI (Virtualized Desktop Infrastructure), we are finalizing the rollout schedule of new Teams as previously communicated in MC804769 Microsoft Virtual Desktop Infrastructure: Classic Microsoft Teams retirement schedules (GCCH, DoD) (June 2024) and End of availability for classic Teams client – Microsoft Teams | Microsoft Learn:

When this will happen:
General Availability (GCCH, DoD): We will begin rolling out the new policy value early October 2024 and expect to complete by mid-October 2024.
How this will affect your organization:
After this rollout, the Teams admin center policy UseNewTeamsClient under TeamsUpdateManagement will be overwritten to New Teams only on the schedule in this message. This means that a new Teams client will be installed automatically (if not present already) and will become the default client. The toggle to return to classic Teams will not be available.
This policy value override will only apply to persistent VDI environments where classic Teams is version 1.7.00.7956 or newer.
For non-persistent environments, admins will continue to control the rollout of the new Teams client with golden/master image updates, and the value of the existing policy in the Teams admin center will be honored for users in non-persistent VDI environments.
Classic Teams installation details and definitions
- Persistent environments: Classic Teams was installed with the .exe installer (user installation in Appdata/local).
- Non-persistent environments: Classic Teams was installed with the .msi installer (machine-wide installation in C:Program Files (x86)).
In persistent environments only, Microsoft will attempt to uninstall Classic Teams between 1-2 weeks after new Teams is installed.
What you need to do to prepare:
Review the main VDI article and your current configuration to determine the impact for your organization. Please notify your users about this change and update relevant documentation as appropriate.
MC899179 — Microsoft Teams: Menu bar icon for Mac devices (GCC, GCCH, DoD)
Microsoft 365 Roadmap ID 416069
Coming soon: Microsoft Teams for Mac devices is adding an extension to the macOS Menu Bar, where users will find a Teams icon with a persistent indicator of their presence status. Users can change their presence status with the Menu Bar extension, which also contains additional actions for streamlining Teams workflows.
When this will happen:
Targeted Release: We will begin rolling out mid-October 2024 and expect to complete by late October 2024.
General Availability (GCC, GCC High, DoD): We will begin rolling out mid-November 2024 and expect to complete by mid-December 2024.
How this will affect your organization:
Before this rollout, Teams users on Mac devices do not have a persistent indicator of their Teams presence status.
After this rollout, Teams users on Mac devices will have the Menu Bar extension by default. If a user prefers not to have the icon present in the macOS Menu Bar, it can be disabled from the Teams Settings. More details on how to use or disable Teams Menu Bar extension will be available in the documentation. We will update this post with the documentation link before rollout begins.
The feature will be available for users after an update to the latest version of Teams. We will update this communication soon with the specific version number.

What you need to do to prepare:
The feature will be enabled automatically for users after Teams updates to the build containing this functionality. No admin action is required. You may want to notify your users about this change and update any relevant documentation.
MC898394 — Stay current with your OS to keep your Microsoft Teams desktop client supported
Microsoft Teams is governed by the Modern Lifecycle Policy, the Teams desktop client needs to be under a supported OS version. This is to ensure that users have the latest updates, capabilities, performance enhancements, security features, and service compatibility.
On new Teams, users on OS versions that are not supported will receive in-app notifications to encourage them to update their device to a supported OS version. A version that is too far out of date will become incompatible with the service and the Desktop client will be blocked until the OS is updated.
Windows OSes support dates and lifecycle policy are documented in Product and Service lifecycle page. For example, OSes such as Windows LTSC and OSes under Long Term Serving Channel (LTSC), are not supported as they follow the Fixed lifecycle policy.
MacOS typically receives support for three years following its release, with the end of support coinciding with the launch of the third subsequent major macOS version. For example, once macOS 15 is released, macOS 12 will no longer be supported.
When this will happen:
This will be shown on the new Teams client starting on October 15th, 2024. Note, users on Virtual Desktop Infrastructure (VDI) deployments are currently excluded.
How this will affect your organization:
New Teams- Windows 10 OS Versions less than 19041
- Beginning October 15th, 2024, the Teams desktop client may present a banner notifying users that they are on an unsupported OS version with a link to this page.
- Beginning January 15th, 2025. The desktop client may present a blocking page for users and require an update to a supported OS version to continue using the Desktop Client with a link to this page.
New Teams- Windows 10 or Windows 11 OS on LTSC update servicing (not on Modern Lifecycle)
- Beginning October 15th, 2024, the Teams desktop client may present a banner notifying users that they are on an unsupported OS version with a link to this page.
- Beginning August 15th, 2025. The desktop client may present a blocking page for users and require an update to a supported OS version to continue using the Desktop Client with a link to this page.
New Teams – macOS versions 11 (Big Sur) and older
- Beginning October 15th, 2024, the Teams desktop client may present a banner notifying users that they are on an unsupported OS version with a link to this page.
- Beginning November 15th, 2024, the Teams desktop client may present a blocking page for users and require an update to a supported OS version to continue using the Desktop Client with a link to this page.
New Teams – macOS 12 (Monterey)
- Beginning November 15th, 2024, the Teams desktop client may present a banner notifying users that they are on an unsupported OS version with a link to this page.
- Beginning March 15th, 2025, the Teams desktop client may present a blocking page for users and require an update to a supported OS version to continue using the Desktop Client with a link to this page.
Note: For the classic Teams client see End of availability for classic Teams client for classic Teams Timelines regarding end of support and end of availability.
What you can do to prepare:
To avoid disruption to end-users, admins should plan for a regular OS update cadence to remain on a supported OS version.
MC898391 — Microsoft Teams: Performance improvements for meetings in Edge web browser for guests
Microsoft 365 Roadmap ID 401117
Anonymous users (guests) who join Microsoft Teams meetings in the Microsoft Edge for Business web browser will soon experience performance improvements. They will be able to join meetings faster.
When this will happen:
Targeted Release: We will begin rolling out early November 2024 and expect to complete by mid-November 2024.
General Availability (Worldwide): We will begin rolling out mid-November 2024 and expect to complete by late-November 2024.
General Availability (GCC, GCC High, and DoD): We will begin rolling out early January 2025 and expect to complete by late January 2025.
How this will affect your organization:
Before this rollout, anonymous users (guests) may experience longer wait times when attempting to join a Teams meeting.
After this rollout, anonymous users (guests) will be able to join meetings faster, even on low-end devices.
What you need to do to prepare:
This rollout will happen automatically with no admin action required.
MC894581 — Microsoft Teams: Performance improvements for meetings in Chrome web browser for guests
Microsoft 365 Roadmap ID 401116
Anonymous users (guests) who join Microsoft Teams meetings in the Chrome web browser will soon experience performance improvements.
When this will happen:
Targeted Release: We will begin rolling out early November and expect to complete by mid-November 2024.
General Availability (Worldwide): We will begin rolling out mid-November 2024 and expect to complete by late-November 2024.
General Availability (GCC, GCC High and DoD): We will begin rolling out early January 2025 and expect to complete by late January 2025.
How this will affect your organization:
Before this rollout, anonymous users (guests) may experience longer wait times when attempting to join a Teams meeting.
After this rollout, anonymous users (guests) will be able to join meetings faster, even on low-end devices.
What you need to do to prepare:
You may want to update your internal documentation to inform your users about this improvement. However, because the improvement is for external users and does not change the look of Teams, you can skip this step./p>
MC893623 — Microsoft Teams Rooms on Windows: New Cloud IntelliFrame preview
Coming soon to Microsoft Teams Rooms for Windows: When Cloud IntelliFrame is activated for a room, the in-room preview video on the display will be the same view that online attendees see. Previously, the in-room preview video did not show IntelliFrame while online participants could see IntelliFrame, which resulted in a lot of confusion. This update now ensures everyone sees the same experience. Available for tenants with Teams Rooms Pro licenses.
When this will happen:
Targeted Release: We will begin rolling out mid-September 2024 and expect to complete by late September 2024.
General Availability (Worldwide): We will begin rolling out late September 2024 and expect to complete by early October 2024.
How this will affect your organization:
Before this rollout, participants in Teams Rooms on Windows using Cloud IntelliFrame would see themselves without IntelliFrame in the in-room preview video, while the online audience sees IntelliFrame. In-room participants do not know how they appear to the online audience.
After this rollout, participants in Teams Rooms on Windows using Cloud IntelliFrame will see how they appear to the audience with the in-room preview:

What you need to do to prepare:
All Rooms using Cloud IntelliFrame will receive this feature update automatically and it will be on by default. No admin action required before rollout.
You may want to notify your users about this change and update any relevant documentation.
Learn more: Cloud IntelliFrame – Microsoft Teams | Microsoft Learn (will be updated before rollout)
MC893620 — Microsoft Teams: Enhanced admin controls for Cloud IntelliFrame in Teams Rooms on Windows
Coming soon for Microsoft Teams Rooms for Windows: Admins will be able to override the default settings of Cloud IntelliFrame and use cameras even if not on the supported camera list. This feature is available for customers a Pro license for Teams Rooms for Windows
When this will happen:
Targeted Release: We will begin rolling out late September 2024 and expect to complete by mid-October 2024.
General Availability (Worldwide): We will begin rolling out early October 2024 and expect to complete by late October 2024.
How this will affect your organization:
Before this rollout: Cloud IntelliFrame is available for customers with a Pro license for Teams Rooms for Windows with supported cameras only. Admins can enable/disable Cloud IntelliFrame for these eligible rooms.
After this rollout: All customers a Pro license for Teams Rooms for Windows are eligible to use Cloud IntelliFrame. Rooms with supported cameras get Cloud IntelliFrame by default. Rooms with non-supported cameras can be configured by admins to use Cloud IntelliFrame. We recommend you disable all AI features using OEM firmware on unsupported cameras before enabling Cloud IntelliFrame.
Default settings for a supported camera:

Default settings for an unsupported camera:

Settings required to use Cloud IntelliFrame on an unsupported camera:

This feature is on by default.
What you need to do to prepare:
This rollout will happen automatically by the specified date with no admin action required before the rollout. You may want to notify your admins about this change and update any relevant documentation.
Learn more: Cloud IntelliFrame – Microsoft Teams | Microsoft Learn (will be updated before rollout)
MC892646 — (Updated) Microsoft Teams: New policy for voice and face enrollment defaulting to ‘On’
Microsoft 365 Roadmap ID 413708
Updated September 20, 2024: We have updated the content below for clarity. Thank you for your feedback.
We’re introducing a new policy that gives IT admins enhanced flexibility with distinct settings for voice and face enrollment. This adjustment provides greater control over managing these features, allowing organizations to tailor to their needs. Voice and face biometric enrollment will be enabled by default, enabling voice isolation and speaker recognition in meeting rooms and enhancing intelligent meeting recaps and Microsoft Copilot for meetings.
When this will happen:
General Availability (Worldwide, GCC):
- We will begin rolling out the new policy in early October 2024 and expect complete by mid-October 2024.
- The policy will be enabled beginning in early January 2025 and expect to be complete by mid-January 2025.
How this will affect your organization:
These changes will provide your organization with increased flexibility in managing voice and face enrollments. By using separate settings, you can customize for your organization’s specific needs. The enrollment policy will be enabled by default. Once enabled, these enrollments will activate features like Voice Isolation and enhanced speaker recognition, leading to more efficient and productive meetings.
What you need to do to prepare:
To ensure you have enough time to prepare for this change, you have until mid-January 2025 to configure everything to best suit your needs. If your organization requires keeping face and voice enrollments off, be sure to review the new policy and adjust the settings during this time. This period provides an opportunity to optimize how you manage voice and face data, enhancing your team’s control over the process.
The new csTeamsAIPolicy will replace the current csTeamsMeetingPolicy, introducing two separate settings for face and voice enrollment: EnrollFace and EnrollVoice. Each can be set to Enabled or Disabled.
To help you get ready, review:
For more information about voice and face enrollment, visit Overview of voice and face enrollment – Microsoft Teams | Microsoft Learn
MC892055 — Microsoft Teams: Participant roster grouping in Teams BYOD meeting rooms
Microsoft 365 Roadmap ID 413711
Coming soon for Microsoft Teams: When users join a Teams meeting with their laptop in bring your own device (BYOD) meeting rooms, they will appear in the In-room participant section of the roster, which enables individual identification and meeting intelligence capabilities. As communicated in MC814577 (Updated) Microsoft Teams: Roster grouping for in-room participants through Proximity Join for Teams Rooms on Windows (July 2024), we will launch this same experience in September 2024 for joining a nearby meeting with a Microsoft Teams Room and a companion device.
Unique to BYOD meeting rooms, the roster group will be displayed as Meeting space if the connected device is NOT identified in the Teams Pro Management Portal (PMP). If the device is identified in the PMP, the roster group will display the configured meeting room name.
This message applies to Teams for Windows and Mac desktops.
When this will happen:
Targeted Release: We will begin rolling out early October 2024 and expect to complete by mid-October 2024.
General Availability (Worldwide): We will begin rolling out mid-October 2024 and expect to complete by late October 2024.
General Availability (GCC, GCCH, DoD): We will begin rolling out mid-October 2024 and expect to complete by late November 2024.
How this will affect your organization:
Before this rollout: Users joining a Teams meeting from a BYOD meeting room will be displayed as an individual participant in the Participants roster. Room node treatments will only be applicable to users joining from a Microsoft Teams Room.
After this rollout, this update will be available by default for all users joining a Teams meeting from a BYOD meeting room. After joining, in-room participants will automatically be grouped under the room node on the Participant roster. The two scenarios in which in-room participants can be ungrouped from the room node are:
- Raised hand: We will continue to follow the sequential order of raised hands on the roster. In-room participants who use their companion device to raise their hand will appear on the roster in the order in which they raised their hand.
- Role assignment: For changes in roles (presenters and attendees), in-room participants can be broken up and placed in the appropriate category on the roster. (This is an existing feature before this rollout.)
In both scenarios, room information will be listed below participant name.

What you need to do to prepare:
This rollout will happen automatically by the specified date with no admin action required before the rollout. You may want to notify your users about this change and update any relevant documentation.
Before rollout, we will update this post with revised documentation.
MC892049 — (Updated) Microsoft Teams: Users will exclusively control their voice and face data exports
Microsoft 365 Roadmap ID 413709
Updated September 27, 2024: We have updated the rollout timeline below. Thank you for your patience.
We are excited to announce an important update designed to enhance the privacy and security of your organization. Before this rollout, admins had the capability to download voice and face data for their users who have opted in to enroll their voice and/or face on the Recognition tab in Microsoft Teams. With this rollout, to better protect user data, we are shifting this capability to users. This change will ensure that users have more control over their own voice and face data, aligning with our commitment to privacy and security. This change reduces the risk of unauthorized access or sharing, as users will handle their own data export requests and admins will not have access to this data. This message applies to Teams for Windows desktop and Teams for Mac desktop.
When this will happen:
Targeted Release: We will begin rolling out mid-November 2024 and expect to complete by late November 2024.
General Availability (Worldwide, GCC): We will begin rolling out early December 2024 (previously mid-October) and expect to complete by mid-December 2024 (previously late October).
How this will affect your organization:
With this rollout, we will remove the download button from the Teams admin center (TAC) > User > Manage user > select any user > Account:

Users can go to Teams > Settings > Recognition and select the Export button to access their data and download it to their Download folder:

The new Export feature is on by default.
What you need to do to prepare:
This rollout will happen automatically by the specified date with no admin action required before the rollout. You may want to notify your admins and users about this change and update any relevant documentation.
Learn more: Overview of voice and face enrollment – Microsoft Teams | Microsoft Learn (will be updated before rollout)
MC891240 — Microsoft Teams: Voice isolation will be available for macOS desktops
Microsoft 365 Roadmap ID 412359
With voice isolation in Microsoft Teams, you can enjoy clear and uninterrupted calls or meetings, no matter where you are. Voice isolation is an AI-based advanced noise suppression feature that eliminates unwanted background noise, including other human voices. The technology recognizes your voice profile and ensures only your voice is transmitted. Voice isolation can be enabled for calls and meetings. With this rollout, voice isolation will be available on Teams for macOS desktops.
When this will happen:
Targeted Release: We will begin rolling out early October 2024 and expect to complete by mid-October 2024.
General Availability (Worldwide, GCC): We will begin rolling out mid-October 2024 and expect to complete by late October 2024.
How this will affect your organization:
Before this rollout, Teams users on macOS desktops are not able to access the Teams voice isolation feature.
After this rollout, to use this feature, admins must enable the enrollUserOverride policy and the Voice isolation feature policy in the Teams admin center. Users will need to enroll their voice profile in Teams Settings on the Recognition tab to enable the voice isolation feature to have better audio input quality.
To disable this feature for your organization, use Microsoft PowerShell: Set-CsTeamsMeetingPolicy
This feature is on by default and available for admins to enable it.
What you need to do to prepare:
Make sure to enable the enrollUserOverride policy for Voice and Face profile enrollment. Users can begin enrolling their Recognition profile now so they can use the voice isolation on macOS as soon as it is rolled out to your tenant.
These support articles and resources will help address any questions you or your users may have about the rollout:
This rollout will happen automatically by the specified date with no admin action required before the rollout. You may want to notify your users about this change and update training and documentation as appropriate.
MC889534 — (Updated) Microsoft Teams: Embed support for Teams town hall
Microsoft 365 Roadmap ID 401120
Updated September 26, 2024: We have updated the rollout timeline below. Thank you for your patience.
As a part of Team’s ongoing effort to enable our customers to create, manage, and run large scale events, end users can now embed Teams town hall in sites they manage. This capability allows town hall attendees to watch the event instance within a particular website.
Embed for town hall introduces embeddable support for town hall engagement features on release. Attendees will have the same engagement feature access within the embed player as they do in client such as Q&A, Captions, Reactions and more.
To implement embed for town hall, organizers can access their town hall events unique embed code from the town hall scheduling template upon publish. Organizers can then take that code and inject it to their SharePoint or Microsoft 365 site as desired. On event start, attendees will be able to view and engage with the embed stream on the published site.
When this will happen:
Targeted Release: We will begin rolling out early November 2024 (previously early October) and expect to complete by mid-November 2024 (previously mid-October).
General Availability (Worldwide, GCC): We will begin rolling out early December 2024 (previously late October) and expect to complete by mid-December 2024 (previously late November).
How this will affect your organization:
Users will be able to copy embed code directly from town hall scheduling form on event publish. After the embeddable code is placed in the website, the town hall player will be accessible to attendees who have access to the URL.
Note: Attendee access to the embedded video player is driven by the town hall event access.
What you need to do to prepare:
Organizers with SharePoint or Microsoft 365 site who want to utilize embed support for town hall can begin implementing the embeddable code upon release.
MC889529 — (Updated) Microsoft Teams: Volume ratio setting for meeting participants using language interpretation
Microsoft 365 Roadmap ID 411569
Updated September 19, 2024: We have updated the rollout timeline below. Thank you for your patience.
In Microsoft Teams, meeting participants who use language interpretation will be able to control the volume ratio between the original meeting audio and the interpretation audio after they select the language to listen to in the meeting. This message applies to Teams on Windows desktop and Teams on Mac desktop. NOTE: Meeting organizers must enable language interpretation when setting up the meeting.
When this will happen:
Targeted Release: We will begin rolling out early November 2024 (previously early October) and expect to complete by mid-November 2024 (previously early October).
General Availability (Worldwide): We will begin rolling out mid-November 2024 (previously mid-October) and expect to complete by late November 2024 (previously late October).
General Availability (GCC): We will begin rolling out late November 2024 and expect to complete by early December 2024 (previously late November).
General Availability (GCC High): We will begin rolling out early December 2024 and expect to complete by mid-December 2024 (previously early December).
General Availability (DoD): We will begin rolling out late December 2024 (previously late December) and expect to complete by early January 2025 (previously late December).
How this will affect your organization:
Before this rollout: Meeting participants using language interpretation are not able to control the volume ratio of the original meeting audio and the interpretation audio.
After this rollout: If a meeting organizer has enabled language interpretation when setting up the meeting, participants will be asked which language they want to listen when they first join the meeting, or they can go to the More menu > Language and speech > Language interpretation to choose a language:

After choosing a language, participants will see the control for the volume ratio of the original meeting audio and the interpretation audio:

What you need to do to prepare:
This rollout will happen automatically by the specified date with no admin action required before the rollout. You may want to notify your users about this change and update any relevant documentation.
Learn more: Use language interpretation in Microsoft Teams meetings – Microsoft Support (will be updated before rollout)
MC889524 — Microsoft Teams Panels: Reminder to update to avoid disruption
As communicated in Message center post MC798318 about retirement of CNS Service API support for older Android clients, this change impacts Teams Devices including Teams panels. To avoid disruption, an update to Teams panels version 1449/1.0.97.2024071105 or greater is required for Teams panels devices.
Microsoft Teams devices are governed by the Modern Lifecycle Policy and require users to stay on the most up-to-date version of the Teams panels application. Automatic updates ensure that users have the latest capabilities, performance and security enhancements, and service reliability.
Learn more about the Modern Lifecycle Policy under the Servicing agreement for Microsoft Teams.
How this will affect your organization:
The retirement of the CNS service API impacts automatic check-in through Teams Rooms devices. Team panels application version 1449/1.0.97.2024071105 and later versions are not impacted as they use the new and improved notification service APIs.
When this will happen:
On September 30, 2024, Microsoft will stop supporting the legacy services infrastructure for chat messaging, which impacts Teams panels devices on earlier app versions than 1449/1.0.97.2024071105.
What you need to do to prepare:
Update your Teams panels device to latest Teams panels application version or app version greater than 1449/1.0.97.2024071105 as soon as possible.
Manual update process:
In Teams Admin Center, select the device category under Teams Devices group. Select all respective devices from the list and select Update.
Under Manual Updates, select Teams application and press Update button to update to the latest application. If all your devices are eligible to receive Automatic Updates, use that option to get to the latest Teams app version.
Automatic update process:
To help bring the devices to the latest versions, automatic updates will continue at an accelerated pace to ensure adherence to the retirement timeline. Updates can include both firmware and Teams app updates, as applicable to bring the device to the latest versions. These updates will be scheduled outside of normal business hours in the local time of the device, to help minimize any impact to your organization. Since it is important that the devices get updated as soon as possible, the configured maintenance window for the devices will not be adhered to.
For organizations with users around the globe, we recognize that “outside of normal business hours” might affect you differently. We apologize for the impact this may have on your users.
MC888871 — Reminder Teams Phones impacted by retirement of CNS Service API support: Software Application Update Required
As communicated previously about retirement of CNS Service API support for older Android clients, this change impacts Teams Devices including Teams Phone devices. To avoid disruption, an update to Teams phone application version 1449/1.0.94.2024011003 or greater is required for Teams Phone devices.
These updates must be completed before September 30, 2024, to avoid disruption.
Microsoft Teams devices are governed by the Modern Lifecycle Policy and require users to stay on the most up-to-date version of the Teams phone devices application. Automatic updates ensure that users have the latest capabilities, performance and security enhancements, and service reliability.
When will this happen:
By the end of September 2024, Microsoft will stop supporting the legacy services infrastructure for chat messaging thus impacting Teams Phone devices on earlier app version than 1449/1.0.94.2024011003.
How this will affect your organization:
The retirement of the CNS service API incoming calls, voicemail and missed call notifications scenarios on Teams Phone devices. Teams phone devices app versions 1449/1.0.94.2024011003 and later are not impacted.
Update Teams Phone devices to latest Teams Phone app or an app version greater than 1449/1.0.94.2024011003.
Manual update process:
- In Teams Admin Center, select the device category under Teams Devices group. Select all respective devices from the list and select Update.
- Under Manual Updates, select Teams application and press Update button to update to the latest application. If all your devices are eligible to receive Automatic Updates, use that option to get to the latest Teams app version.
Automatic update process:
- To help bring the devices to the latest versions, automatic updates will continue at an accelerated pace to ensure adherence to the retirement timeline. Updates can include both firmware and Teams app updates, as applicable to bring the device to the latest versions. These updates will be scheduled outside of normal business hours in the local time of the device, to help minimize any impact to your organization. Since it is important that the devices get updated as soon as possible, the configured maintenance window for the devices will not be adhered to.
For organizations with users around the globe, we recognize that “outside of normal business hours” might affect you differently. We apologize for the impact this may have on your users.
MC887377 — (Updated) Microsoft Teams: Refreshed view of all your teams and channels page
Microsoft 365 Roadmap ID 411779
Updated September 30, 2024: We have updated the last image below. Thank you for your patience.
Coming soon for Microsoft Teams:
- An updated view of all teams on one Your teams page.
- An updated Manage Team > Channels page, helping team owners and team members to filter, search and manage channels in the team from one page. Team members will be able to navigate to the list of channels from the Your teams page with a single click.
This message applies to Teams on Windows desktop, Mac desktop, and on the web.
When this will happen:
Targeted Release: We will begin rolling out early October 2024 and expect to complete by early October 2024.
General Availability (Worldwide): We will begin rolling out mid-October 2024 and expect to complete by late October 2024.
General Availability (GCC, GCCH, DoD): We will begin rolling out early December 2024 and expect to complete by early December 2024.
How this will affect your organization:
Before this rollout, Team owners and members can hover on the team name on the left side of Teams, select the three dots, and go to Manage team to individually manage the team and its channels. Team owners and members can see all the teams they belong to from the Your teams page. Selecting a team on the Manage teams page takes Team owners and members to the team’s General channel.
The Manage team page with the Channels tab open: Access this page from the three dots next to the team name in the left panel in Teams:

The Your teams page shows all teams you belong to. Access this page from the three dots in the upper right corner of the left panel in Teams:

After this rollout:
- Team owners and members will be able to view their teams from the Your teams page, and access channels in each team. To navigate to the Your teams page, select Your teams and channels from the three dots in the top right corner of the left panel:

- Team owners and members can select a team name to review the channels in the team and choose channels of interest to show in Teams:

- Team owners and members can search and sort on the Your Teams page or hide all channels. When all channels of a team are hidden, the team will not show in the Teams and channels list on the left side of Teams.
- Team owners and members can also view the channels in the team from the Manage Team > Channels page, and show channels of interest by filtering, sorting, and searching for channels in the team from one page.
These features will be on by default.
What you need to do to prepare:
This rollout will happen automatically by the specified date with no admin action required before the rollout. You may want to notify your Team owners and members about this change and update any relevant documentation.
MC886601 — Microsoft Teams displays impacted by retirement of CNS Service API support: Upgrade Required
In June 2024, we communicated in MC798318 Reminder | Microsoft Teams Mobile: Support is retiring for legacy services infrastructure for chat messaging that affected older Android clients. This retirement also affects Microsoft Teams devices, including Teams displays. To avoid disruption to your Teams displays, you will need to update to Teams displays version 1449/1.0.95.2024062804 before September 30, 2024.
Microsoft Teams devices are governed by the Microsoft Modern Lifecycle Policy and require users to stay on the most up-to-date version of the Teams displays application. Automatic updates ensure that users have the latest capabilities, performance and security enhancements, and service reliability. Learn more: Modern Lifecycle Policy – Microsoft Lifecycle | Microsoft Learn and Lifecycle FAQ – Modern Policy | Microsoft Learn
When this will happen:
Worldwide and GCC: On September 30, 2024, Microsoft will stop supporting the legacy services infrastructure for chat messaging, which affects Teams displays devices on earlier app versions than 1449/1.0.95.2024062804.
How this will affect your organization:
The retirement of the legacy services infrastructure for chat messaging affects notifications (chats, missed calls, incoming calls, and voicemails may not work). Team displays application version 1449/1.0.95.2024062804 and later versions are not affected because they use the new and improved notification service APIs.
What you need to do to prepare:
Update your Teams displays to 1449/1.0.95.2024062804 as soon as possible.
Manual update process
- In the Teams admin center > Teams devices, select the device category. Select all devices that need to be updated from the list and then select Update.
- Under Manual updates, select the Teams app and then select the Update button to update to the latest application. If all your devices are eligible to receive automatic updates, use that option to get to the latest Teams app version.
Automatic update process
To help upgrade devices to the latest versions, automatic updates will continue at an accelerated pace to ensure adherence to the retirement timeline. Updates can include both firmware and Teams app updates as applicable. These updates will be scheduled outside of normal business hours in the local time of the device, to help minimize any impact to your organization. Because it is important that the devices get updated as soon as possible, we will not adhere to the configured maintenance window for the devices.
For organizations with users around the globe, we recognize that “outside of normal business hours” might affect you differently. We apologize for the impact this may have on your users.
MC884018 — Microsoft Teams: Set sensitivity labels for town halls and webinar
Microsoft 365 Roadmap ID 409226
Coming soon for Microsoft Team Premium customers: Event organizers will be able to set sensitivity labels for town halls and webinars. Sensitivity labels allow organizations to protect and regulate access to sensitive content created through collaboration in Teams. Sensitivity labels are available only for Teams Premium users on Mac and Windows desktops.
When this will happen:
Targeted release: We will begin rolling out in early October 2024 and expect to complete by mid-October 2024.
General Availability (Worldwide, GCC): We will begin rolling out in mid-October 2024 and expect to complete by late October 2024.
How this will affect your organization:
Before this release: Sensitivity labels were not available for town halls and webinars.
After this rollout, events created or updated by an organizer with a Teams Premium license can apply a sensitivity label to their event. Organizers will be notified if their configured settings are not valid for the selected sensitivity. Specific options under Event access may be enabled or disabled based on the sensitivity label set for the event:

For upcoming events that have already been scheduled prior to rollout, the sensitivity of the event will be set to None. If an event organizer chooses to modify the sensitivity for a scheduled event after the rollout, this action may affect event settings that were previously configured.
What you need to do to prepare:
This rollout will happen automatically by the specified date with no admin action required before the rollout. You may want to notify your users about this change and update any relevant documentation.
Before rollout, we will update this post with revised documentation.
MC884009 — (Updated) Microsoft Teams: Start/stop recording on Teams Rooms on Windows
Microsoft 365 Roadmap ID 412072
Updated September 18, 2024: We have updated the rollout timeline below. Thank you for your patience.
Coming soon to Microsoft Teams Rooms on Windows: Users can start or stop recording meetings directly from a Teams Rooms on Windows device. This feature requires a Teams Rooms Pro license and Teams Rooms on Windows app version 5.2.
When this will happen:
General Availability (Worldwide, GCC): We will begin rolling out early December 2024 (previously mid-October) and expect to complete by mid-December 2024 (previously late October).
General Availability (GCC High): We will begin rolling out mid-December 2024 (previously mid-November) and expect to complete by mid-January 2024 (previously late November).
General Availability (DoD): We will begin rolling out early January 2024 (previously early December) and expect to complete by mid-January 2024 (previously mid-December).
How this will affect your organization:
Before the rollout: When attending a meeting using a Teams Rooms on Windows device, if users want to record the meeting, they need to also join the meeting on a companion device to initiate the meeting recording.
After the rollout
Start/stop recording is supported in any meeting where a participant belongs to the same tenant as the organizer, including scheduled meetings, ad-hoc meetings, channel meetings (only for channel members), and Teams Cast sessions. Users can select Start recording or Stop recording from the More menu, shown here at the bottom of the screen
When users start recording a Meet now or Whiteboard session initiated from a Teams Rooms on Windows device, users must ensure that they invite themselves to the meeting so they can access the meeting chat on their Teams desktop or mobile app where the recording file will be available after the meeting.
This feature will be on by default and available for admins to configure.
As an admin, you can allow or prevent users (including room accounts) from recording meetings with the Teams meeting recording policy:
NOTE: Both the meeting organizer and the recording initiator (room account) need to have recording permissions to record the meeting, or the start/stop recording button will not be available. Also, if the meeting organizer uses Meeting options to remove permissions from the room account to record the meeting, the start/stop recording button will not be available as well.
Start/stop recording is not supported in these scenarios:
- Teams calls including P2P, group, and PSTN calls
- External/cross-tenant Teams meetings and calls
- Third-party meetings and calls including Direct Guest Join and SIP
NOTE: Avoid assigning Microsoft OneDrive for Business licenses to your room accounts to ensure that IT-managed room accounts do not become owners of the recording files.
What you need to do to prepare:
After your Teams Rooms devices are updated to the 5.2 app, configure the desired meeting recording policy, notify your users about this change, and update your training and documentation as appropriate. This rollout will happen automatically by the specified date with no admin action required before the rollout.
MC883202 — (Updated) Microsoft Teams in VDI: Rollout schedule of “New Teams only” policy (Worldwide, GCC)
Updated September 26, 2024: We have updated the rollout timeline below. Thank you for your patience.
As we approach October 1, 2024, when support ends for classic Teams in VDI (Virtualized Desktop Infrastructure), we are finalizing the rollout schedule of new Teams as previously communicated in MC803007 (Updated) Teams in VDI: Expiring UseNewTeamsClient policy and updated new Teams rollout schedule (Worldwide, GCC) (published June 2024 and updated July 2024) and End of availability for classic Teams client – Microsoft Teams | Microsoft Learn:

When this will happen:
General Availability (Worldwide): We will begin rolling out on September 9, 2024, and expect to complete by September 24, 2024 (previously September 12).
General Availability (GCC): We will begin rolling out on September 16, 2024, and expect to complete by October 4, 2024 (previously September 19).
How this will affect your organization:
Starting September 9, 2024, the Teams admin center policy UseNewTeamsClient under TeamsUpdateManagement will be overwritten to New Teams only on the schedule in this message. This means that a new Teams client will be installed automatically (if not present already) and will become the default client. The toggle to return to classic Teams will not be available.
This policy value override will only apply to persistent VDI environments where classic Teams is version 1.7.00.7956 or newer.
For non-persistent environments, admins will continue to control the rollout of the new Teams client with golden/master image updates, and the value of the existing policy in the Teams admin center will be honored for users in non-persistent VDI environments.
Classic Teams installation details
- Persistent environments: Classic Teams was installed with the .exe installer (user installation in Appdata/local).
- Non-persistent environments: Classic Teams was installed with the .msi installer (machine-wide installation in C:Program Files (x86)).
Microsoft will not attempt to uninstall classic Teams. See MC806095 Classic Microsoft Teams: Uninstallation paused for Windows only (June 2024).
What you need to do to prepare:
Review the main VDI article and your current configuration to determine the impact for your organization. Please notify your users about this change and update relevant documentation as appropriate.
MC862236 — (Updated) Microsoft Teams: External presenters can join on mobile
Microsoft 365 Roadmap ID 409228
Updated September 26, 2024: We have updated the rollout timeline below. Thank you for your patience.
In Microsoft Teams, town halls and webinars currently support the ability for an external user outside the organization to present in an event only through the Teams desktop. With this update, external presenters will have the option to join the event through the Teams mobile app on their Android or iOS devices.
Note: It is currently not supported for external presenters to join a town hall or webinar through web platforms.
When this will happen:
General Availability (Worldwide, GCC): We will begin rolling out in late September 2024 (previously mid-September) and expect to complete by early October 2024 (previously late September).
General Availability (GCC High, DoD): We will begin rolling out in mid-October 2024 and expect to complete by early November 2024.
How this will affect your organization:
Presenters external to the organization will now be able to join events through their mobile devices.
For more information on external presenters, see Schedule a town hall in Microsoft Teams.
What you need to do to prepare:
This rollout will happen automatically with no admin action required. You may want to notify your users about this change and update any relevant documentation as appropriate.
MC856755 — (Updated) Microsoft Teams Rooms on Windows: New native Microsoft-defined camera controls in camera settings
Microsoft 365 Roadmap ID 409537
Updated September 26, 2024: We have updated the rollout timeline below. Thank you for your patience.
Coming soon in Microsoft Teams Rooms on Windows: Cameras that have implemented Microsoft-defined camera controls for Active Speaker Framing, Group Framing, and Edge Composed IntelliFrame will see controls for these features in the Camera settings pop-up menu.
When this will happen:
General Availability (Worldwide, GCC): We will begin rolling out late September 2024 (previously mid-September) and expect to complete by early October 2024 (previously late September).
General Availability (GCC High, DoD): We will begin rolling out early October 2024 and expect to complete by early November 2024.
How this will affect your organization:
Before this rollout: Controls for Active Speaker Framing, Group Framing, and Edge Composed IntelliFrame do not appear in the Camera settings pop-up menu for cameras that have implemented Microsoft-defined camera controls.
After this rollout: Users in a Teams Rooms on Windows with a camera connected that has implemented the controls as defined by Microsoft will see in-meeting controls for Active Speaker Framing, Group Framing, and Edge Composed IntelliFrame. Setting the default behavior for cameras with these controls will not be supported as part of this initial release, but we expect to support default setting controls at a later date. There are no related admin controls for this feature as part of this release.
What you need to do to prepare:
This rollout will happen automatically by the specified date with no admin action required before the rollout. You may want to notify your users about this new capability and update any supporting documentation for your users.
MC854652 — (Updated) Microsoft Teams: Meeting participants can choose a breakout room from a list
Microsoft 365 Roadmap ID 121269
Updated September 11, 2024: We have updated the rollout timeline below. Thank you for your patience.
Coming soon: Microsoft Teams meeting organizers can make the list of breakout rooms visible to all meeting participants and allow them to choose which room to join. Enabling this setting in breakout rooms allows participants to move freely from one room to another, simplifying breakout room coordination for meeting organizers and participants. This message applies to Teams for Windows, Mac, and the web.
When this will happen:
Targeted Release: We will begin rolling out early December 2024 (previously early October) and expect to complete by mid-December 2024 (previously mid-October).
General Availability (Worldwide, GCC): We will begin rolling out mid-December 2024 (previously mid-October) and expect to complete by early January 2025 (previously late October).
General Availability (GCC High, DoD): We will begin rolling out early January 2025 (previously early November) and expect to complete by late January 2025 (previously late November).
How this will affect your organization:
Before this rollout: Only the meeting organizer can assign meeting participants to breakout rooms. Participants cannot move between rooms.
After this rollout: Meeting participants can select their breakout rooms of choice if the meeting organizer selects this option during setup.
Organizers can look for the new feature under the breakout rooms panel when setting up breakout rooms.
This feature is on by default and accessible to all meeting participants on the affected platforms if enabled by meeting organizers.
What you need to do to prepare:
This rollout will happen automatically by the specified date with no admin action required before the rollout. You may want to notify your users about this change and update any relevant documentation.
MC818885 — (Updated) Microsoft Teams: Multiple camera view for Teams Rooms on Windows
Microsoft 365 Roadmap ID 402517
Updated September 26, 2024: We have updated the rollout timeline below. Thank you for your patience.
Microsoft Teams Rooms on Windows will be soon able to send up to four single-stream USB camera feeds to render on the receiver side, so remote meeting participants can view all cameras simultaneously. This opt-in feature requires admins to first enable the multiple camera view and map cameras to the desired order that will be displayed on the receiver side. With multiple camera view enabled, remote meeting participants will be able to follow all the action in the room and manually switch to the desired room. This message applies to Teams for Desktop (Windows, Mac).
When this will happen:
Targeted release: We will begin rolling out early November 2024 (previously mid-October) and expect to complete by mid-November 2024 (previously late October).
General Availability (Worldwide): We will begin rolling out mid-November 2024 (previously early November) and expect to complete by late November 2024 (previously mid-November).
General Availability (GCC): We will begin rolling out in mid-November 2024 (previously mid-October) and expect to complete by early December 2024 (previously late October).
How this will affect your organization:
Before the rollout
Multiple camera views are not available in Teams Rooms on Windows.
After the rollout
A multiple camera view can create more visibility and coverage for large and complex spaces, such as multipurpose rooms, classrooms, and executive boardrooms. Admins can set up multiple camera views in two ways:
- Admins can configure settings on a local device by turning on the Multiple camera view toggle and using the dropdown menu to map the cameras.
- Admins can configure multiple camera view using Remote Access in the Microsoft Teams Rooms Pro Management portal.
After the feature is enabled, in-room participants can disable multiple camera view with the Camera chevron button on the meeting console. This action will return the device to a single camera view, and all receiver-side participants will see a single camera view. This in-room setting will only affect that meeting and the device will revert to the admin settings for the next meeting.
Remote participants will see the multiple camera view by default. On the top right corner of the room’s video tile, a remote participant can use the arrows to switch to the desired camera view. This toggle will only affect the remote participant’s own view and will not affect other meeting participants.
What you need to do to prepare:
To prepare for the change, create a plan for the rooms that may require multiple cameras in consideration of the space, meeting scenario, and the desired experience for in-room and remote participants. Then, configure the multiple camera view on the local device or in the Teams Pro Management portal and notify your users about this new experience. You may want to update relevant training documentation.
Before rollout, we will update this post with revised documentation.
MC816179 — (Updated) Microsoft Teams: Bidirectional Support for Teams Live Interpretation
Microsoft 365 Roadmap ID 403103
Updated September 11, 2024: We have updated the rollout timeline below. Thank you for your patience.
With bidirectional support in Teams Live Interpretation, interpreters can now switch the translation direction between two languages by clicking on the button of the language they want to interpret into at the bottom of the screen. The highlighted language button will be the language the interpreter is translating into and attendees hear.
When this will happen:
Targeted Release: We will begin rolling out early September 2024 (previously early August) and expect to complete by mid-September 2024 (previously mid-August).
General Availability (Worldwide, GCC): We will begin rolling out mid-September 2024 (previously mid-August) and expect to complete by late September 2024 (previously late August).
General Availability (GCC High, DoD): We will begin rolling out late October 2024 (previously late September) and expect to complete by early November 2024 (previously early October).
How this will affect your organization:
The new bidirectional capability allows tenants to hire fewer interpreters to do live translation in Teams meetings, reducing the operation costs for tenants.
What you need to do to prepare:
This rollout will happen automatically with no admin action required. You may want to notify your users about this change and update any relevant documentation as appropriate.
MC814579 — (Updated) Microsoft Teams: The new Queues app for customer call management in Teams
Microsoft 365 Roadmap ID 379980
Updated September 19, 2024: We have updated the content. Thank you for your patience
Microsoft is pleased to announce the general availability of Queues app, a new Teams-native app designed to improve the management of customer calls. Integrated with Teams Phone, Queues app will allow team members to manage call queues more efficiently without leaving Teams. Queues app is available by default to all Teams Premium licensed users. This message applies to Teams for desktop.
When this will happen:
General Availability (Worldwide and GCC): We will begin rolling out early-October 2024 (previously mid-August) and expect to complete by mid-October 2024 (previously late August).
Existing Teams Premium customers are now eligible for Teams Premium Early Access for Queues app. Customers with Teams Premium licenses can now access the preview release of Queues app. For more information, please visit Manage Queues app for Microsoft Teams – Microsoft Teams | Microsoft Learn
How this will affect your organization:
Before the rollout: Teams users can receive and answer calls from Call queues directly from their Teams client, just like any other incoming call.
After the rollout: Teams Premium licensed users will be able to select View more apps in the left side of Teams and then select Queues app. Key features of Queues app includes:
- Real-time statistics: Provides an overview of metrics for Call queues, Auto attendants, and agents
- Historical reporting: Track past performance of Call queues, Auto attendants, and agents
- Agent opt-in and opt-out: Allows team members to opt-in and out of the queue based on availability. Authorized users can opt in or opt out on the behalf of agents.
- Collaborative call handling: Facilitates teamwork with call transfers and team communication through the People list.
- Outbound calls: Enables calls on behalf of call queues or auto attendants.
- Enhanced management: Authorized users now have delegated admin capabilities that allow for adding and removing queue members, changing call handing flows, configuring auto attendant greetings, and more.
What you need to do to prepare:
We recommend that you:
Learn more
MC814577 — (Updated) Microsoft Teams: Roster grouping for in-room participants through Proximity Join for Teams Rooms on Windows
Microsoft 365 Roadmap ID 400702
Updated September 25, 2024: We have updated the rollout timeline below. Thank you for your patience.
When joining a meeting in Teams Room on Windows with a companion device (laptop or mobile), in-room participants will be grouped under the room node. Participants must join through Proximity Join. This update includes additional UI elements to create visual clarity of the in-room participants who are together.
When this will happen:
General Availability (Worldwide): We will begin rolling out late September 2024 (previously mid-September) and expect to complete by mid-November 2024 (previously late September).
General Availability (GCC, GCC High, DoD): We will begin rolling out mid-November 2024 and expect to complete rollout by late November 2024 (previously late October).
How this will affect your organization:
This update is available by default if the companion device has enabled the Bluetooth setting and the Teams Room device has any one of the following XML configuration settings enabled:
On the roster, in-room participants will automatically be grouped under the room node. The two scenarios in which in-room participants can be ungrouped from the room node are:
- Raised hand: For raised hand, we continue to follow the sequential order of raised hands. Therefore, in-room participants who use their companion device to raise their hand will be broken up and ordered accordingly.
- Role assignment: For changes in roles (Presenters/Attendees), in-room participants can be broken up and placed in the appropriate category on the roster.
In both scenarios, the room information will be listed below the participant’s name.
What you need to do to prepare:
This rollout will happen automatically. You may want to notify your users about this change and update any relevant documentation as appropriate.
MC810407 — (Updated) Microsoft Teams Rooms on Windows: A Teams Room can be a Breakout Room participant
Microsoft 365 Roadmap ID 95680
Updated September 25, 2024: We have updated the rollout timeline below. Thank you for your patience.
Microsoft Teams Rooms on Windows will soon support Breakout Rooms as a participant. This will allow a Teams Rooms on Windows to be participate in Breakout Rooms if they are used by a meeting organizer. The room can be assigned to any particular Breakout Room and will respect any related settings or actions defined by the organizer, such as automatically being moved into a Breakout Room, permission to return to the main meeting, being reassigned to a different Breakout Room, or receiving announcements from the organizer. This release is applicable to Teams Rooms on Windows.
When this will happen:
General Availability (Worldwide): We will begin rolling out late September 2024 (previously mid-September) and expect to complete by mid-November 2024 (previously late September).
General Availability (GCC): We will begin rolling out late September 2024 (previously mid-September) and expect to complete by late October 2024 (previously early October).
General Availability (GCC High): We will begin rolling out late October 2024 (previously early October) and expect to complete by mid-November 2024 (previously early November).
How this will affect your organization:
Before this rollout: Teams Room did not support Breakout Rooms as a participant, and participants joining meetings through Teams Room on Windows were not able to participate in Breakout Rooms sessions.
After this rollout, meeting organizers using Breakout Rooms will be able to manage a Teams Room on Windows in the same way they manage individual participants. Participants joining a meeting using Breakout Rooms from a Teams Room on Windows will be able to participate in Breakout Rooms sessions. Note: A Teams Room cannot take on the organizer role for Breakout Rooms.
By default, this feature is on and accessible to all Teams Rooms for Windows users.
What you need to do to prepare:
This rollout will happen automatically by the specified date with no admin action required before the rollout. You may want to notify your users about this change and update any relevant documentation.
Learn more: Use breakout rooms in Microsoft Teams meetings – Microsoft Support
MC808162 — (Updated) Microsoft Teams: Proximity Join via ultrasound
Microsoft 365 Roadmap ID 380681
Updated September 25, 2024: We have updated the rollout timeline below. Thank you for your patience.
Microsoft Teams Rooms on Microsoft Windows will soon support Proximity Join via ultrasound. It will be an alternative to using Bluetooth or QR codes and typically will not penetrate walls, therefore improving the quality of detected rooms by personal devices. This release will be rolling out to Microsoft Teams Desktop (Windows and MacOS) for receivers and to select Microsoft Teams Rooms on Windows.
When this will happen:
General Availability (Worldwide): We will begin rolling out late September 2024 (previously mid-September) and expect to complete by early October 2024 (previously late September).
General Availability (GCC): We will begin rolling out mid-September 2024 and expect to complete by early October 2024.
General Availability (GCC High): We will begin rolling out early October 2024 and expect to complete by early November 2024.
How this will affect your organization:
The user experience for Proximity Join on Microsoft Teams Rooms will not change as a result of this feature. The suggested room in the room list will be improved using ultrasound.
Previous tenants that were not able to leverage the Proximity Join feature due to Bluetooth restrictions will be able to use Proximity Join via ultrasound with this release.
This new feature will be enabled by default.
What you need to do to prepare:
You may want to notify your users about this new capability to detect nearby rooms using the laptop microphones, which will receive the ultrasound signal broadcasted from select Microsoft Teams Rooms that have consoles built with a dedicated ultrasound speaker. Audio peripherals connected to laptops may affect the device’s ability to detect the ultrasound signal.
MC803293 — (Updated) Microsoft Teams: Enhanced Chat contextual info and Search
Microsoft 365 Roadmap ID 398956
Updated September 25, 2024: We have updated the rollout timeline below. Thank you for your patience.
Coming soon to Microsoft Teams: As in the General channel, chat users will have access to contextual information including People, Pinned messages, Shared files and links, and will be able to search from chat. This message applies to Teams for Desktop, web, and Mac.
When this will happen:
Targeted Release: We will begin rolling out late July 2024 and expect to complete by late July 2024.
General Availability (Worldwide and GCC): We will begin rolling out early September 2024 (previously mid-Augus) and expect to complete by mid-September 2024 (previously late August).
General Availability (GCC High, DoD): We will begin rolling out mid-September 2024 and expect to complete by mid-January 2025 (previously early October).
How this will affect your organization:
Before this rollout: Users lacked one place to find contextual information in chat.
After this rollout, users can select the new entry point in the top right corner of the chat window to access contextual chat information (People, Pinned messages, Shared files and links). Users can also search the chat and pin multiple messages.
The default state of this feature is on and is accessible to all Teams users (Desktop, web, Mac).
What you need to do to prepare:
This rollout will happen automatically by the specified dates with no admin action required before the rollout. You may want to notify your users about this change and update any relevant documentation as appropriate.
Before rollout, we will update this post with revised documentation.
MC800496 — (Updated) Microsoft Teams: New expanded gallery view option for minimized meeting window
Microsoft 365 Roadmap ID 398449
Updated September 19, 2024: We have updated the rollout timeline below. Thank you for your patience.
In Microsoft Teams, a new feature enhances the meeting view that is shown to attendees while the main meeting window is minimized.
When participants in a meeting minimize the main meeting window, they can multitask without losing sight of the meeting or missing important information by monitoring activity in a smaller meeting view window.
This view switcher feature update allows users to expand the default active speaker view of the meeting to an extended large gallery view. This view allows users to see up to 4 meeting participants, including reactions, raised hands, and a Me Video tile.
This expanded view can be toggled via a new UI control.
When this will happen:
Targeted Release: We will begin rolling out early August 2024 (previously early July) and expect to complete by mid-August 2024 (previously mid-July).
General Availability (Worldwide, GCC, GCC High, and DoD): We will begin rolling out mid-August 2024 (previously mid-July) and expect to complete by late October 2024 (previously late September).
How this will affect your organization:
When multitasking with the main meeting window minimized, meeting participants will now be able to better keep track of the meeting activity by using an extended meeting view window.
What you need to do to prepare:
This feature is available by default. No action is needed to prepare for this change. You may want to notify your users about this change and update any relevant documentation as appropriate.
MC798684 — (Updated) Microsoft Teams: Custom backgrounds for Teams Rooms on Android
Microsoft 365 Roadmap ID 380671
Updated September 11, 2024: We have updated the rollout timeline below. Thank you for your patience.
Soon, you can upload images on the Microsoft Teams admin center to apply as custom backgrounds for your Teams Rooms on Android devices to showcase your brand identity or provide support information in your meeting rooms. This feature requires a Teams Rooms Pro license and will be available with the next Teams Rooms on Android app release.
When this will happen:
General Availability (Worldwide and GCC): We will begin rolling out early August 2024 (previously early July) and expect to complete by mid-August 2024 (previously mid-July).
General Availability (GCC High): We will begin rolling out mid-August 2024 and expect to complete by late September 2024 (previously mid-August).
Note: There can be a delay between when features are released by Microsoft and when they become available on a particular device model and make.
How this will affect your organization:
To manage custom backgrounds for your Teams Rooms on Android devices, log into Teams admin center > go to Teams devices > Teams Rooms on Android > select Configuration profiles > Add or Edit > Device settings > Background > select Upload a custom background.
You can upload up to three images and specify which one goes to the main display, extended display, or touch console.
Note: In a dual screen setup, the main display is where the room calendar is shown and is meant to be placed on the right side. The extended display is where the date/time and room information is shown and is meant to be placed on the left side.
No matter how many screens your devices may have, the main display and extended display inputs are required in the Teams admin center configuration profile, while the touch console input is optional. When you push the configuration profile to a single screen device, only the main display image will show up. When you have two front-of-room displays or when you connect a second display later, the extended display image will be shown. If no image is uploaded for the touch console, a purple gradient default image will be displayed as the background.
Custom background image files must meet the following requirements:
- Minimum resolution: front-of-room display (1920 x 1080), touch console (1280 x 720).
- Format: JPG, JPEG, and PNG.
- Maximum size: 20MB.
Note: If the aspect ratio and the resolution of the image do not match with the aspect ratio and resolution supported by the display, the image may be scaled to fill the frame of the display and/or center-cropped.
Once the images are saved in the configuration profile and the configuration profile is assigned to your Teams Rooms on Android devices, at the next device restart, the custom background image will be applied to the devices that are logged in with a resource account that has a Teams Rooms Pro license.
On your Teams Rooms on Android device settings (Settings > Teams admin settings > General > Background), you can switch the background of your device from the custom image pushed to the device to one of the default images or vice versa. To change the custom image saved on the device, you must go to the Teams admin center.
What you need to do to prepare:
Plan on designing custom background images for your devices and updating your devices to the latest app version through the Teams admin center. More detailed design guidelines similar to the Teams Rooms on Windows PSD templates will be provided on the Microsoft Learn website closer to the release.
MC797474 — (Updated) Microsoft Teams: Channel cards
Microsoft 365 Roadmap ID 397883
Updated September 11, 2024: We have updated the content below with additional information. Thank you for your patience.
Microsoft Teams users will soon be able to get a quick overview about a channel using Channel cards. Channel cards will rollout across Microsoft Teams for desktop and web. Channel cards can be found by hovering over the channel name in the header or wherever a channel is mentioned.
Channel cards will provide information about a channel, including the description, last activity time, team name, and membership information. The card also provides a quick entry to notification settings, owner channel management, and the channel roster.
When this will happen:
General Availability (Worldwide, GCC, GCC High, DoD): We will begin rolling early July 2024 and expect to complete by late September 2024 (previously late August).
How this will affect your organization:
Users will have a simpler way to get important information about channels. This new feature provides key contextual information as well as quick actions.
What you need to do to prepare:
This rollout will happen automatically with no admin action required. You may want to notify your users about this change and update any relevant documentation as appropriate.
MC795085 — (Updated) Microsoft Teams: New meeting option to control permissions for admitting participants from lobby
Microsoft 365 Roadmap ID 392836
Updated September 11, 2024: We have updated the rollout timeline below. Thank you for your patience.
Microsoft Teams: Currently, the capability to admit attendees from lobby and the capability to present are combined into one meeting role: Presenter. This frequently results in situations where meeting participants, who are not in charge of meeting management, are able to admit people from the lobby to enter the meeting, and the meeting organizer has no way to control it.
With this feature update, we are addressing this gap by introducing a meeting option for meeting organizers to be in control of who can admit people from the lobby.
The new option Who can admit from lobby will have two choices:
- Only the organizer and co-organizers can admit from the lobby: This is the more secure option to be used for meetings where only organizers and co-organizers should be able to admit participants from the lobby.
- The organizer, co-organizers, and presenters can admit from the lobby (default option): This mimics the current system behavior that presenters also get the right to admit participants from the lobby.
When this will happen:
Targeted release: We will begin rolling out late September 2024 and expect to complete by early October 2024.
General Availability (Worldwide): We will begin rolling out early October 2024 (previously early September) and expect to complete by mid-October 2024 (previously mid-September).
General Availability (GCC): We will begin rolling out mid-October 2024 (previously mid-September) and expect to complete by late October 2024 (previously late September).
How this will affect your organization:
Based on the above option, people who have access to admitting participants from the lobby, will also have these capabilities:
- Receive notifications related to lobby activity, such as the lobby meeting start notifications or in-meeting lobby alerts
- View lobby in the People tab during the meeting
What you need to do to prepare:
No specific action is needed to enable or utilize this capability for meetings in your organization
All existing meetings will be configured with organizers, co-organizers and presenters with this capability.
For all new meetings, the organizers will have access to set this option during scheduling time.
The default for this new meeting option can be configured by the tenant admins using the meeting policy
MC779850 — (Updated) Microsoft Teams Webinar template is available in GCC High
Microsoft 365 Roadmap ID 387790
Updated September 18, 2024: We have updated the timeline below. Thank you for your patience.
The Microsoft Teams Webinar template that allows organizers to set up webinars and have attendees internal or external to the organization register and join is finally available to GCC High customers.
Description
Webinar, a building block to virtual events, is ideal for large audiences internal and/or external to your tenant and require registration. In webinars the focus is on the presenter(s) and audience will join without audio or video by default but can be enabled by the organizer via meeting options. Common webinar scenarios include but not limited to trainings, classes, marketing events, orientations, public meetings, and more. Below are key webinar template experience highlights:
- adding co-organizers to the webinar
- adding presenter bios to event page
- adding event promo image, theme color, and company logo for event page, and registration page
- advanced registration configurability of
- registration capacity
- registration start and end date&time* [Covered under Teams Premium license]
- manual approvals* [Covered under Teams Premium license]
- Waitlist* [Covered under Teams Premium license]
- Customize automated attendee emails* [Covered under Teams Premium license]
- viewing attendee status to gain overview of registration state
- Share event recording to attendees to consume event content at will
- Events Portal – out of the box event page and registration page which reflects event theming with speaker details
Known limitation: Q&A app is not yet available in GCC-High.
When this will happen:
General Availability (GCC High): Rollout will begin in late September 2024 (previously early September) and is expected to complete mid-October 2024 (previously late September).
How this will affect your organization:
Users in your tenant should now be able to use the webinar template on Teams to host internal or external webinars.
For more information, see Get started with Microsoft Teams webinars – Microsoft Support.
What you need to do to prepare:
This rollout will happen automatically. You may want to notify your users about this change and update any relevant documentation as appropriate.
MC772556 — (Updated) Microsoft Teams: Shorter meeting URLs
Microsoft 365 Roadmap ID 381953
Updated September 18, 2024: We have updated the rollout timeline below. Thank you for your patience.
We are reducing the length of Microsoft Teams meeting URLs for easier sharing. This rollout applies to all Microsoft Teams platforms (Teams for iOS, Android, Mac, Teams devices, desktop, and web).
When this will happen:
Targeted Release: We will begin rolling out mid-January 2025 (previously early November) and expect to complete by late January 2025 (previously mid-November).
General Availability (Worldwide, GCC): We will begin rolling out mid-February 2025 (previously mid-November) and expect to complete by mid-March 2025 (previously late November).
General Availability (GCC High, DoD): We will begin rolling out early April 2025 (previously early December) and expect to complete by late April 2025 (previously mid-January).
How this will affect your organization:
Longer URLs for meetings scheduled before the rollout will continue to work. The new URL syntax is: https://teams.microsoft.com/meet/?p=
What you need to do to prepare:
You may want to check if you have any integrations that use parameters from URL. After the rollout, the URL will only contain the meeting ID. Parameters such as tenant ID, organizer ID, conversation ID and message ID will not be in the URL.
This rollout will happen automatically by the specified date with no admin action required. You may want to notify your users about this change and update any relevant documentation as appropriate.
MC767481 — (Updated) Microsoft Teams: Presenter window enhancements while screensharing
Microsoft 365 Roadmap ID 383653
Updated September 19, 2024: We have updated the rollout timeline below. Thank you for your patience.
In Microsoft Teams, we are delivering new enhancements to the presenter window that is shown while screensharing.
The presenter window now shows up to four meeting participants (both video and audio), active speakers, raised hands and reactions, and a preview of shared content.
Meeting notifications are surfaced to the central area of the screen for easier awareness and consistent windowing behavior.
These enhancements improve awareness and visibility of what’s going on in your meeting and make it easier to engage with other attendees while screensharing.
When this will happen:
Preview: We will begin rolling out mid-May 2024 and expect to complete by late May 2024.
General Availability (Worldwide, GCC, GCC High, and DoD): We will begin rolling out early August 2024 (previously mid-July) and expect to complete by late October (previously late September).
How this will affect your organization:
When sharing the Microsoft Teams screen or content, the presenter will now be able to better keep track of the participants’ activity during a meeting by using an extended presenter window.
What you need to do to prepare:
No action is needed to prepare for this change. You may want to notify your users about this change and update any relevant documentation as appropriate.
MC718553 — (Updated) Microsoft Teams: Change background while recording on phone
Microsoft 365 Roadmap ID 380852
Updated September 19, 2024: We have updated the rollout timeline below. Thank you for your patience.
Users can now record themselves anywhere and share it with coworkers in the Microsoft Teams chat or channel without worrying about the background. Users can now change their background to any image they want or make the background blurry while recording using their Microsoft Teams camera on iOS devices.
When this will happen:
General Availability (Worldwide, GCC, GCC High and DoD): We will begin rolling out early May 2024 (previously late March) and expect to complete by late October 2024 (previously early September).
How this will affect your organization:
Users will get an option to change their background to any image they want or make the background blurry while recording using their Microsoft Teams camera on an iOS device. To use this feature:
- Press and hold the camera icon next to the Compose box and then tap the blur icon to the right of the shutter button.
- You can then choose either an image to replace the background or choose to mildly or heavily blur your background.
What you need to do to prepare:
No action is needed to prepare for this change. You may want to notify your users about this change and update any relevant documentation as appropriate.
MC718250 — (Updated) Microsoft Teams: Describe it to design it in Teams Workflows
Microsoft 365 Roadmap ID 382659
Updated September 25, 2024: We have updated the rollout timeline below. Thank you for your patience.
Can’t find a workflow template that matches what you need in Microsoft Teams? You will now be able to describe in detail how you want your automation to work and receive a workflow to match your needs. All you need to do is select the Workflow builder button at the bottom of the create dialog in the Workflows app in Microsoft Teams chat and channel overflow menu.
Workflow builder will come to the Workflows app in Microsoft Teams chat and channel overflow menu first. Other entry points to Workflows will get this feature later.
When this will happen:
Worldwide: We will begin rolling out late September 2024 (previously mid-September) and expect to complete by late October 2024 (previously late September).
GCC Release: We will begin rolling out early October 2024 (previously mid-August) and expect to be complete by late October 2024 (previously mid-October).
How this will affect your organization:
All users with the ability to create workflows with the Workflows app in Teams will be able to describe the workflow they are trying to build and then receive a suggested flow.
Prerequisites
A work or school Teams account with access to a Power Automate environment in Europe or the United States.
Limitations
Power Automate supports workflow descriptions written in the English language only. Descriptions written in other languages might work but are not supported.
Cloud flows are the only type of flow that you can create from a written description.
In the version rolling out, the AI might omit some parameters, even if you provide them in the description.
What you need to do to prepare:
No action is needed to prepare for this rollout. If your tenant uses the Power Automate app within Microsoft Teams, you may want to notify your users about this change and update any relevant documentation as appropriate.
To learn more: Create a cloud flow from a description (preview) – Power Automate | Microsoft Learn
MC714167 — (Updated) Microsoft Teams: Wiki Notes Retirement in GCC High
Updated August 13, 2024: We have updated the timing of this change. Thank you for your patience.
We previously announced in MC675282 (September ’23) Wiki retirement and the future of note taking in Teams Channels, that we will be retiring Wiki-based Meeting notes in meetings in GCC High as planned by mid-August 2024 (previously July). While we understand Wiki notes has been a valuable collaboration tool for many of our users, we are still working to introduce a richer alternative for Microsoft Teams. There is no planned date at this time. Users in GCC High will need to keep using an alternative product such as OneNote to continue taking notes until then.
When this will happen:
Beginning late July 2024 and complete by late August 2024 (previously mid-August)
How this affects your organization:
Once Wiki notes have been retired, users will need to utilize an alternative product such as OneNote to continue taking notes.
What you need to do to prepare:
- When Wiki retires in private meetings, users can select Download from the banner at the top of their meeting chat to download the notes as a file. Learn more: Access wiki meeting notes in Microsoft Teams – Microsoft Support.
- Before and after Wiki retires in channel meetings, users can still download their existing Wiki notes in Word doc format from the SharePoint site of the channel > Teams Wiki Data folder.
- Those who didn’t create Wiki notes, who joined the meeting after the Wiki notes were created, or who are using the new Teams client can retrieve and download the notes of the meeting.
No action is needed to prepare for this change. You may want to notify your users about this change and update any relevant documentation as appropriate.
MC709270 — (Updated) Mute with Windows Taskbar available in the new Microsoft Teams on Windows
Microsoft 365 Roadmap ID 191528
Updated October 1, 2024: We have updated the rollout timeline below. Thank you for your patience.
The Muting Teams with Windows Taskbar is now available. This feature, available in the new Teams experience on Windows, enables you to mute and unmute your audio by clicking the mic icon in Windows taskbar.
To control your call mic from the taskbar, do the following:
Select the mic icon on your taskbar or press Windows logo key + Alt + K to mute or unmute your microphone while using a calling app.
-OR- Click the volume icon in the hardware indicator for volume in Windows taskbar.
When this will happen:
Targeted release: We will begin rolling out early June 2024 (previously mid-May) and expect to complete by mid-June 2024 (previously late May).
Worldwide, GCC, GCC High & DoD: We will begin rolling out mid-June 2024 (previously early June) and expect to complete by late October 2024 (previously late September).
How this will affect your organization:
This enables a feature previously available in older version of Teams on Windows.
What you need to do to prepare:
To prepare, distribute updates on this rollout with your organization if applicable for your users.
MC705760 — (Updated) Teams: Latest meeting experiences with performance improvements on web for Safari and Firefox (for guests)
Microsoft 365 Roadmap ID 329253
Updated September 25, 2024: We have updated the rollout timeline below. Thank you for your patience.
The latest Teams meeting experiences will be available for Teams on the web in Safari and Firefox browsers – including performance improvements, refreshed pre-join, updated meeting stage, and the updated meeting toolbar. (for anonymous join only)
When this will happen:
Worldwide: We will begin rolling out early September 2024 (previously mid-August) and expect to complete by early October 2024 (previously late August).
GCC, GCC High and DoD: We will begin rolling out mid-October 2024 (previously mid-September) and expect to complete by mid-January 2024 (previously early November).
How this will affect your organization:
We make constant steps to improve Teams performance irrespective of the platform – this time we are making the experience of Teams meetings on web (in Safari and Firefox browsers) better for anonymous users (guests). That’s crucial because it improves external collaboration. For example, if participants from your tenant would like to have meetings with non-Teams users (who are often joining as guests) it’ll become simpler as guests joining meeting from Safari/Firefox web browsers won’t have to wait significant amount of time for the meeting experience to load.
You may also notice that currently meeting UI in Chrome and Safari/Firefox is different, but with this update it won’t be a case anymore and you’ll enjoy all the benefits of modern UI (such as meeting toolbar on top of the screen, etc).
What you need to do to prepare:
You may want to update your internal documentation to inform your users about this improvement.
MC704955 — (Updated) Now get Real Time Calendar Notifications in Teams
Microsoft 365 Roadmap ID 314355
Updated September 11, 2024: We have updated the rollout timeline below. Thank you for your patience.
You can now get the Calendar Notifications in Teams from the Activity Feed.
- You will get calendar notifications in the Activity Feed for the below scenarios:
- Meeting invite (including channel meetings you are explicitly invited to)
- Meeting updates
- Meeting cancellations
- Meeting forwards (as an organizer)
- When you get a calendar notification, you will see an unread notification in the Activity Feed pane or at the bell icon.
- When you click on a notification, you will see the details of the meeting/event in the right pane.
When this will happen:
Targeted Release: We will begin rolling out mid-March 2024 and expect to complete by early April 2024 (previously late March).
General Availability (Worldwide, GCC, GCC High & DoD): We will begin rolling out early April 2024 (previously late March) and expect to complete by late September 2024 (previously late August).
How this will affect your organization:
Users will get Calendar notifications in the Activity Feed within Teams. These notification settings for Calendar can be modified from “Notifications and activity” in the Settings menu in Teams.
What you need to do to prepare:
There is no action needed to prepare for this change. You may want to notify your users about this change and update any relevant documentation as appropriate.
MC704035 — (Updated) Microsoft Teams: Integrate Chat notification with Meeting RSVP status
Microsoft 365 Roadmap ID 161739
Updated September 24, 2024: We have updated the rollout timelines below. Thank you for your patience.
Microsoft Teams users will soon be able to control how they get notified in meeting chats through RSVP to their meetings. When they decline a meeting, they will not receive notifications or see the chats in chat list; when they accept a meeting, they will receive notification for all new messages. This release of Microsoft Teams Meeting ID will be rolling out across Microsoft Teams Desktop, Mobile and Web and will provide an additional way for users to control their chat list by selecting which meetings they want to receive message updates from.
When this will happen:
Targeted Release will begin rolling out early November 2024 (previously mid-October) and expect to complete by mid-November 2024 (previously late October).
Worldwide will begin rolling out early December 2024 (previously late October) and expect to complete by mid-December 2024 (previously early November).
GCC will begin rolling out January 2025 (previously early November) and expect to complete by mid-January 2025 (previously mid-November).
GCC High will begin rolling out mid-January 2025 (previously mid-November) and expect to complete by January 2025 (previously late November).
DoD will begin rolling out late January 2025 (previously early October) and expect to complete by early February 2025 (previously mid-October).
How this will affect your organization:
You will not receive notifications or see chats from meetings you declined. You will be able to set how you want to be notified for meetings you RSVP with Accept or Tentative from Microsoft Teams settings.
What you need to do to prepare:
You might want to notify your users about this new capability to control meeting chat notifications by RSVP to meetings.
MC688109 — (Updated) Co-organizer experience updates in Teams Webinars and Townhalls
Microsoft 365 Roadmap ID 168524
Updated September 26, 2024: We have updated the rollout timeline below. Thank you for your patience.
Scheduling, setting up, and managing an event is not a simple task. Which is why we allow co-organizer to be added to the event so they can work alongside or on behalf of the organizer. So far co-organizers were able to set up event theming, manage registration, meeting options, view reports and more but were not able to edit event details like title, date/time, description, event group; nor publish or cancel event. Now they can! Co-organizer can edit event details, publish, and cancel the event like the organizer can. So once the co-organizer is added they will have full parity of experience as organizer and control/manage/edit event.
When this will happen:
Targeted release: We will begin rolling out early December 2024 (previously early October) and expect to complete by mid-December 2024 (previously mid-October).
General Availability (Worldwide, GCC): We will begin rolling out mid-December 2024 (previously mid-October) and expect to complete by early January 2024 (previously early November).
How this will affect your organization:
When co-organizer opens the event scheduling page, they should have the ability to edit the details page, publish, and cancel the event.
What you need to do to prepare:
Nothing required to prepare.
MC686919 — (Updated) Simplified Compose Experience for Teams
Microsoft 365 Roadmap ID 123486
Updated September 19, 2024: We have updated the rollout timeline below. Thank you for your patience.
Teams Compose is the heart of collaboration, where all Teams messages flow each month. It’s also the gateway to a wealth of features, from Copilot to Files, Loops, Video, and Platform Apps.
While Teams’ capabilities have grown by leaps and bounds, the compose experience has remained largely unchanged. This update addresses usability, scalability, and information density challenges. We’ve simplified the compose experience, enhancing usability for various rich authoring scenarios, establishing scalable patterns for all compose actions, and optimizing it for your everyday needs. Get ready to enjoy a more seamless and efficient collaboration experience! This is for the new Teams experience only.
When this will happen:
Targeted Release: We will begin rolling out early-December 2023 and expect to complete by mid-December 2023.
Worldwide: We will begin rolling out mid-April 2024 (previously early April) and expect to complete by mid-May 2024 (previously late April).
GCC, GCC High and DoD: We will begin rolling out in late May 2024 (previously early May) and expect to complete rollout by late September 2024 (previously early September).
How this will affect your organization:
All Teams users will still be able to do everything they have previously done in Teams, but now, accessing these features will be easier and clearer.
What you need to do to prepare:
No changes are required to prepare for this change.
MC683928 — (Updated) Microsoft Teams: In-meeting Error Messaging
Microsoft 365 Roadmap ID 167211
Updated September 11, 2024: We have updated the rollout timeline below for DoD organizations. Thank you for your patience.
Microsoft Teams Meeting users will be notified directly through the error message on meeting right pane for why they cannot access meeting chats when their chat access is limited by policy or due to system limitations and unexpected errors.
When this will happen:
Targeted Release: We will begin rolling out mid-November and expect to complete by late November.
Worldwide: We will begin rolling out early December and expect to complete by mid-December.
GCC: We will begin rolling out early January and expect to complete by mid-January.
GCC High: We will begin rolling out mid-January and expect to complete by late January.
DoD: We will begin rolling out early February and expect to complete by late September 2024 (previously late August).
How this will affect your organization:
Once available, users will begin to understand why they cannot access certain chats during meetings.
What you need to do to prepare:
There is no action needed to prepare for this change.
MC674737 — (Updated) Microsoft Teams: Emojis, GIFs and Stickers Unified in One Picker
Microsoft 365 Roadmap ID 84023
Updated September 11, 2024: We have updated the rollout timeline below. Thank you for your patience.
Users can soon find all of their emojis, GIFs, and stickers in a combined picker in Microsoft Teams.
When this will happen:
Targeted Release: We will begin rolling out in early December 2023 (previously late November) and expect to complete rollout by late January 2024 (previously mid-December).
Worldwide: We will begin rolling out in early April 2024 (previously mid-March) and expect to complete rollout by late July 2024.
GCC, GCC High, DoD: We will begin rolling out in late July 2024 (previously early June) and expect to complete rollout by late September 2024 (previously late August).
How this will affect your organization:
Users can find emojis, GIFs, and stickers combined in one menu under the smiley face icon. All the fun content will remain as normal for users to add in their messages.
What you need to do to prepare:
There is nothing you need to do to prepare.
Microsoft Purview
MC901828 — Microsoft Purview | Data Loss Prevention: Oversharing popups enhancements on classic Microsoft Outlook for Windows
Microsoft 365 Roadmap ID 416078
Coming soon: Two new Microsoft Purview | Data Loss Prevention (DLP) Microsoft Exchange support predicates for DLP policy tips and Oversharing popups for Microsoft 365 E5 Compliance customers: Message contains and Attachment contains. Unlike the existing broader Content contains DLP predicate that evaluates the entire email envelope, these new predicates are for client-side evaluation of specific email components only (email body or attachments) and show DLP policy tips and Oversharing popups in classic Microsoft Outlook for Windows.
When this will happen:
General Availability (GCC, GCC High, DoD): We will begin rolling out late October 2024 and expect to complete by early November 2024.
How this will affect your organization:
After this rollout, you can use the new focused Message contains and Attachment contains predicates to create new DLP policies or edit existing policies to include support for policy tips and Oversharing popup features.
The new predicates are on by default and available for admins to configure.
What you need to do to prepare:
This rollout will happen automatically by the specified date with no admin action required. You may want to notify your admins about this change and update any relevant documentation. Review your current configuration to determine the impact for your organization.
You can access the DLP solution in the Microsoft Purview compliance portal.
Learn more
MC898386 — Microsoft Purview | Insider Risk Management: Exfiltration of business sensitive data to free public domain emails
Microsoft 365 Roadmap ID 399551
Microsoft Purview | Insider Risk Management will be rolling out exfiltration of business-sensitive data to free public domain emails.
When this will happen:
General Availability (GCC, GCC High, DoD): We will begin rolling out mid-October 2024 and expect to complete by late October 2024.
How this will affect your organization:
After this rollout
We will enhance the existing email insight alerts to provide additional information when business sensitive data is potentially leaked from a work email account to a free public domain email. The new domain detection group Free public domains will list common domains used for personal email accounts. Admins with appropriate permissions can choose to select these domains in their indicator variants.
Administrators with the necessary permissions can modify the Free public domains detection group to add new domains, remove existing domains, or reset the domain list to the default list. The maximum number of domains allowed per detection group remains capped at 200, and this includes the Free public domains group. Any changes made to this group will be taken into account when analyzing potential data exfiltration to personal email accounts.
Microsoft Purview Insider Risk Management correlates various signals to identify potential malicious or inadvertent insider risks, such as IP theft, data leakage, and security violations. Insider Risk Management enables customers to create policies based on their own internal policies, governance, and organizational requirements. Built with privacy by design, users are pseudonymized by default, and role-based access controls and audit logs are in place to help ensure user-level privacy.
This feature will be on by default and ready for admins to configure.
Admins: Configure at Purview compliance portal > Insider risk management > Settings > Domain groups > Free public domains:

New column and filters for email activities:

Updated email insights:

What you need to do to prepare:
No action is required for this update. Any email going to a free public domain or to “self” will be automatically highlighted in email insights alerts. You may want to notify your admins about this change and update any relevant documentation.
Microsoft Purview Insider Risk Management correlates various signals to identify potential malicious or inadvertent insider risks, such as IP theft, data leakage, and security violations. Insider Risk Management enables customers to create policies based on their own internal policies, governance, and organizational requirements. Built with privacy by design, users are pseudonymized by default, and role-based access controls and audit logs are in place to help ensure user-level privacy.
You can access the Insider Risk Management solution in the Microsoft Purview compliance portal.
Learn more: The section called How the Free public domains domain group detects for exfiltration of business data to personal email domains in Fine-tune exclusions in insider risk management by creating detection groups and modifying built-in indicator variants (preview) | Microsoft Learn
MC897565 — Microsoft Purview | Data Loss Prevention: Oversharing popup enhancements on Microsoft Outlook Win32 desktop
Microsoft 365 Roadmap ID 414528
In Microsoft Outlook for Windows for E5 users, we are expanding the functionality of Oversharing popups (Show policy tip as a dialog) for better parity with the deprecating Microsoft Azure Information Protection (AIP) popups.
When this will happen:
General Availability (GCC, GCC High, DoD): We will begin rolling out late October 2024 and expect to complete by late November 2024.
How this will affect your organization:
- We are adding more Data Loss Prevention (DLP) predicates for the Policy tips and the Oversharing dialogs, such as Content is not labeled, Message is not labeled, Attachment is not labeled, and File extension is.
- We are adding customizations to the Oversharing dialog. You can configure custom title, body, business justifications, and dynamic variables for matched recipients, and labels and attachments names in multiple locales.
The AIP popup is set to deprecate in 2024 (with some exceptions until April 2025).
This new feature is available by default.
What you need to do to prepare:
Start migrating to DLP Policy tips and Oversharing popups for your use cases.
References:
MC888050 — Microsoft Purview | Data Loss Prevention for endpoints: Archive file support for Mac endpoints
Microsoft 365 Roadmap ID 393653
Coming soon for Microsoft Purview: Data Loss Prevention (DLP) for endpoints will inspect the content of every archive file when it is created, modified, or read. After inspection, all supported file types in the archive file will be classified and evaluated against active DLP policies and the defined enforcement action will be enforced on the file.
NOTE: Archive file support is already enabled for Windows devices. This rollout will enable the same protection for Mac devices.
When this will happen:
General Availability (GCC, GCC High, DoD): We will begin rolling out late September 2024 and expect to complete by early October 2024.
How this will affect your organization:
Before this rollout: DLP ignores the contents of the archive file on Mac devices.
After this rollout, DLP will classify Mac archive files and admins will be able to view file activities in the Activity explorer in the Microsoft Purview compliance portal.
This feature is on by default and available for admins to configure it.
What you need to do to prepare:
Learn more: Configure endpoint DLP settings | Microsoft Learn
This rollout will happen automatically by the specified date with no admin action required before the rollout. You may want to notify your admins about this change and update any relevant documentation.
MC887373 — (Updated) Microsoft Purview: Minor encrypted message portal design updates, URL to remain the same
Updated September 16, 2024: Based on customer feedback, we have determined we will not be moving forward with the domain change as originally communicated. Users will not see a new URL and will continue to see outlook.office365.com/Encryption as they do today. Thank you for your feedback.
We will be proceeding with the minor design updates on the portal (fonts, colors, controls and more). These changes are to align with Purview branding and should not disrupt users.
When this will happen:
General Availability (Worldwide, GCC): We will begin rolling out mid-October 2024 and expect to complete by mid-December 2024.
How this affects your organization:
Users will see minor design changes within the UI.
What you need to do to prepare:
You may consider updating training and documentation as appropriate.
—Summary of original message—
The Microsoft Purview Message Encryption portal provides access to encrypted messages sent from your organization’s users to external recipients. The cloud.microsoft domain was provisioned in early 2023 to provide a unified, trusted, and dedicated DNS domain space to host Microsoft’s first-party authenticated SaaS products and experiences. With this rollout, selected Microsoft products and scenarios will transition to a similar static.microsoft domain, in parallel with the previous domains. As part of this transition, the design of the portal (fonts, colors, controls, and more) will be adjusted to align with Purview branding and domain change.
MC846386 — (Updated) Microsoft Purview | Insider Risk Management: Bulk upload for priority user groups
Microsoft 365 Roadmap ID 409540
Updated September 20, 2024: We have updated the rollout timeline below. Thank you for your patience.
Coming soon to Microsoft Purview | Insider Risk Management: Priority user groups will support bulk upload.
When this will happen:
Public Preview: We will begin rolling out mid-August 2024 and expect to complete by late August 2024.
General Availability (Worldwide, GCC, GCCH, DoD): We will begin rolling out late September 2024 (previously February 2025) and expect to complete by late October 2024 (previously early March 2025).
How this will affect your organization:
Before this rollout: Insider Risk Management admins enter UPNs one at a time when adding to a new or existing priority user group.
After this rollout: Insider Risk Management admins will be able to upload a CSV of UPNs (User Principal Names) that they would like to add to a new or existing priority user group:
This feature is on by default and accessible to all Insider Risk Management admins with appropriate permissions.
What you need to do to prepare:
This rollout will happen automatically by the specified dates with no admin action required before the rollout. You may want to notify your admins about this change and update any relevant documentation.
Learn more: Prioritize user groups for insider risk management policies | Microsoft Learn (This page will be updated soon).
MC809599 — (Updated) Microsoft Purview: Information Barriers v2 support for all new onboarding customers (GCC, GCCH, DoD)
Microsoft 365 Roadmap ID 402516
Updated September 20, 2024: To ensure the optimal experience for our customers, we have decided not to proceed with the rollout of this change at this time. We will communicate via Message center when we are ready to proceed. We apologize for any inconvenience this may have caused and thank you for your patience.
Microsoft Purview Information Barriers v2 (IB v2) will soon be available for all new onboarding customers. IB v2 has enhanced architecture with these new features:
- Large-scale segment support: The segment limit in organizations has increased to 5,000.
- Multi-segment support: Users can be assigned to up to 10 segments.
- Flexible user discoverability: Organizations can now choose to allow IB-protected users to discover each other while adhering to IB communication and collaboration policies.
When this will happen:
General Availability (GCC, GCC High, DoD): We will begin rolling out late September 2024 (previously late July) and expect to complete by mid-October 2024 (previously late September).
How this will affect your organization:
What is Information Barriers?
Microsoft Purview Information Barriers (IB) is a comprehensive compliance platform that allows regulated customers in finance (FSI), legal, consulting verticals to meet compliance requirements to protect communication and collaboration across internal regulated users. IB was first released for Microsoft Teams in 2019. Since the initial release, IB has expanded from Microsoft Teams to also support Microsoft OneDrive for Business and Microsoft SharePoint Online.
New capabilities with IB v2
- Large-scale segment support: A big improvement with IB v2 is large scale segment support per tenant. For IB v1, the maximum number of defined segments in a tenant was 250. With IB v2, this limit is increased to 5,000 segments per tenant. No extra IB configuration changes are needed to use IB v2 at this new scale.
- Multi-segment support: The new multi-segment organization mode enables admins to assign users in your organization to up to 10 segments in IB, instead of being limited to just one segment. This allows support for more diverse communication rules between users and groups and supports more complex organizational and operational scenarios. Learn more: Use multi-segment support in information barriers | Microsoft Learn.
- Flexible user discoverability: IB v2 now allows administrators to enable or disable user discoverability restrictions in IB. After user discoverability restricted by IB is turned off, users can discover each other in the people picker, independent of their IB policies.
By default, the people picker restriction is enabled for all IB policies. For example, IB policies that block two users from communicating with each other also restrict these users from seeing each other when using the people picker. Administrators can now choose to disable the user discoverability restriction using the Security & Compliance PowerShell cmdlet Set-PolicyConfig. For more information, review the Enable or disable user discoverability section of Manage information barriers policies | Microsoft Learn.
IB v2 is on by default. Admins can update the state with the PowerShell parameter -InformationBarrierMode.
What you need to do to prepare:
Organizations using IB v1 will be eligible to upgrade to IB v2 in the future. Currently, this is only for new customers.
This rollout will happen automatically by the specified date with no admin action required before the rollout. You may want to notify your admins about this change and update any relevant documentation as appropriate.
MC808165 — (Updated) Microsoft Purview eDiscovery | Modernized eDiscovery in new Microsoft Purview portal
Microsoft 365 Roadmap ID 383744
Updated September 20, 2024: We have updated the image below. Thank you for your patience.
A modernized new user experience (UX) for Microsoft Purview eDiscovery will be available in the Purview portal. In this new UX experience, Content Search, eDiscovery Standard, and eDiscovery Premium are unified so that users can now navigate a shared workflow that simplifies the transition between non-premium and premium features. This UX modernization also introduces features that enhance the eDiscovery process. Some of these new features include:
- Enhanced search efficiency with message ID and sensitivity labels for faster access to information.
- Use of the improved search by Sensitive Information Type (SIT) interface for user-friendly selection without manual input.
- Advanced Data Source Mapping allows linking a user’s OneDrive using input such as the user’s mailbox Simple Mail Transfer Protocol (SMTP) address or user’s name, streamlining data retrieval and management.
- Acceleration through powerful investigation capabilities, such as user’s frequent collaborators, providing a comprehensive view of the user’s networks.
- Data Source Sync: Stay updated with the new Data Source synchronization feature, which allows users to easily track any new or removed data locations, ensuring that eDiscovery investigations remain aligned with the latest data source landscape.
- Introduction of the new visual Statistics allows users to gain insights at a glance (such as Results containing Sensitive Information Types, top communication participants, etc.)
- Monitor long-running processes with an informed and transparent progress bar with the option to cancel (for certain process types) if needed.
- Obtain a full process report for all actions taken, such as statistics for holds and exports, bolstering the defensibility of your eDiscovery efforts.
- Customize your exports with new settings, including the option to export as a single PST file path truncation and the use of friendly names to make exported data more accessible.
When this will happen:
Public Preview: We will begin rolling out late July 2024 and expect to complete by late September 2024.
General Availability (Worldwide, GCC, GCC High, DoD): We will begin rolling out mid-November 2024 (previously early October) and expect to complete by late December 2024 (previously late November)
How this will affect your organization:
The unification of Content Search, eDiscovery Standard, and eDiscovery Premium into a single eDiscovery solution in the new Microsoft Purview portal will necessitate updates to your organization’s training materials and documentation.
The deprecation timeline for the classic eDiscovery experience will be announced when the new modernized experience becomes generally available (GA). We will ensure that customers have ample time to transition to the new modernized experience before retiring the classic version.
What you need to do to prepare:
Update internal documentation and provide training to all eDiscovery users in your organization.
Learn more about the new Purview Portal.
Learn more about the modernized eDiscovery (preview) experience: Learn about eDiscovery (preview) solutions | Microsoft Learn
MC805721 — (Updated) Purview | Insider Risk Management: Adaptive Protection is generally available in GCC, GCCH, and DoD
Microsoft 365 Roadmap ID 335856
Updated September 11, 2024: We have updated the rollout timeline below. Thank you for your patience.
Coming soon: Adaptive Protection integrates the breadth of intelligence in Microsoft Purview Insider Risk Management with the depth of protection in Microsoft Purview Data Loss Prevention, to continuously and automatically fine-tune policies and protect data where and when it matters the most. The capability is built into the Microsoft platform with no endpoint agents required so organizations can get started using this as soon as it rolls out.
When this will happen:
General Availability (GCC, GCC High, DoD): We will begin rolling out late September (previously late August) 2024 and expect to complete by late October 2024 (previously late September).
How this will affect your organization:
Before the rollout: Admin are not able to configure custom definitions for insider risk levels in Insider risk managements or use insider risk levels as conditions in Data Loss Prevention (DLP) policies to apply dynamic controls to risky users.
After the rollout: Adaptive Protection is a capability of Microsoft Purview that enables organizations to dynamically optimize the balance between data protection and productivity. By leveraging the machine learning-driven analysis in Insider Risk Management, Adaptive Protection detects potentially risky user actions that may result in a data security incident and automatically adds the user to a stricter Data Loss Prevention (DLP) policy. The protection policies are adaptive based on user context, ensuring low-risk users can maintain productivity and high-risk users have appropriate protection in place.
What you need to do to prepare:
To begin using this capability, configure risk levels for Adaptive Protection in Insider Risk Management and add a new condition for risk levels for Adaptive Protection in new or existing DLP policies for Exchange, Teams, or Devices.
You can also set up Adaptive Protection using the one-click activation option from the home page of Microsoft Purview compliance portal. With one click, Adaptive Protection will create an Insider Risk Management policy based on aggregated risk insights of anonymized user activities in your organization, set your risk levels for Adaptive Protection, and create a DLP policy in test mode.
The default state of this feature is off.
Get started with Adaptive Protection in the Microsoft Purview compliance portal > Insider risk management > Adaptive Protection:
References
Microsoft Purview Insider Risk Management correlates various signals to identify potential malicious or inadvertent insider risks, such as IP theft, data leakage, and security violations. Insider Risk Management enables customers to create policies to manage security and compliance. Built with privacy by design, users are pseudonymized by default, and role-based access controls and audit logs are in place to help ensure user-level privacy.
This rollout will happen automatically by the specified date with no admin action required before the rollout. You may want to notify your admins about this change and update any relevant documentation as appropriate.
MC801975 — (Updated) Endpoint Data Loss Prevention (DLP): Enhancements to the device onboarding page
Microsoft 365 Roadmap ID 393934
Updated September 10, 2024: We have updated the Public Preview rollout timeline below. Thank you for your patience.
For Endpoint Data Loss Prevention (DLP), we’ve added enhancements to the device onboarding page. These include:
- Ability to search by IP address to look up devices.
- New filter for ‘Valid user’ available.
- Refined device list to only include devices that can be DLP supported, which excludes Android devices from showing up in the device onboarding list.
- New properties in the export report.
When this will happen:
Public Preview: We will begin rolling out mid-July 2024 (previously late June) and expect to complete by late July 2024 (previously early July).
General Availability (Worldwide, GCC, GCC-High, DoD): We will begin rolling out early August 2024 and expect to complete by late September 2024 (previously late August).
How this will affect your organization:
- You will be able to look up devices using their IP address in the search box (located in the upper right corner of the page) and view their device health status in the device onboarding page.
- You can filter for valid or invalid devices using the Valid user filter to get a list of all the devices that have an invalid user status. When the valid user status is invalid, it means that there was no authenticated user found. Without proper authentication, data classification is impeded. If the status of the valid user status is invalid, follow the provided remediation guidance.
- The device onboarding page has been enhanced to only show devices that can be DLP supported.
- You can get all the device information from the device onboarding page using the export capability. The export report now contains new device properties including:
- Valid user
- First onboarded date
- MDATP device ID
- Defender engine version
- Defender Mocamp version
- Endpoint DLP status
- Last policy sync time
- Advanced Classification bandwidth usage exceeded
For more information, see Troubleshooting endpoint data loss prevention configuration and policy sync | Microsoft Learn
What you need to do to prepare:
This rollout will happen automatically with no admin action required. You may want to notify your users about this change and update any relevant documentation as appropriate.
MC795079 — Microsoft Purview | Insider Risk Management – Adaptive Protection – HR resignation date as a condition for risk level
Microsoft 365 Roadmap ID 124972 and 171748
Updated September 12, 2024: We have updated the rollout timeline below. Thank you for your patience.
Microsoft Purview: The feature to configure HR resignation date as a condition for risk level in Adaptive Protection will be rolling out to General Availability. We communicated the preview for this feature in MC681240 Adaptive Protection in Microsoft Purview: Public preview of HR resignation date as a condition for risk level (November 2023).
When this will happen:
General Availability: We will begin rolling out late June 2024 and expect to complete by late September 2024 (previously late August).
How this will affect your organization:
When the HR connector has been configured, admins with appropriate permissions can now select the HR resignation date as a condition to assign a minor, moderate, or elevated risk level. For example, an admin can configure the elevated risk level to be assigned when an HR resignation date is sent via the HR connector.
What you need to do to prepare:
No action is required for this update. To configure user’s risk level for Adaptive Protection, admins can visit Insider Risk Management > Adaptive Protection (preview) > risk levels for Adaptive Protection.
Microsoft Purview Insider Risk Management correlates various signals to identify potential malicious or inadvertent insider risks, such as IP theft, data leakage, and security violations. Insider Risk Management enables customers to create policies based on their own internal policies, governance, and organizational requirements. Built with privacy by design, users are pseudonymized by default, and role-based access controls and audit logs are in place to help ensure user-level privacy.
Additional Resources:
You can access the Insider Risk Management solution in the Microsoft Purview compliance portal.
Learn more about adaptive risk mitigation:
MC788980 — (Updated) Microsoft Purview | Insider Risk Management: Granular trigger throttling
Microsoft 365 Roadmap ID 382130
Updated September 5, 2024: We have updated the rollout timeline below. Thank you for your patience.
Coming soon, Microsoft Purview Insider Risk Management will be rolling out public preview of granular trigger throttling limits.
When this will happen:
Public Preview: We will begin rolling out late October 2024 (previously late May) and expect to complete by late January 2024 (previously late October).
General Availability: We will begin rolling out late January 2024 (previously late December) and expect to complete by late January 2024.
How this will affect your organization:
With this update, we are introducing more granular trigger throttling limits to isolate the impact of a surge in noisy trigger volumes and prevent other policies from being affected. This ensures that organizations can receive critical alerts without being throttled by these limits. By default, these throttling limits will be applied:
- All sensitive triggers, including HR signals, Azure AD leavers, and custom triggers, will be limited to 15,000 per day per trigger.
- All other triggers will be limited to 5,000 per day per trigger.
Additionally, the policy health warning messages will be enhanced to assist admins with appropriate permissions in effectively identifying and addressing noisy triggers.
What you need to do to prepare:
No action is needed from you to prepare for this rollout. You may want to notify your admins about this change and update any relevant documentation as appropriate.
Microsoft Purview Insider Risk Management correlates various signals to identify potential malicious or inadvertent insider risks, such as IP theft, data leakage, and security violations. Insider Risk Management enables customers to create policies based on their own internal policies, governance, and organizational requirements. Built with privacy by design, users are pseudonymized by default, and role-based access controls and audit logs are in place to help ensure user-level privacy.
You can access the Insider Risk Management solution in the Microsoft Purview compliance portal.
Learn more: Insider risk management | Microsoft Learn
MC776192 — (Updated) Microsoft Purview | New eDiscovery Hold reports
Microsoft 365 Roadmap ID 93268 and Roadmap ID 93269
Updated September 12, 2024: To ensure the best customer experience we have decided not to proceed with the rollout of this change at this time. We will communicate via Message center when we are ready to proceed. We apologize for any inconvenience this may have caused and thank you for your patience.
Coming soon: For Microsoft Purview, we will release a tenant-wide Hold report in eDiscovery (Premium).
When this will happen:
We will communicate via Message center when we are ready to proceed.
How this will affect your organization:
The Hold report in eDiscovery (Premium) will let users with eDiscovery Administrator and eDiscovery Manager permissions access a built-in report with information on all hold policies associated with eDiscovery cases in the Microsoft Purview compliance portal. This includes eDiscovery holds associated with eDiscovery (Standard) and eDiscovery (Premium) cases. The Hold report lists all locations that are part of a tenant’s hold policies (whether enabled or disabled). The Hold report currently doesn’t show custodian association for each data source but will show the location.
Your organization must have an organization subscription that supports Purview eDiscovery (Premium) to generate and access the Hold report. eDiscovery Managers can only view Hold reports related to the cases they are a member of.
The Hold report will be available under the Reports tab in eDiscovery (Premium)
Use the Group option to group eDiscovery holds from eDiscovery (Standard) cases using group by Case Type. Use Customize options to select case type options and display Standard or Premium (case type column not shown here)
What you need to do to prepare:
- Assess if the rollout will change your organization’s eDiscovery workflow. If so, update internal documentation and provide training to all eDiscovery users in your organization.
Learn more
Microsoft Outlook
MC901831 — New Microsoft Outlook for web and Windows: Organize and reorder folders
Microsoft 365 Roadmap ID 378775
Coming soon: We will automatically import the folder order from classic Microsoft Outlook for Windows to new Microsoft Outlook for Windows and Outlook for the web. If users have not customized their folder order, the default view will continue to display folders alphabetically in the new Outlook.
When this will happen:
Targeted Release: We will begin rolling out early October 2024 and expect to complete by early November 2024.
General Availability (Worldwide): We will begin rolling out early November 2024 and expect to complete by early December 2024.
General Availability (GCC, GCC High, DoD): We will begin rolling out early December 2024 and expect to complete by early January 2025.
How this will affect your organization:
Before this rollout: If a user enabled custom folder order in classic Outlook, the custom order is preserved in the new Outlook for Windows and Outlook on the web. This may result in changes to the folder structure for affected users, as the new Outlook supports only alphabetical ordering.
After this rollout: users will see the custom folder order they previously enabled in classic Outlook. Special folders such as Inbox, Drafts, Sent Items, and others will still remain at the top of the folder list, even when the rest of the folders are arranged alphabetically.
This change is on by default.
To change folder order, go to the new Outlook ribbon, and select View > Layout > Folder pane. Choose one of these options:
- Order folders A to Z order: This will organize folders alphabetically
- Custom order

Users can hover next to each folder name to see the three-dot menu where they can move folders with drag-and-drop or the move up/move down options:

What you need to do to prepare:
This rollout will happen automatically by the specified date with no admin action required before the rollout. You may want to notify your users about this change and update any relevant documentation.
Learn more: Change the order of folders in the Folder Pane – Microsoft Support (will be updated before rollout)
MC901825 — New Microsoft Outlook: New work location sharing options
Microsoft 365 Roadmap ID 418127
Coming soon to This update provides more flexibility for selecting the amount of work location information other users in the organization see, by adding the option to not share any work location information. This message applies to new Outlook for Windows and Outlook for the web.
Users can configure Share your location in Outlook settings > Calendar > Work hours and location. Admins can configure location for users with the PowerShell cmdlet Set-MailboxCalendarConfiguration -LocationDetailsInFreeBusy. Learn more: Set-MailboxCalendarConfiguration (ExchangePowerShell) | Microsoft Learn.
When this will happen:
General Availability (Worldwide, GCC): We will begin rolling out mid-October 2024 and expect to complete by late October 2024.
How this will affect your organization:
Before this update, users and admins can choose whether other users in the tenant see general location or detailed location information:

After this rollout, a user can choose from these location sharing options (or an admin can set on behalf of users):
- No location shared: Others cannot see any work location information.
- Only general location shared: Others can only see Office or Remote, if provided.
- Detailed location shared: Others can see building or desk location information, if provided. (This will continue to be the default.)

Users and admins will be able to turn off sharing any location information from Work hours and locations.
The location sharing option set in Work Hours and location will display to others in the Outlook Calendar, in Microsoft Places, and in Microsoft Teams.
What you need to do to prepare:
This rollout will happen automatically by the specified date with no admin action required before the rollout. You may want to notify your users about this change and update any relevant documentation.
Learn more
We will update these articles before rollout.
#newoutlookforwindows
MC894575 — Microsoft Outlook: Updates to “Turn off sharing recommendations” Cloud Policy
Microsoft 365 Roadmap ID 415467
Coming soon: Updates to the Microsoft 365 Cloud Policy service setting Turn off sharing recommendation in the Microsoft 365 admin center will disable the ability for users to share or edit folder permissions with individual users in Microsoft Outlook on the web and new Microsoft Outlook for Window desktops. We will not change anything else about how the policy currently works.
When this will happen:
Targeted Release: We will begin rolling out early October 2024 and expect to complete by late October 2024.
General Availability (Worldwide): We will begin rolling out mid-November 2024 and expect to complete by early December 2024.
General Availability (GCC, GCC High, DoD): We will begin rolling out mid-December 2024 and expect to complete by late December 2024.
How this will affect your organization:
Before this rollout, the policy blocks users’ ability to update default and anonymous permission levels for shared folders. This functionality will remain after the rollout, when users will also not able to share or edit individual user permissions. The current policy and how it works with calendar sharing will not be affected by this change and will remain as is.
After the rollout: The steps to update this policy at https://config.office.com/officeSettings/officePolicies will not change:

After this rollout, this screen will change (and the lower half of the screen is intentionally grayed out):

This change is on by default.
What you need to do to prepare:
This rollout will happen automatically by the specified date with no admin action required before the rollout. You may want to notify your users about this change and update any relevant documentation.
Review your current configuration to determine the impact for your organization.
Learn more: Overview of Cloud Policy service for Microsoft 365 – Microsoft 365 Apps | Microsoft Learn
#newoutlookforwindows
MC888052 — New Outlook for Desktop and web: Users can scope search suggestions to specific entities
Microsoft 365 Roadmap ID 398707
For new Microsoft Outlook for Windows and Microsoft Outlook for web, users will be able to filter search results by All, Mail, Files, Teams, and People.
When this will happen:
Targeted Release: We began rolling out mid-August 2024 and expect to complete by mid-September 2024.
General Availability (Worldwide, GCC, GCC High, DoD): We will begin rolling out mid-September 2024 and expect to complete by mid-October 2024.
How this will affect your organization:
Before this rollout, users will not be able to filter their search results. After this rollout, the following new search filters will be available in new Outlook for Windows and Outlook for web:
- All
- Mail
- Files
- Teams
- People
The Teams filter shows relevant chat messages. In the People filter results, users can select a person’s name to display their full People card.
This feature is available by default.
What you need to do to prepare:
This rollout will happen automatically with no admin action required. You may want to notify your users about this change and update any relevant documentation as appropriate.
MC882252 — (Updated) New Microsoft Outlook for Windows: Sharing Word, Excel, and PowerPoint local files through email
Microsoft 365 Roadmap ID 397094
Updated September 26, 2024: We have updated the rollout timeline below. Thank you for your patience.
Coming soon to new Microsoft Outlook: Users will be able to share Microsoft Word, Microsoft Excel and Microsoft PowerPoint files stored on their device (not stored in a cloud like Microsoft OneDrive) from new Outlook for Windows.
When this will happen:
General Availability (Worldwide, GCC): We will begin rolling out early October 2024 (previously mid-September) and expect to complete by late December 2024 (previously mid-November).
How this will affect your organization:
Before this rollout, users are only able to see old Outlook for Windows when they try to share a Word, Excel or PowerPoint fie.
After this rollout, when users want to share a Word, Excel, or PowerPoint file that is saved to their device (not stored in a cloud like Microsoft OneDrive), the user can right-click the file name in File Explorer, select Share, and select new Outlook for Windows to email the file.
This option is on by default.
What you need to do to prepare:
This rollout will happen automatically by the specified date with no admin action required before the rollout. You may want to notify your users about this change and update any relevant documentation.
MC847877 — (Updated) Microsoft Outlook for iOS and Android: Choose fonts while composing
Microsoft 365 Roadmap ID 409969
Updated September 25, 2024: We have updated the rollout timeline below. Thank you for your patience.
Coming soon for Microsoft Outlook for iOS and Android: We will add support for choosing fonts while composing emails. We will also improve support for fonts while reading emails.
When this will happen:
General Availability (Worldwide, GCC, GCC High): We will begin rolling out mid-October 2024 (previously mid-September) and expect to complete by early November 2024. (previously early October).
How this will affect your organization:
When this update rolls out, users will be able to select fonts to use in emails, signatures, automatic replies, and calendar invitations
What you need to do to prepare:
You might want to notify your users about this new capability and update your training and documentation as appropriate.
MC844915 — (Update) Microsoft Outlook: Open attachments in desktop apps from the new Outlook for Windows
Microsoft 365 Roadmap ID 401123
Updated September 5, 2024: We have updated the rollout timeline below. Thank you for your patience.
In new Outlook for Windows, users will be able to open attachments of all types in their preferred desktop apps by double-clicking on them.
When this will happen:
General Availability (Worldwide): We will begin rolling out early September 2024 (previously late August) and expect to complete by early October 2024 (previously late September).
General Availability (GCC): We will begin rolling out early October (previously late September) 2024 and expect to complete by late October 2024 (previously mid-October).
How this will affect your organization:
This feature is designed to streamline the process of opening attachments in desktop apps by reducing the number of steps, making it more efficient in your daily workflow.
What’s new
Previously, double-clicking on an attachment in new Outlook for Windows would open a preview of the file within Outlook. This meant that if users wanted to open the file in a desktop app, they would first have to save the file locally.
Now, when a user double-clicks on an attachment, the file will open in the desktop app specified as the default app to open that file type in the user’s operating system, just like in Outlook Desktop and Windows Mail apps. Single-clicking on an attachment will continue to open a preview of the file within Outlook.
It’s important to note that, for security reasons, users will see a confirmation dialog every time they open an attachment of a certain file type unless they choose to dismiss it permanently. To do so, they must uncheck the “Always ask before opening this type of file” checkbox for each file type (.pdf, .docx, .xlsx, jpeg, etc.).
This feature is available by default.
What you need to do to prepare:
This rollout will happen automatically with no admin action required. You may want to notify your users about this change and update any relevant documentation as appropriate.
MC805216 — (Updated) Updating conversation actions on Microsoft Outlook for iOS
Microsoft 365 Roadmap ID 398983
Updated September 11, 2024: We have updated the rollout timeline below. Thank you for your patience
Note: If your organization does not support iOS, you can safely ignore this message.
Currently, when viewing a Microsoft Outlook email, users can access the available actions in the top-right corner of the screen. We are updating these actions to be in a bar at the bottom of the screen, and users will now have the ability to customize the order and placement of the actions.
Additionally, users will now be able to access these actions from their Inbox view by long-pressing a message.
When this will happen:
General Availability: We will begin rolling out in early July 2024 and will finish rolling out by late September 2024 (previously late August).
How this will affect your organization:
The functionality of conversation actions will remain the same. With this update, we are specifically changing the position of the actions, adding the ability to customize, and making actions available in the Inbox view on long-press.
Because these actions will now be at the bottom of the screen when viewing a message, the tab bar to switch between mail, calendar, and so on will no longer be available when reading a message. To get to the tab bar, a user simply has to go back to the Inbox view.
What you need to do to prepare:
This rollout will happen automatically. You may want to notify your users about this change and update any relevant documentation as appropriate.
MC801582 — (Updated) Microsoft Outlook: Adding Search to settings in the Outlook for iOS app
Microsoft 365 Roadmap ID 398982
If your organization does not support iOS devices, you can ignore this message.
Coming soon for Microsoft Outlook for iOS: We will add the ability for users to search Settings to quickly find the desired setting.
When this will happen:
General Availability (Worldwide, GCC, GCC High, DoD): We will begin rolling out early August 2024 (previously early July) and expect to complete by late September 2024 (previously late August).
How this will affect your organization:
Before the rollout: Users are unable to search Settings.
After the rollout: This change is additive. All other Settings will remain the same. This feature is on by default and accessible to all Outlook iOS users.
What you need to do to prepare:
This rollout will happen automatically by the specified dates with no admin action required before the rollout. You may want to notify your users about this change and update any relevant documentation as appropriate.
MC801243 — (Updated) Microsoft Outlook: Adding search to settings in the Outlook for Android app
Microsoft 365 Roadmap ID 398984
Updated September 13, 2024: We have updated the rollout timeline below. Thank you for your patience.
If your organization does not support Android devices, you can ignore this message.
We are adding the ability to search within Settings on the Microsoft Outlook for Android app so that users can find exactly what they’re looking for.
When this will happen:
General Availability (Worldwide, GCC, GCC High, DoD): We will begin rolling out early August 2024 (previously early July) and expect to complete by late September 2024 (previously late August).
How this will affect your organization:
Users will now have the ability to search within Settings, but everything else within settings will remain the same.
To use search in Settings, users will need to go into the Settings page within their Outlook for Android app. On the Settings page, they will see a search bar at the top. Once they click into the search bar, they can query for the setting that they are looking for and see relevant results.
This feature is available by default.
What you need to do to prepare:
This rollout will happen automatically with no admin action required. You may want to notify your users about this change and update any relevant documentation as appropriate.
MC779851 — (Updated) To Do app opens in new Outlook for Windows – GCCH
Microsoft 365 Roadmap ID 375602
Updated September 27, 2024: We have updated the rollout timeline below. Thank you for your patience.
Use the Microsoft To Do app without leaving new Outlook for Windows. Clicking the To Do icon in the navigation bar will open the app inline and will no longer open it in a separate browser.
When this will happen:
Standard Release (GCC High, DoD): We will begin rolling out late November 2024 (previously mid-September) and expect to complete by late December 2024 (previously mid-October).
How this will affect your organization:
Users will notice a new entry point in classic Outlook for Windows if their active commercial Microsoft account has been granted access by their tenant administrator. No additional steps are required from the admin if the To Do app has already been enabled for the appropriate users in the existing To Do web or desktop applications.
What you need to do to prepare:
Ensure that the To Do app workload is enabled for your tenant. For details about ensuring access, see Set up Microsoft To Do.
For more information about the To Do app, see Use To Do app to manage Tasks in Outlook.
MC761261 — (Updated) New Microsoft Outlook for Windows and web: Improvements to working hours and location
Updated September 24, 2024: We have updated the rollout timeline below for GCC High and DoD. We apologize for the delay and will provide an updated timing when available. Thank you for your patience.
In 2023, Microsoft Outlook on the web and new Outlook for Windows released new flexible working hours that allowed users to set different working hours and location (office/remote) for individual workdays. Users could update their daily work location in the calendar and see their coworkers’ work location in the scheduling assistant. We will soon roll out these additional updates:
- Updated daily location menu to help users plan their day and see who else is in the office
- Integrating your work location with your Out of Office time
This message refers to MC553273 (Updated) Outlook on the web – Work Hours and Location (May 2023) and is associated with Microsoft 365 Roadmap ID 383721.
When this will happen
Outlook on the web and new Outlook for Windows
- Targeted Release: We will begin rolling out late March 2024 and expect to complete by late April 2024. Complete
- General Availability (Worldwide): We will begin rolling out late March 2024 and expect to complete by late May 2024. Complete
- General Availability (GCC): We will begin rolling out early May 2024 and expect to complete by late June 2024. Complete
- General Availability (GCC High, and DoD): We will begin rolling out in early 2025. (We will provide an update once the schedule is set)
How this will affect your organization:
Learn more with this blog coming in May 2024: https://aka.ms/NewWHLOutlook (points to support article before blog is ready)
What you need to do to prepare:
This rollout will happen automatically by the specified date with no admin action required. You may want to notify your users about this change and update any relevant documentation as appropriate.
User support: Learn more about work hours in Outlook – Microsoft Support
Exchange Online / Defender for Office 365
MC902782 — Exchange Online token deprecation plan
We’re contacting you because your tenant uses legacy Exchange Online tokens that are deprecated and Outlook add-ins that still use them will break when tokens are turned off.
- Legacy Exchange Online user identity tokens and callback tokens are deprecated and will soon be turned off for all Exchange Online tenants. This is part of Microsoft’s Secure Future Initiative to protect orgs in the current threat landscape. If add-ins use legacy tokens to make calls to Exchange, developers need to migrate from Exchange tokens to using Nested App Authentication (NAA) and Entra ID tokens ASAP.
- Code changes to add-ins using legacy Exchange Online tokens are required to ensure they continue to work. We recommend you update affected add-ins to use NAA, which provides simple authentication and top tier identity protection through APIs designed specifically for add-ins in Office hosts.
NOTE: This change only applies to Exchange Online; add-ins used in on-premises environments are not impacted by this change.
Recommended actions:
- Administrators: Identify which add-ins need to be updated and contact the ISVs or developers of those applications to get updates.
- Developers: Check the add-in code to see if the related API calls are used and then make appropriate updates.
- Register: The updated add-ins require an application registration in Microsoft Azure. Developers need to create an application registration for each add-in. Admins need to consent to the application registration for each add-in’s required permissions.
- Don’t wait: Add-ins are often part of mission critical functions, and the updates will take time to implement. It’s best to implement updates well before legacy Exchange Online tokens are turned off.
When will Microsoft turn off legacy Exchange Online tokens?
The following table lists the key milestones based on which Office app release channel tenant you’re using. Note that the GA date for NAA varies based on channel. We’ll soon provide tooling via PowerShell for Microsoft 365 administrators to reenable legacy Exchange tokens for their tenant or specific add-ins if those add-ins are not yet migrated to NAA.
NAA availability for Outlook on Mac, Android, iOS, new Outlook, and Outlook on the web will align with the Microsoft 365 Current Channel release. Support for Work and School accounts as well as Microsoft account will be available for Classic Outlook on Windows, Outlook on Mac, Android, and iOS at GA. Work and School accounts will be supported on new Outlook and Outlook on the web at GA, with Microsoft account support shortly thereafter.

Note: If a single tenant uses multiple Microsoft 365 apps / Office release channels, Legacy Exchange Online tokens will be turned off based on the slowest release channel.
How do I check which Outlook add-ins are impacted?
Add-ins may use the legacy Exchange tokens to get resources from Exchange through the EWS or Outlook REST APIs. Sometimes an add-in requires Exchange resources for some use cases and not others, making it difficult to figure out whether the add-in requires an update. We recommend reaching out to add-in developers and owners to ask them if their add-in code references the following APIs:
We’ll provide tooling via PowerShell for Microsoft 365 admins in October 2024 to turn legacy Exchange tokens on or off in your tenant. This will allow you to test if any add-ins are using Exchange tokens. We’ll provide more info when the tooling is ready in the Outlook legacy token deprecation FAQ.
If you rely on an independent software vendor (ISV) for your add-in, we recommend you contact them as soon as possible to confirm they have a plan and a timeline for moving off legacy Exchange tokens. ISV developers should reach out directly to their Microsoft contacts with questions to ensure they’re ready for the end of Exchange legacy tokens. If you rely on a developer within your organization, we recommend you ask them to review the Updates on deprecating legacy Exchange Online tokens for Outlook add-ins blog and ask any questions to the Outlook extensibility PM team on the OfficeDev/office-js GitHub issues site.
How do I keep up with the latest guidance?
We’ll share additional guidance on the Office Add-ins community call, the M365 developer blog, and the Outlook legacy token deprecation FAQ.
Ask questions about NAA and legacy Exchange Online token deprecation on the OfficeDev/office-js GitHub issues site. Please put “NAA” in the title.
Additional resources:
MC889519 — (Updated) Microsoft Defender for Office 365: Tenant Allow/Block List will support IPv6 allow and block entries
Microsoft 365 Roadmap ID 406166
Updated September 30, 2024: We have updated the timeline below. Thank you for your patience.
NOTE: This applies to customers with Microsoft Exchange Online Protection or Microsoft Defender for Office 365 Plan 1 or Plan 2 service plans. https://learn.microsoft.com/defender-office-365/tenant-allow-block-list-ip-addresses-configure
Soon, it will be possible to create IPv6 allow and block entries in the Tenant Allow/Block Lists.
When this will happen:
General Availability (Worldwide, GCC, GCC High, DoD): We will begin rolling out early October 2024 (previously late September) and expect to complete by early November 2024 (previously late October).
How this will affect your organization:
Before this rollout: Admins cannot block or allow IPv6 addresses.
After this rollout, you can make IPv6 allow and block entries in these formats:
- Colon-hexadecimal notation single IPv6 address (for example, 2001:0db8:85a3:0000:0000:8a2e:0370:7334)
- Zero compression single IPv6 address (for example, 2001:db8::1)
- Classless inter-domain routing (CIDR) IPv6 (for example, 2001:0db8::/32). The range supported is 1-128.
The IP block entry will drop any email sent from that IP at the edge, whereas the IP allow will just override the IP filtering, allowing the rest of the Defender for Office 365 stack to evaluate threats. IP block has a higher priority over IP allow entries.
Admins can create entries in the Defender portal or with the Microsoft PowerShell New-TenantAllowBlockListItems cmdlet (ListType parameter with value IP) without need for submissions.

This change will not impact any of your current Tenant Allow/Block List entries or your IPv4 entries in the hosted connection filter policy or enhanced filtering connection policy
Last used date support for IPv6 allow and block will be added soon.
Entry limits for IPv6:
- Exchange Online Protection: The maximum number of allow entries is 500, and the maximum number of block entries is 500 (1000 entries in total).
- Defender for Office 365 Plan 1: The maximum number of allow entries is 1000, and the maximum number of block entries is 1000 (2000 entries in total).
- Defender for Office 365 Plan 2: The maximum number of allow entries is 5000, and the maximum number of block entries is 10000 (15000 entries in total).
Permissions:
The same existing set of permissions we have for Tenant Allow/Block List will also apply to this rollout.
What you need to do to prepare:
This rollout will happen automatically by the specified date with no admin action required before the rollout. If one wants to block emails from IPv6 addresses or allow email from IPv6 addresses, the admin need to create entries to do so.
Additional references:
MC886603 — (Updated) Reject multiple From addresses (P2 From headers) without a Sender header
Updated September 20, 2024: We have updated the content. Thank you for your patience.
Starting December 1st, we’re going to start gradually dropping messages that have multiple From addresses (also known as P2 From headers) without a Sender header from being sent via Exchange Online.
If we see significant traffic exhibiting multiple From addresses (P2 From headers) without a Sender header in your tenant in the month of September, we will send you a Message Center Post by October 15th alerting you and providing some sample message IDs.
We are doing this to comply with RFC 5322 (https://www.rfc-editor.org/rfc/rfc5322#section-3.6.2) which mandates the Sender header to be present and contain a single address if the From header has more than one address. Noncompliance with this could be exploited by attackers, allowing them to impersonate a sender address by misleading the client into using the From header to determine the sender instead of the Sender header.
When this will happen:
December 1st, 2024
How this affects your organization:
If email clients including devices and applications that you use to send messages, do so using multiple From addresses but without a Sender address header after December 1st, you will get an NDR error code 550 5.1.20 Multiple From addresses are not allowed without Sender address’.
What you can do to prepare:
When this change is in effect, if you need to send a message that has more than one email address in the From field, make sure that you have a single email address in the Sender header.
If you expect this change to cause any issues for your organization, please share that feedback.
MC835648 — (Updated) Announcing IPv6 Enablement for Accepted Domains
Updated September 26, 2024: We have updated the content. Thank you for your patience.
Starting October 16, 2024, we’re gradually enabling IPv6 for all customer Accepted Domains that use Exchange Online for inbound mail. Microsoft is modernizing Exchange Online so our customers can easily meet their local regulations as well as benefit from the enhanced security and performance offered by IPv6.
More information on IPv6 support for Microsoft 365 services can be found at: IPv6 support in Microsoft 365 services
When this will happen:
October 16, 2024 (previously October 1, 2024)
How this will affect your organization:
After we enable IPv6 for your Accepted Domains, when someone tries to send an email to one of your users and queries the MX record for the domain, they will receive both IPv4 and IPv6 addresses (AAAA records) in response to their MX record query.
What you need to do to prepare:
To take advantage of IPv6 connectivity, please make sure that you and your partner’s update network allow-lists to allow Exchange Online IPv6 endpoints in the same way it allow-lists IPv4.
The Exchange Online IPv6 endpoints can be found here: Microsoft 365 URLs and IP address ranges.
To opt a domain out of inbound IPv6 so traffic flowing to the domain remains IPv4-only, please use Disable-IPv6ForAcceptedDomain -Domain for each domain you want to opt out of IPv6 (Disable-IPv6ForAcceptedDomain (ExchangePowerShell) | Microsoft Learn).
IPv6 enablement may impact the source IP type used by Senders when connecting to Exchange Online, as the source and destination IP versions must match. For any IP Address-based Inbound connectors in Exchange Online that are referencing IPv4 addresses, you need to either:
- Keep the sending server as IPv4.
- Coordinate with the Sender so the Sender keeps connecting to your domain(s) via IPv4 or Opt your domain(s) out of IPv6
- Change the IP based connector to certificate domain based connector.
- This applies to both OnPremises type (From: Your organization’s email server, To: Office 365) and Partner Type connectors (From: Partner organization, To: Office 365).
Update: If you are using any Exchange Transport Rules or Data Loss Prevention policies which rely on the SenderIPRanges predicate, you need to opt out all your domains from IPv6.
You can manage IPv6 for your Exchange Online Accepted Domains using the commands Enable-IPv6ForAcceptedDomain or Disable-IPv6ForAcceptedDomain.
Currently, you can check the status of your Accepted Domains with the Get-IPv6StatusForAcceptedDomain command. While some customers have already enabled IPv6, most will see it as disabled until October 16th.
After October 16, once IPv6 is enabled for your tenant, if you haven’t explicitly set the IPv6 status for your Accepted Domains, the Get-IPv6StatusForAcceptedDomain command will reflect the new default behavior (enabled).
IMPORTANT: To ensure your preferred settings are applied, please use the Enable-IPv6ForAcceptedDomain or Disable-IPv6ForAcceptedDomain commands before October 16th, after which IPv6 will be enabled by default if you haven’t explicitly set it.
MC835647 — (Updated) Announcing IPv6 Enablement for Accepted Domains in GCC High and DoD
Updated September 26, 2024: We have updated this message to provide additional information to help you prepare for the change.
Starting November 1st, 2024, we’re gradually enabling IPv6 for all customer Accepted Domains that use Exchange Online for inbound mail. Microsoft is modernizing Exchange Online so our customers can easily meet their local regulations as well as benefit from the enhanced security and performance offered by IPv6.
More information on IPv6 support for Microsoft 365 services can be found at: IPv6 support in Microsoft 365 services
When this will happen:
November 1, 2024
How this will affect your organization:
After we enable IPv6 for your Accepted Domains, when someone tries to send an email to one of your users and queries the MX record for the domain, they will receive both IPv4 and IPv6 addresses (AAAA records) in response to their MX record query.
What you need to do to prepare:
To take advantage of IPv6 connectivity, please make sure that you and your partner’s update network allow-lists to allow Exchange Online IPv6 endpoints in the same way it allow-lists IPv4.
The Exchange Online IPv6 endpoints can be found here: Microsoft 365 URLs and IP address ranges.
To opt a domain out of inbound IPv6 so traffic flowing to the domain remains IPv4-only, please use Disable-IPv6ForAcceptedDomain -Domain for each domain you want to opt out of IPv6 (Disable-IPv6ForAcceptedDomain (ExchangePowerShell) | Microsoft Learn).
IPv6 enablement may impact the source IP type used by Senders when connecting to Exchange Online, as the source and destination IP versions must match. For any IP Address-based Inbound connectors in Exchange Online that are referencing IPv4 addresses, you need to either:
- Keep the sending server as IPv4.
- Coordinate with the Sender so the Sender keeps connecting to your domain(s) via IPv4 or Opt your domain(s) out of IPv6
- Change the IP based connector to certificate domain based connector.
- This applies to both OnPremises type (From: Your organization’s email server, To: Office 365) and Partner Type connectors (From: Partner organization, To: Office 365).
Update: If you are using any Exchange Transport Rules or Data Loss Prevention policies which rely on the SenderIPRanges predicate, you need to opt out all your domains from IPv6.
You can manage IPv6 for your Exchange Online Accepted Domains using the commands Enable-IPv6ForAcceptedDomain or Disable-IPv6ForAcceptedDomain.
Currently, you can check the status of your Accepted Domains with the Get-IPv6StatusForAcceptedDomain command. While some customers have already enabled IPv6, most will see it as disabled until November 1st.
After November 1st, once IPv6 is enabled for your tenant, if you haven’t explicitly set the IPv6 status for your Accepted Domains, the Get-IPv6StatusForAcceptedDomain command will reflect the new default behavior (enabled).
IMPORTANT: To ensure your preferred settings are applied, please use the Enable-IPv6ForAcceptedDomain or Disable-IPv6ForAcceptedDomain commands before November 1st, after which IPv6 will be enabled by default if you haven’t explicitly set it.
Microsoft 365
MC902780 — (Reminder) Delve retires December 16, 2024
This is a reminder that we are retiring Microsoft Delve on December 16, 2024, as communicated in MC698136 (Updated) Retiring Delve Web (originally published December 2023, updated May 2024).
In addition to the details in MC698136, learn more at:
Please review these sources and update your internal documentation and training.
MC889526 — Microsoft Project for the Web rollout in GCCH
Microsoft 365 Roadmap ID 416299
Beginning on mid-October 2024, Project for the web and Roadmap will be rolling out to Project Plan 3 and Project Plan 5 subscribers. After the roll out completes, these subscribers will have the new Project for the web app and Roadmap capability along with the existing Project Online service and Project Online desktop client. Please note that this rollout does not include the new Planner app.
New service plans to support Home, Roadmap and Project for the web. Two new service plans will be appearing in your tenant:
- Project P3 (PROJECT_P3_USGOV)
- Data integration for Project with Power Automate for GCC High (FLOW_FOR_PROJECT_USGOV_GCCHIGH)
Note: Common Data Service for Project (DYN365_CDS_FOR_PROJECT_OFFICE) was previously deployed is required for these services to function.
These plans provision the services that directly support the infrastructure to run Roadmap and Project for the web.
- Project for the web: The roll out of this modern, reenergized project management experience gives you and your teams a simple, yet powerful tool to manage work – from quick projects to more complex initiatives. Designed for collaboration, Project makes it easy for anyone to contribute to a project and share updates across the team. And because Project is now built on the Microsoft Power Platform, you have the flexibility to customize and extend your solution that best suits your business needs.
- Roadmap: The rollout of this capability will give users in your organization a cross-functional, big picture view of all projects underway. With Roadmap, you can create timeline views of multiple projects—complete with key dates and milestones—so that all the work is visible in one place.
When this will happen:
On or after October 16, 2024: New service plans will deploy and Admins will have the option to enable or disable Project for the Web.
On or after November 16, 2024: The service rollout begins and will complete December 2024.
How this affects your organization:
New service plans to support Roadmap and Project for the web. On or after October 16, 2024, the service plans will be on by default for active Project Plan 3 and Project Plan 5 subscribers. Additionally, the new Project-specific version of Power Automate will enable the features in Roadmap and Project for the web.
Project for the web. On or after November 16, 2024, the new Project for the web service will roll out to active Project Plan 3 and Project Plan 5 subscribers. Once the Project app tile within the Microsoft 365 app launcher is clicked, your users automatically will be directed to Project Home where they can work on either Project Online or Project for the web projects. To get started with Project for the web, within Project Home, click the New blank project button at the top of the page to build your new project plan in Project for the web!
What you can do to prepare:
New service plans to support Roadmap and Project for the web. There are no actions for you to take or costs to incur associated with this update.
Project for the web and Roadmap. As referenced above, the service plans that enable Project for the web and Roadmap are on by default. Please review the Turn Project for the web or Roadmap on or off for users in your organization article to help you determine if the toggles should be “on” or “off” for your organization before November 16, 2024.
Please click Additional Information to learn more.
We welcome your feedback so please provide either by clicking on the black Feedback button in the lower right-hand corner of the canvas.
MC887371 — The new Microsoft Planner for the web
Microsoft 365 Roadmap ID 411777
The new Microsoft Planner for the web (https://planner.cloud.microsoft) brings together the simplicity of Microsoft To Do, the collaboration of Planner, the power of Microsoft Project, and the intelligence of Copilot for Microsoft 365 into a simple, scalable solution that spans individual task management to professional project management.
With this rollout, we will update the existing web version of Planner to the new Planner. The new Planner for the web will match Planner in Teams to enable your users to seamlessly switch between Teams and web.
A Microsoft 365 license is required to use the new Planner. While final pricing for Copilot in Planner (preview) has not been announced, if you have a Project Plan 3 license, Project Plan 5 license, or a premium Planner trial license, you can preview Copilot in Planner capabilities.
When this will happen:
Targeted Release: We will begin rolling out early October 2024 and expect to complete by mid-October 2024.
General Availability (Worldwide): We will begin rolling out mid-October 2024 and expect to complete by late November 2024.
General Availability (GCC): We will begin rolling out late November 2024 and expect to complete by late January 2025.
How this will affect your organization:
The following features will not be available at launch but will be available by early 2025:
- Open plans associated with a Loop task list
- Board view in the Assigned to me view
- Add Assigned to me tasks or a plan to an external calendar with an iCalendar link. NOTE: Existing iCalendar links will continue to work. New iCalendar link creation is not supported, and existing iCalendar links cannot be disabled while this feature is not available.
- Undoing the deletion of a task
As part of our efforts to simplify Planner, these existing features are not available in the new Planner due to low usage:
- Charts for pinned plans in Planner Hub
- While you were away notifications
- Activity log of a task’s creation, assignments, and completion date in the task comments.
- Links to group members, Microsoft Outlook conversations, and Microsoft OneNote notebook (you can still access these links in Outlook)
- Menu option to Leave plan
- Suggested attachments
- Charts view and Schedule view on the Assigned to me page
- Customized backgrounds for plans
Planner will also now support Targeted release. For organizations that opt in to Targeted release, your organization will be the first to see the latest Planner updates and can help shape the product by providing early feedback. Planner does not support individuals opted into Targeted release. Learn more about Targeted release.
Lastly, after the new Planner for the web is rolled out, users can still access Project for the web. For this rollout, we will merge notification settings in the new Planner and Project for the web. Users will see identical notification options in the two apps, and the settings they choose will be reflected across both apps. Until a user reviews their notification settings, we will maintain what the user had set before the notifications are merged.
The new Planner for the web:

What you need to do to prepare:
- The new Planner is on by default for users with the required licenses. This rollout will happen automatically by the specified date with no admin action required before the rollout. You may want to notify your users about this change.
- Please review our Planner blog announcement to update any internal documentation. We will update Planner help documentation in the coming weeks.
- Supporting adoption resources: The new Microsoft Planner
MC884011 — (Updated) ActiveX will be disabled by default in Microsoft Office 2024
Updated September 6, 2024: We have added an image below. Thank you for your patience.
We’re making some changes to the handling of ActiveX objects in the Microsoft Office client apps.
Starting in new Office 2024, the default configuration setting for ActiveX objects will change from Prompt me before enabling all controls with minimal restrictions to Disable all controls without notification. This change applies to the Win32 desktop versions of Word, Excel, PowerPoint, and Visio.
When this will happen:
For new Office 2024, this change will happen immediately when it’s released in October 2024.
For Microsoft 365 apps, this change will rollout in stages beginning in April 2025.
How this will affect your organization:
Users will no longer be able to create or interact with ActiveX objects in Office documents when this change is implemented. Some existing ActiveX objects will still be visible as a static image, but it will not be possible to interact with them. In non-commercial SKUs of Office, users will see this notification when an ActiveX object is blocked by the new default behavior:

The new default setting is equivalent to the existing DisableAllActiveX group policy setting.
What you need to do to prepare:
When this change takes effect, if you need to use ActiveX controls in Office documents, you can change back to the previous default behavior using any one of the following methods:
- In the Trust Center Settings dialog, under ActiveX Settings, select the Prompt me before enabling all controls with minimal restrictions option.
- In the registry, set HKEY_CURRENT_USERSoftwareMicrosoftOfficeCommonSecurityDisableAllActiveX to 0 (REG_DWORD).
- Set the Disable All ActiveX group policy setting to 0.
MC805212 — (Updated) Microsoft 365 apps: Improved resharing experience
Updated September 24, 2024: We have updated the rollout timeline below. Thank you for your patience.
Currently, when you share a link with view-only permissions in Microsoft 365 apps, clicking on Copy link defaults to an “Only people with existing access” link that does not always target your intended people.
With this new feature, when you share a link with view-only permissions with other people, those people will now be able to copy that same link directly from the Share dialog when they attempt to share. If your only option to share with others is Only people with existing access, you will be able to send a request to the owner to share this file with specific people directly in the sharing control. The owner of the file will then receive a request and will be able to approve or reject the request.
When this will happen:
Targeted Release: We will begin rolling out mid-September (previously mid-August) 2024 and expect to complete by late September (previously late August) 2024.
General Availability (Worldwide, GCC, GCC High, and DoD): We will begin rolling out late September (previously mid-September) 2024 and expect to complete by early October 2024 (previously late-September).
How this will affect your organization:
With this new feature, anyone who accesses a Microsoft 365 apps file with view-only permissions will see this new experience.
Learn more: Sharing files, folders, and list items – Microsoft Support (content within will be updated before rollout begins).
What you need to do to prepare:
This rollout will happen automatically by the specified dates with no admin action required. You may want to notify your users about this change and update any relevant documentation as appropriate.
Microsoft 365 IP and URL Endpoint Updates
|
Documentation – Office 365 IP Address and URL web service
September 30, 2024 – GCC
September 30, 2024 – GCC High
September 30, 2024 – DOD


Recent Comments