
by Scott Muniz | Sep 21, 2020 | Uncategorized
This article is contributed. See the original author and article here.
Companies building Internet of Things (IoT) solutions today are likely to deploy IoT applications that use unsecured devices, mainly because they cannot verify the security claims from device manufacturers.
Solution builders could create secured devices themselves. They tend not to because they either lack domain expertise, or simply prefer to buy devices off-the-shelf. Device makers, on the other hand, possess the requisite expertise to secure devices but lack the ability to convey details. For example, language constructs such as for conveying computation, storage, and power profiles of an Industrial PC (IPC), are simply not available for security. Device makers therefore see no motivation to invest in securing devices if they can’t claim the value and hence the current stalemate. Our studies and observations show this stalemate exists for two reasons:
- Lack of standards guiding how to holistically engineer and claim device security.
- Lack of standards guiding how to consume and verify device security claims.
Given how IoT globally connects solutions, supply chains, and interests irrespective of company, geography, or governmental affiliations, effectively solving the stalemate requires global openness as well.
We’re happy to announce the Edge Compute Node protection profile (ECN PP), a Common Criteria (ISO 15408) standard that will guide how to engineer, claim, evaluate, and consume security for IoT devices. We build on Common Criteria for transparency, cross-industry practice, global recognition arrangements, and global availability of licensed laboratories. Edge Compute Node protection profile, officially NSCIB-CC-0112146-CR, is in final step of certification.
We created and drove development of ECN PP here at Microsoft but our efforts were immensely amplified by the following partners contributing diverse expertise and experience, and for whom we’re very grateful.
 Figure 1: We recognize these collaborators with gratitude for amplifying our efforts with their diverse expertise.
We’re excited by this development and so are our partners:
“ProvenRun’s mission is to help its customers resolve the security challenges linked to the large-scale deployment of connected devices. We are very proud to have contributed our expertise into this mission to enable industry motions that help ensure all IoT deployments are secured-by-design”, Dominique Bolignano, CEO and founder, ProvenRun.
When ready, device makers and solution builders can freely access ECN PP from the Common Criteria portal, and later view list of ECN PP certified devices. We’re excited to see how ECN PP co-development partners are already putting it into use as we illustrate one real example at the end of this article. Device makers of products like Azure IoT Edge can now holistically secure devices, objectively claim security, and be assured of differentiated visibility on Azure device catalog in addition to the Common Criteria portal. We envision other IoT solution providers building custom experiences with ECN PP on respective platforms. For us, ECN PP is only the beginning of an exciting journey in which we invite you to join us in making it our common journey towards a unified goal.
How we see security in IoT
Our vision for security in IoT is a world in which every IoT ecosystem stakeholder choices and actions contributes to overall security of IoT where consumers and benefactors are simply secured by default. To a solution builder as an example, this means building with components that have been certified to deliver all security and compliance requirements for the target solution. We achieve this vision by standardizing a baseline and then evolve this baseline with maturity. Given afore described stalemate between the IoT solution builder and device maker, it stands to reason for the IoT device, and not the security subcomponents, to be the current minimum baseline.
 Figure 2: The IoT device as the practical minimum baseline to standardize on security.
Sizing the solution right – device security promise
A major goal in security is to balance efficacy with cost otherwise unintended consequences result. Go cheap and risk efficacy or spend too much and risk security budget cuts. For IoT devices, secured silicon (aka hardware security module or simply HSM) is often the last defense to deliver resistance against tampering from malicious physical access. Secure silicon together with associated engineering and operating costs is also the biggest cost driver. A need therefore arises to appropriately size secure silicon investments for the IoT deployment risk profile. We address this need by providing a useful tool to judge the coverage expected of the secure silicon, a tool we call device security promise, that currently offer standard promise, secure element promise, and secure enclave promise for sizing.
 Figure 3: Device security promise for IoT devices.
If you wondered how to assess the IoT deployment risk then you are in luck. The IoT Security Maturity Model by the Industrial Internet Consortium delivers excellent tools and guidance for exactly this purpose. You can also learn more here about the role of secure silicon in securing IoT.
It is worthwhile to note device security promise only conveys the scope of secure silicon isolation. Robustness in protection, for example how much resistance can one expect from the secure silicon against physical and environmental tampering, derives from depth in secure silicon security engineering and qualifiable through standards such as the National Institute of Standards and Technology’s (NIST) Federal Information Processing Standard 140-2 (FIPS 140-2) and Platform Security Architecture certification (PSA Certified™). ECN PP captures and reports compliances to standards addressing robustness for a holistic view of the device security posture. The approach taken by ECN PP is equally important.
Measurable goals over prescriptions
ECN PP defines measurable security goals instead of component prescription. This approach invites and engages unique talents and expertise of device makers in achieving these goals for efficacy while simultaneously garnering product differentiation. We avoid prescriptions to preclude blind compliance with no stake in efficacy, which brings us back to the problem we set out to solve. The result is a modular protection profile that presents a comprehensive security goals grouped under convenient categories and accommodates device security promise customization.
 Figure 4: ECN PP modularly structured for device security promise customization
Taking device security certification to the next level with programmatic real-time attestations
ECN PP on its own provides the tools that help enable secured IoT deployments through standards for collaboration and global transparency, but we envision using it to build more. To start with, while Common Criterial portal shall remain authoritative listing for security ECN PP compliant devices, device makers with ECN PP compliant devices certified for Azure will merit product targeted recognition within our IoT device catalog. We’re excited for this ability to recognize our device partner commitment to security. We’re equally excited about our current engagements to build on ECN PP and deliver programmatic real-time device security attestations.

Beyond visibility into overall deployment security posture, programmatic workflows with real-time security attestations will empower solution builders to target workloads only to devices that meet certain security posture for example, they can target workloads with confidential or privacy content only to secure enclave promise devices. Another pleasant upshot are the signals these workflows will generate to device makers for the types of devices in demand based on device security promise.
While this work is just being announced, we already see strong interest and real engagements such as follows:

This is an example of a device maker, Scalys, following ECN guidance to select Arm TrustZone® based NXP Layerscape® LS1012A to build a robust secure enclave promise device, and engaging UL to setup for certification. A solution builder will discover Scalys certified device from Common Criteria portal, and build solution they can later attest the device’s security real-time.
What’s next
We thank all the partners that have joined us already on this journey to secure IoT for all and invite more. Engage now as follows:
- Access Edge Compute Node protection profile, NSCIB-CC-0112146-CR, coming very soon to Common Criterial portal.
- Device makers – engineer device security to ECN PP, engage any Common Criterial licensed lab for certification and attestation setup, and view Common Criterial portal for licensed devices (allow time for engineering and certification of early devices).
- Solution builders – demand ECN PP compliant devices for security assurance.
- Common Criterial licensed labs – contact us to setup for device attestation.
- Technology partners – join us to evolve ECN PP.
by Scott Muniz | Sep 21, 2020 | Uncategorized
This article is contributed. See the original author and article here.
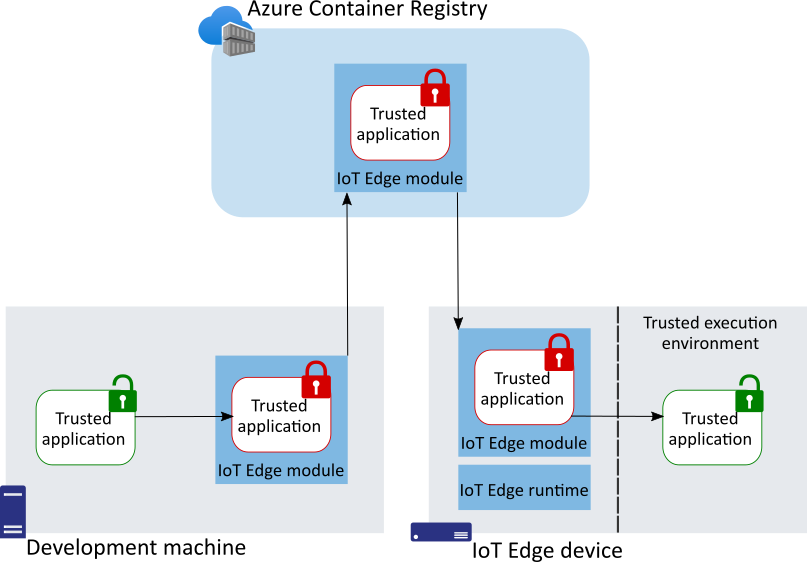
Today excited to announce the general availability of Azure IoT Edge security with enclaves that helps protect sensitive assets and workloads at runtime when deployed to an IoT Edge enclave enabled device.
A major roadblock to edge computing and Internet of Things (IoT) experiences is the risk of exposing sensitive assets and workloads to exfiltration or malicious tampering. Sensitive assets include proprietary algorithms, private data, artificial intelligence models, and real-time computational insights, while sensitive workloads entail edge computing on sensitive assets which in some cases create valuable insights that generate actions to directly control critical infrastructure. While these assets and workloads can be secured in transit and storage using encryption, they become vulnerable at runtime when they are decrypted for execution. The lack of solutions protecting the confidentiality of sensitive assets and workloads has held back IoT solution operators from distributing rich cloud computing experiences to the edge, until now.
 Figure 1: Deploying trusted applications (TA) with IoT Edge.
The solution builds on the robust edge compute application deployment mechanism of Azure IoT Edge to encrypted workloads (and data) known as trusted applications or simply TA, to Azure IoT Edge enclave enabled devices for safe and secured execution inside of enclaves. The TA is encrypted from when it leaves the developer build machine to when it lands inside of the devices trusted execution environment (TEE) or enclave where it is decrypted for safe execution.
We previously announced a public preview of this solution in a blog post where we detailed the types of blocking challenges and showed how a true solution requires deep integrations and collaboration with ecosystem partners. These integrations and collaboration are necessary to abstract the complexities away from IoT solution builders so they can focus on respective business transformations. We highlighted one example of the requisite collaboration of ecosystem partners to simplify this experience. We have since maintained focus and now observing dividends such as from this example alone, a solution builder is now able to:
In general, the ability to deploy TA is available now on IoT Edge certified enclave enabled devices built on Arm TrustZone® and Intel® Software Extension Guard (SGX®) technologies. Building on Open Enclave SDK means you only develop once and deploy to both Arm and Intel platforms. Moreover, Open Enclave SDK automatically opens possibilities for rich cloud-edge confidential computing patterns such as:
- Asymmetrical compute workload distribution e.g. train ML models in the cloud rich environment and only inference in resource constrained edge devices.
- Cloud-to-edge end-to-end confidential computing with workloads encrypted everywhere except for TEE at the edge or in the cloud e.g. deploy the same workload in Azure IoT Edge enclave at the edge or Azure Confidential Computing virtual machines in the cloud.
Our commitment to simplifying confidential computing in collaboration with a wide ecosystem of partners is yielding greater maturity to Open Enclave SDK, developer tooling, and availability of commercial off-the-shelf IoT Edge enclave enabled devices. We now offer secure deployments of trusted applications from cloud to edge at scale because of these accomplishments.
What’s Next
Simplifying confidential computing is a massive undertaking anywhere and more so at the edge where collaboration between many ecosystem roles and stakeholders must thrive to succeed. Delivering an end-to-end deployment experiences is a major success milestone but there’s always opportunity for continuous improvements, such as in attestations in which you can check out our progress with Microsoft Azure Attestation.
We now invite you to unleash your rich edge compute experiences with greater confidence:

by Scott Muniz | Sep 21, 2020 | Uncategorized
This article is contributed. See the original author and article here.
Hi everyone, and welcome to the MR Tech Community! I’m Nick from the MR Academy in San Francisco, and when I’m not burying my head in one of my numerous different code projects, I host events and do presentations at the local Microsoft Reactor! Or at least, I used to.
My team stopped doing in-person events towards the start of the year, and that’s turned out to be a pretty cool thing since we got to move many of our events online. It has been really awesome having easier access to amazing speakers that weren’t available in-person, and chatting with developers from all over the world is a really humbling experience as well!

Remember when we used to do things in-person? Hah! Wild. Here’s a few more people from the MR Academy onstage at the reactor: Dan Escudero, Jesse McCulloch, and myself, with Jo Ryall hanging out in the background!
But the one event I loved the most, the MR Workgroup, didn’t translate very well into an online event. Twice a month I used to host a small group of MR developers in the Reactor kitchen, and we’d just hang out and work on projects, share ideas, chat about the latest news, whatever was on our minds at the time! It was one of the highlights of my week, and I miss everyone who used to come out and join us.
So we’ve tried to make this space feel like that workgroup! It’s definitely not 1:1, but I think it’ll come close. So think of this as a place to share, learn socialize, a developer workgroup on the web!
The Mixed Reality team has also been itching for a platform to blog on, so you’ll see some great content from our developers pop up here! We’ve got a cool line-up for this week, from some incredibly talented developers!
Thank you for dropping in and being part of the MR community, and before I sign off here, I’m going to take you on a quick tour of the space!
- Mixed Reality Blog
We’ll be posting content here straight from our devs! We have so much cool tech, and so much great knowledge to share! This will grow into a treasure trove of MR information. Feel like you’ve got a blog post in you too? Send me a note! We’d love to feature learnings from the community too!
- Mixed Reality General
Do you have something to talk about, but can’t find a good spot to say it? May as well pop into General! Everything is great here, and it’s a perfect place to introduce yourself!
- Mixed Reality Showcase
Showcasing your projects, features, or experiments is a great way to get some visibility, feedback, or just a little ego boost from showing off! No need to be humble over here, and if you’re looking for feedback, it’s always great to clarify what type of feedback you’re looking for! Just uh… don’t leak anything secret ;)
- Mixed Reality News
There’s a lot happening in this industry! Share the latest developments and talk shop over here! Doesn’t even have to be Microsoft specific, everyone is welcome here!
- Mixed Reality Feedback and Help
While this Tech Community is a social space, not a technical support channel, sometimes you just need some guidance! Q&A sites are better for answering specific questions, but if you don’t even know what to ask, or need something a little more vague, this is a great spot to drop into! We also love to hear feedback about Microsoft MR tech, and this is a good channel for that too!
- Mixed Reality Events
Do you have an event? Post it here! Does Microsoft have an event? We’ll post it here too! Want to chat about an event? Park your keyboard over here! There’s a lot of fun events happening out there.
So! Make yourselves at home, introduce yourselves and say hi, maybe even share some screenshots of what you’re working on, if you can! I know I’m definitely looking forward to meeting everyone :)
– Nick Klingensmith
by Scott Muniz | Sep 21, 2020 | Uncategorized
This article is contributed. See the original author and article here.
Overview
Microsoft BizTalk Server is a rich and robust integration platform and is nearing its twentieth birthday(!). Hundreds, if not thousands, of customers have made significant investments over the years developing their integration solutions on BizTalk Server. As they move workloads to Azure to either run both in conjunction with BizTalk Server and within Azure natively, they would like to be able to leverage those investments with minimal refactoring.
Azure Logic Apps is an integration cloud service which allows users to schedule, automate, and orchestrate tasks, business processes, and workflows. Logic Apps functionality both overlaps and complements functionality in BizTalk, but quite helpfully, it also allows for the reuse of existing BizTalk artifacts, such as schemas and maps.
BizTalk maps transform messages between different schemas, and use a number of tools within the map to manipulate data during the transformation. The maps can also utilize external .NET assemblies for these transformations, but because of how BizTalk references these assemblies natively, the maps need some changes in order to be able to reference those assemblies when run in Logic Apps. This article shows how to edit a map created in BizTalk to utilize external assemblies when run in Logic Apps.
Scenario
For the purpose of this blog, we will setup a small solution consisting of two schemas, a BizTalk map, as well as an external .NET assembly. The full solution of BizTalk artifacts and sample files is available here.
In this scenario, we have two sample schemas: Foo, representing our source schema, and Bar, representing the target.


We also have a .NET Framework class library, called MapperAssemblies, which contains a small class with two trivial methods: AddTodayToValue, which will simply append today’s day of the week value to the input value, and ConcatValues, which concatenates the input values.
using System;

namespace MapperAssemblies
{
    public class TransformValues
    {
        public string AddTodayToValue(string input)
        {
            return $"{input} today is {DateTime.Now.DayOfWeek.ToString()}";
        }
        public string ConcatValues(string val1, string val2)
        {
            return string.Concat(val1, val2);
        }
    }
}
As per most libraries used in BizTalk, this assembly has been signed and added to the global assembly cache (GAC).
Finally, we have the map: This map performs a simple transform of the incoming two values from Foo to the three values in Bar.

Each of the three functoids pictured is referencing the sample assembly code, for exmple:

Testing the map with the following sample input
<ns0:Foo xmlns:ns0="http://MapWithAssmeblyReference.FooSchema">
  <Val1>Value 1</Val1>
  <Val2>Value 2</Val2>
</ns0:Foo>
Will yield the following output
<ns0:Bar xmlns:ns0="http://MapWithAssmeblyReference.BarSchema">
    <Val1>Value 1 today is Monday</Val1>
    <Val2>Value 2 today is Monday</Val2>
    <Val1Val2>Value 1Value 2</Val1Val2>
</ns0:Bar>
Adding the artifacts to Logic Apps
In order to utilize the BizTalk artifacts in Logic Apps, the artifacts must be stored to an Integration Account in Azure. Integration Accounts are a companion resource to Logic Apps in Azure, and can be used as a container to store integration artifacts such as maps, schemas and assemblies, as well as certificates and trading partner agreements.
Create the Integration Account
- Information on creating an Integration Account is documented here. For the purpose of this sample, the free tier for the Integration Account is adequate.
Adding Schemas
For both the Foo and Bar schemas, perform the following steps:
- Open the Integration Account
- Click on Schemas under Settings
- Click on + Add
- Select “Small File” and click the file icon and navigate to the XSD in your BizTalk solution. The schema name will auto-populate.
- Click “OK” to add the schema
Adding the map
This step is not quite as intuitive as adding the schemas because BizTalk maps files (btm) are not natively supported by Logic Apps. However, as BizTalk files compile to XSLT, the output XSLT can be loaded to the Integration Account.
- Open Visual Studio and open your BizTalk map file.
- Right-click the BizTalk map file in Solution Explorer, and select “Validate Map”
- In the Output window for BizTalk output, there will be a link to the output XSLT. Copy this file location.
- In the Azure portal, open the Integration Account
- Click on Maps under Settings
- Click on + Add
- Leave the Map Type as XSLT
- Click the file icon and navigate to the XSLT path from the “Validate Map” step about. The map name will auto-populate.
- Click “OK” to add the map
Adding the Assembly
- In the Azure portal, open the Integration Account
- Click on Assemblies under Settings
- Click on + Add
- Click the file icon and navigate to the DLL for your assembly. The assembly name will auto-populate.
- Note: For DLLs larger than 2 MB, select the “Large File” option. This will require you to first upload your DLL to Azure Storage and provide the URI to the file.
- Click “OK” to add the assembly
Adding the Logic App
While there are many ways to trigger and test the logic app, in this scenario we will create a simple Logic App with an HTTP Trigger and use Postman to test the Logic App.
Create the Logic App
- In the Azure portal, click “+ Create a resource” and enter Logic App into the search. Select “Logic App” and follow the wizard to create a new Logic App.
- Navigate to the newly created Logic App and select Workflow settings under Settings
- Under “Integration account” select the integration account created in the initial step. Click Save to save the changes.
- Click Logic app designer under Development Tools
- This test will create a simple Logic App with four (4) steps:
- Set the initial trigger to “HTTP request”. Do not change any settings on this step.
- Add a XML Validation step to the Logic App after the HTTP request trigger. The Content will be the value of the Body from the HTTP request. Add the “Foo schema for the schema name.
- Add a Transform XML step to the Logic App after the XML Validation step. The Content will be the value of the Body from the HTTP request and the map will be the Foo-2-Bar map imported to the Integration Account.
- Add a Response step to the Logic App after the Transform XML step. The body will be the Transformed XML from the Transform step.
- Save the Logic App

Testing the Logic App
This scenario will use Postman to test the Logic App, but any equivalent tool can be used.
- After saving the Logic App, the HTTP POST URL will be displayed. Copy this URL to Postman and set the request type to “POST”
- In the request body, use the sample used previously to test the map
<ns0:Foo xmlns:ns0="http://MapWithAssmeblyReference.FooSchema">
  <Val1>Value 1</Val1>
  <Val2>Value 2</Val2>
</ns0:Foo>
- Click “Send” to submit the POST to Logic Apps.
- In the Azure portal, click the “Overview” link and view the Runs history.
Looking at the “Runs” history will display an error in the Transform XML step. The specific error will be similar to the following:
“Code”: “Invalid XsltContent”,
“Message”: “An error occured while processing map. ‘Cannot find a script or an extension object associated with namespace ‘http://schemas.microsoft.com/BizTalk/2003/ScriptNS0‘.'”

Understanding the error
Looking inside the XSLT generated by the BizTalk map will show us the source of the error. When BizTalk generates the XSLT, it leaves a namespace reference to the assembly (ScriptNS0), but does not explicitly reference the assembly, which causes Logic Apps to throw the error as it does not know which assembly to associate with this.
<?xml version="1.0" encoding="UTF-16"?>
<xsl:stylesheet xmlns:xsl="http://www.w3.org/1999/XSL/Transform" xmlns:msxsl="urn:schemas-microsoft-com:xslt" xmlns:var="http://schemas.microsoft.com/BizTalk/2003/var" exclude-result-prefixes="msxsl var s0 ScriptNS0" version="1.0" xmlns:ns0="http://MapWithAssmeblyReference.BarSchema" xmlns:s0="http://MapWithAssmeblyReference.FooSchema" xmlns:ScriptNS0="http://schemas.microsoft.com/BizTalk/2003/ScriptNS0">
  <xsl:output omit-xml-declaration="yes" method="xml" version="1.0" />
  <xsl:template match="/">
    <xsl:apply-templates select="/s0:Foo" />
  </xsl:template>
  <xsl:template match="/s0:Foo">
    <xsl:variable name="var:v3" select="string(Val1/text())" />
    <xsl:variable name="var:v4" select="string(Val2/text())" />
    <ns0:Bar>
      <xsl:variable name="var:v1" select="ScriptNS0:AddTodayToValue(string(Val1/text()))" />
      <Val1>
        <xsl:value-of select="$var:v1" />
      </Val1>
      <xsl:variable name="var:v2" select="ScriptNS0:AddTodayToValue(string(Val2/text()))" />
      <Val2>
        <xsl:value-of select="$var:v2" />
      </Val2>
      <xsl:variable name="var:v5" select="ScriptNS0:ConcatValues($var:v3 , $var:v4)" />
      <Val1Val2>
        <xsl:value-of select="$var:v5" />
      </Val1Val2>
    </ns0:Bar>
  </xsl:template>
</xsl:stylesheet>
Fixing the error
In order to tell Logic Apps how to associate this reference with the uploaded assembly, we need to tweak the XSLT. To do this we will need to know the assembly details, the name of the namespace for the helper class, as well as the class name and method signatures of all referenced methods.
As shown in the sample below, we will add an msxsl:script element to the generated XSL which will help Logic Apps associate the script with the assembly. The key parts to the element are:
- The implements-prefix attribute indicates which xmlns to associate (e.g. ScriptNS0).
- The msxsl:assembly element gives the assembly information, including name, version, Culture and PublicKeyToken.
- msxsl:using namespace attribute indicates which namespace within the assembly is being referenced.
- One CDATA block for each method being referenced in the mapper.
For this example, the modified XSLT will look like this (note the msxsl:script element):
<?xml version="1.0" encoding="UTF-16"?>
<xsl:stylesheet xmlns:xsl="http://www.w3.org/1999/XSL/Transform" xmlns:msxsl="urn:schemas-microsoft-com:xslt" xmlns:var="http://schemas.microsoft.com/BizTalk/2003/var" exclude-result-prefixes="msxsl var s0 ScriptNS0" version="1.0" xmlns:ns0="http://MapWithAssmeblyReference.BarSchema" xmlns:s0="http://MapWithAssmeblyReference.FooSchema" xmlns:ScriptNS0="http://schemas.microsoft.com/BizTalk/2003/ScriptNS0">
	<msxsl:script language="C#" implements-prefix="ScriptNS0">
		<msxsl:assembly name="MapperAssemblies, Version=1.0.0.0, Culture=neutral, PublicKeyToken=c62342917314647d" />
		<msxsl:using namespace="MapperAssemblies" />
		<![CDATA[public string AddTodayToValue(string input){ TransformValues helper = new TransformValues(); return helper.AddTodayToValue(input); }]]>
		<![CDATA[public string ConcatValues(string val1, string val2){ TransformValues helper = new TransformValues(); return helper.ConcatValues(val1, val2); }]]>
	</msxsl:script>
	<xsl:output omit-xml-declaration="yes" method="xml" version="1.0" />
  <xsl:template match="/">
    <xsl:apply-templates select="/s0:Foo" />
  </xsl:template>
  <xsl:template match="/s0:Foo">
    <xsl:variable name="var:v3" select="string(Val1/text())" />
    <xsl:variable name="var:v4" select="string(Val2/text())" />
    <ns0:Bar>
      <xsl:variable name="var:v1" select="ScriptNS0:AddTodayToValue(string(Val1/text()))" />
      <Val1>
        <xsl:value-of select="$var:v1" />
      </Val1>
      <xsl:variable name="var:v2" select="ScriptNS0:AddTodayToValue(string(Val2/text()))" />
      <Val2>
        <xsl:value-of select="$var:v2" />
      </Val2>
      <xsl:variable name="var:v5" select="ScriptNS0:ConcatValues($var:v3 , $var:v4)" />
      <Val1Val2>
        <xsl:value-of select="$var:v5" />
      </Val1Val2>
    </ns0:Bar>
  </xsl:template>
</xsl:stylesheet>
Retesting the Logic App
After modifying the XSLT, we need to re-upload the modified file to the Integration Account.
- Open the Integration Account in the Azure portal
- Select “Maps” under Settings
- Click on the map previously uploaded
- Click the “Update” button and select the new XSLT file
Re-run the test in Postman. The Runs history in the Logic App should indicate a successful run, and there should be a response body in Postman with the values which are generated in the C# assembly.
Summary
In this scenario, we looked at how to modify the XSLT generated by the BizTalk mapper to correctly reference an external assembly when the map is run in Logic Apps.
by Scott Muniz | Sep 21, 2020 | Azure, Technology, Uncategorized
This article is contributed. See the original author and article here.
Over the course of the last couple weeks, I have been asked many questions about how the different RBAC roles in Azure Security Center and how they should be assigned. In this blog post, I will discuss how to assign the roles used across Azure Security Center and the types of scenarios that determine how they could be assigned.
Assigning permissions to users for specific workloads
To assign permissions for Azure workloads:
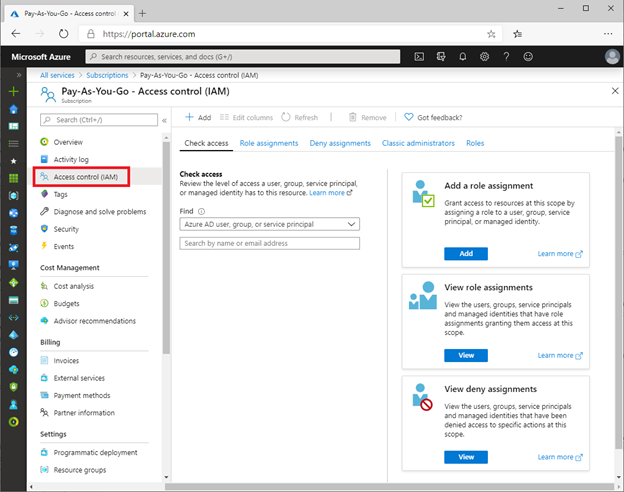
- Log into the Azure portal > type “Subscriptions” in the search bar > select your subscription > then look for Access Control (IAM).

- Once in Access Control (IAM) you will need to add a role assignment, click on “Role assignment”> Add role assignment. The role assignment pane will open and you will select the role assignment to be granted to user.

To perform remediation of recommendations, users will need the appropriate permissions and access to those workloads. For example, to remediate recommendations related to virtual machines, the user will need the Security Admin or Contributor on resource group level for people that should manage resources. This role allows users with that role assignment to view Virtual machines in the portal to make changes.
Assigning permissions for using Logic Apps/Workflow Automation
One thing that might be confusing in terms of permissions are Logic Apps, which are used in the Workflow Automation part of Azure Security Center. These Logic Apps can be automatically triggered once a new alert or recommendation appears. You cannot use any type of Logic App for Workflow Automation, but only those with a Security Center Alerts API Connector or a Security Center Recommendations API Connector. So, if you want to configure workflow automation, you must create a Logic App which then can be triggered.
The LogicApp itself uses a Managed Identity which can be granted access to resources, if necessary. For example, when your Logic App is supposed to get information about all resources in a subscription from Azure Resource Graph or the Azure Security Center Assessments API once a new recommendation pops up, the Managed Identity would need to be assigned the Reader or Security Reader role on the subscription.
The person who creates a new workflow automation does not necessarily have access to all the resources the Logic App will access, because the automation artifact itself has its own permissions. But what level of access is needed to create a workflow automation?
Your user account needs to have the right to create a new workflow automation in a particular resource group and at the same time, to trigger the Logic App you want to use in your workflow automation. So, it’s not enough to only see the Logic App so you can use it, and it is also not enough to only be able to manage Azure Security Center. You will have to make sure that your account will get at least the following permissions:
- Logic App Contributor on the Logic App’s scope, so you can trigger it
- Microsoft.Security/automations/write on the resource group you want to create the workflow automation in. This level of access is included in the Security Admin and the Contributor roles.
It is important to understand, that the Security Admin role alone does not allow you to see or manage resources, but only security-related information and settings.
Permissions for Quick Fixes
Quick Fix Remediation enables you to quickly remediate a recommendation directly in the console and improve your secure score quickly. Quick Fixes, use a template deployment or REST PATCH or PUT API call to configure the resource. To view the list of recommendations with Quick Fixes, you can click here.

Users that will be using the “Quick Fix” feature in Azure Security Center may require additional permissions depending on the logic/action the in the specific recommendation.
The screenshot below shows the result of the Diagnostic logs in Logic Apps should be enabled recommendation for a test user which I’ve granted three different sets of access rights on three different resource groups in a test subscription.

With the Security Reader role, the user will see the assessment result for a particular recommendation, but in order to be able to remediate it, the account would need either the Security Administrator, or Contributor roles assigned.
If we take a deeper look at the Security Admin role, we realize that this role does not allow an account to directly access resources, such as storage accounts, VMs, virtual networks, but it will give your account the right to create resource deployments and configure everything which is related to security.

As you learned above, the quick fix option in Azure Security Center leverages a REST PATCH or PUT API call which is what is incorporated in the Microsoft.Resources/deployments/* set of access rights. So, in case you want to build a custom role in addition to Security Reader (which will enable you to only see, but not change security configurations), you need to make sure to include the deployments rights as sketched above.
Depending on the scope you grant access rights on, the Secure Score within one subscription might change between user accounts. So, for example, if you have one subscription with several resource groups, and you assign one account the Security Admin role on subscription level, and a second account the Security Reader role on two of these resource groups, the second account might see a higher Secure Score, than the overall Secure Score the first account might see for the subscription. This is because the Secure Score calculation takes place on the scope of resources you can see related information for. The owner of the second account, who only sees Security Recommendations and Alerts for a subset of resources, might think that the overall Secure Score is a lot higher than what is true for the subscription. We will cover that topic with more details in an upcoming blog post.
Common ASC scoping Scenarios – and the why
Azure Security Center is a tool that can give you tenant-wide visibility into your security posture depending on the level and scope of access rights your user account has in your Azure environment. For example, if your account has a role assignment for the Security Reader role on your Tenant Root Group (the upmost Management Group in every Azure Tenant), you will , existing, and future ones, within your company’s environment, r. If your account has been assigned the Contributor role on a single Resource Group in one of your subscriptions only, ASC will exclusively provide you with information about resources within this scope.
For the purpose of this post, we will focus on the three most common scenarios:
- Security is owned (and enforced) by a central team
- Security is owned by resource owners
- A mix of both
In the first scenario, a central team is responsible for enforcing security over all subscriptions. It is common practice to assign this team the Security Administrator and Contributor roles on a central scope, such as the Tenant Root Management Group, so they can:
- Enforce security policies across all subscriptions
- Remediate security controls and recommendations for all resources in the environment
- Enforce resource eviction (quarantine) in case a security threat or configuration issue is found
This is a scenario which will give the security team a lot of power and responsibility, which is good from a process point of view, but what also might lead to bad situations in terms of service availability. Therefore, this approach should be chosen for companies only that have a very high level of automation so it can be made sure that security won’t break their business.
In the second scenario, there is no central IT security team, or at least, the team does not own security for the company’s Azure subscriptions, which makes the resource owners responsible for security. In this scenario, the central team does not have access to any of the subscriptions, so subscription (or resource group) owners will have the Owner or Contributor roles assigned to their accounts on either subscription or resource group level. In this scenario, every resource owner will see security alert, controls, and recommendations for their owned resources only. However, this approach comes with at least four:
- There is no central visibility for security threats and security posture information
- Without enforcement, resource owners decide if they want to remediate security controls and recommendations, what might lead to security issues.
- Resource owners only see security controls and recommendations for their particular scope. If there is no one who owns the overall security (and gets visibility into subscription- and tenant-wide recommendations), they will never be seen and remediated.
- Security policy is assigned per subscription and can be changed and controlled by the subscription owners
This is why most of my customers chose to go with the third scenario: Resource owners will own security for their resources, but there is a central team that gets insights into the overall security posture. Role assignments for this scenario might be:
- Owner or Contributor roles for resource owners on subscription or resource group level which will enable them to see security controls and alerts for their resources and to remediate recommendations within their scope.
- Security Reader role on Management Group level for a central IT security team so they can gather insights for all subscriptions and make resource owner accountable for improving their resources’ security postures.
- Custom RBAC role(s) on Management Group level for the central team to enable them doing advanced tasks, such as create a security policy on Management Group level which can then be assigned by the resource owners only.
Let’s talk more about custom RBAC. As you learned before, you need to have the Microsoft.Resources/deployments/* access rights to remediate recommendations using the quick fix feature in ASC, which is part of both, Security Admin and Contributor roles. But in the third scenario, we might not want to give this level of access to the central team, because they only should get visibility but not remediation rights. However, imagine they should be able to create new policy definitions that can be used by resource owners to enforce different settings in their subscriptions or resource groups. For example, you want to give resource owners the option to enable the ASC Standard Pricing tier on their resource scope, only. In this case, you could create a custom RBAC role which will give the central team the right to create a new policy definition on Management Group level, but not the right to assign the definition. This RBAC role definition could be created with the following access rights:
{
“Name”: “Policy Definition Contributor”,
“Id”: null,
“IsCustom”: true,
“Description”: “Allows to create Policy Definitions”,
“Actions”: [
“Microsoft.Authorization/policyDefinitions/*”,
“Microsoft.Authorization/policySetDefinitions/*”,
“Microsoft.Management/managementGroups/read”
],
“NotActions”: [],
“AssignableScopes”: [
“/providers/microsoft.management/managementGroups/<Root Management Group ID>”
]
}
With that role assigned to the central team, they can then create one or several central deploy if not exists policies (DINE), as you can find them in the Azure Security Center GitHub repository.
You learned that not only security alerts and recommendations, but also your Secure Score itself will always depend on the set of access rights your account will have. In a future blog post, we will cover this aspect more deeply because it is mandatory to understand how the overall Secure Score might be different from a Secure Score that is true for a subset of resources, only.
Contributors:
Tom Janetscheck, Senior Program Manager
Fernanda Vela, Program Manager
Reviewers:
Yuri Diogenes, Principal Program Manager
Meital-Taran-Gutman, Principal PM Manager
Liron Kachko, Senior Software Engineer

Recent Comments