This article is contributed. See the original author and article here.
Azure Sphere and cellular connectivity
Cellular connectivity is one of the most common functions that customers wish to take advantage of when developing secured IoT solutions. Cellular connectivity is naturally applicable to scenarios in which Wi-Fi or Ethernet connectivity is not readily available. However, we have also seen that cellular connectivity can deliver tremendous value even in places where Ethernet or Wi-Fi are present. For instance, cellular connectivity can simplify device setup and provisioning by removing the dependency on the configuration of local network infrastructure; cellular can sidestep technical or policy obstacles and accelerate deployments.
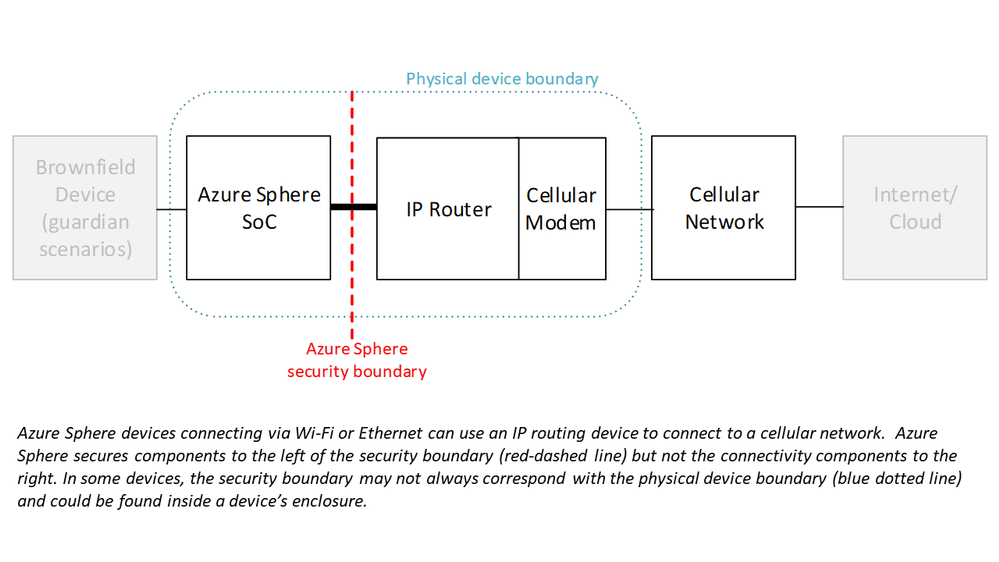
Although Azure Sphere currently supports connecting through Ethernet and Wi-Fi networks only, it can be a useful building block for a cellular solution. You can introduce cellular connectivity by pairing the Azure Sphere device with a cellular-capable router device. This allows you to take advantage of Azure Sphere’s software update infrastructure, certificate-based authentication, and Azure integration while connecting over cellular.
When using this kind of architecture, it’s extremely important to be aware that there is a security boundary between the Azure Sphere elements and the cellular connectivity elements. Azure Sphere security does not extend beyond its own Wi-Fi or Ethernet interface. Therefore, you will want to be certain that the non-Azure Sphere parts of your solution are adequately and properly secured to ensure that the overall system (and not just the parts running on or behind Azure Sphere) is robust against security threats.
Common cellular risks
Connecting a device to the internet through a cellular-enabled router introduces many similar network security risks that are present whenever you connect through other routing devices, such as the Wi-Fi access points or routers found in home and business environments. In these configurations, Azure Sphere is unable to protect the external hardware from threats like being the target of a denial-of-service attack or becoming a part of a botnet. Although the Azure Sphere parts of the system remain secured, the overall device might not be able to reach the Internet, interrupting critical functions like device telemetry and updates. This can affect your business or the customer experience you are trying to deliver.
To avoid any potentially disruptive surprises, it is critical that you identify the boundary between Azure Sphere and the cellular connectivity elements. On some devices this boundary may be difficult to spot, but this boundary is always present. For elements outside of the Azure Sphere security boundary, you should make sure that the manufacturer of the hardware, as well as the cellular service provider, offers the appropriate level of security, services, and support for your use case. For a deep-dive about evaluating the security boundaries and risks of the Azure Sphere cellular connectivity architecture please read our paper, “Cellular connectivity options immediately available to users of Azure Sphere.”
What Solutions are Available Now?
The Azure Sphere ecosystem includes a wide range of solutions representing different levels of integration between Azure Sphere and cellular connectivity. These solutions range from cellular connectivity modules suitable for additional customization to complete cellular Guardian devices ready for connection to brownfield equipment.
Although the options for introducing cellular connectivity to an IoT device may seem varied, fundamentally, the security boundary will be the same. Clearly understanding this boundary—where Azure Sphere security stops—and the security risks that remain to be resolved by you, your system integration partner, or your network provider will help you deliver the most secure and robust solution for your organization or for your customers.
The instructions below are not a complete path to a production solution… they were prepared with the intention of conveying basic knowledge and providing a foundation that you could tailor to fit your environment, standards, etc.
Keep a watchful eye on incurred costs … consider a daily assessment and use of budgets / alerts
Azure interface and functionality evolve rapidly; the snips below will become dated over time
Step-by-Step Instructions
Instantiate Resources
First, we will quickly run through creation of the basic resources we will need to complete this exercise. Although you can use existing Azure resources in your subscription, consider creating resources specific to this exercise to provide for future maintenance, cost analysis, reporting, etc.
Resource Group
Create this resource to group related resources, provide for simplified cost accounting and enable bulk housekeeping.
On the “Create a resource group” page, enter values for the following form items:
Subscription
Self-explanatory
Resource Group
Enter a name that is meaningful for you (and aligned with your naming standards)
Region
Select a region appropriate for your situation; take into consideration that some regions {e.g. West US and East US} see higher demand than others
Review settings on remaining tabs {e.g. Tags}. No additional settings are required for this exercise.
Click the “Review + create” button, validate, and then click the Create button. Allow time for processing.
Data Explorer
Use the Azure Portal to create an Azure Data Explorer Cluster.
On the “Create an Azure Data Explorer Cluster” page, enter values for the following form items:
Subscription
Self-explanatory
Resource Group
Select the resource group created in the prior step
Cluster Name
Enter a name that is meaningful for you (and aligned with your naming standards)
Region
Select the value used during Resource Group creation
Workload
Select “Compute optimized” from the dropdown
Size
Select “Extra Small (2 cores)” from the dropdown
Compute Specifications
This should be auto populated with “Standard_D11_v2” based on the Workload and Size selections
Availability Zones
Confirm default selection, “(none)”
Review settings on remaining tabs {e.g. Tags}. No additional settings are required for this exercise.
Click the “Review + create” button, validate, and then click the Create button. Allow time for processing.
Add Database
Use the Azure Portal to add an Azure Data Explorer Database.
In the newly created Data Explorer Cluster, click the “+ Add database” button.
On the “Create an Azure Data Explorer Database” popout, enter values for the following form items:
Database Name
Enter a name that is meaningful for you (and aligned with your naming standards)
Retention Period (in days)
Confirm the default value, 3650
Cache Period (in days)
Confirm the default value, 31
Click the Create button. Allow time for processing.
Review the results so you are familiar with the data for later sections.
Power Apps
This write-up assumes that you already have a working instance of the Power Platform with necessary licensing. If not, you can get started at https://powerapps.microsoft.com/en-us/
“StormEvents | where State == ‘” & Dropdown1.SelectedText.Value & “‘ | take 5”
).value
)
Click the “Capture schema” button. Allow time for processing.
Add Data Table
Click Insert in the menu bar. Click “Data table” in the resulting sub menu bar. Re-position the data table and consider adding a border for visibility.
Click on the Properties tab in the right-hand popout. Select Results from the “Data Source” dropdown.
Click the “Edit fields” link. Click “+ Add field” in the resulting popout. Select desired fields. Click the Add button.
Confirm Success
Click the “Preview the app” button in the upper-right of the screen.
Try the dropdown, scroll through the data table, and confirm successful data retrieval and presentation.
Good Job!
You have successfully completed Objective #2: Create App
Reference
Quickstart: Ingest sample data into Azure Data Explorer
This article is contributed. See the original author and article here.
Azure SQL Managed Instance provides management operations that you can use to automatically deploy new managed instances, update instance properties, and delete instances when no longer needed. All management operations can be categorized as follows:
Instance deployment (new instance creation)
Instance update (changing instance properties, such as vCores or reserved storage)
With instance operations API in place you can monitor progress of create and scaling requests across tools including Azure Portal, PowerShell, Azure CLI or using REST API itself. API and tools have in place commands for retrieving operation details and canceling ongoing operations.
Command for retrieving operation details gives insight into:
Operation start time
Operation parameters – set of properties that retrieves a list of current and requested parameters for scaling operation. In case of create operation only requested parameters are returned
Operation status – parameter that shows if operation is in progress, completed or has failed
Is operation cancelable – deployment steps in operations API are high level logical steps. Some of the micro steps beneath cannot be abandoned. This parameter represents if operation can be canceled or not in current point of time
Operation steps – set of properties that retrieves information on current step, total number of steps and each individual step details
Example of the API call for getting list of operations for the specific managed instance:
GET https://management.azure.com/subscriptions/00000000-1111-2222-3333-444444444444/resourceGroups/my-rg/providers/Microsoft.Sql/managedInstances/my-managed-instance/operations?api-version=2019-06-01-preview
Example of the API response with list of operations:
Cancel operation is executed for specific operation performed on the managed instance. Operation names that are unique and that can be found as part of the GET operation details response, are used for this purpose.
Example of the API call for canceling operation:
POST https://management.azure.com/subscriptions/00000000-1111-2222-3333-444444444444/resourceGroups/my-rg/providers/Microsoft.Sql/managedInstances/my-managed-instance/operations/11111111-1111-1111-1111-111111111111/cancel?api-version=2019-06-01-preview
Managed Instance Operations API use cases and examples
Get Operation
Command for returning operation with operation steps enables you to take dependent actions based on operation progress or simply track progress of the submitted operation.
Note: Examples displayed in this article are just the basics and there is a space for improvement in terms of additional validations or parametrization. Main goal of these examples is to bring closer benefits of management operations API.
Example 1: deploy resources dependent on managed instance deployment
In create operation or general purpose vCores scaling, step with virtual cluster resize/creation is the longest one. After it is completed you could start spinning up some other environment or app that will be connected to the managed instance as remaining steps are the shorter one and create/update operation is close to finish. In both scenarios (create or GP vCores update) virtual cluster resize/creation step is second one. For full list of steps and their order of execution visit Management Operations overview documentation article. PowerShell example for the scenario could look like the following:
#Define parameters
$managedInstance = "managed-instance-name"
$resourceGroup = "resource-group-name"
$location = "westcentralus"
$subnetId = "/subscriptions/xxxxxxxx-xxxx-xxxx-xxxx-xxxxxxxxxxxx/resourceGroups/resource-group-name/providers/Microsoft.Network/virtualNetworks/vnet-name/subnets/subnet-name"
$licenseType = "LicenseIncluded"
$vCores = 8
$storageSizeInGB = 256
$edition = "GeneralPurpose"
$hardwareGen = "Gen5"

#New SQL Managed Instance. Perform it As Job so script could proceed further.
$myNewMI = New-AzSqlInstance -Name $managedInstance -ResourceGroupName $resourceGroup -Location $location -AdministratorCredential (Get-Credential) -SubnetId $subnetId -LicenseType $licenseType -StorageSizeInGB $storageSizeInGB -VCore $vCores -Edition $edition -ComputeGeneration $hardwareGen -AsJob

#Wait for 5 minutes for validation to complete
Start-Sleep -s 300

#Get list of ongoing management operations for the instance
$managementOperations = Get-AzSqlInstanceOperation -ManagedInstanceName $managedInstance  -ResourceGroupName $resourceGroup

#Iterate over management operations to find ongoing one
foreach ($mo in $managementOperations ) {
	if($mo.State -eq "InProgress"){
		#Create ongoing operation object
        $ongoingOperation = $mo
		break
	}
}

#If there is ongoing operation
if ($ongoingOperation) {
    $operationName = $ongoingOperation.Name
    $operationSteps = $ongoingOperation.operationSteps
    $operationStep = $operationSteps.currentStep

    #While operation is in progress and operation step is less than 3 (as step 2 is virtual cluster resize/creation) do not proceed further.
    #Check state each 10 minutes (600 seconds)

    Write-Host "Operation status is: " $ongoingOperation.State
    Write-Host "Operation step is: " $operationStep

    while($ongoingOperation.State -eq "InProgress" -and $operationStep -lt 3) {
        Write-Host "Operation status is: " $ongoingOperation.State
        Start-Sleep -s 600
        $ongoingOperation = Get-AzSqlInstanceOperation -ManagedInstanceName $managedInstance  -ResourceGroupName $resourceGroup -Name $operationName
        $operationSteps = $ongoingOperation.operationSteps
        $operationStep = $operationSteps.currentStep
    }

    Write-Host "Operation result is: " $ongoingOperation.State
    Write-Host "Operation step is: " $operationStep

    #Here goes the code for starting dependent deployment
}
Example 2: deploy managed instances as part of the same DNS zone
Another scenario could be deploying two managed instances that should be part of the failover group. First instance deployment is started and operation status is checked. In addition to operation status, we can check if DNS zone field is defined for the managed instance. As soon as it is defined, we could start another instance deployment as part of the same DNS zone. Example:
#Define parameters
$managedInstance = "managed-instance-name"
$resourceGroup = "resource-group-name"
$location = "westcentralus"
$subnetId = "/subscriptions/xxxxxxxx-xxxx-xxxx-xxxx-xxxxxxxxxxxx/resourceGroups/resource-group-name/providers/Microsoft.Network/virtualNetworks/vnet-name/subnets/subnet-name"
$licenseType = "LicenseIncluded"
$vCores = 8
$storageSizeInGB = 256
$edition = "GeneralPurpose"
$hardwareGen = "Gen5"

#New SQL Managed Instance. Perform it As Job so script could proceed further.
$myNewMI = New-AzSqlInstance -Name $managedInstance -ResourceGroupName $resourceGroup -Location $location -AdministratorCredential (Get-Credential) -SubnetId $subnetId -LicenseType $licenseType -StorageSizeInGB $storageSizeInGB -VCore $vCores -Edition $edition -ComputeGeneration $hardwareGen -Force -AsJob

#Wait for 5 minutes for validation to complete
Start-Sleep -s 300

#Get list of ongoing management operations for the instance
$managementOperations = Get-AzSqlInstanceOperation -ManagedInstanceName $managedInstance  -ResourceGroupName $resourceGroup

#Get SQL Managed Instance object and DNS zone property
$newInstance = Get-AzSqlInstance -Name $managedInstance -ResourceGroupName $resourceGroup

#Iterate over management operations to find ongoing one
foreach ($mo in $managementOperations ) {
	if($mo.State -eq "InProgress"){
		#Create ongoing operation object
		$ongoingOperation = $mo
		break
	}
}

#If there is ongoing operation
if ($ongoingOperation) {
    $operationName = $ongoingOperation.Name
    #While operation is in progress and DNS zone is not configured do not proceed further.
    #Check state each 10 minutes (600 seconds)

    Write-Host "Operation status is: " $ongoingOperation.State

    while($ongoingOperation.State -eq "InProgress" -and $null -eq $newInstance.DnsZone) {
        Write-Host "Operation status is: " $ongoingOperation.State
        Start-Sleep -s 600
        $ongoingOperation = Get-AzSqlInstanceOperation -ManagedInstanceName $managedInstance  -ResourceGroupName $resourceGroup -Name $operationName
        $newInstance = Get-AzSqlInstance -Name $managedInstance -ResourceGroupName $resourceGroup
    }

    Write-Host "Operation result is: " $ongoingOperation.State
    Write-Host "DNS Zone is: " $newInstance.DnsZone

    #Here goes the code for starting second instance deployment

    #Define parameters
    $managedInstanceFOG = "managed-instance-name-fog"
    $resourceGroupFOG = "resource-group-name-fog"
    $locationFOG = "westcentralus-fog"
    $subnetIdFOG = "/subscriptions/xxxxxxxx-xxxx-xxxx-xxxx-xxxxxxxxxxxx/resourceGroups/resource-group-name-fog/providers/Microsoft.Network/virtualNetworks/vnet-name-fog/subnets/subnet-name-fog"
    $licenseTypeFOG = "LicenseIncluded"

    $myNewMIForFOG = New-AzSqlInstance -Name $managedInstanceFOG -ResourceGroupName $resourceGroupFOG -Location $locationFOG -AdministratorCredential (Get-Credential) -SubnetId $subnetIdFOG -LicenseType $licenseTypeFOG -StorageSizeInGB $storageSizeInGB -VCore $vCores -Edition $edition -ComputeGeneration $hardwareGen -Force -AsJob
}
Example 3: Scale up managed instance and kick off any data processing job that requires more compute
Customers are often facing with a situation where there are periodic jobs or tasks that require higher compute power which requires managed instance vCores scaling. Flow starts with instance scale up, then performing ETL or ML job (or any other) and then doing the instance scale down. Example script for this scenario:
#Define parameters
$managedInstance = "managed-instance-name"
$resourceGroup = "resource-group-name"
$sourceVcores = 8
$destVcores = 16

#Get SQL Managed Instance
$initialInstance = Get-AzSqlInstance -Name $managedInstance -ResourceGroupName $resourceGroup
Write-Host "Instance vCores value is: " $initialInstance.VCores

#Update SQL Managed Instance to 16 vCores. Force to skip verification. Perform it As Job so script could proceed further.
Set-AzSqlInstance -Name $managedInstance -ResourceGroupName $resourceGroup -VCore $destVcores -Force -AsJob

#Get list of ongoing management operations for the instance
$managementOperations = Get-AzSqlInstanceOperation -ManagedInstanceName $managedInstance  -ResourceGroupName $resourceGroup

#Iterate over management operations to find ongoing one
foreach ($mo in $managementOperations ) {
	if($mo.State -eq "InProgress"){
		#Create ongoing operation object
		$ongoingOperation = $mo
		break
	}
}

#If there is ongoing operation
if ($ongoingOperation) {
    $operationName = $ongoingOperation.Name

    #While operation is in progress do not proceed further. Check state each 10 minutes (600 seconds)
    Write-Host "Operation status is: " $ongoingOperation.State
    while($ongoingOperation.State -eq "InProgress") {
        Write-Host "Operation status is: " $ongoingOperation.State
        Start-Sleep -s 600
        $ongoingOperation = Get-AzSqlInstanceOperation -ManagedInstanceName $managedInstance  -ResourceGroupName $resourceGroup -Name $operationName
    }
    Write-Host "Operation result is: " $ongoingOperation.State

    #Get SQL Managed Instance and check if vCores are increased. If vCores are increased, start ML Process
    $scaledInstance = Get-AzSqlInstance -Name $managedInstance -ResourceGroupName $resourceGroup
    Write-Host "Instance vCores value is: " $scaledInstance.VCores
    if($scaledInstance.VCores -eq $destVcores ) {
        #Here goes the code for starting ML process which will be triggered after scaling operation is completed

        #Add code

        #After ML process is completed, scale down MI to 8 vCores. If there is need, adjust this part so it depends on ML result
        $restoredInstance = Set-AzSqlInstance -Name $managedInstance -ResourceGroupName $resourceGroup -VCore $sourceVcores
    }
}
Cancel operation
Cancellation of ongoing operation can be a handful when create or update request is submitted with wrong parameters or when create/update operation is running for longer than expected.
Example 1: Cancel create/update request without any condition
This article is contributed. See the original author and article here.
Ignite 2020 Neural Text-to-Speech updates: new language support, more voices and flexible deployment options
This post was co-authored by Garfield He, Melinda Ma, Yueying Liu and Yinhe Wei
Neural Text to Speech (Neural TTS), a powerful speech synthesis capability of Cognitive Services on Azure, enables you to convert text to lifelike speech which is close to human-parity. Since its launch, we have seen it widely adopted in a variety of scenarios by many Azure customers, from voice assistants to audio content creation. We continue to push the envelope to enable more developers to add natural-sounding voices to their applications and solutions.
Today, we are happy to announce a series of updates to Neural TTS that extends its reach globally and allows developers to deploy it anywhere the data resides. This includes new languages available, new voices with rich personas, and on-prem deployment through docker containers.
18 new languages/locales supported
Neural TTS has now been extended to support 18 new languages/locales. They are Bulgarian, Czech, German (Austria), German (Switzerland), Greek, English (Ireland), French (Switzerland), Hebrew, Croatian, Hungarian, Indonesian, Malay, Romanian, Slovak, Slovenian, Tamil, Telugu and Vietnamese.
You can hear samples of these voices below.
Locale
Language
Gender
Voice
Sample
bg-BG
Bulgarian
Female
Kalina
Архитектурното културно наследство в България е в опасност.
cs-CZ
Czech
Female
Vlasta
Policisté většinou chodí v uniformě a jsou označeni hodnostmi.
de-AT
German (Austria)
Female
Ingrid
Ab Herbst werden Lehrer, die sich dafür interessieren, eigens ausgebildet.
de-CH
German (Switzerland)
Female
Leni
Dreizehn Millionen Liter mehr als im Vorjahr.
el-GR
Greek
Female
Athina
Για να βρεις ποιος σε εξουσιάζει, απλώς σκέψου ποιος είναι αυτός που δεν επιτρέπεται να κριτικάρεις .
en-IE
English (Ireland)
Female
Emily
Now we have seventy members and two dragon boats.
fr-CH
French (France)
Female
Ariane
Chaque équipe jouera donc 5 matchs de 20 minutes dans sa poule.
he-IL
Hebrew (Israel)
Female
Hila
הכל פתוח במאבק על המקום האחרון לפלייאוף העליון של ליגת העל בכדורגל.
hr-HR
Croatian
Female
Gabrijela
Idemo na pobjedu u Maksimiru, pred našem publikom dat ćemo sto posto.
hu-HU
Hungarian
Female
Noemi
A macska felmászott a tetőre és leugrott.
id-ID
Indonesian
Male
Ardi
Inflasi dapat digolongkan menjadi empat golongan, yaitu inflasi ringan, sedang, berat, dan hiperinflasi.
ms-MY
Malay
Female
Yasmin
Beg berkenaan dibawa ke hospital untuk menjalankan proses pengenalan.
ro-RO
Romanian
Female
Alina
Temperaturile maxime se vor încadra între 15 şi 23 de grade Celsius.
sk-SK
Slovak
Female
Viktoria
Kúzelné miesta nájdete aj za jej hranicami, v malebnej prírode.
sl-SI
Slovenian
Female
Petra
Predlagani zakon vključuje tudi načrt nadaljnjega ukrepanja.
With these new voices, Microsoft Azure Neural TTS supports 49 languages/locales in total.
14 additional voices released to enrich the variety
Customers use TTS for different scenarios and their requirements for voice personas can vary. To provide more options to developers, we continue to create more voices in each language. Besides the extension to support new locales, we’ve announced 14 new voices to enrich the variety in the existing languages.
Hear samples of these voices below.
Locale
Language
Gender
Voice
Sample
de-DE
German
Male
Conrad
Je würziger das Fleisch, desto würziger und kräftiger sollte auch der Wein sein.
en-AU
English (Australia)
Male
William
They have told me nothing, and probably cannot tell me anything to the purpose.
en-GB
English (UK)
Male
Ryan
Today’s temperature was a record 26.5 degrees Celsius.
en-US
English (US)
Female
Jenny
For example, we place a session cookie on your computer each time you visit our Website.
es-ES
Spanish (Spain)
Male
Alvaro
Dos helicópteros medicalizados tuvieron que acudir al lugar a rescatar a los heridos.
es-MX
Spanish (Mexico)
Male
Jorge
El niño mencionó que si pudiera caminar, pediría un balón para poder patearlo o una cuerda para poder saltar.
fr-CA
French (Canada)
Male
Jean
Ce jour tant attendu arrive enfin!
fr-FR
French (France)
Male
Henri
Jusqu’ici, nous vous avons toujours fait confiance et accordé le bénefice du doute.
it-IT
Italian
Female
Isabella
I gel igienizzanti sono aumentati di prezzo.
it-IT
Italian
Male
Diego
Domani preparerò dei biscotti con le gocce di cioccolato.
ja-JP
Japanese
Male
Keita
キャッシュレス決済を利用して、支払いを簡単にする。
ko-KR
Korean
Male
InJoon
규모가 더욱 확대되었다.
pt-BR
Portuguese (Brazil)
Male
Antonio
O que você quer ganhar de presente de natal?
th-TH
Thai
Female
Premwadee
วิกฤตแบบนี้บริษัทยิ่งต้องการคนที่พร้อมเผชิญปัญหา
With these updates, Microsoft Azure Text-to-Speech service offers 68 neural voices. Across standard and neural TTS capabilities, we now offer 140+ voices in total. Check the 70+ standard voices here.
More than 15 speaking styles available in en-US and zh-CN voices
Today, we’re building upon our Neural TTS capabilities in English (US) and Chinese (CN) with new voice styles. By default, the Text-to-Speech service synthesizes text using a neutral speaking style. With neural voices, you can adjust the speaking style to express different emotions like cheerfulness, empathy, and calm, or optimize the voice for different scenarios like customer service, newscasting and voice assistant that fit your need.
With the English (US) new voice, Jenny, which is created with a friendly, warm and comforting voice persona focusing on conversational scenarios, we provide additional speaking styles including chatbot, customer service, and assistant.
You can hear the different speaking styles in Jenny’s voice below:
Style
Style description
Sample
General
Expresses a neutral tone and available for general use
Valentino Lazaro scored a late winner for Austria to deny Northern Ireland a first Nations League point.
Chat
Expresses a casual and relaxed tone in conversation
Oh, well, that’s quite a change from California to Utah.
Customer service
Expresses a friendly and helpful tone for customer support
Okay, great. In the meantime, see if you can reach out to Verizon and let them know your issue. And Randy should be calling you back shortly.
Assistant
Expresses a warm and relaxed tone for digital assistants
United States spans 2 time zones. In Nashville, it’s 9:45 PM.
A new speaking style is also available for the en-US male voice, Guy. Guy’s newscast style can be a great choice for a male voice that can read professional and news related content.
In addition, 10 new speaking styles are available with our zh-CN voice, Xiaoxiao. These new styles are optimized for audio content creators and intelligent bot developers to create more engaging interactive audios that express rich emotions.
You can hear the new speaking styles in Xiaoxiao’s voice below:
Calm
Affectionate
Angry
那,那我再问你,你之前有养过宠物嘛?
老公,把灯打开好吗,好黑呀,我很怕。
没想到,我们八年的感情真的完了!
Disgruntled
Fearful
Gentle
这你都不明白吗?真是个榆木脑袋。
先生,你没事吧?要不要我叫医生过来?
我今天运气特别好,如果没有遇到您,还不知道会怎么样呢!
Cheerful
Serious
Sad
太好了,恭喜你顺利通过考核。
不要恋战,等待时机,随时准备突围。
没想到,你居然是这么一个无情无义的的人!
For the Chinese voice Xiaoxiao, the intensity (‘style degree’) of speaking style can be further adjusted to better fit your use case. You can specify a stronger or softer style with ‘style degree’ to make the speech more expressive or subdued.
没想到,你居然是这么一个无情无义的的人!
Sad=0.5
Sad=1.0
Sad=1.5
Sad=2.0
The style degree can be adjusted from 0.01 to 2 inclusive. The default value is 1 which means the predefined style intensity will be applied. The minimum unit is 0.01, which softens the style with a flatter tone. The value of 2 is the highest, which makes the style intensity obviously stronger than the default.
The SSML snippet below illustrates how the ‘style degree’ attribute is used to change the intensity of a speaking style.
The ‘style degree’ feature currently only applies to the Chinese voice Xiaoxiao and will come to more languages and voices later soon.
Check SSML for the details on how to use these speaking styles, together with other rich voice tuning capabilities.
Neural TTS Container is in public preview with 16 voices available in 14 languages
We have launched Neural TTS Container in public preview, as we are seeing a clear trend towards a future powered by the intelligent cloud and intelligent edge. With Neural TTS Container, developers can run speech synthesis with the most natural digital voices in their own environment for specific security and data governance requirements. Their Speech apps are portable and scalable with greater consistency whether they run on the edge or in Azure.
Currently 14 languages/locales are supported with 16 voices in Neural TTS Containers, as listed below.
Locale
Voice
de-de
KatjaNeural
en-au
NatashaNeural
en-ca
ClaraNeural
en-gb
LibbyNeural
en-gb
MiaNeural
en-us
AriaNeural
en-us
GuyNeural
es-es
ElviraNeural
es-mx
DaliaNeural
fr-ca
SylvieNeural
fr-fr
DeniseNeural
it-it
ElsaNeural
ja-jp
NanamiNeural
ko-kr
SunHiNeural
pt-br
FranciscaNeural
zh-cn
XiaoxiaoNeural
To get started, fill out and submit the request form to request access to the container. Currently Neural TTS Containers are gated and only approved for enterprises (EA customers) and Microsoft partners, and to an extent only for qualified customers.
Azure Cognitive Services Containers including Neural TTS Containers aren’t licensed to run without being connected to the metering / billing endpoint. You must enable the containers to communicate billing information with the billing endpoint at all times. Cognitive Services containers don’t send customer data, such as the image or text that’s being analyzed, to Microsoft. Queries to the container are billed at the pricing tier of the Azure resource that’s used for the ApiKey.
Here are the steps of how to install and run the container:
Get the container image with docker pull. For all the supported locales and corresponding voices of the neural text-to-speech container, please see Neural Text-to-speech image tags.
With these updates, we’re excited to be powering natural and intuitive voice experiences for more customers globally with flexible deployment options. For more information, visit below.
This article is contributed. See the original author and article here.
Microsoft Information Protection (MIP) integrations continue to see great momentum and interest from our partners and customers. These integrations help customers adopt and derive the benefits of Microsoft Information Protection to meet their security and compliance. The Microsoft Information Protection development platform consists of SDKs, APIs, and various other programmatic interfaces. Following are some examples of how some of the industry leaders are using MIP development platform to build innovative solutions solving customer’s Security and Compliance related needs.
Symantec Integration with Microsoft Benefits Customers
Symantec and Microsoft together help enterprises protect their sensitive data wherever it lives and travels with the deepest data discovery and protection available in the industry. Customers can now take full advantage of Symantec Data Loss Prevention’s powerful content inspection engine combined with the broad classification and encryption capabilities provided by Microsoft Information Protection (MIP). The integrated solution gives customers the ability to detect and read MIP-labeled and -protected documents and emails. In the upcoming release, customers will also be able to automatically suggest and enforce MIP labels for sensitive and personal data with greater accuracy based on their DLP policies. Thanks to this interoperability, enterprises are able to better ensure consistent enforcement of policies across all control points (endpoints, email, web, storage, and cloud apps), prevent data leaks, and address privacy regulations, such as GDPR and CCPA.
McAfee MVISION seamlessly integrates with MIP to detect and apply labels
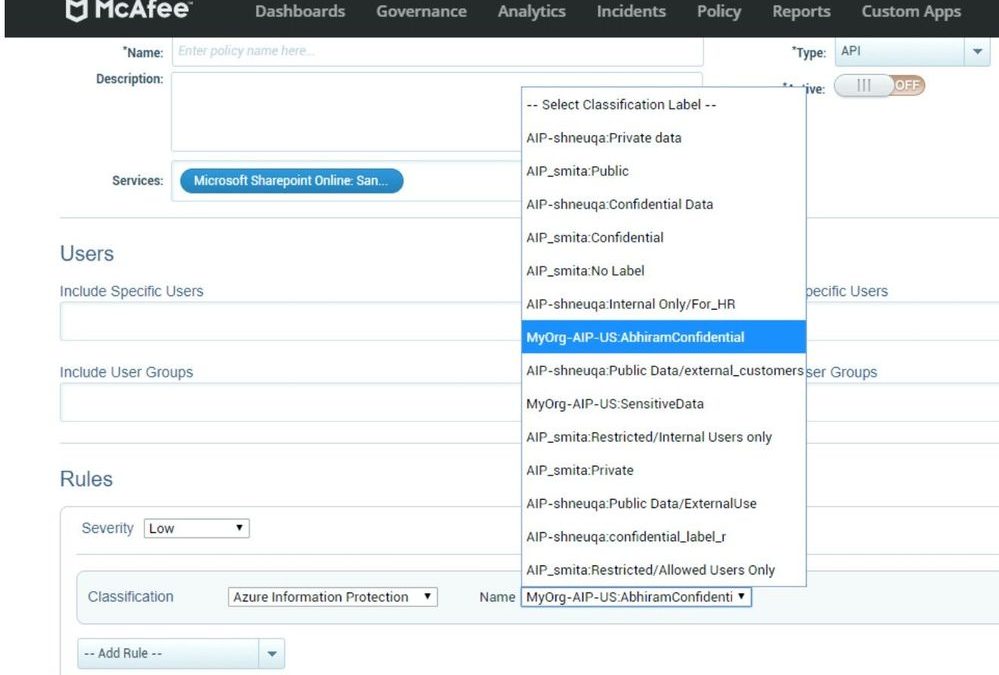
McAfee MVISION Cloud integrates directly with Microsoft Information Protection (MIP) API’s to seamlessly detect and apply MIP labels to sensitive data discovered by the McAfee’s cloud-native Data Loss Prevention (DLP) service. For example, for data already protected by Microsoft Information Protection, MVISION Cloud’s DLP can read the MIP metadata and allow or prevent data dissemination or collaboration such as when an employee shares confidential data with a 3rd party. For sensitive data not yet protected, MVISION Cloud can detect sensitive data and apply MIP label to assure that customer data is protected as intended. If labels have ‘Encryption’ turned on, the documents classified with those labels will be automatically encrypted. As an example, a customer may push PCI data to SharePoint; in this case an MIP label can be applied to protect the data based on the MIP protection framework. The screenshot shows that MVISION Cloud retrieves all predefined MIP policies for use with the DLP service.
Relativity uses MIP to empower Communication Compliance for customers
Relativity Trace is used by compliance teams to monitor the communications of high-risk individuals – across email, chat, email, and audio – in near real-time. Using AI and machine learning the system automatically flags conversations that exemplify scenarios of collusion, corruption, complaints, market manipulation, excessive gifts, sharing of sensitive information and others for compliance analysts to review. Our clients know that encrypting data through the use of Microsoft Information Protection (MIP) labels greatly improves overall security within their organization, but the encryption of content can make it difficult for compliance teams to identify internal threats. To solve this issue, Relativity Trace has built secure MIP decryption into the product using the MIP SDK, so all content can be analyzed for risk and compliance analysts can understand the complete story of a communication. This integration ensures compliance teams can efficiently protect their organization and meet regulatory obligations without degrading security throughout the organization.
Relativity Screenshot
VMware’s Boxer and Workspace ONE enables security and compliance for customers
Boxer’s integration with the MIP SDK enables our corporate clients to use MIP Sensitivity labels and secure the emails and documents which they exchange within or outside their organizations.
The real innovation of the unified labelling is in the combination of three different components: classification, protection, and encryption that already exist on their own. AIP Sensitivity labels provide an excellent end-user experience by allowing users to secure their information by simply applying a label. Organizations can also boost their security and Data Loss Prevention policies with a comprehensive and unified approach for the data protection.
With classification, our users can add header and footer text to an email or watermark to a document. With protection, the content can be limited to be used by a specific group of people.
Further restrictions may include specific actions such as do not view, do not forward, do no reply and more. In addition, labels can even limit for how long the content will be available.
Currently the MIP Sensitivity labels are in General Availability and we are onboarding our first customers.
On another exciting note, VMware’s Workspace ONE Content app is also now leveraging the MIP SDK to provide editing of AIP documents and will soon follow with adding AIP Sensitivity labels.


Recent Comments