This article is contributed. See the original author and article here.
Prologue – The creation of a new proxy with Linux, Rust, and OSS
In this introductory blog to the new Azure Front Door next generation platform, we will go over the motivations, design choices and learnings from this undertaking which helped us successfully achieve massive gains in scalability, security and resiliency.
Introduction
Azure Front Door is a global, scalable, and secure entry point for caching and acceleration of your web content. It offers a range of features such as load balancing, caching, web application firewall, and a rich rules engine for request transformation. Azure Front Door operates at the edge of Microsoft’s global network and handles trillions of requests per day from millions of clients around the world.
Azure Front Door, originally built upon a Windows-based proxy, has been a critical component in serving and protecting traffic for Microsoft’s core internet services. As the commercial offering of Azure Front Door expanded, and with the ever-evolving landscape of security and application delivery, we recognized the need for a new platform. This new platform would address the growing demands of scale, performance, cost-effectiveness, and innovation, ensuring we are able to meet the challenging scale and security demands from our largest enterprise customers. For our next-generation Azure Front Door platform, we opted to build it on Linux and embrace the open-source software community. The new edge platform was designed to incorporate learnings from the previous proxy implementation, while allowing us to accelerate innovation and deliver enhanced value to our customers. We will delve into the key design and development decisions that shaped the next generation proxy, and a modern edge platform that meets innovation, resiliency, scale and performance requirements of Azure and Microsoft customers.
Why Linux and Open Source?
A key choice that we made during the development of the new proxy platform was to use Linux as the operating system for the proxy. Linux offers a mature and stable platform for running high-performance network applications and it has a rich ecosystem of tools and libraries for network programming which allows us to leverage the expertise and experience of the open-source community.
Another reason for choosing Linux was that it offers a vibrant ecosystem with containers and Kubernetes for deploying and managing the proxy instances. The use of containers and Kubernetes offer many benefits for cloud-native applications, such as faster and easier deployment, scaling, and updates, as well as better resource utilization and isolation. By using containers and Kubernetes, we were also able to take advantage of the existing infrastructure and tooling that Microsoft has built for running Linux-based services on Azure.
The next decision that we made was to use open-source software as the basis of the platform. We selected high-quality and widely used open-source software for tasks like TLS termination, caching, and basic HTTP proxying capabilities. By using existing and reliable open-source software as the foundation of the new edge platform, we can concentrate on developing the features and capabilities that are unique to Azure Front Door. We also gain from continuous development and enhancement by the open-source community.
How did we build the next generation proxy?
While open-source software provides a solid foundation for the new proxy, it does not cover all the features and capabilities that we need for Azure Front Door. Azure Front Door is a multi-tenant service that supports many custom proxy features that are not supported by any open-source proxy. Building the proxy from scratch was faced with multiple design challenges but in this blog we will focus on the top two that helped build the foundation of the new proxy. We will discuss other aspects such as resilient architecture and protection features in later parts of this blog series.
Challenge 1: Multi-Tenancy
The first major challenge in developing Azure Front Door as a multi-tenant service was ensuring that the proxy could efficiently manage the configurations of hundreds of thousands of tenants, far surpassing the few hundred tenants typically supported by most open-source proxies. Each tenant’s configuration dictates how the proxy handles their HTTP traffic, making the configuration lookup an extremely critical aspect of the system. This requires all tenant configurations to be loaded into memory for high performance.
Processing configuration for hundreds of thousands of tenants means that the system needs to handle hundreds of config updates every second which requires dynamic updates to the data path without disrupting any packets. To address this, Azure Front Door adopted a binary configuration format which supports zero-copy deserialization and ensures fast lookup times. This choice is crucial not only for efficiently managing current tenant configurations but also for scaling up to accommodate future growth, potentially increasing the customer base tenfold. Additionally, to handle dynamic updates to the customer configuration delivered by the Azure Front Door’s configuration pipeline, a custom module was developed to asynchronously monitor and update the config in-memory.
Challenge 2: Customer business logic
One of the most widely adopted features of Azure Front Door is our Rules Engine, which allows our customers to set up custom rules tailored for their traffic. To build the proxy from scratch means that we must enable this extremely powerful use case in the open-source proxy, which brings us to our second challenge. Rather than creating fixed modules for each rule, we chose to innovate.
We developed a new domain-specific language (DSL) named AXE (Arbitrary eXecution Engine), specifically designed to add and evolve data plane capabilities swiftly. AXE is declarative and expressive, enabling the definition and execution of data plane processing logic in a structured yet flexible manner. It represents the rules as a directed acyclic graph (DAG), where each node signifies an operation or condition, and each edge denotes data or control flow. This allows AXE to support a vast array of operations and conditions, including:
Manipulating headers, cookies, and query parameters
Regex processing
URL rewriting
Filtering and transforming requests and responses
Invoking external services
These capabilities are integrated at various phases of the request processing cycle, such as parsing, routing, filtering, and logging.
AXE is implemented as a custom module in the new proxy, where it interprets and executes AXE scripts for each incoming request. The module is built on a fast, lightweight interpreter that operates in a secure, sandboxed environment, granting access to necessary proxy variables and functions. It also supports asynchronous and non-blocking operations, vital for non-disruptive external service interactions and timely processing.
This innovative approach to building and integrating the Rules Engine using AXE ensures that Azure Front Door remains a cutting-edge solution, capable of meeting and exceeding the dynamic requirements of our customers. Though AXE was developed for supporting Rules Engine feature of Azure Front Door, it was so flexible that we use it to power our WAF module now.
Why Rust?
Another important decision that we made while building the next generation proxy was to write new code in Rust, a modern and safe systems programming language. All the components we mentioned in the section above are either written in Rust or being actively rewritten in Rust. Rust is a language that offers high performance, reliability, and productivity, and it is gaining popularity and adoption in the network programming community. Rust has several features and benefits that make it a great choice for the next generation proxy, such as:
Rust has a powerful and expressive type system that helps us write correct and robust code. Rust enforces strict rules and performs all checks at compile time to prevent common errors and bugs, such as memory leaks, buffer overflows, null pointer exceptions, and data races. Rust also supports advanced features found in modern high-level languages such as generics, traits, and macros, that allow us to write generic and reusable code.
Rust has a concise and consistent syntax that avoids unnecessary boilerplate and encourages common conventions and best practices. Rust also has a rich and standard library that provides a wide range of useful and high-quality functionality with an emphasis on safety and performance, such as collections, iterators, string manipulation, error handling, networking, threading, and asynchronous execution abstractions.
Rust has a strong and vibrant community that supports and contributes to the language and its ecosystem. It has a large and growing number of users and developers who share their feedback, experience, and knowledge through various channels, such as forums, blogs, podcasts, and conferences. Rust also has a thriving and diverse ecosystem of tools and libraries that enhance and extend the language and its capabilities, such as IDEs, debuggers, test frameworks, web frameworks, network libraries, and AI/ML libraries.
We used Rust to write most of the new code for the proxy. By using Rust, we were able to write highly performant and reliable code for the proxy, while also improving our development velocity by leveraging existing Rust libraries. Rust helped us avoid many errors and bugs that could have compromised the security and stability of the proxy, and it also made our code more readable and maintainable.
Conclusion
The Azure Front Door team embarked on this journey to overhaul the entire platform a few years ago by rewriting the proxy and changing the infrastructure hosting the proxy. This effort enabled us to increase our density and throughput by more than double along with significant enhancements to our resiliency and scalability. We have successfully completed the transition of Azure Front Door customers from the old platform to the new one without any disruption. This challenging task was like changing the wings of a plane while it is airborne.
In this blog post, we shared some of the design and development challenges and decisions that we made while building the next generation edge platform for Azure Front Door that is based on Linux and uses Rust and OSS to extend and customize its functionality. We will share more details about AXE and other data plane and infrastructure innovations in later posts.
If you want to work with us and help us make the internet better and safer, we have some great opportunities for you. Azure Front Door team is looking to hire more engineers in different locations, such as USA, Australia, and Ireland. You can see more details and apply online at the Microsoft careers website. We hope to hear from you and welcome you to our team.
This article is contributed. See the original author and article here.
One year ago, generative AI burst onto the scene and for the first time since the smartphone, people began to change the way they interact with technology. People are bringing AI to work at an unexpected scale — and now the big question is, how’s it going?
As AI becomes ubiquitous in the workplace, employees and businesses alike are under extreme pressure. The pace and intensity of work, which accelerated during the pandemic, has not eased, so employees are bringing their own AI to work. Leaders agree AI is a business imperative — and feel the pressure to show immediate ROI — but many lack a plan and vision to go from individual impact to applying AI to drive the bottom line.
At the same time, the labor market is set to shift and there’s a new AI economy. While some professionals worry AI will replace their job, the data tells a more nuanced story — of a hidden talent shortage, more employees eyeing a career change, and a massive opportunity for those willing to skill up.
“AI is democratizing expertise across the workforce,” said Satya Nadella, Chairman and Chief Executive Officer, Microsoft. “Our latest research highlights the opportunity for every organization to apply this technology to drive better decision-making, collaboration — and ultimately business outcomes.”
For our fourth annual Work Trend Index, out today, we partnered with LinkedIn for the first time on a joint report so we could provide a comprehensive view of how AI is not only reshaping work, but the labor market more broadly. We surveyed 31,000 people across 31 countries, identified labor and hiring trends from LinkedIn, analyzed trillions of Microsoft 365 productivity signals and conducted research with Fortune 500 customers. The data points to insights every leader and professional needs to know — and actions they can take — when it comes to AI’s implications for work.
1. Employees want AI at work — and won’t wait for companies to catch up.
Three in four knowledge workers (75%) now use AI at work. Employees, overwhelmed and under duress, say AI saves time, boosts creativity and allows them to focus on their most important work. While 79% of leaders agree AI adoption is critical to remain competitive, 59% worry about quantifying the productivity gains of AI and 60% worry their company lacks a vision and plan to implement it. While leaders feel the pressure to turn individual productivity gains into organizational impact, employees aren’t waiting to reap the benefits: 78% of AI users are bringing their own AI tools to work. The opportunity for every leader is to channel this momentum into ROI.
2. For employees, AI raises the bar and breaks the career ceiling.
We also see AI beginning to impact the job market. While AI and job loss are top of mind for some, our data shows more people are eyeing a career change, there are jobs available, and employees with AI skills will get first pick. The majority of leaders (55%) say they’re worried about having enough talent to fill open roles this year, with leaders in cybersecurity, engineering, and creative design feeling the pinch most.
And professionals are looking. Forty-six percent across the globe are considering quitting in the year ahead — an all-time high since the Great Reshuffle of 2021 — a separate LinkedIn study found U.S. numbers to be even higher with 85% eyeing career moves. While two-thirds of leaders wouldn’t hire someone without AI skills, only 39% of users have received AI training from their company. So, professionals are skilling up on their own. As of late last year, we’ve seen a 142x increase in LinkedIn members adding AI skills like Copilot and ChatGPT to their profiles and a 160% increase in non-technical professionals using LinkedIn Learning courses to build their AI aptitude.
In a world where AI mentions in LinkedIn job posts drive a 17% bump in application growth, it’s a two-way street: Organizations that empower employees with AI tools and training will attract the best talent, and professionals who skill up will have the edge.
3. The rise of the AI power user — and what they reveal about the future.
In the research, four types of AI users emerged on a spectrum — from skeptics who rarely use AI to power users who use it extensively. Compared to skeptics, AI power users have reoriented their workdays in fundamental ways, reimagining business processes and saving over 30 minutes per day. Over 90% of power users say AI makes their overwhelming workload more manageable and their work more enjoyable, but they aren’t doing it on their own.
Power users work for a different kind of company. They are 61% more likely to have heard from their CEO on the importance of using generative AI at work, 53% more likely to receive encouragement from leadership to consider how AI can transform their function and 35% more likely to receive tailored AI training for their specific role or function.
“AI is redefining work and it’s clear we need new playbooks,” said Ryan Roslansky, CEO of LinkedIn. “It’s the leaders who build for agility instead of stability and invest in skill building internally that will give their organizations a competitive advantage and create more efficient, engaged and equitable teams.”
The prompt box is the new blank page
We hear one consistent piece of feedback from our customers: talking to AI is harder than it seems. We’ve all learned how to use a search engine, identifying the right few words to get the best results. AI requires more context — just like when you delegate work to a direct report or colleague. But for many, staring down that empty prompt box feels like facing a blank page: Where should I even start?
Today, we’re announcing Copilot for Microsoft 365 innovations to help our customers answer that question.
If you’ve got the start of a prompt, Copilot will offer to auto-complete it to get to a better result, suggesting something more detailed to help ensure you get what you’re looking for. That not only speeds things up, it offers you new ideas for how to leverage Copilot’s power.
Other times, you know exactly what you want — you’re just not sure how to ask. With its new rewrite feature, Copilot turns a basic prompt into a rich one with the click of a button, turning everyone into a prompt engineer.
Catch Up, a new chat interface that surfaces personal insights based on your recent activity, provides responsive recommendations, like “You have a meeting with the sales VP on Thursday. Let’s get you prepared — click here to get detailed notes.”
We also know that every role, team and function has unique needs and ways of working. To help create prompts for exactly the work you do, you’ll soon be able to create, publish and manage prompts in Copilot Lab that are expressly tailored to your closest teams.
These features will be available in the coming months, and in the future, we’ll take it a step further, with Copilot asking you questions to get to your best work yet.
LinkedIn has also made free over 50 learning courses to empower professionals at all levels to advance their AI aptitude.
Head to WorkLab for the full Work Trend Index Report, and head to LinkedIn to hear more from LinkedIn’s Chief Economist, Karin Kimbrough, on how AI is reshaping the labor market.
And for all the blogs, videos and assets related to today’s announcements, please visit our microsite.
This article is contributed. See the original author and article here.
Cloud computing and the rapid pace of emerging technologies have made identifying and upskilling talent an increased challenge for organizations. And AI is further widening this skills gap. A recent IDC infographic, commissioned by Microsoft, highlights that organizations are adopting AI, but a shortage of skilled employees is hindering their AI-based initiatives, with 52% citing a lack of skilled workers as the top blocker. [1]
We’re seeing more organizations use a skills-first approach to address the challenge of attracting, hiring, developing, and redeploying talent.This new shift in talent management emphasizes a person’s skills and competencies—in addition to degrees, job histories, and job titles.
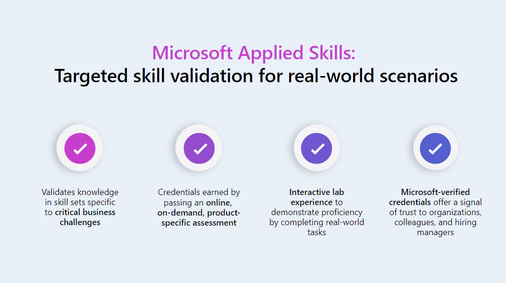
At Microsoft, we value our people, their skills, and the impact they make. We follow the skills-first approach for our employees’ development, and we want to enable you to do the same as your organization pursues the opportunities for growth and innovation presented by cloud and AI. That’s why we’ve evolved ourMicrosoft Credentials, to give you the tools you need as you invest in and expand your workforce. Our credentials offer organizations the flexibility to grow the skills needed for critical roles with Microsoft Certifications, and the agility to expand the skills needed for real-world business opportunities with Microsoft Applied Skills.
Take on high priority projects with Applied Skills
We developed Microsoft Applied Skills, new verifiable credentials that validate specific real-world skills, to help you address your skills gaps and empower your employees with the in-demand expertise they need. Applied Skills credentials are earned through interactive lab-based assessments on Microsoft Learn, offering flexibility with optional training that accommodates individual learning journeys. Your team members can earn credentials at their own pace, aligning with project timelines.
Recently, we’ve received outstanding feedback regarding the significant value-add of Applied Skills from Telstra, Australia’s leading telecommunications and technology company: “There are so many opportunities for us to leverage this across our skilled workforce at Telstra,” notes Cloud and Infrastructure Lead Samantha Davies.
Applied Skills also be useful to prepare their teams before they start work on highly technical new projects. Charlyn Tan, Senior Chapter Lead, Cloud Engineering, points out that, “Being in a company with multiple technology stacks integrating and interacting with each other, it is important to have multiple scenario-based learnings for our people to upskill and experiment before they jump into the actual production environment.”
Watch this video to see how Telstra plans to integrate Applied Skills as part of their broader skilling strategy moving forward.
Here are a few more ways Microsoft Applied skills can help your organization:
Identify talent for projects: Whether you want to maximize the skill sets of your own team members or recruit new talent, Applied Skills helps you identify the right people with the specific skills required for critical projects.
Accelerate the release of new projects or products: Applied Skills can help your team quickly acquire, prove, and apply in-demand skills so projects move forward with increased success and reduced cost.
Retaining and upskilling talent: Applied Skills can help team members demonstrate their technical expertise so they can advance in their career and make an impact on projects that involve emerging technologies including AI.
Snapshot of Microsoft Applied Skills benefits to organizations
Upskill your teams in AI—and more—with Applied Skills
Applied Skills credentials provide a new way for employees to upskill for key AI transformation projects and help you assess how your organization can best leverage AI.
Explore our current portfolio of Applied Skills and certifications that are focused specifically on AI (with more to come):
Snapshot of Microsoft Applied Skills credentials currently available
Learn more
Explore Applied Skills today and invest in a nimble and resilient workforce ready to take on new projects, no matter how specialized. Through a variety of resources available on Microsoft Learn, we ensure that we’re partnering with organizations like yours to help you address challenges and maximize opportunities with comprehensive credentials and skilling solutions.
Be sure to follow us on X and LinkedIn, and get subscribed to “The Spark,” our LinkedIn newsletter, to stay updated on new Applied Skills as they are released.
This article is contributed. See the original author and article here.
Microsoft Defender for Cloud becomes the first CNAPP to protect enterprise-built AI applications across the application lifecycle
The AI transformation has accelerated with the introduction of generative AI (GenAI), unlocking a wide range of innovations with intelligent applications. Organizations are choosing to develop new GenAI applications and embed AI into existing applications to increase business efficiency and productivity.
Attackers are increasingly looking to exploit applications to alter the designed purpose of the AI model with new attacks like prompt injections, wallet attacks, model theft, and data poisoning, while increasing susceptibility to known risks such as data breaches and denial of service. Security teams need to be prepared and ensure they have the proper security controls for their AI applications and detections that address the new threat landscape.
As a market-leading cloud-native application protection platform (CNAPP), Microsoft Defender for Cloud helps organizations secure their hybrid and multicloud environments from code-to-cloud. We are excited to announce the preview of new security posture and threat protection capabilities to enable organizations to protect their enterprise-built GenAI applications throughout the entire application lifecycle.
With the new security capabilities to protect AI applications, security teams can now:
Continuously discover GenAI application components and AI-artifacts from code to cloud.
Explore and remediate risks to GenAI applications with built-in recommendations to strengthen security posture
Identify and remediate toxic combinations in GenAI applications using attack path analysis
Hunt and investigate attacks in GenAI apps with built-in integration with Microsoft Defender
Start secure with AI security posture management
With 98% of organizations using public cloud embracing a multicloud strategy[1], many of our customers use Microsoft Defender Cloud Security Posture Management (CSPM) in Defender for Cloud to get visibility across their multicloud environments and address cloud sprawl. With the complexities of AI workloads and its configurations across models, SDKs, and connected datastores – visibility into their inventory and the risks associated with them is more important than ever.
To enable customers to gain a better understanding of their deployed AI applications and get ahead of potential threats – we’re announcing the public preview of AI security posture management (AI-SPM) as part of Defender CSPM.
Defender CSPM can automatically and continuously discover deployed AI workloads with agentless and granular visibility into presence and configurations of AI models, SDKs, and technologies used across AI services such as Azure OpenAI Service, Azure Machine Learning, and Amazon Bedrock.
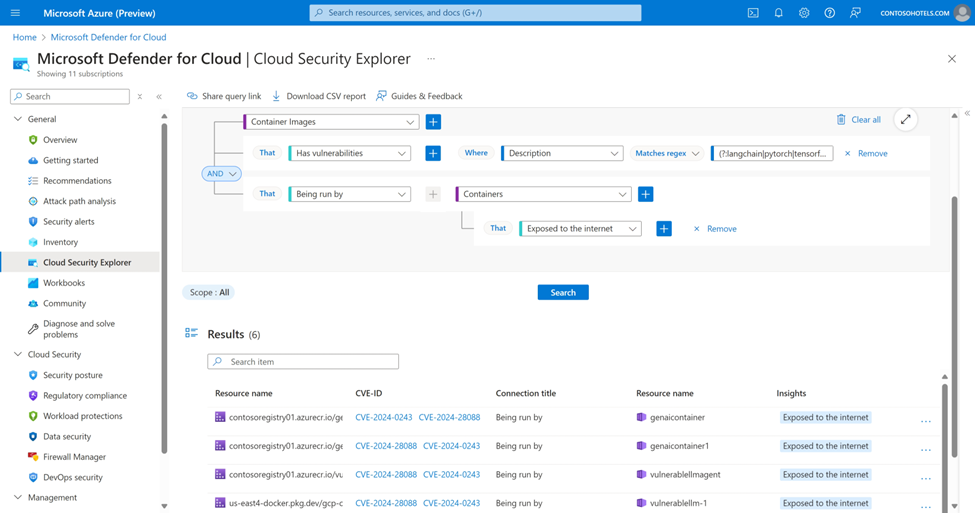
The new AI posture capabilities in Defender CSPM discover GenAI artifacts by scanning code repositories for Infrastructure-as-Code (IaC) misconfigurations and scanning container images for vulnerabilities. With this, security teams have full visibility of their AI stack from code to cloud and can detect and fix vulnerabilities and misconfigurations before deployment. In the example below, the cloud security explorer can be used to discover several running containers across clouds using LangChain libraries with known vulnerabilities.
Using the cloud security explorer in Defender for Cloud to discover container images with CVEs on their AI-libraries that are already deployed in containers in Azure, AWS and GCP.
By mapping out AI workloads and synthesizing security insights such as identity, data security, and internet exposure, Defender CSPM continuously surfaces contextualized security issues and suggests risk-based security recommendations tailored to prioritize critical gaps across your AI workloads. Relevant security recommendations also appear within the Azure OpenAI resource itself in Azure portal, providing developers or workload owners direct access to recommendations and helping remediate faster.
Recommendations and alerts surfaced directly in the resource page of Azure OpenAI in the Azure portal, aiming to meet business users and resource owners directly.
Grounding and fine tuning are top of mind for organizations to infuse their GenAI with the relevant business context. Our attack path analysis capability can identify sophisticated risks to AI workloads including data security scenarios where grounding or fine-tuning data is exposed to the internet through lateral movement and is susceptible to data poisoning.
This attack path has identified that a VM with vulnerabilities has access to a data store that was tagged as a grounding resource for GenAI applications. This opens the data store to risks such as data poisoning.
A common oversight around grounding happens when the GenAI model is grounded with sensitive data and could pose an opening to sensitive data leaks. It is important to follow architecture and configuration best practices to avoid unnecessary risks such as unauthorized or excessive data access. Our attack paths will find sensitive data stores that are linked to AI resources and extend wide privileges. This will allow security teams to focus their attention on the top recommendations and remediations to mitigate this.
This attack path has captured that the GenAI application is grounded with sensitive data and is internet exposed, making the data susceptible to leakage if proper guardrails are not in place.
Furthermore, attack path analysis in Defender CSPM can discover risks for multicloud scenarios, such as an AWS workload using an Amazon Bedrock model, and cross-cloud, mixed stacks that are typical architectures where the data and compute resources are in GCP or AWS and leverage Azure OpenAI model deployments.
An attack path surfacing vulnerabilities in an Azure VM that has access to an Amazon account with an active Bedrock service. These kinds of attack paths are easy to miss given their hybrid cloud nature.
Stay secure in runtime with threat protection for AI workloads
With organizations racing to embed AI as part of their enterprise-built applications, security teams need to be prepared with tailored threat protection to emerging threats to AI workloads. The potential attack techniques targeting AI applications do not revolve around the AI model alone, but rather the entire application as well as the training and grounding data it can leverage.
To complement our posture capabilities, today we are thrilled to announce the limited public preview of threat protection for AI workloads in Microsoft Defender for Cloud. The new threat protection offering leverages a native integration Azure OpenAI Service, Azure AI Content Safety prompt shields and Microsoft threat intelligence to deliver contextual and actionable security alerts. Threat protection for AI workloads allows security teams to monitor their Azure OpenAI powered applications in runtime for malicious activity associated with direct and in-direct prompt injection attacks, sensitive data leaks and data poisoning, as well as wallet abuse or denial of service attacks.
GenAI applications are commonly grounded with organizational data, if sensitive data is held in the same data store, it can accidentally be shared or solicited via the application. In the alert below we can see an attempt to exfiltrate sensitive data using direct prompt injection on an Azure OpenAI model deployment. By leveraging the evidence provided, SOC teams can investigate the alert, assess the impact, and take precautionary steps to limit users access to the application or remove the sensitive data from the grounding data source.
The sensitive data that was passed in the response was detected and surfaced as an alert in the Defender for Cloud.
Defender for Cloud has built-in integrations into Microsoft Defender XDR, so security teams can view the new security alerts related to AI workloads using Defender XDR portal. This gives more context to those alerts and allows correlations across cloud resources, devices, and identities alerts. Security teams can also use Defender XDR to understand the attack story, and related malicious activities associated with their AI applications, by exploring correlations of alerts and incidents.
An incident in Microsoft Defender XDR detailing 3 separate Defender for Cloud alerts originating from the same IP targeting the Azure OpenAI resource – sensitive data leak, credential theft and jailbreak detections.
Learn more about securing AI applications with Defender for Cloud
Get started with AI security posture management in Defender CSPM
Get started with threat protection for AI workloads in Defender for Cloud
Get access to threat protection for AI workloads in Defender for Cloud in preview
Read more about securing your AI transformation with Microsoft Security
This article is contributed. See the original author and article here.
Scale your Azure Web App automatically using Azure App Service Automatic Scaling
In this article we will focus on scaling azure web apps and how the new automatic scaling feature of azure app service, which allows it to scale out and in, in response to HTTP web traffic against your web app is a great feature which further enhances cost savings and improves the availability and resiliency of your web application under conditions of load.
We will also try to understand how automatic scaling is different (and at times based on scenarios better) than rule scaling, how to better understand and configure scaling limits and how it impacts scaling of different web applications sharing the same app service plan.
A look at existing options to scale an Azure Web App
Manual scale: This is the simplest form of scaling where you decide on a fixed number of instances that you code needs to execute. This may seem similar to deploying an application to a virtual machine, but it has many advantages such as deploying code only once, no management of underlying hardware and as your needs change you can always change the number of instances running without having to deploy the code again.
Rule based auto scale: This has been the most used scale option on azure web apps. This is further sub classified in two options.
Scale based on a schedule: Let’s say your application is used by your users in a predictable manner, for instance an intranet application used by office employees will most likely see traffic consistently during the working days or a payroll application will see traffic once or twice a month (depending how you get your paycheck) for a period of 3-5 days, customers have traditionally been creating these schedules to scale an application out (and in: let’s forget to scale an application back in) using configurations as shown in example below, which allows the web application to run specific number of instances during the specific period of time during the specified days.
Scale based on a metric: This has been the most advanced and a complex scaling condition to set. It allows you to configure the web application to scale in response to how a metric such as CPU Percentage or Memory Percentage of the underlying existing hosts changes during the load conditions. The way this is configured is how we configure an azure monitor metric alert and in response to it, in addition to firing an optional notification, the platform allows you to automatically scale out or in by adding or removing one or more instances of a fresh worker that can cater to your end user application traffic.
Although it works well but I have seen users having their fair share of challenges while setting this up with the common ones, I have faced, being
Which metric should I use to scale? If your application has adopted message or event-based mechanisms, then it is an even more special case to consider the queue depth etc.
Metrics are always aggregated over a period and if your application sees short bursts of load also referred to a transient spike, chances are high that by the time the scale out logic triggers your application may have already passed its peak demand and the scale out operation may not really help. You can try to keep evaluating your rule on a smaller duration and then match it with a smaller cool down period associated with aggressive scale out (meaning you add more instances quickly) and controlled scale in (meaning you scale back in smaller decrements over a longer duration) to cover for any next transient spike. You will see when you try it that it takes several attempts and good proactive monitoring before you get this balance working and the cost savings are less than optimal with a cohort of users complaining about slow response times often.
You forget to create a scale in rule, and you only realize this at the end of the month when you get your invoice, and you are billed for a much higher number of web app instances than what you had planned for.
Automatic Scaling
With Automatic Scaling, instead of us choosing a metric or configuring a schedule, the app service platform continues to monitor the HTTP traffic as soon as your application starts receiving it. Automatic Scaling periodically checks the /admin/host/ping endpoint along with other health check mechanisms inherent to the platform. These checks are specifically implemented features, with worker health assessments occurring at least once every few seconds. If the system detects increased load on the application, health checks become more frequent. In the event of deteriorating workers’ health and slowing requests, additional instances are requested. Once the load subsides, the platform initiates a review for potential scaling in. This process typically begins approximately 5-10 minutes after the load stops increasing. During scaling in, instances are removed at a maximum rate of one every few seconds to a minute.
As you dig in, you will realize that automatic scaling is very similar to the Elastic Premium plan that was introduced a while back for Azure Function Apps. If you are already familiar with Elastic Premium plans and are using them, then you will find the below section as a refresher to the concepts and you can choose to skip it.
Few terms to understand before we get into more details
Pre-warmed instances: Consider this as an additional buffer worker that is ready to receive your applications traffic at moment’s notice. Using pre-warmed instances helps greatly reduce the time it takes to perform a scale-out operation. The default prewarmed instance count is 1 and, for most scenarios, this value should remain as 1. Currently, it is not possible to modify this setting to a higher number using the portal experience, but you can use the CLI, if you want to play around. Be mindful that you are charged for pre-warmed instances so unless you have tested that the default value of 1 does not work for you, do not change it.
Maximum burst: Number of instances this plan can scale out under load. Value should be greater than or equal to current instances for this plan. This value is set at the level of the app service plan and in case you have multiple app services sharing the same plan and you want to see them scale independently then set the “Maximum scale limit” which is a setting that limits the number of instances a specific app under the app service plan can scale up to. All apps combined under the app service plan will be limited to this maximum burst value.
Maximum scale limit: The maximum number of instances this web app can scale out to. As highlighted in the above point this is the setting which controls how much each individual app in the same app service plan can scale up to in terms of number of instances. If you have only one single web app in the same app service plan, then there is no point in configuring this value.
Load Testing the Metric based scaling vs Automatic Scaling
Web App Setup: The Azure web app is a Linux App Service set to Premium V3 P0V3 and 1 single instance set to the “Always Ready” instance.
The code deployed is the eShopOnWeb solution found on GitHub.
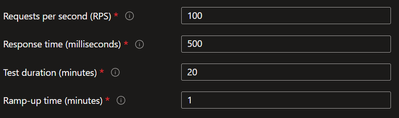
Load Test Setup
Note: Automatic Scaling takes precedence over custom auto scale settings. In case you have configured custom auto scale and want to switch to Automatic Scaling, I suggest you first switch to manual scale and disable the rule scale settings. Then enable and configure automatic scaling. As part of my tests, I observed some random behavior when switching between automatic scaling and rule-based scale with metrics back and forth without moving to manual scaling in between. This is also documented.
Rule based scaling:
As you can see, I configure the web app to scale based on the CpuPercentage metric by an instance count of 1.
As a result of the configuration, we observe a consistent scale out and in during the load testing and the graph is consistent in repeated runs.
Automatic Scaling:
For automatic scale setting shown below
under the same load the observed automatic scaling behavior is captured below along with the request rate and HttpResponseTime observed.
Key observations:
What we are measuring is the maximum of a metric introduced as part of automatic scaling called automatic scaling instance count.
We see the scaling out is very quick as the health checks being performed by the automatic scaling setup are being done continuously and if you read the documentation, it states that as the load increases the health checks become more frequent to keep up with the demand.
Quick scale out ensures that the average response time does not stay at peak for a long time and is quickly brought down and remains consistent around a few ms.
As the load varies the instances keep getting added and removed. The pace at which this happens is not always consistent. This is evident from a different set of graphs showing the automatic scale instance count metric for 2 runs of the same load test.
The scaling in also happens quickly as the load decreases. As per documentation, the in starts to happen 5 minutes after the load reduced but I observed a more aggressive scale in which is much nicer as it helps me keep my costs down.
It is safe to say that with automatic scaling the scale behavior is aggressive.
My test load ran for 20 minutes. Comparing the total time, it takes for the scale operation to happen between the two scenarios, it is essentially 22 minutes approximately in case of automatic scale and 35 minutes in the custom scale with rules.
Based on these observations, it is easy to see how automatic scaling brings function app kind of scaling capabilities to azure web app under the new premium plans. However, do note that both are inherently different implementations internally which is why you cannot share a plan with automatic scaling between a function app and an azure web app.
How to understand the billing with automatic scaling
Let’s use my setup as an example. I have only 1 always ready instance, so this is the instance that I am always being billed at. The platform will keep 1 pre-warmed instance handy.
When I am not running my load tests my web application is idle and the pre-warmed instance does not come in to play and hence there are no charges for the same. The moment my web application starts receiving traffic the pre-warmed instance is allocated and the billing for it starts. This is because I had only 1 always ready instance.
Assume, I had 2 or 3 always ready instances so unless all my existing instances had been activated and were receiving a steady stream of traffic the pre-warmed instance will not be activated and hence not billed.
The speed at which instances are added varies based on the individual application’s load pattern and startup time. The only way to keep track is to continue to monitor the automatic scaling instance count metric which is also used internally to come up with the billing which is done on a per second basis with automatic scaling configured. I found “Max” to be a better aggregation as compared to average for this metric so that you are safe with your cost projections.
Sample monthly cost projection, considering 1 single always ready instance at P0V3 and a maximum of 5 scaled instances running for 300 hours a month in east US = 73.73 + 300*0.101 = 104.03 USD. The actual cost will be less because my application is not peaking at 5 instances consistently (look at the graphs).
Automatic Scaling with multiple web apps in the same plan
To test how well different web applications will scale under the same app service plan, I deployed a simple Hello World template for an asp.net core web application you get in visual studio.
The first thing that you will notice is that the new web application also has the automatic scaling turned out as it is sharing the same app service plan.
To make sure that both apps make good use of the available resources and scale without impacting on the performance of the other app sharing the same plan we need to configure the scale out limit.
I kept that as 2 for the Hello World app and 3 for the eShopOnWeb app with the maximum burst set to 5.
There is nothing that prevents us from setting the maximum scale limit as 5 for both the applications and not even enforcing this limit in which case both the web applications will be competing for the 5 maximum burst instances.
My second sample application is just a simple web page with a 5 second delay so I will not be observing its response times for my analysis.
Running the same load test for both the applications
without limits set for each individual web application
With limits set
Observations
When no limits are set both web applications try to scale to the maximum burst limit set at the level of the app service plan. This causes a bit of a race for the available resources initially but soon the web applications can scale to the number of required instances to meet the demand generated by the load.
The average response time is much lower when no limits are set on individual web applications but when we ran the same load with limits of 2 and 3 instances set respectively the same eShopOnWeb application resulted in a much higher average response time.
In this case the load test was run simultaneously but even when the same test was run with a delay of 5 minutes and no limits were set, the resources were distributed to both the web applications despite the first web application having a lead time to scale to more instances. Based on the one run, I executed in this manner having the first web application scaling out and the instances already in place allowed the second web application to scale even faster but my applications are simple so we should not generalize this.
Final Thoughts
Automatic scaling is a great addition to the azure web application service. Being able to scale a web application against web traffic and not just measured metrics has been an ask from customers for a long time and they can now do so by using this feature.
I have seen a lot of customers looking to containerize their web UI to achieve faster scalability against incoming traffic and with automatic scaling they can leverage the azure web application to host the web UI, while using AKS to host their backend API’s and scale the components independently.
It is quite adept in addressing the common challenges highlighted earlier with rule-based scaling by ensuring that setting up scaling is simple to just a couple of radio buttons and a slider, scale in happens as quickly as possible so that cost is optimized as much as possible.
I am sure this feature will see more improvements in the coming months. While the current concept adapts from how function app premium plans work, it will be great to see if the teams can adapt to scaling features akin to Kubernetes, without making it as complex as Kubernetes.


Recent Comments