by Contributed | Oct 3, 2024 | Technology
This article is contributed. See the original author and article here.
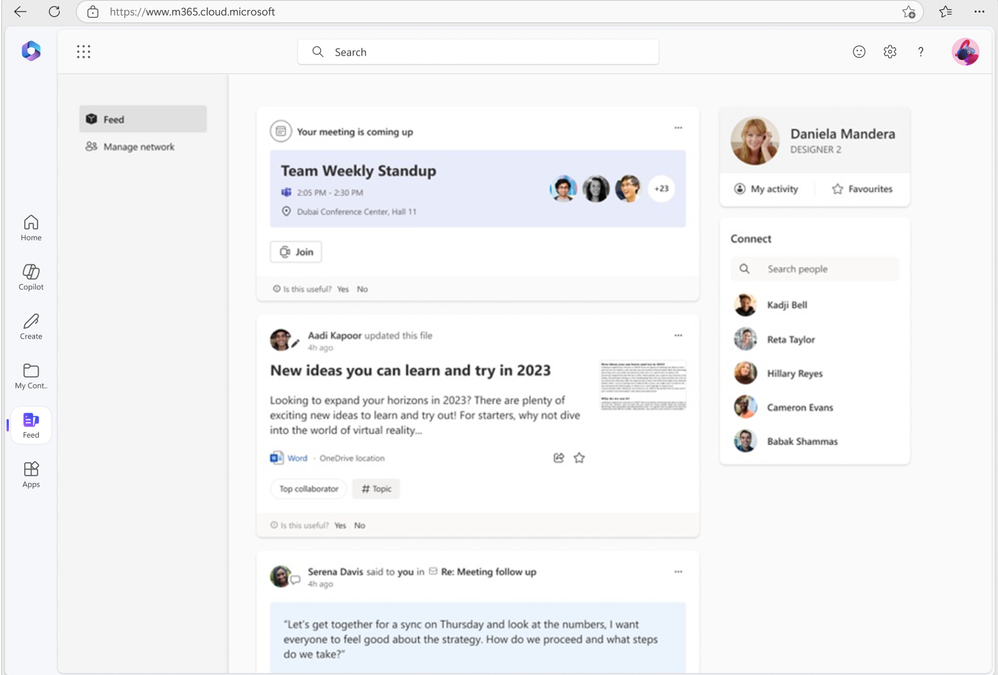
As part of our ongoing efforts to streamline and enhance user experiences, we will be retiring the Feed feature (shown in figure 1 below) on the Microsoft 365 app. This change will affect web endpoints (www.microsoft365.com, www.office.com) and the Windows app (“Microsoft 365 (Office)”).
We are committed to ensuring that your existing workflows remain unaffected. Launched in 2022, Feed was designed to help users explore the latest content and team activities. Over time, we have integrated all the essential features of Feed into a more accessible surface within the Microsoft 365 app: the “Recommended” files on the Home tab (shown in figure 2 below).
Deprecation timeline: Feed will no longer be accessible from the Microsoft 365 app starting November 1, 2024.
 Figure 1: Feed as seen on Microsoft 365
 Figure 2: Recommended files on Microsoft 365
by Contributed | Oct 2, 2024 | Technology
This article is contributed. See the original author and article here.
Join us in Reston, VA, on October 15th, 16th, or 17th for our Microsoft 365 Copilot GCC Readiness Days!
This exclusive in-person event is your chance to learn how AI and Microsoft 365 Copilot GCC can address the unique challenges of public sector missions. Tailored for IT professionals, administrators, and decision-makers in government agencies, these readiness days offer practical, actionable insights to help you drive secure productivity, efficiency, and innovation in your organization.
Reserve Your Spot Today!
Spaces are limited for these in-person readiness days to ensure personalized, in-depth discussions. Register now to secure your spot and be among the first to explore how Microsoft 365 Copilot GCC can empower your teams to work more effectively.
Why You Should Attend
Microsoft 365 Copilot GCC is set to revolutionize government workspaces, bringing AI-powered productivity into secure, compliant environments. At this event, you will uncover how Copilot can automate routine tasks, enhance collaboration, and help your team focus on higher-priority activities—all while meeting the stringent regulations of government operations.
What You’ll Gain from the Event:
- In-Depth, Actionable Learning: Sessions will provide detailed, step-by-step guides on how to implement Copilot GCC within your agency’s existing workflows.
- Transparency and Trust: Gain insights from candid discussions about the strengths and limitations of AI in government settings, addressing your concerns around compliance, security, and data privacy.
- Real-World Solutions: Learn directly from AI thought leaders and engineers on how to navigate integration challenges and leverage responsible AI practices.
What to Expect:
- Prepare to Become an AI-Powered Public Sector Organization: Learn how to ready your workforce for a seamless transition to Microsoft 365 Copilot GCC, with practical tips tailored to government environments.
- Responsible AI: Discover how Microsoft partners with government agencies to implement AI responsibly, ensuring compliance, security, and ethical considerations.
- Gov AI Integration Challenges and Opportunities: Engage in transparent discussions with product experts and engineers to explore best practices for deploying Copilot GCC in your agency’s environment.
Event Agenda:
- 09:00 AM – 09:15 AM: Keynote
- 09:15 AM – 10:00 AM: Roadmap
- 10:00 AM – 10:50 AM: How Copilot Works
- 11:00 AM – 11:50 AM: How to Get Ready: Technology
- 12:00 PM – 01:00 PM: Lunch
- 01:00 PM – 01:50 PM: Microsoft 365 Business Chat Conversation
- 02:00 PM – 02:50 PM: How to Get Ready: People
- 03:00 PM – 03:50 PM: Art of the Possible Demos
Note: The agenda is identical for each day, so select the date that best fits your schedule.
Is Lunch Provided?
Yes! Lunch is provided each day, thanks to our spectacular sponsoring partners:
Be sure to learn more about our sponsoring partners’ Copilot offerings during the Partner Lunch & Learn session!
Venue Details:
- Where: The Microsoft Garage, Reston – DC, 11955 Freedom Drive, Reston, VA 20190
Engage and Share!
Have questions or want to share your thoughts on Microsoft 365 Copilot in GCC? Join the conversation in the comments below and connect with your peers!
by Contributed | Oct 1, 2024 | Technology
This article is contributed. See the original author and article here.
1. File Actions
If you use the SharePoint File Actions dataset in Microsoft Graph Data Connect, you might want to join it with the SharePoint Files dataset to get the details for each file. This post is about how you can do it, including the most common issues.
2. What is in File Actions
The SharePoint File Actions dataset includes details about every time a file was accessed, deleted, downloaded, modified, moved, renamed, or uploaded. The information about each action includes the type of action, when it happened, what file was acted upon, what application was used, and the user who performed the action (the actor).
For more information about the dataset, see the full schema documentation at data-connect-dataset-sharepointfileactions.md.
3. Joining with other datasets
A common use of this dataset is to join with the SharePoint Sites or the SharePoint Files to understand how much activity is going on for a specific Site or File. You could use this to see which Site or File was the most accessed on a given day. If you accumulate the actions for a longer period, you could find which sites had no activities in the last 90 days.
To find the details for site associated with a specific action, group File Actions by site ID then join with Sites. Here’s a SQL example to get a list of most popular sites during the period covered by File Actions:
WITH ActionsBySite AS (
    SELECT
        SiteId,
        MIN(ActionDate) AS EarliestAction,
        MAX(ActionDate) AS LatestAction,
        COUNT(*) AS ActionCount
    FROM FileActions
    GROUP BY SiteId
)
SELECT
    S.Id AS SiteId,
    S.[RootWeb.Title] AS SiteName,
    S.CreatedTime AS SiteCreated,
    S.[RootWeb.LastItemModifiedDate] AS SiteLastModified,
    S.[RootWeb.TemplateId] AS SiteTemplateId,
    A.EarliestAction,
    A.LatestAction,
    A.ActionCount
FROM ActionsBySite AS A
JOIN Sites S
ON A.SiteId = S.Id
ORDER BY ActionCount DESC
LIMIT 10;
To find details of the file associated with a specific action, group File Actions by File then join with Files. Here’s a similar example to get a list of most popular files during the period covered by File Actions:
WITH ActionsByFile AS (
    SELECT
        SiteId,
        WebId,
        ListId,
        ListItemId,
        MIN(ActionDate) AS EarliestAction,
        MAX(ActionDate) AS LatestAction,
        COUNT(*) AS ActionCount
    FROM FileActions
    GROUP BY SiteId, WebId, ListId, ListItemId
)
SELECT
    F.DirName,
    F.FileName,
    F.AuthorEmail,
    F.TimeCreated AS FileCreated,
    F.TimeLastModified AS FileLastModified,
    A.EarliestAction,
    A.LatestAction,
    A.ActionCount
FROM ActionsByFile AS A
JOIN Files F
ON A.SiteId = F.SiteId
AND A.WebId = F.WebId
AND A.ListId = F.ListId
AND A.ListItemId = F.ItemId
ORDER BY ActionCount DESC
LIMIT 10;
NOTE: Please check with your compliance team if they approve of keeping the File Actions data for longer periods of time. There might be restrictions on how long you should keep private information.
4. Potential issues
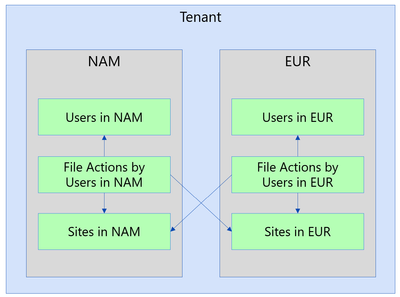
With huge datasets like Files and File Actions, there are scenarios where the JOIN is not a perfect match. Here are a few possible issues when joining File Actions with Sites or Files.
4a. Different regions
IMPORTANT: This section applies only to tenants that use the Microsoft 365 Multi-Geo capabilities, as described at Microsoft 365 Multi-Geo and Multi-Geo Capabilities in OneDrive and SharePoint.
The JOIN operation will exclude a specific action if the File Action is in a different region than the File. When a tenant has multiple regions, the actions are recorded in the region of the actor. An actor in that region might be accessing files in other regions, which you might not have in that environment. To overcome that, you must run collection for SharePoint Files from all the regions and combine (union) them into a single dataset.
NOTE: These datasets are partitioned by region for compliance reasons, so please make sure to run this scenario by your compliance team before combining data from multiple regions.
4b. Matching dates
There are certain situations where the Files will be missing when you try the join because your File Action snapshot is more recent than your File snapshot date. For instance, if you have a File Actions snapshot for July 15th joined with a Files snapshot for July 1st. Essentially, the JOIN will exclude the File Action because the File data did not make it yet.
Also, the SharePoint Files dataset might take about a week to fully update. You might exclude an action for a file that was recently created and did not make its way into the Files dataset yet. So even if both the File Actions snapshot and the Files snapshot are from July 1st, there is the possibility that some of the recent files have not been captured yet.
There is also the chance of some File Actions arriving late (typically less than 0.01%). For instance, a small percentage of actions for July 1st might show in the snapshot for July 2nd.
So, in general, if you want to get the most complete dataset, it’s a good idea to wait until July 8th to process and report on actions for July 1st. This will guarantee that you are using a fresher Files dataset and allowing for late-arriving File Actions data.
4c. Not a Document Library
Another reason for not finding a match between the File Actions dataset and the Files dataset is when the file action is for a file not in a document library. The SharePoint Files dataset only includes files in a document library, ignoring other types of lists. This is by design to keep the Files dataset to a more reasonable size.
A common scenario here are actions related to SharePoint pages (files with the “aspx” extension), typically in Communication Sites. While you will not see these “aspx” pages in the Files dataset, you could still count actions per site.
Covering this gap would require adding specific datasets for SharePoint Pages and/or SharePoint Lists, providing additional details. This is something the team is considering for the future, but there is no estimated date for this.
4d. List Item Id missing
The File Actions dataset shows the telemetry as reported by applications. For some of these applications, it is possible that the ListItemId is not reported or is reported as “null”. In that case, the join will exclude those actions.
Again, you could summarize these actions at a site level even if the ListItemId is missing. You can also look at a summary by User Agent to identify specific applications that are not providing data.
5. Conclusion
I hope you learned more about the SharePoint File Actions dataset in Microsoft Graph Data Connect. You can read more about the Microsoft Graph Data Connect for SharePoint at https://aka.ms/SharePointData. There you will find many details, including a list of datasets available and frequently asked questions.

by Contributed | Sep 30, 2024 | Business, Microsoft 365, Technology
This article is contributed. See the original author and article here.
Microsoft 365 is the best way to access the latest versions of the productivity apps that millions of people use every day to bring their ideas to life and power through tasks. But we know some of our customers still prefer a non-subscription way to access our familiar apps, which is why we’re releasing Office 2024 on October 1 for consumers and small businesses.
The post Office 2024 for consumers available October 1 appeared first on Microsoft 365 Blog.
Brought to you by Dr. Ware, Microsoft Office 365 Silver Partner, Charleston SC.

Recent Comments