by Contributed | Jun 1, 2021 | Technology
This article is contributed. See the original author and article here.
Mapping Data Flows is the visual data transformation service in Azure Data Factory and Azure Synapse Analytics that enables powerful scale-out ETL capabilities with a low-code user interface. The ADF team is excited to announce that we are opening up on-prem and VM-based SQL Server as a source and sink to data flows in ADF and Azure Synapse Analytics. You will see SQL Server now as a connector option in both shared integration datasets as well as inline in your source & sink.

Instructions on how to set-up the network configuration to use the Azure IR VNET and private link for accessing your SQL Server from data flows can be found here. Data flows in ADF & Synapse currently only support Azure IR, not self-hosted IR (SH-IR).
by Contributed | Jun 1, 2021 | Technology
This article is contributed. See the original author and article here.
Disclaimer
The sample scripts are not supported under any Microsoft standard support program or service. The sample scripts are provided AS IS without warranty of any kind. Microsoft further disclaims all implied warranties including, without limitation, any implied warranties of merchantability or of fitness for a particular purpose. The entire risk arising out of the use or performance of the sample scripts and documentation remains with you. In no event shall Microsoft, its authors, or anyone else involved in the creation, production, or delivery of the scripts be liable for any damages whatsoever (including, without limitation, damages for loss of business profits, business interruption, loss of business information, or other pecuniary loss) arising out of the use of or inability to use the sample scripts or documentation, even if Microsoft has been advised of the possibility of such damages.
Are you constantly challenged with keeping up with all your Azure Active Directory Enterprise Application client secrets and certificates and their associated expiration dates?
I sometimes work with customers who have a thousand or more Azure AD applications to manage. Unfortunately, trying to keep up with all the client secrets and certificates expiring on each one of these apps can be a futile experience.
I came up with a solution to this problem by using Power Automate to proactively notify the Azure Active Directory administrators of upcoming client secret and certificate expirations. This solution was a big help for customers with thousands of AAD apps to keep track of. I owe a huge thanks to a friend and peer of mine, Norman Drews, for his CSS & HTML expertise.
Here’s how I solved it using Power Automate. If you’d like to download the Power Automate flow and import it into your environment, click here to download it from my Github repository.
- Create (or use an existing) Azure AD app registration that has ONE of the following Application Permissions (starting from the least and ending with the most restrictive option) – Application.Read.All, Application.ReadWrite.All, Directory.Read.All, or Directory.AccessAsUser.All.
- Create a Scheduled Flow to run daily or weekly depending on how often you want to be alerted.
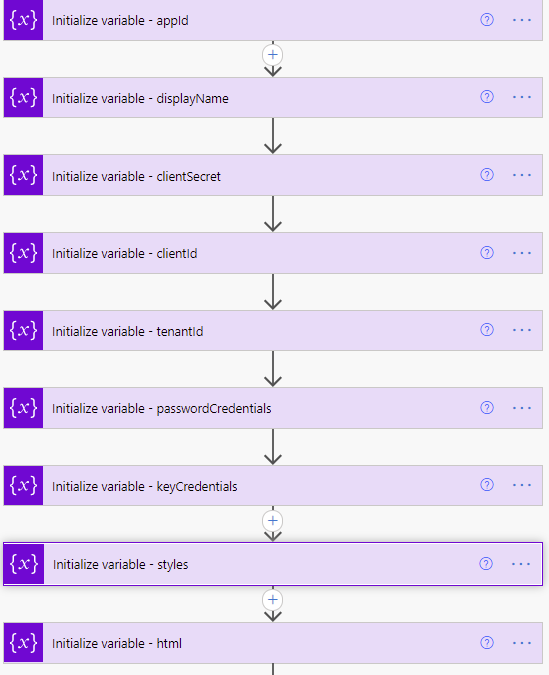
 Variable definitions in the Flow
- Initialize variable (String) – appId – this is the appID of the application.
- Initialize variable (String) – displayName – this will be used to identify the display name of the application.
- Initialize variable (String) – clientSecret – this needs to be set with the client secret of the Azure AD application created or chosen in step 1.
- Initialize variable (String) – clientId – this needs to be set with the application (client) ID of the Azure AD application created or chosen in step 1.
- Initialize variable (String) – tenantId – this needs to be set with the tenant ID of the Azure AD application created or chosen in step 1.
- Initialize variable (Array) – passwordCredentials – this variable will be used to populate the client secrets of each Azure AD application.
- Initialize variable (Array) – keyCredentials – this variable will be used to populate the certificate properties of each Azure AD application.
- Initialize variable (String) – styles – this is some CSS styling to highlight Azure AD app secrets and expirations that are going to expire in 30 days (yellow) vs 15 days (red). You can adjust these values accordingly to meet your needs.
Content of this step:
{
  "tableStyle": "style="border-collapse: collapse;"",
  "headerStyle": "style="font-family: Helvetica; padding: 5px; border: 1px solid black;"",
  "cellStyle": "style="font-family: Calibri; padding: 5px; border: 1px solid black;"",
  "redStyle": "style="background-color:red; font-family: Calibri; padding: 5px; border: 1px solid black;"",
  "yellowStyle": "style="background-color:yellow; font-family: Calibri; padding: 5px; border: 1px solid black;""
}
11. Initialize variable (String) – html – this creates the table headings and rows that will be populated with each of the Azure AD applications and associated expiration info.
Content of this step:
<table @{variables('styles').tableStyle}><thead><th @{variables('styles').headerStyle}>Application ID</th><th @{variables('styles').headerStyle}>Display Name</th><th @{variables('styles').headerStyle}>Days until Expiration</th><th @{variables('styles').headerStyle}>Type</th><th @{variables('styles').headerStyle}>Expiration Date</th></thead><tbody>
- Initialize variable (Float) – daysTilExpiration – this is the number of days prior to client secret or certificate expiration to use in order to be included in the report
- We need to request an authentication token using our tenantId, clientId, and clientSecret variables.
 Request token step of the Flow
- The Parse JSON step will parse all the properties in the returned token request.
The JSON schema to use is as follows:
{
    "type": "object",
    "properties": {
        "token_type": {
            "type": "string"
        },
        "expires_in": {
            "type": "integer"
        },
        "ext_expires_in": {
            "type": "integer"
        },
        "access_token": {
            "type": "string"
        }
    }
}
 Retrieve token info JSON schema
- Initialize variable (String) – NextLink – This is the graph API URI to request the list of Azure AD applications. The $select only returns the appId, DisplayName, passwordCredentials, and keyCredentials, and since graph API calls are limited to 100 rows at a time, I bumped my $top up to 999 so it would use less API requests (1 per 1000 apps vs 10 per 1000 apps).
https://graph.microsoft.com/v1.0/applications?$select=appId,displayName,passwordCredentials,keyCredentials&$top=999
- Next, we enter the Do until loop. It will perform the loop until the NextLink variable is empty. The NextLink variable will hold the @odata.nextlink property returned by the API call. When the API call retrieves all the applications in existence, there is no @odata.nextlink property. If there are more applications to retrieve, the @odata.nextlink property will store a URL containing the link to the next page of applications to retrieve. The way to accomplish this is to click “Edit in advanced mode” and paste @empty(variables(‘NextLink’)).
 Do Until loop
- The next step in the Do until loop uses the HTTP action to retrieve the Azure AD applications list. The first call will use the URL we populated this variable within step 15.
- A Parse JSON step is added to parse the properties from the returned body from the API call.
The content of this Parse JSON step is as follows:
{
    "type": "object",
    "properties": {
        "@@odata.context": {
            "type": "string"
        },
        "value": {
            "type": "array",
            "items": {
                "type": "object",
                "properties": {
                    "appId": {
                        "type": "string"
                    },
                    "displayName": {
                        "type": "string"
                    },
                    "passwordCredentials": {
                        "type": "array",
                        "items": {
                            "type": "object",
                            "properties": {
                                "customKeyIdentifier": {},
                                "displayName": {},
                                "endDateTime": {},
                                "hint": {},
                                "keyId": {},
                                "secretText": {},
                                "startDateTime": {}
                            },
                            "required": []
                        }
                    },
                    "keyCredentials": {
                        "type": "array",
                        "items": {
                            "type": "object",
                            "properties": {
                                "customKeyIdentifier": {},
                                "displayName": {},
                                "endDateTime": {},
                                "key": {},
                                "keyId": {},
                                "startDateTime": {},
                                "type": {},
                                "usage": {}
                            },
                            "required": []
                        }
                    }
                },
                "required": []
            }
        },
        "@@odata.nextLink": {
            "type": "string"
        }
    }
}
- A Get future time action will get a date in the future based on the number of days you’d like to start receiving notifications prior to expiration of the client secrets and certificates.
- Next a foreach – apps loop will use the value array returned from the Parse JSON step of the API call to take several actions on each Azure AD application.
 ForEach apps loop
- Set variable (String) – appId – uses the appId variable we initialized in step 3 to populate it with the application ID of the current application being processed.
- Set variable (String) – displayName – uses the displayName variable we initialized in step 4 to populate it with the displayName of the application being processed.
- Set variable (String) – passwordCredentials – uses the passwordCredentials variable we initialized in step 5 to populate it with the client secret of the application being processed.
- Set variable (String) – keyCredentials – uses the keyCredentials variable we initialized in step 5 to populate it with the client secret of the application being processed.
- A foreach will be used to loop through each of the client secrets within the current Azure AD application being processed.
 ForEach passwordCreds loop
- The output from the previous steps to use for the foreach input is the passwordCreds variable.
- A condition step is used to determine if the Future time from the Get future time step 19 is greater than the endDateTime value from the current application being evaluated.
- If the future time isn’t greater than the endDateTime, we leave this foreach and go to the next one.
- If the future time is greater than the endDateTime, we first convert the endDateTime to ticks. Ticks is a 100-nanosecond interval since January 1, 0001 12:00 AM midnight in the Gregorian calendar up to the date value parameter passed in as a string format. This makes it easy to compare two dates, which is accomplished using the expression ticks(item()?[‘endDateTime’]).
- Next, use a Compose step to convert the startDateTime variable of the current time to ticks, which equates to ticks(utcnow()).
- Next, use another Compose step to calculate the difference between the two ticks values, and re-calculate it using the following expression to determine the number of days between the two dates.
div(div(div(mul(sub(outputs(‘EndTimeTickValue’),outputs(‘StartTimeTickValue’)),100),1000000000) , 3600), 24)
- Set the variable daystilexpiration to the output of the previous calculation.
- Set variable (String) – html – creates the HTML table. The content of this step is as follows:
<tr><td @{variables('styles').cellStyle}><a href="https://ms.portal.azure.com/#blade/Microsoft_AAD_RegisteredApps/ApplicationMenuBlade/Credentials/appId/@{variables('appId')}/isMSAApp/">@{variables('appId')}</a></td><td @{variables('styles').cellStyle}>@{variables('displayName')}</td><td @{if(less(variables('daystilexpiration'),15),variables('styles').redStyle,if(less(variables('daystilexpiration'),30),variables('styles').yellowStyle,variables('styles').cellStyle))}>@{variables('daystilexpiration')} </td><td @{variables('styles').cellStyle}>Secret</td><td @{variables('styles').cellStyle}>@{formatDateTime(item()?['endDateTime'],'g')}</td></tr>
- Another foreach will be used to loop through each of the certificates within the current Azure AD application being processed. This is a duplication of steps 25 through 33 except that it uses the keyCredentials as its input, compares the future date against the currently processed certificate endDateTime, and the Set variable – html step is as follows:
<tr><td @{variables('styles').cellStyle}><a href="https://ms.portal.azure.com/#blade/Microsoft_AAD_RegisteredApps/ApplicationMenuBlade/Credentials/appId/@{variables('appId')}/isMSAApp/">@{variables('appId')}</a></td><td @{variables('styles').cellStyle}>@{variables('displayName')}</td><td @{if(less(variables('daystilexpiration'), 15), variables('styles').redStyle, if(less(variables('daystilexpiration'), 30), variables('styles').yellowStyle, variables('styles').cellStyle))}>@{variables('daystilexpiration')} </td><td @{variables('styles').cellStyle}>Certificate</td><td @{variables('styles').cellStyle}>@{formatDateTime(item()?['endDateTime'], 'g')}</td></tr>
 ForEach Key Credentials loop
- Immediately following the foreach – apps loop, as a final step in the Do while loop is a Set NextLink variable which will store the dynamic @odata.nextlink URL parsed from the JSON of the API call.
- Append to variable (Array) – html – Immediately following the Do while loop ends, we close out the html body and table by appending <tbody></table> to the variable named html.
 Yes branch
- Finally, send the HTML in a Send an e-mail action, using the variable html for the body of the e-mail.
 End of the flow including send email
And below is the resulting e-mail received when the flow runs on its scheduled time. Included is a hyperlink for each application that takes you directly to where you need to update the client secret and/or certificates for each application within the Azure portal.
 Sample e-mail
Thanks for reading!

by Contributed | Jun 1, 2021 | Technology
This article is contributed. See the original author and article here.
As a fan of Surface Go and Surface Go 2, I sometimes get asked about a little-known capability: Near field communication (NFC), the technology behind card readers. Even though we have only limited support for NFC, there are a growing number of third-party solutions that take advantage of the card reading capability.
All Surface Go for Business and Surface Go 2 for Business devices are equipped to take advantage of greater third-party support for passwordless authentication. Azure AD now supports FIDO2 security keys as an authentication method for signing into operating systems, applications, and services. Organizations can issue these keys to everyday information workers.
And we’re seeing more innovations in the marketplace that build on the NFC capabilities in Surface Go:
AuthenTrend Technology ATKey.Card
Our friends in Azure recently partnered with AuthenTrend Technology in using its ATKey.Card Smart Badge type security card with Surface Go 2. To learn more, check out this recent Ignite session:

Imprivata OneSign
The increasing use of Surface Go as a shared mobile device in health care settings means protecting personal medical information has never been more critical. To meet this challenge, Imprivata OneSign provides an NFC solution that enables health care providers to simply tap their badge (instead of typing a username and password) to access the device and applications, which protects private health information with minimal disruption to the user.
“There’s tons of sensitive data on these devices that need to be secured but protecting these devices can’t be disruptive for the end-user clinicians focused on patient care,” Imprivata explains in the following video. The “seamless process gives them access to that tablet without having to enter a username or password or having to put a call into IT because they forgot those passwords.”

The Joy Factory aXtion Pro MPA NFC for Surface Go
This waterproof case features an NFC range extender for use in health care settings. Infused with an antimicrobial agent to help prevent against bacteria and mold growth, the military-grade certified aXtion Pro MPA for Surface Go features a built-in rotating module with hand strap and non-slip kickstand. To learn more, see this short demo:

FAQ
Here are some answers to questions that typically come up when talking about the NFC functionality in Surface Go.
Is NFC available on all Surface Go and Surface Go 2 devices?
- NFC is only available on Surface Go for Business and Surface Go 2 for Business devices.
Can the NFC be disabled through UEFI or DFCI?
Can Go NFC be used to issue (digital wallet) or process (point of sale) payments?
- No. The NFC component does not include a secured element and the interface is not HID but a simple I2C.
Is multi factor authentication on Surface Go compliant with FIDO2.0 standards?
- Yes, when combined with compliant authentication solutions and server, such as using Authentrend Key Card, Windows Hello and Azure AD.
Can I access and use NFC from the front of the device?
- Yes, but only if the card has an independent power source like Authentrend. Passive cards can only be read from the back of the device — at very close proximity of ~10mm.
How can I troubleshoot multiple failed read attempts?
- Recall the location of the effective read area on the device.
- Remove any other NFC tags or NFC-enabled cards in the vicinity. limited NFC support is available for ISO/IEC 14443-A tag types 1 and 2 with antenna diameter between 15mm to 17mm.
- We recommend using the Mifare Classic 1K card type.
- Try keeping your badge in a nylon sleeve rather than a hard plastic case.
- You might find this tool useful for troubleshooting: Springcard.
What are some other commercial uses?
- Proximity-based apps. Applications that take advantage of proximity and location by using the RFID capability in Surface Go and a proximity sensor in Windows 10.
- Consumer apps. RFID-enabled apps capable of directing consumers to target websites. For example, users can swipe an RFID-enabled prescription container that opens relevant product information.
Learn more
by Contributed | Jun 1, 2021 | Technology
This article is contributed. See the original author and article here.
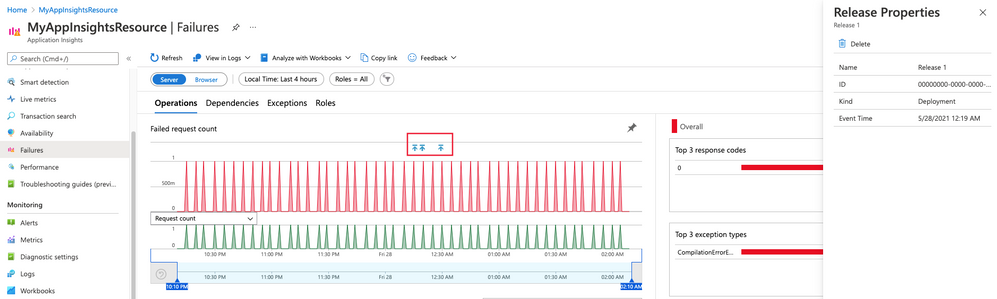
Visualizations & Workbooks are a key component of the App Insights experience. They enable customers to monitor performance / failure trends & debug issues as they occur.
While performance data is critical to understanding the health of your application by itself it lacks the full context to help you understand why performance issues may be happening. Release Annotations are a simple way to add context & quantify the impact of an Azure DevOps release on your metrics.
Annotations can be automatically created by the Azure Pipelines build system. You can also create annotations to flag any event you like by creating them from PowerShell.
If your subscription has an Application Insights resource linked to it and you use one of the following deployment tasks, then you don’t need to configure anything else.
by Contributed | Jun 1, 2021 | Technology
This article is contributed. See the original author and article here.
Microsoft focuses on providing a seamless move to Microsoft 365 with as much expertise and tooling we and our ecosystem can offer – across the globe. Our goal is to help move to the cloud with confidence.
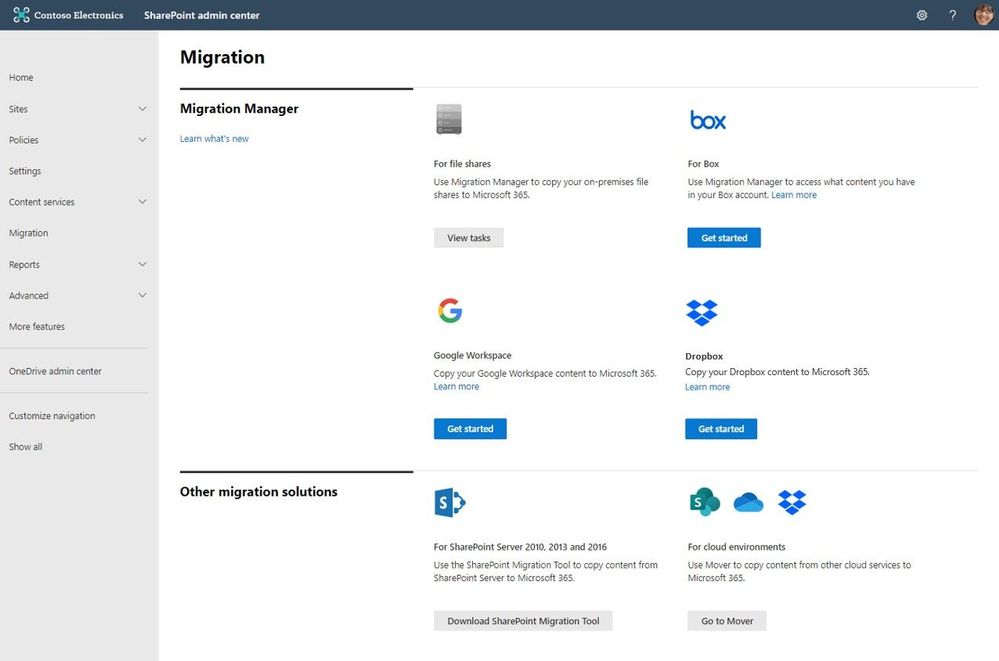
At times, you need to move content cloud-to-cloud. We’re pleased to highlight Mover integration progress, to bring more of their technology directly inside the SharePoint admin center in Microsoft 365. Now, the Migration Manager admin tab is the home to manage all content migrations into Microsoft 365 (primarily into OneDrive, SharePoint, and Microsoft Teams) – without leaving the service.
Connect your Box, Dropbox, or Google Workspace account to Microsoft 365 to move files and folder into OneDrive, SharePoint, and Microsoft Teams.
Microsoft offers numerous content migration tools and services to assist your migration into Microsoft 365 – from assessment, to planning and onboarding. And we work closely with our 3rd-party migration partners to optimize their offerings as well.
Migrate your files and folder from Box [roadmap ID: 68816]
SharePoint and Microsoft 365 admins require support to migrate content from Box into Microsoft 365; that’s Box files and folders as well as conversion of Box notes into Word documents – to where you choose as destination into OneDrive, SharePoint, and Teams. Now it’s more centrally located and fewer clicks to discover content and move it into Microsoft 365.
 After clicking “Get Started” from the main Migration Manager page, Box users are scanned automatically. You can also review reports and logs pre-migration to investigate any possible issues that might block your migration.
When you connect to a Box enterprise account, the service discovers users and their files. The service will automatically map to an individual’s OneDrive accounts, and you can manually map to a specific OneDrive user account, or route to SharePoint sites or a Teams channel for content meant to be in shared spaces.
See Migrate Box to Microsoft 365 with Migration Manager to learn more.
Migrate your files and folder from Dropbox [roadmap ID: 82015]
Similar to the Box movement of content into Microsoft 365, this release makes it so you can take that same action – to migrate Dropbox folders, files, and users to OneDrive, SharePoint, and Teams in Microsoft 365, enabling collaboration take place on a single platform closer to where you manage much of your work and productivity.
As you connect to a Dropbox for Business account, the service begins discovering users and their files. The service will automatically map to an individual’s OneDrive accounts, and you can also manually map to a specific OneDrive user account, SharePoint site, or a Teams channel.
 After clicking “Get Started” from the main Migration Manager page, Dropbox files and folders are scanned automatically. You can also review reports and logs pre-migration to investigate any possible issues that might block your migration.
Note: To access, you must be a global admin or OneDrive/SharePoint admin to the Microsoft 365 tenant where you want to migrate your content.
Migrate Dropbox to Microsoft 365 with Migration Manager to learn more.
Migrate your files and folder from Google Workspace [roadmap ID: 82014]
To cover the spectrum of customer needs, we, too, have released the ability to move content from Google Workspace – helping you move documents, data, and users to OneDrive, SharePoint, and Teams in Microsoft 365 and collaborate all in one place.
As you connect to a Google enterprise account, the service begins discovering drives and their files. The service will automatically map to an individual’s OneDrive accounts, and you can also manually map to a specific OneDrive user account, SharePoint site, or a Teams channel.
 After clicking “Get Started” from the main Migration Manager page, Google Workspace files and folders are scanned automatically. You can also review reports and logs pre-migration to investigate any possible issues that might block your migration.
Note: To access, you must be a global admin or OneDrive/SharePoint admin to the Microsoft 365 tenant where you want to migrate your content.
Migrate Google Workspace to Microsoft 365 with Migration Manager to learn more.
Additional resources
What’s next…
As we continue to invest across the migration offerings, we are excited to expand our cloud-to-cloud capabilities to allow moving content from Egnyte into Microsoft 365 [roadmap ID: 82016]. And before you move any file or folder from on-premises into Microsoft 365, you need to discover content and plan for the migration. Soon, Migration Manager will provide content discovery so admins can best understand what content they have, decide what to migrate and what to remediate. If you are interested, you can complete this form for the Migration discovery preview.
Regardless of your organization’s size, data scale or information complexity, you can migrate documents and sites into OneDrive, SharePoint, and Teams in Microsoft 365 successfully. And we are here to help.
Use more of what SharePoint and Microsoft 365 offer, and let us know what you think
In addition to the above updates now rolling out to Microsoft 365, we encourage you to learn more about all migration offerings. Mover supports numerous cloud-to-cloud migration scenarios alongside our the SharePoint Migration Tool (SPMT) which targets migrating content from on-premises SharePoint sites and file shares to Microsoft 365, FastTrack planning and onboarding, and a strong migration partner ecosystem – collectively the broadest set of offerings to assist your migration into Microsoft 365.
Our goal is to empower you and every person on your team to achieve, and move, more. Let us know what you need next. We are always open to feedback via UserVoice and continued dialog in the SharePoint community within the Microsoft Tech Community —and we always have an eye on tweets to @SharePoint. Let us know.
Thanks, Mark Kashman, senior product manager – Microsoft

Recent Comments