by Contributed | Jun 1, 2021 | Technology
This article is contributed. See the original author and article here.
The product submissions must be tested using the Hardware Lab Kit (HLK) for Windows Server 2022 hardware and software testing. The kit is available at the Partner Center for Windows Hardware, https://docs.microsoft.com/en-us/windows-hardware/test/hlk/.
For information on how to make a submission, see https://docs.microsoft.com/en-us/windows-hardware/drivers/dashboard
Vendors may download the Windows Server 2022 Eval version of the operating system for testing purposes here, https://www.microsoft.com/en-us/evalcenter/evaluate-windows-server-2022-preview
Vendors may also download the Virtual Hardware Lab Kit (VHLK) here, https://docs.microsoft.com/en-us/windows-hardware/test/hlk/. The VHLK is a complete pre-configured HLK test server on a Virtual Hard Disk (VHD). The VHLK VHD can be deployed and booted as a Virtual Machine (VM) with no installation or configuration of the HLK required.
The playlist for testing Windows Server 2022 hardware and software may also be downloaded at that location. For Windows Server 2022, the release playlist has been consolidated for both X64 and ARM64 architecture. The Playlist may be updated in the future, so it is best to check for new versions regularly.
Preview versions of the OS and HLK cannot be used for certification testing or products for Windows Server 2022.
Previous versions of the HLK to be used for testing previous Windows Server versions will continue to be available in accord with the Microsoft Product Lifecycle guidance.
by Contributed | Jun 1, 2021 | Technology
This article is contributed. See the original author and article here.
With the Azure Static Web Apps GA there was a sneaky little project that my colleague Wassim Chegham dropped, the Static Web Apps CLI.
The SWA CLI is a tool he’s been building for a while with the aim to make it easier to do local development, especially if you want to do an authenticated experience. I’ve been helping out on making sure it works on Windows and for Blazor/.NET apps.
It works by running as a proxy server in front of the web and API components, giving you a single endpoint that you access the site via, much like when it’s deployed to Azure. It also will inject a mock auth token if want to create an authenticated experience, and enforce the routing rules that are defined in the staticwebapp.config.json file. By default, it’ll want to serve static content from a folder, but my preference is to proxy the dev server from create-react-app, so I can get hot reloading and stuff working. Let’s take a look at how we can do that.
Using the cli with VS Code
With VS Code being my editor of choice, I wanted to work out the best way to work with it and the SWA CLI, so I can run a task and have it started. But as I prefer to use it as a proxy, this really requires me to run three tasks, one of the web app, one for the API and one for the CLI.
So, let’s start creating a tasks.json file:
{
    "version": "2.0.0",
    "tasks": [
        {
            "type": "npm",
            "script": "start",
            "label": "npm: start",
            "detail": "react-scripts start",
            "isBackground": true
        },
        {
            "type": "npm",
            "script": "start",
            "path": "api/",
            "label": "npm: start - api",
            "detail": "npm-run-all --parallel start:host watch",
            "isBackground": true
        },
        {
            "type": "shell",
            "command": "swa start http://localhost:3000 --api http://localhost:7071",
            "dependsOn": ["npm: start", "npm: start - api"],
            "label": "swa start",
            "problemMatcher": [],
            "dependsOrder": "parallel"
        }
    ]
}
The first two tasks will run npm start against the respective parts of the app, and you can see from the detail field what they are running. Both of these will run in the background of the shell (don’t need it to pop up to the foreground) but there’s a catch, they are running persistent commands, commands that don’t end and this has a problem.
When we want to run swa start, it’ll kick off the two other tasks but using dependent tasks in VS Code means it will wait until the task(s) in the dependsOn are completed. Now, this is fine if you run a task that has an end (like tsc), but if you’ve got a watch going (tsc -w), well, it’s not ending and the parent task can’t start.
Unblocking blocking processes
We need to run two blocking processes but trick VS Code into thinking they are completed so we can run the CLI. It turns out we can do that by customising the problemMatcher part of our task with a background section. The important part here is defining some endPattern regex’s. Let’s start with the web app, which in this case is going to be using create-react-app, and the last message it prints once the server is up and running is:
To create a production build, use npm run build.
Great, we’ll look for that in the output, and if it’s found, treat it as the command is done.
The API is a little trickier though, as it’s running two commands, func start and tsc -w, and it’s doing that in parallel, making our output stream a bit messy. We’re mostly interested on when the Azure Functions have started up, and if we look at the output the easiest message to regex is probably:
For detailed output, run func with –verbose flag.
It’s not the last thing that’s output, but it’s close to and appears after the Functions are running, so that’ll do.
Now that we know what to look for, let’s configure the problem matcher.
Updating our problem matchers
To do what we need to do we’re going to need to add a problemMatcher section to the task and it’ll need to implement a full problemMatcher. Here’s the updated task for the web app:
{
    "type": "npm",
    "script": "start",
    "problemMatcher": {
        "owner": "custom",
        "pattern": {
            "regexp": "^([^s].*)((d+|d+,d+|d+,d+,d+,d+)):s+(error|warning|info)s+(TSd+)s*:s*(.*)$",
            "file": 1,
            "location": 2,
            "severity": 3,
            "code": 4,
            "message": 5
        },
        "fileLocation": "relative",
        "background": {
            "activeOnStart": true,
            "beginsPattern": "^.*",
            "endsPattern": "^.*To create a production build, use npm run build."
        }
    },
    "label": "npm: start",
    "detail": "react-scripts start",
    "isBackground": true
}
Since create-react-app doesn’t have a standard problemMatcher in VS Code (as far as I can tell anyway) we’re going to set the owner as custom and then use the TypeScript pattern (which I shamelessly stole from the docs :rolling_on_the_floor_laughing:). You might need to tweak the regex to get the VS Code problems list to work properly, but this will do for now. With our basic problemMatcher defined, we can add a background section to it and specify the endsPattern to match the string we’re looking for. You’ll also have to provide a beginsPattern, to which I’m lazy and just matching on anything.
Let’s do a similar thing for the API task:
{
    "type": "npm",
    "script": "start",
    "path": "api/",
    "problemMatcher": {
        "owner": "typescript",
        "pattern": {
            "regexp": "^([^s].*)((d+|d+,d+|d+,d+,d+,d+)):s+(error|warning|info)s+(TSd+)s*:s*(.*)$",
            "file": 1,
            "location": 2,
            "severity": 3,
            "code": 4,
            "message": 5
        },
        "background": {
            "activeOnStart": true,
            "beginsPattern": "^.*",
            "endsPattern": ".*For detailed output, run func with --verbose flag..*"
        }
    },
    "label": "npm: start - api",
    "detail": "npm-run-all --parallel start:host watch",
    "isBackground": true
}
Now, we can run the swa start task and everything will launch for us!

Conclusion
Azure Static Web Apps just keeps getting better and better. With the CLI, it’s super easy to run a local environment and not have to worry about things like CORS, making it closer to how the deployed app operates. And combining it with these VS Code tasks means that with a few key presses you can get it up and running.
I’ve added these tasks to the GitHub repo of my Auth0 demo app from the post on using Auth0 with Static Web Apps.
by Contributed | Jun 1, 2021 | Technology
This article is contributed. See the original author and article here.
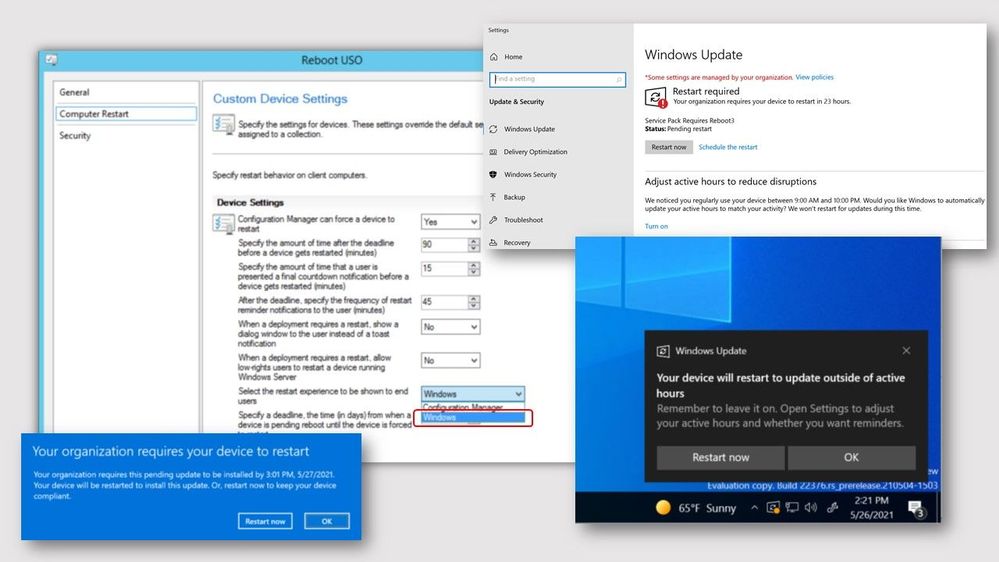
Update 2105.2 for the Technical Preview Branch of Microsoft Endpoint Configuration Manager has been released. When installing software updates from Configuration Manager, you can now choose to use the native Windows Update interface and restart experience. The client’s Windows Update Settings page will display the updates like they appear when using Windows Update for scanning. Restarts from software updates will also behave as though you’re using Windows Update.
screenshots of Windows native software update experience
To use this feature, client devices must be running Windows Insider build 21277 or later. To enable the Windows Update native experience:
- From the Administration workspace, select Client Settings in Configuration Manager.
- Select the Computer Restart group in Client Settings
- For the Select the restart experience to be shows to end users setting, choose the Windows option.
- If needed, you can change the number of days the device is allowed to be pending a restart before it’s forced using the following setting: Specify a deadline, the time (in days) from when a device is pending reboot until the device is forced to restart.
For more information, see Windows Update native experience for software updates.
This preview release also includes:
Send product feedback from error windows – Previously, if the Configuration Manager console reported an error in a separate window, you had to go back to the main console window to send feedback. In some cases, this action isn’t possible with other console windows open.
Starting in this release, error messages include a link to Report error to Microsoft. This action opens the standard “send a frown” window to provide feedback. It automatically includes details about the user interface and the error to better help Microsoft engineers diagnose the error. Aside from making it easier to send a frown, it also lets you include the full context of the error message when you share a screenshot.
Custom properties for devices – Many customers have other data that’s external to Configuration Manager but useful for deployment targeting, collection building, and reporting. This data is typically non-technical in nature, not discoverable on the client, and comes from a single external source. For example, a central IT Infrastructure Library (ITIL) system or asset database, which has some of the following device attributes:
- Physical location
- Organizational priority
- Category
- Cost center
- Department
Starting in this release, you can use the administration service to set this data on devices. You can then use the custom properties in Configuration Manager for reporting or to create collections.
Hardware inventory for client log settings – You can now inventory client log file settings such as log levels and size by enabling the new inventory class, Client Diagnostics (CCM_ClientDiagnostics). This behavior allows you to track settings that you change by the Client Diagnostics actions. This new inventory class isn’t enabled by default.
Simplified CMPivot permissions requirements – We’ve simplified the CMPivot permissions requirements. The new permissions are applicable for CMPivot standalone and CMPivot in the on-premises console. The following changes have been made:
- CMPivot no longer requires SMS Scripts read permission
- The default scope permission isn’t required.
Hierarchy approved console extensions don’t require signing – Starting in this technical preview, you can choose to allow unsigned hierarchy approved console extensions. You may need to allow unsigned console extensions due to an unsigned internally developed extension, or for testing your own custom extension in a lab.
Improvements to CMPivot – We’ve made the following improvements to CMPivot:
- Added a Key value to the Registry entity
- Added a new RegistryKey entity that returns all registry keys matching the given expression
- Added maxif and minif aggregators that can be used with the summarize operator
- Improvements to query autocomplete suggestions in the query editor
PowerShell release notes preview – These release notes summarize changes to the Configuration Manager PowerShell cmdlets in technical preview version 2105.2.
For more details and to view the full list of new features in this update, check out our Features in Configuration Manager technical preview version 2105.2 documentation.
Update 2105.2 for Technical Preview Branch is available in the Microsoft Endpoint Configuration Manager Technical Preview console. For new installations, the 2103 baseline version of Microsoft Endpoint Configuration Manager Technical Preview Branch is available on the Microsoft Evaluation Center. Technical Preview Branch releases give you an opportunity to try out new Configuration Manager features in a test environment before they are made generally available.
We would love to hear your thoughts about the latest Technical Preview! Send us feedback about product issues directly from the console and continue to share and vote on ideas about new features in Configuration Manager.
Thanks,
The Configuration Manager team
Configuration Manager Resources:
Documentation for Configuration Manager Technical Previews
Try the Configuration Manager Technical Preview Branch
Documentation for Configuration Manager
Configuration Manager Forums
Configuration Manager Support
by Contributed | Jun 1, 2021 | Technology
This article is contributed. See the original author and article here.
Last March, at Ignite, we gave you a preview of the new powerful and customizable Bookings experience and starting today, we are rolling it out to everyone!
To turn on the new experience, toggle the switch on the top right corner of the Bookings home page.
Look for the toggle on the top right corner of the Bookings web experience
Once you’re in the new Bookings view, you’ll see the new experience which introduces many new capabilities in Microsoft Bookings.
.png") Image showing the welcome to Bookings popup
Image showing the welcome to Bookings popup
The new Bookings has more options to customize and better controls on each staff’s role
If you need to go back to the classic version, you can flip the toggle back and forth as often as you need.
Now that the preview is live, we wanted to highlight some of the key features of Bookings and what new experiences you’ll be seeing.
Compliance, Privacy and Tighter Controls
We understand that each organization is different and has varied needs for managing appointments. Bookings now has stricter administrative controls, and each user within Bookings has varied levels of control over how calendars are created, edited, and shared as well as how appointments can be booked.
Microsoft 365 Admins
Admins can now control who has access to Bookings, whether external users can book appointments, and if staff details can be shared with customers.
Admins can also control the privacy of the customers’ booking appointments and can restrict what information can be collected when making a booking, like phone numbers, email, or contact address. Additionally, they can prevent staff members from requesting customer information by blocking the creation of custom fields.
 Image showing the new tenant administrator controls
Admins can control the information required in a booking and even block custom fields
Bookings Admins
Bookings admins have controls to ensure their organization’s compliance and privacy standards. They can restrict appointments to users within the organization and can also restrict search engine listings. Admins can also configure data usage consent with their own custom message, privacy policy link, as well as add terms and conditions information on the Bookings page.
New Roles
To ensure that the correct staff members have the adequate access to Bookings’ pages, two new roles have been created.
- Team Member – this role allows a staff member to view and edit their own calendar but not anyone else’s.
- Scheduler – this role allows staff members to schedule appointments without being able to modify services or settings. In addition to ensuring tighter access control, these roles unburden the Bookings admin from day-to-day operations.
 Image showing all the roles including the newly introduced Scheduler & Team member
New roles for staff members
Customization & Branding
Bookings allows organizations to customize their Bookings page with their own logo. A color theme that best suits the organization can be chosen as well. Confirmations, cancellations, and reminders can be customized using a rich text editor.
 Image showing the new theming options
Choose a color and add your logo for your Bookings page
 Image showing the new Create Services popup
Set your services’ details
Simpler Scheduling
We’ve strived to make appointment scheduling as simple as possible. Admins can add multiple staff members and get a unified view across all their calendars and availability. Switching between multiple calendars is made easier with an option to filter by staff members and services. There is also an option to pin a specific calendar for easier tracking.
.png") Image showing the new filters experience
Image showing the new filters experience
Unified calendar view across staff members
Admins can navigate to a staff member profile directly from the calendar and get a comprehensive view of their scheduled meetings, contact information, and services offered.
.png") Image showing the new views for Staff & Services
Image showing the new views for Staff & Services
See a comprehensive view of staff’s details
Custom availability can be set for each staff member with multiple slots in a day and certain days marked as non-available. This is synced with the staff’s Outlook calendar to avoid double bookings. Additionally, appropriate lead time can be configured for each service to ensure that staff members are well prepared before an appointment. There’s also an option to add buffer time before and after an appointment to provide sufficient breathing time.
Coming soon
Today, Microsoft Bookings is used by thousands of organizations globally to manage their appointments inside and outside their organization. It is used across various industries to enable different scenarios like virtual classrooms, financial consulting, and tele-health.
To read more on how customers are using Bookings for these scenarios, please click here.
As Bookings continues to grow and evolve, we are committed to building new features and capabilities which can further improve the Bookings experience and empower organizations to manage their calendars and appointments better.
Admin Toolkit
We want organizations to have more control over how Bookings is used by their staff members. The admin toolkit will provide admins with granular control over the naming policy, logo, business hours, staff availability and other aspects of Bookings within their organization.
Scalability
We talked about scaling Bookings for large demand in an earlier post here. We are working hard on improving Bookings to handle more scale so that Bookings continues to work well across various scenarios like virtual meetings, consultations, and other types of appointments.
Customized Scheduling
Availability of staff members keeps changing based on personal and business needs. We want to provide granular access to admins and staff members to customize the staff availability for appointments well into the future.
Richer APIs
While we continue to improve Bookings, we also want to allow organizations to build on top of the Bookings platform and develop custom solutions which are more suited to their needs. Bookings APIs are currently available in preview as part of Microsoft Graph APIs and will soon be generally available.
If you want to learn more about Bookings, how to set it up, and start creating your own bookings pages click here.
As always, we welcome your feedback. Let us know if you have any scenarios you’d like to see us support in the future.
Thanks!
Teja
by Contributed | Jun 1, 2021 | Technology
This article is contributed. See the original author and article here.
Special thanks to @ZhipengZhao , @JulianGonzalez, @Lars_Mohr, and Microsoft CredScanCore team for making these notebooks happen.
Thanks to @Tiander Turpijn for reviewing this blog and for the great feedback.
In this blog post, I’m going to walk you through three cool and easy-to-use Azure Sentinel notebooks that can scan logs across your entire Azure Sentinel workspace, Azure Blog storage, and Azure Data Explorer environment to detect credential leaks (which can save you from some serious potential cyberattacks!). These are the built-in templates that you can instantly use without writing any line of code!
Why is there a need?
According to Verizon’s 2020 Data Breach Investigation Report, the use of credentials in cyberattacks has been on a meteoric rise. Over 80% of hacking-related breaches involve the use of stolen or lost credentials.
It’s common sense to protect sensitive data such as passwords, API keys, database credentials, etc. by properly storing them. Unfortunately, storing data safely is not an easy task, and human error will continue to happen. This makes credential leaks high risks to many organizations. For that reason, it’s crucial to perform regular log scans to catch potential leaked credentials and take actions before they get in the wrong hands.
In the Azure Sentinel context, collected log messages are stored in a Log Analytics workspace. Many organizations also store their data in Azure Blob Storage or Azure Data Explorer, especially for long-term retention purpose. You might have an Azure Storage account Shared Access Signature used in a KQL query or an Azure Active Directory client access token used to authorize an application that has been logged and saved in a storage location. The storage becomes a gold mine for bad actors waiting to readily access, excavate, and exploit your organizations’ assets.
To help solve this problem, we’ve recently released three new Azure Sentinel notebooks that can scan across these environments – your Azure Sentinel workspace, Azure Blob Storage, and Azure Data Explorer – to uncover credential leaks in your data!
How do the notebooks work?
Each notebook scans logs in each respective environment.
- The Credential Scan on Azure Log Analytics notebook enables you to pick any Azure Sentinel log table in your Log Analytics workspace and scan all or one specific column in the selected table.
- The Credential Scan on Azure Data Explorer (ADX) notebook enables you to pick and scan a table in a database from a specific ADX cluster.
- The Credential Scan on Azure Blob Storage notebook enables you to pick and scan a file in a blob container from your Blob storage account.
If any sensitive credentials are found, the results will be exported into a csv file. This file is saved in the same location as your notebook, where you can access and view the details of the leaked credentials. The file can also be downloaded and shared with relevant members in your team to validate the findings and apply appropriate remediation actions.
If no leaked credentials are found, no csv file is generated.
What types of credentials can the notebooks detect? The notebooks use regular expression patterns to identify the most common types of credentials, including passwords, Azure SQL connection strings, etc.
For a full list of credential categories, please click on the following Spoiler section.
Spoiler (Highlight to read)
- User login credentials
- Azure SQL connection string
- Azure IoT Shared Access Key
- Azure Storage Account Shared Access Signature
- Azure Storage Account Shared Access Signature for High-Risk Resources
- Azure Active Directory access token
- Amazon S3 client secret access key
- Azure Service Bus Shared Access Signature
- Azure Redis Cache Connection String Password
- Azure COSMOS DB Account Access Key
- Azure App Service Deployment Password
- Azure DevOps Personal Access Token
- Azure Function Master-API Key
- Azure Shared Access Key
- Azure AD Client Access Token
- X.509 Certificate Private Key
- ASP.NET Machine Key
- General Password
- Http Authorization Header
- Client Secret – API Key
- General Symmetric Key
- Ansible Vault
- Moniker Agent Storage Account Key
- Legacy Geneva Resource Access Key
- Domain User Password
User login credentials
Azure SQL connection string
Azure IoT Shared Access Key
Azure Storage Account Shared Access Signature
Azure Storage Account Shared Access Signature for High-Risk Resources
Azure Active Directory access token
Amazon S3 client secret access key
Azure Service Bus Shared Access Signature
Azure Redis Cache Connection String Password
Azure COSMOS DB Account Access Key
Azure App Service Deployment Password
Azure DevOps Personal Access Token
Azure Function Master-API Key
Azure Shared Access Key
Azure AD Client Access Token
X.509 Certificate Private Key
ASP.NET Machine Key
General Password
Http Authorization Header
Client Secret – API Key
General Symmetric Key
Ansible Vault
Moniker Agent Storage Account Key
Legacy Geneva Resource Access Key
Domain User Password
Let’s look at a notebook example in detail. While these notebooks are simple to use, there are some basic pre-requisites and important instructions for them to work.
Pre-requisites
- Data in at least one of these locations: Azure Sentinel workspace, Azure Blob storage, Azure Data Explorer.
- An Azure Sentinel workspace to use Azure Sentinel notebooks.
- An Azure Machine Learning (AML) workspace. Create an Azure Machine Learning workspace. You can set a default AML workspace from Azure Sentinel portal if you have more than one AML workspaces. Make sure to have at least Contributor permissions to the AML workspace to launch and execute the notebooks.
- At least a Azure Sentinel or Azure Data Explorer or Azure Blob Storage Reader role to query logs on these data locations.
Deployment
- From the Azure Sentinel portal, navigate to the Threat Management section and open the Notebooks blade.
- Go to the Templates tab.
- Search for Credential Scan and you should see three notebooks in the result.
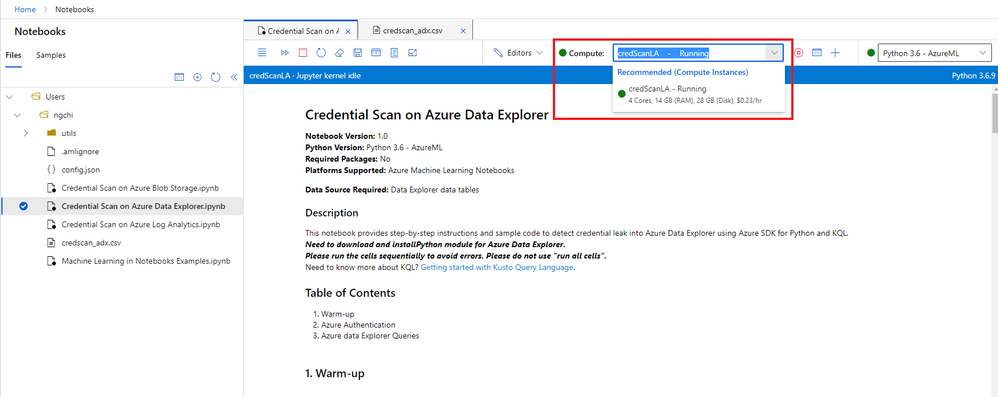
- Select one notebook. For this example, I’m going to use Credential Scan on Azure Data Explorer.
- On the right panel, select Save notebook. You can rename the selected notebook or keep the default name and save it to a default AML workspace. Then select OK.
- The notebook is now accessible to your AML workspace. From the same panel, select Launch notebook. Then you are prompted to log into the AML workspace.
- In the AML workspace, notice that a Credential Scan on Azure Data Explorer.ipynb file and a config.json file have been automatically generated from step 6 above.
- The Credential Scan on Azure Data Explorer.ipynb file has the main content of the notebook.
- The config.json file has configuration information about your Azure Sentinel environment where your notebook was launched from. It contains tenant_id, subscription_id, resource_group, workspace_id, and workspace_name, which are used for Azure Authentication (see step 9 below).
- Select a compute instance for your notebook server. If you don’t have a compute instance, create one by following step 5 in Launch a notebook using your Azure ML workspace.
create compute
- There are three main sections in this specific notebook: Warm-up, Azure Authentication, and Azure Data Explorer Queries. Each notebook cell contains instructions and/or the sample code using Azure SDK for Python and KQL. To avoid common errors, it’s important to not skip these instructions.
- The Warm-up cells load Python libraries, parameters, and functions that will be used in the notebook.
- The Azure Authentication section allows the notebook access to your Azure Resource Group where your ADX environment is located.
- The Azure Data Explorer Queries section enables you to choose an ADX cluster, a database from the cluster, then a table that you want to scan.
- After you finish running the notebook, if you don’t see the results in a newly created csv file, refresh the notebooks file explorer on the left navigation panel. Note that the name of the csv file is different for each notebook, and no csv file is created if no credentials are found.
 csv file
11. If you need to download the csv file, select the three dots next to the file name, right click and hit Download option.
12. All scripts and output files are stored in a default storage account of your AML workspace.
- Go to the storage account.
- Open File Shares -> Users.
- Select your user’s folder.
Important notes:
- It’s crucial to execute the cells sequentially instead of running all cells at once. Each code cell depends on the output of its previous cells.
- Depending on your data volume, some cell execution may take a few minutes, so please be patient.
- If you run into an issue, follow these preliminary steps:
- Sign off from AML workspace and sign in again.
- Restart the kernel.
 Restart kernel
3. Rerun the notebook.
4. If that still doesn’t work, send me a direct message and make sure to tag me. Or you can always create a Support ticket and our team will assist you.
Check out the video below for a live demo!
Summary
I hope you find these notebooks useful. Give them a try and let us know what you think!
Got more scenarios where you would like to use a notebook for? We’d love to hear! You can reach us by sending me a direct message, or posting a comment below, or posting your feedback on Azure Sentinel feedback forums.

Recent Comments