by Contributed | Nov 15, 2021 | Technology
This article is contributed. See the original author and article here.
In the previous part of this blog series- Microsoft 365 Compliance audit log activities via O365 Management API – Part 1, we discussed the importance of auditing and reporting for an organization’s security and compliance posture. We also discussed Microsoft auditing solutions, auditing architecture (and its components), as well as Microsoft Information Protection audit log schema
DLP-Activities Audit Log Schema
Let’s try to go over some of the audit log schema parameters for email and file events to make it clearer. Please note that the below is a cut-down list of the schema as most of the schema parameters are self-explanatory. For a full and updated list of DLP log schema, please visit Microsoft official documentation here, however, we will highlight a few schema parameters that we believe are important to explain what they mean and how can we use them. Below is an example of a DLP audit log:
{“CreationTime”: “2021-11-02T21:52:10”, “Id”: “1c446afc-5996-4236-845c-c6d28557bd78”, “Operation”: “DlpRuleMatch”,”OrganizationId”: “123456-8385-8539b47e6810”, “RecordType”: 13, “UserKey”: “1153801120595078600”,”UserType”: 4, “Version”: 1, “Workload”: “Exchange”, “ObjectId”: “u003cBL0PR01MB52980905BA71DB19C194A324BA8B9@prod.exchangelabs.com”, “UserId”: “user.one@nodomain.xyz”,”IncidentId”: “3d3db700-9bea-643b-3000-08d99e4c1d8b”, “PolicyDetails”: [{“PolicyId”: “fad884cb-d5a5-4ad2-9dab-24283e4bb6cc”,”PolicyName”: “Email X-Header Tagging”,”Rules“: [{“Actions”: [“ExSetHeader”,”ExModifySubject”], “ConditionsMatched”: {“ConditionMatchedInNewScheme”: true, “OtherConditions“: [{“Name”: “SensitivityLabels”, “Value”: “OFFICIAL”} ,”ManagementRuleId”: “edb9343d-fabe-47b4-a725-18f0cb031b54”, “RuleId”: “ad484e0b-752f-4787-befd-bd14db5598d4″,”RuleMode”: “Enable”,”RuleName”: “Stamp the X-Header and Append the Subject [SEC=OFFICIAL]”, “Severity”: “Medium”}], “SensitiveInfoDetectionIsIncluded”: true, “ExchangeMetaData“: {“BCC”: [], “CC”: [], “FileSize”: 18823, “From”: “user.one@nodomain.xyz”, “MessageID”: “u003cBL0PR01MB52980905BA71DB19C194A324BA8B9@prod.exchangelabs.com”, “RecipientCount”: 1, “Sent”: “2021-11-02T21:52:09″,”Subject”: “RE: Test new – 3rd Nov – 03 [SEC=OFFICIAL]”, “To”: [“admin@nodomain.xyz”],”UniqueID”: “32e0decc-4e67-4259-ef4b-08d99e4b052f”}}
|
DLP log event schema reference
Schema parameter
|
Description
|
Potential Values
|
Notes
|
DLP-Specific Base Schema
|
RecordType
|
The operation type indicated by the record
|
- 11 = ComplianceDLPSharePoint
- 13 = ComplianceDLPExchange
- 33 = ComplianceDLPSharePointClassification
- 63 = DLPEndpoint
- 99 = OnPremisesFileShareScannerDlp
- 100 = OnPremisesSharePointScannerDlp
|
For a complete updated list and full description of the Log RecordType, please refer to this article. Here we are only listing the relevant DLP Record types.
|
Operation
|
The operation type for the audit log (Referenced here as discussed above)
|
- DlpRuleMatch
- DlpRuleUndo
- DlpInfo
|
- DlpRuleMatch – This indicates a DLP rule was matched. These events exist in both Exchange and SharePoint Online and OneDrive for Business.
- For Exchange it includes false positive and override information.
- For SharePoint Online and OneDrive for Business, false positive and overrides generate separate events.
- DlpRuleUndo – These only exist in SharePoint Online and OneDrive for Business. These events indicate a previously applied policy action has been “undone” – either because of false positive/override designation by user, or because the document is no longer subject to policy (either due to policy change or change to content in doc).
- DlpInfo – These only exist in SharePoint Online and OneDrive for Business. These events indicate a false positive designation but no action was “undone.”
|
IncidentId
|
The DLP incident unique ID
|
|
|
DLP-Specific Extended Schema
|
PolicyId
|
The GUID of the DLP policy for this event
|
|
|
PolicyName
|
The friendly name of the DLP policy for this event
|
|
|
RuleId
|
The GUID of the DLP rule for this event.
|
|
|
RuleName
|
The friendly name of the DLP rule for this event
|
|
|
Actions
|
A list of actions taken because of a DLP RuleMatch event.
|
Examples only:
- ExSetHeader
- ExModifySubject
- ApplyContentMarking
- Encrypt
- BlockAccess
- NotifyUser
|
The DLP policy actions depend on many variables, such as, workload in scope (EXO, SPO, etc.) and conditions selected. Here we listed a few DLP policy action examples for the purpose of the article.
|
Severity
|
The severity of the rule match.
|
|
|
DLP-Specific Extended SENSITIVE Schema (the SensitiveInformationDetections section of the log)
|
DetectedValues
|
An array of sensitive information that was detected.
|
|
- DLP sensitive data is only available in the activity feed API to users that have been granted “Read DLP sensitive data” permissions.
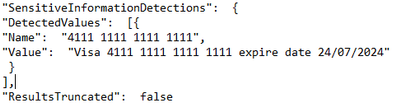
- Example from our tenant API (Teams DLP event):
|
ResultsTruncated
|
Indicates if the logs were truncated due to large number of results.
|
|
- DLP sensitive data is only available in the activity feed API to users that have been granted “Read DLP sensitive data” permissions.
- See example above
|
DLP-Specific Extended SENSITIVE Schema (the ExceptionInfo section of the log)
|
Reason
|
For a DLPRuleUndo event, which indicates why the rule no longer applies.
|
- Override
- Document Change
- Policy Change
|
- DLP sensitive data is only available in the activity feed API to users that have been granted “Read DLP sensitive data” permissions.
- Example from our tenant API (Teams DLP event):

|
Justification
|
If the user chose to override policy, any user-specified justification is captured here.
|
|
- DLP sensitive data is only available in the activity feed API to users that have been granted “Read DLP sensitive data” permissions.
- See example above
|
Rules
|
A collection of GUIDs for each rule that was designated as a false positive or override, or for which an action was undone.
|
|
- DLP sensitive data is only available in the activity feed API to users that have been granted “Read DLP sensitive data” permissions.
- See example above
|
MIP/DLP in Office 365 Management API
So before knowing how to retrieve MIP and DLP logs via Office 365 Management API queries, we need to know first, where to look for them.
Below is a summary of each of the Office 365 Management API content blobs and what operations they contain. Please use this as a reference whenever you are performing a log search for a specific activity event for MIP and/or DLP.
Content Blob
|
Operation
|
Notes
|
Audit.AzureActiveDirectory
|
|
Very useful in general for any investigation or reporting purposes.
|
Audit.Exchange
|
- MIPLabel
- DLPRuleMatch
- AutoSensitivityLabelRuleMatch
|
|
Audit.SharePoint
|
- DLPRuleMatch
- DLPRuleUndo
- DlpInfo
- FileSensitivityLabelChanged
|
- FileSensitivityLabelChanged is applicable to a document using:
|
Audit.General
|
- SensitivityLabelApplied
- SensitivityLabelUpdated
- SensitivityLabelChanged
- SensitivityLabelRemoved
- SensitivityLabeledFileOpened
- SensitivityLabeledFileApplied
- SensitivityLabeledFileRenamed
- SensitivityLabeledFileRemoved
- FileSensitivityLabelChanged
- AutoSensitivityLabelRuleMatch
- DLPRuleMatch
- DLPRuleUndo
- DlpInfo
|
- SensitivityLabelApplied, SensitivityLabelChanged, SensitivityLabelRemoved are applicable to:
- SPO/Teams sites
- Emails and files activities from Microsoft 365 Apps Only
- SensitivityLabelUpdated is applicable to a document using:
- SensitivityLabeledFileChanged is applicable to a document using:
- Office on the Web
- Auto-labelling policy.
- SensitivityLabeledFileRemoved is applicable to a document using:
- SensitivityLabeledFileOpened is applicable to a document using:
|
DLP.All
|
- DLPRuleMatch
- DLPRuleUndo
- DlpInfo
- MIPLabel
|
DLP events may include sensitive data (if configured)
|
Querying Management API
In this section, we will go over the configuration details in depth to prepare the environment before performing any API queries. As well as the “Compliance API” script that we have created to help querying and exporting the Microsoft 365 audit log activities via Office 365 management API.
Register your application in Azure AD
In order to be able to query the Office 365 Management API endpoints, you will need to configure your application with the right permissions. For a step-by-step guide, please visit the Microsoft official documentation here for more details.
Compliance-API Script
We have created a sample Office Management API script that enables administrators to access their tenant management API service (given all the prerequisites steps above have been completed). The script uses a few variables that you will need to update to be able to use it in your tenant (explained below). Also, the script mainly uses the “Get” function to export the log activities to a bunch of JSON files from the main 5 content blobs that we need. Now, let’s go through the script.
Script facts
- We highly recommend using this script and testing it first in your testing environment. If you need to use it in your production environment, consider removing the hard-coded variables (as shown below) from the script. It is highly NOT RECOMMENDED to keep any passwords, secrets, etc. within files or scripts on endpoints. You may consider using secure string or Azure Key Vault with Azure functions/variables.
- The script exports the log data to JSON files, due to the extensive information and attributes for each log event. The aim was to export all the Microsoft 365 audit logs so that they suit everyone’s needs (not only for MIP and DLP). For example, if there are MIG, eDiscovery, or Communication Compliance audit logs, these will be exported too. Further customization can be done to the script if needed to narrow the export scope, by applying export filters (i.e., Operation -eq, etc.). So, it is up to you to use it the way that works best for you.
- The script checks content availability (i.e., notifications) that became available today, which means from 12:00 AM UTC to the current time. If you want to specify a different period (keeping in mind that the maximum period for which you can query is 24 hours), you can add the starttime and endtime parameters in the script to the URI in the last 24 hours from the time runs. Like the below (don’t forget to define the starttime and endtime parameters):
Invoke-WebRequest -Method GET -Headers $OfficeToken -Uri "$BaseURI/content?contentType=$Subscription&startTime=$Date022T00:00&endTime=$Date022T23:59&PublisherIdentifier=$TenantGUID" ErrorAction Stop
Script variables
The script defined variables are depicted below, you will need to update the following:
•$AppClientID = " The Azure AD registered application ID "
•$ClientSecretValue = " The application secret Value"
•$TenantGUID = " Tenant ID – you can get it from Azure AD portal"
•$tenantdomain = " Tenantname.onmicrosoft.com"
•$OutputPath = "Logs folder path – i.e., C:APILogs"
•$APIResource = Endpoint URI ($Enterprise, $GCC, $GCCH, $DOD)
MIP/DLP PowerBI (PBI) Reports
So now we have the MIP/DLP logs exported via the Office 365 management API to JSON files, what can we do with them?. We can use those JSON files in various ways, such as:
- Import them to your 3rd party SIEM solution for reporting and analysis.
- Use 3rd JSON reading tools to export/convert to other formats for further analysis.
- Use PowerBI to create reports based on the data in those files.
Here we will show you an example on how to use PowerBI Desktop tool to create MIP/DLP audit report. We have selected to create a report for DLP policy incidents in the last 24 hours within our tenant
Configuration steps
- Download the PowerBI Desktop client from here then install it on your machine. Run the client once the install is complete.
- Once the client is running, click on File, then Get Data, then click on Get data to get started

- In the Get Data page, select JSON from the list, then click Connect

- Select the JSON file(s) that you would like to create a report for, then click Open

- The Power Query editor page will open. Here you can modify the JSON file results’ view and data. You can rename column headers, remove columns/rows, and expand an array data into values to name a few. For our report, this is what we have decided to do:
- We have filtered the “operation” column to just show “DLPRuleMatch” and “DLPRuleUndo” operations

- We have expanded all the “list” items to their original headers and values. The “list” items are the data into the complex (i.e., array) part within the audit log. Then we will select to show only the “PolicyName” and “Rules” headers.


- We will also expand the “Rules” data and show the ones selected below


- Then click on the close and apply to exit the query editor.

Report examples
- From the visualizations section, select the visualization that you would like to use, then drag and drop fields that you would like to create a report for. Below is what we have chosen to configure for our DLP incidents reporting:
- A simple report to report on DLP incidents in the last 24 hours, per workload, per DLP policy:

- This report shows the number of DLP incidents, per user, per workload, per DLP policy:

- The last one has more details. This shows the DLP incident severity, per DLP Policy, per user, with visual count on bars, per workload (in the tooltip):

References
Thank you.
by Contributed | Nov 14, 2021 | Technology
This article is contributed. See the original author and article here.
Summary: This article discusses using TF902 as a quick workaround to bring up your SQL Server service if it fails to be started due to post upgrade script failure after installing SQL Server patch. Further troubleshooting steps to address the post upgrade script failure have been discussed in later part of this article.
Please be noted that it is not suggested to keep your SQL Server service in this state for long since your SQL Server is in an incomplete patch installation status and considered instable for your production environment. This is because part of your SQL DLL files, MSP files or related registry key record might have already been upgraded while a few other files or metadata are not upgraded.
Why We Need To Run Post Upgrade Script After SQL Patch?
——————————————————————
After you have finished most part of installing the SQL patch (the scenarioengine.exe process and a few other related SQL and Windows process finished the change made to MSP file, registry key, and DLL files), SQL Server service (sqlservr.exe) still needs to perform another step – to run a few post upgrade TSQL scripts – to successfully complete the change made by patch installation. This is because the patch installation process mainly makes change to the related MSP files, registry key, and DLL files. We still need to apply a few remaining changes made in DLL into SQL database level by running a few system TSQL scripts. Major part of these TSQL scripts are stored in the ‘Install’ folder for your SQL instance while another part of them are encrypted (i.e. C:Program FilesMicrosoft SQL ServerMSSQL15.MSSQLSERVERMSSQLInstall). If the post upgrade script cannot be successfully finished , SQL Server service cannot be started successfully after the patch as the system databases’ status are not ready to be started on service startup process.
Symptom
======
After installing SQL Patch, your SQL Server service cannot be started.
SQL Server service can still generate new ERROR LOG on starting up attempt.
In the latest SQL ERROR LOG file, you found below error as ‘Script level upgrade for database ‘**’ failed’ indicating that SQL Server failed to perform the script level upgrade for a specific system database and caused subsequent shut down(Below are sample testing error from my LAB when reproducing the same issue)
2021-10-14 11:27:02.98 spid7s Error: 912, Severity: 21, State: 2.
2021-10-14 11:27:02.98 spid7s Script level upgrade for database ‘%’ failed because upgrade step ‘%’ encountered error 3930, state 1, severity 16. This is a serious error condition which might interfere with regular operation and the database will be taken offline. If the error happened during upgrade of the ‘master’ database, it will prevent the entire SQL Server instance from starting. Examine the previous errorlog entries for errors, take the appropriate corrective actions and re-start the database so that the script upgrade steps run to completion.
2021-10-14 11:27:02.98 spid7s Error: 3417, Severity: 21, State: 3.
2021-10-14 11:27:02.99 spid7s Cannot recover the master database. SQL Server is unable to run. Restore master from a full backup, repair it, or rebuild it. For more information about how to rebuild the master database, see SQL Server Books Online.
2021-10-14 11:27:02.99 spid7s SQL Server shutdown has been initiated
Quick Workaround To Bring Up SQL Service(Not Suggested to Keep it for Long)
=====================================================
We can add trace flag 902 to SQL Server service startup parameter to skip the script upgrade process in order to bring up your SQL Server service.
However, we suggest to resolve the failure for finishing the post upgrade script as we cannot leave SQL Server service in this state with TF902 for long. It is an incomplete upgrade state and considered unstable. This is because part of your DLL files might have already been upgraded while a few other files or metadata are not upgraded.
Further Troubleshooting Steps for Post Upgrade Script Failure
=========================================
The failure of post upgrade script can be caused by issue at database level in finishing the scripts or failure at patch installation level.
The latter indicates that the post upgrade failure is actually a consequence of an earlier exception in patch installation phase rather than the root cause of the patch installation failure. To go further, we need to investigate the actual exception that causes the subsequent failure.
Phase 1: Directly check the error and failed script steps for post upgrade script failure issue
1. As the post upgrade script will also be performed at the end of the patch installation process, you can check the latest SQL Setup Bootstrap log folder for ERRORLOG file details to see in which step and in which script do we encounter the error.
One of the common causes can be an orphaned SQL login which cannot be dropped and recreated when running a few of these post upgrade scripts.
2. If we don’t have the detailed ERRORLOG that records the script upgrade failure details, we can find a down time , remove trace flag 902 from SQL startup parameter and add trace flag 3601 to SQL Server startup parameter. Then we can try to start SQL Server service to reproduce the issue. Trace flag 3601 will dump script level upgrade details to the SQL Error Log. This is a trace flag used by Microsoft for internal troubleshooting purpose. Please use it under instruction and avoid using it in your PRODUCTION environment. Alternatively, we can configure X-event on service startup to check the errors and TSQL script details when we reproduce the issue. Please be noted that part of these scripts are encrypted.
Phase 2: Check the Setup Bootstrap logs for more details of the exception on SQL Server patch installation process
If the post upgrade script is actually a consequence of failure encountered during SQL patch installation process , then the issue is not at database level but patch installation phase. We need to investigate the exception encountered on patch installation process in order to address the issue.
If this is the case, check the ‘Detials.txt’ and other logs on the Setup Bootstrap ‘Log’ folder for this issued patch installation and investigate further.(Default path: “C:Program FilesMicrosoft SQL Server<YourSQLVersion>Setup BootstrapLog<YourIssuedPatchInstallationTime>”)
In some simple scenarios, minor failure can be caused by file in use or lack of permission issue and can be quickly resolved by ‘Repair’ option in ‘setup.exe’ program to repair the corrupted patch installation.
DISCLAIMER : THIS CODE AND INFORMATION IS PROVIDED “AS IS” WITHOUT WARRANTY OF ANY KIND, EITHER EXPRESSED OR IMPLIED, INCLUDING BUT NOT LIMITED TO THE IMPLIED WARRANTIES OF MERCHANTABILITY AND FITNESS FOR A PARTICULAR PURPOSE.
by Contributed | Nov 13, 2021 | Technology
This article is contributed. See the original author and article here.
Before implementing data extraction from SAP systems please always verify your licensing agreement. |
One of the greatest opportunities of having SAP on Azure is the rich portfolio of integration services, especially focusing on data. And one of the best use cases for using SAP data on Azure is the possibility of blending it with data coming from external sources. The last ten years have proven that while SAP is one of the most important IT solutions for many customers, it’s not the only one. We witness a significant shift from having a single solution towards implementing multiple specialized systems surrounding the core ERP functionalities.
These surrounding solutions can be pretty much anything – from a cloud CRM system to an advanced Excel spreadsheet filled with fancy formulas, which many finance people love so much. We can’t forget about business partners, who send data worth blending with information you already own.
To provide value, you need to democratize and integrate your data. When you look at your data in isolation, most times you won’t get the big picture. You’ll probably miss information on how the huge marketing campaign influenced the sales of your new product. Was it worth the spend? Should you repeat it? To make data-driven decisions, organizations invest their time and energy in building reliable common data platforms that connect the dots between various areas of the business.
SAP remains one of the key systems of records, and ensuring a reliable data flow to a common data platform is essential. The question I often hear is how to approach data extraction from an SAP system. High volumes of data, frequent changes, and proprietary protocols don’t make things easier. Getting data directly from the underlying database is probably not the best idea, as it often breaches licensing terms. Simultaneously there are also technical challenges. Some complex data structures, like cluster tables, are impossible to extract from this layer. A while ago, the RFC-based data extraction through an application server was a leading solution. It’s still a viable approach, especially if you reuse available BW extractors to populate the schema information.
There is also a third option available, which is getting more powerful, especially if you’re lucky enough to have recent release of an SAP system. While I don’t think the protocol offers significant advantages in the extraction process (and sometimes it causes much pain), its integration possibilities make it worth a closer look. Yes, you got it right – I’m talking about OData.
The increasing adoption of the OData protocol and much-invested energy by SAP makes it the most advanced data integration method. There is a large library of available OData services published by SAP. All SAP Fiori apps use OData to read information from the back-end system. You can even expose CDS-views as an OData service and query them from external applications. And while I’m aware of the problems that OData-based extraction brings, I still think it’s worth your attention.
Over the next couple of episodes, I will show you how to use OData services to extract SAP data using Azure Synapse. My goal is to provide you with best practices to embrace OData and use SAP data with information coming from other sources. Today I’m giving you a quick overview of the Azure Synapse and its data integration capabilities. We will build a simple ETL / ELT pipeline to extract data from one of the available OData services. In the coming weeks, I’ll cover more advanced scenarios, including delta extraction, client-side caching, and analytic CDS views.
INTRODUCTION TO AZURE SYNAPSE
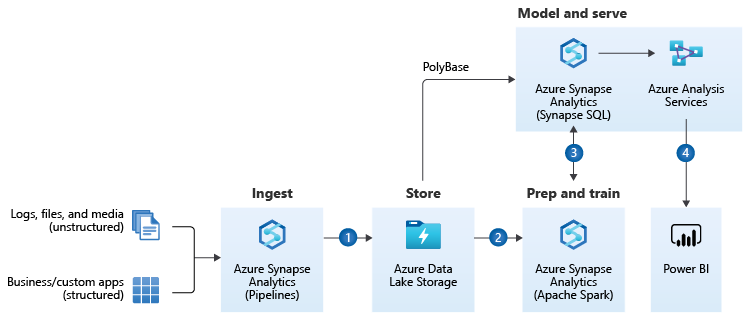
I want to keep the theory as short as possible, but I think you will benefit from a brief introduction to Azure Synapse. Especially, if you’re unfamiliar with Azure tools for data analytics. Whenever you work with data, there are a few steps involved to retrieve a piece of information or insight. I guess we are all familiar with the ETL acronym, which stands for Extract – Transform – Load. It basically describes a process that gets data from one system, modifies them, and then uploads them to a target solution. For example, to a data warehouse, making it available for reporting.
I like the way Microsoft extends the data warehousing model. It provides a solution that consolidates all the steps required to get an actual insight. No matter what is the source and format of data and what are the expected target results. It can be a simple report or an action triggered by the Machine Learning algorithm. The heart of the Modern Data Warehouse platform is Azure Synapse – a complete analytics solution that together with massively scalable storage allows you to process and blend all sorts of data. No matter if you work with highly structured data sources, like an SAP system, or if you want to analyze streaming data from your IoT device, you can model and query your dataset from one data platform hosted on Azure.
(source: Microsoft.com)
A part of the Modern Data Warehouse concept that we will pay special attention to is data ingestion. We will use Synapse Pipelines to copy data from an SAP system to Azure Data Lake and make it available for further processing.
To streamline data movements, Azure Synapse offers more than 90 connectors to the most common services. Six of them works with SAP landscapes. Depending on the source system, each offers a unique type of connectivity. The SAP Tables retrieves data from NetWeaver tables using RFC protocol. For SAP BW systems, you can copy data using MDX queries or by OpenHub destination. There is even a dedicated connector that uses the OData protocol.
Configurable building blocks simplify the process of designing a pipeline. You can follow a code-free approach, but in upcoming episodes, I’ll show you how to use a bit of scripting to fully use the power of the ingestion engine. A basic pipeline uses a single Copy Data activity that moves data between the chosen source and target system. More advanced solutions include multiple building blocks that can be executed in sequence or parallel, creating a flow of data that calls various services within a single execution.

Linked Service is a definition of the connection to a service. You can think of it as a connection string that stores essential information to call an external service – like a hostname, a port or user credentials. A dataset represents the format of the data. When you save a file in the lake, you can choose to keep it as a CSV file, which is easy to read and edit using a notepad, or a specialized parquet file type, which offers columnar storage and is more efficient when working with large amounts of data.
An Integration Runtime provides compute resources that connect to the service and run transformation created as data flows. It’s a small application that you could compare to the SAP Cloud Connector. It acts as a proxy between the cloud-based ingestion engine and your resources. There are two main types of Integration Runtime available:
- Azure Integration Runtime
- Self-Hosted Integration Runtime
The Azure Integration Runtime allows you to connect to public services available over the internet, but with Private Endpoints, you can also use it inside Azure Virtual Network. To establish a connection with a system hosted on-premise, you should instead use the Self-Hosted version of the runtime. Using custom connection libraries or choosing the Parquet file format also mandates using the self-hosted integration runtime.
In this blog series, I will use the Self-Hosted Integration Runtime. The installation process is simple, and Microsoft provides extensive documentation, so I won’t provide a detailed installation walkthrough.
CREATE AZURE SYNAPSE ANALYTICS WORKSPACE
It’s time to get our hands dirty and create some resources. From the list of available Azure Services, choose Azure Synapse and create a new workspace. On the first tab, provide initial information like the resource group and the service name. An integral part of the Azure Synapse is the data lake which can be created during the service provisioning.

You can maintain user SQL Administrator credentials on the Security Tab. On the same tab, you can integrate Azure Synapse with your virtual network or change firewall rules. To follow this guide, you don’t have to change any of those default settings.
The Review screen shows a summary of settings and provides a high-level cost estimation. Click Create to confirm your choices and deploy the service.

That’s it! Within a couple of minutes, Azure deploys the service, and you can access the Synapse Studio.
CREATE INTEGRATION RESOURCES
Azure Synapse Studio is the place where you manage your data engineering and data analytics processes. It provides you with quick-start templates that you can use and rapidly build your data solution. But we’ll take a longer path – I want you to understand how the service works and how to design data pipelines, so no shortcuts in this guide!
The menu on the left side of the screen provides easy access to Synapse features. Take a moment to walk around. The Data element allows you to explore your data. You can connect to SQL and Spark pools or browse data stored in the lake. To write code, like SQL queries or stored procedures, you will use the Develop workspaces. But the place where we will spend most of our time is the Integrate area. Here you can provision pipelines and build processes that copy information from one system to another. We will also frequently use Monitoring features to see the status and progress of an extraction job.
To start designing the very first pipeline, create a Linked Service that stores the SAP connection information. You can do it in the Manage section. Choose Linked Services item – you will notice that you already have two entries there – one of them pointing to the Azure Data Lake Storage that you defined during Synapse service provisioning.

The predefined connection is used internally by Synapse and allows you to explore the data lake. To use the parquet file format in the data lake, we will create another connection that uses the Self-Hosted Integration Runtime.
Click the New button at the top and choose Azure Data Lake Gen2 from the list.

Provide the connection name in the New Linked Service screen and choose the storage account from the list. I’m using Managed Identity as the authentication method as it provides the most secure way of accessing the data lake without using any authentication keys.
If you haven’t installed the Self-Hosted Integration Runtime yet, this is the right moment to do it. When you expand the selection box Connect via Integration Runtime, you will notice the “New” entry. Select it, and the wizard will guide you through the installation process.
Finally, I run the connection test (verifying access to the path where I want my files to land) and save settings.

The connection to the storage account is defined. Now, we have to do the same for the SAP system. As previously, click the “New” button at the top of the screen. This time choose OData as the service type.

When defining an OData connection, you have to provide the URL pointing to the OData service. During the connection test, Synapse fetches the service metadata and reads available entities. Throughout the blog series, I will be using various OData services. I’m starting with the API_SALES_ORDER_SRV service that allows me to extract Sales Order information.
Using credentials in the pipeline is a sensitive topic. While it is possible to provide a username and password directly in the Linked Service definition, my recommendation is to avoid it. Instead, to securely store secrets, use the Key Vault service. Using a secret management solution is also a prerequisite for using parameters in Linked Service, which will be the topic of the next episode.
When you select Key Vault instead of password authentication, the Synapse Studio let you define a connection to the vault. It is stored as another linked service. Then you can reference the Secret instead of directly typing the password.

Whenever you want to save your settings, click the Publish button at the top of the screen. It is the right moment to do it as both connections are working, and we can define datasets that represent the data format. Switch to the Data view in the Synapse Studio and then click the plus button to create a new Integration Dataset.

Firstly, we’ll create a dataset that represents a file stored in the storage account. Choose Azure Data Lake Gen2 as the data store type. Then, choose the format of the file. As mentioned earlier, we’ll use parquet format, which is well-supported across Azure analytics tools, and it offers column store compression. Remember that this file format requires Java libraries deployed on the Integration Runtime.
Provide the name of the dataset and choose the previously created Linked Service pointing to the data lake. Here you can also choose the path where the file with extracted data will be stored. Click OK to confirm your settings and Publish changes.

Create a dataset for the OData service. This time you’re not asked to choose the file format, and instead, you jump directly to the screen where you can associate the dataset with the OData linked service. It is also the place where you can choose the Entity to extract – Synapse automatically fetches the list using the OData metadata.

I selected the A_SalesOrder entity to extract sales orders headers.
BUILD THE FIRST PIPELINE
Having all linked services and datasets defined, we can move to the Integrate area to design the first pipeline. Click on the plus button at the top of the screen and choose Pipeline from the menu.
All activities, that you can use as part of your pipeline, are included in the menu on the left side of the modeller. When you expand the Move & Transfer group, you’ll find a Data Copy activity that we will use to transfer data from the SAP system to Azure Data Lake. Select and move it to the centre of the screen.

You can customize the copy data process using settings grouped into four tabs. Provide the name of the activity on the General tab. Then on the Source tab, choose the dataset that represents to SAP OData service.

Finally, on the Sink tab select the target dataset pointing to the data lake.

That’s everything! You don’t have to maintain any additional settings. The Copy Data process is ready. Don’t forget to Publish your changes, and we can start the extraction process.
EXECUTION AND MONITORING
To start the pipeline, click on the Add Trigger button and then choose Trigger Now.

Within a second or two, Synapse Studio shows a small pop-up saying the pipeline execution has started. Depending on the size of the source data, the extraction process can take a couple of seconds or minutes. It can also fail if something unexpected happens. Switch to Monitor view to check the pipeline execution status. You can see there the whole history of the extraction jobs.

By clicking on the pipeline name, you can drill down into job execution and display details of every activity that is part of the process. Our extraction was very basic, and it consisted of just a single Copy Data activity. Click on the small glasses icon next to the activity name to display detailed information.

The detailed view of the copy activity provides the most insightful information about the extraction process. It includes the number of processed records, the total size of the dataset and the time required to process the request. We will spend more time in the monitoring area in future episodes when I’ll show you how to optimize the data transfer of large datasets.
As the extraction job completed successfully, let’s have a look at the target file. Move to the Data view and expand directories under the data lake storage. Choose the container and open the path where the file was saved. Click on it with the right mouse button and choose Select Top 100 rows.

In this episode, we’ve built a simple pipeline that extracts SAP data using OData protocol and saves them into the data lake. You’ve learnt about basic resources, like linked services and datasets and how to use them on the pipeline. While this episode was not remarkably challenging, we’ve built a strong foundation. Over the next weeks, we will expand the pipeline capabilities and add advanced features. In the meantime, have a look at my GitHub page, where I publish the full source code of the pipeline.

by Contributed | Nov 11, 2021 | Technology
This article is contributed. See the original author and article here.
We are excited to be partnering with SWOOP Analytics to host our 2021 Yammer Community Festival on December 8th-9th! This event has been curated and designed for our customers, for you to learn from each another and hear how to build culture and community in your own organizations. Whether you are just launching your Yammer network and not sure where to begin or are curious to hear what’s coming down the product pipeline, there are sessions for you!
Agenda
This virtual event will span across European, Americas, and Asia Pacific time zones. Look at the agenda to see an idea of the types of stories and sessions that will be available. All sessions will be recorded to be able to watch on demand following the event.

*Exact timing and content subject to change.
Speakers
We have an incredible line up of Yammer customer speakers that have a variety of experiences and types of organizations from across the world. They’ll share best practices, lessons learned and provide practical guidance that you’ll be able to take and use at your organization. You’ll also hear directly from Microsoft , including the product teams who build Yammer and learn more about the future of products like Microsoft Viva. You might see new faces and familiar brands that have great stories to share. Take a closer look at all the presenters here.
Nominate your colleagues for the Community Champion Award
The Yammer Community Champion Award is an opportunity to recognize passionate community managers around the world who are committed to employee engagement, knowledge sharing, and collaboration in their Yammer networks and communities.
As part of our first Yammer Community Festival, we will announce regional winners of the Yammer Community Champion Award.
Can you think of anyone who deserves this title? Tell us who you think should win this award!
There will be one winner per regional session and winners will be contacted in advance of session that they have been ‘shortlisted’ as a top contender for the Yammer Community Champion Award. This is to ensure the winners are present to virtually accept their award. Based on network size, the number of nominations per organization is not limited as there may be many opportunities within a company to submit a nomination.

Register today!
We’re running the event as an interactive Microsoft Teams meeting with Q&A enabled. Bring your questions and ideas as we want to make the chat component active, with many voices heard. Speakers are there to prompt conversations in chat and be prepared to unmute!
“We are so excited to present the future of Yammer to this community. We’ve heard from customers like you, that you want to connect and learn from the Yammer community of customers that exist across the globe. This is a great opportunity to showcase your success and learn from others in the community. We look forward to seeing you all at the festival!”
MURALI SITARAM
CVP Yammer+M365 Groups, Microsoft
Save your seat and register now!
FAQ
How much does this cost?
This event is free so invite your whole team!
Can I attend a session outside of my time zone?
Yes! Feel free to attend any session that fits your schedule, regardless of your location.
Will sessions be recorded?
Yes, sessions will be recorded and made available after the event.
How many people can I nominate for the Community Champion Award?
We do not have a set limit for number of nominations by organization or person. Feel free to nominate all the Community Champions you know!
What do the Community Champion Award members win?
There will be custom swag sent to each award winner.
Who should attend?
All roles and departments are welcome. Customer speakers will be a variety of backgrounds and roles within an organization and you’ll be sure to find similar roles that support the work you do, regardless if you are in marketing, communications, sales, product development or IT.

Recent Comments