
by Contributed | Dec 2, 2021 | Dynamics 365, Microsoft 365, Technology
This article is contributed. See the original author and article here.
You chose Dynamics 365 for your enterprise to improve visibility and to transform your business with insights. Is it a challenge to provide timely insights? Does it take too much effort to build and maintain complex data pipelines?
If your solution includes using a data lake, you can now simplify data pipelines to unlock the insights hidden in that data by connecting your Finance and Operations apps environment with a data lake. With general availability of the Export to Data Lake feature in Finance and Operations apps, data from your Dynamics 365 environment is readily available in Azure Data Lake.
Data lakes are optimized for big data analytics. With a replica of your Dynamics 365 data in the data lake, you can use Microsoft Power BI to create rich operational reports and analytics. Your data engineers can use Spark and other big data technologies to reshape data or to apply machine learning models. Or you can work with a data lake the same way that you work with data in a SQL database. Serverless SQL pool endpoints in Azure Synapse Analytics conveniently lets you query big data in the lake with Transact-SQL (T-SQL).
Why limit yourself to business data? You can ingest legacy data from previous systems as well as data from machines and sensors at a fraction of the cost incurred when storing data in a SQL data warehouse. You can easily mash-up business data with signals from sensors and machines using Azure Synapse Analytics. You can merge signals from the factory floor with production schedules, or you can merge web logs from e-commerce sites with invoices and inventory movement.
Can’t wait to try this feature? Here are the steps you need to follow.
Install the Export to Data Lake feature
The Export to Data Lake feature is an optional add-in included with your subscription to Dynamics 365. This feature is generally available in certain Azure regions: United States, Canada, United Kingdom, Europe, South East Asia, East Asia, Australia, India, and Japan. If your Finance and Operations apps environment is in any of those regions, you can enable this feature in your environment. If your environment isn’t in one of the listed regions, complete the survey and let us know. We will make this feature available in more regions in the future.
To begin to use this feature, your system administrator must first connect your Finance and Operations apps environment with an Azure Data Lake and provide consent to export and use the data.
To install the Export to Data Lake feature, first launch the Microsoft Dynamics Lifecycle Services portal and select the specific environment where you want to enable this feature. When you choose the Export to Data Lake add-in, you also need to provide the location of your data lake. If you have not created a data lake, you can create one in your Azure subscription by following the steps in Install Export to Azure Data Lake add-in.
Choose data to export to a data lake
After the add-in installation is complete, you and your power users can launch the environment for a Finance and Operations app and choose data to be exported to a data lake. You can choose from standard or customized tables and entities. When you choose an entity, the system chooses all the underlying tables that make up the entity, so there is no need to choose tables one by one.
Once you choose data, the system makes an initial copy of the data in the lake. If you chose a large table, the initial copy might take a few minutes. You can see the progress on screen. After the initial full copy is done, the system shows that the table is in a running state. At this point, all the changes occurring in the Finance and Operations apps are updated in the lake.
That’s all there is to it. The system keeps the data fresh, and your users can consume data in the data lake. You can see the status of the exports, including the last refreshed time on the screen.
Work with data in the lake
You’ll find that the data is organized into a rich folder structure within the data lake. Data is sorted by the application area, and then by module. There’s a further breakdown by table type. This rich folder structure makes it easy to organize and secure your data in the lake.
Within each data folder are CSV files that contain the data. The files are updated in place as finance and operations data is modified. In addition, the folders contain metadata that is structured based on the Common Data Model metadata system. This makes it easy for the data to be consumed by Azure Synapse, Power BI, and third-party tools.
If you would like to use T-SQL to work with data in Azure Data Lake, as if you are reading data from a SQL database, you might want to use the CDMUtil tool, available from GitHub. This tool can create an Azure Synapse database. You can query the Synapse database using T-SQL, Spark, or Synapse pipelines as if you are reading from a SQL database.
You can make the data lake into your big data warehouse by bringing data from many different sources. You can use SQL or Spark to combine the data. You can also create pipelines with complex transforms. And then, you can create Power BI reports right within Azure Synapse. Simply choose the database and create a Power BI dataset in one step. Your users can open this dataset in Power BI and create rich reports.
Next steps
Read an Export to Azure Data Lake overview to learn more about the Export to Data Lake feature.
For step-by-step instructions on how to install the Export to Data Lake add-in,see Install Export to Data Lake add-in.
We are excited to release this feature to general availability. You can also join the preview Yammer group to stay in touch with the product team as we continue to improve this feature.
The post Unlock hidden insights in your Finance and Operations data with data lake integration appeared first on Microsoft Dynamics 365 Blog.
Brought to you by Dr. Ware, Microsoft Office 365 Silver Partner, Charleston SC.
by Contributed | Dec 1, 2021 | Technology
This article is contributed. See the original author and article here.
This public preview of Microsoft Azure Active Directory (Azure AD) custom security attributes and user attributes in ABAC (Attribute Based Access Control) conditions builds on the previous public preview of ABAC conditions for Azure Storage. Azure AD custom security attributes (custom attributes, here after) are key-value pairs that can be defined in Azure AD and assigned to Azure AD objects, such as users, service principals (Enterprise Applications) and Azure managed identities. Using custom attributes, you can add business-specific information, such as the user’s cost center or the business unit that owns an enterprise application, and allow specific users to manage those attributes. User attributes can be used in ABAC conditions in Azure Role Assignments to achieve even more fine-grained access control than resource attributes alone. Azure AD custom security attributes require Azure AD Premium licenses.
We created the custom attributes feature based on the feedback we received for managing attributes in Azure AD and ABAC conditions in Azure Role Assignments:
- In some scenarios, you need to store sensitive information about users in Azure AD, and make sure only authorized users can read or manage this information. For example, store each employee’s job level and allow only specific users in human resources to read and manage the attribute.
- You need to categorize and report on enterprise applications with attributes such as the business unit or sensitivity level. For example, track each enterprise application based on the business unit that owns the application.
- You need to improve your security posture by migrating from API access keys and SAS tokens to a centralized and consistent access control (Azure RBAC + ABAC) for your Azure storage resources. API access keys and SAS tokens are not tied to an identity; meaning, anyone who possesses them can access your resources. To enhance your security posture in a scalable manner, you need user attributes along with resource attributes to manage access to millions of Azure storage blobs with few role assignments.
Let’s take a quick look at how you can manage attributes, use them to filter Azure AD objects, and scale access control in Azure.
Step 1: Define attributes in Azure AD
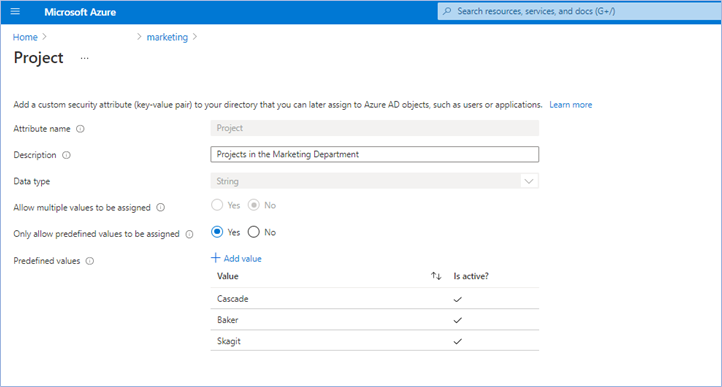
The first step is to create an attribute set, which is a collection of related attributes. For example, you can create an attribute set called “marketing” to refer to the attributes related to the marketing department. The second step is to define the attributes inside the attribute set and the characteristics of the attribute set. For example, only pre-defined values are allowed for an attribute and whether an attribute can be assigned a single value or multiple values. In this example, there are three values for the project attribute—Cascade, Baker, and Skagit—and a user can be assigned only one of the three values. The picture below illustrates the above example.
Step 2: Assign attributes to users or enterprise applications
Once attributes are defined, they can be assigned to users, enterprise applications, and Azure managed identities.

Once you assign attributes, users or applications can be filtered using attributes. For example, you can query all enterprise applications with a sensitivity level equal to high.

Step 3: Delegate attribute management
There are four Azure AD built-in roles that are available to manage attributes.

By default, Global Administrators and Global Readers are not able to create, read, or update the attributes. Global Administrators or Privileged Role Administrators need to assign the attribute management roles to other users, or to themselves, to manage attributes. You can assign these four roles at the tenant or attribute set scope. Assigning the roles at tenant scope allows you to delegate the management of all attribute sets. Assigning the roles at the attribute set scope allows you to delegate the management of the specific attribute set. Let me explain with an example.

- Xia is a privileged role administrator; so, Xia assigns herself Attribute Definition Administrator role at the tenant level. This allows her to create attribute sets.
- In the engineering department, Alice is responsible for defining attributes and Chandra is responsible for assigning attributes. Xia creates the engineering attribute set, assigns Alice the Attribute Definition Administrator role and Chandra the Attribute Assignment Administrator role for the engineering attribute set; so that Alice and Chandra have the least privilege needed.
- In the marketing department, Bob is responsible for defining and assigning attributes. Xia creates the marketing attribute set and assigns the Attribute Definition Administrator and Attribute Assignment Administrator roles to Bob.
Step 4: Achieve fine-grained access control with fewer Azure role assignments
Let’s build on our fictional example from the previous blog post on ABAC conditions in Azure Role Assignments. Bob is an Azure subscription owner for the sales team at Contoso Corporation, a home improvement chain that sells items across lighting, appliances, and thousands of other categories. Daily sales reports across these categories are stored in an Azure storage container for that day (2021-03-24, for example); so, the central finance team members can more easily access the reports. Charlie is the sales manager for the lighting category and needs to be able to read the sales reports for the lighting category in any storage container, but not other categories.
With resource attributes (for example, blob index tags) alone, Bob needs to create one role assignment for Charlie and add a condition to restrict read access to blobs with a blob index tag “category = lighting”. Bob needs to create as many role assignments as there are users like Charlie. With user attributes along with resource attributes, Bob can create one role assignment, with all users in an Azure AD group, and add an ABAC condition that requires a user’s category attribute value to match the blob’s category tag value. Xia, Azure AD Admin, creates an attribute set “contosocentralfinance” and assigns Bob the Azure AD Attribute Definition Administrator and Attribute Assignment Administrator roles for the attribute set; giving Bob the least privilege he needs to do his job. The picture below illustrates the scenario.

Bob writes the following condition in ABAC condition builder using user and resource attributes:

To summarize, user attributes, resource attributes, and ABAC conditions allow you to manage access to millions of Azure storage blobs with as few as one role assignment!
Auditing and tools
Since attributes can contain sensitive information and allow or deny access, activity related to defining, assigning, and unassigning attributes is recorded in Azure AD Audit logs. You can use PowerShell or Microsoft Graph APIs in addition to the portal to manage and automate tasks related to attributes. You can use Azure CLI, PowerShell, or Azure Resource Manager templates and Azure REST APIs to manage ABAC conditions in Azure Role Assignments.
Resources
We have several examples with sample conditions to help you get started. The Contoso corporation example demonstrates how ABAC conditions can scale access control for scenarios related to Azure storage blobs. You can read the Azure AD docs, how-to’s, and troubleshooting guides to get started.
We look forward to hearing your feedback on Azure AD custom security attributes and ABAC conditions for Azure storage. Stay tuned to this blog to learn about how you can use custom security attributes in Azure AD Conditional Access. We welcome your input and ideas for future scenarios.
Learn more about Microsoft identity:

by Contributed | Dec 1, 2021 | Business, Microsoft 365, Technology
This article is contributed. See the original author and article here.
Perhaps no one has been hit harder over the past 20 months than small businesses. To adapt and thrive in this new normal, small businesses need comprehensive solutions that are designed specifically for them and their unique needs.
The post New Microsoft Teams Essentials is built for small businesses appeared first on Microsoft 365 Blog.
Brought to you by Dr. Ware, Microsoft Office 365 Silver Partner, Charleston SC.
by Contributed | Nov 30, 2021 | Technology
This article is contributed. See the original author and article here.
Microsoft Ignite 2021 took place online November 2-5. This fall edition was full of dev news, and if you don’t want to miss anything related to App development and innovation, keep reading!
Session Highlights
What does it take to build the next innovative app?
During the Digital and App Innovation Into Focus session, Ashmi Chokshi and Developer and IT guests Amanda Silver, Donovan Brown and Rick Claus discussed processes and strategies to help deliver innovative capabilities faster.
Developers are driving innovation everywhere, and Ashmi started the conversation strong sharing how she sees the opportunity to drive impact. Then, Donovan presented his definition of cloud native, the benefits of a microservices architecture, and engaged in a discussion with Rick around DevOps and Chaos Engineering. This session also discussed how to transform and modernize your existing .NET and Java applications. Amanda Silver concluded with a demo showing how tools like GitHub Actions, Codespaces and Playwright can help with development, testing and CI/CD, no matter what language and framework you are using.
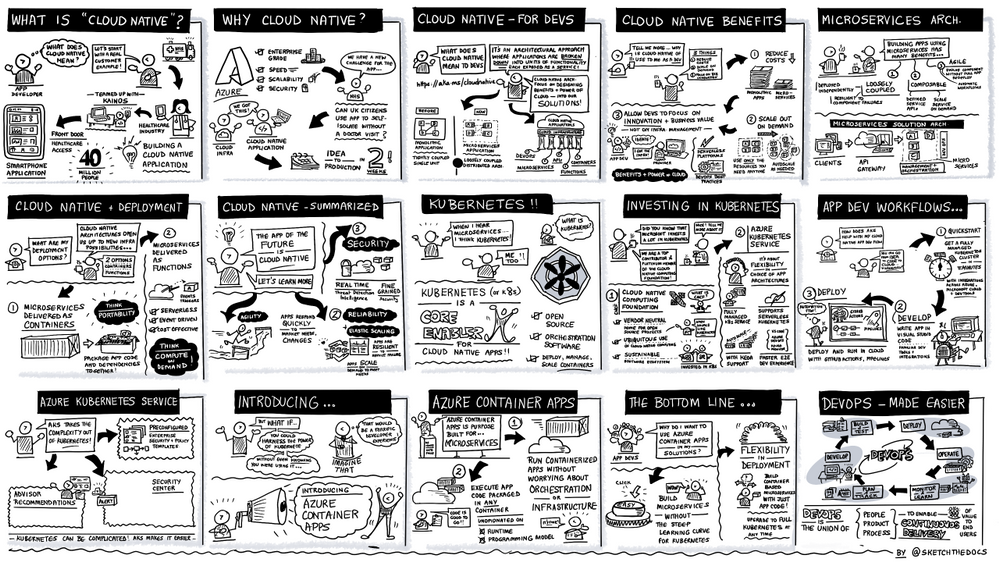
The sketch below illustrates the cloud native and DevOps segment showcasing the new public preview of Azure Container apps, a fully managed serverless container service built for microservices that scales dynamically based on HTTP traffic, events or long-running background jobs.
To dive deeper into the latest innovation on containers and serverless to create microservices application on Azure, don’t miss Jeff Hollan and Phil Gibson’s session where they demoed Azure Container apps and the Open Service Mesh (OSM) add-on for Azure Kubernetes Service, a lightweight and extensible cloud native open-source service mesh built on the CNCF Envoy project. Brendan Burns, Microsoft CVP of Azure Compute, also shared his views on how Microsoft empowers developers to innovate with cloud-native and open source on Azure in this blog.
Another highlight of Ignite was the Build secure app with collaborative DevSecOps practice session, followed by the Ask-the-expert, where Jessica Deen and Lavanya Kasarabada introduced a complete development solution that enables development teams to securely deliver cloud-native apps at DevOps speed with deep integrations between GitHub and Azure.
Announcements recap
In addition to Azure Container apps and Open Service Mesh add-on for AKS, we also announced new functionalities for Azure Communication Services, API management, Logic Apps, Azure Web PubSub, Java on Azure container platforms and DevOps.
- Azure Communication services announced two upcoming improvements designed to enhance customer experiences across multiple platforms: Azure Communication services interoperability into Microsoft Teams for anonymous meeting join, generally available in early December; and short code functionality for SMS in preview later this month.
- Regarding Azure Logic Apps, updated preview capability and general availability to Logic Apps standard features have been made available for SQL as storage provider, Managed identity, Automation tasks, Designer, Consumption to standard export and connectors.
The complete line up of Azure Application development sessions and blogs is listed below:
On-demand sessions:
Innovate anywhere from multicloud to edge with Scott Guthrie
|
Microsoft Into Focus: Digital & App Innovation with Amanda Silver, Donovan Brown, Ashmi Chokshi, Rick Claus, Ben Walters and Adam Yager
|
Innovate with cloud-native apps and open source on Azure with Phil Gibson and Jeff Hollan
|
Build secure apps with collaborative DevSecOps practices with Jessica Deen and Lavanya Kasarabada
And Ask-the Experts session
|
Deep Dive on new container hosting options on Azure App Service and App Service Environment v3 with Stefan Schackow
|
Modernize enterprise Java applications and messaging with Java EE/Jakarta EE on Azure and Azure Service Bus with Edward Burns
|
Updates on Migrating to Azure App Service with Rahul Gupta, Kristina Halfdane, Gaurav Seth
|
Scaling Unreal Engine in Azure with Pixel Streaming and Integrating Azure Digital Twins with Steve Busby, Erik Jansen, Maurizio Sciglio, Aaron Sternberg, David Weir-McCall
|
Enterprise Integration: Success Stories & Best Practices with Derek Li
|
Build a basic cloud-native service using PostgreSQL and Node.js with Scott Coulton, Glaucia Lemos
|
Programming Essentials for Beginners with Cecil Phillip
|
Low Code, No Code, No Problem – A Beginner’s Guide to Power Platform. with Chloe Condon
|
Blog-posts:
Additional learn resources:
- Each session has a curated Microsoft learn collection with learn modules and paths, e-books recommendations, related blog posts etc. Here is the collection for Digital and App Innovation IntoFocus session: https://aka.ms/intofocus-digital-apps
- We also just released the new 2021 edition of the Developer’s Guide to Azure, free for you to download!
We can’t wait to see what you create!

by Contributed | Nov 29, 2021 | Technology
This article is contributed. See the original author and article here.
We hope you enjoyed Ignite 2021! We loved hearing from you and learning how you’re using Azure Active Directory to implement Zero Trust to protect users and applications from threats. Many of you have asked for more empowering and easier to use tools for protection and investigation in your identity environment. So today we’re delighted to offer a closer look at the new Azure AD Conditional Access and Identity Protection capabilities that help you better protect your identities while making your job easier.
New capabilities in Azure AD Conditional Access and Identity Protection
This Ignite, we announced a powerful set of capabilities that make Conditional Access easier to use and empower you with insights that help accelerate your Zero Trust deployments and give you more comprehensive protection for key scenarios. The Conditional Access overview dashboard (in public preview) empowers you to quickly find gaps in your policy coverage, while templates make it much easier to deploy recommended policies. Filters for devices and filters for apps (generally available) unlock new scenarios like restricting admin access to privileged workstations, giving you more comprehensive scenario coverage in key scenarios. Finally, we have made it easier to export risk data (including the new token signals!) and built a really cool new workbook to give you insight on risks (and what to do about it)!
Conditional Access overview dashboard
Let’s dive into the Conditional Access overview dashboard first. As organizations deploy an increasing number of policies, one of the biggest challenges admins face is understanding whether their policies are truly protecting their entire organization. The new Conditional Access overview dashboard makes it easier than ever to deploy comprehensive policies by summarizing users, apps, and devices in scope of your policies and highlighting gaps in your policy coverage.
The dashboard is comprised of four main tabs:
- Getting started: If you are new to Conditional Access, learn about policy components and create a new policy.
- Overview: Get a quick summary of your users, devices, and applications protected by Conditional Access. You can also view policy recommendations based on sign-in activity data in your tenant and quickly deploy policies from policy templates.
- Coverage: Ensure the most commonly accessed applications in your tenant are protected by Conditional Access.
- Monitoring: Visualize the impact of each policy in your tenant and add filters to see trends like guest access, legacy authentication, risky sign-ins and unmanaged devices.
- Tutorials: Learn about commonly deployed Conditional Access policies and best practices.
Conditional Access Templates
Additionally, to provide a simple and sample method for deploying new policies that align with Microsoft recommended best practices and help you respond to evolving threats, we also announced Conditional Access templates. These templates help you provide maximum protection for your users and devices and align with the commonly used policies across many different customer types and locations.
You can quickly create a new policy from any of the 14 built-in templates (we’ll add to these based on your input, new capabilities and in response to new attack types). Deploying your policies from templates is simple. It may be all you need to do, but you can also start from a template and custom tune it to meet your business needs.
 Figure 1: Admin experience for Conditional Access templates
Conditional Access Filters for Devices
With filters for devices, security admins can target Conditional Access policies to a set of devices based on device attributes. This capability unlocks many new scenarios you have asked for, such as requiring privileged access workstations to access key resources. You can also use the device filters condition to secure the use of IoT devices (including Teams meeting rooms). Surface Hubs, Teams phones, Teams meeting rooms, and all sorts of IoT devices. We designed filters for devices to match the existing rule authoring experiences in Azure AD dynamic groups and Microsoft Endpoint Manager.
In addition to the built-in device properties such as device ID, display name, model, Mobile Device Management (MDM) app ID, and more, we’ve provided support for up to 15 additional extension attributes. Using the rule builder, admins can easily build device matching rules using Boolean logic, or they can edit the rule syntax directly to unlock even more sophisticated matching rules. We’re excited to see what scenarios this new condition unlocks for your organization!
 Figure 2: Admin experience for filters for devices
Filters for apps
In addition to filters for devices, you can also use filters for applications in Conditional Access. We’ve heard from customers that with the explosion of apps in their tenants, they need an easier way to apply policies to their apps at scale. Filters for apps will allow improved Conditional Access app targeting based on custom security attributes. Simply tag groups of apps with a custom security attribute and then apply policy directly to apps with the attribute, rather than individually selecting all the apps. When new apps are onboarded, you only need to add the attribute to the app, rather than updating your policy.
Filters for apps use the new Azure AD custom security attributes. These are created and managed by each organization, so you can define attributes that work for you and use them in Conditional Access policy. Custom security attributes also support a rich delegation model, allowing you to select which users have permission to add specific attributes to apps and preventing app owners from making changes to these attributes. This makes it easy to have a set of admins manage app onboarding to Conditional Access policy without requiring them modify the policy and risk accidental changes. Conditional Access filters for apps will be available soon in public preview.

New export options in Diagnostic Settings
With our rich detections and signals in identity protection, we are now making it easier for you to leverage this risk data to understand trends in your environment with two major improvements.
The first improvement is expanded Diagnostic Settings, where we added new ways for you to export your risk data. Now with just one click, you can send your risky users and risk detections data to Log Analytics or your third party SIEM of choice. To address your need to retain this data beyond our built-in retention periods, we have enabled another simple click for you to send months of data to a storage account.
 Figure 3: Admin experience for identity protection diagnostic settings
Risk Analysis Workbook
We also heard your requests for deeper, easily configurable insights into risk trends in your organization. Built upon Log Analytics and the expanded Diagnostic Settings, we released a new Risk Analysis Workbook for Identity Protection. This workbook shows the types of risks that are most prevalent and where you are seeing them in the world. Additionally, you now have visibility into how effectively you are responding to risk detected in your environment and the workbook highlights opportunities for improved policy configuration.
 Figure 4. Admin experience for identity protection risk analysis workbook
To use the new workbook
- Sign in to the Azure portal.
- Navigate to Azure Active Directory > Monitoring > Workbooks.
- Click on “Identity Protection Risk Analysis”
We hope these new capabilities in Conditional Access make it even easier for you to deploy Zero Trust and unlock a new wave of scenarios for your organization. And the two Identity Protection capabilities help you understand your environment with simplicity yet come with powerful insights. As always, we are actively listening to your feedback. Join the conversation in the Microsoft Tech Community and share your feedback and suggestions with us.
Learn more about Microsoft identity:

Recent Comments