This article is contributed. See the original author and article here.
Every contact center wants to maintain system health with minimal usability disruptions to offer a delightful and seamless customer experience. Now, contact center managers can use Application Insights to get details about customer conversations and solve problems more easily.
Application Insights, an extension of Azure Monitor, provides greater visibility into conversation-based operational telemetry in Dynamics 365 Customer Service. This helps contact center managers keep track of the application’s health across the full conversation lifecycle. Metrics are available starting with initiation, virtual agent engagement, routing, and assignment, through to resolution. Application Insights tracks volumes, latency, scenario success, failures, and trends at scale. In addition to facilitating proactive system monitoring, it empowers developers and IT professionals to easily identify and diagnose problematic conversations. From there, they can self-remediate where applicable or get swift support.
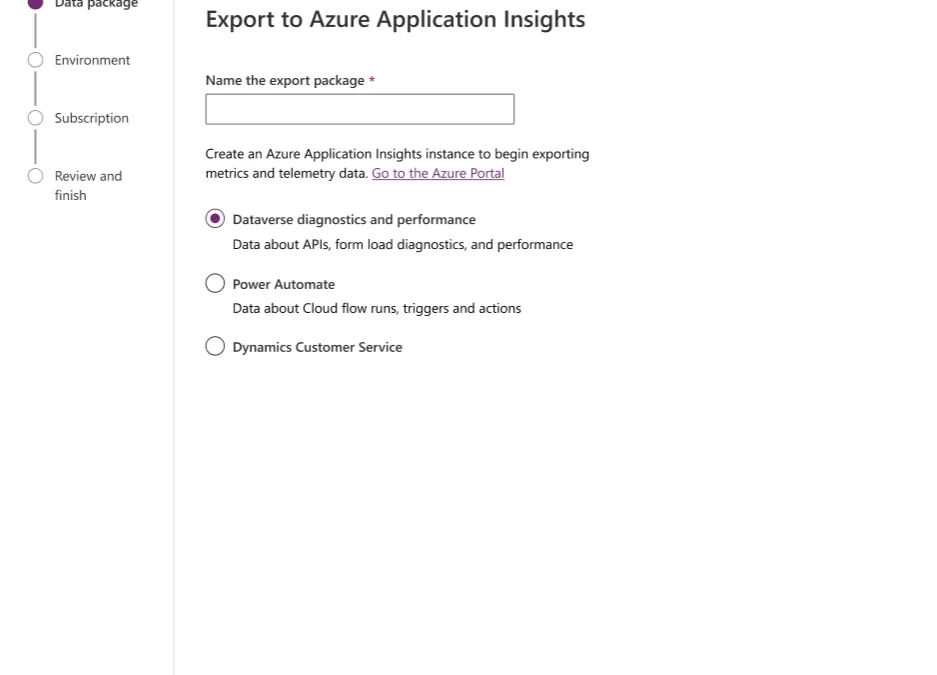
Connect to Application Insights
This capability enables customers to establish connectivity between their Dynamics 365 Customer Service environment and Application Insights instance. Then they can subscribe to system telemetry for a core set of conversation lifecycle events across the channels they use. When these logs are available in Application Insights, users can combine them with additional data sets to build custom dashboards.
Enable Application Insights to get conversation lifecycle logs for your organization from Power Platform admin centerMonitor conversation telemetry with ease and track performance through Application InsightsCreate your own custom monitoring dashboards with Application Insights and other data sets
Application Insights in action
Contoso Clothing, a retail giant in apparel, has recently launched their online shopping experience. With the approaching holiday season, they anticipate high volumes. Their workforce is prepared to provide a satisfying customer service experience using Dynamics 365 Customer Service.
Tim is a supervisor for Contoso Clothing’s customer service division. He is responsible for the management and optimum functioning of their live chat queues. On his monitoring dashboard, Tim notices a sharp increase in conversations in the backlog, leading to longer wait times. He can see that his customer service representatives are busy with ongoing conversations. This means they are unable to receive new chats, which is leading to long wait times and low customer satisfaction. The overall conversation volumes are well within Tim’s capability, and something doesn’t seem right to him.
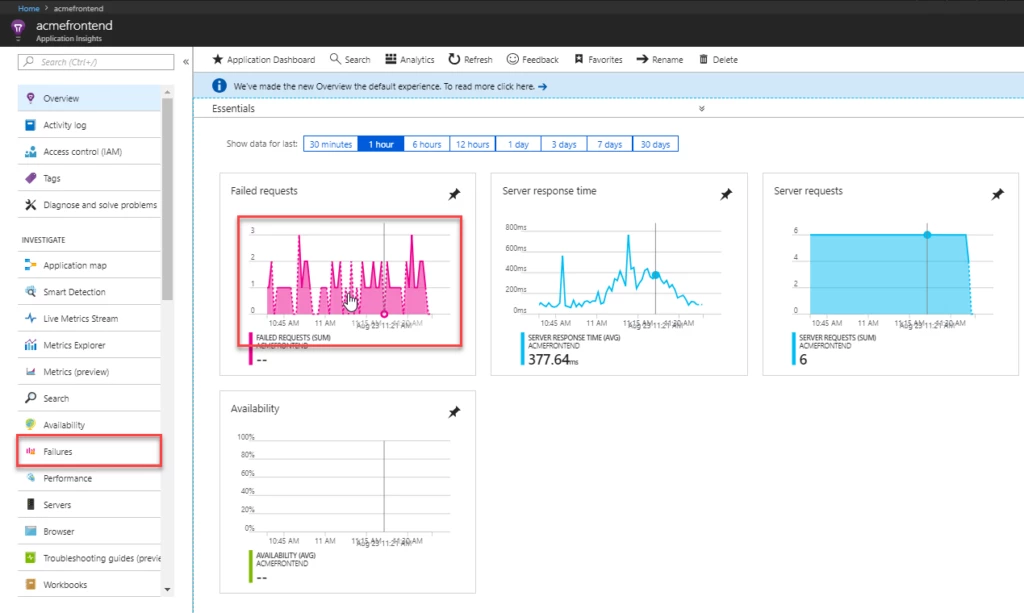
He highlights this to Kaylee, an IT professional on his team. Kaylee has recently enabled App Insights for Contoso Clothing’s Dynamics 365 Customer Service environment to access conversation telemetry. This has been helping her monitor operational health as well as troubleshoot issues in real time. Based on Tim’s observation, she pulls up telemetry for all live chat conversations from the last few hours. Each conversation contains business events logged along with associated success or failure, duration, and associated metadata in Application Insights.
While looking through anomalies and failures, she notices a high number of ‘customer disconnected’ events being logged repeatedly. Tracing these conversations, Tim and Kaylee determine that multiple chat conversations being created for the same customer within a short span of time. They see that customers are having to reinitiate a chat every time they navigate away from their app and come back to continue the conversation.
Tim realizes the need to give customers the option to reconnect to a previous chat session. Being a business admin himself, can enable this through the Customer Service admin center in a few clicks. Using Application Insights data, Kaylee can set up auto-alerts for this scenario in case the problem happens again. Over the next few days, Tim and Kaylee see live chat wait times go down and customer satisfaction improve. They not only proactively detected the problem early but were also self-equipped to take the necessary steps to fix it and meet their customers’ needs.
This article is contributed. See the original author and article here.
Overview
Microsoft Azure services already operate in TLS 1.2-only mode. There are a limited number of services that still allow TLS 1.0 and 1.1 to support customers with legacy needs. For customers who use services that still support legacy protocol versions and must meet compliance requirements, we have provided instructions on how to ensure legacy protocols and cipher suites are not negotiated. For example, HDInsight provides the minSupportedTlsVersion property as part of the Resource Manager template. This property supports three values: “1.0”, “1.1” and “1.2”, which correspond to TLS 1.0+, TLS 1.1+ and TLS 1.2+ respectively. Customers can set the allowed minimum version for their HDInsight resource.
This document presents the latest information on TLS protocols and cipher suite support with links to relevant documentation for Azure Offerings. For offerings that still allow legacy protocols to support customers with legacy needs, TLS 1.2 is still preferred. The documentation links explain what needs to be done to ensure TLS 1.2 is preferred in all scenarios.
Legacy protocols are defined as anything lower than TLS 1.2.
What is meant by legacy cipher suites?
Cipher suites that were considered safe in the past but are no longer strong enough or they PFS. While these ciphers are considered legacy, they are still supported for some backward compatibility customer scenarios.
What is the Microsoft preferred cipher suite order?
For legacy purposes, Windows supports a large list of ciphers by default. For all Microsoft Windows Server versions (2016 and higher), the following ciphers are the preferred set of cipher suites. The preferred set of cipher suites is set by Microsoft’s security policy. It should be noted that Microsoft Windows uses the IANA (Internet Assigned Numbers Authority) cipher suite notation. This link shows the IANA to OpenSSL mapping. It should be noted that Microsoft Windows uses the IANA (Internet Assigned Numbers Authority) cipher suite notation. This link shows the IANA to OpenSSL mapping.
TLS_ECDHE_ECDSA_WITH_AES_256_GCM_SHA384
TLS_ECDHE_ECDSA_WITH_AES_128_GCM_SHA256
TLS_ECDHE_RSA_WITH_AES_256_GCM_SHA384
TLS_ECDHE_RSA_WITH_AES_128_GCM_SHA256
TLS_ECDHE_ECDSA_WITH_AES_256_CBC_SHA384
TLS_ECDHE_ECDSA_WITH_AES_128_CBC_SHA256
TLS_ECDHE_RSA_WITH_AES_256_CBC_SHA384
TLS_ECDHE_RSA_WITH_AES_128_CBC_SHA256
Why is ChaCha20-Poly1305 not included in the list of approved ciphers?
ChaCha20-Poly1305 PolyChacha ciphers are supported by Windows and can be enabled in scenarios where customers control the OS.
Why are CBC ciphers included in the Microsoft preferred cipher suite order?
The default Windows image includes CBC ciphers. However, there are no known vulnerabilities related to the CBC mode cipher suites. We have mitigations for CBC side-channel attacks.
Microsoft’s preferred cipher suite order for Windows includes 128-bit ciphers. Is there an increased risk with using these ciphers?
AES-128 does not introduce any practical risk but different customers may have different preferences with regard to the minimum key lengths they are willing to negotiate. Our preferred order prioritizes AES-256 over AES-128. In addition, customers can adjust the order using the TLS Cmdlets. There is also a group policy option detailed in this article: Prioritizing Schannel Cipher Suites – Win32 apps | Microsoft Docs.
This article is contributed. See the original author and article here.
The year 2023 has ushered in dramatic innovations in AI, particularly regarding how businesses interact with customers. Every day, more organizations are discovering how they can empower agents to provide faster, more personalized service using next-generation AI.
We’re excited to announce three Microsoft Copilot features now generally available in Microsoft Dynamics 365 Customer Service in October, along with the new summarization feature that was made generally available in September. Copilot provides real-time, AI-powered assistance to help customer support agents solve issues faster by relieving them from mundane tasks—such as searching and note-taking—and freeing their time for more high-value interactions with customers. Contact center managers can also use Copilot analytics to view Copilot usage and better understand how next-generation AI impacts the business. The following features are generally available to Dynamics 365 Customer Service users:
Ask Copilot a question.
Create intelligent email responses.
Understand Copilot usage in your organization.
Summarize cases and conversations with Copilot (released in September 2023).
Copilot uses knowledge and web sources that your organization specifies, and your organizational and customer data are never used to train public models.
Copilot in Microsoft Dynamics 365 and Power Platform
Copilot features are empowering marketing, sales, and customer service teams in new ways.
Whether they’re responding to customers using the phone, chat, or social media, agents can use Copilot to harness knowledge across the organization to provide quick, informative answers, similar to having an experienced coworker available to chat all day, every day. When an administrator enables the Copilot pane in the Dynamics 365 Customer Service workspace or custom apps, agents can use natural language to ask questions and find answers. Copilot searches all company resources that administrators have made available and returns an answer. Agents can check the sources that Copilot used to create a response, and they can rate responses as helpful or unhelpful. Contact center managers can then view agent feedback to see how their agents are interacting with Copilot and identify areas where sources may need to be removed or updated.
The ability to ask Copilot questions can save agents valuable time. Microsoft recently completed a study that evaluated the impact of Copilot in Dynamics 365 Customer Service on agent productivity for Microsoft Support agents providing customer care across the commercial business. They found that agents can quickly look up answers to high volume requests and avoid lengthy investigations of previously documented procedures. One of our lines of business with these characteristics has realized a 22 percent reduction in time to close cases using Copilot.
2. Create intelligent email responses
Agents who receive customer requests via email can spend valuable time researching and writing the perfect response. Now, agents can use Copilot to draft emails by selecting from predefined prompts that include common support activities such as “suggest a call,” “request more information,” “empathize with feedback,” or “resolve the customer’s problem.” Agents can also provide their own custom prompts for more complex issues. Copilot uses the context of the conversation along with case notes and the organization’s knowledge to produce a relevant, personalized email. The agent can edit and modify the text further, and then send the response to help resolve the issue quickly.
3. Understand Copilot usage in your organization
It’s important for service managers to measure the impact and improvements as part of the change that generative AI-powered Copilot has on their operations and agent experience. Dynamics 365 Customer Service historical analytics reports provide a comprehensive view of Copilot-specific metrics and insights. Managers can see how often agents use Copilot to respond to customers, the number of agent/customer interactions that involved Copilot, the duration of conversations where Copilot plays a role, and more. They can also see the percentage of cases that agents resolved with the help of Copilot. Agents can also rate Copilot responses so managers have a better understanding of how Copilot is helping to improve customer service and the overall impact on their organization.
4. Summarize cases and conversations with Copilot
Generally available since September, the ability to summarize cases and complex, lengthy conversations using Copilot can save valuable time for agents across channels. Rather than spending hours to review notes as they wrap up a case, agents can create a case summary with a single click that highlights key information about the case, such as customer, case title, case type, subject, case description, product, and priority. In addition, agents can rely on Copilot to generate conversation summaries that capture key information such as the customer’s name, the issue or request, the steps taken so far, the case status, and any relevant facts or data. Summaries also highlight any sentiment expressed by the customer or the agent, plus action items or next steps. Generating conversation summaries on the fly is especially useful when an agent must hand off a call to another agent and quickly bring them up to speed while the customer is still on the line. This ability to connect customers with experts in complex, high-touch scenarios is helping to transform the customer service experience, reduce operational cost savings, and ensure happier customers.
Next-generation AI that is ready for enterprises
Microsoft Azure OpenAI Service offers a range of privacy features, including data encryption and secure storage. It also allows users to control access to their data and provides detailed auditing and monitoring capabilities. Microsoft Dynamics 365 is built on Azure OpenAI, so enterprises can rest assured that it offers the same level of data privacy and protection.
AI solutions built responsibly
We are committed to creating responsible AI by design. Our work is guided by a core set of principles: fairness, reliability and safety, privacy and security, inclusiveness, transparency, and accountability. We are putting those principles into practice across the company to develop and deploy AI that will have a positive impact on society.
This article is contributed. See the original author and article here.
In the digital age, spatial data management and analysis have become integral to a wide array of technical applications. From real-time tracking to location-based services and geospatial analytics, efficient handling of spatial data is pivotal in delivering high-performance solutions.
Azure Cache for Redis, a versatile and powerful in-memory data store, rises to this challenge with its Geospatial Indexes feature. Join us in this exploration to learn how Redis’s Geospatial Indexes are transforming the way we manage and query spatial data, catering to the needs of students, startups, AI entrepreneurs, and AI developers.
Introduction to Redis Geospatial Indexes
Azure Cache for Redis Geo-Positioning, or Geospatial, Indexes provide an efficient and robust approach to store and query spatial data. This feature empowers developers to associate geographic coordinates (latitude and longitude) with a unique identifier in Redis, enabling seamless spatial data storage and retrieval. With geospatial indexes, developers can effortlessly perform a variety of spatial queries, including locating objects within a specific radius, calculating distances between objects, and much more.
In Azure Cache for Redis, geospatial data is represented using sorted sets, where each element in the set is associated with a geospatial coordinate. These coordinates are typically represented as longitude and latitude pairs and can be stored in Redis using the GEOADD command. This command enables you to add one or multiple elements, each identified by a unique member name, to a specified geospatial key.
If you’re eager to explore the Azure Cache for Redis for Geo-positioning, be sure to tune in to this Open at Microsoft episode hosted by Ricky Diep, Product Marketing Manager at Microsoft and Roberto Perez, Senior Partner Solutions Architect at Redis.
Spatial Queries with Redis
Azure Cache for Redis equips developers with a set of commands tailored for spatial queries on geospatial data. Some of the key commands include:
– GEOADD: Adds a location(s) to the geospatial set. – GEODIST: Retrieves the distance between two members. – GEOSEARCH: Retrieves location(s) by radius or by a defined geographical box. – GEOPOS: Retrieves the position of one or more members in a geospatial set.
These commands empower developers to efficiently perform spatial computations and extract valuable insights from their geospatial data.
Benefits of Redis Geospatial Indexes
In-Memory Performance: Azure Cache for Redis, as an in-memory database, delivers exceptional read and write speeds for geospatial data. This makes it an excellent choice for real-time applications and time-critical processes.
Flexibility and Scalability: Redis Geospatial Indexes can handle large-scale geospatial datasets with ease, offering consistent performance even as the dataset grows.
Simple Integration: Azure Cache for Redis enjoys wide support across various programming languages and frameworks, making it easy to integrate geospatial functionalities into existing applications.
High Precision and Accuracy: Redis leverages its geospatial computations and data to ensure high precision and accuracy in distance calculations.
Common Use Cases
Redis Geospatial Indexes find applications in a diverse range of domains, including:
Location-Based Services (LBS): Implementing location tracking and proximity-based services. Geospatial Analytics: Analyzing location data to make informed business decisions, such as optimizing delivery routes or targeting specific demographics. Asset Tracking: Efficiently managing and tracking assets (vehicles, shipments, etc.) in real-time. Social Networking: Implementing features like finding nearby users or suggesting points of interest based on location. Gaming Applications: In location-based games, Redis can be used to store and retrieve the positions of game elements, players, or events, enabling dynamic gameplay based on real-world locations. Geofencing: Redis can help create geofences, which are virtual boundaries around specific geographical areas. By storing these geofences and the locations of mobile users or objects, you can detect when a user enters or exits a specific region and trigger corresponding actions.
For use cases where only geospatial data is needed, users can leverage the GeoSet command. However, if use cases require storing more than just geospatial data, they can opt for a combination of RedisJSON + RediSearch or Hash + RediSearch, both available in the Enterprise tiers, to accomplish real-time searches.
Conclusion
Redis Geospatial Indexes present a potent and efficient solution for storing, managing, and querying spatial data. By harnessing Azure Cache for Redis’s in-memory performance, versatile commands, and scalability, developers can craft high-performance applications with advanced spatial capabilities. Whether it’s location-based services, geospatial analytics, or real-time tracking, Redis Geospatial Indexes empower students, startups, AI entrepreneurs, and AI developers to unlock the full potential of spatial data processing.
This article is contributed. See the original author and article here.
Introduction
The healthcare industry is no stranger to complex data management challenges, especially when it comes to securing sensitive information. As technology continues to evolve, healthcare professionals are increasingly turning to modern frameworks like Blazor to streamline operations and improve patient outcomes. However, as with any new technology, there are challenges to overcome. One of the biggest hurdles is implementing delegated OAuth flow, a security measure that allows users to authenticate with delegated permissions. In this blog post, we’ll explore step-by-step how Visual Studio and MSAL tools can accelerate your time to value and abstract away many of the complexities in the OAuth delegated flow for Blazor.
Pre-requisites
Latest version of Visual Studio 2019 with the ASP.NET and web development workload
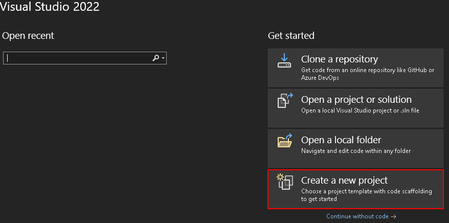
Open Visual Studio and create a New Blazor Web Assembly project and provide the name of your project and local file path to save the solution.
On the Additional Information screen, select the following options:
Framework: .NET 7
Authentication Type: Microsoft Identity Platform
Check the box for ASP.NET Core Hosted
Hit Create to continue
You will now be seeing the Required components window with the dotnet msidentity tool listed. Press next to continue.
Follow the guided authentication window to authenticate your identity to your target Azure tenant.
this is so that Visual Studio is able to assume your identity to create the AAD application registrations for the Blazor Web Assembly.
Once authenticated, you will see a list of owned applications for the selected tenant. If you have previously configured application registrations, you can select the respective application here.
For the purposes of this demo, we will create a new application registration for the server.
Once the application is created, select the application you have created.
Hit Next to proceed.
In the next prompt we will provide information about the target Azure DevOps service, choose theAdd permissions to another APIoption to let Visual Studio configure the Azure DevOps downstream API.
Scopes – set to 499b84ac-1321-427f-aa17-267ca6975798/.default
Note: this value does not change, as it is the unique GUID for Azure DevOps APIs with the default scope.
Hit Next to proceed.
Next, the tool will create a client secret for your newly created app registration. You can choose to save this locally (outside of the project/git scope) or copy it to manage it yourself.
Note: if you choose to not save to a local file, the secret will not be accessible again and you will need to regenerate the secret through the AAD app registration portal.
Afterwards, review the Summary page and selectively decide which components the tool should modify in case you have your own configuration/code already in place.
For this demo, we will keep all boxes selected.
Hit Finish to let the tool configure your project with the Microsoft Identity Platform!
Test your Blazor Web Assembly Project’s Microsoft Identity Platform Connectivity
Now that the Blazor Web Assembly project is provisioned, we will quickly test the authentication capabilities with the out-of-the-box seed application.
On the Visual Studio window after provisioning is completed, our solution will now have both the Client and Server projects in place
Ensure your Server is set as your Startup Project
If it isn’t, you can do so by right clicking your Server Project on the Solution Explorer.
Test your OAuth configuration
Run your application locally
On the web application, press the Log in button on the top right corner to log into your Azure DevOps organization
Once logged in, you should see a Hello, ! message
Getting to this point verifies that you are able to authenticate to Azure Active Directory, but not necessarily Azure DevOps as we have yet to configure any requests to the Azure DevOps REST APIs.
If you chose not to use the template-guided method of provisioning your Blazor application with MS identity, there are some steps you must take to ensure your application registration to function properly.
Navigate to your tenant’s Active Directory > App registrations
Note the two application registrations – one for the Server, and another for the Client
Configuring the Server app registration
In order to allow your application to assume the logged-in identity’s access permissions, you must expose theaccess_as_user API on the application registration.
to do this, selectExpose an API on the toolbar and selectAdd a Scope
For the Scope Name, ensure you provideaccess_as_useras well as selectingAdmins and users forWho can consent?
Now go to theAuthentication blade and selectAdd a platformto configure yourWeb platform’s API redirect
For when you deploy to your cloud services, the localhost will be replaced by your application’s site name but will still have the /signin-oidcpath by default for redirects (can be configured within your appsettings.json)
On the same page (Expose an API) selectAdd a client application around the bottom to add yourClient app registration’s Application ID to allow for your client to call this API
Save the authorized scopes for your client configuration within your Visual Studios project
Configuring the Client app registration
Navigate to theAuthentication blade and do the same as in step 2.b but for your client’s callback URL
Now ensure that both your client and server’s appsettings.json in the Web Assembly project mirrors your app registration’s configurations
Client app settings can be found within thewwwrootdirectory by default and should have the following details
Server app settings can be found at the base tree and should look like the following


Recent Comments