This article is contributed. See the original author and article here.
Frontline managers have gained greater control, on a team-level, over the capabilities offered in Microsoft Shifts.
With the latest releases now available on the Shifts settings page, we have made updates to improve the end-user experience for frontline manager and workers. The updates are as follows:
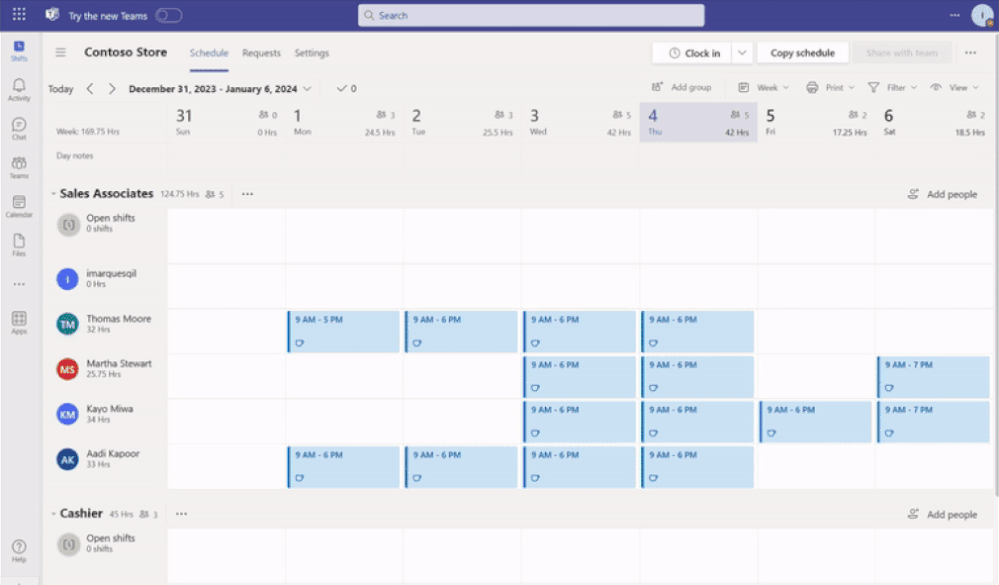
Open shifts
Previously, when the Open Shifts setting was off, frontline managers could create but not publish open shifts. Also, they could view open and assigned shifts listed on their team’s schedule (including when workers are scheduled for time off).
Now, when the setting is turned off, frontline managers can’t create open shifts and can only view on their team’s schedule the assigned shifts (including scheduled time off).
See the differences from the past and new experience for frontline managers:
Time-off requests
Previously, when the time-off request setting was turned off, frontline managers couldn’t assign time off to their team members; more over, frontline workers couldn’t request time-off.
Now, when the setting is turned off, frontline managers can continue to assign time off to their team members. However, frontline workers will not have the ability to create time-off requests if this setting remains off.
Your organization can leverage Shifts as the place where the frontline may view their working and non-working schedules despite not using Shifts as your leave management tool.
See the new experience for frontline managers:
Open shifts, swap shifts, offer shifts and time-Off requests
Previously, when any of the request-related setting toggled between on to off, frontline managers couldn’t manage previous requests that were submitted when the setting was on.
Now, frontline managers can directly manage previous requests on the Requests page while frontline workers can view status and details of their individual requests.
This article is contributed. See the original author and article here.
Introduction:
The start of the new year has brought a wave of exciting enhancements to the Demand Planning module in Dynamics 365 Supply Chain Management. We’re thrilled to introduce you to five groundbreaking features that will redefine the way you approach demand planning. In this blog post, we’ll look into each feature, highlighting their benefits and showcasing live demos hosted by the expert, Anders Girke.
Feature 1: Edit on Total Level
The new feature in our January release is the revolutionary “Edit on Total Level” functionality. This empowers planners to expedite their planning workflows through effective edits on a broader scale. Let’s swiftly explore the advantages:
✨ Edit on Total Level: Accelerate planning with efficient edits on a larger scale.
? Date Filters: Navigate and analyze data effortlessly.
? Distribute Proportional Over Time: Streamline workflows with proportional changes.
? Allocate Proportional Amongst Dimensions: Optimize precision in planning.
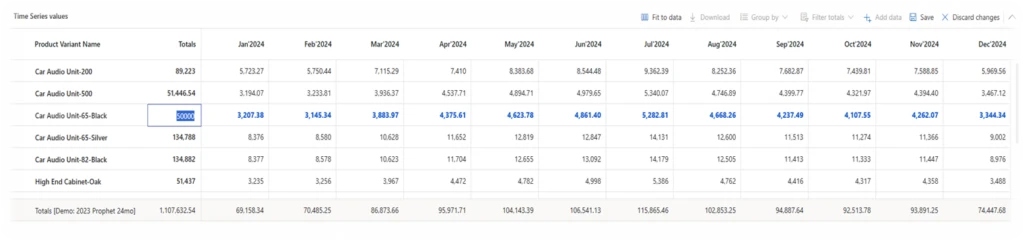
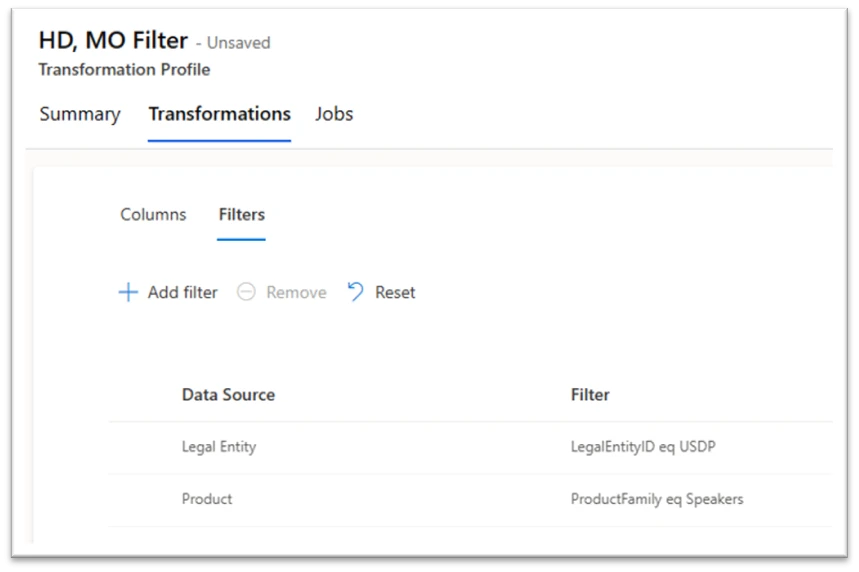
The second feature in our January release series is “Filter in Transformation.” This powerful tool allows precise data transformation for enhanced what-if analysis and forecasting on a focused dataset. Here are the key benefits:
? Perform What-if forecasts on a filtered sub-set of data
? Filter staging data prior to transformation
? Ensure secure performance
? Experiment with Dimensions to refine your planning
Witness the possibilities unfold as you perform What-if forecasts, filter staging data, ensure secure performance, and experiment with dimensions to refine your planning. Your demand planning just got a whole lot smarter!
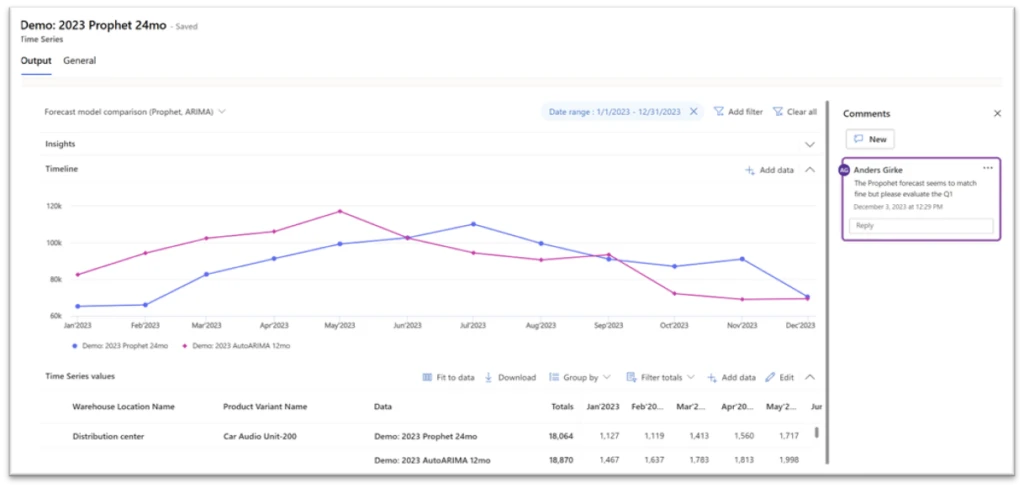
The third installment of our January release series introduces “Comments.” This feature is set to transform collaboration and communication within the demand planning application. Key highlights include:
? Enhanced Communication: Provide detailed explanations for changes, fostering transparency.
? Real-time Collaboration: Facilitate consensus-building among team members.
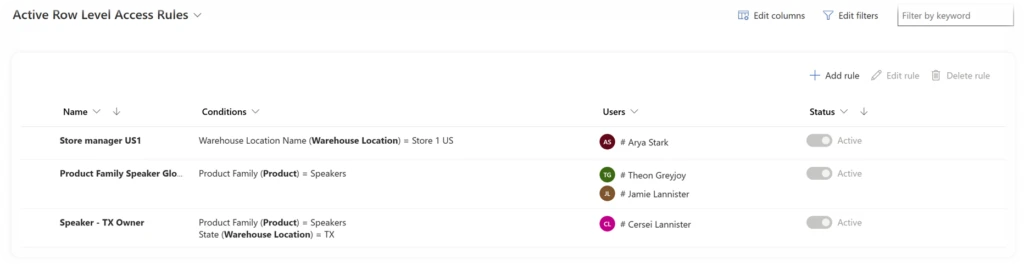
Feature 4: System Administrator Role for Demand Planning
In this release, we introduce the pivotal role of the System Administrator for Demand Planning. This role is responsible for installing the app, assigning roles, managing teams, and overseeing critical operations. Highlights include:
? Role Level Access for Contributors: Empower limited users with the ability to view shared worksheets, create personalized views, and edit data within their permissions.
? Row Level Access Rules: Define conditions for specific tables, columns, and operators for unparalleled flexibility.
? Editing Demand Plans with Flexibility: Highlighting the power of role level access, added experience, and disaggregation in editing demand plans.
Get a sneak peek into the upcoming February release, emphasizing the balance between limiting filters for optimal performance and ensuring an exceptional user experience.
In conclusion, the recent January release of Dynamics 365 Supply Chain Management Demand Planning has brought forth a wave of transformative features, including “Edit on Total Level,” “Filter in Transformation,” and “Comments,” redefining the landscape for planners with tools that enhance efficiency and collaboration. The incorporation of the System Administrator role, Role Level Access for Contributors, Row Level Access Rules, and advanced security features positions the platform as a robust and secure solution for demand planning needs. With increased flexibility in editing demand plans and promising additions in the upcoming February release, Dynamics 365 is shaping a future of more streamlined and user-friendly demand planning experiences. This release marks a substantial leap forward, promising organizations worldwide a future characterized by smarter and more precise demand planning. As we embrace this evolution in demand planning, Dynamics 365 Supply Chain Management stands as a pioneer, leading the way with innovative features. Stay tuned for ongoing updates and enhancements that will continuously elevate your planning processes to unprecedented heights!
?North America Demand Planning Workshop?
Join us at the forthcoming Demand Planning Workshop, hosted at Microsoft’s state-of-the-art facility – Microsoft in Redmond, WA (98052). This event is tailored to introduce the innovative Demand Planning application to both our valued Customers and Partners.
This article is contributed. See the original author and article here.
We are updating our Microsoft Copilot product line-up with a new Copilot Pro subscription for individuals; expanding Copilot for Microsoft 365 availability to small and medium-sized businesses; and announcing no seat minimum for commercial plans.
This article is contributed. See the original author and article here.
Starting January 19, 2024, Microsoft Copilot in Dynamics 365 Customer Service will be automatically installed and enabled in your Dynamics 365 Customer Service environment. This update will install the case summarization and conversation summarization features. These features are available to all users with a Dynamics 365 Customer Service Enterprise license, and/or digital messaging or Voice add-on license for conversation summary enablement.
If your organization has already enabled Copilot in Customer Service, there will be no change to your environment.
Key dates
Disclosure date: December 2023 Administrators received a notification about the change in the Microsoft 365 admin center and Power Platform admin center.
Installation date: January 19 – February 2, 2024 Copilot in Customer Service is installed and enabled by default.
Please note that specific dates for messages and auto-installation will vary based on the geography of your organization. The date applicable to your organization is in the messages in Microsoft 365 admin center and Power Platform admin center. Copilot auto-installation will occur only if your organization is in a geography where all Copilot data handling occurs “in geo.” These regions are currently Australia, United Kingdom, and United States. Organizations where Copilot data handling does not occur “in geo” must opt in to cross-geo data transmission to receive these capabilities.
What is Copilot in Dynamics 365 Customer Service?
Copilot in Customer Service is a key part of the Dynamics 365 Customer Service experience. Copilot provides real-time, AI-powered assistance to help customer support agents solve issues faster. By relieving them from mundane tasks such as searching and note-taking, Copilot gives them time for more high-value interactions with customers. Contact center managers can also use Copilot analytics to view Copilot usage and better understand how it impacts the business.
Why is Microsoft deploying this update?
We believe this update presents a significant opportunity to fundamentally alter the way your organization approaches service by quickly improving and enhancing the agent experience. The feedback we have received from customers who are already using Copilot has been overwhelmingly positive. Generative AI-based service capabilities have a profound impact on efficiency and customer experience, leading to improved customer satisfaction. This update applies only to the Copilot summarization capabilities, which integrate with service workflows and require minimal change management.
Learn more about Copilot in Dynamics 365 Customer Service
This article is contributed. See the original author and article here.
Problem:
===========
Assume that you have tables with Identity columns declared as datatype INT and you are using Auto Identity management for those articles in a Merge Publication.
This Publication has one or more subscribers and you tried to re-initialize one subscriber using a new Snapshot.
Merge agent fails with this error:
>> Source: Merge Replication Provider
Number: -2147199417
Message: The Publisher failed to allocate a new set of identity ranges for the subscription. This can occur when a Publisher or a republishing Subscriber has run out of identity ranges to allocate to its own Subscribers or when an identity column data type does not support an additional identity range allocation. If a republishing Subscriber has run out of identity ranges, synchronize the republishing Subscriber to obtain more identity ranges before restarting the synchronization. If a Publisher runs out of identit
Cause:
============
Identity range Merge agent is trying to allocate, exceeds maximum value an INT datatype can have.
Resolution
=================
Assume that publisher database has only one Merge publication with 2 subscribers, and your merge articles have this definition:
As you see from above diff_pub_range_end_max_used column is zero for tblCity.
When Merge agent runs depending on how many servers are involved it has to allocate 2 ranges for each.
In the example above we have Publisher and 2 subscribers and @identity_range is 1000. So, we will have to allocate range for 3 servers i.e., 3 * (2*1000) = 6000
Our diff_pub_range_end_max_used should be greater than 6000, only then we will be able to allocate a new range for all the servers.
To resolve the issue.
Remove tblCity table from publication.
Change the datatype from int to bigint and add this table back to publication.
Then generate a new snapshot. It will generate snapshots for all articles, but only this 1 table will be added back to the existing Subscribers.
.gif")


Recent Comments