
by Contributed | Oct 23, 2023 | Dynamics 365, Microsoft 365, Technology
This article is contributed. See the original author and article here.
The year 2023 has ushered in dramatic innovations in AI, particularly regarding how businesses interact with customers. Every day, more organizations are discovering how they can empower agents to provide faster, more personalized service using next-generation AI.
We’re excited to announce three Microsoft Copilot features now generally available in Microsoft Dynamics 365 Customer Service in October, along with the new summarization feature that was made generally available in September. Copilot provides real-time, AI-powered assistance to help customer support agents solve issues faster by relieving them from mundane tasks—such as searching and note-taking—and freeing their time for more high-value interactions with customers. Contact center managers can also use Copilot analytics to view Copilot usage and better understand how next-generation AI impacts the business. The following features are generally available to Dynamics 365 Customer Service users:
- Ask Copilot a question.
- Create intelligent email responses.
- Understand Copilot usage in your organization.
- Summarize cases and conversations with Copilot (released in September 2023).
Copilot uses knowledge and web sources that your organization specifies, and your organizational and customer data are never used to train public models.
Copilot in Microsoft Dynamics 365 and Power Platform
Copilot features are empowering marketing, sales, and customer service teams in new ways.
1. Ask Copilot a question
Whether they’re responding to customers using the phone, chat, or social media, agents can use Copilot to harness knowledge across the organization to provide quick, informative answers, similar to having an experienced coworker available to chat all day, every day. When an administrator enables the Copilot pane in the Dynamics 365 Customer Service workspace or custom apps, agents can use natural language to ask questions and find answers. Copilot searches all company resources that administrators have made available and returns an answer. Agents can check the sources that Copilot used to create a response, and they can rate responses as helpful or unhelpful. Contact center managers can then view agent feedback to see how their agents are interacting with Copilot and identify areas where sources may need to be removed or updated.
The ability to ask Copilot questions can save agents valuable time. Microsoft recently completed a study that evaluated the impact of Copilot in Dynamics 365 Customer Service on agent productivity for Microsoft Support agents providing customer care across the commercial business. They found that agents can quickly look up answers to high volume requests and avoid lengthy investigations of previously documented procedures. One of our lines of business with these characteristics has realized a 22 percent reduction in time to close cases using Copilot.
2. Create intelligent email responses
Agents who receive customer requests via email can spend valuable time researching and writing the perfect response. Now, agents can use Copilot to draft emails by selecting from predefined prompts that include common support activities such as “suggest a call,” “request more information,” “empathize with feedback,” or “resolve the customer’s problem.” Agents can also provide their own custom prompts for more complex issues. Copilot uses the context of the conversation along with case notes and the organization’s knowledge to produce a relevant, personalized email. The agent can edit and modify the text further, and then send the response to help resolve the issue quickly.
3. Understand Copilot usage in your organization
It’s important for service managers to measure the impact and improvements as part of the change that generative AI-powered Copilot has on their operations and agent experience. Dynamics 365 Customer Service historical analytics reports provide a comprehensive view of Copilot-specific metrics and insights. Managers can see how often agents use Copilot to respond to customers, the number of agent/customer interactions that involved Copilot, the duration of conversations where Copilot plays a role, and more. They can also see the percentage of cases that agents resolved with the help of Copilot. Agents can also rate Copilot responses so managers have a better understanding of how Copilot is helping to improve customer service and the overall impact on their organization.
4. Summarize cases and conversations with Copilot
Generally available since September, the ability to summarize cases and complex, lengthy conversations using Copilot can save valuable time for agents across channels. Rather than spending hours to review notes as they wrap up a case, agents can create a case summary with a single click that highlights key information about the case, such as customer, case title, case type, subject, case description, product, and priority. In addition, agents can rely on Copilot to generate conversation summaries that capture key information such as the customer’s name, the issue or request, the steps taken so far, the case status, and any relevant facts or data. Summaries also highlight any sentiment expressed by the customer or the agent, plus action items or next steps. Generating conversation summaries on the fly is especially useful when an agent must hand off a call to another agent and quickly bring them up to speed while the customer is still on the line. This ability to connect customers with experts in complex, high-touch scenarios is helping to transform the customer service experience, reduce operational cost savings, and ensure happier customers.
Next-generation AI that is ready for enterprises
Microsoft Azure OpenAI Service offers a range of privacy features, including data encryption and secure storage. It also allows users to control access to their data and provides detailed auditing and monitoring capabilities. Microsoft Dynamics 365 is built on Azure OpenAI, so enterprises can rest assured that it offers the same level of data privacy and protection.
AI solutions built responsibly
We are committed to creating responsible AI by design. Our work is guided by a core set of principles: fairness, reliability and safety, privacy and security, inclusiveness, transparency, and accountability. We are putting those principles into practice across the company to develop and deploy AI that will have a positive impact on society.
Learn more and try Dynamics 365 Customer Service
Learn more about how to elevate your service with AI and enable Copilot features for your support agents.
Try Dynamics 365 Customer Service for free.
The post Modernize customer support with Copilot in Dynamics 365 Customer Service appeared first on Microsoft Dynamics 365 Blog.
Brought to you by Dr. Ware, Microsoft Office 365 Silver Partner, Charleston SC.
by Contributed | Oct 21, 2023 | Technology
This article is contributed. See the original author and article here.
In the digital age, spatial data management and analysis have become integral to a wide array of technical applications. From real-time tracking to location-based services and geospatial analytics, efficient handling of spatial data is pivotal in delivering high-performance solutions.
Azure Cache for Redis, a versatile and powerful in-memory data store, rises to this challenge with its Geospatial Indexes feature. Join us in this exploration to learn how Redis’s Geospatial Indexes are transforming the way we manage and query spatial data, catering to the needs of students, startups, AI entrepreneurs, and AI developers.
Introduction to Redis Geospatial Indexes
Azure Cache for Redis Geo-Positioning, or Geospatial, Indexes provide an efficient and robust approach to store and query spatial data. This feature empowers developers to associate geographic coordinates (latitude and longitude) with a unique identifier in Redis, enabling seamless spatial data storage and retrieval. With geospatial indexes, developers can effortlessly perform a variety of spatial queries, including locating objects within a specific radius, calculating distances between objects, and much more.
In Azure Cache for Redis, geospatial data is represented using sorted sets, where each element in the set is associated with a geospatial coordinate. These coordinates are typically represented as longitude and latitude pairs and can be stored in Redis using the GEOADD command. This command enables you to add one or multiple elements, each identified by a unique member name, to a specified geospatial key.
If you’re eager to explore the Azure Cache for Redis for Geo-positioning, be sure to tune in to this Open at Microsoft episode hosted by Ricky Diep, Product Marketing Manager at Microsoft and Roberto Perez, Senior Partner Solutions Architect at Redis.
Spatial Queries with Redis
Azure Cache for Redis equips developers with a set of commands tailored for spatial queries on geospatial data. Some of the key commands include:
– GEOADD: Adds a location(s) to the geospatial set.
– GEODIST: Retrieves the distance between two members.
– GEOSEARCH: Retrieves location(s) by radius or by a defined geographical box.
– GEOPOS: Retrieves the position of one or more members in a geospatial set.
These commands empower developers to efficiently perform spatial computations and extract valuable insights from their geospatial data.
Benefits of Redis Geospatial Indexes
In-Memory Performance: Azure Cache for Redis, as an in-memory database, delivers exceptional read and write speeds for geospatial data. This makes it an excellent choice for real-time applications and time-critical processes.
Flexibility and Scalability: Redis Geospatial Indexes can handle large-scale geospatial datasets with ease, offering consistent performance even as the dataset grows.
Simple Integration: Azure Cache for Redis enjoys wide support across various programming languages and frameworks, making it easy to integrate geospatial functionalities into existing applications.
High Precision and Accuracy: Redis leverages its geospatial computations and data to ensure high precision and accuracy in distance calculations.
Common Use Cases
Redis Geospatial Indexes find applications in a diverse range of domains, including:
Location-Based Services (LBS): Implementing location tracking and proximity-based services.
Geospatial Analytics: Analyzing location data to make informed business decisions, such as optimizing delivery routes or targeting specific demographics.
Asset Tracking: Efficiently managing and tracking assets (vehicles, shipments, etc.) in real-time.
Social Networking: Implementing features like finding nearby users or suggesting points of interest based on location.
Gaming Applications: In location-based games, Redis can be used to store and retrieve the positions of game elements, players, or events, enabling dynamic gameplay based on real-world locations.
Geofencing: Redis can help create geofences, which are virtual boundaries around specific geographical areas. By storing these geofences and the locations of mobile users or objects, you can detect when a user enters or exits a specific region and trigger corresponding actions.
For use cases where only geospatial data is needed, users can leverage the GeoSet command. However, if use cases require storing more than just geospatial data, they can opt for a combination of RedisJSON + RediSearch or Hash + RediSearch, both available in the Enterprise tiers, to accomplish real-time searches.
Conclusion
Redis Geospatial Indexes present a potent and efficient solution for storing, managing, and querying spatial data. By harnessing Azure Cache for Redis’s in-memory performance, versatile commands, and scalability, developers can craft high-performance applications with advanced spatial capabilities. Whether it’s location-based services, geospatial analytics, or real-time tracking, Redis Geospatial Indexes empower students, startups, AI entrepreneurs, and AI developers to unlock the full potential of spatial data processing.
Additional Resources
by Contributed | Oct 20, 2023 | Technology
This article is contributed. See the original author and article here.
Introduction
The healthcare industry is no stranger to complex data management challenges, especially when it comes to securing sensitive information. As technology continues to evolve, healthcare professionals are increasingly turning to modern frameworks like Blazor to streamline operations and improve patient outcomes. However, as with any new technology, there are challenges to overcome. One of the biggest hurdles is implementing delegated OAuth flow, a security measure that allows users to authenticate with delegated permissions. In this blog post, we’ll explore step-by-step how Visual Studio and MSAL tools can accelerate your time to value and abstract away many of the complexities in the OAuth delegated flow for Blazor.
Pre-requisites
Setting up the Blazor Web Assembly Project
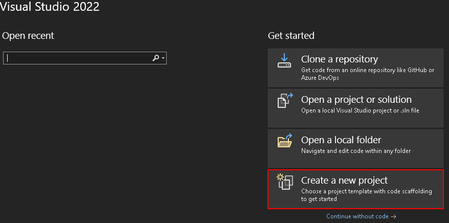
- Open Visual Studio and create a New Blazor Web Assembly project and provide the name of your project and local file path to save the solution.

- On the Additional Information screen, select the following options:
- Framework: .NET 7
- Authentication Type: Microsoft Identity Platform
- Check the box for ASP.NET Core Hosted
- Hit Create to continue
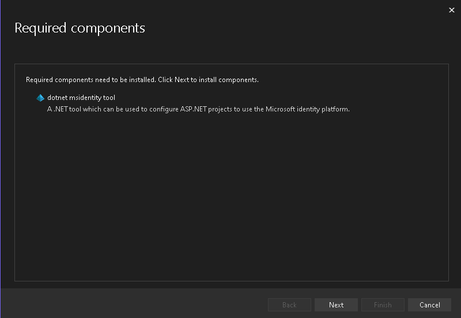
- You will now be seeing the Required components window with the dotnet msidentity tool listed. Press next to continue.
- Follow the guided authentication window to authenticate your identity to your target Azure tenant.
- this is so that Visual Studio is able to assume your identity to create the AAD application registrations for the Blazor Web Assembly.
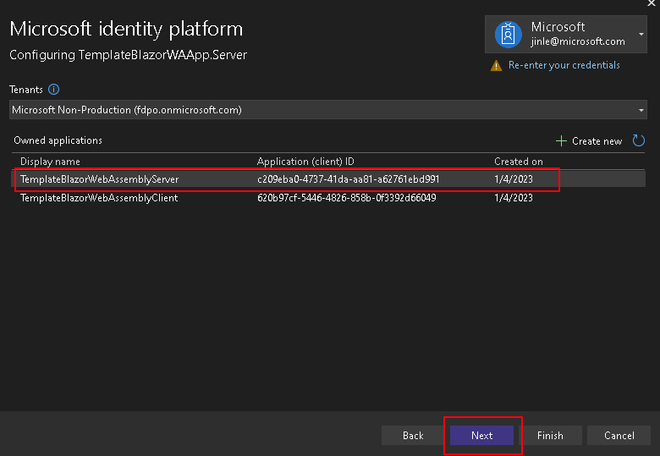
- Once authenticated, you will see a list of owned applications for the selected tenant. If you have previously configured application registrations, you can select the respective application here.
- For the purposes of this demo, we will create a new application registration for the server.
- Once the application is created, select the application you have created.
- Hit Next to proceed.
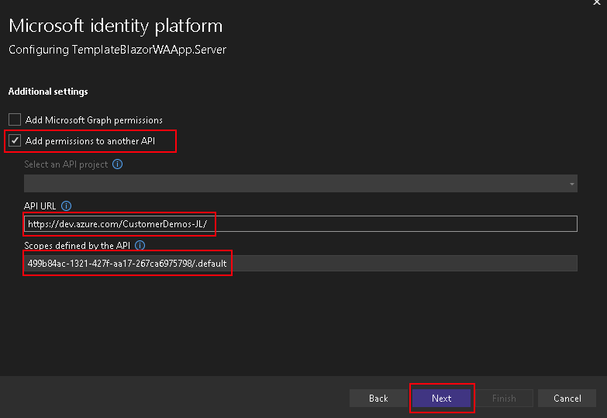
- In the next prompt we will provide information about the target Azure DevOps service, choose the Add permissions to another API option to let Visual Studio configure the Azure DevOps downstream API.
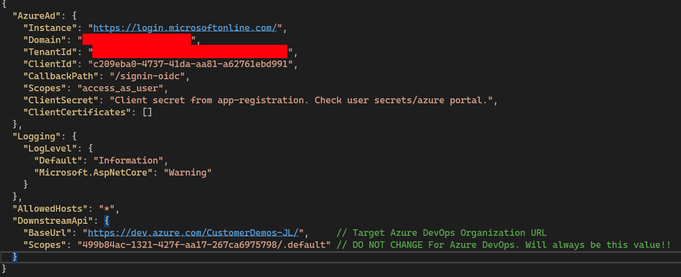
- API URL – Provide your Azure DevOps organization URL (example: https://dev.azure.com/CustomerDemos-JL).
- Scopes – set to 499b84ac-1321-427f-aa17-267ca6975798/.default
- Note: this value does not change, as it is the unique GUID for Azure DevOps APIs with the default scope.
- Hit Next to proceed.
- Next, the tool will create a client secret for your newly created app registration. You can choose to save this locally (outside of the project/git scope) or copy it to manage it yourself.
- Note: if you choose to not save to a local file, the secret will not be accessible again and you will need to regenerate the secret through the AAD app registration portal.
- Afterwards, review the Summary page and selectively decide which components the tool should modify in case you have your own configuration/code already in place.
- For this demo, we will keep all boxes selected.
- Hit Finish to let the tool configure your project with the Microsoft Identity Platform!
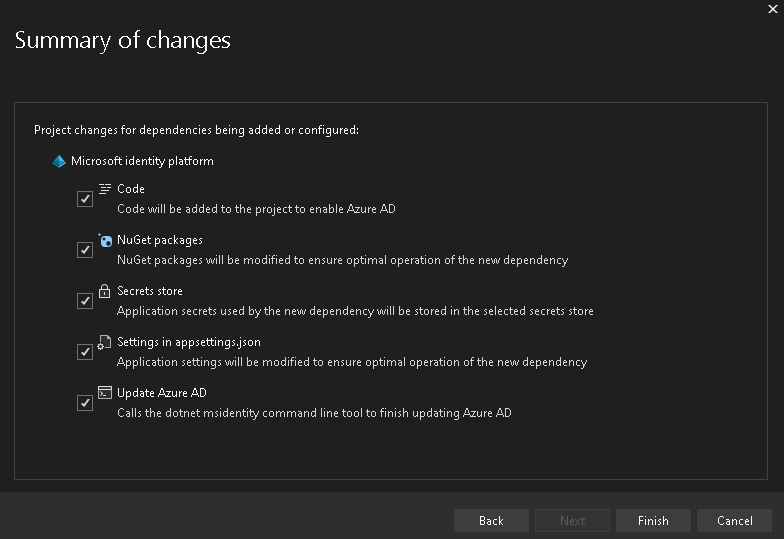
Test your Blazor Web Assembly Project’s Microsoft Identity Platform Connectivity
Now that the Blazor Web Assembly project is provisioned, we will quickly test the authentication capabilities with the out-of-the-box seed application.
- On the Visual Studio window after provisioning is completed, our solution will now have both the Client and Server projects in place
- Ensure your Server is set as your Startup Project

- If it isn’t, you can do so by right clicking your Server Project on the Solution Explorer.
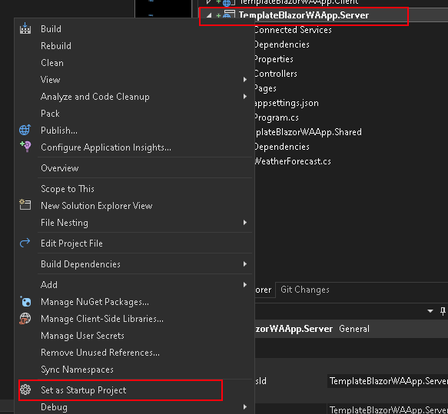
- Test your OAuth configuration
- Run your application locally

- On the web application, press the Log in button on the top right corner to log into your Azure DevOps organization
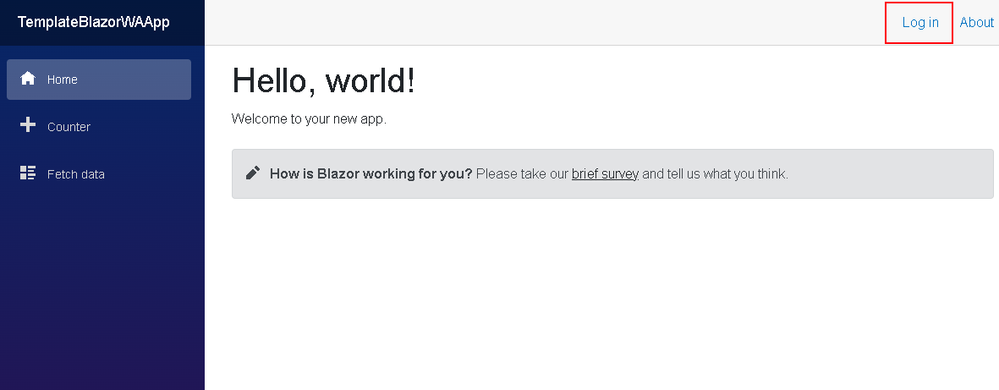
- Once logged in, you should see a Hello, ! message

- Getting to this point verifies that you are able to authenticate to Azure Active Directory, but not necessarily Azure DevOps as we have yet to configure any requests to the Azure DevOps REST APIs.
[Alternative Route] AAD App Registration Configuration
If you chose not to use the template-guided method of provisioning your Blazor application with MS identity, there are some steps you must take to ensure your application registration to function properly.
- Navigate to your tenant’s Active Directory > App registrations
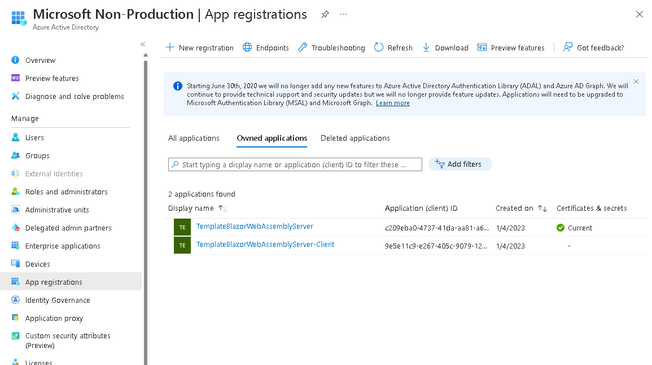
- Note the two application registrations – one for the Server, and another for the Client
- Configuring the Server app registration
- In order to allow your application to assume the logged-in identity’s access permissions, you must expose the access_as_user API on the application registration.
- to do this, select Expose an API on the toolbar and select Add a Scope
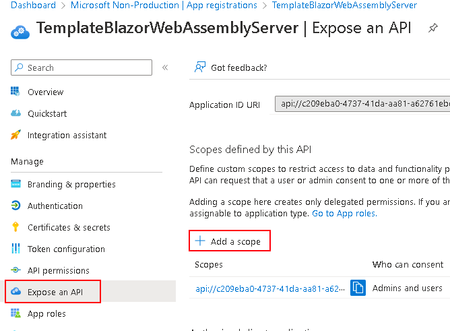
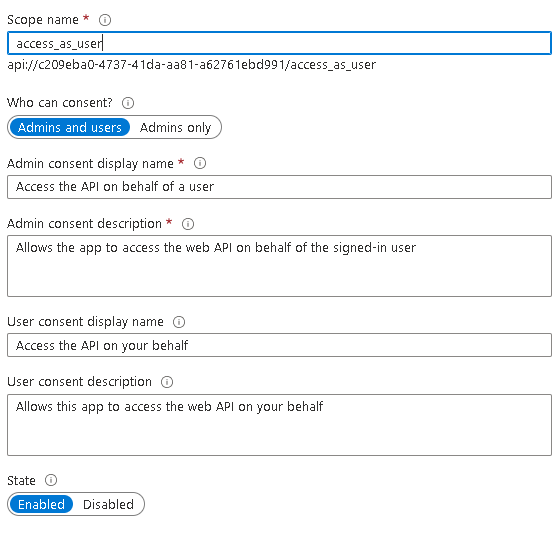
- For the Scope Name, ensure you provide access_as_user as well as selecting Admins and users for Who can consent?
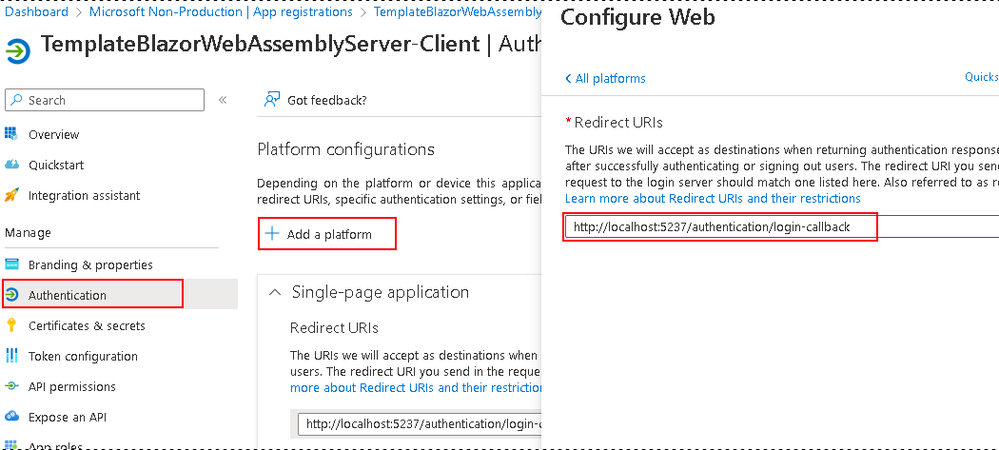
- Now go to the Authentication blade and select Add a platform to configure your Web platform’s API redirect
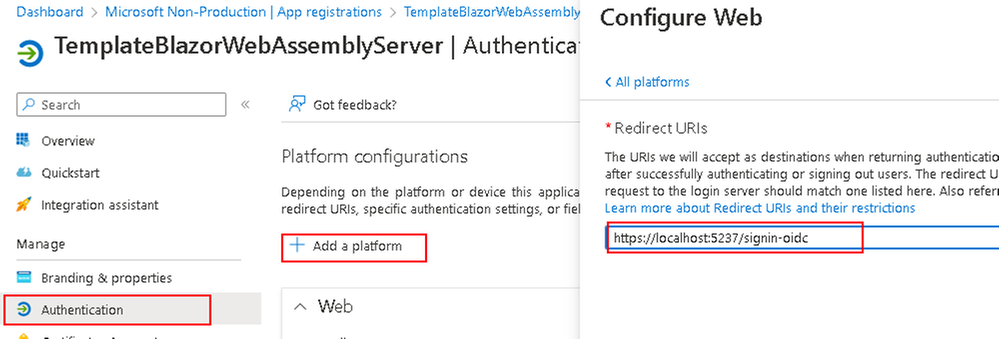
- For when you deploy to your cloud services, the localhost will be replaced by your application’s site name but will still have the /signin-oidc path by default for redirects (can be configured within your appsettings.json)
- On the same page (Expose an API) select Add a client application around the bottom to add your Client app registration’s Application ID to allow for your client to call this API
- Save the authorized scopes for your client configuration within your Visual Studios project
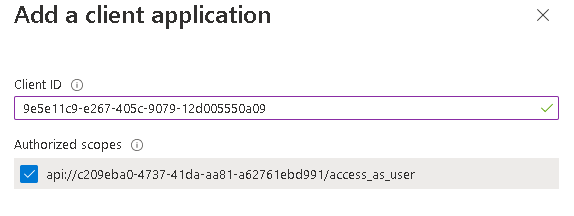
- Configuring the Client app registration
- Navigate to the Authentication blade and do the same as in step 2.b but for your client’s callback URL
- Now ensure that both your client and server’s appsettings.json in the Web Assembly project mirrors your app registration’s configurations
- Client app settings can be found within the wwwroot directory by default and should have the following details

- Server app settings can be found at the base tree and should look like the following
by Contributed | Oct 20, 2023 | Technology
This article is contributed. See the original author and article here.
In any business organization, you need to be able to communicate effectively with your clients and prospects, as well as access and manage relevant documents and data in real-time. Microsoft Teams is a powerful tool that enables seamless collaboration and communication among team members, as well as with external parties. But when it comes to file management in Microsoft Teams, there are some nuances that need to be taken care of.
With Microsoft Teams being built on the capabilities of SharePoint, whatever data we store in Microsoft Teams, is directly stored in SharePoint.
But one of the drawbacks of uploading a file in a Teams conversation is that you have no control over where it is stored. It automatically goes into the root folder of the SharePoint site that is linked to the team. If you want to move the file to a different folder, you would have to do it manually, which is time-consuming.
Other than this, one of the biggest use cases is of Microsoft chats. Most of the time, file sharing happens on chats. So, the question is, where do the files stored in chats go? Well, they are stored in the user’s ‘OneDrive for Business’ account rather than SharePoint.
An altogether another cloud storage!
This makes the search and retrieval of files complicated. Your business is losing money when your employees waste time looking for files rather than focusing on their core tasks, especially if they are sales reps or customer services reps, impacting customer experience as well.
As you can see, one of the drawbacks of using Teams independently for file management is that we have no control over our files.
So, you then have to manually sit and copy/move all such files to a centralized cloud storage. If you miss moving even one file, it will come to bite you back during crunch moments.
And as your business scales, your organization’s data also scales. And with the above challenges we discussed, your organization can face significant hurdles in communication and collaboration.
One solution to the above hurdle is to integrate Microsoft Dynamics 365 and Microsoft Teams and leverage their combined capabilities. Check out this article for a step-by-step guide on integrating Microsoft Teams and Microsoft Dynamics 365.
Suppose you are on a client call using Teams, and the client shares some updates on their order in the form of a note attachment/ directly in the chat. As you have integrated your CRM and Teams, you can add it against the respective record directly.
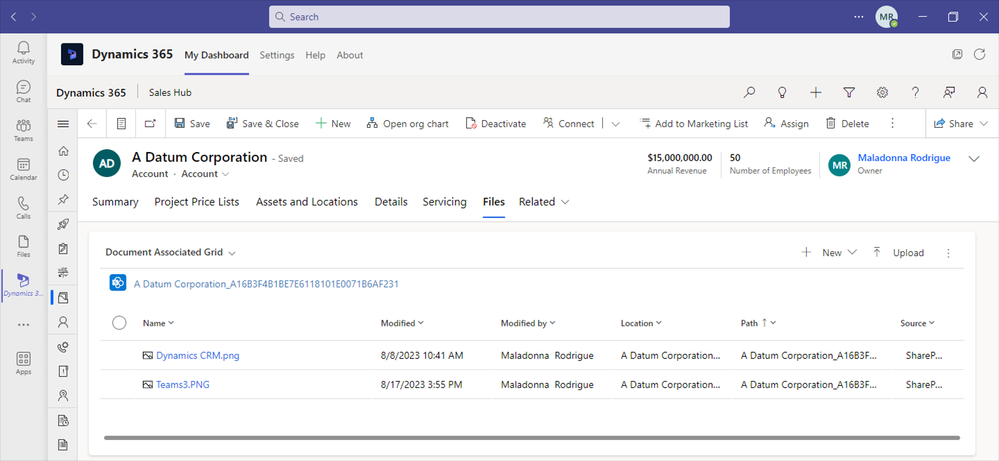
From within Teams, you can access the ‘Files’ tab of the respective CRM record and store it in the respective SharePoint site. You need to enable SharePoint Integration for this which is natively available. As there is only one SharePoint instance for each tenant, the root site is the same for your Dynamics 365 and Microsoft Teams. So even though the subsites may be different, both Dynamics 365 documents and Microsoft Teams files are stored on the same SharePoint site.

This way, all your files will be stored in your SharePoint and that too against their respective records. To retrieve it, you can just go to the record in CRM and access the file without having to manually go back to the conversations/chats.
One other way to manage files smartly is Inogic’s Attach2Dynamics, a popular file and storage management app.
With Attach2Dynamics, you get a button right on your CRM entity grid (custom or OOB) which lets you manage the cloud (SharePoint) documents right from within your CRM.
Download the app from Microsoft Commercial Marketplace and get a 15-day free trial.
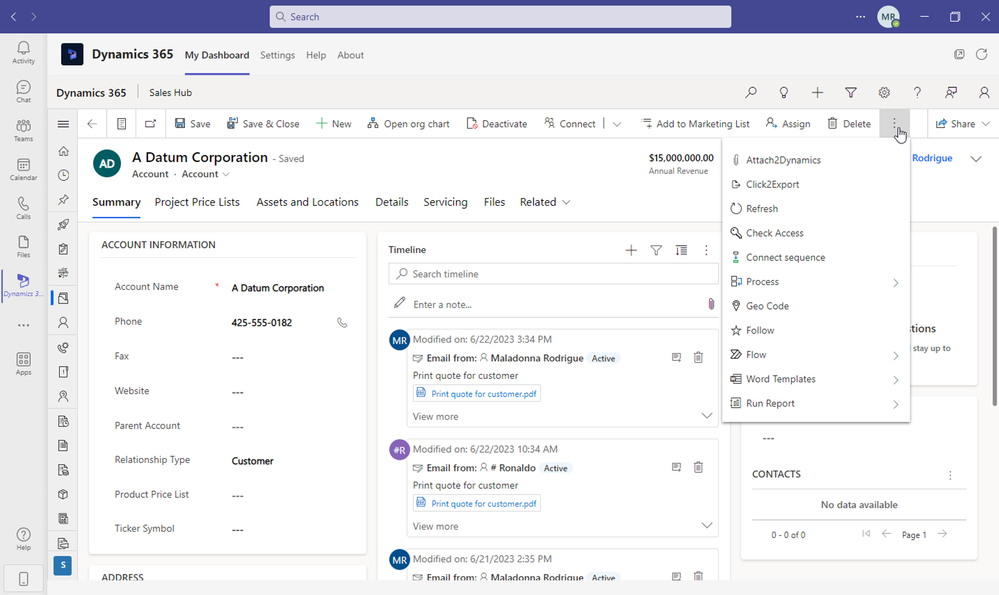
You can drag and drop files and folders from your system directly into your SharePoint. Create new folders in your SharePoint from within CRM, rename, upload, delete, do a deep search, download a sharable copy, email directly as an attachment or as a link, and much more. You get a plethora of options with this advanced UI.
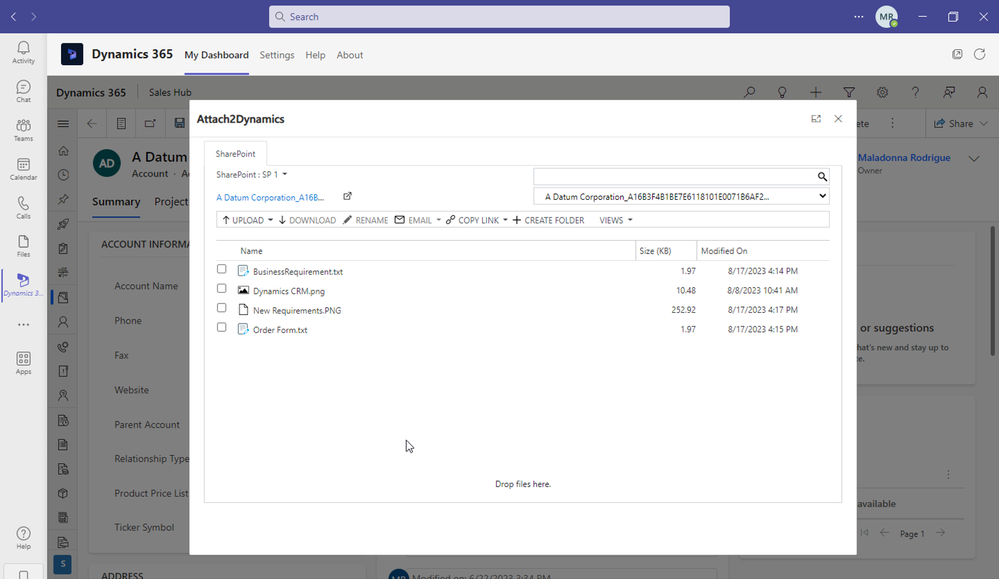
In this way, you can access all your files and folders stored in SharePoint right from your CRM, make updates to them as required, and do a lot more without toggling between different tabs.
Other than Teams, you get most of the attachments through emails. This can also create a gap in document retrieval as some documents are in SharePoint and some in your CRM emails. Also, over a period of time, these email content and attachments consume a lot of your Dynamics 365 space. This gives rise to CRM performance issues and buying additional Dynamics 365 space is also costly.
So, to truly centralize your file storage and take your file management to the next level, move these email attachments as well to the same SharePoint location. And how great it would be if you could automate this process?
With the help of Attach2Dynamics, all the email attachments that you see in your CRM timeline will get automatically moved/copied to your respective SharePoint folder. You would get a direct hyperlink to the document residing in SharePoint for ease of access as well.
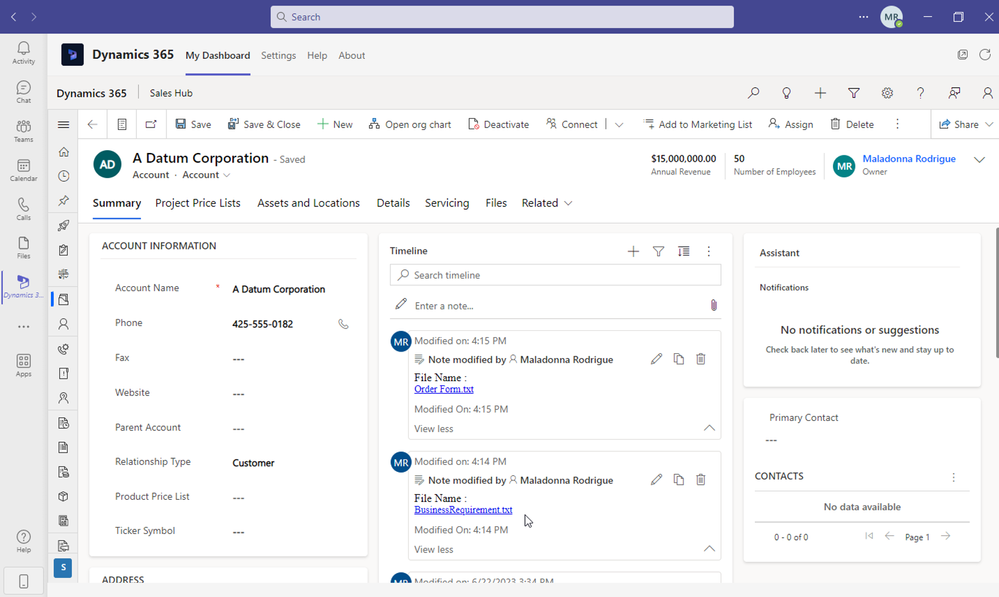
How convenient is this real-time migrating of documents to SharePoint!
Get the app today!
No more your client files are scattered in different locations; be it Teams files, Email files, or CRM files.
Note: This app only works in Teams when integrated with Dynamics 365. For more details on how to best use it along with Teams integration, reach out to Inogic at crm@inogic.com.
It does not end with just centralizing the file storage with Teams and Microsoft Dynamics 365 integration, we also need to look at having a custom folder structure and the security aspects of these files which we will cover in our next post. Keep checking this space for it.
Streamline your document management today!
by Contributed | Oct 19, 2023 | Technology
This article is contributed. See the original author and article here.
In a Security Operations Center (SOC), time to resolve and mitigate both alerts and incidents are of the highest importance. This time can mean the difference between controlled risk and impact, and large risk and impact. While our core products detect and respond at machine speed, our ongoing mission is to upskill SOC analysts and empower them to be more efficient where they’re needed to engage. To bridge this gap, we are bringing Security Copilot into our industry-leading XDR platform, Microsoft 365 Defender, which is like adding the ultimate expert SOC analyst to your team, both raising the skill bar and increasing efficiency and autonomy. In addition to skilling, we know that incident volumes continue to grow as tools get better at detecting, while SOC resources are scarce, so providing this expert assistance and helping the SOC with efficiency are equally important in alleviating these issues.
Security Copilot provides expert guidance and helps analysts accelerate investigations to outmaneuver adversaries at scale. It is important to recognize that not all generative AI is the same. By combining OpenAI with Microsoft’s security-specific model trained on the largest breadth and diversity of security signals in the industry–over 65 trillion to be precise. Security Copilot is built on the industry-transforming Azure OpenAI service and seamlessly embedded into the Microsoft 365 Defender analyst workflows for an intuitive experience.
Streamline SOC workflows
To work through an incident end to end, an analyst must quickly understand what happened in the environment and assess both the risk posed by the issue and the urgency required for remediation. After understanding what happened, the analyst must provide a complete response to ensure the threat is fully mitigated. Upon completion of the mitigation process, they are required to document and close the incident.
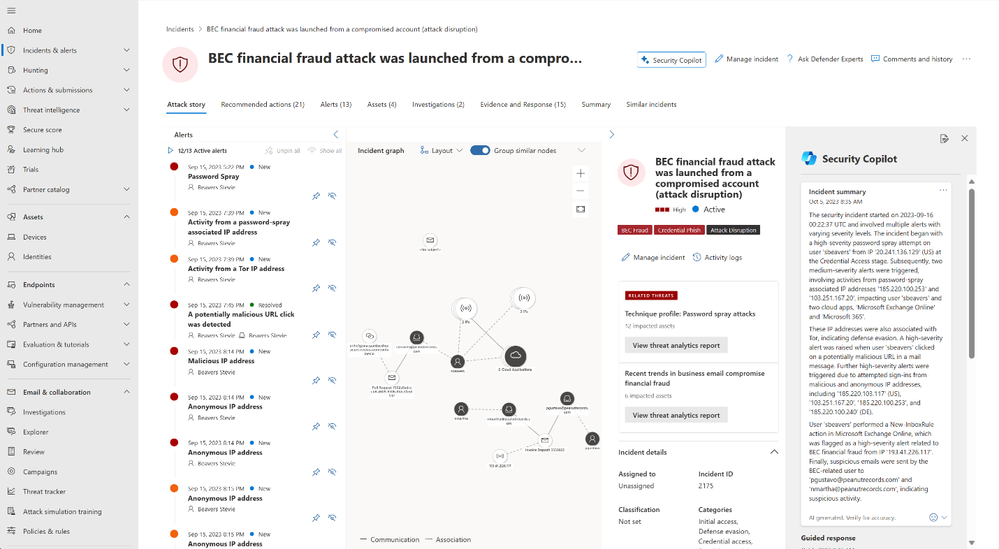
When the SOC analyst clicks into an Incident in their queue in the Microsoft 365 Defender portal, they will see a Security Copilot-generated summary of the incident. This summary provides a quick, easy to read overview of the story of the attack and the most important aspects of the incident. Our goal is to help reduce the time to ramp up on what’s happening in the SOC’s environment. By leveraging the incident summary, SOC analysts no longer need to perform an investigation to determine what is most urgent in their environment, making prioritization, understanding impact and required next steps, easy and reducing time to respond.
 Figure 1: Microsoft 365 Defender portal showing the Security Copilot-generated incident summary within the Incident page
After verifying the impact and priority of this incident, the analyst begins to review IOCs. The analyst knows that this type of attack usually starts with a targeted attack on an employee and ends with that employee’s credentials being available to the threat actor for the purposes of finding and using financial data. Once the user is compromised the threat actor can live off the land in the organization and has legitimate access to anything that user would normally have access to such as financial account information for the company. This type of compromise must be handled with urgency as the actor will be difficult to track after initial entry and could continue to pivot and compromise other users through the organization. If the targeted organization handles this risk with urgency, they can stop the actor before additional assets/accounts/entities are accessed.
The SOC analyst working on this incident is in the incident summary page and sees that the attack began with a password spray, or the threat actor attempting to access many users with a list of passwords using an anonymous IP address. This must be verified by the analyst to determine urgency and priority of triage. After determining the urgency of this incident, the analyst begins their investigation. In the incident summary, the analyst sees many indicators of compromise including multiple Ips, Cloud Applications, and other emails that may be related to the incident. The analyst sees that Defender disrupt suspended one compromised account and captured additional risk including phishing email identification. In an attempt to cast an organizational-level view, the analyst will investigate these IOCs to see who else interacted with or was targeted by the attacker.
The analyst pivots the hunting experience and sees see another “Security Copilot” button. This will allow the SOC analyst to ask Security Copilot to generate a KQL to review where else in the organization this IOC has been seen. For this example, we use, “Get emails that have ‘sbeavers’ as the sender or receiver in the last 10 days” to generate a KQL query. This reduces the time to produce the query and the need to look up syntax. The analyst now understands there’s another user account that was reached out by the adversary and the SOC needs to validate risk level / check the account state. The “llodbrok” account will be added to the incident by the analyst.
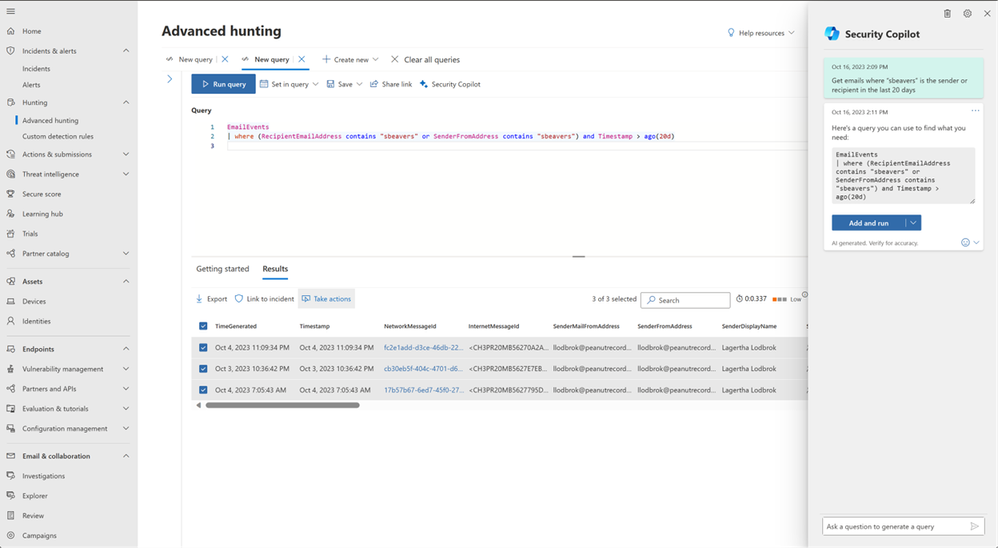 Figure 2: Microsoft Defender Security Portal showing the query assistant within Advanced hunting editor
After identifying all entry vectors and approached users, the SOC analyst shifts focus to the action on targets and what happened next for the incident they are investigating. This incident does not contain a PowerShell IOC, but if the analyst found PowerShell on the “llodbrok” user’s machine, the analyst would be able to click on the PowerShell-related alert and scroll down in the righthand pane to find the evidence component. After the analyst clicks on the PowerShell evidence, they see the “Analyze” button with the Copilot symbols. This will take a command line and turn it into human-readable language. Oftentimes attackers leverage scripts to perform network discovery, elevate privilege, and obfuscate behavior. This script analysis will reduce the time it takes to understand what the command does and respond quickly. Having human-readable scripts is also useful when the analyst is investigating an alert in a language, they are unfamiliar with or haven’t worked with recently.
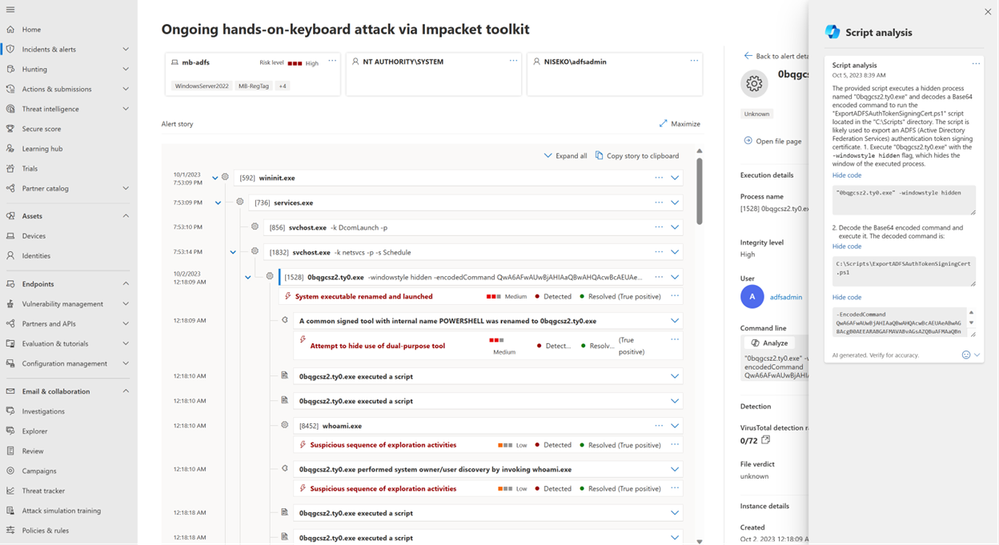 Figure 3: Microsoft 365 Defender portal showing the Security Copilot-generated script analysis within the Incident page
After the analyst has confirmed these indicators of compromise are legitimate, the next step is to initiate the remediation process. To do this, the analyst navigates back to the Incident page in the Microsoft 365 Defender portal and scrolls down in the right-hand pane. Right below the incident summary, the analyst will see a set of “guided response” recommendations. The SOC analyst has verified the incident IOCs are legitimate and selects the “Classify” dropdown and the option “Compromised Account” to indicate to other analysts this was a true positive of BEC. The SOC analyst also sees ‘quick actions’ they can take to quickly remediate the compromised user’s account, selecting “Reset user password” and “Disable user in Active Directory” and “Suspend user in Microsoft Entra ID.”
In this process, the SOC analyst is assisted by Security Copilot in what actions to take based on past actions taken by the organization in response to similar alerts or incidents in the past. This will improve their abilities from day one, reducing early training requirements.
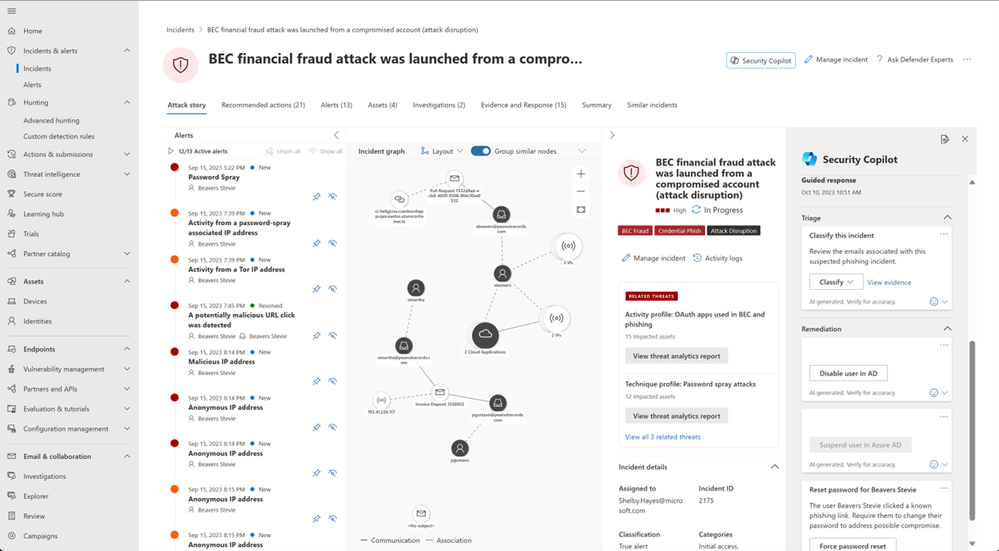 Figure 4: Microsoft 365 Defender portal showing the guided response within the Incident page
Finally, the analyst needs to send a report to their leadership. Reporting and documenting can be a challenge and time-consuming task, but with Security Copilot, the analyst can generate a post-response activity report with the click in seconds and provide partners, customers, and leadership with a clear understanding of the incident and what actions were taken.
Here is how it works: the SOC analyst selects the “Generate incident report” button in the upper right corner of the Incident page or the icon beside the ‘x’ in the side panel. This generates an incident report, that can be copied and pasted, showing the incident title, incident details, incident summary, classification, investigation actions, remediation actions (manual or automated actions from Microsoft 365 Defender or Sentinel) and follow-up actions.
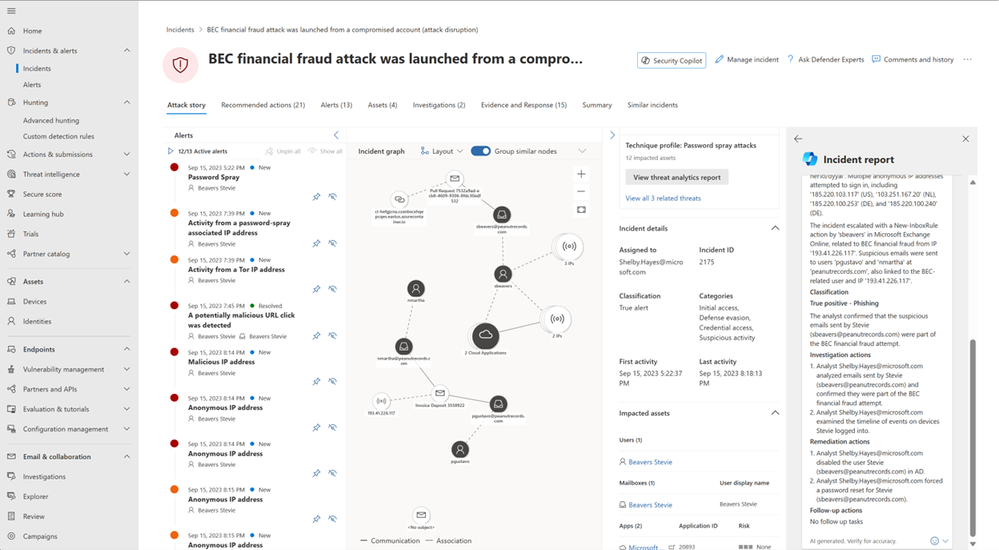 Figure 5: Microsoft 365 Defender portal showing the Security Copilot-generated incident report within the Incident page
What sets Security Copilot apart
As a part of this effort, our team worked side-by-side with Security Researchers to ensure that we weren’t providing just any response but providing a high-quality output. Today, we are reviewing a few key indicators to inform us of our response quality using clarity, usefulness, omissions, and inaccuracies. These measures are made up of three core areas that our team focused on: lexical analysis, semantic analysis, and human-oriented clarity analysis. There are three core areas that our team focused on: lexical analysis, semantic analysis, and human-oriented clarity analysis. The combination of core areas provides a solid foundation for understanding human comprehension, content similarity, and key insights between the data source and the output. With the help of our quality metrics, we were able to iterate on different versions of these skills and improve the overall quality of our skills by 50%.
Quality measurements are important to us as they help ensure we aren’t losing key insights and that all the information is well connected. Our security Researchers and Data Scientists partnered together across organizations to bring a variety of signals across our product stack, including threat intelligence signals, and a diverse range of expertise to our skills. Security copilot has obviated the necessity for labor-intensive data curation and quality assessment prior to model input.
You’ll be able to read more about how we performed quality validation in future posts.
Share your feedback with us
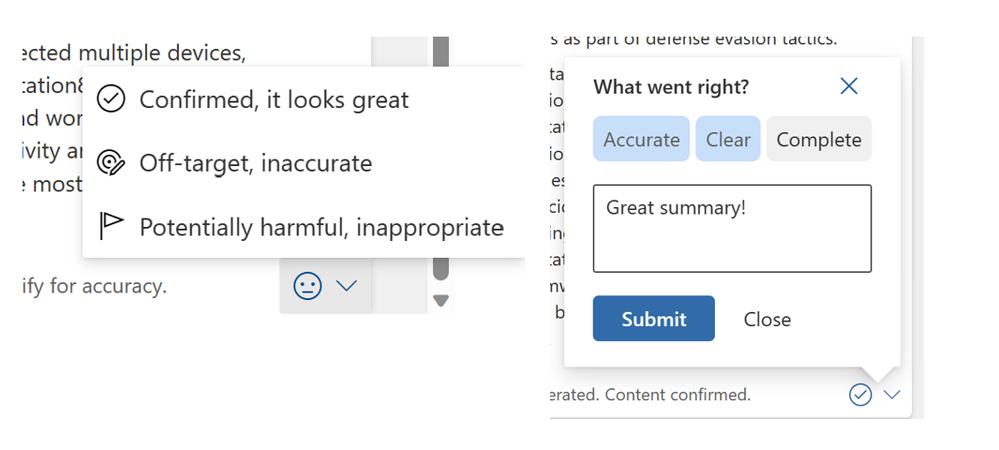
We could not talk about a feature without also talking about how important your feedback is to our teams. Our product teams are constantly looking for ways to improve our product experience, and listening to the voices of our customers is a crucial part of that process SOC analysts can provide feedback to Microsoft through each of the skill’s User Interface (UI) components (as shown below). Your feedback will be routed to our team and will be used to help influence the direction of products. We use this constant pulse check via your feedback, and a variety of other signals to monitor how we’re doing.
Security Copilot is in Early Access now, but to sign up here to receive updates on Security Copilot and the use of AI in Security. To learn more about Microsoft Security Copilot, visit the website.
Getting started
- Analyze scripts and codes with Security Copilot in Microsoft 365 Defender | Microsoft Learn
- Summarize incidents with Security Copilot in Microsoft 365 Defender | Microsoft Learn
- Create incident reports with Security Copilot in Microsoft 365 Defender | Microsoft Learn
- Use guided responses with Security Copilot in Microsoft 365 Defender | Microsoft Learn
- Microsoft Security Copilot in advanced hunting | Microsoft Learn
Learning more


Recent Comments