This article is contributed. See the original author and article here.
Introduction
Today there is a lot of interest around generative AI, specifically training and inferencing large language models (OpenAIGPT4, DALL.E2), Git copilot, Azure OpenAI service). Training these large language models requires lots of float-point performance and high interconnect network bandwidth. The Azure NDm_v4 virtual machine is an ideal choice for these types of demanding jobs (because it has 8 A100 GPU and each GPU has 200 Gbps of HDR InfiniBand). Kubernetes is a popular choice to deploy and manage containerized workloads on compute/gpu resources. The Azure Kubernetes service (AKS) simplifies Kubernetes cluster deployments. We show how to deploy an optimal NDm_v4 (A100) AKS cluster, making sure that all 8 GPU and 8 InfiniBand devices on each virtual machine come up correctly and are available to deliver optimal performance. A multi-node NCCL allreduce benchmark job is executed on the NDm_v4 AKS cluster to verify its deployed/configured correctly.
Procedure to deploy a NDmv4 (A100) AKS Cluster
We will deploy AKS cluster from the Azure cloud shell using Azure command line interface (azcli). The Azure cloud shell has azcli preinstalled, but if you prefer to install from your local workstation, instructions to install azcli are here.
Note: There are many other ways to deplot an AKS cluster (e.g. Azure Portal, ARM template, Bicep and terraform are also popular choices)
First we need to install the aks-preview azcli extension, to be able to deploy AKS and control AKS via azcli.
az extension add –name aks-preview
It is also necessary to register infiniBand support, to make sure all nodes in your pool can communicate over the same InfiniBand network.
az feature register –name AKSInfinibandSupport –namespace Microsoft.ContainerService
Create a resource group for the AKS cluster.
az group create –resource-group –location
For simplicity we will use the default kubenet networking (you could also deploy AKS using CNI and choose your own VNET), in the kubenet case AKS will deploy the VNET and subnet. System managed identity will be used for authentication. Ubuntu is chosen for the HostOS (The default AKS version deployed was 1.25.6 and the default Ubuntu HostOS is Ubuntu 22.04).
az aks create -g –node-resource-group -n –enable-managed-identity –node-count 2 –generate-ssh-keys -l –node-vm-size Standard_D2s_v3 –nodepool-name –os-sku Ubuntu –attach-acr
Then deploy the NDmv4 AKS pool. (Initially only one NDmv4 VM, later we will scale up the AKS cluster).
Note: Make sure you have sufficient NDmv4 quota in your subscription/location.
A specific tag (SkipGPUDriverInstall=true) needs to be set to prevent the GPU driver from being installed automatically (we will use the Nvidia GPU operator to install the InfiniBand driver instead). Some container images can be quite large and so we use a larger OS disk size (128 GB)
az aks nodepool add –resource-group –cluster-name –name –node-count 1 –node-vm-size Standard_ND96amsr_A100_v4 –node-osdisk-size 128 –os-sku Ubuntu –tags SkipGPUDriverInstall=true
Get credentials to connect and interact with the AKS Cluster.
az aks get-credentials –overwrite-existing –resource-group –name
Check that the AKS pools are ready.
kubectl get nodes
kubectl get nodes
Install NVIDIA network and gpu operators (they will be used to install specific GPU and InfiniBand drivers (in this case OFED 5.8-1.0.1.1.2 and GPU driver 525.60.13)
RUN apt update RUN apt-get -y install build-essential RUN apt-get -y install infiniband-diags RUN apt-get -y install openssh-server RUN apt-get -y install kmod COPY nccl-tests.sh . RUN ./nccl-tests.sh COPY ndv4-topo.xml .
Login to your Azure container registry, where your custom container will be stored.
az acr login -n
Build your container locally on a Ndmv4 VM. First change to the directory containing your Dockerfile.
docker build -t .azurecr.io/ .
Push your local container to your Azure container registry.
docker push .azurecr.io/
Run NCCL allreduce benchmark on NDmv4 AKS Cluster
The NVIDIA NCCL collective communication tests are ideal to verify that the NDv4 AKS cluster is set-up correctly for optimal performance. On 2 NDmv4 nodes (16 A100), NCCL allreduce should be ~186 GB/s.
We will use the docker container we created in the previous section and submit the NCCL allreduce benchmark using the Volcano scheduler.
Scale-up the NDmv4 AKS cluster to 2 NDmv4 VM’s (16 A100).
az aks nodepool scale –resource-group –cluster-name –name –node-count 2
Correct deployment of NDmv4 kubernetes pools using Azure Kubernetes service is critical to get the expected performance. NCCL collectives tests (e.g allreduce) are excellent benchmarks to verify the cluster is set-up correctly and achieving the expected high performance of NDmv4 VM’s.
This article is contributed. See the original author and article here.
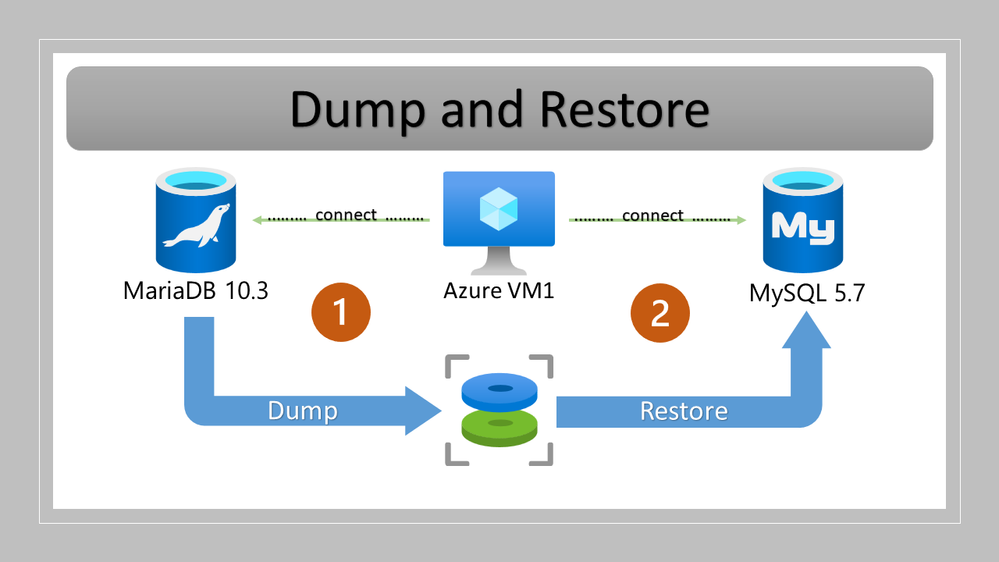
MariaDB is the open-source relational database management system created by MySQL’s original developers. MariaDB is designed to be highly compatible with MySQL. It supports the same SQL syntax, data types, and connectors as MySQL, allowing for a seamless transition for applications or databases that previously used MySQL.
Recently we’ve had many customers asking for guidance on moving from MariaDB to MySQL. To address this request, this blog post focuses on moving from Azure Database for MariaDB version 10.3 to Azure Database for MySQL version 5.7 using the MySQL Shell (MySQLSh) client. However, the same process, with minor changes, can help migrate other compatible MariaDB-MySQL version pairs.
Preparation
Before beginning, it’s important to assess any application changes or workarounds that are required to ensure a smoother migration. In real-world scenarios there are often challenges, so testing an application with the target MySQL 5.7 becomes crucial before starting the migration. To understand the potential incompatibilities between MariaDB and MySQL, refer to the following documents.
To take a full backup (which will also include the master binlog file number and position) of the source server, at the mysqlsh prompt, run the following command:
Next, I need to set up replication from Azure Database for MariaDB to Azure Database for MySQL. However, before setting up replication, it’s important to ensure that the firewall of both Azure Database for MariaDB and Azure Database for MySQL servers are configured such that they are allowed to communicate with each other.
To configure network settings on the source Azure Database for MariaDB server, ensure that the IP addresses of the VM used to perform the migration and the target Azure Database for MySQL server are whitelisted in the firewall on the source Azure Database for MariaDB server, as shown below.
To configure network settings on the target Azure Database for MySQL server, ensure that the IP addresses of the VM used to perform the migration and the source Azure Database for MariaDB server are whitelisted in the firewall on the target Azure Database for MySQL server, as shown below.
To configure the replication, use the stored procedure mysql.az_replication_change_master, as shown below.
Restore error – Lock wait timeout exceeded. Locking can happen between transactions when loading data to MySQL, which may result in throwing the following error:
If you get this error, you can work around it by increasing the value of the “innodb_lock_wait_timeout” parameter in the Azure portal (as shown below), and then continuing the migration.
Then, verify the change from the MySQL client by running the following command:
SHOW VARIABLES LIKE ‘innodb_lock_wait_timeout’;
Example output
Conclusion
Migrating from Azure Database for MariaDB to Azure Database for MySQL using dump and restore tools, together with replication to minimize the downtime needed for cutover, is not a difficult process. However, be sure to thoroughly test and benchmark things to help minimize the potential for encountering issues during and post migration, as every database, application architecture can be incredibly unique.
If you have any feedback or questions about the information supplied above, please leave a comment below or email us at AskAzureDBforMariaDB@service.microsoft.com. Thank you!
This article is contributed. See the original author and article here.
Across Microsoft solutions, it is possible to search for work/organizational content in many different entry points, such as Office.com, Sharepoint.com and Microsoft Bing – Work tab.
Office.com and Sharepoint.com are great places to start a search across all your personal and content accessible to you within your organization, including shared documents, offering capabilities that can help you navigate content in a way that suits you the best.
This post will guide you through some of the most frequent work search tasks and demonstrate how you can achieve them with different methods. You will learn how to optimize your search experience and access the information you need efficiently.
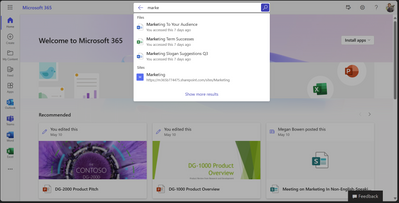
It all starts with the Search box.
The Search box can help you find your recent content quickly and easily. It shows you suggestions of Files, People, and Apps that you interact with frequently.
How does starting your search in Office.com or Sharepoint.com looks like
You can also use keywords like “ppt” or “doc” to refine the results you are seeing in the Search box suggestions.
Retrieve Word documents by using ‘doc’ keyword.
Retrieve PowerPoint documents by using ‘ppt’ keyword.
You can also get People results in Search box suggestions based on their phone number or department.
People search suggestions based on phone number.
People search suggestions based on department name.
Navigating to Search Results Page
If you don’t see what you are looking for in Search box suggestions, press enter or click ‘Show more results’ to go to the results page to explore more content. You can use different tabs or filters to refine the results you are seeing.
As an example, you can use People tab and different keywords to search for people based on their department or job title.
Search for People based on department name.
Search for People based on job title.
Or go to Messages tab to find an Email or a Teams message with specific keywords.
Email and Teams messages search.
Easily navigate through your own content
Navigating through your own content daily can be challenging. Sometimes you may want to search for a specific document you created or edited, or a message/email you sent. This can be easily done by typing your name in the Search box and clicking on the Search box suggestion. This opens up a Person Centric Search view shown below.
It is worth noting that Messages tab is currently available in Office.com and is yet to come to Sharepoint.com
Navigating to People Centric Search view by clicking on suggestions in the Search Box
You can further narrow down your own content by typing additional keywords in the search box next to the name pill or using filter and tab refiners.
Using keyword + File Type filter to further refine your search
Search for people and content they shared.
You can search for your colleagues’ content or understand their position in the organizational chart by looking them up and clicking on their name from the search box suggestion.
Browse through content your colleagues have shared with you.
Understand your company organization and who your colleagues report to.
This feature only shows public content and content that has been explicitly shared with you by the person you are looking up. Hence in some cases, you may not get any results.
You can only browse through content explicitly shared with you.
Getting to work search results in Microsoft Bing
We are currently working to bring the same set of search capabilities across Office.com, Sharepoint.com and Bing.com/work.
To access work search in Bing.com, you need to be signed into Bing with your organizational account. This will enable you to see top work search results in the All-Tab. You can further explore work content by clicking some of the work result suggestions or going straight to Work tab.
Work result suggestions in All-Tab
Work search results in Work-Tab
On images below, we are showing how some of the searches mentioned in this article may look like in Bing.com/work.
Email and Teams messages search
People search by name.
Understand your company organization and who your colleagues report to.
You can only browse through content explicitly shared with you.
This article is contributed. See the original author and article here.
Thanks to a recent upgrade of Microsoft Learn, you can now get an up-to-the-minute PDF version of release plans for Dynamics 365, Power Platform, and Cloud for Industry anytime you like, in any language we publish. Previously, you had to wait for us to create PDF files to share the release plans with your team, clients, or partners. And since we created PDFs just once a month, they were often out of sync with the published release plans. Our localized PDFs were even more tardy.
Custom PDFs will be retired
In the next two weeks, we’ll retire the custom PDF files we’ve been creating every month. After that, any links to PDFs on the release wave landing pages will redirect to the automated PDF option so that you have the most up-to-date information available.
How to get live PDF release plans on demand
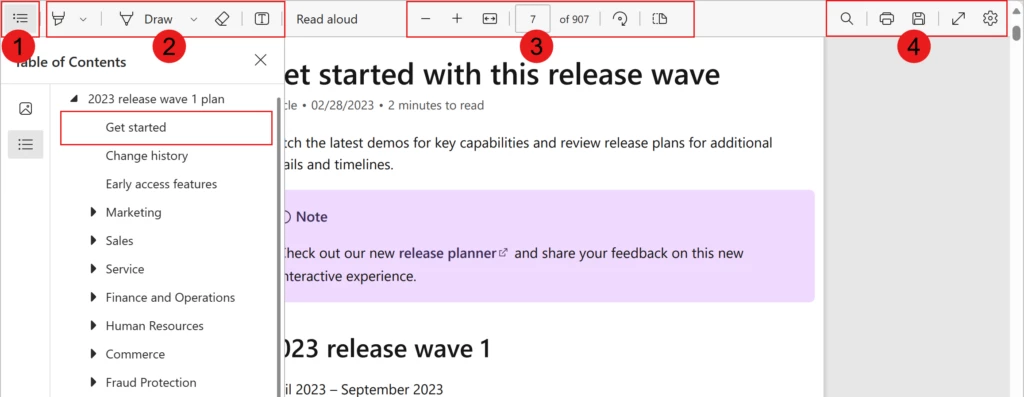
How do you get the new experience? At the bottom of the table of contents on any release plan page, select Download PDF. A PDF version of the entire release plan opens in a new browser tab. Select the Contents icon to expand the table of contents and easily navigate to sections that interest you.
Legend:
Contents icon
Annotation tools (highlighter, pen, eraser, text)
View tools (zoom out, zoom in, fit to width, go to page, rotate page, switch between viewing one or two pages)
You can use the same technique to get a PDF of any documentation section of the Learn site.
Tell us what you think
We’re excited about this upgrade, but we want to know what you think! We’re always working to make the release plans more useful for you. Give it a try and let us know. And feel free to suggest features you’d like to see in the PDF version.
This article is contributed. See the original author and article here.
AI-powered experiences are changing the game of what’s possible for sellers, and generative AI with Copilot is here to assist sellers do their best work. Copilot in Viva Sales is quickly evolving and adding new features and experiences to make sellers’ lives better. The tools are there to help offload and automate those mundane sales activities, allowing a seller to spend more time with prospects and engaging customers at the right moment in the sales cycle.
With email remaining a key channel in day-to-day interactions the recently announced General Availability of email features have received great feedback from salespeople helping them save time when connecting with customers. Let’s look at 5 ways Copilot in Viva Sales takes seller productivity to the next level:
Use Copilot in Viva Sales to generate email content suggestions
Responding to emails can take time and is often the activity sellers leave until the end of the day or week. It can be overwhelming and might even cause sellers to miss important deals. With AI-generated email content suggestions, we’re here to help your sellers balance their time and effort!
Sellers can use this feature to
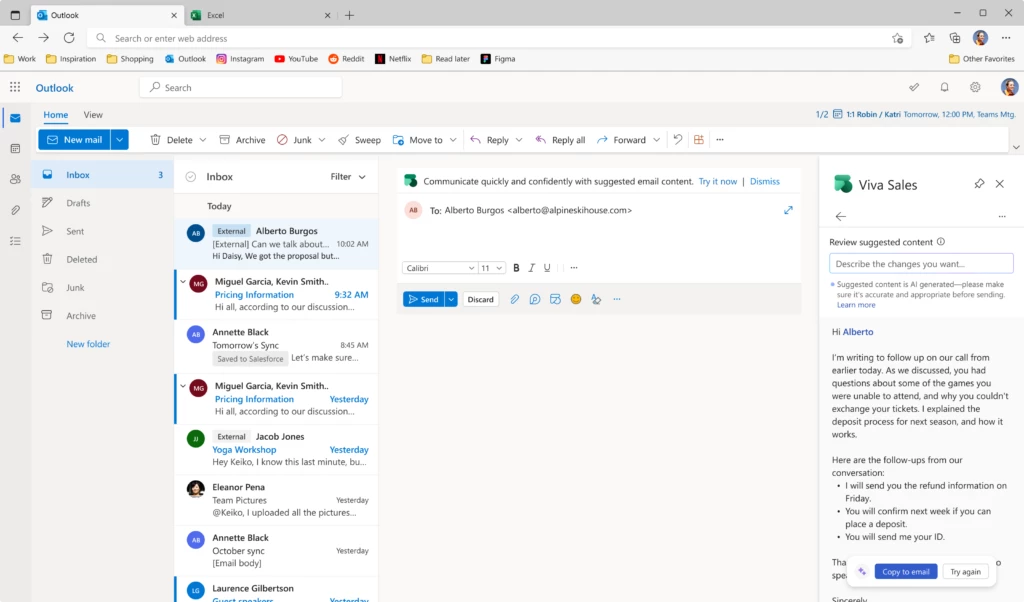
Generate email replies. These replies will be in context of the e-mail thread and surface data from the relevant CRM opportunity.
Generate new emails based on a user defined prompt.
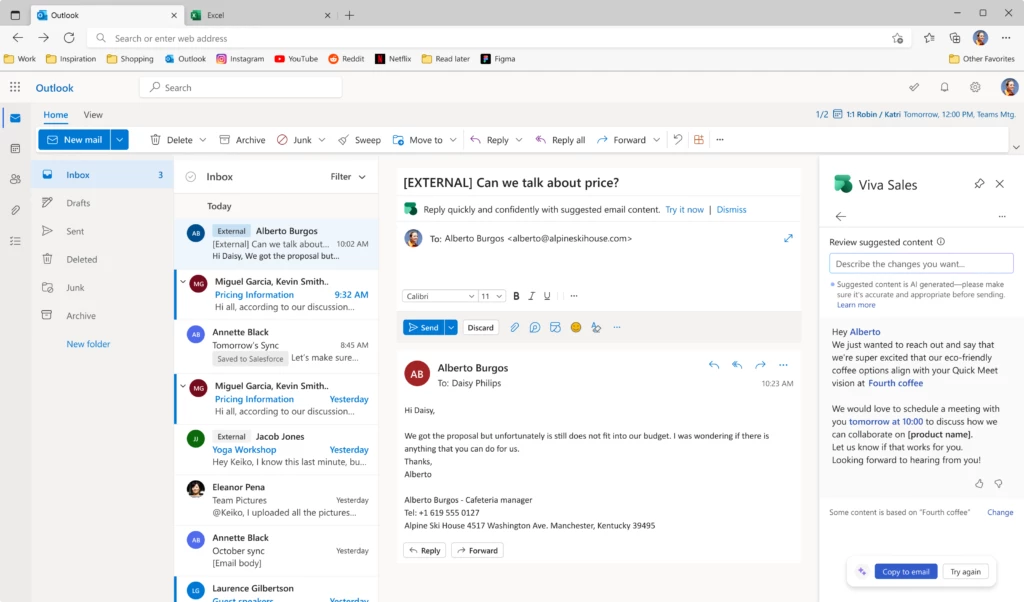
In our suggested replies, users can choose between several pre-defined categories or suggest their own prompt. The AI-generated replies intelligently create drafts that directly address the email thread users are replying to. In addition, the suggestions use CRM data to enrich the text and make it relevant to the specific situation. The response includes opportunity data based upon a contact match and allows the individual to adjust and switch opportunities with a simple click. It can even include the seller’s Outlook calendar availability to suggest meeting times.
AI-generated email content
With AI generated new emails and replies, users can refine the suggested text to add more content or context. For example, if a seller prefers to adjust the auto-suggested meeting day, they could simply add a free-text prompt asking Copilot to offer a time next week. The generated text will then update with the new timeslot.
Making sure the data is correct is critical to adoption. If the seller wants to understand the source of information in the generated reply, simply click the blue highlighted data point to see a window into the data source. Not only does this help build trust that the data is accurate, it also ensures they can validate without having to context-switch across multiple applications saving time and focus.
Forget “Admin Day” – quickly catch up on emails and update the CRM in the moment
With Copilot in Viva Sales, we are looking to reduce those admin days and instead help sellers get up to speed on customer communications quickly. Help them make those critical updates that improve data quality back into CRM and generate responses faster, so sellers can execute them in the moment rather than save up for an end of week activity.
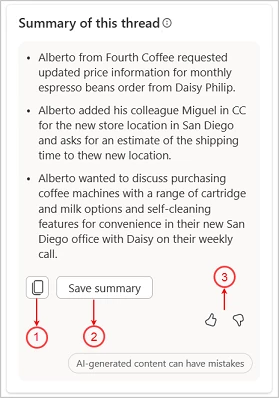
AI-generated email thread summary
Viva Sales uses Copilot to summarize email conversation threads and provide your sellers with options to:
Copy the summary.
Save the summary to the CRM system as a note on the record’s timeline.
Provide feedback on the quality and relevancy of the summary output.
When logging into your inbox it can be daunting to work through all the unread mail. As a typical pattern long emails are often reviewed briefly by skim reading the first few paragraphs. This can provide a huge risk to sellers missing key points that could be placed later in the thread. This is where the summarization capability with Copilot can help.
Email summaries are generated for emails or email threads with more than 1000 characters, which is about 180 words.
The email summary contains the key insight broken down into digestible bullet points so sellers can quickly catch up in seconds.
After adding the summary to the CRM system, sellers can edit it as needed in the timeline of the record.
The summary generated is designed to help sellers see key insights immediately and assist in the decision making on whether they need to take a deeper look. Copilot capabilities are never a replacement for a human review, but we designed them to help sellers decide to jump in faster with better context.
Effectively prepare for sales meetings
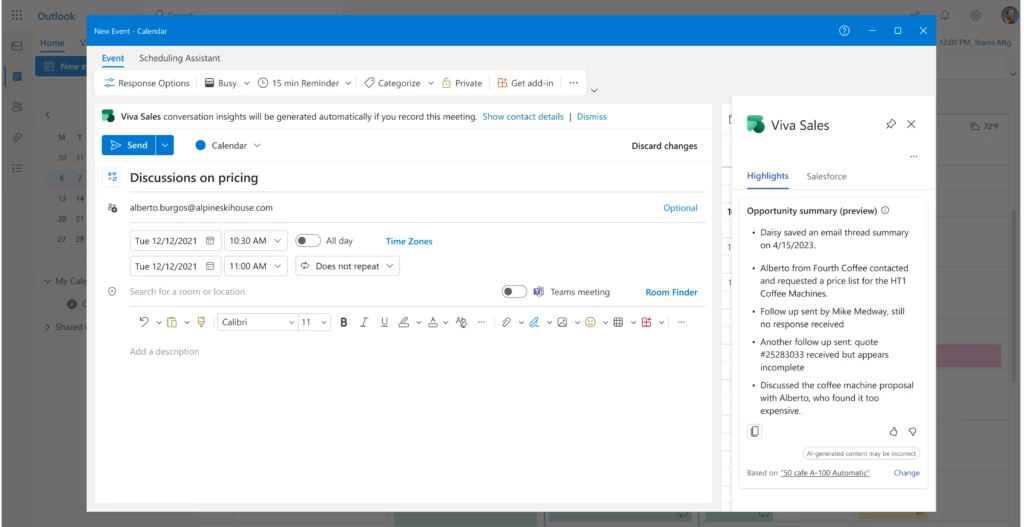
Copilot in Viva Sales helps sellers prepare for meetings in advance. It saves precious time by offering relevant customer information within Outlook, without making the seller switch screens to their CRM.
When opening a customer meeting in Outlook, in the Viva Sales pane, sellers get a view to help them get ramped up on the situation with the customer. The view includes:
CRM information on the opportunity that is the discussion topic of in the meeting.
Summary of recent notes that were captured on the opportunity level.
Any issues or concerns addressed within the notes.
Summary of previous opportunity activities (like emails and meetings).
Sellers can drill into the data source to get more context if necessary and be readier to engage knowing the top items that need to be addressed.
AI-generated opportunity summary
Boost seller productivity with AI-generated meeting summaries
Delivering a professional engagement with a customer can be the difference between winning and losing a deal. This applies to seller communications. When finishing an important meeting with a client a common task is to send a follow-up recap. Not only does this show that the seller has listened throughout the call but also ensures that there is a clear understanding of the next steps. Sellers capture their notes in a variety of places, but if they use the conversation intelligence capability in Viva Sales – creating the recap is easy.
With Copilot in Viva Sales, we’re here to help sellers cross this task off their list quickly and easily. We’re combining our conversation intelligence technology with the magic of Viva Sales and GPT, to boost seller productivity and help sellers focus on their customer relationships.
With just a few easy steps, Viva Sales flags that a new meeting summary is available for the previous communication. The seller can select and use the generated recap as a solid starting point for the response. Simple!
Compose a new email and launch Viva Sales to see the highlights tab.
Select “summarize a meeting”.
Select the relevant meeting to summarize.
Add the generated summary to the email then review, edit, and send.
AI-generated meeting summaries
The generated meeting summary will cover topics that sellers discussed in their calls and action items that were mentioned, all captured by our conversation intelligence. The GPT technology will format the information into an email, and leverage CRM data to enrich the content.
Immediately engage with Viva Sales Copilot experiences, then sign in to connect with your CRM
Users who are not initially connected to CRM are still able to get instant value with Copilot in Viva Sales. We’ve made some capabilities available immediately upon opening the Viva Sales pane to showcase the productivity experience. Sellers who would like to take further advantage can then connect to CRM for access to the full capabilities.
When opening the Viva Sales pane without being connected to CRM, users can:
Provide a prompt to draft AI-generated email content.
Catch up on emails with email summaries at a glance.
Users can easily sign into their CRM to save those thread summaries or get additional Copilot in Viva Sales value.
Copilot in Viva Sales without CRM
Next steps
As organizations embark on their AI defined vision and strategy, Copilot in Viva Sales is a great way to see immediate value for sellers. The solution is designed to help sellers see real tangible results from the moment they switch it on without lengthy consultancy effort or technical training. If you are a Dynamics 365 Sales Enterprise and above customer Copilot in Viva Sales is included within your license plan and it is easily available for Salesforce customers to purchase.


Recent Comments