This article is contributed. See the original author and article here.
Your brand is the face of your business. And often, the live chat widget on your website is the first point of contact for your customers. Having a strong brand for your customer service products can build trust and credibility, differentiate yourself from competitors, ensure consistency in communication, and create a positive emotional connection with customers.
We are excited to announce our upgraded live chat widget that allows you to customize every detail of the widget to match your brand identity. From the font and color scheme to the iconography, you can now own every pixel of the widget and ensure that it represents your brand in the best possible way.
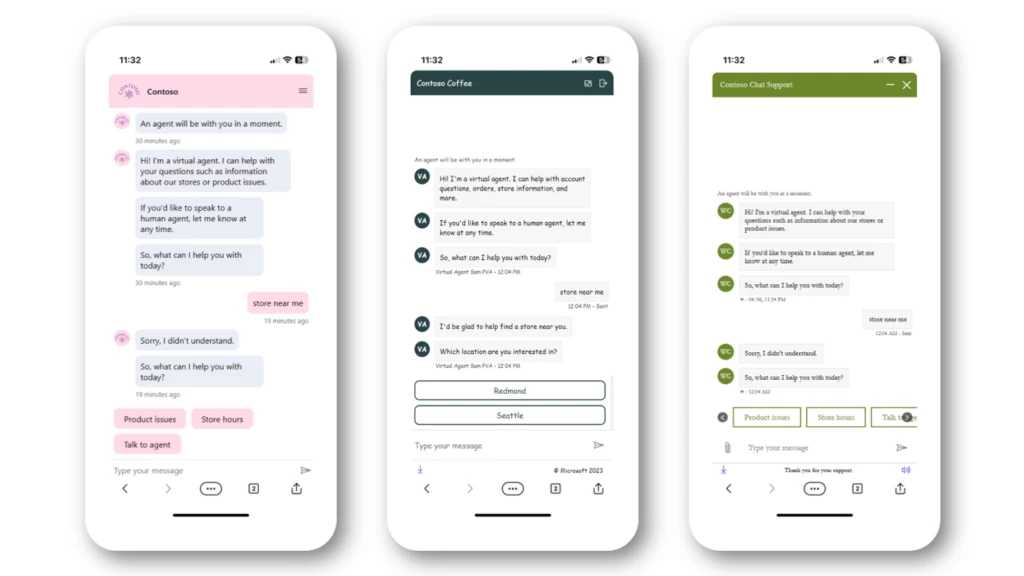
Three customized chat widgets, each representing a different branding style
Style every component of the live chat widget to reflect your brand
When you update your environment with the latest release, you can use our live chat script tag customization to edit the design of the live chat widget through CSS-represented styling. It is easier than ever to create a branded look for your chat widget. You can choose the font, color, style, and size of every component of the chat widget to reflect your brand. The image below shows examples of chat widget components and the different ways you can change them.
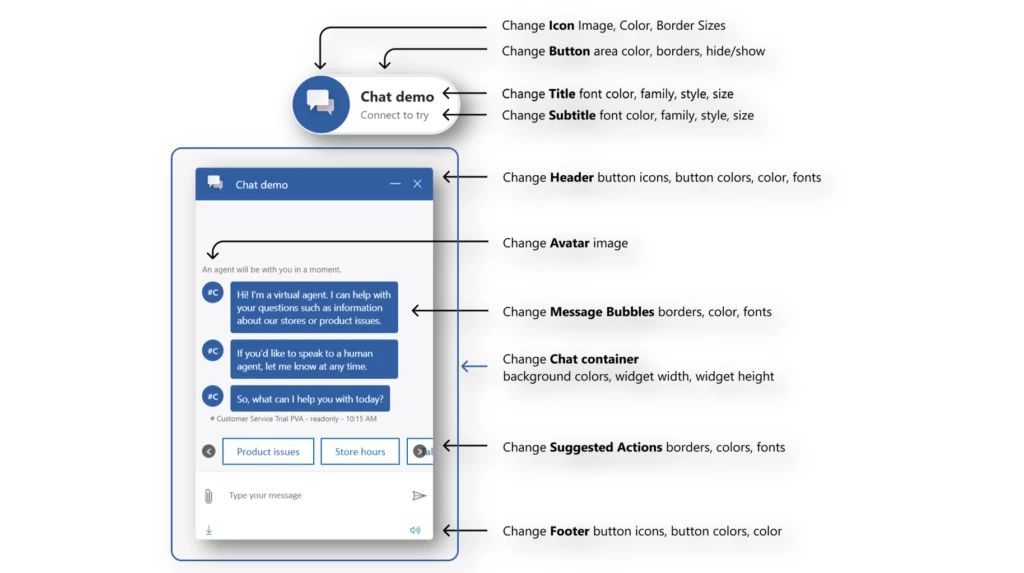
Editable elements in the default chat button and chat container
This article is contributed. See the original author and article here.
Como criar uma extensão customizada para o Azure DevOps
Em alguns casos, é necessário criar uma extensão personalizada para o Azure DevOps, seja para adicionar funcionalidades que não estão disponíveis nativamente ou para modificar alguma funcionalidade existente que não atenda às necessidades do projeto. Neste artigo, mostraremos como criar uma extensão personalizada para o Azure DevOps e como publicá-la no Marketplace do Azure DevOps.
Antes de começar certifique:
Ter uma conta no Azure DevOps. Caso ainda não tenha uma, você pode criar uma seguindo as instruções disponíveis aqui.
Ter um editor de código instalado, como o Visual Studio Code, que pode ser baixado em code.visualstudio.com.
Ter a versão LTS do Node.js instalada, disponível para download em, nodejs.org. Ter o compilador de TypeScript instalado, sendo a versão recomendada 4.0.2 ou superior. Ele pode ser instalado via npm em npmjs.com.
Ter o CLI do TFX instalado, sendo a versão recomendada 0.14.0 ou superior. Ele pode ser instalado globalmente via npm com o comando npm i -g tfx-cli ou conferindo mais detalhes em TFX-CLInpm i -g tfx-cli.
Preparando o ambiente de desenvolvimento
Crie uma pasta para a extensão, por exemplo, my-extension e dentro desta pasta crie a uma subpasta, por exemplo, task.
Abra o terminal na pasta criada e execute o comando npm init -y, o parâmetro -y é para aceitar todas as opções padrão. Você vai notar que foi criado um arquivo chamado package.json e nele estão as informações da extensão.
Substitua o <> por ID único de cada extensão, você pode gerar um ID aqui. Substitua o <> pelo publisher ID criado no passo 1 da etapa de publish.
Na pasta raiz da sua extensão my-extension, crie uma pasta chamada images e adicione uma imagem chamada icon.png com o tamanho de 128×128 pixels. Essa imagem será usada como ícone da sua extensão no Marketplace.
Criando a extensão
Depois de configurar o ambiente, você pode criar a extensão.
Na pasta task crie um arquivo chamado task.json e adicione o seguinte conteúdo:
Substitua o <> pelo mesmo GUID gerado no passo 8 da etapa de preparação de ambiente de desenvolvimento.
Esse arquivo descreve a extensão que será executada no pipeline. Nesse caso, a extensão ainda não faz nada, mas você pode adicionar os inputs e a lógica para executar qualquer coisa.
Na sequência crie um arquivo chamado index.js e adicione o seguinte conteúdo:
Esse arquivo é o responsável por executar a extensão. Nesse caso, ele apenas retorna uma mensagem de sucesso. Você pode adicionar a lógica para executar qualquer coisa.
Adicione na pasta task uma imagem chamada icon.png com o tamanho de 32×32 pixels. Essa imagem será usada como ícone da sua extensão no Azure Pipelines.
No terminal, execute o comando tsc, para compilar o código Typescript para Javascript. Esse comando irá gerar um arquivo chamado index.js na pasta task.
Para executar a extensão localmente, execute o comando node index.js. Você deve ver a mensagem My Extension Succeeded!.
Quando a sua extensão estiver pronta, você pode publicá-la no Marketplace. Para isso será necessário criar um editor de extensão no Marketplace.
Acesse o Marketplace e clique em Publish Extension. Após fazer o login, você será redirecionado para a página de criação de um editor de extensão. Preencha os campos e clique em Create.
Imagem 1 – Criando um editor de extensão no Portal no Marketplace
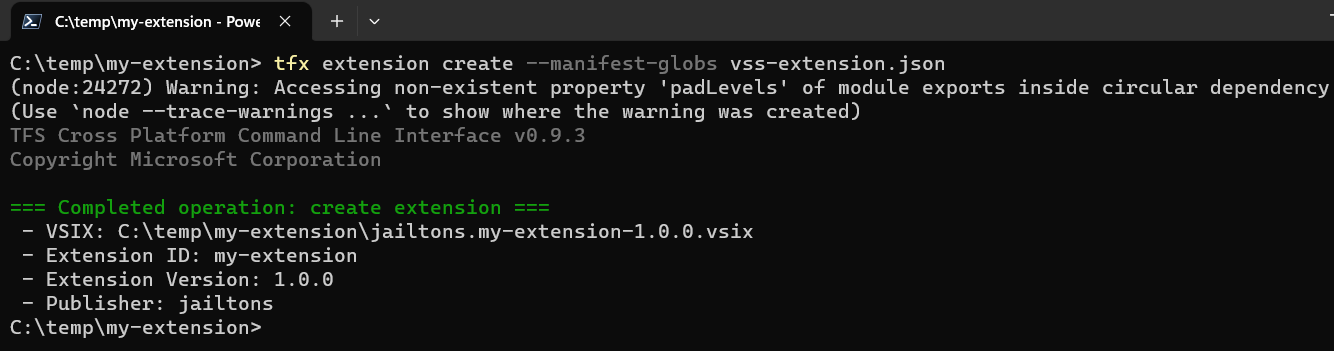
No terminal execute o comando tfx extension create –manifest-globs vss-extension.json, na pasta My-Extension. Esse comando irá gerar um arquivo chamado publishID-1.0.0.vsix, que é o arquivo que será publicado no Marketplace.
Imagem 2 – Tela de linha de comando TFX CLI, criando uma extensão
Acesse a página de publicação de extensão no Marketplace e clique New extension e seguida Azure DevOps. Selecione o arquivo my-extension-1.0.0.vsix e clique em Upload.
Imagem 3 – Tela para fazer o Upload de uma Extensão para o Marketplace
Se tudo ocorrer bem, você verá algo como a imagem abaixo.
Imagem 4 – Exemplo de uma extensão publicada no Marketplace
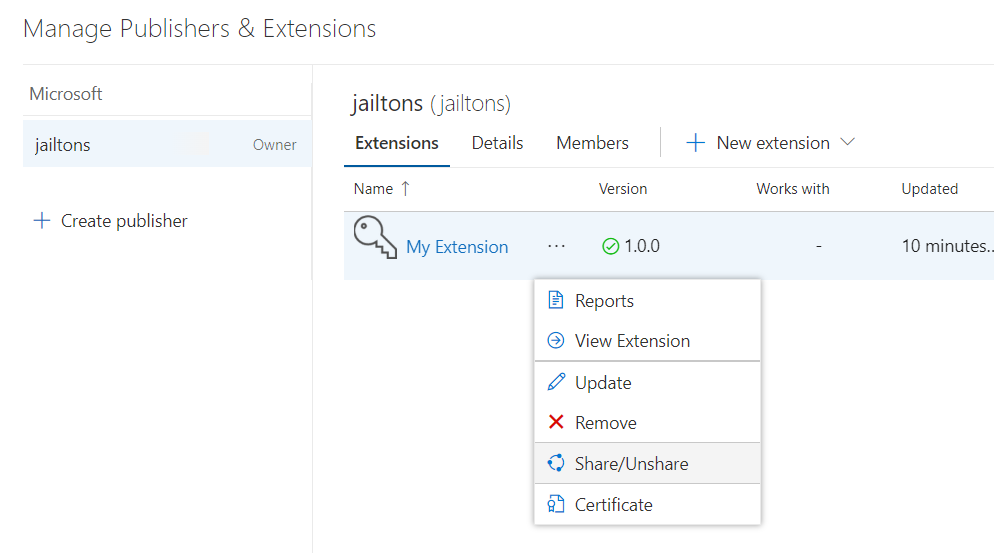
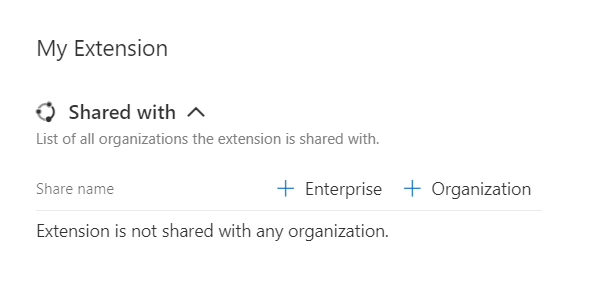
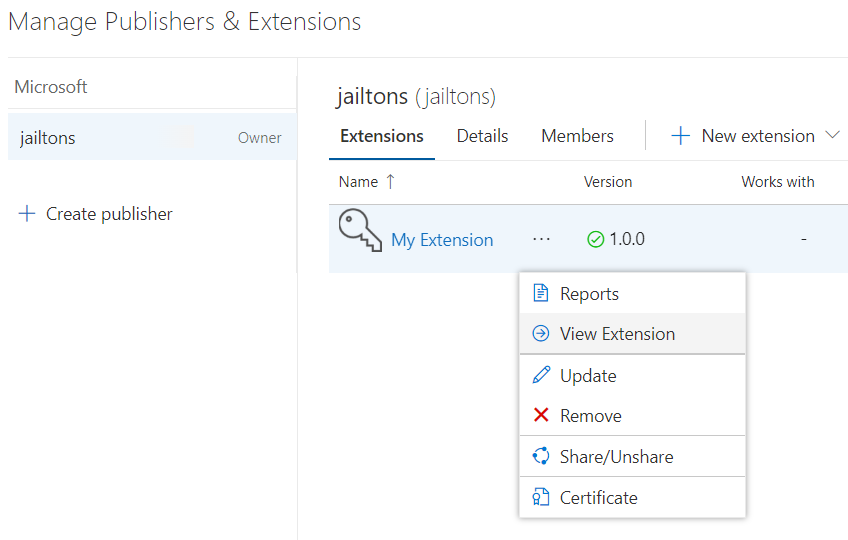
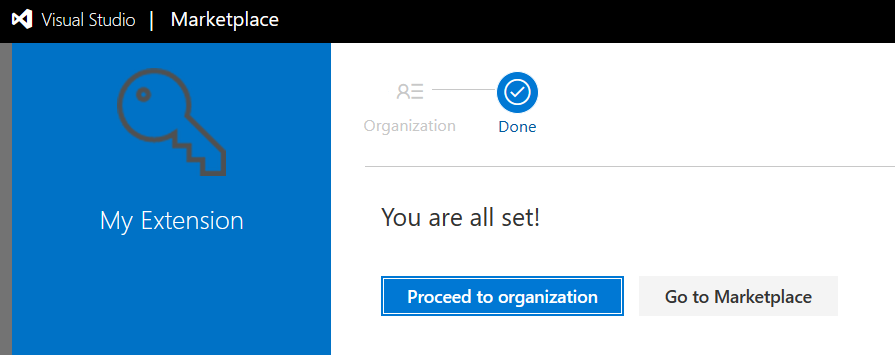
Com a extensão publicada, será necessário compartilhá-la com a sua organização. Para isso, clique no menu de contexto da extensão e clique em Share/UnShare.
Imagem 5 – Menu de opções de uma extensão, com a opção de compartilhar destacada
Clique em + Organization.
Imagem 6 – Tela para compartilhar um extensão
E digite o nome da sua Organização, ao clicar fora da caixa de digitação a validação é feita e o compartilhamento é realizado.
Imagem 7 – Exemplo de como é possível compartilhar uma extensão com uma organização
Instalando a extensão na sua organização
Após publicar a extensão no Marketplace, você pode instalá-la na sua organização, para isso siga os passos abaixo.
Clique no menu de contexto da extensão e clique em View Extension.
Imagem 8 – Menu de uma extensão, opção de visualizar destacada
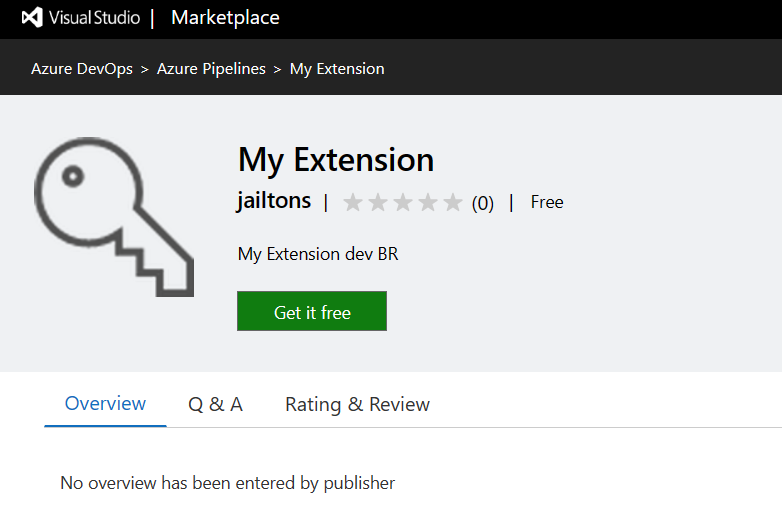
Você verá algo como a imagem abaixo.
Imagem 9 – Tela da extensão no Marketplace
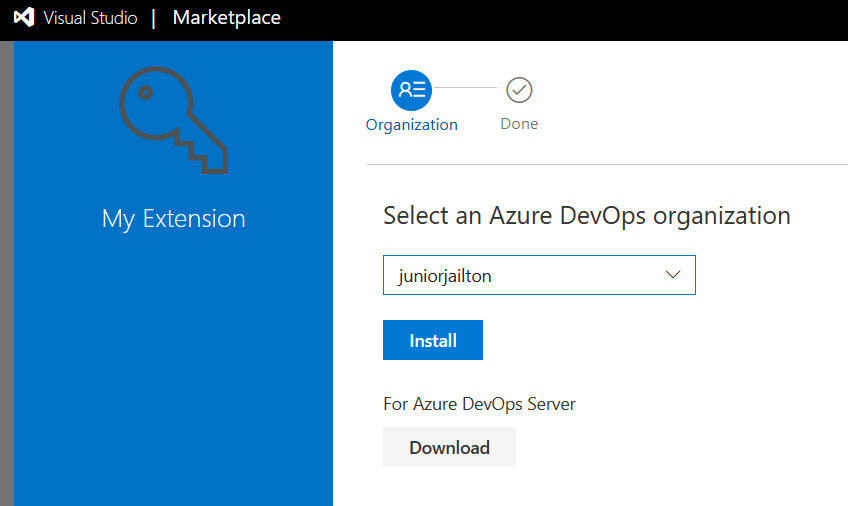
Clique em Get it free.
Verifique se sua organização está selecionada e clique em Install.
Imagem 10 – Tela de instalação da extensão no marketplace
Se a instalação ocorrer tudo bem, você verá algo como a imagem abaixo.
Imagem 11 – Tela de confirmação de instalação da extensão
Após a instalação, você verá a extensão na lista de extensões instaladas e poderá ser utilizada nos seus pipelines.
Conclusão
O uso de extensões customizadas no Azure DevOps desbloqueiam funcionalidades que não estão disponíveis. Neste artigo, você aprendeu como criar uma extensão customizada e como publicá-la no Marketplace. Espero que tenha gostado e que possa aplicar o conhecimento adquirido em seus projetos.
This article is contributed. See the original author and article here.
Documents can contain table data. For example, earning reports, purchase order forms, technical and operational manuals, etc., contain critical data in tables. You may need to extract this table data into Excel for various scenarios.
Extract each table into a specific worksheet in Excel.
Extract the data from all the similar tables and aggregate that data into a single table.
Here, we present two ways to generate Excel from a document’s table data:
Azure Function (HTTP Trigger based): This function takes a document and generates an Excel file with the table data in the document.
Apache Spark in Azure Synapse Analytics (in case you need to process large volumes of documents).
The Azure function extracts table data from the document using Form Recognizer’s “General Document” model and generates an Excel file with all the extracted tables. The following is the expected behavior:
Each table on a page gets extracted and stored to a sheet in the Excel document. The sheet name corresponds to the page number in the document.
Sometimes, there are key-value pairs on the page that need to be captured in the table. If you need that feature, leverage the add_key_value_pairs flag in the function.
Form Recognizer extracts column and row spans, and we take advantage of this to present the data as it is represented in the actual table.
Following are two sample extractions.
Top excel is with key value pairs added to the table. Bottom one is without the key value pairs.
The Excel shown above is the extraction of table data from an earnings report. The earnings report file had multiple pages with tables, and the fourth page had two tables.
Solution
Azure Function and Synapse Spark Notebook is available here in this GIT Repository
This article is contributed. See the original author and article here.
Disclaimer
This document is not meant to replace any official documentation, including those found at docs.microsoft.com. Those documents are continually updated and maintained by Microsoft Corporation. If there is a discrepancy between this document and what you find in the Compliance User Interface (UI) or inside of a reference in docs.microsoft.com, you should always defer to that official documentation and contact your Microsoft Account team as needed. Links to the docs.microsoft.com data will be referenced both in the document steps as well as in the appendix.
All the following steps should be done with test data, and where possible, testing should be performed in a test environment. Testing should never be performed against production data.
Target Audience
Microsoft customers who want to better understand Microsoft Purview.
Document Scope
The purpose of this document (and series) is to provide insights into various user cases, announcements, customer driven questions, etc.
Topics for this blog entry
Here are the topics covered in this issue of the blog:
Sensitivity Labels relating to SharePoint Lists
Sensitivity Label Encryption versus other types of Microsoft tenant encryption
How Sensitivity Labels conflicts are resolved
How to apply Sensitivity Labels to existing SharePoint Sites
Where can I find information on how Sensitivity Labels are applied to data within a SharePoint site (i.e. File label inheritance from the Site label)
Out-of-Scope
This blog series and entry is only meant to provide information, but for your specific use cases or needs, it is recommended that you contact your Microsoft Account Team to find other possible solutions to your needs.
Sensitivity labels and SharePoint Sites – Assorted topics
Encryption Sensitivity Label Encryption versus other types of Microsoft tenant encryption
Question #1
How does the encryption of Sensitivity Labels compare to encryption in leveraged in BitLocker?
Answer #1
The following table breaks this down in detail and is taken from the following Microsoft Link.
Can you apply Sensitivity Labels to SharePoint Lists?
Answer #2
The simple answer is NO while in the list, but YES once the list is exported to a file format.
Data in the SharePoint List is stored within a SQL table in SharePoint. At the time of the writing of this blog, you cannot apply a Sensitivity Label to a SharePoint Online tables, including SharePoint Lists.
SharePoint Lists allow for exports of the data in the list to a file format. An automatic sensitivity label policy can apply a label to those file formats. Here is an (example below of those export options.
How to apply Sensitivity Labels to existing SharePoint Sites
Question #3
Can you apply Sensitivity Labels to existing SHPT sites? If so, is this, can this be automated (ex. PowerShell)
Answer #3
You can leverage PowerShell to apply SharePoint labels to multiple sites. Here is the link that explains how to accomplish this.
Look for these two sections in the link below for details:
Use PowerShell to apply a sensitivity label to multiple sites
View and manage sensitivity labels in the SharePoint admin center
If you have an existing file with an existing Sensitivity Label that is stricter than the Sensitivity Label being inherited from SharePoint Site label, which Sensitivity Label is applied to the file?
Answer #4
Please refer to the link and table below for how Sensitivity Label conflicts are handled. Notice that any Higher priority label or user applied label, would not be overridden by a site label or an automatic labeling policy.
“When SharePoint is enabled for sensitivity labels, you can configure a default label for document libraries. Then, any new files uploaded to that library, or existing files edited in the library will have that label applied if they don’t already have a sensitivity label, or they have a sensitivity label but with lower priority.
For example, you configure the Confidential label as the default sensitivity label for a document library. A user who has General as their policy default label saves a new file in that library. SharePoint will label this file as Confidential because of that label’s higher priority.”


Recent Comments