by Contributed | Mar 28, 2023 | Technology
This article is contributed. See the original author and article here.
Training large AI models on Azure using CycleCloud + Slurm
In the past year generative AI models have leapt into common discourse through the popularity of text-to-image models and services such as DALL-E and Stable Diffusion, but especially through the explosion in knowledge and use of chatbots like ChatGPT and their integration into apps and services like Bing Search.
These models implement variations on the transformer architecture which has dominated natural language processing (NLP) tasks since its introduction in the “Attention is all you need” (Vashwani et al.) paper in 2017. These models have been shown to be very effective in a range of tasks including machine translation, summarization, named entity recognition, and question answering. Remarkably, the models demonstrate a scaling in capabilities correlated with an increase in model size and training data without task specific training leading to the notion of referring to these models as “foundational models” (e.g. “Scaling Laws for Neural Language models” (Kaplan et al. 2020), “Scaling Laws for Autoregressive Generative Modeling” (Henighan et al. (2020)). This scaling property has led to an explosion in the growth in both the size of the model (the number trainable parameters) and the size of the training data used to train these models. The same increase in demand for model sizes results in surging demand for GPU clusters of sufficient size to not only fit the entire model in memory, but to train as quickly possible.
Here we demonstrate and provide template to deploy a computing environment optimized to train a transformer-based large language model on Azure using CycleCloud, a tool to orchestrate and manage HPC environments, to provision a cluster comprised of A100, or H100, nodes managed by Slurm. Such environments have been deployed to train foundational models with 10-100s billions of parameters on terabytes of data.
Provision the Slurm cluster
In this demonstration we’re going to use Terraform to provision the infrastructure required to create a Slurm cluster managed by CycleCloud. [C]loud-init will be used to install CycleCloud on a provisioned VM and CycleCloud will then be configured with an admin account and a pre-configured Slurm cluster.
A few key features of this deployment are:
Use of Terraform as Infrastructure-as-Code tool to deploy CycleCloud
Use of Slurm as the batch scheduler
Support for container-based workloads using enroot and pyxis
- Integration with PMIx to support efficient large-scale training
Integration with Node Health Check(NHC) to monitor and automatically detect common hardware issue that may slow down or stop the training
Configuration for key variables supplied through environment variables – Installation and configuration of CycleCloud and Slurm using cloud-init
Not demonstrated here for simplicity, but potentially useful, are:
- Use of Slurm accounting to track resource usage
- Use of Azure NetApp Files, or Azure Managed Lustre FS, as the shared filesystem for better performance if appropriate for your workload
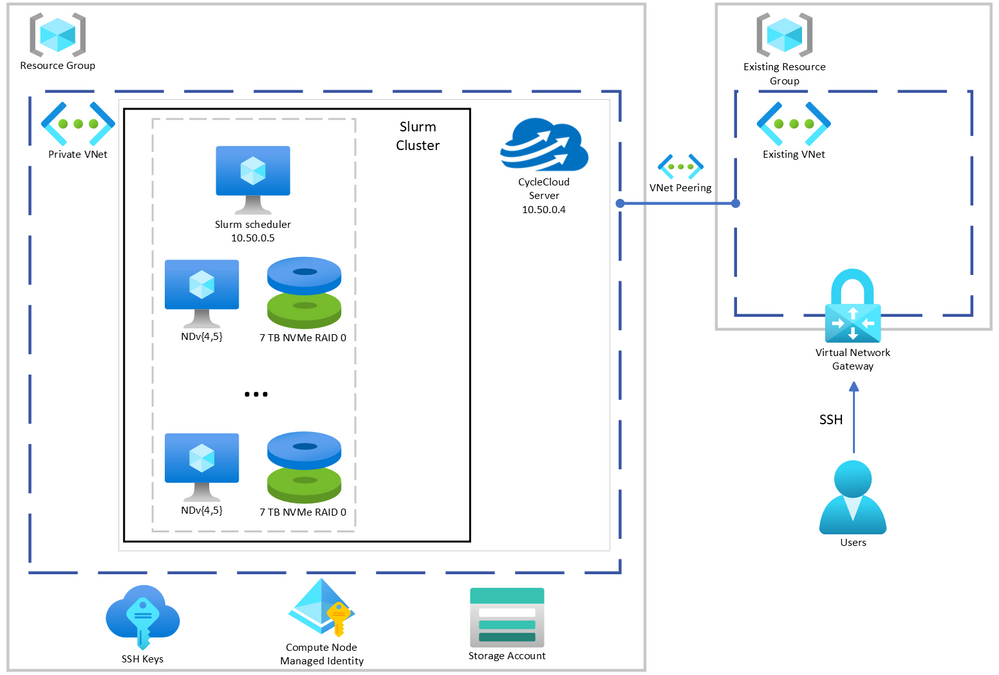
.png") CycleCloud + Slurm managed GPU cluster system architecture described here.
CycleCloud + Slurm managed GPU cluster system architecture described here.
Prerequisites
The steps described here require the following:
Deploy Cyclecloud
The first step is to set variables used to configure the deployment. Copy the provided .envrc-template to .envrc and set the variables to values appropriate for your deployment. Then source the file to set the variables in your environment.
.envrc is configured to be ignored by git in .gitignore so that you can set your own values without accidentally committing them.
$ source .envrc
Next, we will provision the infrastructure required to deploy the cluster. Note, this only provisions the infrastructure required for CycleCloud. Note that this does not provision any of the Slurm cluster compute resources which will be provisioned later using CycleCloud (See Start the cluster).
Specifically, we will provision (defined in main.tf):
- A new resource group
- A new virtual network and subnet
- A new storage account without hierarchical namespace to work with CycleCloud
- A storage container for use with CycleCloud
We’ll also provision (defined in cycleserver.tf:(
- A new network interface
- A new VM to run CycleCloud which will be configured using cloud-init to install and configure CycleCloud with an admin account and a Slurm cluster with a SystemManaged identity with “Contributor” permissions on the resource group so that it can create and manage resources in the cluster (i.e. create the VMs required for the cluster)
All of the variables used in the provisioning of infrastructure and configuration of CycleCloud and Slurm are defined in variables.tf. The variables set in set-env.sh provide values for these variables.
First, we’ll initialize Terraform and ensure the required providers are installed.
$ terraform init
Then we’ll plan the deployment and save the plan to a file so that we can review the plan before applying it.
$ terraform plan -out=plan.out
Finally, after everything looks acceptable, we will apply the plan to provision the infrastructure except for the CycleCloud VM.
$ terraform apply “plan.out”
Once that has completed, you must (re-)connect to the existing virtual network gateway (VPN) to deploy the CycleCloud VM because multiple configuration files are copied to the VM by Terraform. Provision the VM by running the following commands (notice the extra environmental variable create_cyclecloud_vm which defaults to false):
$ terraform plan -out=plan.out -var “create_cyclecloud_vm=true”
$ terraform apply “plan.out”
Assuming the deployment is successful, you should see output similar to the following:
Apply complete! Resources: 2 added, 6 changed, 0 destroyed.

Outputs:

 cyclecloud_vm_ip = "10.50.0.4"
Start the cluster
The installation and configuration of CycleCloud takes another 4-5 minutes after the Terraform provisioning is completed. Once the deployment is complete you can connect to the CycleCloud web app on port 8080 (e.g. 10.50.0.4:8080) using the credentials you provided in set-env.sh. Once logged into the CycleCloud web app, you should see a cluster named slurm in the list of clusters. Once logged in, verify the desired configuration of the cluster by pressing the Edit button on the Cluster page.
 CycleCloud webapp.
In particular, verify the following:
- “MSI Identify” is configured with “cyclecloud-node” (defined in main.tf)
- “HPC VM Type” is the desired type
- “Max HPC Cores” is the desired number of cores for the cluster (NDv4 have 96 cores, so 192 cores would be 2 nodes and 16 A100 GPUs)
- “Max VMs per Scale Set” is the desired number of VMs per scale set (Max can be 300 unless you’ve made other special arrangements)
- “Subnet ID” is the subnet ID of the default subnet created by Terraform
- “Network Attached Storage”, the shared NFS configuration:
- “Size (GB)” is the desired size of the shared filesystem. This is the total size of the filesystem used for home directories, not the local scratch space on the VMs.
- “Credentials” is the correct that you provided through the environmental variables
- “{Scheduler, Login Cluster, HP Cluster}-init” included appropriate projects.
- “cc_misc_ndv4”, “cc_slurm_nhc”, “cc_slurm_pyxis_enroot” is appropriate for compute VMs
- “cc_misc_ubuntu” is appropriate for all vms
- “Public Head Node” – check if public IP is for scheduler is desired
Then start the cluster by pressing the Start button on the Cluster page.
The scheduler node will take a few minutes to start. Once the scheduler node is provisioned, start the compute nodes by right-clicking the “hpc” labeled row under “Template” and selecting “Start” from the “Actions” pull-down menu. Note that provisioning NDv4 VMs can take up to 20 minutes.
Verify performance of cluster
An essential component of training at scale is the ability to monitor and detect hardware issues. To verify that the cluster is configured and operating as expected, Node Health Checks are deployed and configured as part of the CycleCloud deployment. Included in this are checks on each node for:
- disk issues
- IB network issues
- NCCL bandwidth issues
- GPU issues
If any problems are detected by NHC checks, the node will be put into a “drained” state by Slurm and will not be used when submitting jobs.
To verify optimal performance when using distributed training, NCCL tests can also be run to measure the bandwidth between nodes and GPUs on the cluster. Here we use a set of scripts that allow us to verify distributed all-reduce performance on the cluster using scripts from the azurehpc collection of scripts. Specifically, we can test NCCL tests without Slurm, using Slurm, and using Slurm with containers.
Connect to the scheduler node via SSH. You can get the IP address of the scheduler node from the CycleCloud web app by clicking on “scheduler” node which brings up a new lower pane, then clicking on “Connect” (see figure below), or it will be 10.50.0.5 if the same IPs are used as provided in the .envrc-template.
 CycleCloud webapp cluster administration panes.
$ ssh -i cyclecloud@
Then connect to a compute node because one of the steps requires a GPU to be available.
$ slogin slurm-hpc-pg0-1
Clone the Git repo and cd to the directory nccl-tests:
$ git clone https://github.com/yosoyjay/cyclecloud-llm.git
$ cd cyclecloud-llm/nccl-tests
A convenience script make-hostfile.py is provided to create a hostfile from output of sinfo which lists the nodes to be used in in the test not launched with Slurm.
$ python make-hostfile.py
Next, run the all reduce test without Slurm. The output logs printed to stdout should show all reduce bandwidth greater than 185 GB/s for two or more nodes for the largest message sizes. E.g.
...

  2147483648     536870912     float     sum    21495   99.91  187.33  5e-07    21563   99.59  186.74  5e-07

  4294967296    1073741824     float     sum    42741  100.49  188.42  5e-07    42679  100.63  188.69  5e-07

  8589934592    2147483648     float     sum    84929  101.14  189.64  5e-07    85013  101.04  189.45  5e-07

...
To test on two nodes (16 GPUs):
$ all-reduce.sh 16 hostfiles.txt
Next run NCCL tests with Slurm on NP processors:
$ sbatch -N $NP all-reduce.sh
And, finally, run NCCL tests with Slurm and containers on NP processors:
$ sbatch -N $NP all-reduce-containers.sh
Benchmarking / training a Large Language Model (OPT-175B)
As an example, we’ll benchmark a smaller 175M parameter version of a 175B parameter LLM on 16 A100 GPUs using Metaseq and following the directions in the Metaseq README. Note that this example does not use containerized models, but the cluster is configured to support such workloads.
Prepare the environment
Now the Python environment can be created and populated with the required libraries.
Step 1. Create Python environment
This benchmark is run on bare metal in a Python virtual environment following the instructions in the Metaseq README.
Here we install Python environment using miniconda:
$ curl -fsO https://repo.anaconda.com/miniconda/Miniconda3-latest-Linux-x86_64.sh
$ bash Miniconda3-latest-Linux-x86_64.sh -b -p $HOME/miniconda
$ $HOME/miniconda/bin/conda init
Create and activate conda environment:
$ source $HOME/.bashrc
$ conda create -y -c conda-forge --name fairseq python=3.9
$ conda activate fairseq
Then, install the prerequisites pip.
The the version of torch specified in the requirements should match the CUDA version of the VM. Check CUDA version with nvcc –version and then install the appropriate version of torch, e.g.: CUDA 11.6 -> torch==1.10.0+cu116.
Note that the PyTorch version packaged for CUDA 11.3 works with CUDA 11.4 (the version shipped with Ubuntu 18.04 HPC images), see Github issue.
$ pip install -r requirements.txt -f https://download.pytorch.org/whl/torch_stable.html
Step 2. Install NVIDIA Apex to enable training optimizations
Install the Apex extension to PyTorch to enable mixed precision and distributed training optimizations.
In some cases, as in when VM CUDA version is 11.4 and PyTorch is 1.10.0+cu113, one must disable a check in the Apex setup script. This is currently done by removing the line in the setup.py file as done with the sed command below.
This is the step that must be performed on a device with a GPU, so log into a compute node if not already on one (e.g. slogin slurm-hpc-pg0-1). Then run the following commands:
$ git clone https://github.com/NVIDIA/apex
$ pushd apex
$ sed -i "s/check_cuda_torch_binary_vs_bare_metal(CUDA_HOME)//g" setup.py
$ python -m pip install -v --no-cache-dir --global-option="--cpp_ext"
    --global-option="--cuda_ext"
    --global-option="--deprecated_fused_adam"
    --global-option="--xentropy"
    --global-option="--fast_multihead_attn" .
$ popd
Step 4. Install Metaseq
Install Megatron fork as specified in the Metaseq README.
$ git clone https://github.com/ngoyal2707/Megatron-LM.git
$ pushd Megatron-LM
$ git checkout fairseq_v3
$ pip install -e .
$ popd
Step 5. Install Fairscale
Note, this install via pip is not editable (i.e. no -e) as the metaseq/train.py checks the fairscale version which will not be defined if installed in editable mode.
$ git clone https://github.com/facebookresearch/fairscale.git
$ pushd fairscale
$ git checkout fixing_memory_issues_with_keeping_overlap
$ pip install .
$ popd
Now you can return to the scheduler node (e.g. ctrl-d).
These steps have been aggregated into a single script install-opt175.sh which should be run from a compute node to meet the requirement of having a GPU device locally available for compilation of Apex.
Run OPT benchmark with synthetic data
Ensure Python environment is activated and environmental variables are set for optimal performance, e.g.:
$ conda activate fairseq
$ source nccl-env-var.sh
If on a stand-alone VM specify a 125M parameter model as that will fit in memory:
$ time opt-baselines --model-size 125m --benchmark -t 1 -g 8 -n 128 -p test-125m --local --azure
If on Slurm cluster using NP nodes and model size of your choosing, e.g. 175B:
$ time opt-baselines --model-size 175b --benchmark -t $NP -g 8 -n 128 -p test-125m --azure
On a single instance of an Azure VM Standard_ND96amsr_A100_v4 VM (8 x 80GB SMX A100) this took ~2.5 minutes with a training rate of at least 200K words per second.
Summary
In this post we’ve outlined the steps to provision a Slurm managed GPU cluster on Azure using CycleCloud. We then demonstrated how to verify correct and optimal configuration of the cluster using NCCL and NHC tests. Finally, we described how to prepare a Python conda environment with the libraries and optimizations required to benchmark and train OPT models.
All scripts and templates used here are available at https://github.com/yosoyjay/cyclecloud-llm and additional information about Azure HPC can be found at https://azure.com/hpc.
by Contributed | Mar 27, 2023 | Technology
This article is contributed. See the original author and article here.
We’re excited to announce that version 4 of the Node.js programming model is currently in preview! This programming model is part of Azure Function’s larger effort to provide a more flexible and intuitive experience for all supported languages. If you follow news from Functions closely or happen to use Python as well, you may have heard about the release of the new programming model for Python last fall. During that time, we were working on a similar effort for Node.js. The experience we ship today is a culmination of feedback we received from JavaScript and TypeScript developers through GitHub, surveys, and user studies, as well as suggestions from internal Node.js experts working closely with customers.
What’s improved in the V4 model?
In this section, we highlight several key improvements made in the V4 programming model.
Flexible folder structure
The existing V3 model requires that each trigger be in its own directory, with its own function.json file. This strict structure can make it hard to manage if an app has many triggers. And if you’re a Durable Functions user, having your orchestration, activity, and client functions in different directories decreases code readability, because you have to switch between directories to look at the components of one logical unit. The V4 model removes the strict directory structure and gives users the flexibility to organize triggers in ways that makes sense to their Function app. For example, you can have multiple related triggers in one file or have triggers in separate files that are grouped in one directory.
Furthermore, you no longer need to keep a function.json file for each trigger you have in the V4 model as bindings are configured in code! See the HTTP example in the next section and the Durable Functions example in the “More Examples” section.
Define function in code
The V4 model uses an app object as the entry point for registering functions instead of function.json files. For example, to register an HTTP trigger responding to a GET request, you can call app.http() or app.get() which was modeled after other Node.js frameworks like Express.js that also support app.get(). The following shows what has changed when writing an HTTP trigger in the V4 model:
V3 |
V4 |
module.exports = async function (context, req) {
  context.log('HTTP function processed a request');

  const name = req.query.name
    || req.body
    || 'world';

  context.res = {
    body: `Hello, ${name}!`
  };
};
|
const { app } = require("@azure/functions");

app.http('helloWorld1', {
  methods: ['GET', 'POST'],
  handler: async (request, context) => {
    context.log('Http function processed request');

    const name = request.query.get('name')
      || await request.text()
      || 'world';

    return { body: `Hello, ${name}!` };
  }
});
|
{
  "bindings": [
    {
      "authLevel": "anonymous",
      "type": "httpTrigger",
      "direction": "in",
      "name": "req",
      "methods": [
        "get",
        "post"
      ]
    },
    {
      "type": "http",
      "direction": "out",
      "name": "res"
    }
  ]
}
|
 Nothing Nothing |
Trigger configuration like methods and authLevel that were specified in a function.json file before are moved to the code itself in V4. We also set several defaults for you, which is why you don’t see authLevel or an output binding in the V4 example.
New HTTP Types
In the V4 model, we’ve adjusted the HTTP request and response types to be a subset of the fetch standard instead of types unique to Azure Functions. We use Node.js’s undici package, which follows the fetch standard and is currently being integrated into Node.js core.
HttpRequest – body
V3 |
V4 |
// returns a string, object, or Buffer
const body = request.body;
// returns a string
const body = request.rawBody;
// returns a Buffer
const body = request.bufferBody;
// returns an object representing a form
const body = await request.parseFormBody();
|
const body = await request.text();
const body = await request.json();
const body = await request.formData();
const body = await request.arrayBuffer();
const body = await request.blob();
|
HttpResponse – status
V3 |
V4
|
context.res.status(200);

context.res = { status: 200}
context.res = { statusCode: 200 };

return { status: 200};
return { statusCode: 200 };
|
return { status: 200 };
|
To see how other properties like header, query parameters, etc. have changed, see our developer guide.
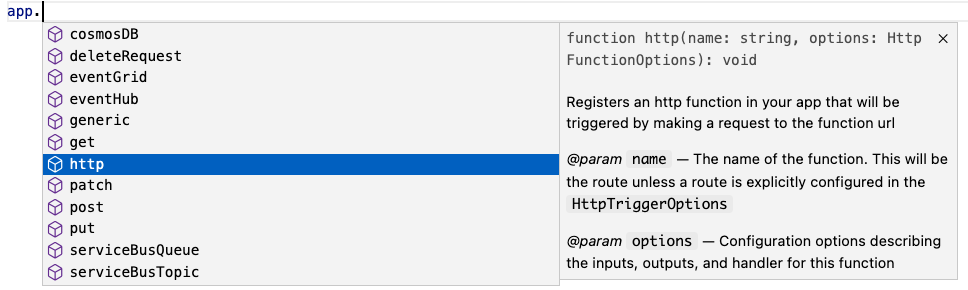
Better IntelliSense
If you’re not familiar with IntelliSense, it covers the features in your editor like autocomplete and documentation directly while you code. We’re big fans of IntelliSense and we hope you are too because it was a priority for us from the initial design stages. The V4 model supports IntelliSense for JavaScript for the first time, and improves on the IntelliSense for TypeScript that already existed in V3. Here are a few examples:

More Examples
NOTE: One of the priorities of the V4 programming model is to ensure parity between JavaScript and TypeScript support. You can use either language to write all the examples in this article, but we only show one language for the sake of article length.
Timer (TypeScript)
A timer trigger that runs every 5 minutes:
import { app, InvocationContext, Timer } from '@azure/functions';

export async function timerTrigger1(myTimer: Timer, context: InvocationContext): Promise {
    context.log('Timer function processed request.');
}

app.timer('timerTrigger1', {
    schedule: '0 */5 * * * *',
    handler: timerTrigger1,
});
Durable Functions (TypeScript)
Like in the V3 model, you need the durable-functions package in addition to @azure/functions to write Durable Functions in the V4 model. The example below shows one of the common patterns Durable Functions is useful for – function chaining. In this case, we’re executing a sequence of (simple) functions in a particular order.
import { app, HttpHandler, HttpRequest, HttpResponse, InvocationContext } from '@azure/functions';
import * as df from 'durable-functions';
import { ActivityHandler, OrchestrationContext, OrchestrationHandler } from 'durable-functions';

// Replace with the name of your Durable Functions Activity
const activityName = 'hello';

const orchestrator: OrchestrationHandler = function* (context: OrchestrationContext) {
    const outputs = [];
    outputs.push(yield context.df.callActivity(activityName, 'Tokyo'));
    outputs.push(yield context.df.callActivity(activityName, 'Seattle'));
    outputs.push(yield context.df.callActivity(activityName, 'Cairo'));

    return outputs;
};
df.app.orchestration('durableOrchestrator1', orchestrator);

const helloActivity: ActivityHandler = (input: string): string => {
    return `Hello, ${input}`;
};
df.app.activity(activityName, { handler: helloActivity });

const httpStart: HttpHandler = async (request: HttpRequest, context: InvocationContext): Promise => {
    const client = df.getClient(context);
    const body: unknown = await request.text();
    const instanceId: string = await client.startNew(request.params.orchestratorName, { input: body });

    context.log(`Started orchestration with ID = '${instanceId}'.`);

    return client.createCheckStatusResponse(request, instanceId);
};

app.http('durableOrchestrationStart1', {
    route: 'orchestrators/{orchestratorName}',
    extraInputs: [df.input.durableClient()],
    handler: httpStart,
});
In Lines 8-16, we set up and register an orchestration function. In the V4 model, instead of registering the orchestration trigger in function.json, you simply do it through the app object on the durable-functions module (here df). Similar logic applies to the activity (Lines 18-21), client (Lines 23-37), and Entity functions. This means you no longer have to manage multiple function.json files just to get a simple Durable Functions app working!
Lines 23-37 set up and register a client function to start the orchestration. To do that, we pass in an input object from the durable-functions module to the extraInputs array to register the function. Like in the V3 model, we obtain the Durable Client using df.getClient() to execute orchestration management operations like starting a new orchestration. We use an HTTP trigger in this example, but you could use any trigger supported by Azure Functions such as a timer trigger or Service Bus trigger.
Refer to this example to see how to write a Durable Entity with the V4 model.
How to get started
Check out our Quickstarts to get started:
See our Developer Guide to learn more about the V4 model. We’ve also created an upgrade guide to help migrate existing V3 apps to V4.
Please give the V4 model a try and let us know your thoughts so we can enhance the experience further in the General Availability release!
If you have questions and/or suggestions, please feel free to drop an issue in our GitHub repo. As this is an open-source project, like most in Azure Functions, we also welcome any PR contributions from the community 


Recent Comments