
by Priyesh Wagh | Dec 26, 2022 | Dynamics 365, Microsoft, Technology
Here’s how you can retrieve the Label of the OptionSet from the Plugin in Dynamics 365 CRM while working with the Entity object.
Brought to you by Dr. Ware, Microsoft Office 365 Silver Partner, Charleston SC.
by Contributed | Dec 26, 2022 | Technology
This article is contributed. See the original author and article here.
I did a post a while ago on installing software onto virtual machines using policy state change events as the trigger. Now with the general availability of Azure Automanage Machine Configuration (formerly Azure Policy Guest Configuration) it’s time for a bit of an update to that post. In this guide I’ll again be installing PowerShell 7 – however I’ll use Machine Configuration and Azure Policy to handle the installation. Let’s get started….
Development Environment
To make sure I have all the tools to complete this process I need to install some pre-requisite software. This is so I can generate the package which the virtual machine will download to tell it how to install the software.
On my local machine I have installed:
- PowerShell 7.3.0
- The GuestConfiguration module – version 4.2.0
- The PSDscResources module – version 2.12.0.0
- An Azure Storage Account with a container which will host my configuration. The virtual machine needs to be able to contact this Storage Account so make sure it has connectivity.
The next steps show the process I use to create the configuration right through to running the remediation. I’ve uploaded the script to GitHub so you can follow it through and see what I have done.
Create the Configuration and MOF File
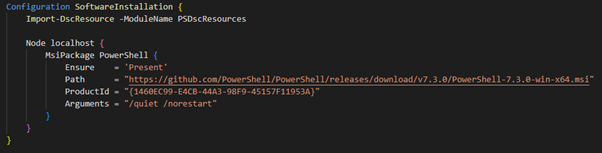
First step is to write a DSC configuration to install the software. I’m using the built in MSIPackage resource because it allows me to specify a URL which the software can be downloaded from. Note that DSC in Machine Configuration works a little bit differently – you can’t have credentials or reboots so be aware of those limitations. My configuration looks like below.
To generate the MOF file I just run the configuration by calling it: –

A MOF file is generated – the same as a normal DSC configuration and you can have a look to see what it contains.
Create the Configuration Package Artifacts
Now I use the GuestConfiguration module to create an artifact. This command packages together my MOF file, plus all the required modules into a zip file.

I just use the generated MOF file as an input and it will create the zip file for me. Notice that the type is ‘AuditAndSet’. This is telling the configuration that it can make changes to the virtual machine. The other option is ‘Audit’ which just checks the setting and reports the compliance state.
Upload the Package to a Storage Account
I must put the zip file into a storage account – I also need to generate a SAS URL which is going to be embedded into the policy. This is so the Machine Configuration agent knows where to get the package from.

Azure Policy Creation
All that is left to do is create the Azure Policy object which will check compliance for me – and allow me to commence remediation. The GuestConfiguration module has a command to generate this for me as demonstrated below.

A couple of things to note about some of the parameters in the image above:-
- PolicyID is a unique ID I generated using the New-Guid cmdlet – if you make changes or updates to the policy ensure this remains the same.
- Platform – ‘Windows’ in this case – if you want to do installs on Linux you need to write class-based DSC resources to do this (will cover in a future post).
- Mode is ‘ApplyAndAutoCorrect’ – this will configure the machine and correct drift as well.
- Tag – allows me to have some control over how the installation is targeted. This policy will only apply to machines which have a tag called “InstallPowerShell” with the value set to true.
The last line of the code above takes the generated policy and uploads it to Azure – by default it uploads it to the subscription but you can use any method you want to create the definition.
Assign the Policy
Before we assign the machine configuration policy we need to ensure that the prerequisite policy is installed – this is the same as in the previous blog.

The machines need to have a Managed Identity enabled so they can authenticate to the GuestConfiguration resource provider.
Assign the newly created policy to a scope of your choosing – we are now ready to test.
Testing the Deployment
I have my policy assigned to a resource group – the effect is going to be DeployIfNotExists however this works a little bit differently to a normal DINE policy. To show you how this works – I’ve assigned my policy to an empty resource group as below.

As expected I can see 100% compliance because there is nothing in that resource group.

Now I’m going to build a virtual machine in that resource group and wait for policy to take effect on it. The prerequisite policies set above will go through and enable a system assigned Managed Identity and install the policy agent for me.
My compliance is still showing 100% after this is done and this is the first trick we can use to control how this is deployed. Remember I specified a tag in my policy assignment – in order to make this policy apply to that virtual machine I need to add the tag to the server.

When I do that a sequence of events start – because the resource has been updated eventually the DeployIfNotExists policy will evaluate. However, unlike a normal DINE policy what Machine Configuration does is uses the metadata in the policy definition to create a Guest Assignment resource. The most important field on this object is the “assignmentType” and it is set to null by default. This means that the virtual machine will start evaluating the assignment but will only work in an audit mode.
Here is what the policy metadata looks like: –

And if I look at the Guest Assignment object in Azure (using the Resource Graph so we can view the properties) you can see that the assignmentType is null.

At this point the virtual machine will have received the assignment and downloaded the package from the storage account – and evaluated its compliance. It reports this back to the Guest Assignment object which Azure Policy is monitoring, and we can now see the non-compliant resource in the policy view.

And here is the compliance reason: –

The second “gate” we have to control the deployment is to run the proper DeployIfNotExists effect on the deployment and I can do this using a remediation task.
This will cause the deployment to happen as stated in the policy file – and you can see the major difference is that it will set that assignmentType value to “ApplyAndAutoCorrect”.

After that remediation task is run – I can check the Guest Assignment object in the Resource Graph and notice the difference.

The virtual machine will now download the new assignment details and see that the assignmentType has changed – the next time it runs it will now perform the correction if required. Once the software is installed the server will send a report back to the Guest Assignment service – and this will update the Guest Assignment object to compliant. Azure Policy will then check that object and report back the overall compliance.
Here is what the Guest Assignment resource looks like: –

And finally, the policy will also be compliant.

There are definitely a lot of moving parts involved with Machine Configuration and some limitations at this stage – however it is the way of the future so jump in and check it out.
Disclaimer
The sample scripts are not supported under any Microsoft standard support program or service. The sample scripts are provided AS IS without warranty of any kind. Microsoft further disclaims all implied warranties including, without limitation, any implied warranties of merchantability or of fitness for a particular purpose. The entire risk arising out of the use or performance of the sample scripts and documentation remains with you. In no event shall Microsoft, its authors, or anyone else involved in the creation, production, or delivery of the scripts be liable for any damages whatsoever (including, without limitation, damages for loss of business profits, business interruption, loss of business information, or other pecuniary loss) arising out of the use of or inability to use the sample scripts or documentation, even if Microsoft has been advised of the possibility of such damages.

by Contributed | Dec 23, 2022 | Technology
This article is contributed. See the original author and article here.
What’s the difference between ‘Poll’, ‘Polls’ and ‘Forms’ app in Teams?
Poll, Polls, and Forms are 3 different apps (icon shown below) for the polling experience in the context of Teams meetings.
App Name
|
Icon
|
Description
|
Polls (plural)
|
|
Polls app is dedicated for the polling experience in Teams
|
Forms
|
 |
Forms app was tailored for different experiences in Teams based on the sync vs async user scenarios, as it points to polling experience in meetings for quick creation to launch, while it points to survey experience in the context of Teams channel.
|
Poll (singular)
|
 |
Poll app is now deprecated in Teams
|
Note, Forms app will be replaced by Polls app in Teams meetings for polling experience, and will point to survey experience across Teams.
How can I add the ‘Polls’ app in my Teams meetings?
– Go to the selected meeting and go to the top navigation bar (as indicated below), where you can see “+” button to add an app to the current meeting
– Click the ‘+’ button to open the pop-up, where you can search for “Polls”
– Click on Polls app icon then Save it to the current meeting

Similarly, if you are trying to add Polls app during meetings, you can follow the same steps as above by adding Polls app via top navigation bar shown as below
Add ‘Polls’ during meetings
Note: Polls app is currently supported in scheduled meetings, meeting chats and group chats. However, it is not yet supported in channel meetings and 1:1 calls .
What’s the key functionalities supported in Polls?
Area
|
Description
|
Screenshots
|
Question types supported
|
· Multiple-choice Poll
· Quiz
· Word Cloud
· Rating
· Ranking
|

|
Instant Poll (in-meeting only)
|
During meeting, launch a poll with binary options (Yes/No, Thumb up/down etc.) by single click to engage with attendees.
|
 |
My recent polls
|
Re-use your previously created polls
|
 |
Support Image in Poll Question
|
Add image to poll questions
|
 |
Multiple-question poll
|
Bundle multiple polls and launch at the same time Ask multiple questions in 1 poll with single ‘Launch’
|
 |
Please follow our blog for new feature updates: Microsoft Forms Blog – Microsoft Community Hub
Why some of the responses were not shown in Word Cloud poll?
The Word Cloud poll is targeting to capture the key words from responses. We used AI to extract the key phrase and display as words in the result view. While not all responses could be extracted a key word so some of the responses may not be displayed.
The creator can check the full inputs in text by clicking “Response details” in the poll card.

Who can create and launch a poll?
Meeting organizer and presenters have the access to create a draft poll and launch it before/during/after the meeting. Attendees cannot create/launch a poll.
How can I share my draft poll with others/set a co-author?
When drafting a poll, select the ‘Allow co-presenters to edit your poll while it’s a draft poll’ option to allow other presenters/organizers in the meeting to edit/launch the poll you created.

How can I manage the result access/share results?
By selecting ‘Share aggregated result with respondents’ setting, results will be shared with respondents after you launched the poll, they can:
- Directly see the poll result after they vote in the poll popup during a meeting
- Or poll respondents can check poll results under Polls tab after they respond

If the ‘Share aggregated result with respondents’ setting was not selected, then poll results will only be visible to the poll creator.
Why it shows ‘Failed to create new poll’?
Currently, you can create and store up to 400 polls (max.) in Teams meetings, and a message will be shown as ‘Failed to create new poll’ (as below). In this case, you can go to forms.office.com and delete some previously created polls to free up quota for new ones.
Message
|
Delete previous poll
|
 |
 |
How can I submit my questions/feedbacks on Polls in Teams meeting?
Please join our community to raise questions and share your feedback/suggestions on Polls experience: Microsoft Forms Community – Teams Channel
by Contributed | Dec 23, 2022 | Technology
This article is contributed. See the original author and article here.
Today, I worked on a service request that our customer got the following error message using Python code: pyodbc.OperationalError: (‘HYT00’, ‘[HYT00] [Microsoft][ODBC Driver 17 for SQL Server]Login timeout expired (0) (SQLDriverConnect)’). I would like to share with you what was my lessons learned here.
The first thing is to isolate the problem running the suggested Python code using pymssql and pyodbc to see the results:
import os

import pymssql
import pyodbc

conn = pyodbc.connect("DRIVER={ODBC Driver 17 for SQL Server};server=servername.database.windows.net,1433;UID=username;PWD=Password;database=dbName");
conn2 = pymssql.connect(server='servername.database.windows.net', user='username', password='password', database='dbname',port=1433);

cursor = conn.cursor()
cursor.execute('select 1 as a, 2 as b')
row = cursor.fetchone()
print(f"row={row}")

cursor = conn.cursor();
cursor.execute("SELECT 1");
row = cursor.fetchall()

conn.close()

for i in row:
    print(i)

cursor2 = conn2.cursor();
cursor2.execute("SELECT 1");
row2 = cursor2.fetchall()

conn2.close()

for i in row2:
    print(i)
After this, we saw that a better error message description using pymsql:
File “”, line 1, in
File “src/pymssql/_pymssql.pyx”, line 653, in pymssql._pymssql.connect
pymssql._pymssql.OperationalError: (20009, b’DB-Lib error message 20009, severity 9:nUnable to connect: Adaptive Server is unavailable or does not exist (nodename.trname.northeurope1-a.worker.database.windows.net,11021)nNet-Lib error during Connection refused (111)nDB-Lib error message 20009, severity 9:nUnable to connect: Adaptive Server is unavailable or does not exist (nodename.trname.northeurope1-a.worker.database.windows.net,11021)nNet-Lib error during Connection refused (111)n’)
All points to that our customer has as a connection policy Redirect and trying to connect to the port 11021 and the new node (nodename.trname.northeurope1-a.worker.database.windows.net,11021) where the database is running, the connection is refused by any firewall/NSG. Even, as this application worked previously, we need to know that the redirect port and node might be changed.
In this case we have two options:
- Review the firewall policy and outbound range from 11000-12000.
- Change the connection policy to proxy using the port 1433 avoiding the redirection.
Our customer chosen to change the connection policy and they were able to connect. Finally, they are going to review the firewall policy and change the Redirect connection.
For reference: Azure SQL Database connectivity architecture – Azure SQL Database and Azure Synapse Analytics | Microsoft Learn
Enjoy!
by Contributed | Dec 23, 2022 | Technology
This article is contributed. See the original author and article here.
Since the last update of v1.4.0, this Azure Functions OpenAPI extension has a lot of improvements. Here in this post, let’s discuss what improvements have been made.
Update – v1.5.0
.NET 7 support for the isolated worker extension
According to the Azure Functions roadmap, Azure Functions isolated worker model has started supporting .NET 7. Therefore, this OpenAPI extension also starts supporting .NET 7 with the isolated worker model. The migration step is as easy as changing the target framework. Update your .csproj file and find the netcoreapp3.1 (.NET Core 3.1), net5.0 (.NET 5) or net6.0 (.NET 6), to net7.0 (.NET 7).
    net7.0
    v4
    Exe
    ...

  ...

    ...


  ...
OpenAPI settings instance support out-of-the-box
There are many environment variables related to the OpenAPI extension. All of them are prefixed with OpenApi__ as the environment variables. These environment variables can now be read through the OpenApiSettings instance, injected directly from the extension package. So, all you need to do is to inject the instance.
Here’s the sample code for the in-proc worker model:
// in-proc worker function
public class Function1
{
    private readonly OpenApiSettings _openapi;
    private readonly ILogger _logger;

    // Inject OpenApiSettings instance through the constructor.
    public Function1(OpenApiSettings openapi, ILogger logger)
    {
        _openapi = openapi;
        _logger = logger;
    }
    ...
}
And here’s the sample code for the isolated worker model:
// out-of-proc worker function
public class Function1
{
    private readonly OpenApiSettings _openapi;
    private readonly ILogger _logger;

    // Inject OpenApiSettings instance through the constructor.
    public Function1(OpenApiSettings openapi, ILoggerFactory loggerFactory)
    {
        _openapi = openapi;
        _logger = loggerFactory.CreateLogger();
    }
    ...
}
GitHub Actions workflow support
You can now generate the OpenAPI document on-the-fly within the GitHub Actions workflow. You can find more details on this document. Here’s the sample usage:
steps:
- name: Checkout the repository
  uses: actions/checkout@v2

- name: Setup .NET SDK 7 LTS
  uses: actions/setup-dotnet@v1
  with:
    dotnet-version: '7.x'

- name: Restore NuGet packages
  shell: pwsh
  run: |
    dotnet restore .

- name: Build solution
  shell: pwsh
  run: |
    dotnet build . -c Debug -v minimal

- name: Generate OpenAPI document
  id: oai
  uses: Azure/azure-functions-openapi-extension/actions/build-openapi@v1
  with:
    functionAppPath: 'bin/Debug/net7.0'
    requestUri: 'http://localhost:7071/api/openapi/v3.json'
    documentPath: 'generated'
    documentName: 'openapi.json'
    delay: '30'
    isRemote: 'false'

- name: Check generated OpenAPI document
    shell: pwsh
    run: |
      echo "Generated Document: ${{ steps.oai.outputs.generated }}"

      $json = Get-Content -Path ${{ steps.oai.outputs.generated }} | ConvertFrom-Json
      $result = $json.openapi -eq "3.0.1"
      echo "Check result: $result"
Generic CI/CD pipeline support
In addition to supporting GitHub Actions workflow, both PowerShell script and bash shell script are provided to support generic CI/CD pipelines, including Azure DevOps.
Here’s the PowerShell script:
& $([Scriptblock]::Create($(Invoke-RestMethod https://aka.ms/azfunc-openapi/generate-openapi.ps1))) `
    -FunctionAppPath     `
    -BaseUri             `
    -Endpoint            `
    -OutputPath          `
    -OutputFilename      `
    -Delay               `
    -UseWindows
And here’s the bash shell script:
curl -fsSL https://aka.ms/azfunc-openapi/generate-openapi.sh
    | bash -s --
        -p|--functionapp-path
        -u|--base-uri
        -e|--endpoint
        -o|--output-path
        -f|--output-filename
        -d|--delay
Update – v2.0.0-preview1
Breaking changes
- The
OpenApiHttpTriggerAuthorization class has now become a property of the OpenApiConfigurationOptions class.
- The property,
IncludeRequestingHost of OpenApiConfigurationOptions has now become ExcludeRequestingHost, and its default value is false.
Azure Functions Easy Auth support
If your Azure Function app implements the Easy Auth feature for better AuthN scenarios, the authN’d claims can be directly used for Swagger UI and OpenAPI document generation through the OpenApiHttpTriggerAuthorization class.
Here’s the sample code for the in-proc worker model:
// in-proc worker function
public class Startup : FunctionsStartup
{
    public override void Configure(IFunctionsHostBuilder builder)
    {
        builder.Services.AddSingleton(_ =>
                        {
                            var options = new OpenApiConfigurationOptions()
                            {
                                ...
                                Security = new OpenApiHttpTriggerAuthorization(async req =>
                                {
                                    var result = default(OpenApiAuthorizationResult);

                                    // Add your custom authorisation logic like below
                                    var identities = req.Identities;

                                    return await Task.FromResult(result).ConfigureAwait(false);
                                }),
                            };

                            return options;
                        });
    }
}
And here’s the sample code for the isolated worker model:
public class Program
{
    public static void Main()
    {
        var host = new HostBuilder()
            .ConfigureServices(services =>
            {
                services.AddSingleton(_ =>
                        {
                            var options = new OpenApiConfigurationOptions()
                            {
                                ...
                                Security = new OpenApiHttpTriggerAuthorization(async req =>
                                {
                                    var result = default(OpenApiAuthorizationResult);

                                    // Add your custom authorisation logic like below
                                    var identities = req.Identities;

                                    return await Task.FromResult(result).ConfigureAwait(false);
                                }),
                            };

                            return options;
                        });
            })
            .Build();

        host.Run();
    }
}
Tell us what you think
There are a bunch of improvements released in this new version. Also, We’ve started gradually upgrading the extension version to v2.0.0. So if you have any questions, issues, suggestions or something else, please let us know!


Recent Comments