by Contributed | Jun 1, 2021 | Technology
This article is contributed. See the original author and article here.
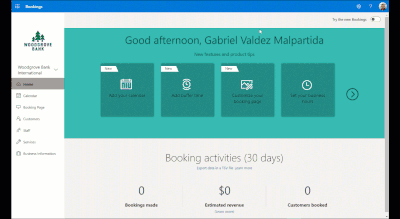
Last March, at Ignite, we gave you a preview of the new powerful and customizable Bookings experience and starting today, we are rolling it out to everyone!
To turn on the new experience, toggle the switch on the top right corner of the Bookings home page.
Look for the toggle on the top right corner of the Bookings web experience
Once you’re in the new Bookings view, you’ll see the new experience which introduces many new capabilities in Microsoft Bookings.
.png") Image showing the welcome to Bookings popup
Image showing the welcome to Bookings popup
The new Bookings has more options to customize and better controls on each staff’s role
If you need to go back to the classic version, you can flip the toggle back and forth as often as you need.
Now that the preview is live, we wanted to highlight some of the key features of Bookings and what new experiences you’ll be seeing.
Compliance, Privacy and Tighter Controls
We understand that each organization is different and has varied needs for managing appointments. Bookings now has stricter administrative controls, and each user within Bookings has varied levels of control over how calendars are created, edited, and shared as well as how appointments can be booked.
Microsoft 365 Admins
Admins can now control who has access to Bookings, whether external users can book appointments, and if staff details can be shared with customers.
Admins can also control the privacy of the customers’ booking appointments and can restrict what information can be collected when making a booking, like phone numbers, email, or contact address. Additionally, they can prevent staff members from requesting customer information by blocking the creation of custom fields.
 Image showing the new tenant administrator controls
Admins can control the information required in a booking and even block custom fields
Bookings Admins
Bookings admins have controls to ensure their organization’s compliance and privacy standards. They can restrict appointments to users within the organization and can also restrict search engine listings. Admins can also configure data usage consent with their own custom message, privacy policy link, as well as add terms and conditions information on the Bookings page.
New Roles
To ensure that the correct staff members have the adequate access to Bookings’ pages, two new roles have been created.
- Team Member – this role allows a staff member to view and edit their own calendar but not anyone else’s.
- Scheduler – this role allows staff members to schedule appointments without being able to modify services or settings. In addition to ensuring tighter access control, these roles unburden the Bookings admin from day-to-day operations.
 Image showing all the roles including the newly introduced Scheduler & Team member
New roles for staff members
Customization & Branding
Bookings allows organizations to customize their Bookings page with their own logo. A color theme that best suits the organization can be chosen as well. Confirmations, cancellations, and reminders can be customized using a rich text editor.
 Image showing the new theming options
Choose a color and add your logo for your Bookings page
 Image showing the new Create Services popup
Set your services’ details
Simpler Scheduling
We’ve strived to make appointment scheduling as simple as possible. Admins can add multiple staff members and get a unified view across all their calendars and availability. Switching between multiple calendars is made easier with an option to filter by staff members and services. There is also an option to pin a specific calendar for easier tracking.
.png") Image showing the new filters experience
Image showing the new filters experience
Unified calendar view across staff members
Admins can navigate to a staff member profile directly from the calendar and get a comprehensive view of their scheduled meetings, contact information, and services offered.
.png") Image showing the new views for Staff & Services
Image showing the new views for Staff & Services
See a comprehensive view of staff’s details
Custom availability can be set for each staff member with multiple slots in a day and certain days marked as non-available. This is synced with the staff’s Outlook calendar to avoid double bookings. Additionally, appropriate lead time can be configured for each service to ensure that staff members are well prepared before an appointment. There’s also an option to add buffer time before and after an appointment to provide sufficient breathing time.
Coming soon
Today, Microsoft Bookings is used by thousands of organizations globally to manage their appointments inside and outside their organization. It is used across various industries to enable different scenarios like virtual classrooms, financial consulting, and tele-health.
To read more on how customers are using Bookings for these scenarios, please click here.
As Bookings continues to grow and evolve, we are committed to building new features and capabilities which can further improve the Bookings experience and empower organizations to manage their calendars and appointments better.
Admin Toolkit
We want organizations to have more control over how Bookings is used by their staff members. The admin toolkit will provide admins with granular control over the naming policy, logo, business hours, staff availability and other aspects of Bookings within their organization.
Scalability
We talked about scaling Bookings for large demand in an earlier post here. We are working hard on improving Bookings to handle more scale so that Bookings continues to work well across various scenarios like virtual meetings, consultations, and other types of appointments.
Customized Scheduling
Availability of staff members keeps changing based on personal and business needs. We want to provide granular access to admins and staff members to customize the staff availability for appointments well into the future.
Richer APIs
While we continue to improve Bookings, we also want to allow organizations to build on top of the Bookings platform and develop custom solutions which are more suited to their needs. Bookings APIs are currently available in preview as part of Microsoft Graph APIs and will soon be generally available.
If you want to learn more about Bookings, how to set it up, and start creating your own bookings pages click here.
As always, we welcome your feedback. Let us know if you have any scenarios you’d like to see us support in the future.
Thanks!
Teja
by Contributed | Jun 1, 2021 | Technology
This article is contributed. See the original author and article here.
Special thanks to @ZhipengZhao , @JulianGonzalez, @Lars_Mohr, and Microsoft CredScanCore team for making these notebooks happen.
Thanks to @Tiander Turpijn for reviewing this blog and for the great feedback.
In this blog post, I’m going to walk you through three cool and easy-to-use Azure Sentinel notebooks that can scan logs across your entire Azure Sentinel workspace, Azure Blog storage, and Azure Data Explorer environment to detect credential leaks (which can save you from some serious potential cyberattacks!). These are the built-in templates that you can instantly use without writing any line of code!
Why is there a need?
According to Verizon’s 2020 Data Breach Investigation Report, the use of credentials in cyberattacks has been on a meteoric rise. Over 80% of hacking-related breaches involve the use of stolen or lost credentials.
It’s common sense to protect sensitive data such as passwords, API keys, database credentials, etc. by properly storing them. Unfortunately, storing data safely is not an easy task, and human error will continue to happen. This makes credential leaks high risks to many organizations. For that reason, it’s crucial to perform regular log scans to catch potential leaked credentials and take actions before they get in the wrong hands.
In the Azure Sentinel context, collected log messages are stored in a Log Analytics workspace. Many organizations also store their data in Azure Blob Storage or Azure Data Explorer, especially for long-term retention purpose. You might have an Azure Storage account Shared Access Signature used in a KQL query or an Azure Active Directory client access token used to authorize an application that has been logged and saved in a storage location. The storage becomes a gold mine for bad actors waiting to readily access, excavate, and exploit your organizations’ assets.
To help solve this problem, we’ve recently released three new Azure Sentinel notebooks that can scan across these environments – your Azure Sentinel workspace, Azure Blob Storage, and Azure Data Explorer – to uncover credential leaks in your data!
How do the notebooks work?
Each notebook scans logs in each respective environment.
- The Credential Scan on Azure Log Analytics notebook enables you to pick any Azure Sentinel log table in your Log Analytics workspace and scan all or one specific column in the selected table.
- The Credential Scan on Azure Data Explorer (ADX) notebook enables you to pick and scan a table in a database from a specific ADX cluster.
- The Credential Scan on Azure Blob Storage notebook enables you to pick and scan a file in a blob container from your Blob storage account.
If any sensitive credentials are found, the results will be exported into a csv file. This file is saved in the same location as your notebook, where you can access and view the details of the leaked credentials. The file can also be downloaded and shared with relevant members in your team to validate the findings and apply appropriate remediation actions.
If no leaked credentials are found, no csv file is generated.
What types of credentials can the notebooks detect? The notebooks use regular expression patterns to identify the most common types of credentials, including passwords, Azure SQL connection strings, etc.
For a full list of credential categories, please click on the following Spoiler section.
Spoiler (Highlight to read)
- User login credentials
- Azure SQL connection string
- Azure IoT Shared Access Key
- Azure Storage Account Shared Access Signature
- Azure Storage Account Shared Access Signature for High-Risk Resources
- Azure Active Directory access token
- Amazon S3 client secret access key
- Azure Service Bus Shared Access Signature
- Azure Redis Cache Connection String Password
- Azure COSMOS DB Account Access Key
- Azure App Service Deployment Password
- Azure DevOps Personal Access Token
- Azure Function Master-API Key
- Azure Shared Access Key
- Azure AD Client Access Token
- X.509 Certificate Private Key
- ASP.NET Machine Key
- General Password
- Http Authorization Header
- Client Secret – API Key
- General Symmetric Key
- Ansible Vault
- Moniker Agent Storage Account Key
- Legacy Geneva Resource Access Key
- Domain User Password
User login credentials
Azure SQL connection string
Azure IoT Shared Access Key
Azure Storage Account Shared Access Signature
Azure Storage Account Shared Access Signature for High-Risk Resources
Azure Active Directory access token
Amazon S3 client secret access key
Azure Service Bus Shared Access Signature
Azure Redis Cache Connection String Password
Azure COSMOS DB Account Access Key
Azure App Service Deployment Password
Azure DevOps Personal Access Token
Azure Function Master-API Key
Azure Shared Access Key
Azure AD Client Access Token
X.509 Certificate Private Key
ASP.NET Machine Key
General Password
Http Authorization Header
Client Secret – API Key
General Symmetric Key
Ansible Vault
Moniker Agent Storage Account Key
Legacy Geneva Resource Access Key
Domain User Password
Let’s look at a notebook example in detail. While these notebooks are simple to use, there are some basic pre-requisites and important instructions for them to work.
Pre-requisites
- Data in at least one of these locations: Azure Sentinel workspace, Azure Blob storage, Azure Data Explorer.
- An Azure Sentinel workspace to use Azure Sentinel notebooks.
- An Azure Machine Learning (AML) workspace. Create an Azure Machine Learning workspace. You can set a default AML workspace from Azure Sentinel portal if you have more than one AML workspaces. Make sure to have at least Contributor permissions to the AML workspace to launch and execute the notebooks.
- At least a Azure Sentinel or Azure Data Explorer or Azure Blob Storage Reader role to query logs on these data locations.
Deployment
- From the Azure Sentinel portal, navigate to the Threat Management section and open the Notebooks blade.
- Go to the Templates tab.
- Search for Credential Scan and you should see three notebooks in the result.
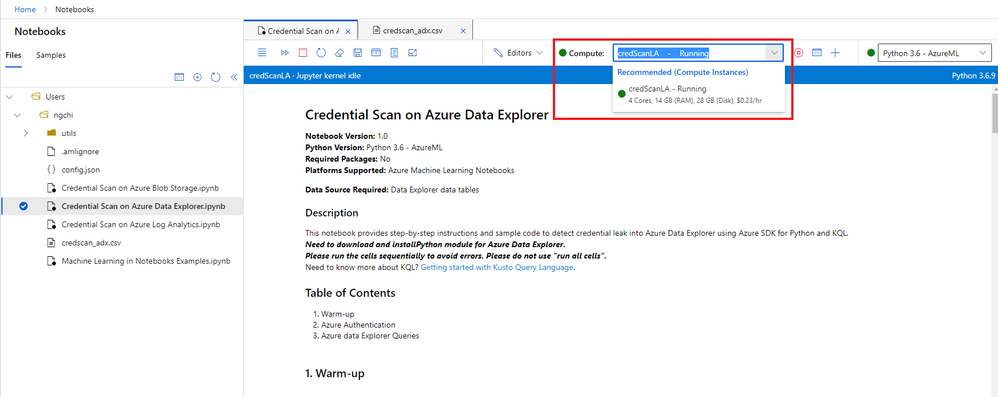
- Select one notebook. For this example, I’m going to use Credential Scan on Azure Data Explorer.
- On the right panel, select Save notebook. You can rename the selected notebook or keep the default name and save it to a default AML workspace. Then select OK.
- The notebook is now accessible to your AML workspace. From the same panel, select Launch notebook. Then you are prompted to log into the AML workspace.
- In the AML workspace, notice that a Credential Scan on Azure Data Explorer.ipynb file and a config.json file have been automatically generated from step 6 above.
- The Credential Scan on Azure Data Explorer.ipynb file has the main content of the notebook.
- The config.json file has configuration information about your Azure Sentinel environment where your notebook was launched from. It contains tenant_id, subscription_id, resource_group, workspace_id, and workspace_name, which are used for Azure Authentication (see step 9 below).
- Select a compute instance for your notebook server. If you don’t have a compute instance, create one by following step 5 in Launch a notebook using your Azure ML workspace.
create compute
- There are three main sections in this specific notebook: Warm-up, Azure Authentication, and Azure Data Explorer Queries. Each notebook cell contains instructions and/or the sample code using Azure SDK for Python and KQL. To avoid common errors, it’s important to not skip these instructions.
- The Warm-up cells load Python libraries, parameters, and functions that will be used in the notebook.
- The Azure Authentication section allows the notebook access to your Azure Resource Group where your ADX environment is located.
- The Azure Data Explorer Queries section enables you to choose an ADX cluster, a database from the cluster, then a table that you want to scan.
- After you finish running the notebook, if you don’t see the results in a newly created csv file, refresh the notebooks file explorer on the left navigation panel. Note that the name of the csv file is different for each notebook, and no csv file is created if no credentials are found.
 csv file
11. If you need to download the csv file, select the three dots next to the file name, right click and hit Download option.
12. All scripts and output files are stored in a default storage account of your AML workspace.
- Go to the storage account.
- Open File Shares -> Users.
- Select your user’s folder.
Important notes:
- It’s crucial to execute the cells sequentially instead of running all cells at once. Each code cell depends on the output of its previous cells.
- Depending on your data volume, some cell execution may take a few minutes, so please be patient.
- If you run into an issue, follow these preliminary steps:
- Sign off from AML workspace and sign in again.
- Restart the kernel.
 Restart kernel
3. Rerun the notebook.
4. If that still doesn’t work, send me a direct message and make sure to tag me. Or you can always create a Support ticket and our team will assist you.
Check out the video below for a live demo!
Summary
I hope you find these notebooks useful. Give them a try and let us know what you think!
Got more scenarios where you would like to use a notebook for? We’d love to hear! You can reach us by sending me a direct message, or posting a comment below, or posting your feedback on Azure Sentinel feedback forums.
by Contributed | Jun 1, 2021 | Technology
This article is contributed. See the original author and article here.
Mapping Data Flows is the visual data transformation service in Azure Data Factory and Azure Synapse Analytics that enables powerful scale-out ETL capabilities with a low-code user interface. The ADF team is excited to announce that we are opening up on-prem and VM-based SQL Server as a source and sink to data flows in ADF and Azure Synapse Analytics. You will see SQL Server now as a connector option in both shared integration datasets as well as inline in your source & sink.

Instructions on how to set-up the network configuration to use the Azure IR VNET and private link for accessing your SQL Server from data flows can be found here. Data flows in ADF & Synapse currently only support Azure IR, not self-hosted IR (SH-IR).
by Contributed | Jun 1, 2021 | Technology
This article is contributed. See the original author and article here.
Disclaimer
The sample scripts are not supported under any Microsoft standard support program or service. The sample scripts are provided AS IS without warranty of any kind. Microsoft further disclaims all implied warranties including, without limitation, any implied warranties of merchantability or of fitness for a particular purpose. The entire risk arising out of the use or performance of the sample scripts and documentation remains with you. In no event shall Microsoft, its authors, or anyone else involved in the creation, production, or delivery of the scripts be liable for any damages whatsoever (including, without limitation, damages for loss of business profits, business interruption, loss of business information, or other pecuniary loss) arising out of the use of or inability to use the sample scripts or documentation, even if Microsoft has been advised of the possibility of such damages.
Are you constantly challenged with keeping up with all your Azure Active Directory Enterprise Application client secrets and certificates and their associated expiration dates?
I sometimes work with customers who have a thousand or more Azure AD applications to manage. Unfortunately, trying to keep up with all the client secrets and certificates expiring on each one of these apps can be a futile experience.
I came up with a solution to this problem by using Power Automate to proactively notify the Azure Active Directory administrators of upcoming client secret and certificate expirations. This solution was a big help for customers with thousands of AAD apps to keep track of. I owe a huge thanks to a friend and peer of mine, Norman Drews, for his CSS & HTML expertise.
Here’s how I solved it using Power Automate. If you’d like to download the Power Automate flow and import it into your environment, click here to download it from my Github repository.
- Create (or use an existing) Azure AD app registration that has ONE of the following Application Permissions (starting from the least and ending with the most restrictive option) – Application.Read.All, Application.ReadWrite.All, Directory.Read.All, or Directory.AccessAsUser.All.
- Create a Scheduled Flow to run daily or weekly depending on how often you want to be alerted.
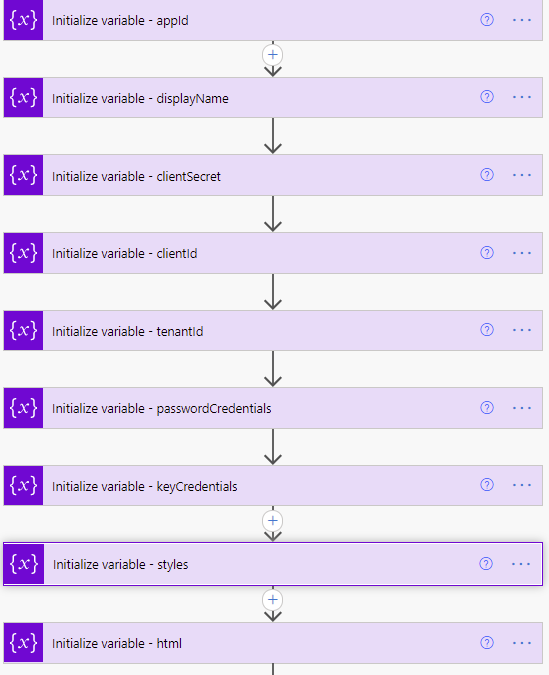
 Variable definitions in the Flow
- Initialize variable (String) – appId – this is the appID of the application.
- Initialize variable (String) – displayName – this will be used to identify the display name of the application.
- Initialize variable (String) – clientSecret – this needs to be set with the client secret of the Azure AD application created or chosen in step 1.
- Initialize variable (String) – clientId – this needs to be set with the application (client) ID of the Azure AD application created or chosen in step 1.
- Initialize variable (String) – tenantId – this needs to be set with the tenant ID of the Azure AD application created or chosen in step 1.
- Initialize variable (Array) – passwordCredentials – this variable will be used to populate the client secrets of each Azure AD application.
- Initialize variable (Array) – keyCredentials – this variable will be used to populate the certificate properties of each Azure AD application.
- Initialize variable (String) – styles – this is some CSS styling to highlight Azure AD app secrets and expirations that are going to expire in 30 days (yellow) vs 15 days (red). You can adjust these values accordingly to meet your needs.
Content of this step:
{
  "tableStyle": "style="border-collapse: collapse;"",
  "headerStyle": "style="font-family: Helvetica; padding: 5px; border: 1px solid black;"",
  "cellStyle": "style="font-family: Calibri; padding: 5px; border: 1px solid black;"",
  "redStyle": "style="background-color:red; font-family: Calibri; padding: 5px; border: 1px solid black;"",
  "yellowStyle": "style="background-color:yellow; font-family: Calibri; padding: 5px; border: 1px solid black;""
}
11. Initialize variable (String) – html – this creates the table headings and rows that will be populated with each of the Azure AD applications and associated expiration info.
Content of this step:
<table @{variables('styles').tableStyle}><thead><th @{variables('styles').headerStyle}>Application ID</th><th @{variables('styles').headerStyle}>Display Name</th><th @{variables('styles').headerStyle}>Days until Expiration</th><th @{variables('styles').headerStyle}>Type</th><th @{variables('styles').headerStyle}>Expiration Date</th></thead><tbody>
- Initialize variable (Float) – daysTilExpiration – this is the number of days prior to client secret or certificate expiration to use in order to be included in the report
- We need to request an authentication token using our tenantId, clientId, and clientSecret variables.
 Request token step of the Flow
- The Parse JSON step will parse all the properties in the returned token request.
The JSON schema to use is as follows:
{
    "type": "object",
    "properties": {
        "token_type": {
            "type": "string"
        },
        "expires_in": {
            "type": "integer"
        },
        "ext_expires_in": {
            "type": "integer"
        },
        "access_token": {
            "type": "string"
        }
    }
}
 Retrieve token info JSON schema
- Initialize variable (String) – NextLink – This is the graph API URI to request the list of Azure AD applications. The $select only returns the appId, DisplayName, passwordCredentials, and keyCredentials, and since graph API calls are limited to 100 rows at a time, I bumped my $top up to 999 so it would use less API requests (1 per 1000 apps vs 10 per 1000 apps).
https://graph.microsoft.com/v1.0/applications?$select=appId,displayName,passwordCredentials,keyCredentials&$top=999
- Next, we enter the Do until loop. It will perform the loop until the NextLink variable is empty. The NextLink variable will hold the @odata.nextlink property returned by the API call. When the API call retrieves all the applications in existence, there is no @odata.nextlink property. If there are more applications to retrieve, the @odata.nextlink property will store a URL containing the link to the next page of applications to retrieve. The way to accomplish this is to click “Edit in advanced mode” and paste @empty(variables(‘NextLink’)).
 Do Until loop
- The next step in the Do until loop uses the HTTP action to retrieve the Azure AD applications list. The first call will use the URL we populated this variable within step 15.
- A Parse JSON step is added to parse the properties from the returned body from the API call.
The content of this Parse JSON step is as follows:
{
    "type": "object",
    "properties": {
        "@@odata.context": {
            "type": "string"
        },
        "value": {
            "type": "array",
            "items": {
                "type": "object",
                "properties": {
                    "appId": {
                        "type": "string"
                    },
                    "displayName": {
                        "type": "string"
                    },
                    "passwordCredentials": {
                        "type": "array",
                        "items": {
                            "type": "object",
                            "properties": {
                                "customKeyIdentifier": {},
                                "displayName": {},
                                "endDateTime": {},
                                "hint": {},
                                "keyId": {},
                                "secretText": {},
                                "startDateTime": {}
                            },
                            "required": []
                        }
                    },
                    "keyCredentials": {
                        "type": "array",
                        "items": {
                            "type": "object",
                            "properties": {
                                "customKeyIdentifier": {},
                                "displayName": {},
                                "endDateTime": {},
                                "key": {},
                                "keyId": {},
                                "startDateTime": {},
                                "type": {},
                                "usage": {}
                            },
                            "required": []
                        }
                    }
                },
                "required": []
            }
        },
        "@@odata.nextLink": {
            "type": "string"
        }
    }
}
- A Get future time action will get a date in the future based on the number of days you’d like to start receiving notifications prior to expiration of the client secrets and certificates.
- Next a foreach – apps loop will use the value array returned from the Parse JSON step of the API call to take several actions on each Azure AD application.
 ForEach apps loop
- Set variable (String) – appId – uses the appId variable we initialized in step 3 to populate it with the application ID of the current application being processed.
- Set variable (String) – displayName – uses the displayName variable we initialized in step 4 to populate it with the displayName of the application being processed.
- Set variable (String) – passwordCredentials – uses the passwordCredentials variable we initialized in step 5 to populate it with the client secret of the application being processed.
- Set variable (String) – keyCredentials – uses the keyCredentials variable we initialized in step 5 to populate it with the client secret of the application being processed.
- A foreach will be used to loop through each of the client secrets within the current Azure AD application being processed.
 ForEach passwordCreds loop
- The output from the previous steps to use for the foreach input is the passwordCreds variable.
- A condition step is used to determine if the Future time from the Get future time step 19 is greater than the endDateTime value from the current application being evaluated.
- If the future time isn’t greater than the endDateTime, we leave this foreach and go to the next one.
- If the future time is greater than the endDateTime, we first convert the endDateTime to ticks. Ticks is a 100-nanosecond interval since January 1, 0001 12:00 AM midnight in the Gregorian calendar up to the date value parameter passed in as a string format. This makes it easy to compare two dates, which is accomplished using the expression ticks(item()?[‘endDateTime’]).
- Next, use a Compose step to convert the startDateTime variable of the current time to ticks, which equates to ticks(utcnow()).
- Next, use another Compose step to calculate the difference between the two ticks values, and re-calculate it using the following expression to determine the number of days between the two dates.
div(div(div(mul(sub(outputs(‘EndTimeTickValue’),outputs(‘StartTimeTickValue’)),100),1000000000) , 3600), 24)
- Set the variable daystilexpiration to the output of the previous calculation.
- Set variable (String) – html – creates the HTML table. The content of this step is as follows:
<tr><td @{variables('styles').cellStyle}><a href="https://ms.portal.azure.com/#blade/Microsoft_AAD_RegisteredApps/ApplicationMenuBlade/Credentials/appId/@{variables('appId')}/isMSAApp/">@{variables('appId')}</a></td><td @{variables('styles').cellStyle}>@{variables('displayName')}</td><td @{if(less(variables('daystilexpiration'),15),variables('styles').redStyle,if(less(variables('daystilexpiration'),30),variables('styles').yellowStyle,variables('styles').cellStyle))}>@{variables('daystilexpiration')} </td><td @{variables('styles').cellStyle}>Secret</td><td @{variables('styles').cellStyle}>@{formatDateTime(item()?['endDateTime'],'g')}</td></tr>
- Another foreach will be used to loop through each of the certificates within the current Azure AD application being processed. This is a duplication of steps 25 through 33 except that it uses the keyCredentials as its input, compares the future date against the currently processed certificate endDateTime, and the Set variable – html step is as follows:
<tr><td @{variables('styles').cellStyle}><a href="https://ms.portal.azure.com/#blade/Microsoft_AAD_RegisteredApps/ApplicationMenuBlade/Credentials/appId/@{variables('appId')}/isMSAApp/">@{variables('appId')}</a></td><td @{variables('styles').cellStyle}>@{variables('displayName')}</td><td @{if(less(variables('daystilexpiration'), 15), variables('styles').redStyle, if(less(variables('daystilexpiration'), 30), variables('styles').yellowStyle, variables('styles').cellStyle))}>@{variables('daystilexpiration')} </td><td @{variables('styles').cellStyle}>Certificate</td><td @{variables('styles').cellStyle}>@{formatDateTime(item()?['endDateTime'], 'g')}</td></tr>
 ForEach Key Credentials loop
- Immediately following the foreach – apps loop, as a final step in the Do while loop is a Set NextLink variable which will store the dynamic @odata.nextlink URL parsed from the JSON of the API call.
- Append to variable (Array) – html – Immediately following the Do while loop ends, we close out the html body and table by appending <tbody></table> to the variable named html.
 Yes branch
- Finally, send the HTML in a Send an e-mail action, using the variable html for the body of the e-mail.
 End of the flow including send email
And below is the resulting e-mail received when the flow runs on its scheduled time. Included is a hyperlink for each application that takes you directly to where you need to update the client secret and/or certificates for each application within the Azure portal.
 Sample e-mail
Thanks for reading!

by Contributed | Jun 1, 2021 | Technology
This article is contributed. See the original author and article here.
As a fan of Surface Go and Surface Go 2, I sometimes get asked about a little-known capability: Near field communication (NFC), the technology behind card readers. Even though we have only limited support for NFC, there are a growing number of third-party solutions that take advantage of the card reading capability.
All Surface Go for Business and Surface Go 2 for Business devices are equipped to take advantage of greater third-party support for passwordless authentication. Azure AD now supports FIDO2 security keys as an authentication method for signing into operating systems, applications, and services. Organizations can issue these keys to everyday information workers.
And we’re seeing more innovations in the marketplace that build on the NFC capabilities in Surface Go:
AuthenTrend Technology ATKey.Card
Our friends in Azure recently partnered with AuthenTrend Technology in using its ATKey.Card Smart Badge type security card with Surface Go 2. To learn more, check out this recent Ignite session:

Imprivata OneSign
The increasing use of Surface Go as a shared mobile device in health care settings means protecting personal medical information has never been more critical. To meet this challenge, Imprivata OneSign provides an NFC solution that enables health care providers to simply tap their badge (instead of typing a username and password) to access the device and applications, which protects private health information with minimal disruption to the user.
“There’s tons of sensitive data on these devices that need to be secured but protecting these devices can’t be disruptive for the end-user clinicians focused on patient care,” Imprivata explains in the following video. The “seamless process gives them access to that tablet without having to enter a username or password or having to put a call into IT because they forgot those passwords.”

The Joy Factory aXtion Pro MPA NFC for Surface Go
This waterproof case features an NFC range extender for use in health care settings. Infused with an antimicrobial agent to help prevent against bacteria and mold growth, the military-grade certified aXtion Pro MPA for Surface Go features a built-in rotating module with hand strap and non-slip kickstand. To learn more, see this short demo:

FAQ
Here are some answers to questions that typically come up when talking about the NFC functionality in Surface Go.
Is NFC available on all Surface Go and Surface Go 2 devices?
- NFC is only available on Surface Go for Business and Surface Go 2 for Business devices.
Can the NFC be disabled through UEFI or DFCI?
Can Go NFC be used to issue (digital wallet) or process (point of sale) payments?
- No. The NFC component does not include a secured element and the interface is not HID but a simple I2C.
Is multi factor authentication on Surface Go compliant with FIDO2.0 standards?
- Yes, when combined with compliant authentication solutions and server, such as using Authentrend Key Card, Windows Hello and Azure AD.
Can I access and use NFC from the front of the device?
- Yes, but only if the card has an independent power source like Authentrend. Passive cards can only be read from the back of the device — at very close proximity of ~10mm.
How can I troubleshoot multiple failed read attempts?
- Recall the location of the effective read area on the device.
- Remove any other NFC tags or NFC-enabled cards in the vicinity. limited NFC support is available for ISO/IEC 14443-A tag types 1 and 2 with antenna diameter between 15mm to 17mm.
- We recommend using the Mifare Classic 1K card type.
- Try keeping your badge in a nylon sleeve rather than a hard plastic case.
- You might find this tool useful for troubleshooting: Springcard.
What are some other commercial uses?
- Proximity-based apps. Applications that take advantage of proximity and location by using the RFID capability in Surface Go and a proximity sensor in Windows 10.
- Consumer apps. RFID-enabled apps capable of directing consumers to target websites. For example, users can swipe an RFID-enabled prescription container that opens relevant product information.
Learn more

Recent Comments