How to setup File system storage utilization alert rule for web apps

How to setup File system storage utilization alert rule for web apps

This article is contributed. See the original author and article here.

As following document indicated, File System Usage is a new metric being rolled out globally, no data is expected unless your app is hosted in an App Service Environment.


https://docs.microsoft.com/en-us/Azure/app-service/web-sites-monitor#understand-metrics


Therefore you may not use this metric for alert rule currently, even you can see this metric in alert rule setting UI.


As a workaround, we can create a WebJob to call following rest api  that can get app service planFile System storage’ utilization and then sent an email if met exceed usage situation.


https://management.azure.com /subscriptions/{sub}/resourceGroups/{rg}/providers/Microsoft.Web/serverfarms/{app service plan name}/usages?api-version=2019-08-01


Here is my demo steps for your reference.


1.In order to call resource manager rest api, firstly I created service principal that can access resources.

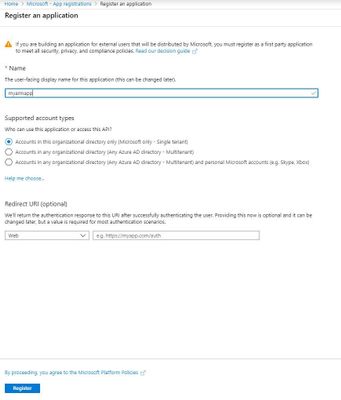
Sign in to  Azure Account through the Azure portal->Select Azure Active Directory->Select App registrations->Select New registration.


Henry_Shen_0-1623401774775.jpeg


To access resources in subscription, assign the application to a role as contributor role.


Henry_Shen_1-1623401774784.png


Select the particular subscription that include your app service plan to monitor.


Henry_Shen_2-1623401774786.jpeg


Select Access control(IAM)->Add role assignment, add the contributor role to application.


Henry_Shen_3-1623401774790.jpeg


Get values for signing in.
Select Azure Active Directory->From App registrations in Azure AD, select your application.
Copy the Directory(tenant)ID and  Application(client) ID and will use it later.


Henry_Shen_4-1623401774793.jpeg


At this App registration, Create a new application secret, select Certificates & secrets->Select Client secrets -> New client secret.


Henry_Shen_5-1623401774794.jpeg


Also copy this secret for later use.


For more details for above steps, please refer below link:


https://docs.microsoft.com/en-us/azure/active-directory/develop/howto-create-service-principal-portal


2.Create a new C# .net Core Console app in the visual studio for the web job development.


Henry_Shen_6-1623401828135.jpeg


Install the latest stable 3.x version of the Microsoft.Azure.WebJobs.Extensions NuGet package, which includes Microsoft.Azure.WebJobs.


Here’s the Package Manager Console command for version 3.0.2:


Install-Package Microsoft.Azure.WebJobs.Extensions -version 3.0.2


Install the Active directory authentication package in Visual Studio.
The package is available in the NuGet Gallery.


Henry_Shen_7-1623401828158.jpeg


Get an access token for the app in C# program.
In  program.cs, add an assembly reference for the ActiveDirectory identity model:


using Microsoft.IdentityModel.Clients.ActiveDirectory;

And add a method to get an access token using previously copied tenantId, applicationId and client secret.

private static async Task<string> GetAccessToken(string tenantid, string clientid, string clientsecret)
        {
            string authContextURL = "https://login.microsoftonline.com/" + tenantid;
            var authenticationContext = new AuthenticationContext(authContextURL);
            var credential = new ClientCredential(clientid, clientsecret);
            var result = await authenticationContext.AcquireTokenAsync("https://management.azure.com/", credential);

            if (result == null)
            {
                throw new InvalidOperationException("Failed to obtain the JWT token");
            }

           
           return result.AccessToken;
        }


Now everything is set to make REST calls defined in the Azure Resource manager REST API.
We can add a method to call a following GET REST API for app service planFile System storage’ utilization  with the token gotten by above method and calculate if the current usage exceed limit.


https://management.azure.com/subscriptions/{sub}/resourceGroups/{rg}/providers/Microsoft.Web/serverfarms/{appserviceplan}/usages?api-version=2019-08-01


private static bool GetUsage(string URI, String token)
        {
            Uri uri = new Uri(String.Format(URI));

            // Create the request
            var httpWebRequest = (HttpWebRequest)WebRequest.Create(uri);
            httpWebRequest.Headers.Add(HttpRequestHeader.Authorization, "Bearer " + token);
            httpWebRequest.ContentType = "application/json";
            httpWebRequest.Method = "GET";

            // Get the response
            HttpWebResponse httpResponse = null;
            try
            {
                httpResponse = (HttpWebResponse)httpWebRequest.GetResponse();
            }
            catch (Exception ex)
            {
                Console.WriteLine(ex.ToString());
                return false;
            }

            string result = null; 
            using (var streamReader = new StreamReader(httpResponse.GetResponseStream()))
            {
                result = streamReader.ReadToEnd();
            }
            Int64 currentvalue = Convert.ToInt64(JObject.Parse(result).SelectToken("value[10].currentValue").ToString());
            Int64 limit = Convert.ToInt64(JObject.Parse(result).SelectToken("value[10].limit").ToString());
            if (currentvalue > limit)//You can set your condition as your requirement
                return true;
            else
                return false;
}


Then in the execute method, will send email if the usage exceed. In this method I used SendGrid to implement emailing feature.


For more details regarding SendGrid configuration, please refer following link:
https://docs.microsoft.com/en-us/azure/sendgrid-dotnet-how-to-send-email


public static void Execute()
        {
            string tenantId = "yourtenandid";
            string clientId = "yourclientid";
            string clientSecret = "yourclientsecret";
            string restapiurl = "https://management.azure.com/subscriptions/{sub}/resourceGroups/{rg}/providers/Microsoft.Web/serverfarms/{appserviceplan}/usages?api-version=2019-08-01";

            var token = GetAccessToken(tenantId,clientId,clientSecret).Result;
            if (GetUsage(restapiurl, token))
            {
                var apiKey = ConfigurationManager.AppSettings["AzureWebJobsSendGridApiKey"].ToString();
                var client = new SendGridClient(apiKey);
                var msg = new SendGridMessage()
                {
                    From = new EmailAddress("loshen@microsoft.com", "DX Team"),
                    Subject = "henry",
                };
                msg.AddTo(new EmailAddress("loshen@microsoft.com", "Test User"));
                msg.AddContent("text/html", "<html><body>There is Alert for File sytem usage.</body></html>");
                var response = client.SendEmailAsync(msg).Result;
            }
                
        }


The complete code for program.cs would be like this:


using System;
using System.IO;
using System.Threading.Tasks;
using SendGrid;
using SendGrid.Helpers.Mail;
using System.Net;
using System.Configuration;
using Microsoft.IdentityModel.Clients.ActiveDirectory;
using Newtonsoft.Json;
using Newtonsoft.Json.Linq;

namespace HenryWebJob
{
    class Program
    {
        
        
        static void Main()
        {
            Execute();
        }
        public static void Execute()
        {
            string tenantId = "yourtenandid";
            string clientId = " yourclientid ";
            string clientSecret = "yourclientsecret";
            string restapiurl = " https://management.azure.com/subscriptions/{sub}/resourceGroups/{rg}/providers/Microsoft.Web/serverfarms/{appserviceplan}/usages?api-version=2019-08-01";

            var token = GetAccessToken(tenantId,clientId,clientSecret).Result;
            if (GetUsage(restapiurl, token))
            {
                var apiKey = ConfigurationManager.AppSettings["AzureWebJobsSendGridApiKey"].ToString();
                var client = new SendGridClient(apiKey);
                var msg = new SendGridMessage()
                {
                    From = new EmailAddress("loshen@microsoft.com", "DX Team"),
                    Subject = "henry",
                };
                msg.AddTo(new EmailAddress("loshen@microsoft.com", "Test User"));
                msg.AddContent("text/html", "<html><body>There is Alert for File sytem usage.</body></html>");
                var response = client.SendEmailAsync(msg).Result;
            }
                
        }

        private static async Task<string> GetAccessToken(string tenantid, string clientid, string clientsecret)
        {
            string authContextURL = "https://login.microsoftonline.com/" + tenantid;
            var authenticationContext = new AuthenticationContext(authContextURL);
            var credential = new ClientCredential(clientid, clientsecret);
            var result = await authenticationContext.AcquireTokenAsync("https://management.azure.com/", credential);

            if (result == null)
            {
                throw new InvalidOperationException("Failed to obtain the JWT token");
            }

           
           return result.AccessToken;
        }
        private static bool GetUsage(string URI, String token)
        {
            Uri uri = new Uri(String.Format(URI));

            // Create the request
            var httpWebRequest = (HttpWebRequest)WebRequest.Create(uri);
            httpWebRequest.Headers.Add(HttpRequestHeader.Authorization, "Bearer " + token);
            httpWebRequest.ContentType = "application/json";
            httpWebRequest.Method = "GET";

            // Get the response
            HttpWebResponse httpResponse = null;
            try
            {
                httpResponse = (HttpWebResponse)httpWebRequest.GetResponse();
            }
            catch (Exception ex)
            {
                Console.WriteLine(ex.ToString());
                return false;
            }

            string result = null; 
            using (var streamReader = new StreamReader(httpResponse.GetResponseStream()))
            {
                result = streamReader.ReadToEnd();
            }
            Int64 currentvalue = Convert.ToInt64(JObject.Parse(result).SelectToken("value[10].currentValue").ToString());
            Int64 limit = Convert.ToInt64(JObject.Parse(result).SelectToken("value[10].limit").ToString());
            if (currentvalue < limit)//You can set your condition as your requirement
                return true;
            else
                return false;
        }
    }
}


Then schedule the webjob as every 5 minutes with Settings.job file.


{
  "schedule": "0 */5 * * * *"


  //    Examples:

  //    Runs every minute
  //    "schedule": "0 * * * * *"

  //    Runs every 15 minutes
  //    "schedule": "0 */15 * * * *"

  //    Runs every hour (i.e. whenever the count of minutes is 0)
  //    "schedule": "0 0 * * * *"

  //    Runs every hour from 9 AM to 5 PM
  //    "schedule": "0 0 9-17 * * *"

  //    Runs at 9:30 AM every day
  //    "schedule": "0 30 9 * * *"

  //    Runs at 9:30 AM every week day
  //    "schedule": "0 30 9 * * 1-5"
}


Publish the webjob to an webapp


In Solution Explorer, right-click the project and select Publish.   


Henry_Shen_8-1623402179130.jpeg


Then go the webapp->WebJobs, can see webjob running as scheduled.


Henry_Shen_9-1623402179138.jpeg


For more details regarding webjob, can refer following link:


https://docs.microsoft.com/en-us/azure/app-service/webjobs-sdk-get-started

Managed Instance – WASDRGTenantMonitoringRO and xtsuser logins

This article is contributed. See the original author and article here.

If you look at the logins for a Managed Instance, you will notice two logins
that are created by default for any Managed Instance: WASDRGTenantMonitoringRO
and xtsuser (which is actually disabled). These logins are part of the internal role
Microsoft creates for DevOps purposes. These roles only have CONNECT and VIEW
SERVER STATE permissions, don’t have access to your data, and have no ability to
make any modifications.


https://testfabrikstorage001.blob.core.windows.net/adp300/Azure_SQL_Revealed.pdf


Regards, Paloma.-

Azure Data Explorer and subnet delegation

Azure Data Explorer and subnet delegation

This article is contributed. See the original author and article here.

Subnet delegation enables you to designate a specific subnet for an Azure PaaS service of your choice that needs to be injected into your virtual network. When you delegate a subnet to Azure Data Explorer, you allow the service to establish some basic network configuration rules for that subnet, which help ADX to operate in a stable manner.


cosh23_0-1623408109886.png


As a result, ADX adds a set of Network Intent Policies policies which are required for the service to work properly. In the past you had to create all of those Input and Output Network Security Group rules yourself and everytime we had to change some of the IPs you had to change some of them. 


cosh23_1-1623408165345.png


Benefits


Since beginning of June 2021 we are enforcing subnet delegation on the subnet you like to use for ADX. However we are aware of scenarios where customers need to opt-out because of certain requirements (Custom Private Link in the same subnet or company policies in general). For those situations we allow our customer to opt-out using the “preview features” configuration in the Azure portal. If you register for “Azure Data Explorer: opt out of subnet delegation” your ADX service deployments will not enforce subnet delegation to be enabled. 


cosh23_1-1623406252411.png


AzUpdate: Azure Migrate Private Endpoint, Azure Backup update, Policy Compliance update and more

AzUpdate: Azure Migrate Private Endpoint, Azure Backup update, Policy Compliance update and more

This article is contributed. See the original author and article here.

Things are warming up in the northern hemisphere and heating up here at Microsoft with all the additional service updates becoming available. News the AzUpdate team will be covering this week includes Azure Migrate private endpoint support is now available in public preview, The need to upgrade to TLS 1.2 or above for secure MARS agent backups by September 1, 2020, updates in policy compliance for resource type policies and a powerful Microsoft Learn module of the week.


Azure Migrate private endpoint support available in public preview


Azure Migrate Private Link support enables organizations to securely connect to the Azure Migrate service over an ExpressRoute private peering or a site-to-site VPN connection.  Azure Migrate: Discovery and Assessment and Azure Migrate: Server Migration tools can now be used to securely discover, assess, and migrate servers over a private network using Azure Private Link.  


Azure Migrate Private Link support can now:  


  • Leverage existing ExpressRoute private peering circuits for greater migration velocity. 


  • Adhere to organizational policies and requirements to not traverse public endpoints.  


  • Achieve additional network-level protection and guard against data exfiltration risks. 


The functionality is now in public preview in all public regions. Get started on how to use Azure Migrate with private endpoints. Learn how to replicate data over ExpressRoute with Azure Migrate. 


Sarah also has a great Azure Migrate overview video you can review.


Azure Backup: Upgrade to TLS 1.2 or above for secure MARS agent backups by September 1, 2021


As a part of Azure-wide initiative towards using TLS 1.2 by default and removing dependencies on older versions, the Azure Backup service is working towards shifting away from legacy protocols to ensure improved security for your backup data. Hence, older versions like TLS 1.0 and TLS 1.1 will no longer be supported. These changes are expected to take effect on September 1, 2021. 


In order to continue using Azure Backup without any interruptions, please ensure all resources using the Microsoft Azure Recovery Services (MARS) agent are enabled to use TLS 1.2 or above. Please refer to the steps documented in our public documentation to take appropriate action to make sure your server configuration does not force use of legacy protocols.


General availability: Update in Policy Compliance for Resource Type Policies


Starting on June 16, 2021, policies where resource type is the only evaluation criterion (e.g. Allowed Resource Types, Disallowed Resource Types) will not have ‘compliant’ resources stored in compliance records. This means that if there are zero non-compliant resources, the policy will show 100% compliance. If there is one or more non-compliant resources, the policy will show 0% compliance, with the total resources equaling the non-compliant resources. This change is to address feedback that resource type policies skew overall compliance percentage data (which are calculated as compliant + exempt resources out of the total resources across all policies, deduped for unique resource IDs) due to a high number of total resources.


The resource type policy has a high total resource count, because it’s the only policy where all resources in the scope of the assignment count towards ‘total resources’. Other policies only consider applicable resource types to count towards total resources (i.e. VM extension policy would only count VMs in total resources).


Going forward, the resource type policies will only count the non-compliant resources (when ‘if’ statement evaluates to true) towards the total resources. So, if there are zero-non-compliant resources, the policy will show 100% compliance. Alternatively, if there are one or more non-compliant resources, the policy will show 0% compliance (since non-compliant resources = total resources). Aggregated with other policies, this logic would provide more accurate assessment of your overall environment.


If this is a concern, and if you’d like other resource types to be reflected as compliant resources, please include the statement ‘allOf:[ field: type in [list of resource types to be counted towards total]],’, as in the built-in policy definition ‘Storage accounts should be migrated to new Azure Resource Manager resources’.


If you have a support plan and need technical help, please create a support request.


Learn more.


Community Events


MS Learn Module of the Week


Microsoft_Learn_Banner.png


Introduction to Power Automate


Microsoft Power Automate is all about process automation. Power Automate allows anyone with knowledge of the business process to create repeatable flows that when triggered leap into action and perform the process for them.


Modules include:


  • What is Power Automate and the business value it creates

  • How two business are using Power Automate to provide better customer experiences

  • See a video walkthrough of Power Automate


Learn more here: Introduction to Power Automate


Let us know in the comments below if there are any news items you would like to see covered in the next show. Be sure to catch the next AzUpdate episode and join us in the live chat.

Experiencing Data Access Issue in Azure portal for Log Analytics – 06/11 – Resolved

This article is contributed. See the original author and article here.

Final Update: Friday, 11 June 2021 08:45 UTC

We’ve confirmed that all systems are back to normal with no customer impact as of 06/11, 06:39 UTC. Our logs show the incident started on 06/11, 08:10 UTC and that during the 1 Hours & 31 minutes that it took to resolve the issue, customers ingesting telemetry in Southeast Asia geographical region may have experienced intermittent data latency, data gaps and incorrect alert activation.
  • Root Cause: The failure was due to an issue with one of our dependent service.
  • Incident Timeline: 1 Hours & 31 minutes – 06/11, 06:39 UTC through 06/11, 08:10 UTC
We understand that customers rely on Azure Log Analytics as a critical service and apologize for any impact this incident caused.

-Vyom