– Up next, we’re joined by engineering leader, Branden Powell to take a look at the latest Microsoft hardware innovations in support of remote and hybrid work at home and in the office and how they deliver the best experience on Microsoft Teams. So Branden, welcome to Microsoft Mechanics.
– Thanks Jeremy. Super excited to be here.
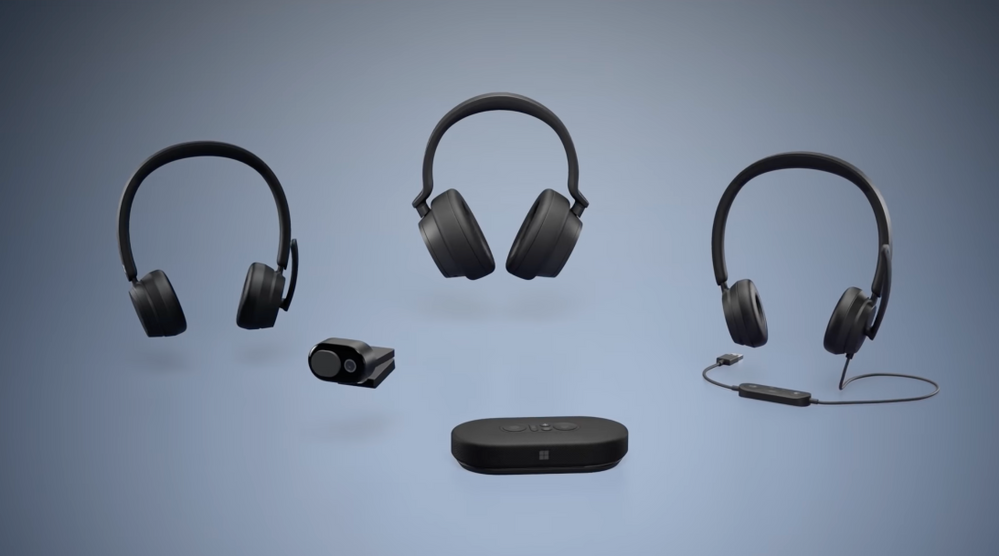
– And thanks again for joining us. So the latest round of accessories is available today from the latest Surface Headphones 2+ for Business, the new Microsoft accessories line with the Modern USB and the Modern Wireless Headsets and Modern USB-C Speaker to the new Modern Webcam. So Branden, congrats first on the launch and this is probably one of the most significant updates that we’ve seen for a while. And what I really noticed here was the cohesiveness of design across the entire portfolio that we can see from Microsoft now.
– Thanks so much. At the end of the day, we’re really just one design team. You can see here, for example, I’ve got the Surface Headphones on my right and the Microsoft Wireless Headset on the left and you can really see the design synergy. There’s a lot of shared learning and best practices and there’s things we just won’t compromise on. Everything we build uses premium materials. So they look great and they’re built to last. They’re compact and lightweight, really to optimize your space no matter where you’re working from. And we’ve prioritized that all-day comfort and mobility. Also, everything is certified for use with Microsoft Teams to give you a great online meeting experience. And this convergence of hardware, plus software goes a long way to minimizing meeting fatigue so we can keep you fresh and in the flow of your work.
– Right. And one thing that the last year has really shown us is that meeting fatigue is a real issue. So how are we looking to improve things here?
– So, a lot of people may be using the mic, speaker, and cameras on your PCs to join meetings. And that makes a lot of sense. In fact, our Surface PCs are optimized to give you a premium experience there. But there are times when you may want more freedom to adjust the angle of the camera, like with our Modern Webcam that you can adjust, while still keeping you in focus, or you may want to move more freely; untethered to your desk. This is where our Surface Headphones and our Modern Wireless Headset and Speaker make a huge difference and give you that mobility. And an added bonus for device flexibility, the battery life on the Wireless Headset has been tested up to 30 hours for talk time and 50 hours of audio playback. And designing for mobility also means they need to be easy to carry. So if we take the Speaker and Surface Headphones for example, both come with protective cases so you can throw them in your bag as you move from space to space. It’s really easy to remove the speaker from the case. And you’ll also notice that we’ve designed it with cable management in mind.
– Right. And you also mentioned the all-day comfort. So how was the design team then able to achieve that?
– Well, if you take the Modern Headset, for example, each weighs around 140 grams or five ounces. This is one of the lightest-weight headsets and we’ve designed it so you can barely feel it. We were very deliberate and purposeful about choosing the exact right materials, the right density of foam, shape of the ear cups, and even though the headsets are less expensive they still have a similar comfort level to Surface Headphones. And there are other things that are non-negotiable, such as the clamping force of the headset and Surface Headphones. They are calibrated to be used for extended periods of time. There’s also a lot of attention to detail that went into the device controls. On the Microsoft accessories, they’re designed to be tactile. For example, the mute button is concave and the Teams button is convex. We’ve also made meeting controls more ergonomically accessible. For example, if you place your hands on the Wireless Headset, where your right hand naturally falls the Teams button is under your index finger and mute button under your thumb.
– So let’s dig deeper though into the Teams and mute controls that are consistent across Microsoft Accessories and also the Surface Headphones 2+.
– Our whole focus here is on giving you more control and saving you time. The first thing that jumps out at you across the range is the integrated Microsoft Teams button. On the wired headset and speaker it’s backlit, so you can easily find it. It can be a lot more convenient using the physical buttons versus finding controls in the software. And it helps in a couple more ways. When you’re multitasking and have a lot of windows open, it brings Teams to the front so you can easily find and join your meetings. But even as a meeting starts, when you see that notification toast pop up in Windows, hit the Teams button, and it takes you to the screen to quickly join your meeting.
– I gotta say, this is a really cool capability to be able to get back to Teams calls instantly. So for me, a real big differentiator though has been the mute button. You know, we’ve all been there as we work from home and maybe something outside starts up like a lawnmower or a leaf blower. We want to quickly be able to place ourselves on mute to minimize the impact of those distractions.
– Happens at least once a day. We really want to give you more control to deal with those disruptions in your environment and protect your privacy by making it a lot easier to mute yourself with confidence. The microphone mute control for Teams is present on all of our Teams Accessories. You will find dedicated buttons on both Modern Headsets and the speaker with red LED lights to remind you when you’re muted. And on the Surface Headphones it’s a single tap on either side’s touch control to mute. With the Wireless Headset, you place the boom mic in the up position to mute and swivel it down towards your mouth to unmute. We placed an LED light on the microphone arm. So if you’re muted, you can see the red light in your peripheral vision. And if you unmute while the boom arm is up it will voice prompt you to lower the boom. Additionally, both the Wireless Headset and Surface Headphones 2+ for business have a USB dongle with an LED, which is red when muted and green when you’re not. We’ve also built in a push-to-talk capability for devices with the mute button. So you can stay on mute. Just long press that mute button, hold it down to unmute yourself while talking, then release the button to return back to mute.
– And that’s super useful. By the way even if you don’t place yourself on mute sometimes presenters and organizers on Teams calls, they can mute you as well. So whatever the reason the visual indicator really helps keep you informed of your status. That said though, hardware mute buttons: I think they’re pretty common on things like microphones and headsets. So how are these different?
– It’s a good question. And our devices, the mute button is a hardware control that can mute local microphones, but it’s also a software control that synchronizes and interacts with Teams to trigger the audio mute in the Teams app. This eliminates echo as you come off of mute.
– And to be clear, you know that software mute feature is an advantage of the Teams certification. You know, otherwise hardware-only mute is like switching your microphone on and off. So if you’re using a speaker that the mic can pick up then Teams by design will need a couple of seconds to recalibrate as it samples the audio to suppress noise and also transmit the cleanest audio. But let’s go back to the dongle though. So why did Teams-certified versions of the Surface Headphones and the Wireless Headsets need the dongle versus just going over Bluetooth?
– You’re not the first person to ask that question. The dongle gives you a few benefits though. First it’s plug and play, and it takes priority in Teams as the default device if you already have other audio peripherals connected. Compare that to Bluetooth, where typically the last device to connect wins. And beyond that, in terms of performance the dongle helps provide high quality, wide band audio throughput, and more connection reliability. In fact, whereas Bluetooth standard range is 10 meters, with the dongle we’ve tested the range beyond 30 meters in open spaces. Also the dongle’s dedicated frequency band and radio ensures that you’re not competing with other Bluetooth connected devices. And if you happen to lose or misplace your dongle you can fall back to Bluetooth connectivity and order a replacement dongle if you need to. Of course, the dongle ensures all the Teams specific controls just work, including the hook switch which you can use to quickly accept or hang up calls.
– That makes a lot of sense. But let’s go deeper into the device experiences.
– So a huge theme for us with this round of accessories was the audio and video experience. We want you to look and sound your best, starting with the sound you receive, whether that’s through the speaker or the headsets, it needs to be accurate and tuned for the human voice. So our sound profile is not too boomy or bright on the top end, like a lot of the music-optimized headphones. With our audio devices, we’re optimizing frequency response in the spoken vocal range. Here, for example, you’re seeing a frequency response curve for the speaker during a Teams meeting. This curve is focused on the human voice range, which is typically 200–5,000 Hertz. And when listening to music, we automatically change the EQ profile to boost base frequencies and give you that fuller sound. Equally important is the sound you send in meetings or calls so that you sound natural to others. In our product design and testing, for example, we’ve optimized the length and angle of the boom in our headset to position it more closely to your mouth for better tone reproduction.
– Right, but in addition to audio, you know, the video experience thing is an important aspect of feeling connected and included in remote and hybrid meetings. So why don’t we switch gears to the Modern webcam.
– You’re absolutely right. Video plays a huge role. There are lots of devices out there with integrated cameras built into device bezels and for size or cost reasons just don’t hit the mark in terms of video quality. So we set out to build an affordable 1080p webcam. It’s tuned out of the box for great image quality which shoots at 30 frames per second and is capable of high dynamic range. We also designed the base of the camera to get the lens as close as possible to your screen to optimize your eye gaze during Teams calls. And just like you want the confidence of knowing you’re on mute, we want you to have the same peace of mind that you are off camera too. A lot of engineering and attention went into building an integrated privacy shutter that’s easy to slide open and shut with a magnetic snap as it moves across positions. And even at its price point it has incredible performance in terms of low-image noise, high-color accuracy, image detail, low-latency, and jitter.
– Okay, but do all these accessories then work across platforms as well?
– Yes, everything I’ve shown today works on Windows and Mac OS. Additionally, the audio devices also work on iOS and Android. And even though everything is tuned to work great out of the box, if you’re using Microsoft accessories with Windows, we also have the new Microsoft Accessory Center to help you manage them. The app automatically installs when you connect to any of our Modern accessories. It’s great for managing all your settings, updating device firmware, and more.
– It’s really great to hear how this new accessory lineup supports our new world of remote and hybrid work.
– You know, at the end of the day, we built off our own experiences over the past year to design a set of products that are perfect for this new way of working: at home, at the office, or wherever you get work done.
– Okay. So what do you recommend then for people who might want to get their hands on these accessories?
– We made everything I just presented available today for purchase. You can find them at your favorite electronics retailers and there are more detailed specs at aka.ms/ModernAccessories as well as Surface.com.
– Thanks so much, Branden. And of course, keep watching Microsoft Mechanics for the latest news and updates from Microsoft. Subscribe to our channel if you haven’t yet. And as always, thanks for watching.


Recent Comments