This article is contributed. See the original author and article here.
Azure Machine Learning (AML) team is excited to announce the availability of Azure Arc-enabled Machine Learning (ML) public preview release. All customers of Azure Arc-enabled Kubernetes now can deploy AzureML extension release and bring AML to , and the edge using Kubernetes on their hardware of choice.
The design for Azure Arc-enabled ML helps IT Operators leverage native Kubernetes concepts such as namespace, node selector, and resources requests/limits for ML compute utilization and optimization. By letting the IT operator manage ML compute setup, Azure Arc-enabled ML creates a seamless AML experience for data scientists who do not need to learn or use Kubernetes directly. Data scientists now can focus on models and work with tools such as Azure Machine Learning AML Studio, AML 2.0 CLI, AML Python SDK, productivity tools like Jupyter notebook, and ML frameworks like TensorFlow and PyTorch.
IT Operator experience – ML compute setup
Once Kubernetes cluster is up and running, IT Operator can follow 3 simple steps below to prepare cluster for AML workload:
Connect Kubernetes cluster to Azure via Azure Arc
Deploy AzureML extension to Azure Arc-enabled cluster
Create a compute target for Data Scientists to use
For the first two steps, IT Operator can simply run the following two CLI commands to accomplish:
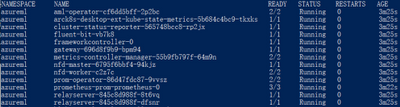
Once AzureML extension installation completes in cluster, you will see following AzureML pods running inside the :
With your cluster ready to take AML workload, now you can head over to AML Studio portal and create compute target for Data Scientists to use, see below AML Studio compute attach UI:
Note by clicking “New->Kubernetes (preview)”, the Azure Arc-enabled Kubernetes clusters will automatically appear in a dropdown list for IT Operator to attach. In the process of Studio UI attach operation, IT Operator could provide an optional JSON configuration file specifying namespace, node selector, and resources requests/limits to be used for the compute target being created. With these advanced configurations in compute target, IT Operator help Data Scientists target a subset of nodes such as GPU pool or CPU pool for training job, improves compute resource utilization and avoids fragmentation. For more information about creating compute targets using these custom properties, please refer to AML documentation.
For upcoming Azure Arc-enabled ML update release, we plan to support compute target creation through CLI command as well, and ML compute setup experience will be simplified to following 3 CLI commands:
Note when connecting Kubernetes cluster to Azure via Azure Arc, IT Operator can also specify configuration setting to enable outbound proxy server. We are pleased to announce that Azure Arc-enabled Machine Learning fully supports model training on-premises with outbound proxy server connection.
Data Scientist experience – train models
Once the attached Kubernetes compute target is available, Data Scientist can discover the list of compute targets in AML Studio UI compute section. Data Scientist can choose a suitable compute target to submit training job, such as GPU compute target, or CPU compute target with proper resources requests for particular training job workload, such as the # of vCPU cores and memory. Data Scientist can submit job either through AML 2.0 CLI or AML Python SDK, in either case Data Scientist will specify compute target name at job submission time. Azure Arc-enabled ML supports the following built-in AML training features seamlessly:
For those Data Science professionals who have used AML Python SDK, existing AML Python SDK examples and notebooks, or your existing projects will work out-of-box with a simple change of compute target name in Python script. If you are not familiar with Python SDK yet, please refer to above links to get started.
AML team is extremely excited that Azure Arc-enabled ML supports the latest and greatest AML 2.0 CLI training job submission, which is in public preview also. Train models with AML 2.0 CLI is simple and easy with following CLI command:
Let’s take a look at job YAML file:
Note job YAML file specifies all training job needed resources and assets including training scripts and compute target. In this case, Data Scientist is using Azure Arc-enabled compute target created by IT Operator earlier. Running the job creation CLI command will submit job to Azure Arc-enabled Kubernetes cluster and opens AML Studio UI portal for Data Scientist to monitor job running status, analyze metrics, and examine logs. Please refer to Train models with the 2.0 CLI for more information and examples.
Get started today
In this post, we provided status updates to Azure Arc-enabled Machine Learning and showed how IT Operator can easily setup and prepare Azure Arc-enabled Kubernetes cluster for AML workload, and how Data Scientist can easily train models with AML 2.0 CLI and Kubernetes compute target.
To get started with Azure Arc-enabled ML for training public preview, visit Azure Arc-enabled ML Training Public Preview Github repository, where you can find detailed documentation for IT Operator and Data Scientist, and examples for you to try out easily. In addition, visit the official AML documentation to find more information.
Azure Arc-enabled ML also supports model training with interactive job experience and debugging, which is in private preview. Please sign up here for interactive job private preview.
After Data Scientist trains a model, ML Engineer or Model Deployment Pro can deploy the model with Azure Arc-enabled ML on the same Arc-enabled Kubernetes cluster, which is in private preview too. Please sign up here for inference private preview.
Also, check out these additional great AML blog posts!
This article is contributed. See the original author and article here.
Part 2 – Deploy LAPS, Check! You’re all set, right? Maybe…
Hi Team, Eric Jansen here to follow up on some auditing suggestions that I mentioned for those of you that have LAPS deployed in your environment, in part one of this series. If you haven’t read part one, then part two likely won’t make much sense, so I encourage you to read that as a prerequisite. Since publishing part one, I’ve had questions, concerns, and feedback from readers, customers, friends, and other Microsoft engineers. In today’s blog, I’d like to address some of those to hopefully provide even more clarity on why auditing LAPS in your enterprise is so important.
I’m going to start by addressing a comment that I got from a cyber security engineer:
Security Engineer: “Our users don’t have the Remote Server Administration Tools (RSAT) on their workstations, so I don’t see this as a big risk”.
Me: “Uh oh. If you think that, being a security guy, then you probably aren’t the only one.”
Me: Proceeded to show examples of why having RSAT on the workstation doesn’t matter.
Note to self: Write this down – good content to share…
Ok, so why was this so alarming to me? In short, it’s because you don’t need the RSAT tools to accomplish this. You could use any number of tools to search a directory with the Lightweight Directory Access Protocol (LDAP), to include some that have no prerequisites and are built into the Windows OS. I just need to be a regular user with a relatively modern Windows OS that has PowerShell on it, and I have the ability to harvest LAPS passwords if delegations aren’t kept in check on computer objects.
Case in Point: The PowerShell ADSI Searcher Type Accelerator… The [ADSISearcher] Type Accelerator is a wrapper for the DirectorySearcher .Net Class, which comes from the System.DirectoryServices Namespace and is used to perform queries against the Active Directory Domain Services hierarchy using LDAP.
Below is a basic snippet of code that I wrote to demonstrate my point. By running this as a regular user in PowerShell, if the extended rights on the computer object aren’t set correctly, then the password harvesting fest will begin:
Next is a common question that I get asked by customers:
Customer: “After running through your LAPS auditing blog and seeing less than desirable results in the findings from our environment, we’d like this addressed immediately, but on an on-going basis. What do we need to do to regularly audit this?”
Me: “Great question, maybe we just setup a group managed service account to run a scheduled task and if there are any findings, email a notification to a distribution list that includes the administrative support team with suggested investigative and fix actions.”
Like I said in part one, sometimes you just need that attention getter, but once the customer sees the findings, in most cases, they’ll want to fix it.
For those that do want to patch things up, you’d need to do scans of the environment like you would with anything else. One way to accomplish this would be to use a Group Managed Service Account (gMSA) to run on a scheduled task to run something similar to the one liner that I pointed out in part one, but maybe ‘out’ the list of machines with bad ACLs to a file on a share:
An item of note however is that a gMSA is derived from the Computer Class, which is derived from the User Class, which is why the gMSA has an attribute for primaryGroupID. If you look at said primaryGroupID for a gMSA you’ll notice that the default primary group is GROUP_RID_COMPUTERS, better known a “Domain Computers”. With that said, you’ll want to add the gMSA to the “Domain Users” group to get that same ‘apples-to-apples’ comparison so that it more closely mirrors the findings that I outlined in part one, where we would see pre-staged computer objects given excessive rights, again, the most common being “Domain Users”, “Authenticated Users”, ”BUILTINUsers”, and “Everyone”. Is it a true ‘apples-to-apples’ comparison though? Not exactly, because when the gMSA runs, it’s also a member of “Domain Computers”.
In one customer environment where we set this up, the scheduled task ran, but shockingly it came back with 1200+ MORE passwords (this was a large enterprise consisting of about 100K machines) when running under the gMSA context. The reason was because for those 1200+ machines, “Domain Computers” was given the “All Extended Rights” permission. So in their case, that also needed to be cleaned up.
But why does that matter if a regular user won’t be running as a gMSA? Great question!
You’re correct, the regular user wouldn’t be running as a gMSA, but it’s relatively easy to run as a computer, which has the same group membership (to “Domain Computers”). As an example, let’s say that your regular user account had an initial harvest, collecting passwords from 900 machines. Maybe a third of those are turned off or stale and permanently offline, and let’s say that for one reason or another you just can’t connect to another third of those. So, we’ll say that there’s roughly 300 machines that are online and you ARE able to connect to those machines. Now it’s just a matter of that user jumping on one of those machines as an admin and then running the same one line of code that they ran as a regular user, but this time as System.
For those that don’t know what that does, System has extensive privileges on the local computer, but more importantly for our mission of harvesting more LAPS passwords, it “acts as the computer on the network“.
So, if I’m running as System on one of the machines that I essentially was “given” the password to, when accessing a resource over the network it would be seen as the ComputerName$, which by default, will belong to ‘Domain Computers’. With that being the case and if “Domain Computers” was given the “All Extended Rights” permission, now I just got the keys to another 1200+ computer accounts…and the day just got worse.
Oh, but there’s more…
The last thing that I want to talk about is more of an interesting scenario that’s recently happened that’s very relevant, makes the LAPS password harvesting even more scary, and should hopefully convince those who don’t see this as a big deal that maybe they really should audit the LAPS permissions in their environment:
Customer: “In doing some coding to validate group members of “Protected Groups” I noticed that someone changed the password of the Administrator account for the domain, but everyone says that they didn’t do it. I need some help figuring out what’s going on.“
Me: “Interesting, let’s dig in…”
In this scenario, we ran the following command to figure out when and where this change occurred:
Repadmin /ShowObjMeta <DomainController> <”DN Path of the Administrator Account”>
When digging in, we found that the change was done at a DC at a remote site, at X time, on the prior day. So, he jumps on that DC, opens the security log and scrolls down to that timeframe, down to the second. In that second there were probably 40 or 50 events, BUT he found the event where the password change was logged! Awesome, except that no user was tied to that change, it showed that the DC itself made the change. I thought of a couple of scenarios of how that was possible, but then he mentioned that the version number for the pwdLastSet attribute was up to almost 400, which was quite high for this relatively small environment that isn’t even 10 years old yet. In short, we tracked it down to the LAPS client-side extension on the DC that was changing the password. We found that the LAPS GPO, which had the default account defined (-500 SID, representing the Administrator account), was applied at the Domain Level, which applied to Domain Controllers, which in fact changed the password for the Administrator account for the domain. So, when the password timestamp expired for each individual domain controller, upon the next policy refresh, that specific domain controller would reset the Administrator password; That explained why the version number was so high.
Just to verify the finding, he used Reset-AdmPwdPassword cmdlet from the AdmPwd.PS (LAPS) PowerShell module and set -WhenEffective to the current time, so that the password would be reset again upon the next policy refresh. The policy was refreshed and an updated Repadmin /ShowObjMeta showed that the password was changed on the DC that had Reset-AdmPwdPassword run against its computer object. Now the test…. Can he log in as Administrator to a DC, with the password that was written to the MS-MCS-AdmPwd attribute on that remote site’s DC? Yep…
So, if that’s the case, then the possibility exists that the domain’s Administrator account credentials could be harvested. From there, it’s game over, and the next thing you know, your pipeline is shutdown…
Also, in case it doesn’t go without saying, don’t install the LAPS client-side extension on the DC and have a policy try to manage it, or at least if you do, have a very good understanding of what you’re doing…but even then, I wouldn’t recommend it…
Until next time!
Disclaimer:
The content above contains a sample script. Sample scripts are not supported under any Microsoft standard support program or service. The sample scripts are provided AS IS without warranty of any kind. Microsoft further disclaims all implied warranties including, without limitation, any implied warranties of merchantability or of fitness for a particular purpose. The entire risk arising out of the use or performance of the sample scripts and documentation remains with you. In no event shall Microsoft, its authors, or anyone else involved in the creation, production, or delivery of the scripts be liable for any damages whatsoever (including, without limitation, damages for loss of business profits, business interruption, loss of business information, or other pecuniary loss) arising out of the use of or inability to use the sample scripts or documentation, even if Microsoft has been advised of the possibility of such damages.
This article is contributed. See the original author and article here.
This use case was generated from an idea involving Xerox Docucentres, which enables end-users to email themselves a scanned document. Equally, this applies to regular emails with attachments that you would like Power Automate to automatically save the attachment(s) to a specific (custom/bespoke/unique) folder and/or SharePoint site and therefore Document Library. The dynamically chosen path is based on the Subject Line OR File Name. This can be achieved relatively easily and would save you a lot of routine administration time.
The Solution
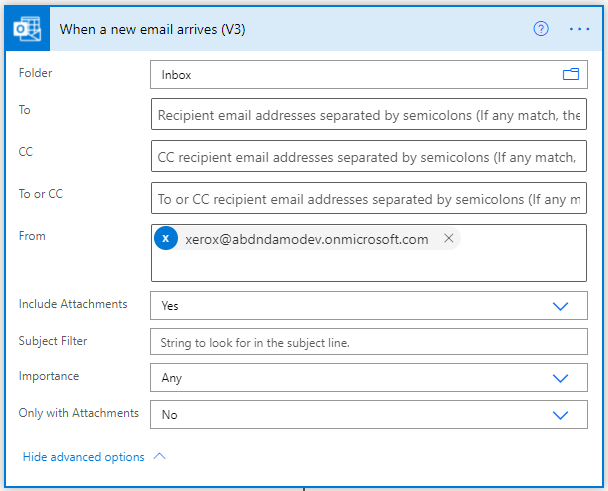
Using Power Automate,When a new email arrives (v3)trigger, we can be quite specific about the sender of the email and for this, I have assumed all emails will come fromxerox@mydomain.comand the email must contain an attachment! Ideally, you want to limit the emails that this Flow will trigger by using the available parameters for that action.
To define the locations for saving files, I have used anarrayin acompose action(but don’t panic!). You might want to use aSharePoint listas somewhere to save the specific subject or file name keywords, alongside the folder or SharePoint site path. The advantage of using an array is that only the owner(s) of the flow can define these and all of the parameters are in one place. Creating a list in SharePoint might give you and/or other colleagues the ability to easily define and visualise the locations.
The parameters for this flow are basic, a keyword for searching the Subject or Filename containing, which I have calledDept; and thePath, which can either be a folder or a Site Name. If you are looking to have a dynamic Folder and Site, you can define a third parament orkey:valuepair.
Finding our path
We must now use the filter array action, which will allow us to search the Subject or Attachment name to see if itcontainsone of the keywords from the Dept key. If we get a match, the array will return a value for the Path. Here I use a compose action to return the first object from the array result. Why do I use the first expression? Because the result is returned as an array, it expects multiple elements. Calling the path without either using the first expression orbody(‘FilterFindPath’)?[0]?[‘Path’]to select the first element, you will receive an error “Array elements can only be selected using an integer index“. Using First() or calling the element by using an integer will allow you to simplify your Flow if you know the result will always be the first element.
Saving the File(s) to a Custom Path
Using theCreate Fileaction for SharePoint, I am using theAttachments NameandAttachments Contentdynamic expressions from the email trigger. By default, when you select these dynamic values, Power Automate will put your actions into an Apply to Each. Why? This is because the results for the attachment name and content are returned as an array. You can accept this and your solution will handle multiple attachments. For my solution, I am a stickler for efficiency and have used the first() expression described previously as my Xerox will only ever include one file. You can accept the default Power Automate build if you would prefer.
I’ve two actions here, one to demonstrate how to save to a custom dynamic path, the other to a custom dynamic site. When manually supplying a custom path for the site or folder, you will have to selectEnter Custom Valueor Power Automate will try and resolve the address and error‘Site Address’ is requiredor the folder path with try and delete any additional text that you supply.
The expressions I have used both using the integer selection for the first array element and the first expression are as follows:
To finish off my flow and this is personal preference, I have deleted the incoming email. Why keep it? The file attachment has been saved for me.
See it in Action
Here I have an incoming email from the Xerox mailbox. I’ve been sent me an attachment from the Xerox Mailbox. This will trigger my flow.
The filter action will look for each of the Dept values in the subject line and return a filtered array. In the example below, we output the ICT Path based on the subject line “This file is for ICT thanks”.
What do the two Create File Actions look like? Here you can see the custom dynamic paths for both the Folder Path or Site Address. I am obviously saving the file twice here in order to demonstrate the two options. You might want to combine the custom site and folder with an additional parameter in your Array or SharePoint List.
Summary
Quickly file away those routine attached documents received via email. Maybe this would simplify uploading documents into SharePoint? Work on a file and email it to a shared mailbox and have the Flow decide where to file the attachment based on keywords? Please let me know how you could use this.
Make sure you check out my YouTube channel for other ideas and proof of concepts.
1. First of all, we need to open Kudu console and drag/upload the tool into the site folder.
2. Next, we need to find the PID of our LogicApp site’s w3wp.exe from Process Explorer.
NOTE: the one with (scm) is for Kudu console. Hence we always have to focus on w3wp.exe without (scm).
3. Then we can run SmartDump.exe and use -p option to specify the PID found in step #2.
This makes SmartDump attach to the target process and start to monitor any exception thrown in it. By default, the tool captures 5 exceptions.
After invoke LogicApp and generate some exceptions, SmartDump will be able to capture them within the console.
4. If you want to see more exceptions, just use -n option to specify number of exceptions to be captured.
NOTE: using -n 0 to start an unlimited/endless capture. However please be careful to use this in Kudu because it doesn’t support Ctrl+C to exit a process. Run inside a common cmd.exe without such issue.
Tips: you can also add: > filename.log at the end of a command to make Kudu write output into a log file for you.
5. To generate dump, use -d option to set number of dumps to be captured. Associating it with -f(filter include) and -fv (filter exclude) options allow you to capture dumps against specific exceptions.
-f Filter exception based on specified string(s). Use ‘|’ as delimiter for multiple strings.
-fv Exclude exceptions contain specified filter. Use ‘|’ as delimiter for multiple strings.
6. The tool also supports to set memory address of breakpoint to generate dump files.
You can capture a dump first and then open it in debugger to find the code entry address of a function you interest in(or code address of any line).
Then use -a option of SmartDump to set the address as breakpoint for capture:
There are also some other useful options and sample commands can be found in the readme of GitHub page: SmartDump
This article is contributed. See the original author and article here.
Join us for this month’s community call where we will continue with our every 4th Tuesday of the month schedule, occurring on June 22nd! Join us at either 8:00 AM or 5:00 PM PT.
This month we will be discussing Lists and To-Do as our primary topics. We will review new features for Lists and To-Do and share tips that you can use to inspire new ways for your organizations to leverage these solutions.
If you have not yet joined our champion community, signup here to get the resource links that contain access to the call calendar, invites, program assets, and previous calls!


Recent Comments