Video Tutorial: Endpoint Protection Part 3 – BitLocker Integration and Management

This article is contributed. See the original author and article here.

Hello everyone, here is part 3 of a series focusing on Endpoint Protection integration with Configuration Manager. This series is recorded by Steve Rachui, a Microsoft principal premier field engineer.


This session focuses on the BitLocker management capabilities integrated into Configuration Manager. Steve details how to configure the integration, how it works and demonstrates the integration in action.


Next in the series Steve focuses on how Configuration Manager can be used to manage the integrated Windows Firewall settings.


Posts in the series


Go straight to the playlist


Deprecating the Distribution of Microsoft Container Images via Docker Hub

This article is contributed. See the original author and article here.

Summary


As containers and cloud native workloads continue to grow, ensuring that customers can reliably acquire vendor artifacts becomes crucial. Microsoft is committed to offer its customers reliable and performant experience for pulling Microsoft container images from the Microsoft Container Registry (MCR or mcr.microsoft.com). MCR contains the full catalog of container images produced by Microsoft with their most up-to-date versions and tags. By leveraging Azure’s global footprint, MCR offers public access to Microsoft’s images globally. With that in mind, we are deprecating all /microsoft org container images hosted in Docker Hub repositories on June 30th, 2021.


How does this impact you?


If you continue to reference Microsoft container images using repositories in Docker Hub, this will have impact on your development, deployment, and automation scripts.


Examples for such references are: `FROM microsoft/*` in Dockerfile or `docker run microsoft/*` in automation scripts. You can leverage https://grep.app/ to discover such references in OSS scripts.


  • Starting June 1st, 2021 pulls of microsoft/ org container images from Docker Hub registry will be throttled according to Docker Terms of Use. This will limit the number of pulls that you are allowed within certain time period.

  • Starting July 1st, 2021 repositories from microsoft/ org on Docker Hub will be removed. At this point development, deployment and automation scripts that still reference /microsoft org images from Docker Hub registry will break.


To avoid any impact on your development, deployment or automation scripts, you must update `docker pull` commands, `FROM` statements in Dockerfiles, and other references to /microsoft container images to explicitly reference the mcr.microsoft.com registry.


We understand that certain repositories from microsoft/ org on Docker Hub registry are highly trafficked, and customers relying on them may not be able to complete these changes by June 30th, 2021. We are working to identify those repositories and provide extension for them. A list of such repositories and for how long they will be available will be published on MCR’s GitHub repository by June 1st, 2021.


Mapping of Docker Hub repositories to MCR repositories


Mapping between the repository names on Docker Hub and MCR can be found on MCR’s GitHub repository.


Guidance for Consuming Public Container Images


Having a controlled workflow for consumption of public content like container images from Docker Hub and MCR is a key for building a secured and reliable software supply chain. Please see the Open Container Initiative’s Consuming Public Content for general guidance and Azure’s guidance for consuming public content.


Background


Back in 2018, we announced the transition of Microsoft container images hosting to MCR with syndication to Docker Hub, which laid the ground for worldwide distribution of Microsoft container images. Last year Docker announced an update of their terms of use and plans for image retention – both changes impacting pulls of container images from Docker Hub. Microsoft and Docker have worked closely to provide smooth transition for customers who need to pull /microsoft org container images. Docker Hub pages were updated to reflect the new pull location, mcr.microsoft.com, and are continuously updated with information how to pull up-to-date tags from MCR. We will continue this collaboration to provide an easy and frictionless discoverability mechanism for Microsoft container images through Docker Hub.


How to get additional help?


We understand that there may be unanswered questions. You can get additional help by submitting an issue on GitHub or sending an email to mcrfeedback@microsoft.com.

Zero Trust Identity Controls – Essentials Series – Episode 2

Zero Trust Identity Controls – Essentials Series – Episode 2

This article is contributed. See the original author and article here.

Screen Shot 2021-05-19 at 1.25.36 PM.png


Tour your identity options when moving to the Zero Trust security model. Our last Essentials episode gave a high-level overview of the Zero Trust security model principles: identity, endpoints, applications, networks, infrastructure, and data.


Join our host, Jeremy Chapman, as he unpacks the foundational layer of the model with identity. As the primary control plane for Zero Trust, it acts as the front door for people, service accounts, and devices as each requests access to resources. Identity is at the core of the Zero Trust concepts of never trust, always verify and grant the appropriate level of access through the principle of least privilege.


Verify Explicitly


Azure AD — easily implement additional protections to verify explicitly Multi-factor authentication (MFA) — requires an additional authentication factor. Replace passwords with Microsoft Authenticator, Windows Hello, or FIDO2 keys. Activity reports in the Authentication methods — see who’s capable of MFA and passwordless authentication, how many recent registrations and by type. Usage — see the distribution of MFA sign-ins and by method, as well as the number of password changes and resets.


Least Privilege access


Conditional Access in Azure AD — uses real-time intelligence at the time of sign-in to assess the risk level, then blocks or grants access. Built-in Insights and Reporting — expose the impact of enabled policies pre- and post enforcement.


QUICK LINKS:


00:37 — Demo in Azure AD


01:47 — Azure AD Application Proxy


02:50 — How to set up multi-factor authentication


04:44 — Activity Reports for admins


05:21 — Least privileged access and conditional access


07:22 — Conditional Access Insights and Reporting


08:16 — Wrap up


Link References:


For tips and demonstrations, check out our series at https://aka.ms/ZeroTrustMechanics


Learn more at https://aka.ms/zerotrust


Unfamiliar with Microsoft Mechanics?


We are Microsoft’s official video series for IT. You can watch and share valuable content and demos of current and upcoming tech from the people who build it at Microsoft.


Keep getting this insider knowledge, join us on social:


-Welcome back to our series for Zero Trust on Microsoft Mechanics. In our Essentials Episode, we gave a high-level overview of the principles for Zero Trust security model, spanning identity, endpoints, applications, networks, infrastructure, and data. Now in this episode, we’re going to unpack the foundational layer of the model with Identity, the primary control plane for Zero Trust, which acts as the front door for people, service accounts, and devices as each request access to resources. Identity is at the core of the Zero Trust concepts of verifying explicitly, and also granting appropriate level of access through the principle of least privilege.


-Now, this begins with Azure Active Directory and first establishing a common and unified directory service to authenticate users, devices, and processes to your resources, apps, and services. In the Microsoft 365 admin center, you’ll see your users, resource accounts, and all of your groups. Now this is powered by Azure Active Directory in the background. In fact, if I click into Azure Active Directory here under the admin centers, it’s going to take me right into Azure AD. And when I click into users, you’re going to see the same people and resource accounts and groups. As I mentioned, one of the key starting points as you move to Zero Trust is unifying the identity and access management environment with your other cloud apps and even your on-premise resources. So now I’m going to click into Enterprise Applications. And here you can see all the SaaS applications that I’ve configured in this tenant that are using an Azure AD to log in. Now, there are thousands of apps that you can choose from. And if I click into Box, for example, you’re going to see the groups that are assigned with access to this application. And under Conditional Access, you can even see some of the access policies assigned to this specific app. And we’re going to go further into Conditional Access policies in a moment.


-Before I jump into the user experience, I want to show you one more thing for connecting your web apps hosted on-premises, the Azure AD Application Proxy. Now here, I can see a few apps that I already have configured for Single Sign-in, along with connector and IP address information. But let me show you what it looks like then to log into a non-Microsoft SaaS app now that Azure AD is configured as its identity provider. So I’m here in the My Apps portal. And if you aren’t familiar with this, you can find it at myapps.microsoft.com. And it gives me a unified view of all the apps that Woodgrove, in this case, has set up for me. And most of these are SaaS apps, but you can see the ones branded Woodgrove. Those are actually on-prem apps. So those are going to work here as well. I’m going to click into ServiceNow and you’ll see that it authenticates me directly into that app.


-If I go back to My Apps, I’ll click into the one called Sales Dashboard On-Prem. And in that case, it’s using the Azure AD App Proxy that we saw earlier to connect me directly, even though that resource is on-premises. Now with Azure AD as your unified identity provider across your apps and services, you can easily implement additional protections to verify explicitly, and here multi-factor authentication, or MFA, is key. Now MFA goes beyond weak password-only authentication and requires an additional authentication factor, like a passcode relayed over an SMS or phone call. And you can even replace passwords using options such as Microsoft Authenticator, Windows Hello, or FIDO2 keys. I’m going to show you how to set this up as an admin. Then we’re going to walk through the user experiences as well as new admin reporting to monitor usage. Now to find your options to configure this in the Azure AD admin center, go to Security, then Authentication methods.


-Here you’ll find methods for FIDO2 security keys, along with the options to target users and groups. This one here is for the Microsoft Authenticator mobile app that you can use in combination with built-in biometric sensors for fingerprint or facial recognition on your phone. And you’ll even find the new Temporary Access Pass method that allows you to provide a time-limited passcode that you can use to register a passwordless sign-in method so that you don’t even need to share the password with the user. Since the account I’m using is setup for passwordless MFA with the Authenticator app, I’ll show you how this even works when logging into non-Microsoft sites directly. So for example, here with ServiceNow, I can use a tenant-specific URL to sign in directly with the service. You’ll see that the Azure AD sign-in page launches, and I’m going to type in my password and username. It’s going to then request passwordless sign-in to match the number on the screen, and then it’s going to send a notification on my phone.


-Okay, so now you can see the notifications come in, I’ll tap on that. And that’s going to open up the Authenticator app and I will then tap on the option here for 26. There we go. And that’s going to sign me in directly into ServiceNow, and I can start working from there. And for admins, we also have reporting to help you track how well your organization is doing. The Activity reports and the Authentication methods area help you to see who’s capable of MFA and passwordless authentication, how many recent registrations have been made, and by which type. Then in Usage, you can see the distribution of MFA sign-ins and by method, as well as the number of password changes and resets. And this will really help as you roll out new authentication methods and track usage over time. So now we’ve shown a few things that you can do to explicitly verify requests to your cross-cloud and on-prem resources and services.


-Another core tenant of Zero Trust is applying Least Privileged Access. So here in Conditional Access in Azure AD, it’s using real-time intelligence at the time of sign-in to assess the risk level of the user or sign-in, the device platform, along with the sign-in location, client apps and device state to make decisions, enforcing access policies in real time, either to block or to grant access. Now earlier, I showed you how ServiceNow could be accessed directly using Azure AD authentication. And in this policy, you’ll see that for ServiceNow you’ll need to log in with MFA. And because I use passwordless earlier that satisfied the requirement.


-A recent addition to Conditional Access is the ability to look at device filters. Now, these filters allow you to scope your Conditional Access policy to a group of devices. For example, you can decide to allow access to privileged resources only from secure access workstation VMs, or conversely, exempt MFA from shared meeting room devices like conference phones, Teams Meeting Room devices, or Surface Hubs. Just to show how this works, I’ll log into a VM that doesn’t meet our secure access workstation requirements, and try to reach the Azure portal. And you’ll see here that I’m blocked from going to the Azure portal. But now let me switch to a second VM that’s a secured access workstation, and you’ll see that when I try to access the Azure portal, it meets the requirements. And then it asks me to verify my identity using passwordless auth. And I’m granted access to my applications and resources in Azure.


-Now Conditional Access can also extend to specific sites and content. So for example, even though I can log into Woodgrove’s marketing site, as you can see here, if I go back to SharePoint’s home and then try to open a highly confidential site, like Project Saturn, you’re going to see that it requires step-up authentication, in my case, again, using passwordless auth, before it allows me to access the protected resource. And now here I can see Project Saturn’s site. So finally, as you roll out Conditional Access, built-in Insights and Reporting in Azure AD can expose the impact of enabled policies, both pre and post-enforcement. Now the Impact Summary is interactive. And for example, can help you identify why sign-ins are failing. And here you can see the device state, device platform, client app, sign-in risk and location. And detailed sign-in events can be found at the bottom of the page. Now, one tip here that you can use is to enforce policies as report only to gauge the impact of them before turning them on. This can help you avoid setting policies that may lock people out of resources they should be able to access.


-That was a tour of your identity options and all the considerations when moving to the Zero Trust security model. Up next, we’ll explore your options for endpoints and applications. And keep checking back to aka.ms/ZeroTrustMechanics for more in our series where I share the tips and hands-on demonstrations of how the tools for implementing the Zero Trust security model work across all the six layers of defense. Now you can also learn more at aka.ms/zerotrust. And thanks for watching.


Import data from local files using Power Query in Excel for Mac

Import data from local files using Power Query in Excel for Mac

This article is contributed. See the original author and article here.

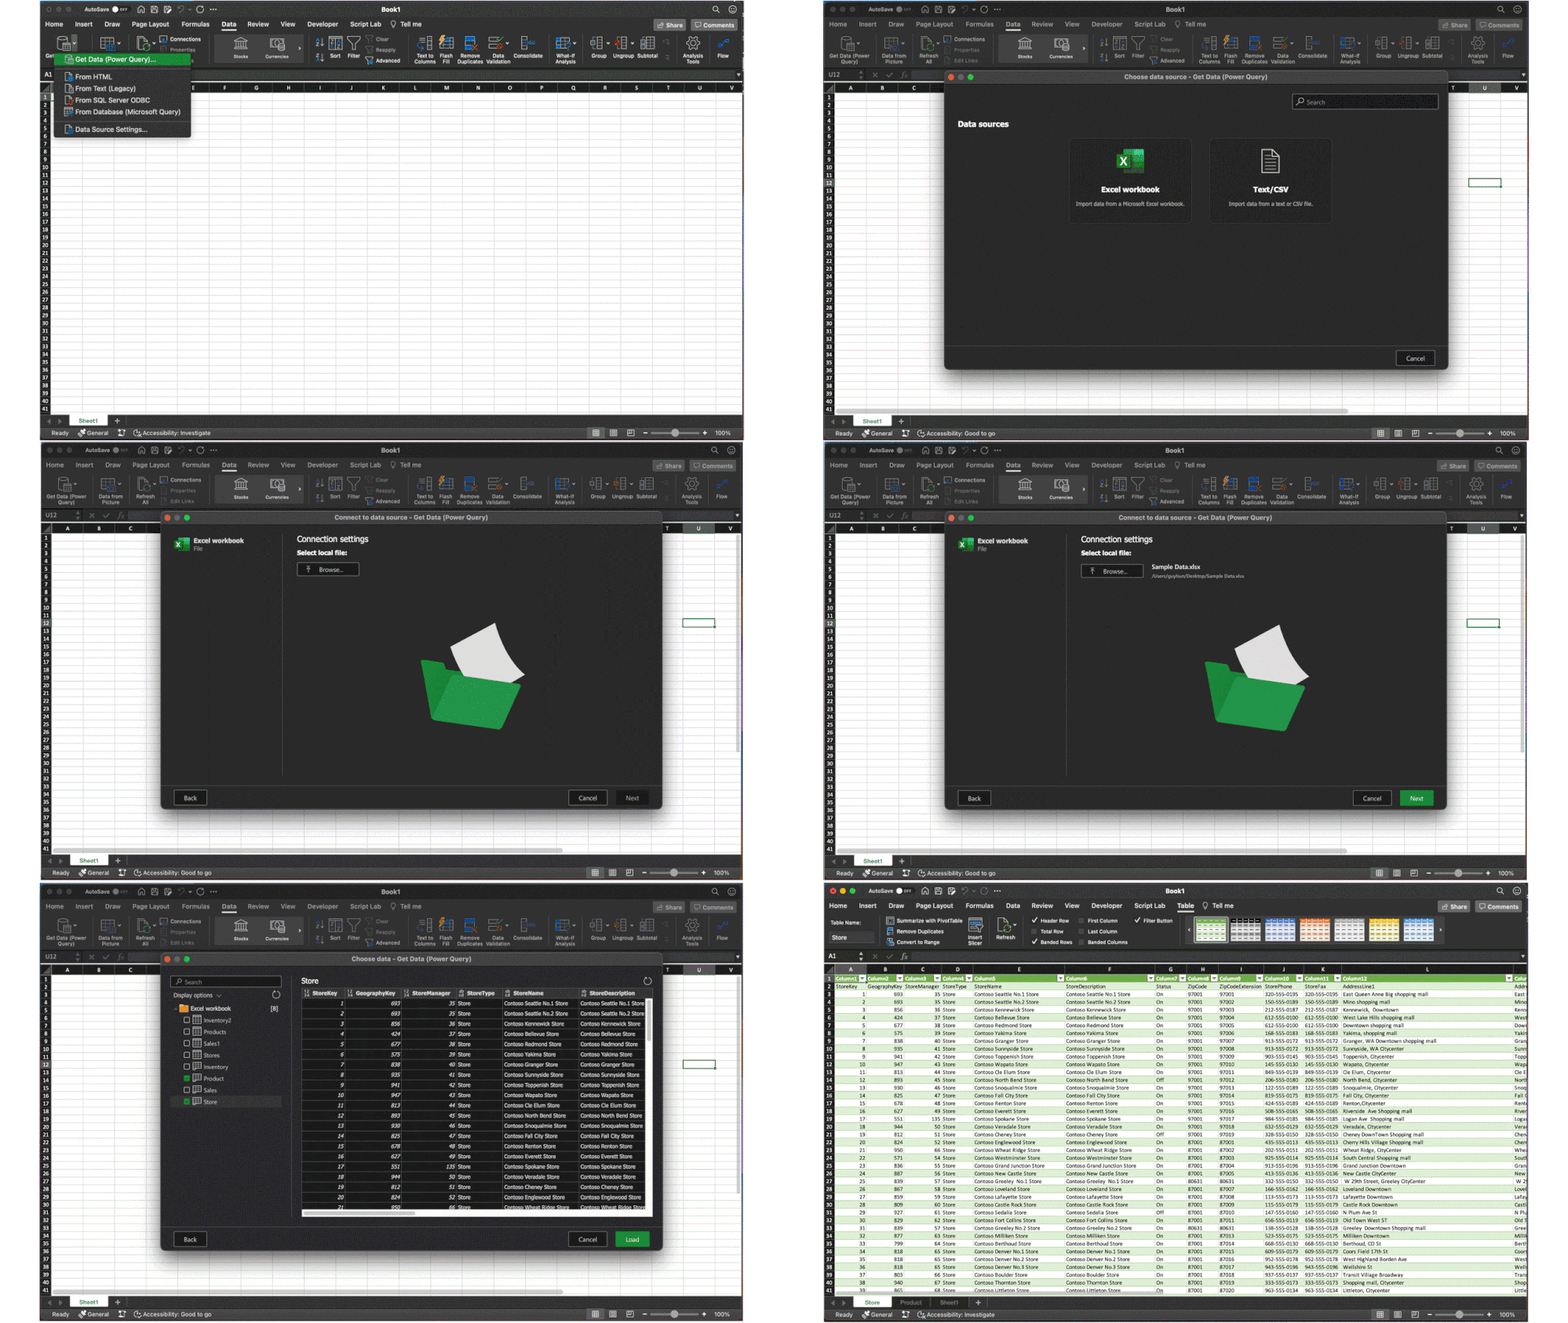
We are excited to announce a new update to Power Query (PQ) in Excel for Mac – the ability to import data from local files.  We’ve received many requests for this feature after the introduction of PQ query refresh.  Now you can import data from local files including Excel workbooks and text & CSV files.


Getting started


This new functionality is available to Beta channel users running version 16.50 (build 21050400) or later.  See this support article to check which version you’re using.


Importing data from local files


You can now import data from local Excel workbooks or text & CSV files.


  1. Click Get Data (Power Query) on the Data tab

  2. Select Excel workbook or Text/CSV in the Choose data source dialog box

  3. Click Browse to select the local file

  4. Select the data you want to import and click the Load button


Import data from local filesImport data from local files


For a feature deep dive, see Import data from local files with Power Query in Excel for Mac on the Office Insider Blog.


Sharing your feedback


Let us know what you think.  Send us your feedback via Send a Smile/Frown button at the top right.


Also, subscribe to our Excel Blog and join our Excel Community to stay connected with us and other Excel fans around the world.


'Lock request time out period exceeded' when connecting to the database from SSMS

'Lock request time out period exceeded' when connecting to the database from SSMS

This article is contributed. See the original author and article here.


When you connect to the database using SQL Server Management Studio (SSMS), It will perform several queries to gather the information necessary for the user interface. If one of the queries performed by SSMS is blocked, you may face a lock time-out in the connection:


Thamires_Lemes_0-1621442395428.png


You can use the PowerShell script below, while attempting to connect, to identify the session that is causing the block:


Note: It is necessary to set values for the highlighted variables. It will create CSVs with the result of the queries in the $OutputFolder.


#Connect to SQL and run QUERY


$SQLServer = “”


$SQLDBName = “”


$SQLUsername = “”


$SQLPassword = “”


$OuputFolder = “C:”


#To get information about sessions that are blocking and being blocked


$SqlQuery = “SELECT current_timestamp as [CURRENT_TIMESTAMP]


       , DB_NAME(dtl.resource_database_id) AS database_name


       , req.session_id AS blocked_sessionID


       , ses.program_name blocked_programName


       , ses.host_name blocked_hostname


       , ses.login_name blocked_login


       , CASE ses.transaction_isolation_level


              WHEN 1 THEN ‘ReadUncomitted’


              WHEN 2 THEN ‘ReadCommitted’


              WHEN 3 THEN ‘Repeatable’


              WHEN 4 THEN ‘Serializable’


              WHEN 5 THEN ‘Snapshot’


       END blocked_isolation_level


       , REPLACE(REPLACE(sqltext.TEXT, CHAR(13), ‘ ‘), CHAR(10), ‘ ‘) AS blocked_last_query


       , req.status AS [blocked_status]


       , req.command AS blocked_command


       , req.cpu_time AS blocked_cpuTime


       , req.total_elapsed_time AS blocked_totalElapsedTime


       , blocked_tran.transaction_id blocked_transaction_id


       , osw.blocking_session_id AS blocker_SessionID


       , blocker_ses.program_name blocker_programName


       , blocker_ses.host_name blocker_hostName


       , blocker_ses.login_name blocker_login


       , CASE blocker_ses.transaction_isolation_level


              WHEN 1 THEN ‘ReadUncomitted’


              WHEN 2 THEN ‘ReadCommitted’


              WHEN 3 THEN ‘Repeatable’


              WHEN 4 THEN ‘Serializable’


              WHEN 5 THEN ‘Snapshot’


       END blocker_isolation_level


       , REPLACE(REPLACE(iif(blocker_sqltext.TEXT is NULL,blocker_sqltext2.event_info,blocker_sqltext.TEXT), CHAR(13), ‘ ‘), CHAR(10), ‘ ‘) AS blocker_last_query


       , blocker_req.status AS [blocker_status]


       , blocker_req.command AS blocker_command


       , blocker_req.cpu_time AS blocker_cpuTime


       , blocker_req.total_elapsed_time AS blocker_totalElapsedTime


       , blocker_proc.lastwaittype blocker_last_waittype


       , blocker_proc.last_batch blocker_last_batch


       , blocker_proc.open_tran blocker_open_tran


       , blocker_tran.transaction_id blocker_transaction_id


       , blocker_proc.cmd blocker_command


       , dtl.request_mode AS lockRequestMode


       , dtl.resource_type AS lockResourceType


       , dtl.resource_subtype AS lockResourceSubType


       , osw.wait_type AS taskWaitType


       , osw.resource_description AS taskResourceDescription


       , osw.wait_duration_ms


FROM sys.dm_exec_requests req


INNER JOIN sys.dm_exec_sessions ses on ses.session_id = req.session_id


CROSS APPLY sys.dm_exec_sql_text(req.sql_handle) AS sqltext


INNER JOIN sys.dm_tran_locks dtl on dtl.request_session_id = req.session_id


INNER JOIN sys.dm_os_waiting_tasks osw on osw.session_id = req.session_id


LEFT JOIN sys.dm_tran_session_transactions blocked_tran on blocked_tran.session_id =req.session_id


INNER JOIN dbo.sysprocesses blocker_proc on osw.blocking_session_id = blocker_proc.spid


LEFT JOIN sys.dm_exec_requests blocker_req on blocker_req.session_id = osw.blocking_session_id


LEFT JOIN sys.dm_exec_sessions blocker_ses on blocker_ses.session_id = osw.blocking_session_id


LEFT JOIN sys.dm_tran_session_transactions blocker_tran on blocker_tran.session_id =osw.blocking_session_id


OUTER APPLY sys.dm_exec_sql_text(blocker_req.sql_handle) AS blocker_sqltext


OUTER APPLY sys.dm_exec_input_buffer(osw.blocking_session_id,0) as blocker_sqltext2;”


#To get the locks that are being held by the sessions that are blocking and being blocked


$SqlQuery2 = “


select DB_NAME(locks.resource_database_id) AS database_name


 , locks.request_session_id


 , locks.resource_type, locks.resource_subtype


 , locks.resource_description


 , locks.resource_associated_entity_id


 , locks.resource_lock_partition


 , locks.request_mode


 , locks.request_type


 , locks.request_status


 , locks.request_reference_count


 , locks.request_lifetime


 , locks.request_exec_context_id


 , locks.request_request_id


 , locks.request_owner_type


FROM sys.dm_exec_requests req


INNER JOIN sys.dm_os_waiting_tasks osw on osw.session_id = req.session_id


INNER JOIN sys.dm_tran_locks locks on osw.blocking_session_id = locks.request_session_id or (osw.session_id = locks.request_session_id and osw.blocking_session_id is not null)


order by locks.request_session_id;”


#Dummy query to test if queries are running successfully, in case the previous ones do not return data


$SqlQuery3 = “select CURRENT_TIMESTAMP as timestamp, @@SERVERNAME as server_name, DB_NAME() as database_name, @@SPID as session_id;”


#Connect to SQL Server


$SqlConnection = New-Object System.Data.SqlClient.SqlConnection


$SqlConnection.ConnectionString = “Server = $SQLServer; Database = $SQLDBName; User ID = $SQLUsername; Password = $SQLPassword”


$SqlCmd = New-Object System.Data.SqlClient.SqlCommand


$SqlCmd.Connection = $SqlConnection


#Create the objects that will be used to run the queries


$SqlAdapter = New-Object System.Data.SqlClient.SqlDataAdapter


#Run 1st query


$DataSet = New-Object System.Data.DataSet


$SqlCmd.CommandText = $SqlQuery


$SqlAdapter.SelectCommand = $SqlCmd


$SqlAdapter.Fill($DataSet)


#Output RESULTS of 1st query to CSV


$DataSet.Tables[0] | Export-Csv -Delimiter ‘;’ -Path “$OuputFolderlock_waits_$(get-date -f yyyy-MM-dd-HH.mm.ss).csv” -NoTypeInformation


#Run 2nd query


$DataSet = New-Object System.Data.DataSet


$SqlCmd.CommandText = $SqlQuery2


$SqlAdapter.SelectCommand = $SqlCmd


$SqlAdapter.Fill($DataSet)


#Output RESULTS of 2nd query to CSV


$DataSet.Tables[0] | Export-Csv -Delimiter ‘;’ -Path “$OuputFolderlock_list_$(get-date -f yyyy-MM-dd-HH.mm.ss).csv” -NoTypeInformation


#Run 3rd query


$DataSet = New-Object System.Data.DataSet  


$SqlCmd.CommandText = $SqlQuery3


$SqlAdapter.SelectCommand = $SqlCmd


$SqlAdapter.Fill($DataSet) 


#Output RESULTS of 3rd query to CSV


$DataSet.Tables[0] | Export-Csv -Delimiter ‘;’ -Path “$OuputFoldertest_connection_$(get-date -f yyyy-MM-dd-HH.mm.ss).csv” -NoTypeInformation


#Close the connection


$SqlConnection.Close()


In the CSV files, you should be able to see the last queries of the sessions involved in the block, their isolation level, if they are inside a transaction and the locks they are holding. This should help you understand why the block is happening.


This PowerShell script uses two queries from this blog post. Please refer to this blog post for additional information.


References:


https://techcommunity.microsoft.com/t5/azure-database-support-blog/troubleshooting-high-lock-wait-time-and-lock-time-out/ba-p/2368875