by Contributed | May 25, 2021 | Technology
This article is contributed. See the original author and article here.
Bill Baer, Senior Product Manager, Microsoft Search Assistant and Intelligence (MSAI)
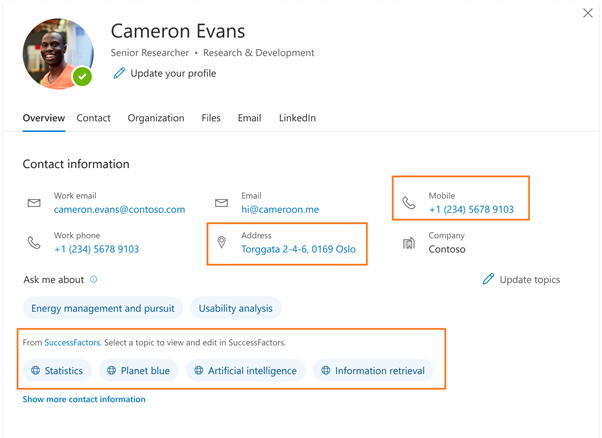
On the profile card in Microsoft 365, you can find information about users that is stored and maintained by your organization, for example Job title or Office location, but what if you don’t know what you don’t know? Sometimes what we’re looking for can be as simple as a Job title or Office location, but what if the information we need is more complex or outside of the boundaries of Microsoft 365? Often you would need to search across multiple systems and know what systems that information is in. What if you could find all the information about a person, even that information which is unique to your company, right in the context of the person?
This is where customization of people experiences in your organization helps. You can already customize some parts of people experience by surfacing AAD data on your profile cards. However, today we’re excited to announce new capabilities in profile enrichment where as an Microsoft 365 administrator you can directly enrich user profiles with information from HRMS systems like Workday, SAP SuccessFactors and more using Microsoft Graph connectors. With these capabilities, you can now find more information you need about a person right in a person’s context, in less time and in fewer places.
Getting started
Enriching Microsoft 365 profiles with third party system data
With new profile enrichment with Microsoft Graph connectors, enriching your profile is possible through few easy steps in Search & Intelligence admin center.
Configure a Microsoft Graph connector to ingest data from systems like SuccessFactors, Workday, and more
Through extending the capabilities of Microsoft Graph connectors to the Microsoft 365 profile, you’ll soon be able to ingest data from systems like SuccessFactors, Workday, and more.
While this work is new and coming soon, we’ll make a few connectors available initially; however, in the event the system you’re using does not have a pre-built connector, we’ve got you covered with Microsoft Graph APIs that allow you to build your own custom connector as well. To learn more visit externalItem resource type – Microsoft Graph beta | Microsoft Docs.
Enrich your Microsoft 365 profile with connector data
The Microsoft 365 Profile API is a set of APIs that provides a rich schema for storing profile data of a user in a tenant. Its entity-based model provides a wide range of entities like accounts, address, educations, interests, skills, projects and many more.
These entities have native semantic depth built-in to support rich profiles– making it easier for everyone to express themselves and be able to contextualize people within the company. These properties are surfaced in shared, people experience across Microsoft 365 and third-party services and experiences via Microsoft Graph.
 Search & intelligence dashboard in Microsoft 365
You can enrich your Microsoft 365 profile data through ‘Customizations’ in the Search & Intelligence admin center. Just jump into the Profile schema management dialog and choose the user properties of the Microsoft 365 profile you want to enrich using configured Microsoft Graph connectors. In addition, you will also be able to choose some of the properties that should be displayed on the user’s profile cards too.
Check out our demonstration video here https://youtu.be/OxeXiw0FwU8.
Limitations
While you can enrich your Microsoft 365 user profiles with data from different third-party systems. There are a few limitations that will be relaxed going forward.
- Not all the user profile properties from the profile schema can be displayed on the profile cards.
- The profile card on which customization is allowed is currently only available for web apps such as Outlook Web App, OneDrive SharePoint, Office.com, etc.
- You cannot create new properties in Microsoft 365 user profile yet i.e. you can only enrich the existing properties.
Call to action
We will be launching a private preview of these features in CY21H2. Reach out to us at peoplecustomizationfeedback@service.microsoft.com if you have any feedback or if you are interested in joining our limited preview.
by Contributed | May 25, 2021 | Technology
This article is contributed. See the original author and article here.
Bill Baer, Senior Product Manager, Microsoft Search Assistant and Intelligence (MSAI)
Information has gone from scarce to superabundant and while the benefits of having access to information are countless, how do we know what we don’t know? New capabilities coming to Microsoft Search provide more reach, more locations, and more flexibility to bring you more choice to find, do, and discover.
Bringing your data to search
Microsoft Graph connectors for Microsoft Search are now generally available. This enables your organization to connect your islands of information to Microsoft 365 (index time merging) so you can find what you need wherever you’re working, whether in one of your favorite productivity apps or one of the many Microsoft 365 services such as SharePoint or Office.com.
Microsoft Graph connectors are the intelligent fabric that bring together information from disparate systems, on-premises and in the cloud, and your information in Microsoft 365 making it easier than ever to find what you need, when you need it. For example, maybe you want to improve self‑service and case resolution, but don’t want to have to remember where to go or what app to use.
With Microsoft Graph connectors, you can simply bring information from systems like ServiceNow into Microsoft 365 and make that information available across its apps and services. Microsoft Search eliminates the need to recall where information is, mitigates costly context switching, and takes advantage of the global perspective provided by the Microsoft Graph. Maybe you haven’t migrated those file shares to the cloud, no problem, we have you covered or maybe you need to not only connect to your customers, but want to connect your leads too – check, we’ve got you covered.
Microsoft Graph connectors empower your organization to discover more, in less time, in fewer places. Keep reading to learn more about Microsoft Graph connectors, how to get started, and what’s coming.
Getting started
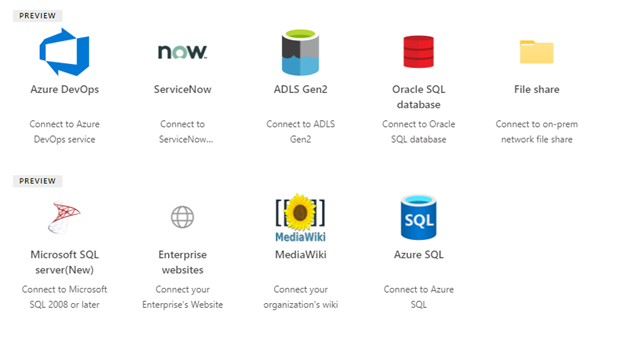
Getting started with Microsoft Graph connectors is as easy a few clicks in the Search & intelligence admin center and as part of your Microsoft 365 subscription, you have access to Microsoft built connectors to include:
Azure Data Lake Storage Gen2
The Azure Data Lake Storage Gen2 Graph connector allows users in your organization to search for files stored in Azure Blob Storage and Azure Data Lake Gen 2 Storage accounts.
Azure DevOps (Preview)
The Azure DevOps Graph connector allows your organization to index work items in its instance of the Azure DevOps service.
Azure SQL
The Microsoft SQL server or Azure SQL Graph connector allows your organization to discover and index data from an on-premises SQL Server database, or a database hosted in your Azure SQL instance in the cloud.
MediaWiki
The MediaWiki Graph connector allows your organization to discover and index data from a wiki created by using MediaWiki software.
Salesforce (Preview)
The Salesforce Graph connector allows your organization to index Contacts, Cases, Opportunities, Leads, and Accounts objects visible to users according to the user criteria permissions within your organization in your Salesforce instance. Learn about how to quickly set up your Salesforce connection and sync non-Azure AD users and groups with this video: https://youtu.be/SZYiFxZMKcM.
ServiceNow
The ServiceNow Graph connector allows your organization to index knowledge-based articles visible to users according to the user criteria permissions within your organization. Learn about the latest improvements at https://youtu.be/TVSkJpk1RiE.
File Share Graph connector
The file share Graph connectors allows you index and search the following formats: DOC, DOCM, DOCX, DOT, DOTX, EML, GIF, HTML, JPEG, MHT, MHTML, MSG, NWS, OBD, OBT, ODP, ODS, ODT, ONE, PDF, POT, PPS, PPT, PPTM, PPTX, TXT, XLB, XLC, XLSB, XLS, XLSX, XLT, XLXM, XML, XPS, and ZIP.
Learn more about the file share Graph connector at https://docs.microsoft.com/en-us/microsoftsearch/fileshare-connector.
Microsoft SQL Server Graph connectors
The Microsoft SQL server or Azure SQL Graph connector allows your organization to discover and index data from an on-premises SQL Server database, or a database hosted in your Azure SQL instance in the cloud.
Learn more about the Azure SQL and Microsoft SQL Server Graph connectors at https://docs.microsoft.com/en-us/microsoftsearch/mssql-connector.
Oracle SQL Graph connector
The Oracle SQL Graph connector allows your organization to discover and index data from an on-premises Oracle database.
Learn more about the Oracle / SQL Graph connector at https://docs.microsoft.com/en-us/microsoftsearch/oraclesql-connector.
Enterprise websites Graph connector
The Enterprise websites Graph connector allows your organization to index articles and content from intranet websites including dynamic sites.
Learn more about the https://docs.microsoft.com/en-us/microsoftsearch/enterprise-web-connector.
In addition to connectors provided by Microsoft, our partners have delivered over 130+ connectors to help you connect your islands of information to Microsoft 365. to help you connect your islands of information to Microsoft 365.
Didn’t find what you need from Microsoft or our partners, not to worry, we’ve got you covered with Graph APIs that allow for building your own custom connector as well. Get started at externalItem resource type – Microsoft Graph beta | Microsoft Docs.
What’s new and what’s next for Graph connectors
As we continue to innovate across the Microsoft Graph connector ecosystem and related capabilities, we’re bringing together more data sources, with more features, and the same ease of use.
Results clusters
In addition to these connectors, Microsoft Graph connectors results clusters (preview) now allow you to search for content from any data source in their default view, the All vertical in SharePoint, Office.com, and Bing.com when signed in with a work or school account.
Result clusters help users discover all third-party content in one place. The results shown in a result cluster are grouped together based on the search vertical configuration.
 Result cluster with Microsoft Graph connectors in SharePoint Online
Profile Query variables
Query variables are used in query template of a vertical to provide dynamic data as an input to the query defined on a vertical. Profile query variables are now supported for connector verticals. Define any attribute from the user’s Profile, as a query variable and it would be resolved during query evaluation. This feature is currently in preview.
Profile enrichment with Graph connectors
In addition to searching across connector data, you will soon be able to enrich Microsoft 365 profile properties like Job title, Phone numbers, Skills etc. with data from HRMS systems like SAP SuccessFactors, Workday, Oracle HCM, etc. using graph connectors. You can then surface this rich profile information on people experiences like profile cards seamlessly for everyone in your organization.
 Profile enrichment with Microsoft Graph connectors
Check out the detailed blog on how you can do this at https://aka.ms/microsoftsearch/build21/profileenrichment.
Sync your non-Azure AD users and groups to support search permissions
For the Azure DevOps, Salesforce, and ServiceNow Microsoft-built connectors, you can now sync non-Azure AD users/groups from your external data source with your Azure AD users/groups so that your end users can see search results permissioned to them.
During the connection configuration process, you can choose Only people with access to this data source on the Manage search permissions screen. For the ServiceNow and Salesforce connectors, you may have to provide a set of mapping rules to map your non-Azure AD users to your Azure AD users. At the end of connection setup, your non-Azure AD users/groups will sync with your Azure AD users/groups along with your content. This will ensure that your end users see searched content permissioned only to them.
This feature is currently in public preview; to try it out, your tenant and users must be in the Targeted release ring.
New connectors coming to Microsoft Search
- Jira Graph connector
- Confluence Graph connector
New locations for Microsoft Graph connectors
Soon Microsoft Graph connector information will be available to search in Microsoft Teams and Windows, in addition to existing locations to include SharePoint, Office.com, and Microsoft Bing.
 Microsoft Graph connector information in Windows 10
Actionable experiences
Search results on select Graph connectors will soon support actions that will allow users to interact with the result and perform changes to the Connector content within the Search application.
 Actionable information with Microsoft Graph connectors in SharePoint Online
eDiscovery support
eDiscovery support for Graph connectors developer preview will be available in summer 2021. Use the same eDiscovery tools in Microsoft 365 to search for content in third-party systems connected to Microsoft Search.
Request a trial
Want to try Microsoft Graph connectors? If you would like to try Microsoft Graph connectors in Microsoft 365, contact your account representative to receive a limited trial experience to try out Microsoft Graph connectors today.
Didn’t find the connector you are looking for? Provide us with feedback at http://aka.ms/graphconnectorsfeedback.
Bring search to your data
In addition to new and improved Microsoft Graph connectors we’ll soon make available the new Microsoft Search Federation as part of the Microsoft Search product offering. New federation capabilities will allow enterprises to retrieve their CRM content from their enterprise Dynamics 365, also build and integrate their custom LOB search experiences, customized search providers, into the overall Microsoft Search.
Federated search is useful when you want to expose data from systems in Microsoft Search that may be subject to strict compliance requirements or where the systems data cannot leave the systems boundaries. In some other cases, sources with sensitive data that customer doesn’t want to be indexed on the cloud where data is on-prem to expand coverage for their sensitive data via federation. With federated search, you can make information from these systems available to search across in Microsoft 365 productivity apps and services, without indexing its data with Microsoft Search.
Built-in Microsoft federation connectors
Information has become increasingly distributed, and often these islands of information are near, but outside of reach. Microsoft federation connectors help you pull together information and insights from across Microsoft clouds, merging that information and making it available to search in your favorite productivity apps and services, from SharePoint, to Office.com, to Microsoft Teams.
Getting started with Microsoft Search federation is as easy a few clicks in the Search & intelligence admin center. You can quickly set up the connection to a federated source using one of the available Microsoft built-in federation connectors (currently limited to Dynamics 365):
Dynamics 365 Federation Search (Preview)
Microsoft Dynamics 365 is a product line of enterprise resource planning and customer relationship management intelligent business applications. Dynamics 365 federation search allows you intelligently search for information in Dynamics 365 through Microsoft Search, which provides the seamless out-of-box search experience to easily and quickly find most relevant customer and business data across your organization without switching back and forth between Microsoft 365 productivity apps and services and Dynamics 365.
Check out a demonstration here https://youtu.be/TH9QUkQoEJM.

A private preview for Dynamics 365 federated search will be available this summer. If you are interested in taking part in the private preview, let us know at aka.ms/D365FederationSearchPreview.
Dynamics 365 is our first provider built on top of our federated search platform, and while a great milestone for federated search with Microsoft Search, this is only the beginning of the journey. We have ambitious plans to continue to add more search federation scenarios, such as Azure Cognitive Search, which will allow customers to seamlessly retrieve and display search results from their custom search index in Microsoft Search.
Customize your Microsoft Search Federation Provider
In addition to federation with native data sources, federated search also provides a platform to empower you to build custom search providers for your own unique information sources. The federated search platform:
- Provides the ability to bring back results from other Microsoft clouds and custom data stores on-premises or on other clouds by building and registering custom search providers that can be invoked for any input query.
- Allows custom vertical for domain specific experiences and high confidence answer cards in the All Results tab enabling enterprise specific and custom data to play a fair role in overall Search experiences.
- Provides an industry-standard development platform powered by Azure Bot Service and Adaptive UX technology to build-once/enable across many canvases (we could expand on this to play up the aspect of bots built for non-Search experiences such as conversational bots can easily be enabled for Search experiences).
- Provides IT Admin controls that allow rich control and flexible customizations for their enterprise specific needs.
The Microsoft Search federation provider will allow you to search for information from external sources and bring the results to Microsoft Search as high confidence Answer cards. You can make use of the platform to integrate HR tools, helpdesk, IT, or any other external content in the Microsoft Search experience.
Watch the demostration at https://youtu.be/AZcOskBTwNU.
 Search federation
Microsoft Search federation will initially be available to SharePoint, Office.com and Microsoft Bing, and in the future across other Microsoft Search enabled apps and services. This platform will be available in private preview summer of 2021. If you are interested in taking part in the private preview, let us know at https://aka.ms/SearchDevPrivatePreview .
Extend your search data
The Microsoft Search API provides one unified search endpoint that you can use to query data in the Microsoft cloud – messages and events in Outlook mailboxes, and files on OneDrive and SharePoint – that Microsoft Search already indexes.
Use Microsoft Graph connectors to include data outside of the Microsoft cloud in your search experience. For instance, connect to an organization’s human resources database or product catalog. Then use the Microsoft Search API to seamlessly query the external data source.
With connectors in place, you can provide your users with easy access to results and improve usage by adding a Microsoft Search embedded box to your company’s intranet sites.
Soon we’ll allow for the use of a new signals API, which will your app’s content take part in intelligent discovery experiences like “Recommended”, and “Recent” files in Office Hub.
Learn more about Microsoft Graph connectors with the following resources:
Documentation
Microsoft Graph Connectors Overview | Microsoft Docs
Videos
Graph connectors for Microsoft Search: What’s new
Getting started with Microsoft Graph connectors
Learn how to build Microsoft Graph connectors
More Microsoft Graph-powered experiences coming soon
In addition, we’re pleased to announce additional Microsoft Graph-powered experiences to help you find and do more to be more productive.
Introducing Org Explorer
It’s the places and faces we remember and today we’re making it easier than ever to visualize and contextualize people and teams across your company with a new addition to Outlook.
This new application available to Office Insiders allows you to find, discover, and explore people and relationships through a delightful organizational browser experience.
 Org Explorer
What’s Next
We’ll continue to evolve this experience over the next few months with some exciting new changes and features.
Availability
This feature has started rolling out to Beta Channel users running Version 14107 of Outlook or later.
We typically release features over some time to ensure that things are working smoothly. This is true for Insiders as well. We highlight features that you may not have because they’re slowly releasing to larger numbers of Insiders. Similarly, sometimes we remove elements to improve them. Though rare, we also reserve the option to pull a feature entirely out of the product.
Sign up for the Office Insider newsletter and get the latest information about Insider features in your inbox once a month!
by Contributed | May 25, 2021 | Technology
This article is contributed. See the original author and article here.
By Anders Ahl – Principal Program Manager | Microsoft Endpoint Manager – Intune
As an admin that manages Windows 10 devices, you can take advantage of joining large numbers of new Windows devices to Azure Active Directory (Azure AD) and Intune.
This article will help IT pros and mobile device administrators understand the steps required to create a provisioning package, as well as enrolling them into the Intune service.
Current state: CATAhlyst Corp has hundreds of stand-alone Windows 10 devices in their stores, acting as kiosks or electronic signs. These machines are not Active Directory joined today and the management platform is an old and outdated proprietary solution that has proven to be too expensive to maintain.
Desired state: All userless devices should be joined to Azure Active Directory and enrolled into Intune.
Process: The goal is to Azure AD join these machines and enroll them into Intune using a provisioning package. The IT Pro tasked with the job has read through the Microsoft Docs article Bulk enrollment for Windows devices but doesn’t like the requirement to rename the device as all devices are already conforming to the established naming standard, we will therefore examine how this requirement can be overcome by modifying the provisioning package.
Automatic MDM enrollment into Intune is enabled for Azure AD joined machines. If this is not the configuration you use in your tenant you would simply end up with an Azure AD joined device, without Intune management after applying the provisioning package. There is nothing in the provisioning package itself that will address the MDM enrollment, it’s all automatically taken care of by Azure AD.
Let’s get started!
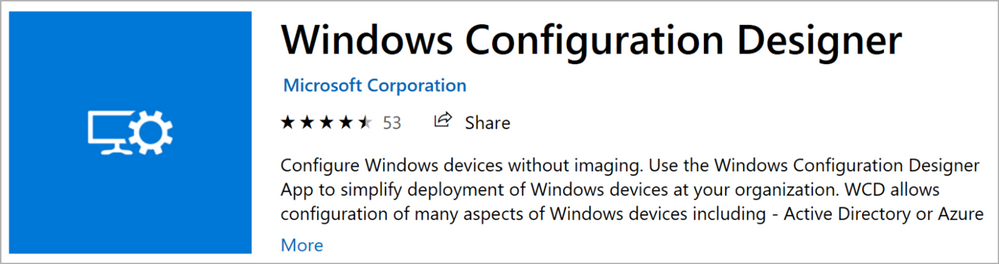
Creating provisioning packages is preferably done using the Windows Configuration Designer (WCD) available from the Microsoft Store.
Figure 1: Windows Configuration Designer Store App
As you download and install WCD on an ITPro Windows 10 device, make sure you’re running at least Windows 10 2004 (20H1) to be able to leverage the new computer rename logic. In this particular scenario, we will be removing it altogether which is a new functionality introduced in 20H1.
Start WCD and from the first screen, make sure you select “Provision desktop devices”. As we will see later on, the template we want to use is actually “Advanced provisioning” but if we start off with that, it is much more work to create and supply the Bulk Azure AD Token than it is to first use the Wizard and then delete the items we don’t need.
 Figure 2: WCD Create profile
Supply the necessary project details for your package and if you regularly create provisioning packages, make sure you give it both a relevant name and a fitting description, especially if you have to come back later to make modifications.
 Figure 3: WCD Enter project details
As you probably can tell from the Project folder path, I’m running as a local account on my ITPro machine. This is not a requirement, but I usually prefer to create provisioning packages from standalone/Workgroup machines just to make sure I’m not involuntarily using any domain references or single sign-on abilities.
Although the button in the bottom right says “Finish” it’s literally the opposite so press it and let’s get started!
Already on the next screen is our first little trick to get what we want: An Azure AD joined, Intune enrolled device without renaming it along the way. The device name value, highlighted in red in Figure 4: WCD Set up device could be anything that the wizard accepts as we will delete this in a later step. As of Windows 10 20H2, the value is required so you have to enter something to be able to continue.
Also worth noting is the statement highlighted in green which tells you that this operation requires Windows 10 2004 (20H1), even if we intend on deleting this part from our package, earlier versions of Windows 10 doesn’t like this so make sure you have an up-to-date client estate before you venture on.
 Figure 4: WCD Set up device
When you’re done, click Next, on ‘Set up network’ page de-select the option to provision a Wireless Network and then click Next again. You should now be on the ‘Account Management’ page.
This is where we prepare the provisioning package to join the machine to Azure AD by supplying a Bulk Azure AD Token. Choose an expiration for the Token itself (the default is 180 days) and click the “Get Bulk Token” button. When the provisioning package is created, there are no other credentials needed to add a machine to your tenant so make sure you set the expiration date as short as possible without requiring you to re-create the provisioning package again if you haven’t completed your migration on time.
 Figure 5: WCD Account Management
Depending on your Azure AD settings, the next couple of screens will look different, potentially asking you for multi-factor authentication (MFA) along with your credentials. Unless you have tweaked your default user settings in Azure AD, the credentials you use to request the Bulk Azure AD Token could be any valid user credentials in your tenant, it doesn’t have to be an admin or a user with any particular rights. As I will show in a bit, the Bulk Azure AD Token will be flagged with the users’ name, so I suggest you use a non-personal account or one that IT has control over. The standard Intune scenario is typically that a user enrolls their own machine and thereby attaches themselves to that device going forward. In this example, as we’re bulk enrolling hundreds of non-personal kiosks and digital signage devices it’s perfectly fine to use a non-personal account.
Note: Using a Bulk Registration token (BPRT) doesn’t count against any enrollment restrictions by number of enrolled devices, it’s for most intents and purposes considered unlimited.
As you have successfully supplied the necessary credentials and honored potential MFA requests, if this is the first time you use WCD to request a Bulk Azure AD Token, you will be presented with a Permission request as seen in Figure 6: WCD Permission request.
 Figure 6: WCD Permission request
Accepting this permission request will bring you to a crucial step in the provision package creation. Please read the entire paragraph before you click Accept.
Important: In the next step, the first check box, highlighted in red in Figure 7: WCD Stay signed in to all your apps “Allow my organization to manage my device” is checked by default and will enroll the device you’re running on right now into Intune. Make sure to un-check this box. This has nothing to do with the provisioning package you’re in the middle of creating.
Do not click the “OK” button in the lower right corner of the dialog box as this will register your device (the device you’re running WCD on) in Azure AD. Instead, click the tiny text in the lower left corner “No, sign in to this app only” to start creating the Bulk Token.
 Figure 7: WCD Stay signed in to all your apps
If you’re on any of the Insider builds, this message has now been updated to reflect this potentially unwanted behavior and avoid making mistakes. The new dialog looks like this:
 Figure 8: WCD Stay signed in to all your apps – Upcoming dialog
If everything was successfully created in Azure AD you will return back to the WCD editor as shown in Figure 9: Bulk Token fetched successfully.
Common errors at this stage could be:
- Your Azure AD Device settings are not allowing users to join devices to Azure AD. If you have the setting shown in Figure 9: Users may join devices to Azure AD to either “None” or “Selected” and the users defined as Selected aren’t including the account you try to create the Bulk Token with, the creation will fail.
 Figure 9: Users may join devices to Azure AD
- Conditional Access rules are blocking you from accessing Azure AD as you’re running WCD from a non-Azure AD machine.
 Figure 10: Bulk Token fetched successfully
If you’re wondering what just happened in the backend, open up your Microsoft Endpoint Manager admin center and head over to the Users blade.
Unless you have created any Bulk Tokens in the past you should only have a single user called “package_<GUID>@yourdomain.com”. This is the placeholder account used for joining the devices, and an easy way of invalidating the provisioning package before it expires automatically would be to remove this account.
 Figure 11: Bulk Token user account in AAD
Want to keep track of who created a particular Bulk Token? Scrolling down to the “Contact info” section of the account will show you the UPN under “Alternate email” as seen in Figure 12.
 Figure 12: Alternate email contains the bulk enroller UPN
This account will be the owner of all joined devices but the user will not be assigned as the primary user, nor will it be listed on the device object as the “Enrolled by” account. We will come back to this a bit later in this post when we have joined our first machine to Azure AD.
After a slight detour in explaining the behind-the-scenes work, hopefully you’ve arrived back at the WCD editor without running into any issues and you could click through the rest of the screens without any modifications until you end up at the summary shown in Figure 13: Final WCD screen, ready to create package.
 Figure 13: Final WCD screen, ready to create package
At this stage, don’t click the blue “Create” button just yet. Remember where we used “Placeholder” in the beginning of this scenario instead of specifying a proper device name? We need to clean up that reference so instead of pressing “Create”, use the option in the bottom left to “Switch to advanced editor”.
This will prompt you for confirmation as there’s no possibility of using the wizard again after you leave it. We used the Wizard simply to facilitate the Bulk Token creation so go ahead and click “Yes”.
 Figure 14: Switch to advanced editor
As we get into the Advanced editor, locate the DNSComputerName on the right-hand side of the screen. Clearing out the field “Placeholder” in the middle pane of the editor will not work, you will have to go to the right pane and select “Remove” to take out the DNSComputerName altogether, as shown in Figure 15: DNSComputerName removal.
 Figure 15: DNSComputerName removal
This should leave you with exactly two customizations: Authority and BPRT as shown in Figure 16: Authority and BPRT.
 Figure 16: Authority and BPRT
We knew from the start that these two items were the only one of interest to us but if you look at the “BPRT” value you can see that it’s a very long, seemingly garbled string that makes up our Bulk Token. Using PowerShell or GraphExplorer to create the BPRT would have been more work than running the Wizard and then cleaning up the DNSComputerName but feel free to ask for a PowerShell scenario and I’d be happy to add one.
With a provisioning package containing only two items/customizations we are now ready to select “Export” from the menu bar up top, shown in Figure 17: Export Provisioning package.
 Figure 17: Export Provisioning package
The next series of dialog boxes will cover provisioning package metadata as well as an option to sign the package. Signing scripts and packages is of course always recommended but as you will see in this scenario, we will consciously not sign this package as the target systems are thought of as not being managed at this point and therefore we don’t have an easy method to distribute the necessary certificate trust requirements.
On the first screen, shown in Figure 18: Describe the provisioning package we provide at set of metadata properties for easier versioning control of the package. Feel free to accept the defaults and click “Next” or provide additional data if it makes sense in your specific case. You might have several provisioning packages for different device types and if so, giving them descriptive names is a very good idea.
 Figure 18: Describe the provisioning package
Up next is the Encrypt & Sign details which we will skip right past for the purpose of this scenario. Selecting to encrypt the package will provide you with a password and the signing process should be straight forward if you are used to signing scripts and have a code signing certificate already available on your device. Click “Next”.
 Figure 19: Security details for the provisioning package
Select a good place to store the finished provisioning package, then click “Next”. Make sure you store the package somewhere suitable for rebuilding and/or resetting the machine you work on, in case you use a lab/test machine for the creation. I.e. the local hard drive might not be the best choice.
 Figure 20: Select where to save the provisioning package
Figure 21: Build the provisioning package – Summary shows the summary screen and offers you a last chance to back out of creating the package in case you want to change something. Unless you spot something that doesn’t look right, click “Build”.
 Figure 21: Build the provisioning package – Summary
After a couple of seconds of creation time, your package should now be created and ready for use. Click “Finish” and we’re all done!
 Figure 22: Provisioning package – All done!
To test our shiny new provisioning package, find a machine that is meeting the requirements for being brought into management by Intune as well as added to Azure AD. The quickest way to check the status of a machine is probably to use the dsregcmd /status command from a PowerShell or Command Prompt. As we can see in Figure 23: we have a standalone Windows 10 device called CATScreen42, driving one of the many digital displays that CATAhlyst Corp. have spread around their locations in Europe.
 Figure 23: Device Domain Status – Pre Azure AD join
By double-clicking on the provisioning package it will launch but as we didn’t sign it, it prompts for user consent. Note that one (the only one actually) of the actions is “Enrolls in Azure Active Directory”. Click “Yes, add it” to start the Azure AD-join process.
 Figure 24: Provisioning package – Trusted Source
Note: If you prefer to apply the provisioning package using a Command Line instead of double-clicking it, the syntax as described here is:
DISM.exe /Image=C: /Add-ProvisioningPackage /PackagePath:C:BulkJoin.ppkg
The package should apply instantly and there is no noticeable activity on the machine. The Azure AD-join itself is instantaneous and the same way we checked on the device domain status above, let’s run the dsregcmd /status command again.
 Figure 25: Device Domain Status – Post Azure AD join
As if by magic, the device is now joined to Azure AD and we haven’t even rebooted the device yet.
Let’s have a look at the Sign-in blade in the Microsoft Azure console and see what has happened. This is a very busy log in an Enterprise environment so we’ll make use of the filter options to get rid of the noise. The flow is outlined in Figure 26: AAD Sign-in logs. From the Azure AD blade in the Azure portal, scroll down to “Sign-ins” and then make sure you switch to the non-interactive view as the entries we’re after are showing up here. The last step is to press the “Add filters” button and add the “User” field. If this is your first attempt at Bulk Token joining devices, specifying “package” as the string to look for is likely enough. If you have several Bulk Tokens or a naming standard that includes users with the string “package” in the name, feel free to qualify the User-field further to narrow your search as necessary.
 Figure 26: Azure AD Sign-in logs
You should see two log entries for each device you run the provisioning package on. As the log is sorted chronologically with the oldest entry at the bottom, we first see the Device Registration entry as the device is brought into Azure AD. Right after this, in my example illustrated in Figure 27, 11 seconds later we see a Microsoft Intune Enrollment event. That’s it!
 Figure 27: Sign-in log entries
Diving into these individual log entries shows that for the Device Registration the Device Info details is pretty empty as the device wasn’t fully registered in Azure AD yet but for the Intune Enrollment entry we can start tracking the lifecycle of the Device ID as well as filter on some of the basic attributes of the device such as Operating System and Join Type. This will be investigated further in a future post about a new concept called Filters.
From an Azure AD perspective, the device object is owned by the Bulk Token user as seen in Figure 28.
 Figure 28: Azure AD Device owner
Wrapping up the scenario, you probably recall from earlier that the Bulk Token user won’t be assigned as the primary user for any of the devices it joins, nor will it be listed on the Intune device object as the “Enrolled by” account. We see this on the Overview blade for the device itself, illustrated in Figure 29.
 Figure 29: Primary user and Enrolled by are intentionally empty
This could possibly be unfortunate for some scenarios but remember that this enrollment method is primarily intended for non-personal devices which shouldn’t necessarily have a primary user. The default behavior for Bulk Enrolled devices using a provisioning package is to flag the device as “Shared”. If you like, there’s always the option of assigning a primary user yourself by going to the Properties blade of the device and press the “Change primary user” button as highlighted in Figure 29.
 Figure 30: Change primary user for a device
That concludes the “Bulk join a Windows device to Azure AD/Intune using a Provisioning package” scenario. I hope you found it useful! Let us know in the comments below or on Twitter (@IntuneSuppTeam) if you have any questions or feedback.
by Contributed | May 25, 2021 | Technology
This article is contributed. See the original author and article here.
At Microsoft Build 2021, we are pleased to announce the availability of Azure Video Analyzer as an Azure Applied AI Service. Azure Video Analyzer (AVA) is an evolution of Live Video Analytics (LVA) that was launched several months ago. As an Azure Applied AI service, AVA provides a platform for solution builders to build human centric semi-autonomous business environments with video analytics. AVA enables businesses to reduce the cost of their business operations using existing video cameras that are already deployed in their business environments.
Many businesses take a manual approach to monitoring mundane business operations. This is prone to a higher degree of error and miss-rate due to human error and the fact that assessing the criticality of a visual event sometimes requires corelating multiple signals in real-time. AVA, in conjunction with other Azure services, addresses this challenge by providing a mechanism for businesses to automate mundane visual observations of operations and enable employees to focus on the critical tasks at hand.
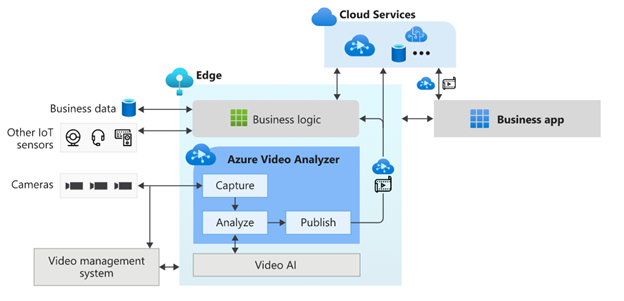
AVA is a hybrid service spanning the edge and the cloud. The edge component of AVA is available via the Azure marketplace and is referred to as “Azure Video Analyzer Edge,” and it can be used on any X64 or ARM 64 Linux device. AVA Edge enables capturing live video from any RTSP enabled video sensor, analysis of live video using AI of choice, and publishing of results to edge or cloud applications. AVA Cloud Service is a managed cloud platform that offers REST APIs for secure management of AVA Edge module and video management functionality. This provides flexibility to build video analytics enabled IoT applications that can be operated locally from within a business environment as well as from a centralized remote corporate location.
AVA can be used with Microsoft provided AI services such as Cognitive Service Custom Vision and Spatial Analysis as well as AI services provided by companies such as Intel. It is also possible to build and integrate a custom AI service that incorporates open-source custom AI models. Business logic that corelates AI insights from AVA with signals from other IoT sensors can be integrated to drive custom business workflows.
AVA has been used by companies such as DOW Inc., Lufthansa CityLine, and Telstra to solve problems such as chemical leak detection, optimizing aircraft turn-around, and traffic analytics. AVA has enabled DOW get closer than ever to reaching their safety goal of zero safety-related incidents. In the case of Lufthansa CityLine, AVA has enabled human coordinators to make better data-driven decisions to reduce aircraft turnaround time, thus reducing costs and improving customer satisfaction significantly. Telstra has been able to unlock new 5G business opportunities with the combination of Azure Video Analyzer, Azure Percept, and Azure Stack Edge.
AVA offers all capabilities that were available in LVA and more. A short summary of some of the prominent capabilities are as follows:
Process live video at the Edge
AVA Edge can be deployed on any Azure IoT Edge enabled X64 or AMD64 Linux device. Live video from existing cameras can be directed to AVA and processed on the edge device within the business environment’s network. In turn, this provides organizations with a solution that considers limited bandwidth and potential internet connectivity issues, all while maintaining the privacy of their environments.
Analyze video with AI of choice
As mentioned earlier, AVA can be integrated with Microsoft provided AI or with AI that is custom built to solve a niche problem, such as Intel’s OpenVINO™ DL Streamer that provides capabilities such as detecting objects (a person, a vehicle, or a bike), object classification (vehicle attributions) and object tracking (person, vehicle and bike).
Azure AI is based on Microsoft’s Responsible AI Principles and the Transparency Note provides additional guidance on designing response AI integrations.
Flexible video workflows
In addition to the existing building blocks provided by LVA, the current release of AVA enables a variety of live video workflows via new building blocks such as Object Tracker, Line Crossing, Cognitive Services extension processor and Video Sink.
Simplify app development with easy-to-use widgets
AVA provides a video playback widget which simplifies app development with a secure video player and enables visualization of AI metadata overlaid on video.
Azure Video Analyzer offers all these capabilities and more. Take a look at Azure Video Analyzer product page and documentation page to learn more.

by Contributed | May 25, 2021 | Dynamics 365, Microsoft 365, Technology
This article is contributed. See the original author and article here.
The past year has brought dramatic change to almost every facet of our lives. We have seen the same disruption play out across every industry, from retail to healthcare to financial services. Customer expectations are fundamentally altered, and it’s hard to imagine things going back to the way they once were.
As organizations work to stay relevant in this new world, they need digital solutions, with a strong software development strategy to meet the evolving needs of their customers. That means, they need developers.
But for developers, the way we have thought about development and product management has changed little in the past 50 years. Although we have moved from binary to assembly to third-generation languages, we have not seen a fundamental shift.
As organizations look for industry-specific digital solutions tailored for their space, developers need to increasingly shift their mindset from coding to composing clouds and components.
The post Build differentiated SaaS apps with Microsoft Industry Clouds appeared first on Microsoft Dynamics 365 Blog.
Brought to you by Dr. Ware, Microsoft Office 365 Silver Partner, Charleston SC.

Recent Comments