by Contributed | May 31, 2021 | Technology
This article is contributed. See the original author and article here.
Whether you are using Microsoft Azure for development, for production workloads, or for both, it’s important to consider the security of the connections to those cloud systems. Virtual private networks are often used to encrypt traffic between a device and Azure using a private tunnel over the public internet – especially for information and systems you don’t want to be made available to the public or open to the possibility of being captured and read. At scale, a site-to-site VPN can be configured to the internet router used by an office (or home office) so the VPN connection can be used by all the devices on that network. But you can also set up a point to site VPN between just one device and Azure – especially useful for laptops and staff who travel or work from home.
Establishing a VPN connection requires some sort of authentication method – commonly a certificate or a username & password. Microsoft Azure point-to-site connections support Azure certificate authentication, authentication with a RADIUS server, or Azure Active Directory authentication with the OpenVPN(r) protocol. Active Directory authentication was limited to only Windows clients, but we’ve just announced a public preview of this capability for macOS.
This means that your macOS device will be able to establish a point-to-site VPN connection to Microsoft Azure using authentication with your Azure Active Directory credentials. And because you’re using native Azure AD authentication, the additional security features of user-based risk policies, conditional access and multi-factor authentication can now also apply from your Mac device when connecting to the VPN. So, for example, you could ensure that macOS VPN connections are only established from allowed locations, or that other locations force a multi-factor-authentication challenge. Note: while authenticating your VPN with Azure Active Directory does not require any additional Azure AD licensing, some of the premium features (like conditional access) do have Azure AD licensing requirements – check the linked feature documentation for details.
Remember: Public preview features are subject to change and don’t come with a Service Level Agreement. Learn more at Choose the right Azure services by examining SLAs and service lifecycle.
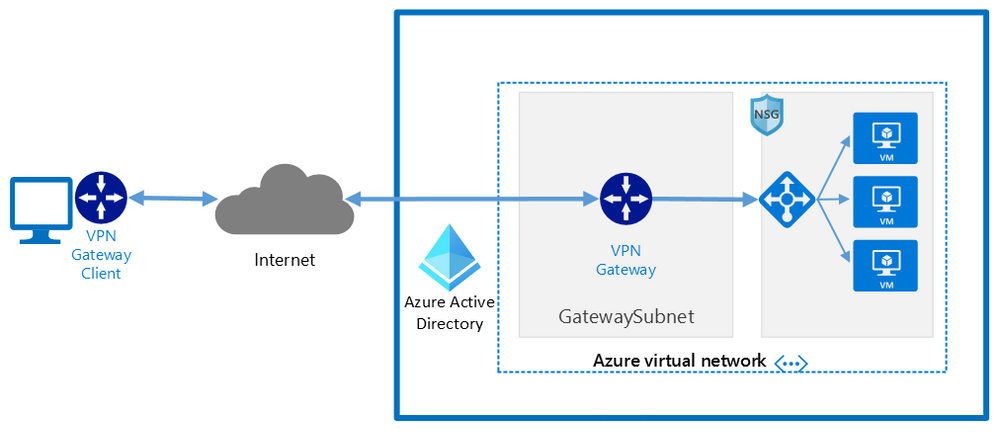
Components of a Microsoft Azure Point-to-Site VPN from macOS with Azure Active Directory authentication
A point-to-site VPN connection from macOS to Microsoft Azure requires:
- An Azure Active Directory tenant
- An Azure virtual network
- An Azure virtual network gateway, with the correct point-to-site configuration.
- A macOS device with a correctly configured Azure VPN Client application.
Network architecture showing a point to site VPN from macOS to Microsoft Azure
The detailed steps
Detailed documentation for each of steps is provided at Microsoft Docs and is updated should the product feature or steps change, but I’ll link to each step in the process here. To implement a VPN client for point-to-site OpenVPN protocol connections from macOS (preview):
Configure an Azure Active Directory tenant.
Register the Azure VPN “Enterprise application”
Create a virtual network
Create a virtual network gateway
Note: You can use an existing virtual network or virtual network gateway if you already have one.
Configure the virtual network gateway & download the VPN client (steps 9-13)
Then on the macOS device:
Install the “Azure VPN Client” application from the Apple Store
Import the connection profile (using azurevpnconfig.xml from the VPN client you downloaded)
Now, when you connect to the Azure VPN, you’ll be promoted for your Azure Active Directory credentials!
 Azure AD sign-in for the macOS VPN to Azure
Conclusion:
VPNs are an important component of network security, especially with a remote and mobile workforce. Azure Active Directory authentication for the VPN for macOS devices is easy to configure and lets you take advantage of other Azure AD security features you may be using for other devices in your organisation.
Learn more:
What is a VPN Gateway?
Explore Azure networking services
Architect network infrastructure in Azure
Implement network security in Azure
by Contributed | May 30, 2021 | Technology
This article is contributed. See the original author and article here.
Pre-requirements:
Before we start please read this .Net send and receive Service Bus message , Service Bus message size limit and .Net AttachmentPlugin Simple code.
Following the first document you may understand how to set up a .Net project to send and receive service Bus messages. However, it has limitation for the size of message, Standard pricing tier 256 KB and premium pricing tier 1MB. Then how about the message above 1MB? You may receive an error message about “QuotaExceededException” when your message above the limit. So how to resolve this issue when you need to send message above 1MB?
We plan to release a preview function that allow users send and receive messages up to 100 MB. But currently we don’t have an estimated time. This blog is to explain how to use an AttachmentPlugin in .Net program to send and receive message above 1MB. This is a work around only implement in .Net program. If your system is using other languages like Python, Java and so on, we suggest you separating the messages and change the size of the messages.
Now, let’s talk about how to use this AttachmentPlugin.
Preparation:
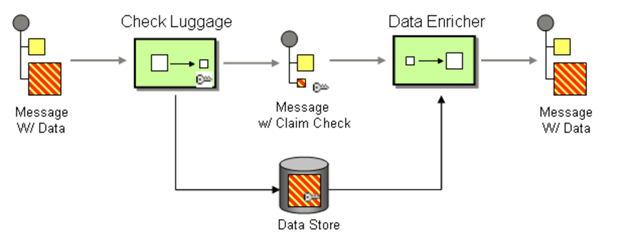
The work principle of this AttahchmentPlugin is implement Claim Check pattern with Azure Storage. It based on this pattern to store message data in Azure Storage Account Container (data Store) and pass a Claim Check to Azure Service Bus. Azure Service Bus can use the Claim Check to retrieve the stored information.
- This Plugin is to save the message to Storage Account, so you need to have an Azure Storage Account first.
- Then you can get the AttachmentPlugin from Microsoft Visual Studio “Manage Nugget Packages” and search for “ServiceBus.AttachmentPlugin”. Or if you are using Nuget Package Manager Console, you can use this script in below to install it.
PM> Install-Package ServiceBus.AttachmentPlugin

Test:
Parameters :
- Service Bus Connection String: You can get it from Azure Portal, your Service Bus Namespace “Shared access Policies”

- Your Service Bus Queue name or Service Bus Topic name and Subscription name
- Storage Account Connection String: you can get from Azure portal. Check your storage account “Access key”.

- And Storage Account Container name.
Program:
After getting all the values, then you can try to use this sample program to send and receive messages.
using System;
using System.Collections.Generic;
using System.Linq;
using System.Text;
using ServiceBus.AttachmentPlugin;
using System.Threading.Tasks;
using Microsoft.Azure.ServiceBus;
using Microsoft.Azure.ServiceBus.Core;
namespace ServiceBusAttachmentPlugin
{
class Program
{
const string ServiceBusConnectionString = “<your Service Bus Connection String >”;
const string ServiceBusQueueName = “<your Service Bus Queue name >”;
const string StorageConnectionString = “<your Storage Account Connection String >”;
const string StorageContainerName = “<your Storage Account Container Name>”;
const string ServiceBusTopicName = “<your Service Bus topic name>”;
const string ServiceBusSubscriptionName = “<your Service Bus subscription name>”;
private static async Task MainAsync()
{
var sender = new MessageSender(ServiceBusConnectionString, ServiceBusQueueName);
var config = new AzureStorageAttachmentConfiguration(StorageConnectionString, StorageContainerName);
sender.RegisterAzureStorageAttachmentPlugin(config);
byte[] msgBytes = Encoding.ASCII.GetBytes(“Test message”);
await sender.SendAsync(new Message(msgBytes));
/*If you want to receive message from Service Bus Topic/Subscription, you need to use this EntityNameHelper to get subscriptionPath, then use MessageReceiver() function to receive message .*/
//string subscriptionPath = EntityNameHelper.FormatSubscriptionPath(ServiceBusTopicName, ServiceBusSubscriptionName);
//IMessageReceiver receiver = new MessageReceiver(ServiceBusConnectionString, subscriptionPath, ReceiveMode.ReceiveAndDelete);
var receiver = new MessageReceiver(ServiceBusConnectionString, ServiceBusQueueName, ReceiveMode.ReceiveAndDelete);
receiver.RegisterAzureStorageAttachmentPlugin(config);
var taskrc = await receiver.ReceiveAsync();//Here we use ReceiveAndDelete mode first, if you need use Peeklock mode, please complete the message.
var message = taskrc.Body;
// await receiver.CompleteAsync(message.SystemProperties.LockToken);
}
static void Main(string[] args)
{
MainAsync().GetAwaiter().GetResult();
}
}
}
Attentions:
- You can use your own way to serialize your message, like use function JsonConvert.SerializeObject(). But you need to deserialize the object to your message when you receive it.
- This sample code use SendAsync() and ReceiveAsync() functions, so we need use “await” to make sure the message complete. For the difference between sync and Async please read my previous blog Service Bus –Complete Message Asynchronously or Synchronously? – Microsoft Tech Community
- We use RecivedAndDelete mode to receive the message, if you need use PeekLock mode, please remember to complete the message. For example in Microsoft.Azure.ServiceBus use receiver.CompleteAsync(message.SystemProperties.LockToken).Please check Service Bus Receive mode and .Net example for more examples.
Results:
- After using the sample code, we sent messages successfully. You can find your message in Azure portal->Service Bus explorer. But it only can Peek 32 messages.

- You also can check your messages from Service Bus Explorer application, you can download it from GitHub Service Bus Explorer. You can use your Service Bus Connection String to connect your Service Bus. You would get more details about this message.

- In addition, these messages will save to your Storage Account container. You can also check it from your container.

In conclusion, this Service Bus AttachmentPlugin is a work around to send and receive messages above 1MB. You need to keep them before you want to receive these messages. And if you received the message from Service Bus the blobs would still in the Azure Storage Account. If you need to delete them when Azure Service Bus receive the message you can add functions to delete it from Storage Account. It would have additional cost in Storage Account, so it would be the limit for this Service Bus AttachmentPlugin. You can weigh your own interests to make decisions.
by Contributed | May 30, 2021 | Technology
This article is contributed. See the original author and article here.
Today we are pleased to announce the general availability of Azure Spring Cloud support in the Terraform Azure Provider. Azure Spring Cloud is a platform for deploying and managing Spring Boot and Spring Cloud-powered services and software built on Microsoft Azure. It is a fully managed microservice development with built-in service discovery and configuration management, jointly built, operated, and supported by Microsoft and VMware.
Additional information about this service can be found within this blog post from Josh Long, and the Azure Spring Cloud documentation.
How To Get Started
Azure team at Microsoft and the Terraform team at HashiCorp has been working together polishing this support since we added the first resource one year ago. It’s now covering almost everything about Azure Spring Cloud including lifecycle management, VNet Injection and integration with some other Azure services. We encourage you to try out this support and use it in production like many of our top customers already doing. In order to use Azure Spring Cloud in the Terraform Azure provider, you will need:
To get an App up and running in Azure Spring Cloud you will need to employ a few new resources like shown in below examples:
- azurerm_resource_group as a container that holds all related resources for this Azure solution
- azurerm_spring_cloud_service to provision a service instance with Config Server settings
- azurerm_spring_cloud_app to provision an app with HTTPS only public endpoint and AAD Managed Identity enabled
- azurerm_spring_cloud_java_deployment to provision a deployment running 2 instances with 2 vCPU cores and 4GB memory
- azurerm_spring_cloud_active_deployment to activate the deployment so that it will start receiving traffics coming to the app
provider "azurerm" {
  features {}
}

resource "azurerm_resource_group" "example" {
  name     = "example-resources"
  location = "West Europe"
}

resource "azurerm_spring_cloud_service" "example" {
  name                = "example-springcloud"
  resource_group_name = azurerm_resource_group.example.name
  location            = azurerm_resource_group.example.location

  config_server_git_setting {
    uri          = "https://github.com/azure-samples/spring-petclinic-microservices-config"
    label        = "master"
    search_paths = ["."]
  }
}

resource "azurerm_spring_cloud_app" "example" {
  name                = "example-springcloudapp"
  resource_group_name = azurerm_resource_group.example.name
  service_name        = azurerm_spring_cloud_service.example.name
  is_public           = true
  https_only          = true

  identity {
    type = "SystemAssigned"
  }
}

resource "azurerm_spring_cloud_java_deployment" "example" {
  name                = "default"
  spring_cloud_app_id = azurerm_spring_cloud_app.example.id
  cpu                 = 2
  memory_in_gb        = 4
  instance_count      = 2
  jvm_options         = "-XX:+PrintGC"
  runtime_version     = "Java_11"

  environment_variables = {
    "Env" : "Staging"
  }
}
Start from here you can easily empower your Azure Spring Cloud apps with various enterprise ready Azure services. For example, below configurations streams all the system logs and metrics to an Azure Storage account for further visualization and analysis.
resource "azurerm_storage_account" "example" {
  name                     = "examplestorage"
  resource_group_name      = azurerm_resource_group.example.name
  location                 = azurerm_resource_group.example.location
  account_tier             = "Standard"
  account_replication_type = "GRS"
}

resource "azurerm_monitor_diagnostic_setting" "example" {
  name               = "example-monitor-setting"
  target_resource_id = azurerm_spring_cloud_service.example.id
  storage_account_id = azurerm_storage_account.example.id

  log {
    category = "SystemLogs"
    enabled  = true

    retention_policy {
      enabled = false
    }
  }

  metric {
    category = "AllMetrics"

    retention_policy {
      enabled = false
    }
  }
}
As another most used scenario, below Azure Monitor configurations enable Auto-scale-out for the deployment. The instance number will be automatically increased whenever the average CPU consumption is greater than 75%.
resource "azurerm_spring_cloud_active_deployment" "example" {
  spring_cloud_app_id = azurerm_spring_cloud_app.example.id
  deployment_name     = azurerm_spring_cloud_java_deployment.example.name
}

resource "azurerm_monitor_autoscale_setting" "test" {
  name                = "acctestautoscale-cz"
  resource_group_name = azurerm_resource_group.example.name
  location            = azurerm_resource_group.example.location
  target_resource_id  = azurerm_spring_cloud_java_deployment.example.id
  enabled             = true
  profile {
    name = "metricRules"
    capacity {
      default = 2
      minimum = 2
      maximum = 6
    }
    rule {
      metric_trigger {
        dimensions {
          name     = "AppName"
          operator = "Equals"
          values   = [azurerm_spring_cloud_app.example.name]
        }

        dimensions {
          name     = "Deployment"
          operator = "Equals"
          values   = [azurerm_spring_cloud_java_deployment.example.name]
        }

        metric_name        = "AppCpuUsage"
        metric_namespace   = "microsoft.appplatform/spring"
        metric_resource_id = azurerm_spring_cloud_service.example.id
        time_grain         = "PT1M"
        statistic          = "Average"
        time_window        = "PT5M"
        time_aggregation   = "Average"
        operator           = "GreaterThan"
        threshold          = 75
      }
      scale_action {
        direction = "Increase"
        type      = "ChangeCount"
        value     = 1
        cooldown  = "PT1M"
      }
    }
  }
}
Further Information
For more information on how to use Azure Spring Cloud features in Terraform, check out the provider documentation in the Terraform Registry. If you experience any issues, please report them on the Terraform Azure provider issue tracker. We would love to hear your feedback!

by Contributed | May 29, 2021 | Technology
This article is contributed. See the original author and article here.
It’s been an eventful time for Hyperscale (Citus) lately. If you’re interested in Postgres, distributed databases, and how to handle ever growing needs for your Postgres application or simply use Hyperscale (Citus), keep reading.
Citus is an open source extension to Postgres that enables horizontal scaling of your Postgres database. Citus distributes your Postgres tables, writes, and SQL queries across multiple nodes—parallelizing your workload and enabling you to use the memory, compute, and disk of a multi-node cluster. And Citus is available on Azure: Hyperscale (Citus) is a deployment option in Azure Database for PostgreSQL.
What’s really exciting to me is that we’ve made it easier and cheaper than ever to try and use Hyperscale (Citus). With Basic tier, you can now use Hyperscale (Citus) on a single node, parallelizing your operations and adopting a distributed database model from the very beginning. And you can now try Citus open source with a single docker run command—boom!
And Hyperscale (Citus) can scale to serve some big applications: it’s used to manage public transport in a large European capital, to handle ongoing market analysis in one of the biggest banks in the world, and to power the UK Coronavirus Dashboard. Lots of use cases can benefit from scaling out Postgres.
So what’s new with Hyperscale (Citus)? Lots. In the last month we launched these new features in preview:
- Basic tier: with Basic tier, you can now run Hyperscale (Citus) on a single node for as little as $0.27 USD/hour[1]
- Postgres 12 & Postgres 13: for the latest developments in Postgres
- Citus 10: The latest version of Citus with all the new capabilities—including columnar compression
- Read replicas in the same region for unlimited read scalability
- Managed PgBouncer: so you no longer need to set up and maintain your own PgBouncer anymore
And there’s more! We have also rolled out:
- Custom schedules for maintenance
- Shard rebalancing features in portal
You can go ahead and try the new Hyperscale (Citus) features right now—whether they are still in preview or have already GA’d. This post will walk you through the new features that were recently added to Hyperscale (Citus) and how you can benefit. Ready? Let’s dive in.
What is the new Basic tier for Hyperscale (Citus)?
Some of you gave us feedback that you wanted us to create a smaller Hyperscale (Citus) cluster, to make it easier to get started and to try out Hyperscale (Citus). We heard you loud and clear.
Think about it—20 worker nodes with 64 vCores in each node would give you 1280 vCores with 8TB+ of RAM to run your Postgres database. That is a lot of power. And in many cases, you don’t need it (yet). Or you need something smaller than even a 2-node cluster for development, test, or stage environment.
So in Preview, we are now introducing a Basic tier.
The new Basic tier in Hyperscale (Citus) allows you to shard Postgres on a single node. So that you are “scale-out ready” and can use a distributed data model from the very start, even when you are still running on a single node database. And it’s easy to add workers nodes to your Hyperscale (Citus) basic tier when you need to—when you do, you’re effectively converting your Basic configuration to a Standard tier.
And the configuration with 1 coordinator and 2 or more worker nodes that you used to know is now called “Standard tier”.
Some of you who have been using Citus for a while told us that if you could rewind the clock, you would have started using Citus earlier, even when your Postgres database was smaller. Now you can, by using Basic tier!
And you can select Postgres version of your choice—11, 12, or 13—for your Basic and Standard tiers. Which brings me to my next point.
Postgres 12 and 13
One of the tough challenges a PM faces with a popular cloud database service like Postgres is prioritization. You keep talking to your customers and you feel how much they need this new functionality. And that one. And another one. It is great to see how many customers are asking for so many things—there is definitely a lot of interest in your service! But it also means that some much-needed capabilities will have to wait until our team delivers others. No matter how big (or not) the team is you can’t get it all at the same time.
One of the tradeoffs we previously made for Hyperscale (Citus) was to delay support for the latest Postgres versions. The good news is, now we are catching up and are extremely happy to offer Postgres 12 and Postgres 13 support in Hyperscale (Citus).
With addition of Postgres 12 and Postgres 13, you may ask—how can I upgrade my Hyperscale (Citus) cluster to the latest Postgres version? You can initiate a major Postgres version upgrade for your cluster with few clicks in Azure portal. Upgrade on all nodes in your Hyperscale (Citus) cluster is performed by the service and keeps all configuration, including server group name and connection string, the same.
One of the advantages to have the latest Postgres versions—in addition to the new capabilities in these major Postgres versions—is the ability to use the latest Citus version! Let’s take a closer look at why you could be interested in the latest Citus version.
Almighty Citus 10
OK, maybe not almighty but look at what Citus database team delivered this time!
In case you didn’t know, we have a dedicated team in Azure Data that is working full time on …the open source Citus extension! That’s right. You can run a Citus cluster on your own anywhere if you don’t need any of the advantages provided by a managed database service. No strings attached and we love our Citus open source community. However, many customers would like us, Azure Data, to run their databases for them and take care of updates, security, backups, BCDR, and many other important things that frankly you can spend a lot of time setting up and maintaining as your databases grow. This way you can focus on what matters most to you: your application. And we love to help you with it.
But let’s get back to Citus 10 in Hyperscale (Citus). With Citus 10 support in Hyperscale (Citus), you can:
- Compress your tables to reduce storage cost and speed up your analytical queries using columnar storage.
- Use joins and foreign keys between local PostgreSQL tables and distributed tables.
- Use the new alter table function to change your distribution key, shard count, colocation properties and more.
- And there’s more: More DDL commands supported, better SQL support, and new views to see the state of your cluster with
citus_tables and citus_shards.
Let’s see what these new capabilities are.
Columnar compression with Citus 10
Postgres typically stores data using the heap access method, which is row-based storage. Row-based tables are good for transactional workloads but can cause excessive IO for some analytic queries.
Columnar storage provides another way to store data in a Postgres table, by grouping data by column instead of by row.
So what are some of the benefits of columnar?
- Compression reduces storage requirements.
- Compression reduces IO needed to scan the table.
- Performance: Queries can skip over the columns that they don’t need, further reducing IO.
All of these together mean faster queries and lower costs!
To use the new columnar feature with Hyperscale (Citus), you just need to create tables with the new USING columnar syntax, and you’re ready to go (of course, read the docs, too!).
And finally, you can mix and match columnar and row tables and partitions; you can also mix and match local and distributed columnar tables; and you can use columnar with Basic tier on a single node as well as on a distributed Citus cluster in Standard tier. There are lots more details in Jeff’s “Quickstart” blog posts about using Columnar in Hyperscale (Citus)—as well as using columnar with Citus open source. Oh, and Jeff made a video demo about Citus Columnar too.
Use joins and foreign keys between local and distributed tables
If you have a very large Postgres table and a data-intensive workload (e.g. the frequently-queried part of the table exceeds memory), then the performance gains from distributing the table over multiple nodes with Citus will vastly outweigh any downsides. However, if most of your other Postgres tables are small, then you may not get much of additional benefits by distributing them.
A simple solution for you would be to not distribute the smaller Postgres tables at all!
Because the Citus coordinator is just a regular Postgres server, you can keep some of your tables as local, regular Postgres tables that live on the Citus coordinator. That’s right, you don’t need to distribute all of your tables with Citus.
Here’s an example of how you could organize your database:
- take your large tables and distribute them across a cluster with Citus,
- convert smaller tables that frequently JOIN with distributed tables into reference tables,
- convert smaller tables that have foreign keys from distributed tables into reference tables,
- keep all other tables as local PostgreSQL tables, that stay local to the coordinator.
That way, you can scale out compute, memory, and IO where you need it—and minimize application changes and other trade-offs where you don’t.
To make this model work seamlessly, Citus 10 adds support for 2 important features:
- foreign keys between local Postgres tables and reference tables
- direct joins between local Postgres tables and distributed tables
With these new features, you can use Postgres tables and Citus distributed tables in combination to get the best of both worlds.
Change your distribution key if you need to
When you distribute a table, choosing your distribution column is an important step, since the distribution column determines which constraints you can create, how (fast) you can join tables, and more.
With Citus 10 you can change the distribution column, shard count, and co-location of a distributed table using the new alter_distributed_table function.
Internally, alter_distributed_table reshuffles the data between the worker nodes, which means it is fast and works well on very large tables. For instance, using this capability makes it much easier to experiment with distributing your tables without having to reload your data.
You can also use the function in production (it’s fully transactional!), but you do need to:
(1) make sure that you have enough disk space to store the table several times, and
(2) make sure that your application can tolerate blocking all writes to the table for a while.
Read scalability via read replicas
Some of you might have sizable read needs that are hard to satisfy with just one database. For instance, dozens and hundreds of business analysts across your company might hit your database hard with queries but are not going to write to your database. That is when a Hyperscale (Citus) server group that contains a read replica of the database in addition to the primary Hyperscale (Citus) cluster can help.
You can now create one or more read-only replicas of a Hyperscale (Citus) server group.
Any changes that happen to the original server group get promptly reflected in its read replicas via asynchronous replication, and queries against the read replicas cause no extra load on the original. The replica is a safe place for you to run big report queries.
The replica cluster is distinct from the original and has its own database connection string. You can also change compute configuration separately on each replica. You can create unlimited number of read replicas without performance penalty on the primary cluster.
Managed PgBouncer
Each client connection to PostgreSQL consumes a noticeable amount of resources. To protect resource usage, Hyperscale (Citus) enforces a hard limit of 300 concurrent connections to the coordinator.
What if you require more client connections for some reason? While you can always setup your preferred connection pooler in front of Hyperscale (Citus) coordinator, it requires additional effort to set it up and maintain.
To improve connection scaling, Hyperscale (Citus) now comes with PgBouncer. If your application requires more than 300 connections, change the port in the connection URL from 5432 to 6432. This will connect to PgBouncer rather than directly to the coordinator, allowing up to roughly 2,000 simultaneous connections.
This new Managed PgBouncer capability in Hyperscale (Citus) will give you all the capabilities of your self-managed PgBouncer—combined with managed service benefits such as automatic updates without connection interruption. And if HA is enabled for your Hyperscale (Citus) cluster, managed PgBouncer is going to be highly available too.
More scheduling choices for maintenance windows
Having an up-to-date database engine (Postgres), operating system (Linux), and other service components is one of the big benefits of any managed database service. Updates however come at a price of downtime that is required to apply them to your system.
For a while now, Hyperscale (Citus) has posted notifications about scheduled maintenance events 5 days before the actual update—plus we’ve had a policy of doing maintenance at least 30 days after the last successful update.
Now you have even more control over planned maintenance events: you can define your preferred day of the week and time window on that day when maintenance for your Hyperscale (Citus) cluster should be scheduled. So you now get to choose between 2 different types of scheduling options for each of your Hyperscale (Citus) clusters:
- System managed schedule: The default maintenance scheduling option is to let the system pick a day and a 30-minute time window between 11pm and 7am in the time zone of your Azure region geography.
- Custom maintenance schedule: You can select day of the week and 30-minute time window, e.g. Sunday at 01:00-01:30am, when maintenance events should be scheduled for that cluster.
You will get notifications about scheduled maintenance 5 days in advance regardless of what schedule your cluster is on.
Take advantage of shard rebalancer recommendations & progress monitoring in the Azure portal
When you add a new node to your Hyperscale (Citus) cluster—or when your database has grown and the data distribution across nodes has become uneven—you will want to rebalance your shards. Shard rebalancing is the movement of shards between nodes in your Citus cluster, to make sure your database is spread evenly across all nodes.
Hyperscale (Citus) has had the shard rebalancer as one of its core features from the very beginning. Recently, we’ve added both shard rebalancing recommendations and progress tracking to the Azure portal.
 Figure 1. Screenshot of the Azure portal and the Shard rebalancer screen for Hyperscale (Citus).
Ways to learn more about Hyperscale (Citus) and to try all of these new things
To figure out if Azure Database for PostgreSQL – Hyperscale (Citus) is right for you and your app, here are some ways to roll up your sleeves and get started. Pick what works best for you!
If you need help figuring out whether Hyperscale (Citus) is a good fit for your workload, you can always reach out to us—the team that created Hyperscale (Citus)—via email at Ask AzureDB for PostgreSQL.
Oh, and if you want to stay connected, you can follow our @AzureDBPostgres account on Twitter. Plus, we ship a monthly technical Citus newsletter to our open source community.
Footnotes
- In the East US region on Azure, the cost of a Hyperscale (Citus) Basic tier with 2 vCores, 8 GiB total memory, and 128 GiB of storage on the coordinator node is $0.27/hour or ~$200/month. At $0.27 USD/hour, you can try it for ~8 hours or so and you’ll only pay $2 to $3 USD.↩

Recent Comments