
by Contributed | Apr 22, 2021 | Technology
This article is contributed. See the original author and article here.
What’s a capstone project?
University College London (UCL) created the UCL Industry Exchange Network (UCL IXN), which partner their students with organizations worldwide. Organizations define a project, and the student picks something that they can relate to and are passionate about.
The goal of those capstone projects is to provide real-world experience to acquired academic knowledge. Through experience, students learn about the industry. They learn about best practices and how to work on a project with deliverables.
Learn more about the UCL Industry Exchange Network by visiting the UCL IXN website.
What’s Project 15 and how it works?
Project 15, on the other hand, is an effort to accelerate conservation and ecosystem sustainability projects with the latest Internet Of Things (IoT) technologies. This is done through an Open Source Software platform.
The platform is made to take you 80% of the way. In comparison, the student only provides the remaining 20% — no need to design a cloud architecture from scratch when all the components are already linked together. We can get started faster and achieve our preservation goals just as quickly.
Learn more about Project 15 by visiting their website.
Get the code that power Project 15 now on GitHub.
Student Capstone Projects
There were many projects this year, but two of them kept our attention. The first project helped us keep track of elephants through Machine Learning Computer Vision. Tracking where the elephants are, where they are going, and how they are doing is vital to ensure that they are kept away from poachers.
The second project is about tracking red pandas through the jungle to ensure their wellbeing. To help preserve their ecosystem, they use Azure Custom Vision to help identify the red pandas in an area and ensure their health.
If you love elephants, we have a bonus for you. The Elephant Edge challenge in which we participated this year also helps in conserving elephants through GPS tracking, GPS fence, visual and sound monitoring.
The amount of work that was done through student projects is incredible. If you want to know more, you need to watch our upcoming events.
Upcoming events
You can watch a Livestream with details and demos of all those projects! You can Register Now, or you can catch the Livestream on Learn TV at 8am PDT (UTC-7).
While we are talking about events and sustainability, do not miss the Microsoft IoT Hack for Sustainability. We have up to $10,000 in prizes, and it’s worth registering. The deadline to participate is May 24th, 2021, at 5pm EDT.
Training Resources
If you want to make a difference, you can start by using the Learn modules the students used while building those projects. Among the modules that will inspire you is Classify Endangered Bird Species with Custom Vision.
Do not forget to get started with Project 15 by retrieving the code from GitHub!.
by Contributed | Apr 22, 2021 | Technology
This article is contributed. See the original author and article here.
Deploy LAPS, Check! You’re all set, right? Maybe…
Hi team, Eric Jansen here again; I’m back after being reminded by a friend and reader that I’ve been away for too long. I’m trying to be better about it since I have a ton of content that I’d like to share and talk about, but these days it all comes down to time.
In today’s blog, I’d like to quickly talk about the Local Administrator Password Solution (aka LAPS). It’s nothing new and has been around for some time. If you aren’t familiar with it, take a look at the documentation, found here: Download Local Administrator Password Solution (LAPS) from Official Microsoft Download Center
It short, it is a solution that allows computers to publish a generated password, for a defined local admin account, to an attribute on itself in Active Directory. For a bit more detail, here are the bullet points from the “How Does LAPS Work?” section in the link above:
The core of the LAPS solution is a GPO client-side extension (CSE) that performs the following tasks and can enforce the following actions during a GPO update:
- Checks whether the password of the local Administrator account has expired.
- Generates a new password when the old password is either expired or is required to be changed prior to expiration.
- Validates the new password against the password policy.
- Reports the password to Active Directory, storing it with a confidential attribute with the computer account in Active Directory.
- Reports the next expiration time for the password to Active Directory, storing it with an attribute with the computer account in Active Directory.
- Changes the password of the Administrator account.
The password can then be read from Active Directory by users who are allowed to do so. Eligible users can request a password change for a computer.
The sentence highlighted above is what I’ll be focusing on today. One of the things that I do is travel around to different customers and audit various things that fall into the technologies that I support. In my experience, when I bring up the topic of LAPS during an audit, and want to take a peek into their setup, it’s somewhat common to hear them say something similar to the following: “No, we’re good, we already set it up and it’s working great!” With that, they want to move on to more pressing matters – which is fine because, well, they’re the customer. But just like when you’re writing a book, or preparing a speech, sometimes you need an ‘attention getter‘ – something to grab their attention to open their eyes – and this is how I do it:
“I say ok, that’s fine, but maybe we could just run one command really fast….as a regular user (with no administrative rights to the environment).”
I have them run the following:
Get-ADComputer -Filter * -Properties MS-Mcs-AdmPwd | Where-Object MS-Mcs-AdmPwd -ne $null | FT Name, MS-Mcs-AdmPwd
And this is when the hook is set… In a LOT of cases, that command is run and then computers start scrolling off the screen showing the local administrator passwords in the clear, and no hacking was involved. Then you see jaws drop and the admin(s) saying…” but we checked this – we used the Find-AdmPwdExtendedRights PowerShell cmdlet and remediated everything.” That may be true, you checked it years ago when you deployed LAPS, but things change and that’s why you must constantly audit your environment.
So how does this happen? Usually (based on my experience) the issue is a training issue, and usually the issue is computer specific (i.e., not inherited). The issue happens because permissions are incorrectly and unknowingly given by an admin to a computer object that gives non-administrative users too many rights. When I say rights, specifically I’m talking about extended rights.
Here is a snip from the LAPS Operations Guide that talks about it:
========================================================================================
Permissions
The Active Directory infrastructure offers advanced tools for implementation of the security model for this solution by allowing for per-attribute Access Control Lists (ACLs) and implementing confidential attributes for password storage. There are four sets of rights that need to be modified.
Removing Extended Rights
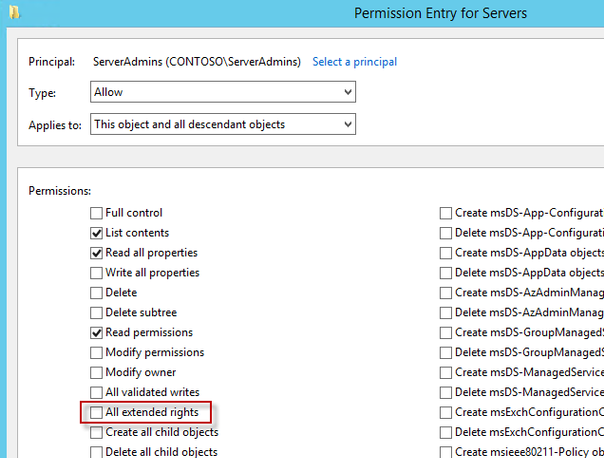
To restrict the ability to view the password to specific users and groups you need to remove “All extended rights” from users and groups that are not allowed to read the value of attribute ms-Mcs-AdmPwd. This is required because the All Extended rights/permissions permission also gives permission to read confidential attributes.
Inherited Permissions
If you want to do this for all computers, you will need to repeat the next steps on each OU that contains those computers. You do not need to do this on sub containers of already processed OUs unless you have disabled permission inheritance.
- Open ADSIEdit
- Right Click on the OU that contains the computer accounts that you are installing this solution on and select Properties.
- Click the Security tab
- Click Advanced
- Select the Group(s) or User(s) that you don’t want to be able to read the password and then click Edit.
- Uncheck All extended rights
Important: This will remove ALL extended rights, not only CONTROL_ACCESS right, so be sure that all roles will retain all necessary permissions required for their regular work.
To quickly find which security principals have extended rights to the OU you can use PowerShell cmdlet. You may need to run Import-module AdmPwd.PS if this is a new window.
Find-AdmPwdExtendedrights -identity <OU name> | Format-Table

If the output is truncated as the number of trustees having permissions is long, focus on a specific OU and run:
Find-AdmPwdExtendedrights -identity Memphis | Format-list
ObjectDN : OU=memphis,OU=members,DC=herbertm01,DC=lab
ExtendedRightHolders : {NT AUTHORITYSYSTEM, HERBERTM01domDomain Admins, contoso-domMember-HelpDesk1-Memhpis}
Direct Permissions
“All extended rights” may also be set through direct, non-inherited Access Control Entries (ACEs) on the computer objects. This might have been done manually by the customer or with a script or provisioning system.
The second common source for ACEs with the extended rights access is the schema default for computers. By default, it contains the “Account Operators” group with full control, which will also grant sufficient permissions to read the local Administrator password:

In a delegated administration environment where the Account Operators are meant to be used for Domain User Accounts only and no or little permissions should be granted to computers, you may need to review changing or even removing this ACE from the schema default.
You also need to develop a solution to remove this ACE from all computers managed by LAPS.
========================================================================================
What I see most commonly are ‘Direct Permissions’ modifications on computer objects, as discussed above. This could be due to lack of knowledge, flawed account provisioning code, laziness, or any number of things. I see this most during the staging of computer accounts before a domain join operation. In this scenario, a process for this is either not established, incorrectly established, or is just plain circumvented. Here’s just one example (but I’m also curious to see what others in the field are seeing, so comment on your findings if you would) :
An admin manually pre-stages a computer account and they want to give the end user the ability to add their own machine to the domain (perhaps for environments where the ms-DS-MachineAccountQuota has been locked down), or they want a certain user, or users, to be able to modify something on the computer object. Whatever the reason, they just give “Domain Users” full control or some sort of delegated control over the computer object just because ‘it works’. The most common principals that I see used are “Domain Users”, “Authenticated Users”, “BUILTINUsers”, and “Everyone” with these excessive rights on the newly created computer objects. So now, consider a new Jr. admin joining the team and his new mentor shows him the processes, and now we have two admins doing said process. Eventually, this gets out of control and as time goes by, there could be hundreds or thousands of machines that have their local administrator passwords available to potentially ‘Everyone’. That’s when things can get bad. I don’t even want to mention what kinds of machines I’ve found in my travels that could have been breached.
The point is that things change and everything needs to be audited. But finding and fixing the permissions alone isn’t the answer. Education and training need to be a part of the solution. With all of that said, go forth and run that one line and let me know what you find. OK, run the command, but I don’t really want to know what you find. ;) Afterwards, if you have any hits, and I hope you don’t, I’d suggest that you fix any findings ASAP by removing any incorrectly distributed extended rights.
So how do we fix this? Well, I explain above, and show the checkbox that you need to remove, but if you had hundreds or thousands of these computers to fix, that’s a lot of clicking, so here’s some sample code for you to fix it programmatically.
<#
.Synopsis
   Removes unauthorized access from the most commonly seen default groups that shouldn't have rights to read the AD stored local admin account password for the given computer - 'Everyone', 'BUILTINUsers', 'Domain Users', and 'Authenticated Users'.

.DESCRIPTION
   Removes unauthorized access from the most commonly seen default group that shouldn't have rights to the CONTROL_ACCESS (as seen if using DSAcls) / ExtendedRights (as seen if using Get-ACL) permission on computer accounts.
   Holders of this right have permission to read the admin account password for the given computer.  In addition to checking to see if these default groups have ExtendedRights specifically, I also check to see if they have 'Full Control',
   which is seen as 'GenericAll'.  Full control obviously includes ExtendedRights, but since all rights are included, there's no need to individually list them, so it's labelled 'GenericAll', and filters just looking for 'ExtendedRights'
   would miss those ACEs.

   The Alpha version of this function only removes non-inherited ACEs from specific computer objects only.

.EXAMPLE
   Remove-AdmPwdExtendedRights -ComputerName <ComputerName>

   Displays the Access Control Entries (ACEs) within the Access Control List (ACL) that contain either Full Control or that had Extended Rights, for any of the following groups defined as the Identity Reference:

   'Everyone', 'BUILTINUsers', 'Domain Users', and 'Authenticated Users'

   The variablized ACL has those ACEs removed, but prompts for confirmation that you're sure that you want write the modified ACL to the computer object in AD.

.EXAMPLE
   Remove-AdmPwdExtendedRights -ComputerName <ComputerName> -Force

   Displays the Access Control Entries (ACEs) within the Access Control List (ACL) that contain either Full Control or that had Extended Rights, for any of the following groups defined as the Identity Reference:

   'Everyone', 'Domain Users', and 'Authenticated Users'

   The variablized ACL has those ACEs removed, DOES NOT PROMPT for modification confirmation and attempts to write the modified ACL to the computer object in AD.

.NOTES
This is an Alpha version of this function with very limited testing.  See Disclaimer below.

Alpha Version - 20 April 2021

When looking at ACLs in AD, and trying to understand what you're seeing in the output of a Get-ACL on an AD Object, reference the following Microsoft Documentation which shows the ActiveDirectoryAccessRule Class:

https://docs.microsoft.com/en-us/dotnet/api/system.directoryservices.activedirectoryaccessrule?redirectedfrom=MSDN&view=net-5.0

or this which shows the Object ACE structure:

https://docs.microsoft.com/en-us/windows/win32/api/winnt/ns-winnt-access_allowed_object_ace?redirectedfrom=MSDN

Info based on the filter criteria in the function below:

ActiveDirectoryRights include permission types
IdentityReference Contains Security Principals
AccessControlType is the Access to the Right (ie Allow or Deny)
ObjectType is the string form of the rightsGUID attribute of the control access right -
    -Below I filter for 00000000-0000-0000-0000-000000000000, which is the equivalent ALL - so 'Read ALL Properties', or 'Write ALL Properties', but in our case it's 'ALL Extended Rights".

This article shows how an ADSI ACE is read:

https://docs.microsoft.com/en-us/windows/win32/ad/reading-a-control-access-right-set-in-an-objectampaposs-acl

   Disclaimer:

 This is a sample script.  Sample scripts are not supported under any Microsoft standard support program or service. The sample scripts are provided AS IS without warranty of any kind. Microsoft further disclaims all implied warranties including, without limitation, any implied warranties of merchantability or of fitness for a particular purpose. The entire risk arising out of the use or performance of the sample scripts and documentation remains with you. In no event shall Microsoft, its authors, or anyone else involved in the creation, production, or delivery of the scripts be liable for any damages whatsoever (including, without limitation, damages for loss of business profits, business interruption, loss of business information, or other pecuniary loss) arising out of the use of or inability to use the sample scripts or documentation, even if Microsoft has been advised of the  possibility of such damages.

 AUTHOR: Eric Jansen, MSFT
#>

function Remove-AdmPwdExtendedRights
{
    [CmdletBinding()]
    [Alias()]
    Param
    (
        # Computer Object in AD to target for removal of Extended Rights.
        [Parameter(Mandatory=$false,
                   ValueFromPipelineByPropertyName=$true,
                   Position=0)]
        $ComputerName,

        # Computer Object in AD to target for removal of Extended Rights.
        [Parameter(Mandatory=$false,
                   ValueFromPipelineByPropertyName=$true,
                   Position=1)]
        [Switch]$Force,

        # OU in AD to target for removal of Extended Rights.
        [Parameter(Mandatory=$false,
                   ValueFromPipelineByPropertyName=$true,
                   Position=2)]
        $OrganizationalUnit
    )


    try
    {

        $ComputerDN = $(Get-ADComputer $ComputerName).distinguishedname
        $ACL = Get-ACl AD:$($ComputerDN)
        $ACEsWithDefinedGroups = $ACL.Access | where {$_.IdentityReference -Match "Everyone" -or $_.IdentityReference -eq "BUILTINUsers" -or $_.IdentityReference -Match "Domain Users" -or $_.IdentityReference -Match "Authenticated Users"}

        If($ACEsWithDefinedGroups){

        $ExtendedRightACEs = $ACEsWithDefinedGroups |
        where {$_.isInherited -eq $false -and $_.ActiveDirectoryRights -match "ExtendedRight" -and $_.AccessControlType -eq "Allow" -and $_.objectType -eq "00000000-0000-0000-0000-000000000000"}

        $FullControlACEs = $ACEsWithDefinedGroups |
        where {$_.isInherited -eq $false -and $_.ActiveDirectoryRights -match "GenericAll" -and $_.AccessControlType -eq "Allow"}


            ForEach($ACE in $ExtendedRightACEs){
            Write-Host "Removing the Following ACE from the ACL: " -NoNewline -ForegroundColor Gray
            Write-Host "ActiveDirecoryRights: $($ACE.ActiveDirectoryRights); IdentityReference: $($ACE.IdentityReference); AccessControlType: $($ACE.AccessControlType)"
            $ACL.RemoveAccessRule($ACE) | Out-Null
            }

            ForEach($ACE in $FullControlACEs){
            Write-Host "Removing the Following ACE from the ACL: " -NoNewline -ForegroundColor Gray
            Write-Host "ActiveDirecoryRights: $($ACE.ActiveDirectoryRights); IdentityReference: $($ACE.IdentityReference); AccessControlType: $($ACE.AccessControlType)" -ForegroundColor Red
            $ACL.RemoveAccessRule($ACE) | Out-Null
            }

            If($ExtendedRightACEs -ne $null -or $FullControlACEs -ne $null){

                If($Force){
                Set-Acl -AclObject $ACL -Path AD:$ComputerDN
                }
                Else{

                    do
                    {
                      $Answer = Read-Host "Write Changes to $($ComputerName) ACL? (Y/N)"

                      IF($Answer.ToLower() -eq "y"){
                      Set-Acl -AclObject $ACL -Path AD:$ComputerDN
                      }
                      ElseIf($Answer.ToLower() -eq "n"){
                      Return
                      }

                    }
                    until ($Answer.ToLower() -eq "y" -or $Answer.ToLower() -eq "n")

                }


            $ACEsWithDefinedGroups = $PostACL.Access | where {$_.IdentityReference -Match "Everyone" -or $_.IdentityReference -eq "BUILTINUsers" -or $_.IdentityReference -Match "Domain Users" -or $_.IdentityReference -Match "Authenticated Users"}

            $ExtendedRightACEs = $ACEsWithDefinedGroups |
            where {$_.isInherited -eq $false -and $_.ActiveDirectoryRights -match "ExtendedRight" -and $_.AccessControlType -eq "Allow" -and $_.objectType -eq "00000000-0000-0000-0000-000000000000"}

            $FullControlACEs = $ACEsWithDefinedGroups |
            where {$_.isInherited -eq $false -and $_.ActiveDirectoryRights -match "GenericAll" -and $_.AccessControlType -eq "Allow"}

                If($ExtendedRightACECheck -eq $null -and $FullControlACEs -eq $null){
                Write-Host "Successfully removed ExtendedRights from $($ComputerName)" -ForegroundColor Green
                }
                Else{
                Write-Warning "Something didn't go as expected..."
                }

            }

        }
        Else{
        Write-Host "There were no ACE's that included 'Everyone', 'BUILTINUsers', 'Domain Users', or 'Authenticated Users'."
        }


    }
    catch
    {
        $_.exception.message
    }

}
The Remove-AdmPwdExtendedRights function that I’ve written above works, but since I wrote it just days before posting this (since I just wanted to get this content out there), it has both limited testing and a list of other limitations that I wanted to point out:
- I don’t give the user of the script a parameter to define their own groups, I only filter for what I most commonly see as far as groups that shouldn’t have rights: ‘Everyone’, ‘BUILTINUsers’, ‘Domain Users’, and ‘Authenticated Users’.
- With that said, if you wanted to add your own groups for removal, you’ll need to edit the function to add them to the filter or add your own parameter. If I add that functionality, I’ll update the blog.
- As of right now, it only fixes computers where the permissions were modified directly on the individual computer object, it doesn’t modify any OU permissions that the computer inherits. I’m debating on fixing this for a future update, but for now, you’ll need to make permission changes to any incorrectly ACLs OU’s separately.
- As of right now, the function is written to just remove the offending ACE(s) of a single computer object to be fixed, but I could easily build a loop into it so that it can fix a whole list. For the time being though, I chose not to since you may want to include other operations into your bulk fix actions. Yeah, I could have made additional parameters for the additional recommended actions (more on that below), but that would do more than what the function name alludes to, so I chose to keep it separate.
- Instead of just unchecking the one box for “All extended rights”, I wipe out the whole ACE, so you may not like that. Here’s an example of what I mean:
- I run the command above as a regular user and collect my list of computer objects that have excessive rights, and I find machines that have additional rights defined in that same ACE, such as this guy:

- The offending checkbox is checked, but so is ‘All validated writes’… Well, I wipe it all out. You’d just need to verify that this wouldn’t have any impact on your environment. If so, and you just need the one box unchecked, then you would need to modify the sample code.
- In addition to looking just for those common groups to have ‘All Extended Rights’, I also check to see if they have ‘Full Control’. If they do, I also remove that ACE.
- I run it through the function, and modify the ACL that’s stored in a variable, and then ask if it’s ok to write the change to AD, so it warns you before making and change, shows what would be removed, and gives you the option to opt out (unless -Force is used and then it just does it).
OK, so you have the code, and you have a list of machines that need to be fixed, now what? We write a small script that loops through all the vulnerable computer objects, and run the Remove-AdmPwdExtendedRights function for each computer object. But remember in the limitations section for the function, in the third bullet, I mentioned that you may want to take additional remediation actions, and you do. You’ll also want to modify the ‘ms-Mcs-AdmPwdExpirationTime’ attribute on the vulnerable computer objects, changing it to the current time, so that upon the next group policy refresh, the client-side extension updates its password and writes it back to Active Directory, rendering the old password useless. You can do this by using the Reset-AdmPwdPassword cmdlet that’s in the AdmPwd.PS module, among other ways.
After all of that, run the original command again to see what has and what has not been fixed, and re-evaluate. Maybe that ‘regular user’ is part of a different group that gives them the ability to see the password, or maybe there was an incorrect delegation to the OU that the computer object resides in. It may take a little more investigation, but it shouldn’t be hard to find and fix the rest of the computer objects.
Finally, after fixing the permissions issues, and then resetting those machines’ passwords, you may want to consider investigating logons to those machines with the local administrator account with that machines’ associated LAPS password to find possible compromise. After all, finding the local admin account to use is not that hard of a task.
In addition to the above information, review the guidance in the link below. It talks about default ACLs for when staging machine accounts, best practices for staging said machine accounts, and other scenarios where some users can read passwords for some computers without being delegated the permissions to do so.
LAPS and permission to join computer to domain | Microsoft Docs
Until next time!

by Contributed | Apr 22, 2021 | Technology
This article is contributed. See the original author and article here.
Storage > Storage Accounts
- Encryption scopes in Azure Storage now generally available
Compute>Virtual Machines and Virtual machine scale sets
- Virtual machine scale sets with flexible orchestration mode are now available in public preview in the Azure portal
General > Management + Governance
- New Management Group UX: Introducing a tree hierarchy, get started page, security tab and more
Intune
- Updates to Microsoft Intune
Let’s look at each of these updates in greater detail.
Storage > Storage Accounts
Encryption scopes in Azure Storage now generally available
Encryption scopes introduce the option to provision multiple encryption keys in a storage account for blobs. Previously, customers using a single storage account for multi-tenancy scenarios were limited to using a single account-scoped encryption key for all the data in the account. With encryption scopes, customers now can provision multiple encryption keys and choose to apply the encryption scope either at the container level (as the default scope for blobs in that container) or at the blob level. Encryption scopes in Azure Storage now generally available.
The key that protects an encryption scope may be either a Microsoft-managed key or a customer-managed key in Azure Key Vault. Customers can also choose to enable automatic rotation of a customer-managed key that protects an encryption scope. When customers generate a new version of the key in their Key Vault, Azure Storage will automatically update the version of the key that is protecting the encryption scope, within a day.
Please refer to our documentation on encryption scopes for more details on the feature.
To create an encryption scope in the Azure portal
- Sign into Azure portal
- Click on ‘More Services’
- Click on ‘Storage Accounts’

- Click on ‘Encryption’ in the table of contents

- Navigate to the ‘Encryption scopes’ tab

- Click ‘Add’ to create an encryption scope and configure as desired

Compute>Virtual Machines and Virtual machine scale sets
Virtual machine scale sets with flexible orchestration mode are now available in public preview in the Azure portal
Virtual machine scale sets with flexible orchestration mode helps customers simplify the deployment, management, and scalability of their applications. This new capability provides full control of the individual VMs within a scale set, like Availability Sets, while increasing high availability for large deployments (thousands of VMs). However, scale sets will now be able to provide several additional features compared to Availability Sets, such as higher levels of reliability and performance, ability to deploy VMs in conjunction with load balancers, support for Availability Zones etc. Virtual machine scale sets with flexible orchestration mode are now available for public preview in Azure portal.
Demo steps to enable flexible orchestration mode preview:
To be able to use flexible orchestration mode you must register your subscription for preview of this feature. Follow the documentation to register your subscription.
Demo steps to a Create VMSS UX:
- Click ‘Create a resource’

- Search for ‘Virtual machine’, then select one of the options for a Virtual Machine

- Click ‘Create’

- In ‘Create a virtual machine scale set’ Basics tab select Orchestration mode to ‘Flexible (preview)’

- Follow instructions on the page to configure the rest of the settings. See documentation to learn more.
Demo steps to Create VM UX:
- Click ‘Create a resource’

- Search for ‘Virtual machine’, then select one of the options for a Virtual Machine

- In ‘Create a virtual machine’ Basics tab select ‘Availability’ options to ‘Virtual machine scale set (preview)’

- Select an existing Virtual machine scale set or create new one.

- Follow instructions on the page to configure the rest of the settings. See documentation to learn more.
General > Management + Governance
New Management Group UX: Introducing a tree hierarchy, get started page, security tab and more
The new management groups Azure portal experience provides a visual hierarchy of management groups to organize your subscriptions and resources for unified policy, security, access control and more. Traverse through the tree structure and expand or collapse nodes of management groups to build or navigate through your structure. You can also now click on a single management group to add subscriptions and apply governance conditions.
Our new experience includes the following changes:
- A new ‘Get Started’ page for first time users with links to documentation and examples of tree structures for planning

On the Management groups homepage, users can view and manage subscriptions in three ways:
- Click on the ‘Subscriptions’ tab on the Management groups homepage which shows all subscriptions at Root level
- Click on a single management group, navigate to the ‘Subscriptions’ tab
- NEW: Click directly on a display name to drill down to the details of single management group view
- Note: We removed the ‘details’ button
- Click on a subscription count via the tree view columns (Child subscriptions and Total subscriptions)
- Added aggregated counts of subscriptions to understand hierarchy faster

- Note: We removed the Role column
- Management groups where a user does not have owner/contributor access are now explicit through disabled links
- However, if a user has access to subscriptions within a disabled management group, they can still view these subscriptions
- NEW: More information provided in Essentials of a single management group (details view)
- Added Path
- Added Subscription count
- Added a clickable parent group for faster upward traversal of structure

- In the single management group view, we added a new section called ‘Governance’. Our current offerings include:
- Security
- Policy
- Deployments

- We added the ability to select subscriptions directly contained in a management group. You can also view all subscriptions included in its child groups.
- You can select a scope by checking/unchecking the ‘Only show direct children’ checkbox
- NEW: Security Center menu item to view secure score and recommendations for single management group

INTUNE
Updates to Microsoft Intune
The Microsoft Intune team has been hard at work on updates as well. You can find the full list of updates to Intune on the What’s new in Microsoft Intune page, including changes that affect your experience using Intune.
Azure portal “how to” video series
Have you checked out our Azure portal “how to” video series yet? The videos highlight specific aspects of the portal so you can be more efficient and productive while deploying your cloud workloads from the portal. Check out our most recently published videos:
Next steps
The Azure portal has a large team of engineers that wants to hear from you, so please keep providing us your feedback in the comments section below or on Twitter @AzurePortal.
Sign in to the Azure portal now and see for yourself everything that’s new. Download the Azure mobile app to stay connected to your Azure resources anytime, anywhere. See you next month!


Recent Comments