by Contributed | Apr 28, 2021 | Technology
This article is contributed. See the original author and article here.
While recently working with a customer’s Governance Risk and Compliance team (GRC) the discussion pivoted to the ability to exempt Azure resources from policies or disable the policy to reflect the Secure Score correctly for their environment. GRC teams may want on a quarterly or monthly basis to produce a report of the exemptions to review and discuss or hand over to auditors looking to see the exemption story.
The Exemption capabilities in Azure Security Center utilize Azure Policy exemptions that have been around for a bit now. @Tom Janetscheck has written quite a bit about the capability and provided some unique Workflow automations around
Submitting a exemption via Logic App
Notifying an Exemption via Logic App
Both are very great workflow automations the GRC team can adopt at an enterprise. Your GRC team may be looking for an easy to pull report they could download around the exemptions and the azure resources to quickly audit findings.
Let’s examine a few ways you can pull this information within the Azure Portal, Azure Resource Graph, and use a new PowerShell Script to download a detailed report.
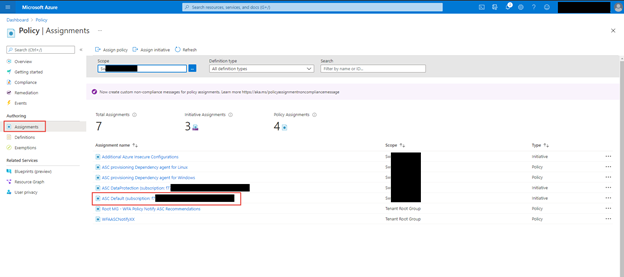
Azure Portal – Policy – Assignments blade
When you want a quick view of the exemptions for a particular subscription within the Azure Portal for Policy you can leverage the Assignments blade to list those exemptions. In addition, if you have written access you can update or create new exemptions as well.
Within the Azure Portal go to Policy and click on the Assignments blade, within there, click on ASC Default assignment.
Click on the Exemptions Tab, if you have write access to policy assignments you can also click on the … and edit the exemption too see more details


Azure Resource Graph
Some of the exemption values are stored as data in Azure Resource Graph and specifically the securityresources table. If you are unfamiliar with the Azure Resource Graph the Azure Portal’s top search bar is also powered by it and helps return fast results. It is a great way to not invoke a GET Azure Resource API call for each Azure resource details and configurations as their state and information are stored here.

Within the table Azure does store some information around the ASC recommendations and their states, including the exemptions and policies disabled.
You can now run a KQL query in Azure Resource Graph to generate a report.
securityresources
        | where type == "microsoft.security/assessments"
        | extend source = tostring(properties.resourceDetails.Source)
        | extend resourceId =
            trim(" ", tolower(tostring(case(source =~ "azure", properties.resourceDetails.Id,
                                            source =~ "aws", properties.resourceDetails.AzureResourceId,
                                            source =~ "gcp", properties.resourceDetails.AzureResourceId,
                                            extract("^(.+)/providers/Microsoft.Security/assessments/.+$",1,id)))))
        | extend status = trim(" ", tostring(properties.status.code))
        | extend cause = trim(" ", tostring(properties.status.cause))
        | extend assessmentKey = tostring(name)
        | where cause == "Exempt" or cause == "OffByPolicy"
        | extend ResourceName = tostring(split(resourceId,'/')[8]), RecommendationName = tostring(properties.displayName), Source = properties.resourceDetails.Source, StatusCause = tostring(properties.status.cause), StatusDescription = properties.status.description, RecommendationSeverity = tostring(properties.metadata.severity)
        | project RecommendationName, RecommendationSeverity, ResourceName, StatusCause, StatusDescription, resourceGroup, Source, subscriptionId
        | sort by RecommendationSeverity, RecommendationName
For a comprehensive and better visual listing experience, be sure to set the query to run on all Azure Subscriptions and Formatted Results turned on. You can then download the report to a CSV file for the auditors or for review of the exceptions and disabled policies.

You can find the KQL query here in the Azure Security Center GitHub repo.
Generate-ExemptionReport.ps1
For a more comprehensive and detailed report that includes Notes in the exemption, expiration dates for exemptions, and who created the exemptions you can now utilize the following PowerShell script which executes across Azure Subscriptions and invokes an API to get the details:
Microsoft.Authorization/policyExemptions?api-version=2020-07-01-preview
To use the script you can download here from the GitHub Repo and open PowerShell.
Within PowerShell be sure to log into an Azure using Connect-AzAccount and using the login of someone who has a large amount of reader access across your Azure enterprises subscriptions. You may see some errors please ignore for now as the script will be tuned over time to support additional scenarios.
The end result is nicely generated CSV with all the details around the exemptions that can be imported into Excel, PowerBI, or other data visualization products.
As an example you can import into into Excel, Open a new Excel sheet and got to the ‘Data’ tab and use the button ‘From Test/CSV’

Once imported you can pivot and filter as needed

In this article you explored several ways to examine and generate an exemption report. You can use the Azure Portal – Policy – Assignments blade to quickly view all the Exemptions. You can use the Azure Resource Graph and a KQL Query to generate a simplified exemption and policy disable report. Finally you can use a PowerShell script to generate a detailed exemption and policy disable report that includes notes, expiration date and time, and who created the exemption. These reports can be used in a quarterly or month basis for you GRC team to review and discuss or handed over to auditors looking to see the exemption story.
Special thanks to:
@Yuri Diogenes for reviewing this post
by Contributed | Apr 28, 2021 | Technology
This article is contributed. See the original author and article here.
Gain rich control over the approval, scheduling, and protection of content delivered from Windows Update thanks to the new Microsoft Graph APIs, now available in public preview! Powered by the Windows Update for Business deployment service, these APIs enable IT professionals and app developers to:
- Approve and schedule specific feature updates to be delivered from Windows Update – including skipping or not taking feature updates.
- Stage deployments over a period of days or weeks using rich expressions (ex: deploy 20H2 to 500 devices per day, beginning on May 11, 2021)
- Bypass pre-configured Windows Update for Business policies to immediately deploy a security update across your organization.
- Deliver safer update results by leveraging automatic pilots for any deployment.
Microsoft Graph is the gateway to Microsoft 365, making it easy to build apps that span organizations, users, and devices. By connecting deployment service capabilities with Microsoft Graph, app developers can easily build rich update management tools and extend these experiences with contextual user data (such as leveraging a user’s calendar data when scheduling an update).
And the best part is, if you have one of the following Windows or Microsoft 365 subscriptions, you can start using the deployment service today!
- Windows 10 Enterprise E3 or E5 (included in Microsoft 365 F3, E3, or E5)
- Windows 10 Education A3 or A5 (included in Microsoft 365 A3 or A5)
- Windows Virtual Desktop Access E3 or E5
- Microsoft 365 Business Premium
What is the Windows Update for Business deployment service?
The Windows Update for Business deployment service is the bridge between you and Windows Update. It allows you to approve and schedule content approvals directly through a service-to-service architecture.
Here is a common scenario for the deployment service:
- Using a management tool, you select the target devices and approve content to be deployed. This tool may be PowerShell, a Microsoft Graph app, or a complete endpoint management solution such as Microsoft Endpoint Manager.
- The tool conveys your approval, scheduling details, and device selection to the deployment service.
- The deployment service processes the content approval and compares it with previously approved content. Final update applicability is determined and conveyed to Windows Update, which then offers the approved content to devices on their next check for updates.
This service-to-service architecture complements existing Windows Update for Business policies while providing unique benefits:
- Update management now goes beyond the individual device – allowing you to easily understand what updates are applicable to your organization and how best to stage deployments.
- Reacting to update challenges is faster than ever before – whether you need to pause or accelerate a deployment.
- New features and capabilities are immediately delivered to all in-support Windows versions – no operating system servicing required.
The Windows Update for Business deployment service is an enterprise-grade solution that provides full control over managed content and is already certified compliant with several industry compliance standards, including: ISO 27001, FedRAMP High, HiTRUST, and SOC II.
Try the service today
With today’s public preview release, you can use the Windows Update for Business deployment service directly through the Microsoft Graph API and associated SDKs, as well as Azure PowerShell. If you’re an IT pro, you can leverage these APIs and SDKs within your in-house solutions. If you’re a management tool vendor, these APIs and SDKs can help you provide deployment service capabilities to your customers through multi-tenant apps.
To begin exploring the deployment service, we encourage you to use Microsoft Graph Explorer or a proven industry solution, such as Postman.
Using Microsoft Graph Explorer to interact with the deployment service
Microsoft Graph Explorer is a tool that makes it simple to make requests and see responses against Microsoft Graph. To begin using Microsoft Graph Explorer with the deployment service, sign in using your tenant.
Next, provide consent for Graph Explorer to access the deployment service on behalf of your organization. Click the settings gear icon next to your account after signing in and choose Permissions. Select WindowsUpdates.ReadWrite.All and then select the Consent action.
You are now ready to begin using the service. In the left pane, you will find several samples for Windows Updates. Start with a basic operation like list catalog entries.
 Interacting with the Windows Update for Business deployment service via Microsoft Graph Explorer
While you can immediately query for data provided by the deployment service—such as available content to deploy—querying for other content, such as deployments, will depend on what have been created for your tenant. You can use Microsoft Graph Explorer to explore the capabilities provided by the deployment service and understand how to incorporate these into your apps, including:
- Enroll in update management. Enroll devices in feature update management by setting the enrollmentUpdateCategory to feature. This will stop offering feature updates to enrolled devices until explicitly approved using the deployment service.
- Create deployment (expedited security update). If a new critical security update is released and you want to reach compliance as rapidly as possible, you can deploy the update as expedited and control settings like the number of days until devices are required to restart.
- Create deployment (rate-based gradual rollout). Stage a deployment over time so that devices are offered the feature update at regular intervals and according to a specified number of devices per offer.
- Create deployment (date-based gradual rollout). Stage a deployment over time so that devices are offered the update at regular intervals until all devices receive the update by a targeted end date/time. You may also use a start date/time with any deployment to control when to begin offering the update.
- Update deployment (replace monitoring rules). Apply monitoring rules to any deployment to detect a threshold of issues, such as number of rollbacks, and then pause the deployment or alert you to the problem.
To learn more about these operations and the associated capabilities, please see our Microsoft Graph API documentation.
Using Postman to interact with the deployment service
Like Graph Explorer, Postman is an easy tool for interacting with the deployment service and a great way to familiarize yourself with the supported operations. For detailed instructions, see Use Postman with the Microsoft Graph API.
Note
When you reach step 3.9, follow the procedure to add and consent Delegated Permissions for WindowsUpdates.ReadWrite.All.
When you reach step 6, expand the Windows Updates (beta) folder of the Postman collection to see operations you can perform with the deployment service.
|
Select a request such as List catalog entries, ensure any required variables are populated, then click Send to interact with the service.
 Interacting with the Windows Update for Business deployment service via Postman
by Contributed | Apr 28, 2021 | Technology
This article is contributed. See the original author and article here.
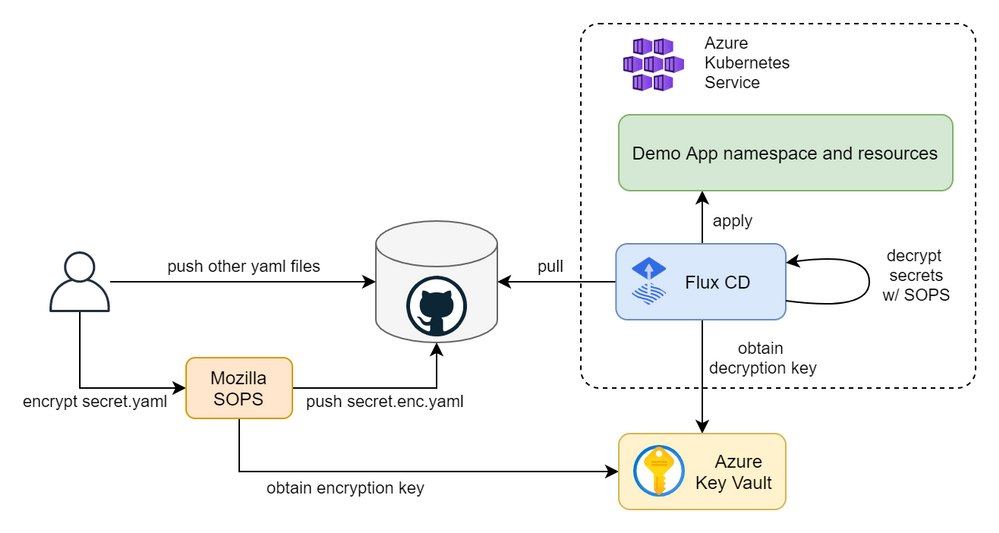
In this article you will learn how to create a fully automated GitOps workflow where your apps will be automatically deployed when you update their definitions in a Git repository. We will create a cluster in Azure Kubernetes Service (AKS) and configure Flux CD, including secret management with Mozilla SOPS and Azure Key Vault. We will push our app manifests and encrypted secrets to the repo and Flux will decrypt them using a cryptographic key in Key Vault and apply our changes. The figure below depicts the overall continuous deployment (CD) workflow.
Create a Kubernetes cluster
First, let’s export a few environment variables that will be used throughout the article to create and reference Azure resources. Replace the values with your own names and preferences.
export RESOURCE_GROUP_NAME=gitops-demo-rg
export LOCATION=westeurope
export CLUSTER_NAME=GitOpsDemoCluster
Create a resource group to contain all the resource that we will create as part of this guide.
az group create -n $RESOURCE_GROUP_NAME -l $LOCATION
Create an AKS cluster. The command below will create a cluster with the default configuration options, i.e., one node pool with three nodes, a system-assigned identity, kubenet network plugin, no network policy, etc. Feel free to customize the cluster to your needs.
az aks create -g $RESOURCE_GROUP_NAME -n $CLUSTER_NAME --enable-managed-identity
Once created, obtain the credentials to access the cluster.
az aks get-credentials -g $RESOURCE_GROUP_NAME -n $CLUSTER_NAME
And check that you are able to interact with it.
kubectl get nodes
The output should look something like this.
NAME                                STATUS   ROLES   AGE     VERSION
aks-nodepool1-30631669-vmss000000   Ready    agent   5m27s   v1.19.9
aks-nodepool1-30631669-vmss000001   Ready    agent   5m30s   v1.19.9
aks-nodepool1-30631669-vmss000002   Ready    agent   5m29s   v1.19.9
Set up Flux CD
Install Flux CD locally.
curl -s https://toolkit.fluxcd.io/install.sh | sudo bash
Validate Flux pre-requisites.
flux check --pre
The output should be something like this.
► checking prerequisites
✔ kubectl 1.19.7 >=1.18.0-0
✔ Kubernetes 1.19.9 >=1.16.0-0
✔ prerequisites checks passed
Create a GitHub repository and clone it locally.
git clone git@github.com:adrianmo/gitops-demo.git
cd gitops-demo
Export the token, your GitHub username, and the AKS cluster name.
export GITHUB_TOKEN=<your-token>
export GITHUB_USER=<your-username>
export GITHUB_REPO=<name-of-your-repo>
export CLUSTER_NAME=GitOpsDemoCluster
Bootstrap the Flux system components.
flux bootstrap github
--owner=$GITHUB_USER
--repository=$GITHUB_REPO
--branch=main
--path=./clusters/$CLUSTER_NAME
You should see how Flux starts to install and sync its components and eventually get a confirmation that all components are healthy.
► connecting to github.com
► cloning branch "main" from Git repository "https://github.com/adrianmo/gitops-demo.git"
✔ cloned repository
[...]
✔ kustomize-controller: deployment ready
✔ helm-controller: deployment ready
✔ all components are healthy
Additionally, you can run the following command to validate the Flux installation.
flux check
Output.
► checking prerequisites
[...]
► checking controllers
[...]
✔ all checks passed
Pull the latest updates published by Flux from the repository.
git pull origin main
Set up the application
Now that the Flux system is up and running, let’s configure the GitOps for our application called “demoapp”.
Since we are using the same repository for both the Flux system and our app, we will create a Kustomization referencing the same “flux-system” source, however, you could use different repositories for Flux and your app. Check the Flux CD getting started guide for more information about creating additional repository sources.
flux create kustomization demoapp
  --namespace=flux-system
  --source=flux-system
  --path="./manifests"
  --prune=true
  --validation=client
  --interval=5m
  --export > ./clusters/$CLUSTER_NAME/demoapp-kustomization.yaml
We are telling Flux that our app manifests are defined in `./manifests`, and Flux is going to keep that directory in sync with the cluster as soon as we make any changes to the app manifests.
Let’s create some manifests to give Flux something to apply.
Create the “manifests” directory.
mkdir manifests
Create the namespace definition.
cat > ./manifests/namespace.yaml <<EOF
---
apiVersion: v1
kind: Namespace
metadata:
  name: demoapp
EOF
The deployment.
cat > ./manifests/deployment.yaml <<EOF
---
apiVersion: apps/v1
kind: Deployment
metadata:
  name: demoapp
  namespace: demoapp
spec:
  replicas: 2
  selector:
    matchLabels:
      app: demoapp
  template:
    metadata:
      labels:
        app: demoapp
    spec:
      containers:
        - name: demoapp
          image: "mcr.microsoft.com/dotnet/core/samples:aspnetapp"
          ports:
            - containerPort: 80
              protocol: TCP
EOF
And the service.
cat > ./manifests/service.yaml <<EOF
---
apiVersion: v1
kind: Service
metadata:
  name: demoapp
  namespace: demoapp
spec:
  type: ClusterIP
  selector:
    app: demoapp
  ports:
    - protocol: TCP
      port: 80
      targetPort: 80
EOF
After a few moments you should see how your Kustomization has been applied the latest commit.
kubectl get kustomization -A
NAMESPACE     NAME          READY   STATUS                                                            AGE
flux-system   demoapp       True    Applied revision: main/a5f6b27feca2e1009afb474adc84c95c972018ad   10m
flux-system   flux-system   True    Applied revision: main/a5f6b27feca2e1009afb474adc84c95c972018ad   58m
And our app gets automatically deployed.
kubectl -n demoapp get pod,deploy,svc
NAME                           READY   STATUS    RESTARTS   AGE
pod/demoapp-6b757bbc47-bx7rx   1/1     Running   0          1m
pod/demoapp-6b757bbc47-rh4db   1/1     Running   0          1m

NAME                      READY   UP-TO-DATE   AVAILABLE   AGE
deployment.apps/demoapp   2/2     2            2           1m

NAME              TYPE           CLUSTER-IP    EXTERNAL-IP      PORT(S)        AGE
service/demoapp   LoadBalancer   10.0.252.90   51.144.185.175   80:31122/TCP   1m
Secret management
At this point Flux will apply any manifest we commit to the repo under the “manifests” folder. That will be fine for every Kubernetes resource except for Secrets, which we do not want to disclose and source control their plain values.
A solution for this would be using the Azure Key Vault Provider for Secrets Store CSI Driver, which allows us to define our secrets in Key Vault and automatically make them available as Kubernetes secrets. However, this approach breaks our the GitOps workflow where the Git repository is the single source of truth for our application desired state.
A popular GitOps approach for secret management is using Bitnami’s Sealed Secrets. Sealed Secrets require an additional controller and a new “SealedSecret” CRD that is safe to store in a Git repository. After Flux applies the “SealedSecret” object, their controller decrypts the sealed secret and applies the plain secrets.
Another popular approach for managing secrets in Flux is using Mozilla’s SOPS. Unlike Sealed Secrets, SOPS does not require us to deploy any additional controller because Flux’s kustomize-controller can perform the decryption of the secrets. Moreover, SOPS has integration with Azure Key Vault to store the cryptographic used to encrypt and decrypt secrets. Therefore, making it an ideal option for managing secrets in Azure.
To configure secret management with Mozilla SOPS and Azure Key Vault we have to create a few resources first.
Install AAD Pod Identity
AAD Pod Identity enables Kubernetes applications to access Azure resources securely with Azure Active Directory. It will allow us to bind a Managed Identity to Flux’s kustomize-controller.
Before installing AAD Pod Identity, we need to give the AKS Kubelet identity permissions to attach identities to the AKS nodes in the AKS-managed resource group. Let’s obtain the relevant IDs.
RESOURCE_GROUP_ID=$(az group show -n $RESOURCE_GROUP_NAME -o tsv --query id)
AKS_RESOURCE_GROUP_NAME=$(az aks show -g $RESOURCE_GROUP_NAME -n $CLUSTER_NAME -o tsv --query nodeResourceGroup)
AKS_RESOURCE_GROUP_ID=$(az group show -n $AKS_RESOURCE_GROUP_NAME -o tsv --query id)
KUBELET_CLIENT_ID=$(az aks show -g $RESOURCE_GROUP_NAME -n $CLUSTER_NAME -o tsv --query identityProfile.kubeletidentity.clientId)
And create the role assignment granting “Virtual Machine Contributor” permissions.
az role assignment create --role "Virtual Machine Contributor" --assignee $KUBELET_CLIENT_ID --scope $AKS_RESOURCE_GROUP_ID
az role assignment create --role "Managed Identity Operator" --assignee $KUBELET_CLIENT_ID --scope $RESOURCE_GROUP_ID
We are going to install AAD Pod Identity in a GitOps way, because Flux is also capable of managing Helm charts with the helm-controller, which is installed by default. Therefore, instead of installing the Helm chart directly from our computer as the AAD Pod Identity documentation indicates, we will create a “HelmRepository” and a “HelmRelease” resource that Flux will apply and keep in sync for us. This will allow us to manage and upgrade AAD Pod Identity from the Git repository.
cat > ./manifests/aad-pod-identity.yaml <<EOF
---
apiVersion: v1
kind: Namespace
metadata:
  name: aad-pod-identity
---
apiVersion: source.toolkit.fluxcd.io/v1beta1
kind: HelmRepository
metadata:
  name: aad-pod-identity
  namespace: aad-pod-identity
spec:
  url: https://raw.githubusercontent.com/Azure/aad-pod-identity/master/charts
  interval: 10m
---
apiVersion: helm.toolkit.fluxcd.io/v2beta1
kind: HelmRelease
metadata:
  name: aad-pod-identity
  namespace: aad-pod-identity
spec:
  interval: 5m
  chart:
    spec:
      chart: aad-pod-identity
      version: 4.0.0
      sourceRef:
        kind: HelmRepository
        name: aad-pod-identity
        namespace: aad-pod-identity
      interval: 1m
  values:
    nmi:
      allowNetworkPluginKubenet: true
EOF
Commit and push the changes to the repo and AAD Pod Identity will be deployed in a few seconds.
kubectl get helmrelease -A
Output.
NAMESPACE          NAME               READY   STATUS                             AGE
aad-pod-identity   aad-pod-identity   True    Release reconciliation succeeded   14m
And let’s check the pods.
kubectl -n aad-pod-identity get pods
Output
NAME                                   READY   STATUS    RESTARTS   AGE
aad-pod-identity-mic-5c9b5845c-4ktft   1/1     Running   0          14m
aad-pod-identity-mic-5c9b5845c-bskj8   1/1     Running   0          14m
aad-pod-identity-nmi-6h6rl             1/1     Running   0          14m
aad-pod-identity-nmi-76vk5             1/1     Running   0          14m
aad-pod-identity-nmi-tr9bk             1/1     Running   0          14m
If your Helm chart is not applied, check the status and logs of the kustomize-controller and helm-controller.
Create a Managed Identity
The Managed Identity will be used by the Flux kustomize-controller to obtain the cryptographic key from Key Vault and decrypt secrets.
az identity create -n SopsDecryptorIdentity -g $RESOURCE_GROUP_NAME -l $LOCATION
Obtain the client Id, object Id, and the resource Id of the identity.
CLIENT_ID=$(az identity show -n SopsDecryptorIdentity -g $RESOURCE_GROUP_NAME -o tsv --query "clientId")
OBJECT_ID=$(az identity show -n SopsDecryptorIdentity -g $RESOURCE_GROUP_NAME -o tsv --query "principalId")
RESOURCE_ID=$(az identity show -n SopsDecryptorIdentity -g $RESOURCE_GROUP_NAME -o tsv --query "id")
Create a Key Vault
Now it’s time to create a Key Vault instance, the cryptographic key and give permissions to our identity.
Create an environment variable with the desired name for your Key Vault resource.
export KEY_VAULT_NAME=GitOpsDemoKeyVault
Create a Key Vault instance.
az keyvault create --name $KEY_VAULT_NAME --resource-group $RESOURCE_GROUP_NAME --location $LOCATION
Create the cryptographic key.
az keyvault key create --name sops-key --vault-name $KEY_VAULT_NAME --protection software --ops encrypt decrypt
Add an access policy for the identity.
az keyvault set-policy --name $KEY_VAULT_NAME --resource-group $RESOURCE_GROUP_NAME --object-id $OBJECT_ID --key-permissions encrypt decrypt
Obtain the key ID and save it for later.
az keyvault key show --name sops-key --vault-name $KEY_VAULT_NAME --query key.kid
The key ID will have a the following form.
https://gitopsdemokeyvault.vault.azure.net/keys/sops-key/b7bc85c1a4ef4180be9d1de46725304c
Configure in-cluster secrets decryption
Now let’s create the Azure identity and binding to attach the Managed Identity we created previously to the kustomize-controller.
cat > ./clusters/$CLUSTER_NAME/sops-identity.yaml <<EOF
---
apiVersion: aadpodidentity.k8s.io/v1
kind: AzureIdentity
metadata:
name: sops-akv-decryptor
namespace: flux-system
spec:
clientID: $CLIENT_ID
resourceID: $RESOURCE_ID
type: 0 # user-managed identity
---
apiVersion: aadpodidentity.k8s.io/v1
kind: AzureIdentityBinding
metadata:
name: sops-akv-decryptor-binding
namespace: flux-system
spec:
azureIdentity: sops-akv-decryptor
selector: sops-akv-decryptor # kustomize-controller label will match this name
EOF
The identity will be bound to the pods that have the “sops-akv-decryptor” label, therefore, we need to patch the kustomize-controller to set such label and allow AAD Pod Identity to bind the identity.
Patch the kustomize-controller Pod template so that the label matches the `AzureIdentity` name. Additionally, the SOPS specific environment variable “AZURE_AUTH_METHOD=msi” to activate the proper auth method within kustomize-controller.
Create a kustomization.
cat > ./clusters/$CLUSTER_NAME/flux-system-kustomization.yaml <<EOF
---
apiVersion: kustomize.config.k8s.io/v1beta1
kind: Kustomization
resources:
  - flux-system
patchesStrategicMerge:
  - sops-kustomize-patch.yaml
EOF
And a file to patch the Flux system kustomize controller deployment.
cat > ./clusters/$CLUSTER_NAME/sops-kustomize-patch.yaml <<EOF
---
apiVersion: apps/v1
kind: Deployment
metadata:
  name: kustomize-controller
  namespace: flux-system
spec:
  template:
    metadata:
      labels:
        aadpodidbinding: sops-akv-decryptor  # match the AzureIdentityBinding selector
    spec:
      containers:
      - name: manager
        env:
        - name: AZURE_AUTH_METHOD
          value: msi
EOF
We also have to tell the kustomize-controller that our app Kustomization needs to use SOPS as the decryption provider and therefore be able to decrypt certain fields of our manifests.
Update the kustomization YAML file in “clusters/$CLUSTER_NAME/demoapp-kustomization.yaml” and add the `spec.decryption` block as shown below.
---
apiVersion: kustomize.toolkit.fluxcd.io/v1beta1
kind: Kustomization
metadata:
name: demoapp
namespace: flux-system
spec:
interval: 5m0s
path: ./manifests
prune: true
sourceRef:
kind: GitRepository
name: flux-system
validation: client
decryption:
provider: sops
Apply the changes and check that the identity binding and patching have been applied successfully.
At this point, the kustomize-controller should be able to decrypt files encrypted with SOPS via our Key Vault key.
Encrypt secrets
Install SOPS locally following the instructions from their repository. Then create a “.sops.yaml” file to contain the SOPS configuration. We will tell SOPS to encrypt only the “data” and “stringData” blocks of our YAML files. Therefore, only the values of our Kubernetes secrets will be encrypted. If that rule is omitted, SOPS will encrypt all keys in our YAML files, which is not necessary.
Also, we need to tell SOPS to use our Azure Key Vault key to encrypt the files. Before running SOPS make sure you are logged in with a user that has encrypt access to the Key Vault key being used, otherwise the encryption will fail.
cat > .sops.yaml <<EOF
creation_rules:
- path_regex: .*.yaml
encrypted_regex: ^(data|stringData)$
azure_keyvault: https://gitopsdemokeyvault.vault.azure.net/keys/sops-key/b7bc85c1a4ef4180be9d1de46725304c
EOF
Create a temporary secret file which we won’t commit to the repository.
cat > ./secret.yaml <<EOF
---
apiVersion: v1
kind: Secret
metadata:
  name: demoapp-credentials
  namespace: demoapp
type: Opaque
stringData:
  username: admin
  password: t0p-S3cr3t
EOF
SOPS will use the logged in user in AZ CLI, therefore, make sure the logged in user has “encrypt” and “decrypt” Key Permissions as shown below.
You can also add those permissions with the following commands.
SIGNED_IN_USER_OBJECT_ID=$(az ad signed-in-user show -o tsv --query objectId)
az keyvault set-policy --name $KEY_VAULT_NAME --resource-group $RESOURCE_GROUP_NAME --object-id $SIGNED_IN_USER_OBJECT_ID --key-permissions encrypt decrypt
And encrypt the secret.
sops --encrypt secret.yaml > ./manifests/secret.enc.yaml
The encrypted secret at “./manifests/secret.enc.yaml” will look something like this.
apiVersion: v1
kind: Secret
metadata:
    name: demoapp-credentials
    namespace: demoapp
type: Opaque
stringData:
    username: ENC[AES256_GCM,data:21q4bo0=,iv:LOLxXQurjQR6cu9heQlZDdmhNgYO6VCBybbQHV6rO0w=,tag:58ep32CDrlCFuuDnD65VEQ==,type:str]
    password: ENC[AES256_GCM,data:oTZDkadQKL45dA==,iv:5VVbXC55xTVwH/n3t5gtKNtlkB3q7t8lW7Jw1czNSL0=,tag:WuqdubjTu6mQN5x1b3zDyw==,type:str]
sops:
    kms: []
    gcp_kms: []
    azure_kv:
        - vault_url: https://gitopsdemokeyvault.vault.azure.net
          name: sops-key
          version: b7bc85c1a4ef4180be9d1de46725304c
          created_at: "2021-04-23T14:22:15Z"
          enc: KuFxRbcge198GU7hwHs078JNd_1EFtvcFqQ6bOLJDYMnWaW0kSbeD4DCxY0jX9MA17Rv3UMKHGfImgEbNfXGGIh7UucLPygpiuUyn9I73ClSQQ4trc4bD2yVkonCMwz5-0MiPVC3muhQpn3KjhThSucOgjhBnqQy_ymwTeUP9PWi1pSp1jc3S2BxQIuKy09-oEakQogU4BRy55219befizYN7EFe8mstSIkvpksqGxKccH6dQum2k-OqsBUH2jkxiVgi5CEU35COy0pNWVJpZGuOaDMkGGqo7lrT4XKEGxtFKvEDxr6bTfjjQafuuxW9-4a9ZtaBkHCKopk55R9dcQ
    hc_vault: []
    age: []
    lastmodified: "2021-04-23T14:22:18Z"
    mac: ENC[AES256_GCM,data:aw5mfREh5xdeiwbchkiiBS96tGuLJnEqme6VdDrPWKV9R0A4ATIM/1+HcbdAzGBXb9TmhO71hZMl3IvmX9DrNA/tvpPwFvLCkDfNhoWXJoXRRv6aRR7AJPlfcXkVMxxYaRDqz+ugAJkZG+5dhYeh1QAmiswjZOXaINEOw3Jf5dI=,iv:p/M2OhPdh2Naxu37Jt7EwiLf9Eb9OgExsmXX3hSUOJQ=,tag:fVqJ2jy++6GxHBPGXZHmHw==,type:str]
    pgp: []
    encrypted_regex: ^(data|stringData)$
    version: 3.7.1
We can now delete the plain secret and push the encrypted secret to the repo.
rm secret.yaml
git add manifests/secret.enc.yaml
git commit -m "Add encrypted secret"
git push
Flux will read the encrypted secret, decrypt it using the identity and the key, and apply it.
kubectl describe secret -n demoapp demoapp-credentials
Output.
Name:         demoapp-credentials
Namespace:    demoapp
Labels:       kustomize.toolkit.fluxcd.io/checksum=c7c24c5836c9f935d9ab866ab9e31192bd98268e
              kustomize.toolkit.fluxcd.io/name=demoapp
              kustomize.toolkit.fluxcd.io/namespace=flux-system
Annotations:  <none>

Type:  Opaque

Data
====
password:  10 bytes
username:  5 bytes
From this point on, Flux will keep our app up to date with the latest Kubernetes definitions in your repository, including secrets. You can find the code generated by this guide in the github.com/adrianmo/aks-flux GitHub repository.
Next steps
Automatic image updates
Flux has a couple of optional components called Image Automation Controllers, which can monitor a container registry and detect when new image tags are uploaded. Then, they can automatically update your deployments to roll out an update to the new container image. Check the official documentation to know more.
Keep Flux up to date
There are multiples ways to keep the Flux components up to date when new versions are released.
Flux’s system components are defined in the “./clusters/${CLUSTER_NAME}/flux-system/gotk-components.yaml” manifest file, therefore, if we regenerate that file with a newer version of Flux (i.e. running “flux install –export ./clusters/${CLUSTER_NAME}/flux-system/gotk-components.yaml”), the manifests will be updated with the new container images and configurations and the Flux system running in the cluster will apply those changes and update itself.
The above procedure can be turned into a scheduled CI workflow and create a Pull Request when changes are made to the manifests, giving us the possibility to review and approve the changes before they are applied. An example implementation of this workflow can be found here.
Notifications and monitoring
Since there are many operations that happen automatically, it can be become quite challenging to understand what is going on in our cluster. Therefore, it is crucial to know the state of our system at any time, but especially when things go south.
With Flux we can configure Notifications to forward events to collaboration and messaging apps like Microsoft Teams or Slack, and also to Git repositories in the form of commit statuses.
Flux also comes with a Monitoring stack composed of Prometheus, for metric collection, and Grafana dashboards, for displaying the control plane resource usage and reconciliation stats.


Recent Comments