by Contributed | Feb 8, 2021 | Technology
This article is contributed. See the original author and article here.
We are excited to announce a public preview refresh of the Live Video Analytics (LVA) platform, adding a new set of capabilities that will help in building complex workflows that capture and process video with real-time analytics. The platform offers the capability of capturing, recording, and analyzing live video and publishing the results (which could be video and/or video analytics) to Azure services in the cloud and/or the edge.
The LVA platform is available as an Azure IoT Edge module via the Azure marketplace. The module is referred to as Live Video Analytics on IoT Edge and is built to run on a Linux x86-64 and arm64 edge devices in your business location.
This refresh release includes the following:
- Support for AI composability on live video – We added support for using more than one HTTP extension processor and gRPC extension processor per LVA media graph in sequential or parallel configurations.
Support for passing custom string to the inference server and carry out custom operations in the server – LVA can now pass an optional string to the gRPC inferencing server to take actions as defined by the inference solution provider.
Improved Developer productivity – Customers now can build LVA graphs via a VS Code extension which has a graphical visual representation to help getting started quickly with the media graph concepts. We have also published C# and Python SDK sample codes that developers can use as guides to build advanced LVA solutions.
- Manage storage space on the edge – LVA now comes with added support for disk management on edge via one of its sink nodes
- Improved observability for developers – You can now collect Live Video Analytics module metrics such as total number of active graphs per topology, number of dropped data, etc. in the Prometheus format.
- Ability to filter output selection – LVA graph now provides customers the ability to filter audio and video via configurable properties.
- Simplifying frame rate management experience – Frame rate management is now available within the graph extension processor nodes itself.
Details and Examples
We will now describe these exciting changes in more detail.
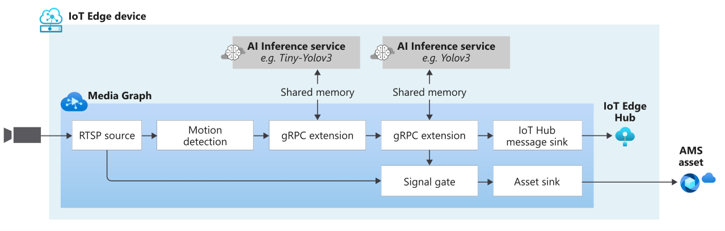
AI Composition
LVA now supports using more than one media graph extension processor within a topology. You can now chain extension processors with or without dependencies in use cases where a cascade of AI inference servers from disparate sources is needed to serve the user’s needs. An example of this is the use of a heavy inference model for object detection on sparse frames and having a lighter tracker downstream that operates on all frames and interpolates data from the upstream detector. These different extensions may operate at different resolutions, including a higher resolution on a downstream node.
Below is an example of how you can use multiple AI models sequentially.
Similarly, you can have inference servers run in parallel as well. This allows customers to stream a video stream to multiple inference servers in parallel reducing bandwidth requirements on the edge. The graph can look something like this:

You can take it a step further and build a complex graph such as this:

You can use as many extension processors as you need if the hardware(s) you are using can support it.
Passing data to your Inference Server
We have added a new property called extensionConfiguration in our gRPC data contract which is an optional string that can be used to pass any data to the inference server and you as an Inference solution provider can define how the inference server uses that data.
One use case of this property is to simplify the calling of multiple AI models that you are using with LVA. Let’s say that you want to use 2 or more inferencing models with LVA. Currently, in our quickstarts, we show you how to deploy an extension with the name: “lvaExtension”. Using the steps there, you would have developed and deployed 2 different modules ensuring that” both are listening on different ports.
For example, one container with lvaExtension1 name listening at port i.e., 44000, other container with name lvaExtension2 name listening at port 44001. In your LVA topology, you would then instantiate two graphs with different inference URLs like below and use multiple AI models:
First instance: inference server URL = tcp://lvaextension:44001
Second instance: inference server URL = tcp://lvaextension:44002
Now, instead of configuring multiple network ports to connect to different AI models, as an extension provider, you can wrap all your AI models in a single inference server. You will then have your inference server invoke AI models based on some string that gets passed to it when called from LVA. When you instantiate the graphs, for each instance assign different strings to the extensionConfiguration property. These strings will be one of the strings you defined in the inferencing server to invoke the models. LVA platform during execution will pass the string to the inferencing server, which will then invoke the AI model of choice.
Improved Developer productivity
In December, we released a VSCode extension to help you manage LVA media graphs. This extension works with LVA 2.0 module and offers editing and managing media graphs with a very sleek and an easy-to-use graphical interface. This extension comes with a set of sample topologies developed for you to try out and get started.

Along with the VS Code extension, we have also released the prerelease versions of C# and Python SDK client libraries that you can use to:
- Simplify interactions with the Microsoft Azure IoT SDKs
- Programmatically construct media graph topologies and instances as simply as:
static async Task Main(string[] args)
        {
            try
            {
                // NOTE: Read app configuration
                IConfigurationRoot appSettings = new ConfigurationBuilder()
                    .SetBasePath(Directory.GetCurrentDirectory())
                    .AddJsonFile("appsettings.json")
                    .Build();

                // NOTE: Configure the IoT Hub Service client
                deviceId = appSettings["deviceId"];
                moduleId = appSettings["moduleId"];

                // NOTE: Get the camera's RTSP parameters.
                var rtspUrl = appSettings["rtspUrl"];
                var rtspUserName = appSettings["rtspUserName"];
                var rtspPassword = appSettings["rtspPassword"];

                // NOTE: create the ILiveVideoAnalyticsEdgeClient (this is the SDKs client that bridges your application to LVAEdge module)
                deviceId = appSettings["deviceId"];
                moduleId = appSettings["moduleId"];
                edgeClient = ServiceClient.CreateFromConnectionString(appSettings["IoThubConnectionString"]);

                // NOTE: build GraphTopology based on the selected Topology
                var topology = BuildTopology();

   // NOTE: build GraphInstance based on the selected Topology
                var instance = BuildInstance(topology, rtspUrl, rtspUserName, rtspPassword);

                // NOTE: Run the orchestration steps (GraphTopologySet, GraphInstanceSet, GraphInstanceActivate, GraphInstanceDeactivate, GraphInstanceDelete, GraphTopologyDelete)
                var steps = Orchestrate(topology, instance);
			}
			catch(Exception ex)
            {
                await PrintMessage(ex.ToString(), ConsoleColor.Red);
            }
        }
To help you get started with LVA using these client libraries, please check out our C# and Python GitHub repositories.
Disk space management
Now, you can now specify how much storage space LVA can use to store processed media when using sink nodes. As a part of the sink node, you can specify the disk space in MiB (mebibyte) that you wish to allocate for LVA to use. Once the specified threshold is reached, LVA will start removing the oldest media from the storage and create space for new media as they come from upstream.
Live Video Analytics module metrics in the Prometheus format
With this release, Telegraf can be used to send LVA Edge module metrics to Azure Monitor. From there, the metrics may be directed to Log Analytics or an Event Hub.

You can learn more about how collect LVA metrics via Telegraf in our documentation. Using Prometheus along with Log Analytics, you can generate and monitor metrics such as used CPUPercent, MemoryUsedPercent, etc. Using Kusto query language, you can write queries as below and get CPU percentage used by the IoT edge modules.

Ability to filter output selection
LVA now enables you to select passing only selected media types between nodes. With this release of LVA, you can now pass audio and video files from the RTSP cameras.
In addition, you can now specify in the LVA processor nodes, if “audio”, “video” or both media elements need to be passed downstream for further processing.
Get Started Today!
In closing, we’d like to thank everyone who is already participating in the Live Video Analytics on IoT Edge public preview. We appreciate your ongoing feedback to our engineering team as we work together to fuel your success with video analytics both in the cloud and on the edge. For those of you who are new to our technology, we’d encourage you to get started today with these helpful resources:
And finally the LVA product team is keen to hear about your experiences with LVA. Please feel free to contact us at amshelp@microsoft.com to ask questions and provide feedback including what future scenarios you would like to see us focusing on.

by Contributed | Feb 8, 2021 | Technology
This article is contributed. See the original author and article here.
How to use Cognitive Services and containers
In this blog we are going to take a look at how we can run a selection of Cognitive Services in Docker compatible containers. This option of using these services can come in handy if you run into scenarios where your application can not connect to the cloud all the time or if you need more control over your data.
What are Cognitive Services
Azure Cognitive Services are cloud-based services that expose AI models through a REST API. These services enable you to add cognitive features, like object detection and speech recognition to your applications without having data science skills. By using the provided SDKs in the programming language of your choice you can create application that can see (Computer Vision), hear (Speech), speak (Speech), understand (Language), and even make decisions (Decision).
Cognitive Services in containers
Azure Cognitive Service in containers gives developers the flexibility in where to deploy and host the services that come with Docker containers and keeping the same API experience as when they where hosted in the Azure.
Using these containers gives you the flexibility to bring Cognitive Services closer to your data for compliance, security or other operational reasons.
What are containers
Containerization is an approach to software distribution in which an application or service, including its dependencies & configuration, is packaged together as a container image. With little or no modification, a container image can be deployed on a container host. Containers are isolated from each other and the underlying operating system, with a smaller footprint than a virtual machine. Containers can be instantiated from container images for short-term tasks, and removed when no longer needed.
When to use Cognitive Services in containers?
Running Cognitive Services in containers can be the solution for you if you have specific requirements or constraints making that make it impossible to run Cognitive services in Azure. The most common scenarios include connectivity and control over the data. If you are running Cognitive Services in Azure all the infrastructure is taken care of, running them in containers moves the infrastructure responsibility, like performance and updating the container, to you.
A case where you choose for container could be, if your connection to Azure is not stable enough. For instance if you have 1000’s of document on-prem and you want to run OCR. If you use the Computer Vision OCR endpoint in the cloud you would need to send all the documents to the end point in azure, while if you run the container locally you only need to send the billing information every 15 minutes to Azure.
Features and benefits
Immutable infrastructure: Enable DevOps teams’ to leverage a consistent and reliable set of known system parameters, while being able to adapt to change. Containers provide the flexibility to pivot within a predictable ecosystem and avoid configuration drift.
Control over data: Choose where your data gets processed by Cognitive Services. This can be essential if you can’t send data to the cloud but need access to Cognitive Services APIs. Support consistency in hybrid environments – across data, management, identity, and security.
Control over model updates: Flexibility in versioning and updating of models deployed in their solutions. Portable architecture: Enables the creation of a portable application architecture that can be deployed on Azure, on-premises and the edge. Containers can be deployed directly to Azure Kubernetes Service, Azure Container Instances, or to a Kubernetes cluster deployed to Azure Stack. For more information, see Deploy Kubernetes to Azure Stack.
High throughput / low latency: Provide customers the ability to scale for high throughput and low latency requirements by enabling Cognitive Services to run physically close to their application logic and data. Containers do not cap transactions per second (TPS) and can be made to scale both up and out to handle demand if you provide the necessary hardware resources.
Scalability: With the ever growing popularity of containerization and container orchestration software, such as Kubernetes; scalability is at the forefront of technological advancements. Building on a scalable cluster foundation, application development caters to high availability.
Which services are available
Container support is currently available for a subset of Azure Cognitive Services, including parts of:
How to use Cognitive Services in containers
The use of the services in containers is exactly the same as if you would use them in Azure. The deployment of the container is the part that takes a bit of planning and research. The services are shipped in Docker Containers. This means that the containers can be deployed to any Docker compatible platform. This can be your local machine running Docker Desktop or a fully scalable Kubernetes installation in your on premise data center.
Generic workflow
- Create the resource in Azure
- Get the endpoint
- Retrieve the API Key
- Find the container for the service
- Deploy the container
- Use the container endpoint as you would use the API resource
Optional you can mount your own storage and connect Application Insights.
Tutorial: Run a Text to Speech container in an Azure Container Instance.
In this tutorial we are going to run a Cognitive Service Speech container in an Azure Container Instance and use the REST API to convert text into speech.
To run the code below you need an Azure Subscription. if you don’t have an Azure subscription you can get $200 credit for the first month. And have the Azure command-line interface installed. If you don’t have the Azure CLI installed follow this tutorial.
1. Create a resource group
Everything in Azure always start with creating a Resource Group. A resource group is a resource that holds related resources for an Azure solution.
To create a resource group using the CLI you have to specify 2 parameters, the name of the group and the location where this group is deployed.
az group create –name demo_rg –location westeurope
2. Create Cognitive Service resource
The next resource that needs to be created is a Cognitive Services. To create this resource we need to specify a few parameters. Besides the name and resource group, you need to specify the kind of cognitive service you want to create. For our tutorial we are creating a ‘SpeechServices’ service.
az cognitiveservices account create

    –name speech-resource

    –resource-group demo_rg

    –kind SpeechServices

    –sku F0

    –location westeurope

    –yes
3. Get the endpoint & API Key
If step 1 and 2 are successfully deployed we can extract the properties we need for when we are going to run the container in the next step. The 2 properties we need are the endpoint URL and the API key. The speech service in the container is using these properties to connect to Azure every 15 minutes to send the billing information.
To retrieve endpoint:
az cognitiveservices account show –name speech-resource –resource-group demo_rg –query properties.endpoint -o json
To retrieve the API keys:
az cognitiveservices account keys list –name speech-resource –resource-group demo_rg
3. Deploy the container in an ACI
One of the easiest ways to run a container is to use Azure Container Instances. With one command in the Azure CLI you can deploy a container and make it accessible for the everyone.
To create an ACI it take a few parameters. If you want your ACI to be accessible from the internet you need to specify the parameter: ‘–dns-name-label’. The URL for the ACI will look like this: http://{dns-name-label}.{region}.azurecontainer. The dns-name-label property needs to be unique.
az container create

    –resource-group demo_rg

    –name speechcontainer

    –dns-name-label <insert unique name>

    –memory 2 –cpu 1

    –ports 5000

    –image mcr.microsoft.com/azure-cognitive-services/speechservices/text-to-speech:latest

    –environment-variables

        Eula=accept

        Billing=<insert endpoint>

        ApiKey=<insert apikey>
The deployment of the container takes a few minutes.
4. Validate that a container is running
The easiest way to validate if the container is running, is to use a browser and open the container homepage. To do this you first need to retrieve the URL for the container. This can be done using the Azure CLI with the following command.
az container show –name speechcontainer –resource-group demo_rg –query ipAddress.fqdn -o json
Navigate to the URL on port 5000. The URL should look like this: http://{dns-name-label}.{region}.azurecontainer.io:5000/
If everything went well you should see a screen like this:
5. Submit your first task
The Text to Speech service in the container is a REST endpoint. To use it we would need to create a POST request. There are many ways to do a POST request. For our tutorial we are going to use Visual Studio Code to do this.
Requirements:
If you have the Visual Studio Code with th REST Client installed create a file call: rest.http and copy past the code below in the file.
POST http://<dns-name-label>.<region>.azurecontainer.io:5000/speech/synthesize/cognitiveservices/v1  HTTP/1.1

Content-Type: application/ssml+xml

X-Microsoft-OutputFormat: riff-24khz-16bit-mono-pcm

Accept: audio/*
<speak version=”1.0″ xml:lang=”en-US”>

    <voice name=”en-US-AriaRUS”>

        The future we invent is a choice we make.

        Not something that just happens.

    </voice>

</speak>
- Change the name of the URL to the URL of your ACI.
- Next click on the Send Request link (just above the URL)
On the right side of VS Code you should see the response of the API. In the top right corner you see “Save Response Body” click on the button and save the response as a .wav file. Now you can use any media player to play the response.

Learn more
Microsoft Learn
Microsoft Learn is a free, online training platform that provides interactive learning for Microsoft products and more.
For this blog we have created a custom Collection of Learn Modules covering all the topics in depth.
Blogs and articles
On Microsoft Docs
by Contributed | Feb 8, 2021 | Technology
This article is contributed. See the original author and article here.
We continue to publish new class types, which are based on real-world classes that schools have hosted using Azure Lab Services. This class type shows how to setup labs with GNS3 to emulate/simulate different networking scenarios.
GNS3 is an open source software that allows emulation, configuration, testing, and troubleshooting of networks on the lab VM. GNS3 has been available for over 10 years with support for many devices from multiple network vendors.
This class type includes:
- Recommended VM size for the lab.
- How to setup GNS3 on the lab template.
- Configure GNS3 to use Hyper-V VM.
- Example costing for a class.
Here is where you can find the new Networking class type: https://docs.microsoft.com/en-us/azure/lab-services/class-type-networking-gns3
Thanks!
Azure Lab Services Team
by Contributed | Feb 8, 2021 | Technology
This article is contributed. See the original author and article here.
If you are looking for quick access to information about Windows updates, known issues, safeguards, lifecycle updates, related news, and announcements, look no further than the new hub and improved navigation experience for Windows release health. Designed for IT pros and Windows enthusiasts alike, the new hub enables you to find and quickly navigate to the resources that can help you stay current, protected, and productive.
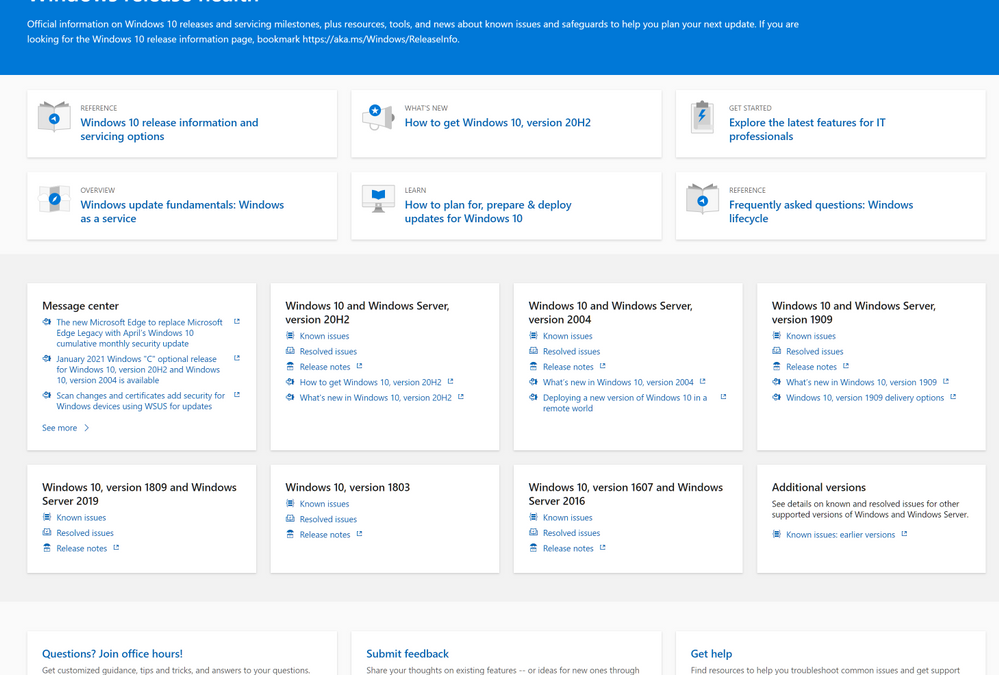
 The Windows release health hub on Docs.Microsoft.com
Keeping your Windows devices current and healthy
Communicating about Windows release health is part of our commitment to increasing transparency. We introduced the Windows release health dashboard in April 2019 to provide you with timely, useful information on issues that might impact your experience with feature and monthly updates for supported versions of Windows 10 and Windows 10 Server. The site offers insight into known and resolved issues, including symptoms, scenarios, workarounds, originating updates, current status, and, ultimately, resolutions. We also introduced the Windows message center to keep you informed about security advisories, preview builds, the rollout status of feature updates, lifecycle events, such as end of service, and other important announcements, such as the recent Windows release notes improvements.
What’s new? What’s changed?
The new Windows release health hub offers a single-page view of the resources you need to help keep your Windows devices and environments healthy and the information you need to help you take advantage of the latest capabilities for update management, deployment, and device management.
At the top of the page, you’ll find the latest and most popular resources—updated with every new feature update or when there are changes in our servicing approach or lifecycle policies. Navigate quickly to Windows 10 release information and the Windows lifecycle FAQ, learn more about the latest featured update, or access digital learning.
 Key resources and important announcements
In the middle of the page, you can quickly catch up on the latest updates from the Windows message center, access details about known issues and safeguards, and find release notes for the version(s) of Windows client and Windows Server you are running in your environment. This is also where you’ll find the most recent announcements from the Windows message center.
 Easy access to the latest announcements, details on known issues, and release notes
As you scroll to the bottom of the page, you’ll find options to provide feedback, get support, or join our monthly Windows 10 Office Hours to get expert advice and answers from our engineering, servicing, and deployment experts.
 Options for providing feedback and getting support
Let us know your thoughts about the new and improved Windows release health hub and leave a comment below.
by Contributed | Feb 8, 2021 | Technology
This article is contributed. See the original author and article here.
Kids are like sponges. They are fast learners, think outside of the box, and have a wide range of abilities. Now, these creative qualities are being applied to Power Apps with some amazing digital results — from emulating the solar system to playing noughts and crosses — thanks to a crack team of MVPs.
PowerApps4Kids is an online community that teaches young people how to build and use Power Apps, those versatile apps that are built with Office 365. With support from Business Apps MVPs Rory Neary, Pieter Veenstra, Ee Lane Yu, Jeevarajan Kumar, and others, the group hopes to inspire kids — and kids at heart — to learn and experiment with digital tools.
“The best ideas need a number of ingredients for them to grow,” Rory says. “Power Apps is hands down a wonderful product to allow people to be both digitally creative and also productive in their organisations, and it is uniquely relevant to parents and children.”
“But, during this pandemic, it occurred to me that children were struggling to be educated at a time when they were at home with their parents. The timing was perfect for the idea of teaching Power Apps to children to be pursued as they would need their parents to help out.”
The resulting website is therefore intended for parents, teachers, developers and children. The group has even created a free online course to get kids started with all things Power Apps and holds free monthly meetings to further the education adventure.
The group is an excellent meeting place for curious minds of any age, Rory says, and the results have been heartening. “We continue to see young people inspiring young people. We have seen kids build apps and proudly present them during our sessions, indirectly inspiring other kids to do the same,” he says.
“We would love PowerApps 4 Kids to become a safe platform for kids to learn and share their Power Apps learnings. We are at an early stage with this, so we need more people, more support but with a focus on the quality of product and indeed spreading of the idea to new users.”
PowerApps4Kids invites developers young and old to check out their website, YouTube channel, and Twitter. “Good luck to all the big kids and little kids out there!” Rory says.

Recent Comments