
by Contributed | Feb 11, 2021 | Technology
This article is contributed. See the original author and article here.
Hello dear digital technology enthusiast. I heard you would like to find out what Adaptive Cards are? In this article I will help you to understand what Adaptive Cards technology is, how it works and how you can use it. Follow me through the next chapters and I will try to explain it as clear as possible.
In short words – Adaptive Cards is a technology, that lets you to focus on content and layout, not how it will be displayed on a specific device or browser. What you are responsible for is to prepare what you would like to show and how it should be organized, e.g. should there be any tables, images, columns. However, the display side is taken care by the host. The host is an application, that displays Adaptive Card. It controls the colors, fonts, specific parts of layout, buttons’ shapes, backgrounds and almost everything that makes the Card to look, once displayed, as if this is just another piece of the user interface.
Like a YouTube video in Facebook Messenger conversation. You see how seamlessly it displays within other chat messages? This is an example of a similar cards’ technology too.
In Microsoft landscape we do have Adaptive Cards already in various places. Have you known it? You can find them when you talk to Cortana.
They are also in Windows Timeline (access it by pressing Win+Tab).

You can find them in your Outlook when you receive a message containing an interactive form inside.

And what is the most obvious – they are also present are very commonly used in Microsoft Teams – this is the platform on which I will focus in this article.
Apart from the places I mentioned, Adaptive Cards are also present in multiple services from Microsoft, like Microsoft Search, Microsoft GraphAPI explorer, Azure Bot Framework and many more. This technology however is not limited and exclusively used only by Microsoft. Cisco is using it to display cards in their Webex Teams and Adaptive Cards’ SDK (Software Development Kit – set of tools used to build and run software) is open-source and hosted on github, therefore anyone can use it in their development own projects, for example when building apps for Android or custom web sites with JavaScript or .NET.
How does Adaptive Cards work?
Adaptive Card is a technology that uses JSON (JavaScript Object Notation – structured method to describe information, learn more from Bob German here: https://techcommunity.microsoft.com/t5/microsoft-365-pnp-blog/introduction-to-json/ba-p/2049369) to declare how the final card should look like. The defined code is then parsed by the host that has Adaptive Cards SDK installed. Using SDK and JSON schema (schema defines what information can be used by authors in their cards) for the specific version translates code into valid HTML that is being displayed to users.

Thanks to this approach, creation of user interface using Adaptive Cards is not only fast (no need to design separate card for desktop and mobile, for Android and iOS etc.), but also secure, since if part of JSON code that is used in card does not exist in SDK, it will not be rendered, so no malicious code can be then executed at user side.
All right. Now that we know what they are and how they work, let me tell you how to create them.
Adaptive Cards authoring
The best place to start authoring your first (and every next) Adaptive Card is the designer, that you can find at https://adaptivecards.io/designer. There you can, following drag&drop visual designing approach create Adaptive Card and then configure all required properties. The designer is built from the following functionalities:

- New card – allows to create a card from a blank canvas or to start using one from existing templates.
- Select host app – is used to switch between hosts. Remember what I wrote at the beginning? Host control how the card is going to be displayed. Just experiment for example by choosing Microsoft Teams – Dark and Light host. See the differences.
- Target version. Each host has different version of Adaptive Cards implemented. Therefore, once you select host, the version will be automatically selected for you. Version determines what functionalities can be used.
- Card elements are the building bricks of the card. Here you need to choose between:
- Containers – they define the layout, like imageSet will be displayed as a gallery, whereas FactSet as a table with two columns.
- Elements – those are the pieces used to display the information like text or image. Why ActionSet is here? Good question. This container is lets you to define actions within any place of the card.
- Inputs – with their help card can not only be used for displaying data, but also for its collecting. With inputs authors can build rich forms and request information from users.
- Main canvas – here you can, following drag&drop method, place elements and build final card’s interface.
- Card structure displays hierarchy of elements. Like TextBlock will be always below a container etc.
- Element properties – here authors define parameters specific per each element. Like font size, align, id, values and much more.
- Payload editor displays working JSON code, that author can simply copy and paste e.g. in Power Automate to display the card in Microsoft Teams.
- Data editor is used to bind data placeholders in card with specific values from data object. This is called Adaptive Cards Templating and since is not yet supported in Microsoft Teams will not be explained in this article.
What are the Actions?
Actions can be added to the card via the ActionSet or simply defined at the bottom of the main container.

There are four types of actions that author can choose from:
- OpenUrl – lets to open an external URL. Like hyperlink.
- Submit – sends back data from the card and inputs back to the host. Host is then responsible for the data processing and further operations.
- ShowCard – displays or hides sub-card – like a card within a card.
- ToggleVisibility – shows or hides defined elements on the card.
Adaptive Cards in Microsoft Teams
In Microsoft Teams the host that displays Adaptive Cards is called Flow Bot. This is a bot built using Azure Bot Framework technology. Its job is not only to display custom cards, but also Power Automate Approvals and some more.
Today there is just one option to display Adaptive Cards in Microsoft Teams without a need to develop custom bots. This is through Power Automate. How? Flow sends Adaptive Cards JSON code to the Flow Bot which renders it and display in Microsoft Teams conversation.
In Power Automate there are several actions that allows to generate Adaptive Cards in MS Teams, however each has significantly different purpose.

 | 1. Post a choice of options as the Flow bot to a user – action allows to send an Adaptive Card in a pre-defined layout, where author can define message and options – that will be displayed as button. After card is sent, flow is paused for up to 30 days waiting for user’s response.
This action can be used in simple approval/ collecting feedback scenarios, where no fancy layout is expected. |
 | 2. Post an Adaptive Card to a Teams user and wait for a response – allows to send custom built Adaptive Card to a specific Microsoft Teams user and to pause the flow for up to 30 days while waiting for response.
3. Post an Adaptive Card to a Teams channel and wait for a response – the same as above, but Adaptive Card is sent to a channel.
|
 | 4. Post a message as the Flow bot to a user – sends a pre-defined Adaptive Card to a chosen user but does nothing more. Author cannot embed here custom JSON code.
5. Post a message as the Flow bot to a channel – the same as above, but message is sent to a channel. |
 | 6. Post your own adaptive card as the Flow bot to a user – allows author to send custom Adaptive Card to a user, however it is not waiting for the response so in case card contains form, Action.Submit results in error. 7. Post your own adaptive card as the Flow bot to a channel. As above, however the card is sent to a channel. The above two actions simply allow to send the card, but they do not offer any way to collect feedback. They are a good choice if you are planning to simply send informative card, without forms. |
Exercise!
Now it is your turn. Build an easy flow, that is triggered manually and all it does is posting an Adaptive Card to a Teams channel (of your choice), using “Post your own adaptive card as the Flow bot to a channel” action.

Then copy paste the following Adaptive Card JSON code and paste as “Message” inside the action:
{
    "$schema": "http://adaptivecards.io/schemas/adaptive-card.json",
    "type": "AdaptiveCard",
    "version": "1.2",
    "body": [
        {
            "type": "TextBlock",
            "text": "Hey @{triggerOutputs()['headers']['x-ms-user-name']}! Here are some cool cats photos",
            "size": "Large",
            "wrap": true
        },
        {
            "type": "TextBlock",
            "text": "I hope you like them ;)",
            "size": "Medium",
            "weight": "Lighter",
            "wrap": true
        },
        {
            "type": "ImageSet",
            "imageSize": "medium",
            "images": [
                {
                    "type": "Image",
                    "url": "https://4.bp.blogspot.com/-XkviAtJ1s6Q/T3YFb2RUhDI/AAAAAAAAAVQ/EHomLZlFMKo/s1600/small+cat.jpg",
                    "size": "Medium"
                },
                {
                    "type": "Image",
                    "url": "https://images4.fanpop.com/image/photos/18500000/Kitten-cats-18565791-1024-768.jpg",
                    "size": "Medium"
                },
                {
                    "type": "Image",
                    "url": "https://tse2.mm.bing.net/th?q=Funny+Cats&pid=Api&mkt=en-US&adlt=moderate&t=1",
                    "size": "Medium"
                },
                {
                    "type": "Image",
                    "url": "https://tse3.mm.bing.net/th?q=Grumpy+Cat&pid=Api&mkt=en-US&adlt=moderate&t=1",
                    "size": "Medium"
                }
            ]
        }
    ]
}
Now save and test your flow. You should see the below cool Adaptive Card in Microsoft Teams channel:

Further learning
Adaptive Cards is not just a simple technology. It is also the community that is behind. If you are interested in learning more about it, check the assets under the links below:
- https://adaptivecards.io – here is the documentation, JSON schema explorer to tell you what is possible and what is not plus several samples.
- https://adaptivecards.io/designer – the already known visual designer.
- https://aka.ms/acroadmap – here is the roadmap, release log and user voice, where you can submit your ideas.
- https://madewithcards.io/ – the repository of community built Adaptive Cards examples, ready to use.
- https://aka.ms/adaptivecardscommunitycall – add monthly, community call about Adaptive Cards to your calendar and be up to date with the latest ideas the team behind is planning.
- https://github.com/microsoft/AdaptiveCards – the official github repository for Adaptive Cards code, where you can find the latest SDK if you plan to begin your journey as a developer.
Wrap up
Adaptive Cards is a modern technology built by Microsoft to help content creators author parts of user interface much faster and with less issues, due to device-specific aspects.
Knowledge about JSON code is useful, however it is not mandatory to successfully design cards.
With the easy to use designer and intuitive actions in Power Automate, anyone can easily create and use Adaptive Cards for communication purposes and to enrich user experience in processes taking place inside Microsoft Teams.
The technology can be used for many scenarios, that turns Microsoft Teams powered with Power Automate into a real digital workplace, where users can take part in the processes directly from conversations or chats, not being disturbed by the need to navigate between different systems.
I encourage you to try it right away.
by Contributed | Feb 11, 2021 | Technology
This article is contributed. See the original author and article here.
Hello Folks!
Not so long ago I was working on an internal project that required me to deploy Linux VMs that were hosting a workload that saved a copy of any number of video live feeds to blob storage for safeguard and for future replays. I also needed it to be mounted automatically when the VM was created.
I know that are several ways to map storage in a VM. You can:
- How to mount an NFS file share
- Use Azure Files with Linux over SMB
- How to mount Blob storage as a file system with blobfuse
- Mount Blob storage by using the Network File System (NFS) 3.0 protocol (preview)
I decided to give the NFS path a try.
Why NFS you may ask?
I’m not sure… Could be because NFSv3 provides compatibility for existing applications, could be because of the scale it can support or maybe just because it’s cost effective and easy to setup.
In any case, I followed the documentation here to create the virtual network, service endpoint to ensure that the storage account can only be accessed from the appropriate vnet and subnet, and the storage account.
To automate this at the time of deployment I added the following few lines to the Custom Script Extention script i use to deploy the workload on a new VM at deployment time.
apt update
apt install nfs-common -y
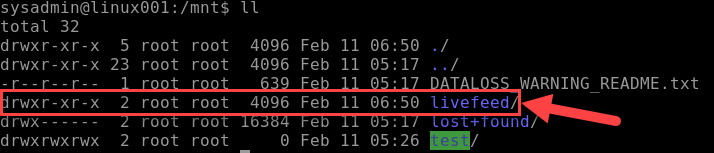
mkdir -p /mnt/livefeed
mount -o sec=sys,vers=3,nolock,proto=tcp <storage-account-name>.blob.core.windows.net:/<storage-account-name>/<container-name> /mnt/livefeed
This worked great!
Except that the workload on the VM could not write to the blob storage. I realized that when the custom Script extension creates the folder livefeed in /mnt it’s done by the Azure Agent user context (Root) and therefore the permissions on that folder
Only provide read write to Root. For my test I added the following line to the end of my script, and it worked like a charme.
chmod 777 /mnt/livefeed

I do Not promote giving all rights to all users in a production environment.
My next step is to create a group that include the user context which the workload in running under and change the permissions so only the account needed have write access.
I really believe in the Least-Privilege Administrative Models when it comes to any environments (On-Prem, Hybrid and cloud native).
In any case, I hope this may give you some ideas on how you can leverage Azure services to address problems in your environment.
Cheers!
Pierre
by Contributed | Feb 10, 2021 | Technology
This article is contributed. See the original author and article here.
First published on TECHNET on Mar 18, 2019
Authored by Brandon McMillan
Hello everyone! My name is Brandon McMillan and I am a Microsoft Endpoint Configuration Manager (ConfigMgr) CE. I have found that Status Message Queries can be one of the more underappreciated features of ConfigMgr. The information you can gather in a quick and easy query can be very powerful in helping you determine the root cause analysis of an issue. I hope this blog will provide you with additional Status Message Queries and how you can quickly export/import some examples into your environment.
First let’s break down the different Status Message Types:
ID
|
Status Message Type
|
Description
|
256
|
Milestones
|
Use this type at the end of an operation to indicate the operation’s success or failure. If the operation was successful, use the Milestone type in an informational message. If the operation failed, use a milestone message type in a warning or error message.
|
512
|
Details
|
Use this type to illustrate the steps in a complex operation. Often, detail messages are meaningful only within the context of the sequence of status messages representing a complex operation.
|
768
|
Audits
|
Use this type for informational messages that provides a trail of actions taken by the Configuration Manager administrator. An audit message also depicts an operation that results in objects being added, modified, or deleted. You do not need to create audit messages; the provider automatically generates these messages for you.
|
1024
|
NT Events
|
|
Reference: SMS_StatusMessage WMI Class
Here is a quick overview of Status Message Queries:
Status Message Queries
|
Use this node to query status messages for specific events and related details. You can use status message queries to find the status messages related to specific events.
You can often use status message queries to identify when a specific component, operation, or Configuration Manager object was modified, and the account that was used to make the modification. For example, you can run the built-in query for Collections Created, Modified, or Deleted to identify when a specific collection was created, and the user account used to create the collection.
|
Reference: Use Alerts and the Status System
Enumerating Status Message Strings
How can we obtain a full listing of Status Message ID’s? If you are unsure what Status Message ID’s to use to create a specific Status Message Query, you can export all the Status Messages ConfigMgr provides by using a PowerShell script from an article by SaudM . The script and an example of an excel output from a ConfigMgr 2012 R2 environment can be found here: Enumerate Status Messages.
Here’s an example of how you can leverage the script and export the Status Messages based on type: Client, Provider, or Server Messages.
Client Messages
.Export-StatusMessages.ps1 -stringPathToDLL "<InstallDrive>:Program FilesMicrosoft Configuration ManagerbinX64system32smsmsgsclimsgs.dll" -stringOutputCSV ExportClientMsgs.csv
Provider Messages
.Export-StatusMessages.ps1 -stringPathToDLL "<InstallDrive>:Program FilesMicrosoft Configuration ManagerbinX64system32smsmsgsprovmsgs.dll" -stringOutputCSV ExportProviderMsgs.csv
Server Messages
.Export-StatusMessages.ps1 -stringPathToDLL "<InstallDrive>:Program FilesMicrosoft Configuration ManagerbinX64system32smsmsgssrvmsgs.dll" -stringOutputCSV ExportServerMsgs.csv
Default Status Message Queries
We provide many out of box queries that are delivered with the product; however, there are many Message ID’s that you can leverage which could help you build your own specific queries for your environment. Some of the default Status Message Queries you may already be familiar with are below:
Query Title |
Query Details |
All Audit Status Messages for a Specific User |
Message Type: 768
Message Attribute ID: 403 |
All Audit Status Messages from a Specific Site |
Message Type: 768 |
Boundaries Created, Modified, or Deleted |
Message IDs: 40600-40602 |
Client Component Configuration Changes |
Message IDs: 30042-30047 |
Collections Created, Modified, or Deleted |
Message IDs: 30015-30017 |
Collection Member Resources Manually Deleted |
Message IDs: 30066-30067 |
Deployments Created, Modified, or Deleted |
Message IDs: 30006-30008 |
Packages Created, Modified, or Deleted |
Includes Package Conversion Status
Message IDs: 30000-30002 |
Programs Created, Modified, or Deleted |
Includes Package Conversion Status
Message IDs: 30003-30005 |
Queries Created, Modified, or Deleted |
Message IDs: 30063-30065 |
Remote Control Activity at a Specific Site, User, or System (4 Total) |
Message IDs: 30069-30087 |
Security Scopes Created, Modified, Deleted, or Imported |
Message IDs: 31200-31202 / 31220-31222 / 31207 |
Server Component Configuration Changes |
Message IDs: 30033-30035 / 30039-30041
Site Control Changes |
Site Addresses Created, Modified, or Deleted |
Message IDs: 30018-30020 |
Enhanced Audit Status Message Queries
Now what if you need something more specific? The following list may help you quickly determine what specific activities are occurring within your environment. You can download the XML file and script resources here on GitHub: Enhanced Audit Status Message Queries.
Query Title |
Query Details |
Audit – All Alert Actions |
Includes DRS Alerts
Message IDs: 30240-30244 |
Audit – All Application Actions |
Message IDs: 30226-30228 / 49003-49005 / 52300 |
Audit – All Application Catalog Actions |
Message IDs: 30800-30805 / 50000-50004 |
Audit – All Asset Intelligence Actions |
Message IDs: 30208-30209 / 31001 |
Audit – All Azure and Co-Management Actions |
Message IDs: 53001-53005 / 53401-53403 / 53501-53503 |
Audit – All Boundary Group Actions |
Message IDs: 40500-40505 |
Audit – All Client and Collection Miscellaneous Actions |
Includes Update Membership, Device Imports, Clear PXE Deployments
Message IDs: 30104 / 30213 / 42021 |
Audit – All Client Configuration Requests (CCRs) |
Client Push actions.
Message IDs: 30106-30111 |
Audit – All Client Operations Actions |
Includes “Right Click” actions.
Message IDs: 40800-40804 |
Audit – All Client Settings Actions |
Includes Antimalware Policies.
Message IDs: 40300-40305 |
Audit – All CMPivot and Script Actions |
Message IDs: 40805-40806 / 52500-52505 |
Audit – All Conditional Access Actions |
Includes Exchange Online, SharePoint Online, and On-Prem Exchange actions.
Message IDs: 30340-30341 |
Audit – All ConfigMgr Actions in Console |
Checks components: Microsoft.ConfigurationManagement.exe / AdminUI.PS.Provider.dll |
Audit – All Configuration Baseline Actions |
Message IDs: 30168 / 30193-30198 |
Audit – All Configuration Items |
Includes Compliance Settings and Endpoint Protection policy actions.
Message IDs: 30152-30167 |
Audit – All Content Library Actions |
Includes Content Library changes
Message IDs: 30080 / 30189-30191 |
Audit – All Distribution Point Actions |
Message IDs: 30009-30011 / 30068 / 30109 / 30125 / 30500-30503 / 40409-40410 |
Audit – All Distribution Point Changes |
Message IDs: 40400-40409 / 40506 |
Audit – All Folder Actions |
Message IDs: 30113-30117 |
Audit – All Messages |
|
Audit – All Messages (Specified Message ID) |
|
Audit – All Messages (Specified Timeline) |
|
Audit – All Migration Actions |
Message IDs: 30900-30907 |
Audit – All Mobile Device Management Actions |
Message IDs: 40200-40206 / 45000-45004 / 47000-47002 / 48000-48003 / 49003-49005 / 51000-51006 / 52000-52020 |
Audit – All Phased Deployment Actions |
Message IDs: 53601-53603 |
Audit – All Query Actions |
Message IDs: 30063-30065 / 30302-30303 |
Audit – All Report Actions |
Message IDs: 30091-30093 / 31000-31002 |
Audit – All Search Folder Actions |
Message IDs: 30700-30702 |
Audit – All Secondary Site Actions |
Message IDs: 30012-30014 / 30021-30023 |
Audit – All Site Server Boundary Actions |
Message IDs: 30054-30056 |
Audit – All Site Server Definition Actions |
Message IDs: 30030-30032 |
Audit – All Site Server Property Actions |
Message IDs: 30024-30029 |
Audit – All Site Server Role Actions |
Message IDs: 30036-30038 |
Audit – All Site Server Security Actions |
Message IDs: 30057-30062 / 30210-30212 / 31200-31242 / 31203-31249 |
Audit – All Site Server SQL Actions |
Includes Site Maintenance Tasks
Message IDs: 30048-30053 |
Audit – All Software Metering Rules Actions |
Message IDs: 30094-30095 / 30105 |
Audit – All Software Update Actions |
Message IDs: 30112 / 30118-30124 / 30135-30137 / 30172 / 30183-30188 / 30196-30198 / 30219-30221 / 30229-30231 / 30506-30507 / 42031-42033 / 4900-49002 |
Audit – All User Object Actions |
Message IDs: 30600-30606 |
Script to Import Status Message Queries
The script below can be download here on GitHub: Import-CMStatusMessageQueries.ps1.
param(
    [Parameter(Mandatory=$True)]
    [string]$XMLPath
)

# Imports ConfigMgr Module
Import-Module "$env:SMS_ADMIN_UI_PATH..ConfigurationManager.psd1"

# Get SiteCode
$SiteCode = Get-PSDrive -PSProvider CMSITE
Set-location $SiteCode":"

# Imports XML
try
{
    $CMStatusMsgs = Import-Clixml $XMLPath
}
catch
{
    Write-Host -ForegroundColor Red "Invalid file path or file type.  Please try again."
    Exit
}

foreach ($Query in $CMStatusMsgs)
{
    try
    {
        $StatusQuery = @{
            Name = $Query.Name
            Expression = $Query.Expression
            Comments = $Query.Comments
        }
        New-CMStatusMessageQuery @StatusQuery
        Write-Host -ForegroundColor Green $Query.Name "was created successfully."
    }
    catch
    {
        Write-Host -ForegroundColor Red $Query.Name "already exists."
    }
}
Export Status Message Queries to XML
What if you wish to export your own Status Message Queries to another environment? You can leverage the ConfigMgr PowerShell cmdlets: Get-CMStatusMessageQuery and Export-Clixml.
NOTE: Requires the ConfigMgr PowerShell Module
Export all Queries
Get-CMStatusMessageQuery | Export-Clixml <path>StatusMsgQueries.xml
Export only Queries beginning with the name “Audit”
Get-CMStatusMessageQuery -Name Audit* | Export-Clixml <path>Audit_StatusMsgQueries.xml
References: Get-CMStatusMessageQuery, Export-Clixml
I hope this information will help you in becoming a true detective within your environment. Very special thanks for SaudM on the “Enumerating Status Message Strings” script along with Kevin Kasalonis on his assistance with the content of this blog.
Thank you again for reading!
Brandon McMillan, Customer Engineer
Disclaimer: The information on this site is provided “AS IS” with no warranties, confers no rights, and is not supported by the authors or Microsoft Corporation. Use of any included script samples are subject to the terms specified in the Terms of Use.
by Contributed | Feb 10, 2021 | Technology
This article is contributed. See the original author and article here.
A few months ago, I published a blog post announcing the availability of guidance for deploying Magento in Azure Kubernetes Service (AKS). Today, I’m pleased to announce the release of an Azure Resource Manager (ARM) template, with variables for all scalability settings, designed to help deploy Azure resources for Magento.
Note: For details about the solution architecture for running Magento on Azure, see this reference architecture.
Performance tuning
Initially, our goal was to identify the parameter settings required to reach 300+ orders per minute. For performance testing, we leveraged the Magento Performance Toolkit, which uses Apache JMeter to simulate customer behaviors such as signing in, browsing products, and checking out. At the beginning of the process, we discovered a few bottlenecks, such as serving static files, storing user sessions, using full-text search, and some issues related to networking. These factors contributed to a starting point of about 140 orders per minute. After we resolved all bottlenecks, we were able to achieve 340 orders per minute by using a 10–node AKS cluster with 16 core MySQL.
Template parameters
To ensure a great starting point for all customers, the ARM template we’ve released uses default values for each variable. This ensures that you can avoid unnecessary initial costs when working on a proof of concept that requires deploying a performant architecture. In all likelihood, you’ll want to update these values to ensure that they address your specific scenario and scalability requirements.
The following table lists parameters in the template that determine how much the cluster can scale. It provides detail about the default values included in the template, along with the parameters we used to achieve 340 orders per minute for comparison.
Parameter
|
Default value
|
Value for 340 orders/min
|
aksNodePoolSize
|
3
|
10
|
aksNodePoolVMSize
|
Standard_DS2_v2
|
Standard_F8s_v2
|
mySQLSkuName
|
MO_Gen5_4
|
MO_Gen5_16
|
mySQLSkuTier
|
MemoryOptimized
|
MemoryOptimized
|
mySQLSkuFamily
|
Gen5
|
Gen5
|
mySQLSkuCapacity
|
4
|
16
|
mySQLStorageSize
|
128000
|
512000
|
fileShareQuota
|
512
|
16384
|
Keep in mind that while higher values generally provide better performance, they also tend to result in increased costs.
Guidance
If you have plans to deploy Magento on Azure, download the template, and review its contents. Use the Magento Performance Toolkit to help determine the most appropriate values based on your own cost and considerations.
I hope you’ll find this template useful. If you have questions or feedback about the template, feel free to reach out to the Ask Azure DB for MySQL alias for additional assistance!
by Contributed | Feb 10, 2021 | Technology
This article is contributed. See the original author and article here.
Kubernetes was built for the needs of IT operations, not developers. Wouldn’t it be nice if you can write code and push to source control, then have your application up and running in minutes?
Azure Red Hat OpenShift runs Kubernetes at its core and includes everything you need to manage your development lifecycle, such as standardized workflows, support for multiple environments, continuous integration, release management, and more.
In this blog post, we’ll explore some of the features that make Azure Red Hat OpenShift a turnkey container platform with a significantly improved developer and operator experience.
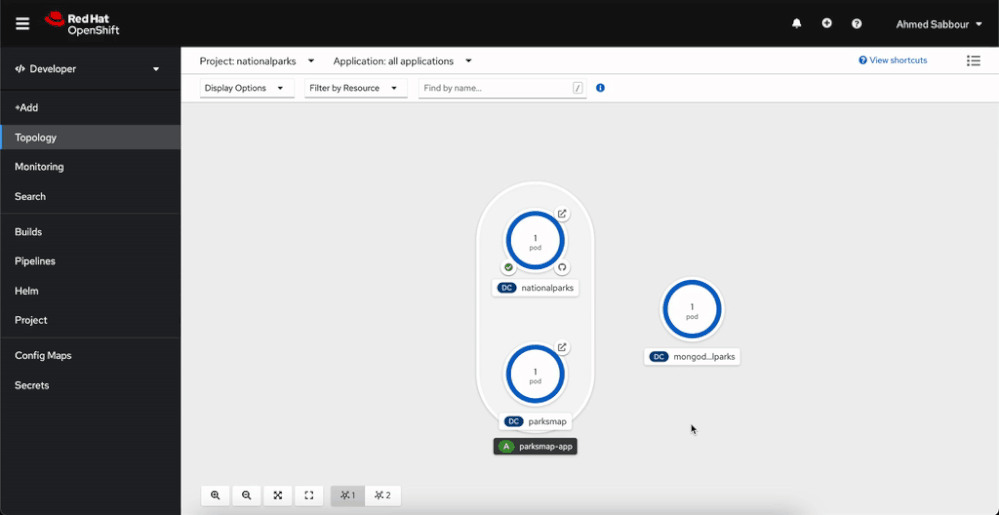
Web Console – developer perspective
The developer perspective in the OpenShift Web Console provides an alternative view that is focused on developer use cases. The enhanced UI for application topology and application builds in the Web Console make it easier for developers to build, deploy, configure, and visualize containerized applications and cluster resources. You can use the developer perspective to view the application topology, deploy applications, setup and review application health monitoring and logging, and configure build pipelines.
Video sequence showing application topology view in the developer console
Source-to-image (S2I)
Bring your code from Git, or push it from your development machine to build reproducible container images, using several built-in builder images for Perl, PHP, .NET Core, Go, Ruby, Python, Java and Node.js. You can even create your own builder images. Source-to-image automatically injects your application’s source or binary artifacts into a base image and assembles the artifacts with any required dependencies to create a new, ready-to-run image containing your application.
 Video sequence showing creating an application from Git using source-to-image
OpenShift Do
When creating applications to be deployed using containers, there are a lot of common build and deployment tasks that make up the inner development cycle. As a developer, you may need to write a Dockerfile, build containers locally, push them to a container registry, write lots of YAML and use kubectl apply before you can see your code running on the cluster. Odo (short for OpenShift Do) is a fast, iterative and straightforward CLI tool for developers who write, build and deploy applications on Kubernetes and OpenShift. Odo streamlines that inner loop to let you focus on your application’s source code. Its syntax and design uses concepts familiar to developers, such as projects, applications, and components. Odo can deploy applications in several development languages and frameworks. Deployment creation, build configurations and routes are automated and it is designed for quick iterations, as it detects changes to local code and deploys the updates to the cluster automatically.
 Video sequence showing creating an application using odo
OpenShift Serverless
Build portable event driven apps that scale with demand. Based on the open source Knative project, OpenShift Serverless simplifies the process of delivering code from development into production while abstracting away the underlying infrastructure. The serverless functionality will start the application containers when they are called by an event, such as an HTTP request and other triggers from a variety of event sources. The containers can also scale to zero, eliminating resource consumption when not in use.
 Video sequence showing deploying an application to OpenShift Serverless
Next steps
Adopting a container platform lets you keep up with application scale and complexity requirements. Azure Red Hat OpenShift is designed to make deploying and managing applications easier. It provides commercial support for the languages, databases, and tooling you already use, while providing easy access to Azure services such as Azure Database for PostgreSQL and Azure Cosmos DB, to enable you create resilient and scalable cloud native applications. If you’re interested to see how this all works together, watch this short video to see how to deploy a multi-tier Java application from containers, from source code and through CI/CD into Azure Red Hat OpenShift.
Try Azure Red Hat OpenShift now. Start with the Azure Red Hat OpenShift documentation and continue your learning experience on the Azure video center. Connect with Microsoft and community experts to share feedback, learn from others, and find answers to your technical questions on the Azure Red Hat OpenShift topic on the Microsoft Q&A site.

Recent Comments