
by Contributed | Feb 11, 2021 | Technology
This article is contributed. See the original author and article here.
How to get started with HTTP requests in Power Automate
If you ever wondered what is an HTTP request and why you would want to know how this works – this post is made for you.
What is a HTTP request and why would I need it?
HTTP requests are a super powerful thing – not only in Power Automate! We will first need to understand what this is in order to determine why we would like to know how to use them. But wait – HTTP?
What is HTTP?
Let’s first get us all an the same page. HTTP is the acronym for Hypertext Transfer Protocol. Its purpose is to structure requests and responses over the internet (yeah, you heard of that one :smiling_face_with_halo:
) – Data needs to be transferred from Point A to Point B over the network.
The transfer of resources (like html files, images, videos etc) happens with TCP – which again is acronym, for Transmission Control Protocol. When you read this blog post, TCP manages the channels between your browser (hope you are using Microsoft Edge) and the server. TCP is used a lot for scenarios in which one computer sends something to another. Now what has TCP to do with HTTP? Think of HTTP as the command language for both computers so they are able to communicate.
When you type a URL like https://www.m365princess.com into the address bar of your browser, your computer establishes first a TCP connection and then makes a request. We will call your computer now client. The request is a HTTP GET request, as we nicely ask to retrieve the website that the browser shall display. And as we send a (nice) request, the server (site that you requested) will send a response and close the TCP connection afterwards. Of course, there are more methods than just the GET method, you will learn later more about methods POST, PUT, PATCH, DELETE.
Now that we know what an HTTP request does, we want to learn what it could do in Power Automate
What can HTTP requests do in Power Automate?
Power Automate offers you a huge variety of connectors and within those connectors, many actions which you can use to automate your processes. But although we have so many options, this won’t cover everything you need or that you might want to build in Power Automate, which is why we have an HTTP action in Power Automate as well. With the HTTP action we can invoke a REST API.
What is a REST API?
Wait but what? Ok, let’s slow down a little bit. What is a REST API and would we want to invoke that?
API is -yet again- an acronym for application programming interface and it is a set of rules and mechanisms. By these an app or a component interacts with others. RESTful APIs (REST means representational state transfer) can return data that you need for your app in a convenient format (for example JSON or XML). By using the HTTP action in Power Automate we can invoke/call an API by using methods GET (read), POST (write), PUT (update), PATCH (update, but only partially) or DELETE (remove). The same way as our browser made a call towards a website and getting a response using HTTP, we now use HTTP to send a request to a service. In my example, I will use Microsoft Graph. Microsoft Graph is a RESTful API that enables you to access Microsoft Cloud service resources. It is literally THE way to read, create, update and delete resources (like files, teams, meetings etc.).
Microsoft provides us with an amazing tool to try out Microsoft Graph, it’s the Graph Explorer.
How to create a HTTP request in Power Automate
Now how do we create an HTTP requests in Power Automate? First let me introduce everyone to our little
Use case
We want to use Power Automate to create a Team with some predefined content in it. To make things easier, we will use the mobile trigger and ask for Team Name, Team Description, and if a user wants a channel for Learning and wants to pin training material (a website) as a tab to this channel

(Of course, we would do that later in a form, an app, or a bot, but for understanding the logic of HTTP requests in Power Automate I will keep this as simple as possible)
We will now add actions to create the team and then we add a condition: If user wants learning material, we want create a channel called Learning and want to pin a website to it.
Unfortunately, there is no action “pin a website to a channel in Teams” in Power Automate. Fortunately, we can still do this by making an HTTP request towards Microsoft Graph. This is why I added the HTTP action into the flow:

You can see a lot of fields in that HTTP action, so I will make you understand them.
What do we need to make a successful HTTP request?
It is a very good idea to open documentation on docs.microsoft.com while building your flows that call Microsoft Graph. You will find in nearly all pages four things, that we need to consider when doing an HTTP request:
Endpoint
First things first, if we want to call an API with HTTP, we need to know the right endpoint. Think of an endpoint like a phone number that you want to call. You need to know it, because otherwise you won’t reach the right person.
An endpoint is a URL like this: https://graph.microsoft.com/v1.0/{resource}?[query_parameters] and we will later use https://graph.microsoft.com/v1.0/teams/{team-id}/channels/{channel-id}/tabs to create this tab.
Method
Second thing we need to know is which method we want to use. As already explained,
GET == Read
POST == Write
PUT == Update
PATCH == partially update
DELETE == remove
If we now open the dropdown menu for the Method field in the HTTP action, we will see a representation of that:

As we want to create a new tab in a channel, we will use POST.
Headers
Headers are not mandatory for all requests, but look like this: Content-type: application/json – If they are needed, documentation will tell you.
Data (or body)
If we call an endpoint, it’s not enough to specify the URL the request needs to make to, but we will also need to post some additional info into the body of our requests. Most GET requests though don’t need information in the body, as they will only list the requested resources.
Fill in the HTTP action
If we carefully follow the Docs, we will see that we should do this:
POST https://graph.microsoft.com/v1.0/teams/{team-id}/channels/{channel-id}/tabs
{ “displayName”: “M365Princess Blog”,”teamsApp@odata.bind” : “https://graph.microsoft.com/v1.0/appCatalogs/teamsApps/com.microsoft.teamspace.tab.web“, “configuration”: { “contentUrl”: “https://m365princess.com“, “websiteUrl”: “https://m365princess.com” } }
Some remarks on that:
In total, this looks like this:

Authentication in Azure AD
We are almost there, but some critical parts are missing. As you can see in the last image, there is a Show advanced options link in the HTTP action and we need to click on it. Our HTTP request need authentication. We can authenticate via Azure Active Directory OAuth, but we will first need to have a representation of our app (yes, this flow that calls Graph is an application) in Azure AD.
We will follow these steps to register an app in Azure AD:
Permission type |
Permissions (from least to most privileged) |
|---|
Application |
TeamsTab.Create.Group*, TeamsTab.Create, TeamsTab.ReadWriteForTeam.All, TeamsTab.ReadWrite.All, Group.ReadWrite.All, Directory.ReadWrite.All |
- Select all these permissions
- Grant Admin consent
- Click Certificates & secrets
- Click New client secret
- Type in a description
- Click Add
- Copy the value and save it in your notepad (you will need that later)
Write the IDs into variables
In our flow, we will now initialize three variables at first level (before any condition) and set their values the copied values of Tenant ID, App ID and App Secret. All three variables are of type string.
Complete the HTTP request
Now we will fill in some more information in the HTTP request:
Besides that, we will use our three variables for Tenant ID, App ID and App Secret.
Our flow should look like this:

Celebrate
If we now run the flow and take a look at the new team in Microsoft Teams:

we can spot our freshly created tab with the the content we wanted to provide!
Conclusion
HTTP requests re a super coo method to achieve a lot of things that are not actions in Power Automate, but can still be executed using Microsoft Graph (or other APIs!).
What are you using HTTP requests for?
First published on m365princess.com
by Contributed | Feb 11, 2021 | Technology
This article is contributed. See the original author and article here.
Today, I worked on an interesting service request where our customer is facing the error message “Connection to database master failed (error 11001, state 0): A network-related or instance-specific error occurred while establishing a connection to SQL Server. The server was not found or was not accessible. Verify that the instance name is correct and that SQL Server is configured to allow remote connections. (provider: TCP Provider, error: 0 – No such host is known.)” trying to connect to Azure SQL Managed Instance.
All points to that the issue is related about DNS resolution based on the message “No such host is known”. In this situation, we saw that our customer created their own entry in their custom DNS to the .database.windows.net DNS Zone pointing to the name of the Azure SQL Managed Instance, for example, nameofmanagedinstance.virtualcluster.database.windows.net 10.0.1.254.
However, when our customer tries to connect they faced the error message that we mentioned before. Why?
By default, the connection policy of Azure SQL Managed Instance is configured as “Default” that means that if the client machine is running on Azure, the connection policy will be redirect.
In this redirection the client will connect directly to the node hosting the Managed Instance that has a specific name. Unfortunately, if the name of this node is not in the Custom DNS that our customer has the redirection will not be possible and you are going to have the error message that the node is unknown.
In this situation, we have 2 different alternatives:
- Custom DNS:
- Add the name of the node in the Custom DNS. Unfortunately, it is quite complex, because we might have different nodes name and different IPs. For this reason, forward the request to the default Azure DNS will be a solution.
- Don’t use a Custom DNS for zone resolution .database.windows.net and add as a last Custom DNS server the IP of the default Azure DNS server.
- If you want to know the name and the IP of this node you could take a network trace from the client machine. But, it is not a recommend solution.
- Change the connection policy to Proxy.
- In this situation, the redirection will be not take place and you could connect normally.
Enjoy!
by Contributed | Feb 11, 2021 | Technology
This article is contributed. See the original author and article here.
Introduction
This blog is a continuation of the blog series on this topic. If you haven’t read Part 1 of the series, here is the link to help you catch up.
At the end of Part 1, we finished the overall planning and assessment of HANA N+M scale-out architecture on ANF. We then designed the base infrastructure. Finally, we went through the build phase of the base infrastructure. With this base setup, we now have the necessary architectural elements for Part 2, and the stage is now set to design and build the remaining components.
Note: The intention throughout the blog series is to cover a solution architect view to designing and building the solution in a more thought-provoking manner, and to compliment already available well-crafted MS Docs and NetApp documentation on this topic. I will cover key highlights from these documentations, and where necessary, will also augment additional detail in this blog to cover more surface area.
Design – Backup and Recovery
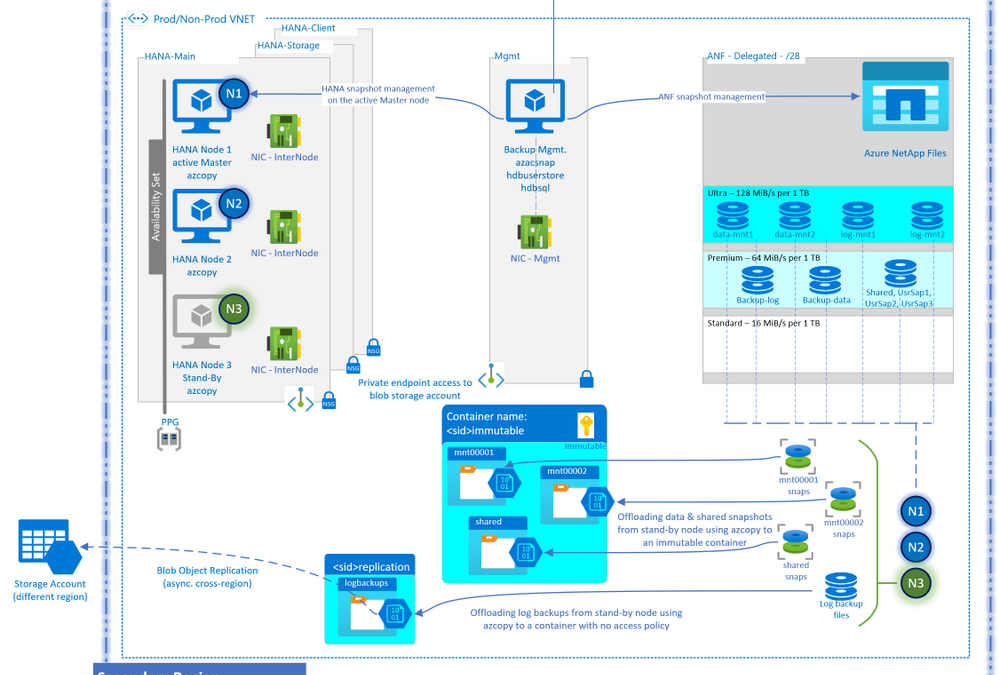
Final Design

Before going through the entire design process, it might be beneficial to see what the end result might look like. The above diagram serves that purpose. The diagram may have components that you may not be familiar with, and that is okay. Once you have gone through the design process below and come back to this diagram, it will make a lot more sense.
Prerequisite Questions
By answering the below questions based on the backup requirements for this scale-out HANA environment, you will have a better sense of what a backup schedule would look like:
- What are you protecting?
- How big are these data components considering the YoY growth?
- How often do you need to back up?
- Do you have any performance boundaries or expectations for the backups?
- How long do you need to retain the backups in the primary location?
- Do you also want to protect the protection of your data (backups of the backups)? If so, do you want to offload locally and/or cross-region, and what retention will these backups of the backups have in these local and cross-region locations?
- Do you need policy variations for other environments (Dev, QA, Prod)?
- How much are you willing to pay for this insurance policy (backups)?
- What will the backup security look like? (data access, immutability, credentials handling etc.)
- What is the Recovery Point Objective (RPO)?
- What is the Recovery Time Objective (RTO)?
- Do you intend to use this backup for recovering (refreshing) another environment? If so, a local refresh or a cross-region refresh?
Design Considerations
Based on the responses to the above questions, the design will vary. Let’s add some commentary and a sample response to the questions to move the design to build phase for this exercise:
- What are you protecting? SAP HANA critical data components: Data volumes, Log Backups and shared binaries and profiles
- How big are these data components considering YoY growth? A database size of 5 TiB with 15% YoY growth. The log Backups volume keeps a day worth of log backups which is roughly around a TiB. Even though /hana/shared doesn’t contain the backup catalog, it does contain the profiles and binaries, and needs to be backed up.
- How often do you need to back up? The log backup volume most frequently since it contains the redo logs which are critical to point-in-time recovery. The availability of log backups also drives the RPO. Since log backups are applied on top of a data backup, the more recent data backup you have, the faster the recovery would be. You could counter adjust this by increasing the frequency of data backups, but this could impact your cost objective, so a happy medium of data backups and log backups frequency is preferred.
- Do you have any performance boundaries for backups? For example, must finish within ‘x’ hours, can only run overnight with a cap of no more than 20% of system resource consumption, etc.
- How long do you need to retain the backups in the primary location? Does the option of storing the backups for ‘x’ many days incurring costs and the time it takes to recover from them, outperforms the option of simply restoring to the most recent data backup and re-run the business process? And the answer could very much be yes, say for example, for a transactional system. But, what about an OLAP system with frequent considerable overwritten of data? Will it be easier to get to a reasonably recent backup and then run the data loads to bring the environment to a state of your choice? Only you, as a business owner, can answer a restore question like this.
- Do you want to protect the protection of your data (backups of the backups)? If so, do you want to offload locally and/or cross-region and what retention will these backups of the backups have? You are defining your protection trail: Original data > first protection > secondary protection > tertiary protection etc. For example, I want to take backups and store them locally, but would also want these backups to be stored in another separate local entity. On top of it, I want the backups to be further offloaded from that local entity to a cross-region entity.
- Do you need policy variations for other environments? Dev, QA and Prod typically do have different flavors of backup policies.
- How much do you want to pay for this insurance? A cost benefit analysis is needed to understand the right backup schedule that doesn’t exceed the cost budget
- What will the backup security look like? Who will have access to perform backups, access to the stored backups, and permission to restore a backup? How will the credentials be shared, will the backups be immutable, etc.?
- What is the Recovery Point Objective (RPO)? I cannot afford to lose more than ‘x’ min. worth of transactions. This ‘x’ defines the frequency of your log backups.
- What is the Recovery Time Objective (RTO)? I cannot afford a downtime of more than ‘y’ hours before I must resume business. The farther back in time you recover from, the amount of log backups needed for the chosen recovery time and re-do of the business processes from that point onwards to bring the system back to current state, defines your total incurred downtime.
- Do you intend to use this backup for recovering (refreshing) another environment? If so, local refresh or cross-region refresh? I want to leverage the offloading of the backups cross-region to prepare a lower environment for an upcoming testing (planned activity).
A sample policy* table would look like this:
Protect:
|
Size
|
Frequency
|
Retention
|
Offloading
|
HANA data
|
5 TiB
(15% YoY Growth)
|
Twice daily
|
48 hrs.
|
To another location within the region, retain for 7 days.
Immutable but no replication to DR region
|
HANA log backups
|
1 TiB
|
Every 15 min.
|
24 hrs.**
|
To another location within the region, retain for 7 days.
Also, replicate to DR region, retain for 7 days
|
Shared binaries and profiles
|
100 GiB
|
Weekly
|
48 hrs.
|
To another location within the region, retain for 7 days.
Immutable but no replication to DR region
|
* This example doesn’t include the special ad-hoc backups, or monthly or yearly longer-term backups, but you can adopt the method for them as well.
* If you keep 24 hours of log backups in your volume, then the 24 hours old snapshot would contain ~48 hours old log backup. Define your log backup settings accordingly.
The weapon of choice
With enough ammunition after answering the above questions, we are now ready to choose the backup solution and design various aspects of it. For this architecture, you could use an enterprise-grade backup solution (backint), or a more traditional native HANA full/inc./diff. file level backups. Though Azure Backup for SAP HANA would have been a great choice for SAP HANA running in Azure, it currently doesn’t support scale-out configuration – please check at the time of reading to get the latest support offering. There is one more option that comes inherently with ANF, it’s native snapshot capability. With HANA 2.0 SP4, snapshots on multi-tenant databases are also supported. We will pick ANF snapshots as the primary backup solution for this architecture and will use native HANA file level backups as a secondary backup option.
Design the secondary backup solution – HANA native file level backups
- Let’s get those low-hanging fruits first. Let’s design the secondary solution first.
- You need a target volume to store the file level HANA backups. Depending upon the number of backups you intend to keep, you can use either the premium or the standard ANF volume. Do your size-cost-performance analysis to pick the SKU that’s right for you. The following graphs will help you with this analysis:

- For example, replacing a 10 TiB ultra sku volume with a 20 TiB premium sku volume, would experience similar performance on a Linux machine but yet cheaper than a 20TiB ultra volume.

*Estimated monthly pricing calculated using Azure Pricing page for US East region at the time of writing.
- Point the default data backup location in HANA configuration to point to this new data backup volume (basepath_databackup)
- We will not cover the secondary backup solution in the build section.
Design the primary backup solution – ANF snapshots
- Management Server: A D4ds_v4 VM would be sufficient, though you can try a smaller SKU as well. You will need azacsnap software on it. You will also need outbound connectivity to Azure APIs from this VM (see Part 1). The management server will also need a saved HANA database user credential capable of managing backups. You will use hdbuserstore to securely store and use this user credential.
- Storage Account kind and access tier: A GPV2 blob standard performance SKU would be ideal to store backups with multi-tier option from hot to archive. The archive tier may not be the best option for you, though the cheapest, if you intend to use a specific redundancy option not available for archive tier, or plan to delete the backups in less than 180 days. You can check more details in Azure docs referenced at the end. We will use “hot” tier for the backups for the first 2 full days before moving them to cool tier for the last 5 full days to meet the 7 days retention. You can also opt to start out with cool tier as the default tier and leave the backups in there for the entire retention period if you have weighed in the SLAs differences, read charges differences, and early deletion charges for different tiers. For an infrequent read access of these backups, and a retention of 7 days, and to get 4 9’s availability SLA, I would start with hot tier only and then optimize later once I have a better understanding of the backup access, costs and usage pattern.
- Storage Account security: You will need to consider whether to keep the storage account accessible only from the VNET or not. If so, you would want to allow access to this storage account from selected subnets only and turning on private endpoint for the blob service. We will choose private endpoints for this scenario.
- Immutable blob: By turning on time-based retention access policy, you can make the blobs immutable. This can be applied to any blob that gets stored in the selected container on which this setting is applied. You can keep the policy in the “unlock” mode for a short period to test out how it works before you lock yourself into the policy.

- Offsite offloading: If you want to further offload the backups that have arrived in the blob storage account for additional protection, you could choose blob object replication to offload these blobs to any cross-region storage account of your choice. Keep in mind that the blob object replication is not backed by an SLA and is currently not supported for blobs that have immutable policy turned on. Also, you can pick and choose these options based on the container’s content. See an example below:
Container for:
|
Immutable Policy
|
Blob Object Replication
|
Data snapshots
|
Yes
|
No (we will have a separate solution for DR)
|
Log backups
|
No
|
Yes
|
Shared snapshots
|
Yes
|
No
|
- You will also need azcopy to be installed on each of the HANA node.
- Log Backups settings: Consider changing the default location of the log backups (basepath_logbackup) and the backup catalog (basepath_catalogbackup). The default setting is /hana/shared/ path and it would make more sense to point both to a separate /backup/log/ volume to enable you to apply different backup and retention values and be able to protect backup catalog alongside the log backups. In addition, consider updating the default log backup timeout (log_backup_timeout_s) from 15 min to a shorter value to meet your recovery point objective. This is well described by my colleague Ralf Klahr in his video series on YouTube.
- Major costs elements to consider: ANF snapshot size that equates to the net increase in the volume consumption, management server compute, ANF volume to store native HANA backups as a secondary backup option, network egress, blob storage and access charges are among the major cost elements.
Design Recovery
- Preferred method of recovery: Define the recovery scenarios and the source of the backup to be used for each of the recovery scenario.
Scenario
|
Getting to the backups
|
HANA recovery comments
|
Restore to a specific backup (snapshot)
|
Is the data snapshot available locally (.snapshot directory of the protected volume)? If not, then download from the storage account.
|
Recovery with no log backups
Initialize log area
|
Restore to a specific point-in-time
|
Are the log backups (or snapshots containing them) available locally? Is the data snapshot available locally? If not, then download from the storage account.
|
Recovery with log backups
Initialize log area
|
Restore to the latest consistent state
|
Same as point-in-time
|
Recovery with log backups
Also recover log segments residing in the log area
|
Let’s go back and look at the design diagram again. Hopefully, this process has helped understanding each of the components laid out in the diagram. We are now ready to build the backup solution!
Build – Backup and Recovery
Build ANF snapshots capability using azacsnap
- For the primary backup solution, build the backup manager VM by choosing a D4ds_v4 in a separate subnet dedicated for management, running RHEL OS, and no additional data disk. Apply OS hardening as needed.
- Install azacsnap software including all the prerequisite on the backup management server. Follow the well-laid-out details in Azure Docs. I have added relevant links in the Reference section at the bottom. The option “I” is the default and the preferred option that would install the tool and configure all relevant options for you.
- Familiarize yourself with azacsnap command guide in Azure Docs. It explains each of the available options with examples.
- Create your own custom configuration JSON file by following the guide. For this setup, and based on the backup schedule we have chosen, we will be needing two config files: One for data volume and log backup volume snapshots, and a separate one for shared volume snapshots. Or, even better, you can place the shared volume together with the data volumes if you have the same snapshot schedule for the both data and shared volumes.
- Test azacsnap with both “hana” and “storage” option and ensure that the test executed successfully. You can get more details about this option in the “Install azacsnap”, “Tips and tricks…” and “Troubleshoot…” sections of azacsnap Azure Docs (links in the reference section)
- Once you are comfortable with the execution, add it to the crontab for automatic scheduling. The crontab will have three lines, one for each data, other (log backup) and other (shared) snapshots:
0 */12 * * * (. /home/azacsnap/.bash_profile ; cd /home/azacsnap/bin ; ./azacsnap –configfile <SID>DataLogConfig.json -c backup –volume data –prefix <SID>DataHrly –retention=4 –trim)
0,15,30,45 * * * * (. /home/azacsnap/.bash_profile ; cd /home/azacsnap/bin ; ./azacsnap –configfile <SID>DataLogConfig.json -c backup –volume other –prefix <SID>LogBk20min –retention=96)
05 0 * * * (. /home/azacsnap/.bash_profile ; cd /home/azacsnap/bin ; ./azacsnap –configfile <SID>SharedConfig.json -c backup –volume other –prefix <SID>SharedDly –retention=2)
|
Note: I am also using “trim” functionality to purge log backups older than the oldest backup available in the backup catalog – the Azure Doc has more details.
- Now you have the local protection of your data.
- It is also a good idea to check the persistence of the snapshots time to time by using SAP’s provided hdbpersdiag tool (SAP Note 2843934). A sample execution is shown below on an hdb00001 volume by going into the snapshot directory in question and run it from each of the volume’s directories. Based on the lab testing on an E8s_v4 VM, it took 2 minutes to check a 3 GB volume on an ANF volume with 64 MB/s throughput, so effectively 27 MB/s to check the persistence. Run this tool against all the volumes for that snapshot.

Build Storage Account for Offloading
It is now time to create a storage account, secure it, and then use azcopy to offload snapshots and log backup files over for offsite protection.
- Create a storage account per specifications laid out in the design session. This is a sample configuration screenshot: (A link is provided below for the tutorial on Azure Docs)

- A sample network configuration would look like this:

- The private endpoint configuration would look like this:


- Next, we will enable system managed id for all HANA nodes. Check the link below for details.
- Grant Blob Data Reader, Blob Data Contributor and Blob Data Owner permissions to these managed IDs of HANA nodes on the storage account.
- Now, let’s give some structure to your storage. Create blob containers as follows:
Container
|
Folders
|
Access Policy
|
Blob Object Replication
|
<sid>immutable
|
/mnt00001
/mnt00002
/shared
|
Yes – Immutable – time based – 7 days
|
No (we will have a separate solution for DR)
|
<sid>replication
|
/logbackups
|
No
|
Yes – to a storage account in another region
|
- Apply immutable policy on the container you are not planning to further offload to another/DR region (<sid>immutable). In our case, we will apply the policy on <sid>immutable/mnt00001, mnt00002 and shared:

- Set up object replication for the container that contains log backups (<hn1>replication/logbackups)

Build offloading capability using azcopy
Now let’s setup azcopy tool on HANA nodes and initiate our first offloading!
- Install azcopy for Linux on HANA nodes – link to Azure Docs below. You can use the <sid>adm user or a new user per your security requirements.
- Use azcopy login –identity command to leverage the managed identity on the VM to access the storage account:
# ./azcopy./azcopy login –identity
INFO: Login with identity succeeded.
|
- Use “sync” option with recursive=true to send all the delta blobs, preserving the directory structure, over to the storage account. YouTube videos from Ralf Klahr has good explanation of these steps.
- Sample commands:
Offloading snapshots (delta). Each snapshot then becomes a full volume size
# ./azcopy sync /hana/data/HN1/mnt00001/.snapshot https://<saName>.blob.core.windows.net/newhn1/mnt00001 –recursive=true
Offloading log backup files (delta)
# ./azcopy sync /backup/log https://<saName>.blob.core.windows.net/<sid>replication/logbackup –recursive=true
|
- Similarly, you can update crontab to schedule this on the stand-by node. You can add a couple of minutes of lag between azacsnap and azcopy execution just to ensure the latest snapshot is ready for the next azcopy execution.
- Performance consideration: The storage account has throughput limitations for each performance tier. You can always scale-out the solution by adding additional storage accounts to reduce your overall offloading time. For instance, you can set up one storage account for data mount 1, another one for data mount 2, and so on. You can also scale-out the azcopy execution by setting it up to run on multiple HANA nodes if you’d like. Underlying ANF volumes’ throughput can also be adjusted.
Build additional logic – Intelligent orchestration and offloading
With the above setup, you have successfully created protection for your data, log backups and HANA binaries. You have also offloaded critical backups for longer retention at a lower cost point. You have also implemented a tertiary replication for selected blobs. If you want, you are done here. But if you want to further enhance this solution and make it more intelligent, then continue reading.
What If there is a failover and stand-by node become the new master node? Your current azacsnap configuration file will fail if it contains one database host name. One option is to add three separate database sections, corresponding to each of the nodes, and replicate the same data and other volumes information in a single configuration file. In that case, the azacsnap will successfully take the snapshots on the active master node but would fail the execution for the remaining nodes. Similarly, the azcopy which was configured to run on the stand-by node, after the failover, will now run on the same node as the active master node.
To enhance this experience, we will build some logic to azacsnap and azopy executions, so that you can identify the current master node and then run azacsnap on it. In addition, you also identify the current stand-by node, and use that to execute azcopy for offloading snapshots/log backups. Here is how you can achieve that:
- Create a shell script on the management server, called “aztools.sh”, pronounced easy tools – pun intended. You can use azacsnap user to execute this.
- Update the crontab to execute this bash script instead of the azacsnap.
- Remove the crontab execution for azcopy on the stand-by node.
- Create a password less ssh connection configuration between the management and the HANA nodes by sharing the ssh keys. The result: azacsnap should be able to ssh into any HANA node using the sidadm user without having to enter the password. You can also use a dedicate azcopy user on HANA nodes if you’d like.
- Now let’s add some logic in this new shell script:
- Determine if the HANA nodes have key HANA processes running. You are essentially checking if the node is up and carrying out “a” role.
- Determine the current name server node and the stand-by node from the nameserver configuration.
- Provide execution choices of running azacsnap or azcopy by passing a selection parameter at the execution time.
- In addition, provide a choice of choosing the volume to execute the tool against by passing a parameter at the execution time.
- Update the azacsnap config file with the current master node.
- Declare variables to store azacsnap and azcopy command settings.
- Update the azacsnap command to execute on the volume of choice.
- Update azcopy command to offload the volume of choice.
- Now, the execution of this new shell script for a three-node system would look like:
./aztools.sh <sidadm> <host1> <host2> <host3> <azacsnap|azcopy> <data|logbackup|shared>
e.g.
Take a snapshot of data volumes from the active master node
# ./aztools.sh hn1adm hana1 hana2 hana3 azacsnap data
Offload log backups by running azcopy from the stand-by node, and sync it with a replication enabled container
# ./aztools.sh hn1adm hana1 hana2 hana3 azcopy logbackup
|
- I am providing a quick linear shell script to achieve the above – check for the link in the Reference section. Please note that there is a quite a bit of room to make this script more robust and effective with error handling and advanced logic. Feel free to fork it and code away.
Note: You need to test aztools extensively especially in the split-brain scenarios where more than one node thinks its the master, and ensure that this overlaying aztools logic weather that storm. Azacsnap tool is inherently configured to check for this situation and would not execute if it detects a split-brain.
Test Recovery
The next logical step is to test this backup solution by restoring. Again, Ralf Klahr has done a fantastic job of explaining it in his YouTube series, but just for completeness, I will skim through it. In the “Design Recovery” section above, we created a scenario table. Let’s expand on that and provide high-level steps for each of the scenario:
- Restore to a specific backup when the snapshot is available locally:
- This means you can get the snapshot from the .snapshot directory of the data volumes.
- You can achieve that in three ways:
- Preferred: ANF option: “Restore to new volume”. This is the least risky option, as the existing volume is preserved for forensic purposes. This does add additional steps such as swapping out volumes at the OS layer by unmounting old volumes and mounting the new ones.
- ANF option: “Revert volume”. This option is quicker, but it will revert all existing content, hence only the adventurous administrators venture this option. This option will also delete all the snapshots newer than the one you used to revert the volume to.
- A manual overwrite at the OS layer. You are essentially doing the reversion at the OS layer by copying the content of a snapshot inside the .snapshot folder to the data volume. For a file recovery, this option is great, but the entire volume reversion, this is not the best option.
- Restore to a specific backup when the snapshot is available in storage account container:
- The major difference here is how you get your backup files.
- You can use azcopy to bring back the backup to a staging volume, perhaps the data backup volume from the secondary backup solution. Or you can also overwrite the existing volumes.
- Restore to a point-in-time or to the latest consistent state:
- For this scenario, you will also need relevant log backups. Follow the same copy process, but also include getting the relevant log backups. You will skip copying the log backups if they are already available in the current log backups directory.
- Apply the log segments in the log area if you need them applied in addition to the log backups.
Also, for the case when backup catalog is being utilized for recovery (point-in-time), you can wait until you get to the backup catalog screen before you overwrite the data and the log backup content, and then refresh the backup catalog. This way, you will see the available snapshot lights up when you refresh the recovery screen after the copy process is complete.
Before overwriting the data volume
|
After overwriting the data volume
|

|

|
Follow the remainder of the recovery process as usual.
Conclusion and What’s next
This concludes the second part of the blog series. Now, in addition to the base infrastructure (Part 1), you now have designed and built the protection for your critical HANA workload using azacsnap. In addition, you have a redundant onsite and offsite protection of the backup. Finally, you have added logic to the execution so it can run more intelligently. Next, we will focus on high-availability and disaster recovery for this setup in Part 3. Stay tuned and stay well.
Reference
by Contributed | Feb 11, 2021 | Technology
This article is contributed. See the original author and article here.
In this series, Microsoft identity team members share their reasons for loving passwordless authentication (and why you should too!). Today, Sue Bohn continues the series.
Hello,
Today, I’m sharing with you my second reason to love passwordless authentication. Last time, I shared how passwordless authentication meets security assurance guidelines using crypto keys, to give you more peace of mind. This week, I’m going to talk about the real cost of passwords on productivity and how this solution addresses it.
In a study by one of our passwordless partners, more than 12 minutes each day entering or resetting passwords—that’s almost an hour every month! Multiplying that hourly loss across an organization with 15,000 members results in more than 160,000 hours of lost productivity and thousands of support calls, all due to managing passwords.
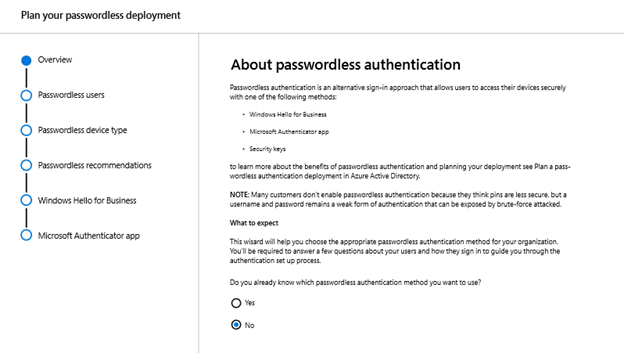
Going passwordless can seem daunting, so we’ve created a powerful tool to help you get started. The passwordless wizard within the Microsoft 365 admin portal helps organizations determine which devices and passwordless methods fit their organization and existing infrastructure. If you’re looking for the easiest place to start with your passwordless deployment, Windows Hello for Business is baked right into Windows and requires no extra hardware.
If your employees have PCs with biometric hardware (think fingerprint scanners, Intel RealSense or other 3D cameras), this is our premier Windows Hello for Business experience. Using biometrics, employees can log in to their PCs and enjoy single sign-on to their local and cloud-based resources, all without ever entering a password. Windows Hello logs you in 3x faster than a password. Those who don’t have biometrics can still take advantage of these features through the use of a PIN.
“But Sue, isn’t a PIN worse than a password?” If a user’s password is compromised, that password can be used anywhere in your digital estate where that person has access. When someone sets up a PIN within Windows Hello for Business, that PIN is tied to their specific device and can’t be used to gain access anywhere else. Once they log in with their PIN, users get the same single sign-on experience without ever having to deal with a password.
Going passwordless means typing a password suddenly becomes very strange for your users, which can make it easier for them to recognize phishing attempts, too. If a password isn’t ever entered into a device from provisioning on day one, it makes it that much harder for a malicious actor to capture a user’s password. Add this to 160,000 hours of productivity and a sizable reduction in password-related help desk calls, all using what’s already built-in to Windows 10. This might just be the easiest decision you have to make today.
Check out the other posts in this series:
Learn more about Microsoft identity:
by Contributed | Feb 11, 2021 | Technology
This article is contributed. See the original author and article here.
SQL assets are critical resources and contain the most precious information a company owns, which makes them one of the preferred targets for attackers. Protecting them across the environments can be challenging and requires multiple skills to deploy, manage, and remediate those precious resources. In this episode with David Trigano, you will learn how Azure Defender for SQL protects your SQL anywhere and offers capabilities to discover misconfigurations and raise alerts in case of usual activities across every flavor of SQL you are using today, in any environment.
Watch on Data Exposed
Resources:
Introduction to Azure Defender for SQL
Azure Security Center
View/share our latest episodes on Channel 9 and YouTube!

Recent Comments