by Contributed | Feb 14, 2021 | Technology
This article is contributed. See the original author and article here.
To develop applications for SharePoint or Microsoft Teams with the SPFx framework, a few requirements must be met on your development computer. Learn how to install the supported Node.js v10.x version and how you can use other Node.js versions additionally with Node Version Manager!
Why?
As developer, it often makes sense to have multiple versions of a framework installed on a single computer. For developing an app for SharePoint Server 2019 or SharePoint Online with the SPFx framework, you need to have Node.js LTS v10.x.x installed (LTS stands for Long Time Support). You can find all the requirements at Set up your SharePoint Framework development environment. For developing other web applications, e.g. when using frameworks such as Angular, you might need other versions of Node.js installed.
The solutions for operation with several different versions of Node.js are supplied with the Node Version Manager (NVM). Here is a step-by-step guide on how to remove old versions of Node.js, how to install NVM and desired Node.js versions, and how to switch between the Node.js versions. After the installation process, learn how to develop your custom SharePoint app using the provided tools.
Install nvm and Node.js
First, follow the steps here to install the Node.js frameworks on your machine. Alternatively, there´s a good description at Set up your Node.js development environment directly on Windows.
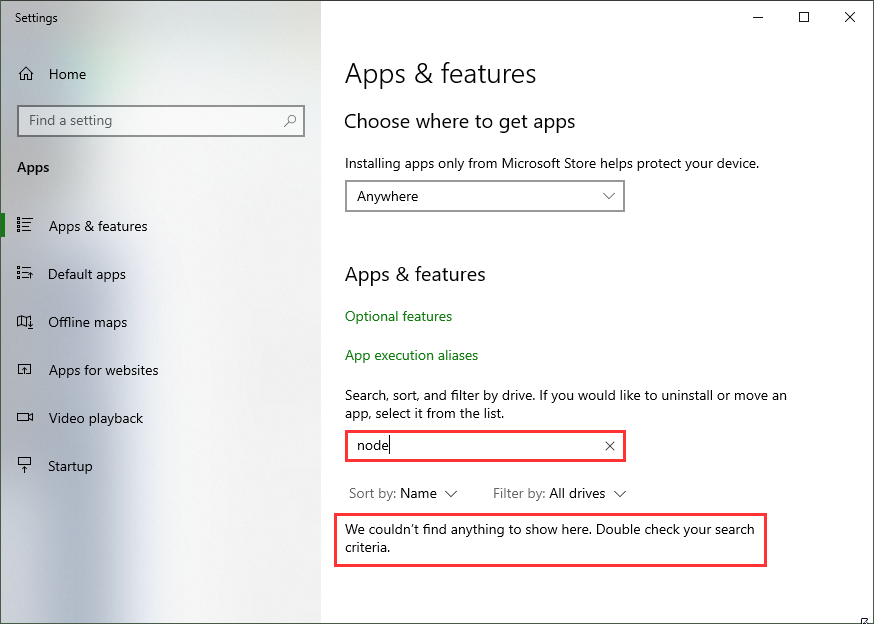
If you already have installed other Node.js versions, it´s a good idea to remove existing versions in the Windows Apps & Features settings. When you have a later version, such as 14.5, already installed, it´s usually not required to uninstall this version. nvm finds that version and allows to use it with nvm.
Alternatively, when you have chocolatey installed, you can run
choco uninstall nodejs -y
(as I did on my machine to cleanup.)

You can install nvm from Node Version Manager (nvm) for Windows by Corey Butler. The latest version is nvm v1.1.7. Download nvm-setup.zip and run it. Or, you can use choco (if installed on your computer):
choco install nvm -y
Let´s check if nvm is working:
nvm ls
should find no Node.js versions.

To see the latest Node.js versions check https://nodejs.org/en/, or simply run
nvm ls available
 List available Node.js versions
Now, install the desired Node.js versions:
Now check the installed versions: nvm ls

You can now switch between versions with nvm. Use <nvm version>, e.g.
nvm use 10.23.0 or nvm use 14.15.4
That´s the basic installation of Node.js and npm.
Install the SPFx development tools once
To install the required tools yo with the sharepoint generator and gulp and for SharePoint development, we follow the steps at Set up your SharePoint Framework development environment. Here are the commands to run in a PowerShell console: First, switch to Node.js v10, confirm, (check the current version), and install the tools with npm.
nvm use 10.23.0
npm install gulp yo @microsoft/generator-sharepoint –global
 npm install
Create a new SPFx webpart
To create a new SPFx app, follow the steps described at Build your first SharePoint client-side web part (Hello World part 1). In a new directory, run
yo @microsoft/sharepoint
 Run yo
You need to trust the development self-signed SSL certificate as described at Trusting the self-signed developer certificate here. Then, you can open the workbench with SSL.
gulp trust-dev-cert
 gulp trust-dev-cert
You can open Visual Studio Code now to modify the solution: code .
Run the SPFx webpart
The generated solution includes the sample app that can now be modified.
 Coding…
When done, let´s open the default browser with the gulp webserver:
gulp serve
This opens the SPFx workbench, in our sample at https://localhost:4321/temp/workbench.html. Here, you can add the webpart to the workbench page and test it.
 Use the workbench to run the webpart
Tip: When gulp serve is running, you can open your M365 tenant´s SPO site and use the custom webpart with the data from SharePoint, too: https://<tenant>.sharepoint.com/sites/<sitename>/_layouts/15/workbench.aspx
Deploy the SPFx solution
To build the ready-to-use solution, run
gulp bundle –ship
to build the package for the correct folder and
gulp package-solution –ship
to create the sharepointsolution<project>.sppkg file that can be uploaded to the SharePoint App catalog.
Develop the solution
You can follow the next steps to develop the app described here:
Switch as required with nvm
The Node Version Manager helps to work with multiple versions of Node.js for different purposes on the same machine. I hope this tip helps developers for a productive development environment!
Happy developing! 
This blog article is a repost from blog.atwork.at.
by Contributed | Feb 14, 2021 | Technology
This article is contributed. See the original author and article here.
API Management has the ability to validate a JSON Web Token (JWT) through the validate-jwt policy. If you use the OpenID config URI property in the policy and set it to your AAD tenant’s OpenID Connect metadata document endpoint, the token would be validated for anyone in your tenant. The goal in this blog post is to control that access to only allow specific users, using an app registration, roles and claims. I will outline the steps to set this up below.
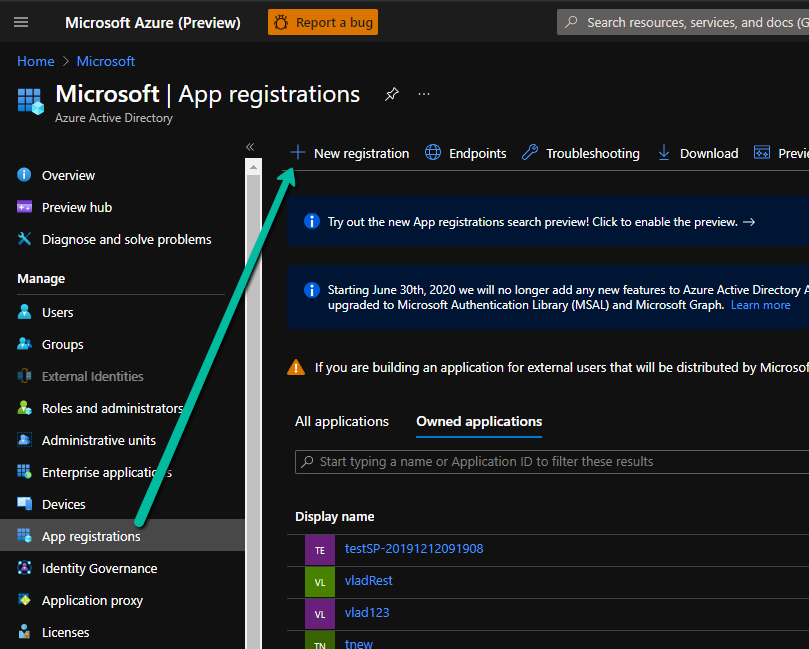
- Create an App registration in your Azure Active Directory.
Enter a name and Register, leave the other settings as they are for now.
- Open the App registration and go to the “App roles | Preview” blade. Create a role. For our purposes, we can use:

- Go to the “Expose an API” blade and set the Application ID URI:

- Now, try to get a token for this resource using Azure CLI:
az login
az account get-access-token –resource api://a268af9e-1598-4ec3-ad16-77e30b042f92
- Notice you will get a HTTP 400 error that states that Azure CLI is not an authorized client application. To fix this, go back to the “Expose an API” blade in the app registration and add a scope:

- Now, we can add the client application from the same blade. Use the client ID for Azure CLI from the error message on step 5. The error looks like this: “Get Token request returned http error: 400 and server response: {“error”:”invalid_grant”,”error_description”:”AADSTS65001: The user or administrator has not consented to use the application with ID ‘04b07795-8ddb-461a-bbee-02f9e1bf7b46‘ named ‘Microsoft Azure CLI’.”

- Next, we need to grant a user that role to test. Go to the “Overview” blade in your app registration and copy the Application (Client) ID. Then go back to Azure Active Directory, “Enterprise applications” blade and search for the Application ID. Open the enterprise application corresponding to your App registration.
- From the “Users and groups” blade, add yourself as a user and select the role you created on step 2:

- Now we can try to generate a token from Azure CLI again:
az account get-access-token –resource api://a268af9e-1598-4ec3-ad16-77e30b042f92′
- Copy that token and decode it using https://jwt.ms:

Notice the audience (aud) is your Application ID URI generated on step 3 and there is a “roles” claim with the role we assigned to ourselves on step 2. We will use this information in the API Management validate-jwt policy to restrict access to tokens that have been generated for this audience and have this specific role. Any other tokens would not be validated by API Management.
- Go to API Management and create an API. We can use Http Bin to test:

- Create an operation:

- Edit the policy for the operation we created:

- The policy would look something like this:
<policies>
<inbound>
<validate-jwt header-name="Authorization" failed-validation-httpcode="403" failed-validation-error-message="Forbidden">
<openid-config url="https://login.microsoftonline.com/72f988bf-86f1-41af-91ab-2d7cd011db47/v2.0/.well-known/openid-configuration" />
<audiences>
<audience>api://a268af9e-1598-4ec3-ad16-77e30b042f92</audience>
</audiences>
<issuers>
<issuer>https://sts.windows.net/72f988bf-86f1-41af-91ab-2d7cd011db47/</issuer>
</issuers>
<required-claims>
<claim name="roles" match="any">
<value>APIM.Access</value>
</claim>
</required-claims>
</validate-jwt>
<base />
</inbound>
<backend>
<base />
</backend>
<outbound>
<base />
</outbound>
<on-error>
<base />
</on-error>
</policies>
Note: you can get the value for the OpenID config URL from the Azure Portal by going to Azure Active Directory -> App registrations -> Endpoints -> OpenID Connect metadata document
Note 2: The audience is the Application ID URI from Step 3.
Note 3: The value of the “roles” claim is the value of the role we created at Step 2.
Note 4: I added the issuer from the token I got from Azure CLI as well (you can see the value if you decode it – Step 10).
- Now, let’s test it using Postman. Generate another token using Azure CLI if the previous one expired (Step 9). Select your API Management operation in the Azure Portal and go to the Test tab to get the Request URL and your subscription key:

- Open postman and fill in the token in the Authorization header (including “Bearer ” in front of the value), the subscription key if it’s required, then send a request:

If you get a HTTP 403 and/or you need to debug, the OCP trace feature would be helpful. If you include the subscription key and the Ocp-Apim-Trace: true header, the response will contain a link to a trace file in the header Ocp-Apim-Trace-Location which will show what is going wrong.

For more information, these links would come in handy:
https://docs.microsoft.com/en-us/azure/active-directory/develop/howto-restrict-your-app-to-a-set-of-users
https://docs.microsoft.com/en-us/azure/active-directory/develop/howto-add-app-roles-in-azure-ad-apps
https://docs.microsoft.com/en-us/azure/api-management/api-management-access-restriction-policies#ValidateJWT
by Contributed | Feb 13, 2021 | Technology
This article is contributed. See the original author and article here.
Synapse provides an exciting feature which allows you to sync Spark database objects to Serverless pools and to query these objects without the Spark pool being active or running. Synapse workspaces are accessed exclusively through an Azure AD Account and objects are created within this context in the Spark pool. In some scenarios I would like to share the data which I’ve created in my Spark database with other users for reporting or analysis purposes. This is possible with Serverless and in this article I will show you how to complete the required steps from creation of the object to successful execution.
In attempt to reproduce a real-world scenario where one Domain user creates a database in a Spark Pool with objects which are synced to Serverless Pool I made use of an admin user and Test user.
I started by creating a database and a table with parquet storage format in Spark pool Notebook, as per the example found here Shared metadata tables – Azure Synapse Analytics | Microsoft Docs
(Only Parquet Format tables will be synced to Serverless, no other format will be synchronized)
%%sql
Create database CharlSync
CREATE TABLE CharlSync.myParquetTable(id int, name string, birthdate date) USING Parquet
%%csharp
using Microsoft.Spark.Sql.Types;
var data = new List<GenericRow>();
data.Add(new GenericRow(new object[] { 1, “Charl”, new Date(2010, 1, 1)}));
data.Add(new GenericRow(new object[] { 2, “Bob”, new Date(2020, 1, 1)}));
data.Add(new GenericRow(new object[] { 3, “Bob”, new Date(2021, 1, 1)}));
data.Add(new GenericRow(new object[] { 4, “Bob”, new Date(2019, 1, 1)}));
var schema = new StructType
(new List<StructField>()
{
new StructField(“id”, new IntegerType()),
new StructField(“name”, new StringType()),
new StructField(“birthdate”, new DateType())
}
);
var df = spark.CreateDataFrame(data, schema);
df.Write().Mode(SaveMode.Append).InsertInto(“CharlSync.myParquetTable”);
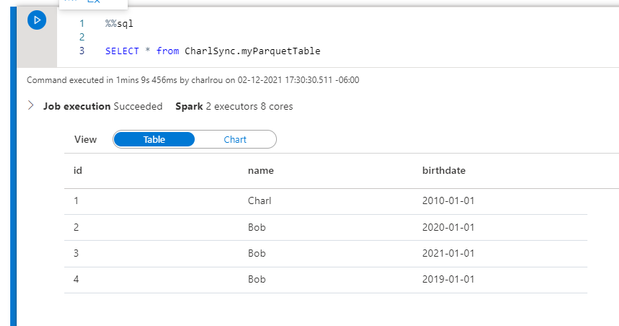
The data has been written to the table and I can perform a SQL select from the table in my Sparkpool
The table is visible in the and the object which I created is listed in the Spark database.

From SQL Serverless I can select from the metadata database without any problem as I am the owner and creator of the database and object, from a storage account perspective my admin account has been granted storage blob contributor access and therefore I am able to write to the storage account and access the data without failure.

Now let’s move on to SSMS or Azure Data Studio
In SSMS I open up an Azure AD connection and connect with my domain account , from the metadata database I run a select statement on the table

It returns invalid object name; this is not supposed to be the case.
I verify the object name in sys.objects and as you can see it is lowercase, the object is case sensitive in Serverless.

I change my object to the name as per the sys.objects table and it returns my data as expected from the metadata sync table.

I will now create an Azure AD User in my Serverless Pool and grant the user access in order to execute statements.
As per our documentation the access is based on the service principal permissions at a storage level, and if your user has access to the service it can execute statements, with server less all access is governed by storage account level permissions and through database or servers scoped credentials.
I therefore do not have to assign any additional permissions or role access within the server itself.

The test user has been created in the sqlodtest database and I connect to the database and attempt to access the table, which fails. The reason for the failure is that the user account has not been granted access to the default storage account and subsequent container and folders.

The Domain user account requires access to the folder which has been created in the default storage account, a folder per table is created as follows: /<containername>/synapse/workspaces/<workspacename>/warehouse/<sparkdatabasename>.db/<tablename>
As the user execution context is being used to connect to the storage account, I grant the user account Storage blob reader RBAC Permissions on the container and underlying folders.


As per the published documentation on Workspace permissions I only have to grant the User Permissions in my On-Demand Database.
Understand the roles required to perform common tasks in Synapse – Azure Synapse Analytics | Microsoft Docs

Within the workspace under Access Control I validate that my test account does not have any workspace level permissions, the highlighted account below is my admin account.

Once you have completed all of the above-mentioned actions and created the User account in the Serverless database and granted the account folder level RBAC permissions, It is important that you disconnect from the Serverless session and re-connect.
I connect to my Serverless database which I created earlier and to which I granted my Test user access, I am then able to execute the statement against the “Spark replicated database and table and return data.

Microsoft Documentation
Understand the roles required to perform common tasks in Synapse – Azure Synapse Analytics | Microsoft Docs
Shared metadata tables – Azure Synapse Analytics | Microsoft Docs


Recent Comments