by Contributed | Feb 22, 2021 | Technology
This article is contributed. See the original author and article here.
It’s common to have a pre-defined perspective when you hear the word “security”. Some people think of applications being configured correctly or insecure coding practices. Some people think of identity concepts like password spray attacks, phishing or multi factor authentication. And some people think of infrastructure concepts like networking, VPNs and port scanning. Security is all of these – and more.
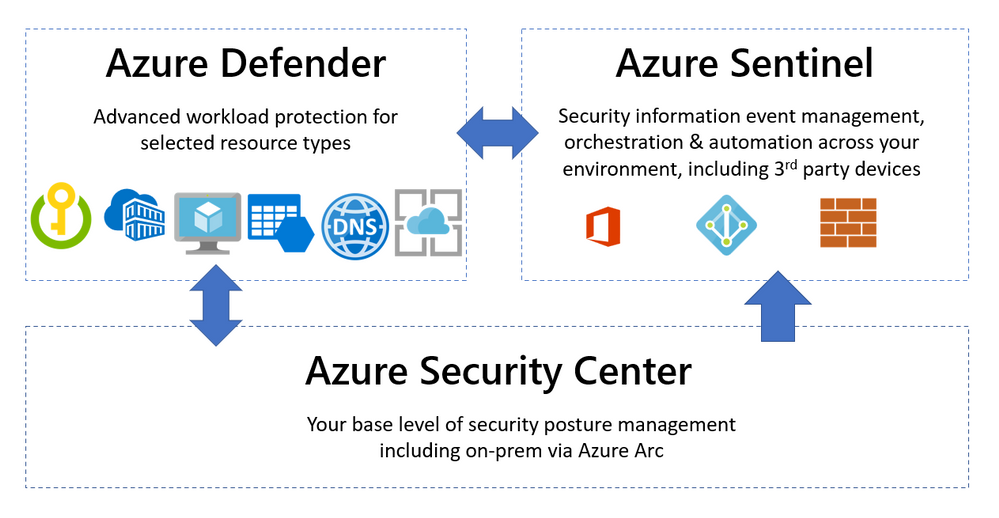
Microsoft helps you manage a layered approach to security with tools that integrate with your Azure and non-Azure workloads. Three common capabilities that are used in unison are Azure Security Center, Azure Defender and Azure Sentinel. So what’s the difference between them and when would you use each product?
Azure Security Center – Security Posture Management
This is your “base layer” for monitoring the security configuration and health of your workloads. Azure Security Center collects events from Azure or log analytics agents and correlates them in a security analytics engine, to provide you with tailored recommendations (hardening tasks) and security alerts.
Strengthening your security posture can be achieved by implementing these recommendations.
The Azure Security Center uses a built-in Azure Policy initiative in audit-only mode (the Azure Security Benchmark) as well as Azure Monitor logs and other Azure security solutions like Microsoft Cloud App Security.
The free pricing tier of the Azure Security Center is enabled by default on all Azure subscriptions, once you visit the Azure Security Center in the portal for the first time (or activate it via the API).
Then it will automatically discover and onboard Azure resources, including PaaS services in Azure (Service Fabric, SQL Database etc). And you can include non-Azure resources via the Log Analytics agent and Azure Arc.
Azure Security Center also includes a network map – an interactive graphical view of the network topology of your Azure workloads and the traffic routes. By default, the topology map displays resources that have network recommendations with high or medium severity. To learn more, visit Protect your network resources.
 Azure Security Center network map
The generated security alerts (IaaS, PaaS) detail the suspicious process executed, start time and MITRE ATT&CK tactic – for Windows, Linux, Azure App Service, Containers (AKS), Containers (host level), SQL Database, Azure Synapse Analytics, Azure Resource Manager, DNS, Azure Storage, Cosmos DB (preview), Azure network layer, Azure key vault and Azure DDoS Protection. For more information, see Security alerts – a reference guide.
But one of the most important features is the pro-active security recommendations for Azure Compute, data, identity and access and networking resources. Implementing these will improve your Secure Score – a visual indication of the improvement of your overall security posture. Learn more about the security recommendations.
 Azure Security Center secure score
To get started, visit the Azure Security Center Planning and operations guide.
Azure Defender – Advanced Workload Protection
To add additional security alerts and advanced threat detection, certain types of resources can also be monitored by Azure Defender. The Azure Defender pane inside the Azure Security Center shows you which workloads are protected by Azure Defender or not. This is a paid service and turning on Azure Defender for servers (for example) applies to all servers in that Azure subscription, when they are running.
 The Azure Defender dashbaord
Azure Defender is available for servers, app service, Storage, SQL, Key Vault, Resource Manager, DNS, Kubernetes and container registries. It can also apply to non-Azure servers on-premises and in other clouds, via Azure Arc.
Lets look at some of the features you’d get for your Windows Server (as an example) by adding Azure Defender for servers:
Vulnerability assessment – Your VM is scanned for artefacts which are analysed by Qualys’ cloud service and the results sent back to Azure Security Center. These results show if any vulnerabilities have been identified in the software running on your VM (including its operating system), highlighting the highest priorities and including the latest available patches. The cost of this service is included in your Azure Defender pricing. For more details, visit Azure Defender’s integrated vulnerability assessment solution for Azure and hybrid machines.
Just in time access – JIT VM access enables you to lock down standard inbound management ports (such as port 3389) and easily open them when requested by an appropriate user, to their connection only (or IP range), for a limited period of time. Then the ports are automatically locked down again. This includes an approval process and no manual configuration of Network Security Groups or Azure Firewall. For more information, visit Understanding just-in-time (JIT) VM access.
Adaptive application controls – This feature provides an intelligent and automated allow list of known-safe applications for your VM. Machine learning analysis your workload to detect what is common or known in your organisation (which you can further customize) and you’ll get security alerts if any other applications are run that are not on the allow list. Learn more at Use adaptive controls to reduce your machines’ attack surface.
Azure Defender for servers also includes file integrity monitoring, adaptive network hardening and Docker host hardening. For more information on these capabilities and the other Azure Defender workload types and features, visit Introduction to Azure Defender.
So far so good! Our VM is being monitored by Azure Security Center protecting all the VMs in our subscription, and we’ve added Azure Defender for servers for vulnerability scanning, adaptive application and network control and just in time access to management ports. What about Azure Sentinel?
Azure Sentinel – Security Information Event Management + Security Orchestration Automated Response
Azure Sentinel helps you to bring in the big picture of what’s happening across your environment and connect the dots that might be related to the same security incident. While I’ve mentioned Azure and on-premises workloads so far, there’s often more to your IT footprint than that – Microsoft 365, Azure Active Directory, Amazon Web Services – CloudTrail, Citrix Analytics, VMWare Carbon Black Cloud Endpoint, and third party firewalls and proxies, just to name a few examples. For a full list of supported data sources visit Connect data sources.
 Azure Sentinel core capabilities
With all of those different data sources connected, Azure Sentinel uses AI and Microsoft’s threat intelligence stream to detect threats across your environment, correlate alerts into incidents, use deep investigation tools to find the scope and root cause and access powerful hunting search and query tools. Now you’re no longer having to search through logs separately in different systems, trying to decide what may be relevant and what is just noise, while trying to compare time stamps to link to the same possible event.
 Investigating a security threat
In addition, Azure Sentinel supports playbooks with Azure Logic Apps – build your own automated workflows to open tickets, send notifications or trigger actions when particular events are detected.
Summary
In human terms – Azure Security Center is me living a generally healthy life and watching for signs that I’m run-down. Azure Defender is my gym membership or vitamins that help improve or boost my health, and Azure Sentinel is the regular and specialists tests and treatments from my doctor, that alert me to specific signs that need investigating across my whole body, including my blood tests.
Now you can choose which workloads need the added protection of Azure Defender and which workloads should be included for visibility in Azure Sentinel, for comprehensive security management across your entire IT environment.
Sarah Young recently joined us to explain how Azure Security Center and Azure Sentinel can protect hybrid (on-prem + cloud) environments. Check out her sessions:
OPS101: Security your Hybrid environment Part 1 – Azure Security Center
OPS103: Security your Hybrid environment Part 2 – Azure Sentinel
by Contributed | Feb 22, 2021 | Technology
This article is contributed. See the original author and article here.
Introduction
This is John Barbare and I am a Sr. Customer Engineer at Microsoft focusing on all things in the Cybersecurity space. It has been a while since I have had time to sit down and write a security blog due to studying and making sure I passed the Microsoft certifications for an Azure Architect. With all that behind me, I’m back into blogging and wanted finish an article I started on several months ago around browser exploits and making sure you are safe and aware of how the attacks can occur.
Most people will argue the internet browser is most likely the weakest link on their machine in one aspect or another. In this blog we will take a deep dive and walk you through the various different types of exploits attacking browsers and more specifically how they are escaping the sandbox in chromium-based browsers. In a previous blog, I wrote about sandboxing and how safe you were from using containers in Microsoft Office documents, so this particular attack drew my interest right away. I felt users needed to know how to safeguard and be aware of this particular CVE (Common Vulnerabilities and Exposures). With that said, lets jump into this browser-based exploits and also provide some visualizations along the way.
Overview of Browser Exploits
To give a background of a browser-based exploit, I will first give an overview of a particular attack I have worked with and familiar with and how the victim can be unaware of its presence – cryptojacking. Cryptojacking takes place directly with a certain internet browser allowing it to use someone’s IT environment to then mine for cryptocurrency in a process called cryptomining. One of the biggest threats over the past several years has been cryptomining (a method in which transactions for numerous forms of cryptocurrency are confirmed and added to the blockchain digital ledger) and more specifically browser-based cryptocurrency miners in internet browsers. Hackers will carefully craft a specific code based cryptomining script and then embed the particular script directly into specific websites thus attacking your internet browser with other malicious code being directly downloaded onto the user’s machine.
Some of the most substantial cryptomining attacks are created entirely inside internet browsers and never have to be installed by users at all. Several services have been found to advertise internet-based cryptomining as a means for website owners to monetize traffic on their site and never have to use or pay for any type of advertising. Web site owners add JavaScript code on their webpages that will then mine cryptocurrency in the background while a user is visiting the website. This will in return produce proceeds which will then be split between the website owner and the actual service. Hackers have been quick to find a way to exploit this and quickly take advantage of these services to mine cryptocurrency without ever gaining permission from any of the end users. This will lead to a compromise of a legitimate website and then the hacker maliciously inserts the carefully crafted mining code directly into the actual website’s source code. One big item to note is this particular attack (browser-based miners) do not even require compromising the end user’s computer at all – which makes it even more stealthy. This browser-based attack will run on any platform that uses a JavaScript capable web browser or enabling Java on the browser. Some browsers might have Java turned off, but you can either enable it or download the plugin for it. Some support was dropped for Java applets in browsers due to script-based attacks like cryptomining, but users still like the functionality of what Java plugins can perform thus reducing security. Just like cryptomining trojans, browser-based miners will significantly degrade a user’s machine and compromise the security of the end user while they surf the particular website(s). This is a very well orchestrated and stealthy attack all while the end user never knows.
One consequence from malicious browser-based miners is the user might never know, but the attacker is gaining intelligence from the end user, thus conducting the first phase of an attack – reconnaissance. As the machine is conducting cryptomining, the user is going to various other sites (bank account, logging into work email, booking travel, etc.) and the attacker is conducting reconnaissance and learning the environment all while looking for security gaps to exploit further. This will then further the attacker’s presence and move the attacker further down the attack kill chain and be ready to carry out a well-organized attack to even include a Human Operated Ransomware campaign.
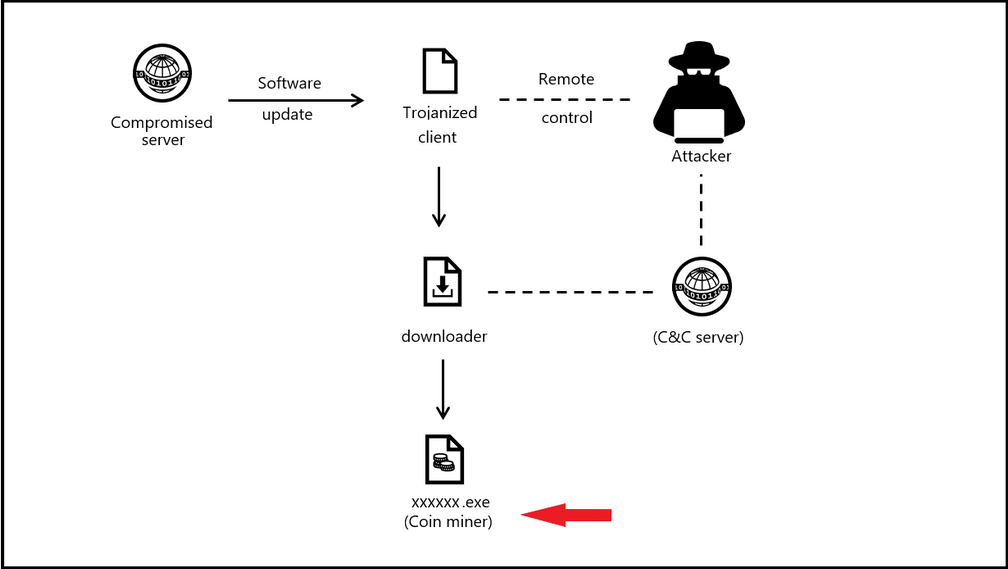
Attack Kill Chain of a Malicious Cryptomining Attack
The below picture shows an attack on a comprised server and leading the attacker to have command and control and distributing the coin miner payload.
Example of a Cryptominer – Brocoiner
This JavaScript code is a cryptocurrency miner that has been found on both malicious and compromised websites, including sites that offer streaming videos, adult content, and online shopping.
When this JavaScript is loaded—whenever one opens a webpage containing it—it automatically starts to mine for Monero or other cryptocurrency. This mining activity, often initiated without user consent, consumes resources, and can slow down affected machines. Brocoiner was big back in 2018 but shows you an example of how a cryptominer works and also newer variants still existing today.
Chromium Based Exploits
Now since we understand how browser-based exploits work by using a cryptomining attack, let’s take a deeper dive into chromium-based exploits and see how they work. Attackers have been exploiting multiple vulnerabilities since October 2020 and using a remote code execution in Chromium based browsers. More concerning is attackers are using a separate elevation of privilege vulnerability in the Windows Kernel Cryptography Driver to execute code in the browser and escape the Chrome application sandbox.
If one is not familiar with sandboxing in a browser and the use of it, I’ll describe the importance of browser sandboxing. Browser sandboxing allows a user to browse to sites in a containerized environment and if any malicious code or malware is downloaded, it will stay in the container and never touch the OS. This way you can keep your host machine clean and safe, manage any used resources, and also have more control with the information you access online by running a separate and isolated sandbox. When the container/sandbox is closed out, the sandbox is closed, and all is safe back on the OS as nothing ever reached the OS.
Chromium sandbox browsers have two separate parts – the broker and the target process. When referring to the browser process it is called the broker process and the child processes are the target processes. Any code which is run by the actual target processes are ran in the sandboxed environment and secured in the sandbox. The broker process spins up as it acts between the actual child process and the other computer resources on the machine to supply the child processes with any resources it needs.
CVE-2020-15999 & CVE-2020-17087 in 0-day Sandbox Escape
CVE-2020-15999 is best be described as Heap buffer overflow in Freetype in Google Chrome prior to 86.0.4240.111 which allowed a remote attacker to potentially exploit heap corruption via a crafted HTML page. CVE-2020-17087 is a Windows Kernel Local Elevation of Privilege vulnerability in the Windows Kernel Cryptography Driver to execute code in the browser and escape the Chrome application sandbox. Both vulnerabilities were being used in a single attack chain in the same type of targeted campaign. The attackers used the remote code execution vulnerability in Chrome to execute code inside the web browser and the elevation of privilege in Windows to elevate privileges and escape the Chrome application sandbox. Even though the initial campaign targeted Google Chrome, the remote code execution CVE exists not only in Google Chrome but all chromium-based web browsers (Chromium Edge, Chromium Canary, etc.). To exploit the Windows escalation of privilege vulnerability, as either part of the sandbox campaign or in other possible attacks, an attacker must already be able to execute code on the machine. In addition, exploiting the vulnerability to elevate privileges does not affect the overall cryptographic functionality of the driver.
Mitigations to Address the Chromium Sandbox Escape
Both Google and Microsoft have addressed these CVEs and have issued a patch for each browser. The updates can be referenced below:
If any user is utilizing either chromium-based browser, you should update your browser to the newest version and check to see if you have the addressed patch for the CVE(s). Updates addressing the vulnerabilities involved in this campaign are available through the November 2020 Security Updates. Customers utilizing automatic updates do not need to take additional actions. Enterprises that manually manage updates should select the latest security updates and deploy them across their environments. Enterprises should also update to the latest version of your operating systems and applications and utilize regular security updates.
Microsoft Edge Chromium Updates
To see how your Edge browser is managed by your organization, open a new tab and type in edge://management and select enter and then select the edge://policy page. Below is when an update is available in the browser and will display a green circle with an arrow in it – stating update available. Go ahead and proceed with the update depending on if you are a home user or if you have a managed enterprise.

To see the version you are using, type in edge://version and select enter and you will see all relevant information pertaining to the version you are using. Below we can see that the browser has a yellow circle with an arrow in it – stating update recommended. Go ahead and proceed with the update depending on if you are a home user or if you have a managed enterprise.

Below we can see that the browser has a red circle with an arrow in it – stating update now! This is one of the most critical updates and most likely you might be exposed to CVE-2020-15999 in Microsoft Edge or any CVE. If you are a home user please update and if you are in an enterprise managed environment, please inform an IT member to let them know a critical update warning has been seen in your Microsoft Chromium Edge browser.

Microsoft Defender for Endpoint
To see if you have either CVEs present in your environment, you can go to https://securitycenter.windows.com/, select the Threat and Vulnerability Management blade, and then Weaknesses. Type in CVE-2020-15999 in the search box and select enter. This will pull up the particular CVE we are looking for and how many exposed devices in our environment are exposed. With the bug icon displaying in red, it shows us a threat insight is available and to hover over the bug for more information. Selecting the number under the Exposed devices will pop out a card.

The card flyout displays all the information about the CVE with a link, all the exposed devices, and the related security recommendations. After selecting the blue box with “Go to related security recommendation” select the remediation options to open a ticket.

For step by step instructions on how to open, prioritize, set a remediation date, and submit a ticket using Microsoft Defender for Endpoint with integration with Microsoft Endpoint Manger, reference the following blog I created back in August of 2020.
Conclusion
Thanks for taking the time to read this blog and I hope you have a better understanding of how your browser can be the biggest security risk in your environment. Be particular careful when navigating to unknown sites and always use a combination of SmartScreen and Network Protection security controls to protect all your browsers from cyrptomining based attacks. Having the latest updates from Microsoft Defender Antivirus, Turning on PUA protection / Real Time Protection, and enabling cloud-derived protection is configured at a minimum (to include tamper protection). If you are using a browser and see any type of update(s) needed, it means that Microsoft has issued some type of patch or update relating to a security risk that it has seen or knows about. I Hope this was a value in understanding browser exploits and the importance of updating your browser along with the necessary security controls.
Hope to see you in the next blog and always protect your endpoints!
Thanks for reading and have a great Cybersecurity day!
Follow my Microsoft Security Blogs: http://aka.ms/JohnBarbare and also on LinkedIn.
References
CVE-2020-15999
CVE-2020-17087
Trojan:HTML/Brocoiner threat description – Microsoft Security Intelligence
by Contributed | Feb 21, 2021 | Technology
This article is contributed. See the original author and article here.
Overview
AKS-HCI , short for Azure Kubernetes Service on Azure Stack HCI is an on-premises Microsoft supported Kubernetes offering. AKS-HCI is built of and consistent with open-source Kubernetes offering. AKS-HCI simplifies on-premises Kubernetes deployment by offering a automated and standardized approach to deploying and managing Kubernetes clusters.
AKS-HCI provides consistency with Azure Kubernetes Service as much as possible in feature and operational details. This presents choices for deploying on-premises workloads and simplifies instrumentation of workload mobility between cloud and the edge.
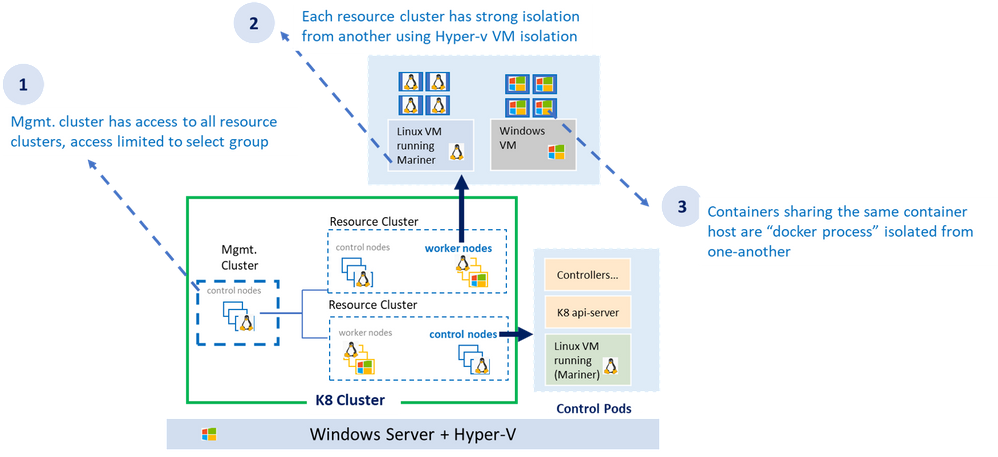
AKS-HCI is designed from the get-go with security as one of its principal value propositions. An earlier blog written by my colleague, provides an overview of the security story for AKS-HCI.
As shown in the diagram above, the AKS-HCI security model follows least privilege principal. The all-powerful management cluster, the cluster used to create the workload clusters (also called resource clusters) is managed by handful of administrators and access to it is limited. Direct access to container host (think ability to SSH) is not allowed.
Each resource (workload) cluster deploys one or more virtual machine serving as container host for the workload cluster. The container host runs the control plane and the worker pods. Virtual machines provide strong kernel level isolation and contain the blast radius by preventing malware from escaping out to the host and affecting other workload clusters. Administrators also have the option to create separate physical clusters.
Finally, the containers themselves running within the virtual machine are process isolated with their respective resources and namespaces.
AKS-HCI Built with Strong Identity & Access Management Foundation
AKS-HCI supports both AD (Active Directory) and AAD (Azure Active Directory) identities. Connectivity to AKS-HCI via AAD identity is instrumented via Azure Arc integration. Starting February as part of the public preview, AKS-HCI will be supporting authentication and Single Sign On via AD (Active Directory) identity using kubectl
AD (Active Directory) Authentication provides several advantages over using certificate-based client authentication.

Kubernetes (a.k.a. K8S) uses configuration (referred as “kubeconfig”) stored on the client machine to connect to the api-server. This configuration contains authentication information to connect to the api-server. Any interaction with the K8 cluster happens via the api-server, one can think of having access to the api-server as having keys to the K8 kingdom. Hence access to the api-server that is built on strong identity and access management foundation is critical to securing your K8 deployment.
Kubernetes offers various options to connect to the api-server, of those the configuration used to connect to the api-server using AD identity is the most secure, this is primarily because AD kubeconfig (think of AD kubeconfig as a type of kubeconfig) does not hold any secret that can potentially be used to compromise access to the api-server.

By default, AKS-HCI uses “certificate” based kubeconfig to connect clients to the api-server. The certificate based kubeconfig contains authentication information such as private keys. If malware or attacker gets access to this configuration file, they will be able to get access to the api-server and that would be like getting keys to the kingdom. As mentioned, earlier, by contrast the AD kubeconfig does not hold any secret and merely having possession of AD kubeconfig does not grant access to the cluster. Eliminating the need to safely distribute kubeconfig improves security and efficiency, directly attributable to significant cost savings.
AD kubeconfig complements the “certificate” based kubeconfig, while certificate based kubeconfig is available to a select group of admins and used to connect to the cluster for initial provisioning (including setting up AD integration), the AD kubeconfig can be freely distributed without any security concerns to a wider group of users. An important distinction to note, unlike static configuration e.g. certificate based kubeconfig where users with the same configuration will always resolve to the same privileges, AD kubeconfig dynamically resolves privileges based on the user context it is applied.
Another benefit is the representation of identities in SID format, the human friendly group names in the role binding definition are stored in the SID format as K8 CRD. This provides protection against any human error in representing group names and naming conflicts or collisions as the group names need to resolve to corresponding SIDs in the domain server before access is granted. A related extension to this is the ability to represent AD groups in the RBAC role bindings, more on that in later part.
The windows server or the container host does not need to be domain joined for AD Authentication to work as long as the domain server and container host are time synchronized.
Lastly, integration with Active Directory provide the opportunity to take advantage of Microsoft Defender for Identity to detect advanced threat attacks.
Let’s now dive a bit into the trenches on AD integration works under the hood.
How it Works Under the Hood
The underlying implementation uses Kerberos protocol and requires Active Directory domain joined windows client. The client authenticates to the server (in our case K8 api-server) using Kerberos protocol. A few things need to be set up before the cluster can accept AD credentials for Authentication.

As shown in the diagram, an AD account for the api-server and corresponding SPN (service principal name) should be created on the AD domain server, the AD domain server also acts as the key distribution center. Next, a “keytab” corresponding to the the SPN needs to be generated.
Keytab contains symmetric encryption keys used to decrypt service tickets, the service ticket is presented to the api-server from the client machine.
These service tickets represent AD groups in SID format that is provided to the client upon successful authentication to the domain server. More details to follow on this flow.
A tool like ktpass (for windows machines) or ktutil (for linux machines) can be used to generate keytab. A client-side plugin is part of the installation to broker communication between kubectl and the api-server.
Three Fundamental Loops of Authentication Flow
At it’s essence, the flow consists of three fundamental loops. . The “first loop” is the user acquiring the “service ticket” from the domain server contingent on successful authentication (we will get into this in a minute). This service ticket has user’s group membership in SID format.
The service ticket is generated for specific SPN (api-server in our case) and is provided to the user based on the user presenting what is known as TGT (ticket granting ticket). The user is able to get TGT based on successfully logging into the windows domain joined machine using their SSO credentials.

The “second loop” is the user presenting the “service ticket” to the api-server when she attempts to connect to the api-server via kubectl. This serves two purposes, to authenticate and authorize.
The “third” and the final loop is the api-server then taking the “service ticket”, unwrapping and unpacking the service ticket using keytab secret stored as K8 secret.
The api-server unpacks the ticket, extracts the group information, and validates against the RBAC (role-based access control) configuration (a.k.a role bindings in K8). In order for the user to execute command via kubectl both authentication and authorization steps need to complete successfully.
Using AD Groups for Authorization

RBAC in K8 is defined in configuration known as “role bindings”. It is a two-step process where a role is defined and then the role is bound to user or group using role bindings. With AD integration users now have the ability to bind roles to AD groups.
When the service ticket is unpacked the group names are compared against the AD groups defined in role binding and access is granted based on the role binding definition.
Details on Few Anticipated Questions about this feature
Q: Do I need continuous connectivity of the container host to my domain server for AD Authentication to work
The container host does not need to have connectivity to the domain server, however, ensure the keytab is updated when the AD password of the api-server is updated.
Q: What is the expected behavior if the password on the AD account of the api-server expires
The service ticket granted to the api-server is cached for about 8-10 hours after which the keytab file (based on prior api-server password) would not be able to decrypt the service ticket and the authentication will fail.
Q: What are the next steps to enable AD Authentication if the api-server password expires
AD admin creates a new password and new keytab is generated. Un-install and re-install AD with the new keytab.
Q: Will AKS-HCI alert me, if api-server AD password is about to expire
AKS-HCI does not have direct line of sight to AD and cannot alert on expiring password.
Q: Can I renew my password before it expires
Yes, you can update the password, refer to the AD SSO set up and installation document for more details.
Stay Tuned for more
We are releasing AD integration for the resource / workload clusters, we will follow up integrating the management cluster in later releases including extending AD Authentication to Windows Admin Center (WAC). Stay tuned as we continue to bring new security features to AKS-HCI.
by Contributed | Feb 21, 2021 | Technology
This article is contributed. See the original author and article here.
There was an announcement that you could refer to Azure Key Vault secrets from either Azure App Service or Azure Functions, without having to put their versions explicitly. Therefore, the second approach mentioned in my previous post has become now the most effective way to access Azure Key Vault Secrets.
@Microsoft.KeyVault(SecretUri=https://<keyvault_name>.vault.azure.net/secrets/<secret_name>)
With this approach, the reference always returns the latest version of the secret. Make sure that, when a newer version of the secret is created, it takes up to one day to get synced. Therefore, if your new version of the secret is less than one day old, you should consider the rotation. For the rotation, the ideal number of versions of each secret could be two. If there are more than two versions in one secret, it’s better to disable all the older ones for the sake of security.
As there’s no maximum number of secrets defined in Azure Key Vault, sometimes there are too many secrets stored in one Key Vault instance. In this case, finding old versions of secrets and disable them by hand should consider automation; otherwise, it needs too many hands. This sort of automation can be done by Azure Functions with the Azure Key Vault SDK. Let me show how to do so in this post.
You can find the sample code used in this post at this GitHub repository.
Azure Key Vault SDK
There are currently two SDKs taking care of Azure Key Vault.
As the first one has been deprecated, you should use the second one. In addition to that, use Azure.Identity SDK for authentication and authorisation. Once you create a new Azure Functions project, run the following commands to install these two NuGet packages.
    dotnet add package Azure.Security.KeyVault.Secrets –version 4.2.0-beta.4

    dotnet add package Azure.Identity –version 1.4.0-beta.3
The Key Vault package uses the IAsyncEnumerable interface. Therefore, also install this System.Linq.Async package.
dotnet add package System.Linq.Async –version 4.1.1
NOTE: As of this writing, Azure Functions doesn’t support .NET 5 yet. Therefore avoid installing 5.0.0 version of the System.Linq.Async package.
We’ve got all the libraries necessary. Let’s build a Functions app.
Building Functions Code to Disable Old Versions of Each Secret
Run the following command that creates a new HTTP Trigger function.
func new –name BulkDisableSecretsHttpTrigger –template HttpTrigger –language C#
You’ve got the basic function endpoint with default settings. Change the HttpTrigger binding values. Leave the POST method only and enter the routing URL of secrets/all/disable (line #5).
    public static class BulkDisableSecretsHttpTrigger

    {

        [FunctionName(“BulkDisableSecretsHttpTrigger”)]

        public static async Task<IActionResult> Run(

            [HttpTrigger(AuthorizationLevel.Function, “POST”, Route = “secrets/all/disable”)] HttpRequest req,

            ILogger log)

        {
Populate two values from the environment variables. One is the URL of the Key Vault instance, and the other is the tenant ID where the Key Vault instance is currently hosted.
            // Get the KeyVault URI

            var uri = Environment.GetEnvironmentVariable(“KeyVault__Uri”);
            // Get the tenant ID where the KeyVault lives

            var tenantId = Environment.GetEnvironmentVariable(“KeyVault__TenantId”);
Then, create the SecretClient that accesses the Key Vault instance. While instantiating the client, you should provide the DefaultAzureCredentialOptions instance as well. If the account logged into Azure is able to access multiple tenants, you should explicitly provide the tenant ID; otherwise, it throws the authentication error (line #4-6).
It happens more frequently on your local machine than on Azure.
            // Set the tenant ID, in case your account has multiple tenants logged in

            var options = new DefaultAzureCredentialOptions()

            {

                SharedTokenCacheTenantId = tenantId,

                VisualStudioTenantId = tenantId,

                VisualStudioCodeTenantId = tenantId,

            };

            var client = new SecretClient(new Uri(uri), new DefaultAzureCredential(options));
Once logged in, get all secrets, iterate them and process each one of them. First things first, let’s get all the secrets (line #2-4).
            // Get the all secrets

            var secrets = await client.GetPropertiesOfSecretsAsync()

                                      .ToListAsync()

                                      .ConfigureAwait(false);
            var utcNow = DateTimeOffset.UtcNow;

            var results = new Dictionary<string, object>();
Now, iterate all the secrets and process them. But we don’t need all the versions of each secret but need only Enabled versions. Therefore use WhereAwait for filtering out (line #7). Then, sort them in the reverse-chronological order by using OrderByDescendingAwait (line #8). Now, you’ll have got the latest version at first.
            foreach (var secret in secrets)

            {

                // Get the all versions of the given secret

                // Filter only enabled versions

                // Sort by the created date in a reverse order

                var versions = await client.GetPropertiesOfSecretVersionsAsync(secret.Name)

                                           .WhereAwait(p => new ValueTask<bool>(p.Enabled.GetValueOrDefault() == true))

                                           .OrderByDescendingAwait(p => new ValueTask<DateTimeOffset>(p.CreatedOn.GetValueOrDefault()))

                                           .ToListAsync()

                                           .ConfigureAwait(false);
If there is no active version in the secret, stop processing and continue to the next one.
                // Do nothing if there is no version enabled

                if (!versions.Any())

                {

                    continue;

                }
If there is only one active version in the secret, stop processing and continue to the next.
                // Do nothing if there is only one version enabled

                if (versions.Count < 2)

                {

                    continue;

                }
If the latest version of the secret is less than one day old, the rotation is still necessary. Therefore, stop processing and continue to the next one.
                // Do nothing if the latest version was generated less than a day ago

                if (versions.First().CreatedOn.GetValueOrDefault() <= utcNow.AddDays(-1))

                {

                    continue;

                }
Now, the secret has more than two versions and needs to disable the old ones. Skip the first (latest) one process the next one (line #2), set the Enabled to false (line #6), and update it (line #8).
                // Disable all versions except the first (latest) one

                var candidates = versions.Skip(1).ToList();

                var result = new List<SecretProperties>() { versions.First() };

                foreach (var candidate in candidates)

                {

                    candidate.Enabled = false;
                    var response = await client.UpdateSecretPropertiesAsync(candidate).ConfigureAwait(false);
                    result.Add(response.Value);

                }
                results.Add(secret.Name, result);

            }
And finally, store the processed result into the response object, and return it.
            var res = new ContentResult()

            {

                Content = JsonConvert.SerializeObject(results, Formatting.Indented),

                ContentType = “application/json”,

            };
            return res;

        }

    }
You’ve got the logic ready! Run the Function app, and you will see that all the secrets have been updated with the desired status. Suppose you change the trigger from HTTP to Timer, or integrate the current HTTP trigger with Azure Logic App with scheduling. In that case, you won’t have to worry about older versions of each secret to being disabled.
So far, we’ve walked through how an Azure Functions app can manage older versions of each secret of Azure Key Vault while Azure App Service and Azure Functions are referencing the ones in Azure Key Vault. I hope that this sort of implementation can reduce the amount of management overhead.
This article was originally published on Dev Kimchi.
by Contributed | Feb 21, 2021 | Technology
This article is contributed. See the original author and article here.
News this week includes:
Announcing general availability for Java Message Service (JMS) 2.0 API on Azure Service Bus Premium
Microsoft Teams Meetings for Government video series available now
IoT Driving Sustainability and a New Green ROI
Karl Wester-Ebbinghaus is our member of the week and a great contributor in the Windows Server Community.
View the Weekly Roundup for Feb 15-19th in Sway and attached PDF document.
https://sway.office.com/s/fGD8WWz1hargtCMw/embed

Recent Comments