by Contributed | Feb 24, 2021 | Technology
This article is contributed. See the original author and article here.
Join us virtually at embedded world is this year!
Running from March 1-5, this in-depth event offers opportunities to experience inventions from the embedded sector. Microsoft will share how Azure IoT is helping lead the way in sessions and roundtables. Register for free: https://aka.ms/AAb76w5
Here is a sneak peak on what sessions and roundtables to join to learn more, hear announcements, and ask us questions live below!
Before the event: Microsoft joins ST for STM32 Innovation Live (Feb. 25)!
Microsoft have been working in close partnership with STMicroelectronics to upgrade the STM32Cube software platform to simplify the development of IoT devices and allow embedded developers to now benefit from pre-integrated Microsoft Azure RTOS on STM32 MCUs. Want to know more? Experts from ST and Microsoft will be available during the live webcast to answer all your questions!
Register now for free to know more about Azure RTOS integration with STM32Cube! Join us at 10.30AM CET on Feb 25. https://bddy.me/3sxqKd5
During the event March 1-5: Learn more and hear latest announcements at the Sessions and Roundtables
Type |
Title |
Speakers |
Date/Time |
Roundtable |
Azure Sphere – A new class of secured system on a chip
|
Sylvain Ekel, Jürgen Schwertl
|
Mar 1: 11.00 am CET
|
Roundtable |
Azure Sphere – A new class of secured system on a chip
|
Galen Hunt, Jürgen Schwertl
|
Mar 1: 4.20 pm CET
|
Exhibitor’s Forum 1 |
What’s next for Windows IoT |
Joe Coco, Martin Tuip |
Mar 2: 11:50 AM CET
|
Exhibitor’s Forum 1 |
STMicroelectronics – Making Microsoft Azure IoT Edge easy with OpenSTLinux on STM32MP1 |
Davide Aliprandi (ST), Kamel Kholti (ST), Pamela Cortez (Microsoft) |
Mar 2: 4:15 PM CET
|
Roundtable |
New Innovations to bring AI to the Edge
|
Dan Rosenstein, Dave Jacobs
|
Mar 2: 4.20 pm CET
|
Roundtable |
New Innovations to bring AI to the Edge |
Bo Pintea, Nabila Babar
|
Mar 3: 4.20 pm CET
|
Roundtable |
Bring the power of Azure to the edge |
Terry Warwick, Chirag Shah
|
Mar 3: 5.20 pm CET
|
Roundtable |
Enabling seamless IoT experience with Azure RTOS
|
Speaker: Bill Lamie, Pamela Cortez
Moderator: Liya Du
|
Mar 4: 4.20 pm CET
|
Roundtable |
IoT Plug and Play
|
Ugan Sivagnanenthirarajah, Sandeep Pujar, Daisuke Nakahara
|
Mar 4: 5.20 pm CET
|
Roundtable |
Built-in IoT security with Edge Secured-core and Azure Defender for IoT
|
Deepak Manohar, Buck Watia, Idan Perkal
|
Mar 5: 2.00 pm CET
|
Roundtable |
Enabling seamless IoT experience with Azure RTOS
|
Bill Lamie, Pamela Cortez, Andres Mlinar
|
Mar 5: 2.30 pm CET
|
Join us at the Renesas Virtual Experience during embedded world
Microsoft will be joining Renesas for their Virtual Experience event. Check out the Microsoft Azure IoT Solutions for Renesas MCU/MPUs tech talk. Speaker Pamela Cortez from the Azure IoT product team will be demoing how to get started building IoT solutions with Azure RTOS and how we are working together to simplify the IoT Device to Cloud Experience with Microsoft Azure IoT and Renesas MCU / MPUs. Register here: https://info.renesas.com/en-embedded-world-2021-registration
Video chat or message us at the Microsoft Exhibitors page
Have questions about our latest announcements or want to discuss your IoT solution? Head over to the Microsoft sponsor page under Exhibitors. Once you are there, you will be able to message and start a video chat with the different product teams and technical specialists from Microsoft.
We hope to see you all there!

by Contributed | Feb 24, 2021 | Technology
This article is contributed. See the original author and article here.
Guest post by Malcolm Smith Fraser, MS Candidate at Duke University | Race and the Professions Fellow at The Kenan Institute of Ethics. Malcolm is an Interdisciplinary Data Science master’s student at Duke University. He is interested in data science, machine learning engineering, and cloud computing. Away from the computer screen his passions revolve around music, fitness, and good food.
Continuous Delivery
In short, continuous delivery (and its younger sibling continuous integration) is a way to ensure that any code you write is always in a functioning state. While continuous integration automates the process of testing our code every time it is checked into a repository, continuous delivery adds the extra step of also updating any applications running on that code. This could be a single step such as updating a static website, or multiple steps – like updating a container that lives in a container registry, then initiating a redeployment of an application that runs on that container image.
The functionality behind continuous delivery lies in the build server. Some build servers are their own standalone services and others are integrated with the various cloud providers. Services like Jenkins, Travis, GitHub Actions and Azure DevOps are all examples of build servers. I will not go into too much depth on these in this post, but they are pretty cool.
In this post I am going to focus on continuous delivery for a Flask-based web application that runs on Azure App Service. However, most of the things I will show are applicable to other applications. I will be showing continuous delivery with Azure DevOps and GitHub Actions which both have very nice integrations with Azure App Service. All code for this application can be found in my GitHub repository here. [malcolmsfraser/AzureFlask-CD (github.com)]
When working properly with Azure DevOps, the continuous delivery workflow looks like this:
Deployed web application.


Make a change and push it to my repository.

Push triggers an app build and new deployment.

Updated web app!

Cool right!?
The main component you need when setting up continuous delivery for any service is a .yml build file. This is what the build server uses to execute commands when activated. Thankfully, the sleek integrations that Azure has with the two build servers I am using means that you do not need to concern yourself with all the syntax needed to write the file yourself.
Azure DevOps
Once you have an application up and running on Azure App Service. Navigate to the Azure DevOps home screen [https://azure.microsoft.com/en-us/services/devops] and create a free account. Follow the prompts to create a new project.

Next you need to create a service connection between your Azure DevOps project and the resource group under which your App Services application is deployed.
*Please note that if you are part of an organization that limits your permissions in making changes to the Active Directory, you might not be able to make this connection. I had to switch to a non duke.edu Microsoft account to create the service connection.
Navigate to project settings, and then select service connections.

Create a new service connection to the Resource group containing the web application.

Now that you have successfully connected to the resource deploying your application, it is time to setup the continuous delivery pipeline.
Click Pipelines à New pipeline. You will then be prompted connect to where your code is hosted (I chose GitHub, but it could be on any of the supported options) and then specify the specific repository where the code lives.


The following page is where you can select the type of pipeline you will be deploying. Since I am working with a Python web application I selected “Python to Linux Web App on Azure”. However, if you click “Show more” you can see how you can easily configure a pipeline do various things – like build and push a Docker image to Azure Container Registry, which could even be followed by a Kubernetes deployment… lots of options to fit your needs.


Once you select the appropriate pipeline configuration, you will be prompted to connect it to the specific resource you are creating it for. Again, since I am working with a web application, I select the name of the appropriate Azure App Service resource in the group I connected to earlier. On the next screen I can hit “Save and run” and a file named azure-pipelines.yml will be pushed to my repository by Azure DevOps. Now every time I make a push to this repository, it will trigger Azure DevOps to redeploy the web application with any new changes.
GitHub Actions
I also could have set up CD with GitHub Actions, which is separate from the Azure DevOps workflow. To initialize you need to navigate to your Azure App Service resource and select “Deployment Center” from the menu on the right.

From there, navigate to the settings tab and create a new CI/CD integration, connect to your repository, select the runtime, and click save.
If you are using GitHub, this will create a file in your repository named .github/workflows/master_{app-name}.yml. Like the Azure DevOps workflow, now whenever you push you your repo GitHub Actions will kick start a deployment to Azure App Service.

Adding other steps to continuous delivery
Up until now the continuous delivery us only deploying your application. Better practice would be to also lint and test the application before it gets deployed (I am just linting here but adding a test would be the same idea). Simply insert these steps to the .yml file after the python environment has built. I use a Makefile to simplify these commands (make lint), but you could run them explicitly.
Azure DevOps (azure-pipelines.yml) on left and GitHub Actions (master_FlaskApp-CD.yml) on right:

Both options for continuous delivery are very straightforward. That being said, it is very easy to see how Azure DevOps could quickly be used to continuously deliver a wide range of applications by changing just a single step in the process, while the current workflow for GitHub Actions that I used is more specific to the Python/Linux web app use case. I suspect that the integration for GitHub Actions is probably just as seamless across other Azure services, but I have not tried it yet.
Next, I want to try this with a containerized deployment…because containers are cool.
Additional Learning Resources
DevOps Learning Pathways
Evolve your DevOps practices learning path – Learn | Microsoft Docs
Deploy applications with Azure DevOps learning path – Learn | Microsoft Docs
Build applications with Azure DevOps learning path – Learn | Microsoft Docs
Container and DevOps
Introduction to Azure Kubernetes Service – Learn | Microsoft Docs
Introduction to Kubernetes – Learn | Microsoft Docs
Automate multi-container Kubernetes deployments with Azure Pipelines – Learn | Microsoft Docs
Automate Docker container deployments with Azure Pipelines – Learn | Microsoft Docs
by Contributed | Feb 24, 2021 | Technology
This article is contributed. See the original author and article here.
In March 2020, we shared some preliminary information about a new security feature in Windows called Hardware-enforced Stack Protection based on Intel’s Control-flow Enforcement Technology (CET). Today, we are excited to share the next level of details with our developer community around protecting user-mode applications with this feature. Please see requirements section for hardware and OS requirements to take advantage of Hardware-enforced Stack Protection.
Starting from the 11C latest cumulative update for 20H1 (19041) and 20H2 (19042) versions of Windows 10, we’ve enabled user mode Hardware-enforced Stack Protection for supported hardware. This exploit mitigation will protect the return address, and work with other Windows mitigations to prevent exploit techniques that aim to achieve arbitrary code execution. When attackers find a vulnerability that allows them to overwrite values on the stack, a common exploit technique is to overwrite return addresses into attacker-defined locations to build a malicious payload. This technique is known as return-oriented programming (ROP). More details on ROP and hardware shadow stacks is in this kernel blog.
For user mode applications, this mitigation is opt-in, and the following details are intended to aid developers in understanding how to build protected applications. We will describe in detail the two policies in Hardware-enforced Stack Protection: 1) shadow stack 2) instruction pointer validation. Shadow stack hardens the return address and instruction pointer validation protects exception handling targets.
Shadow Stack
Shadow stack is a hardware-enforced read-only memory region that helps keep record of the intended control-flow of the program. On supported hardware, call instructions push the return address on both stacks and return instructions compare the values and issues a CPU exception if there is a return address mismatch. Due to these required hardware capabilities only newer processors will have this feature.
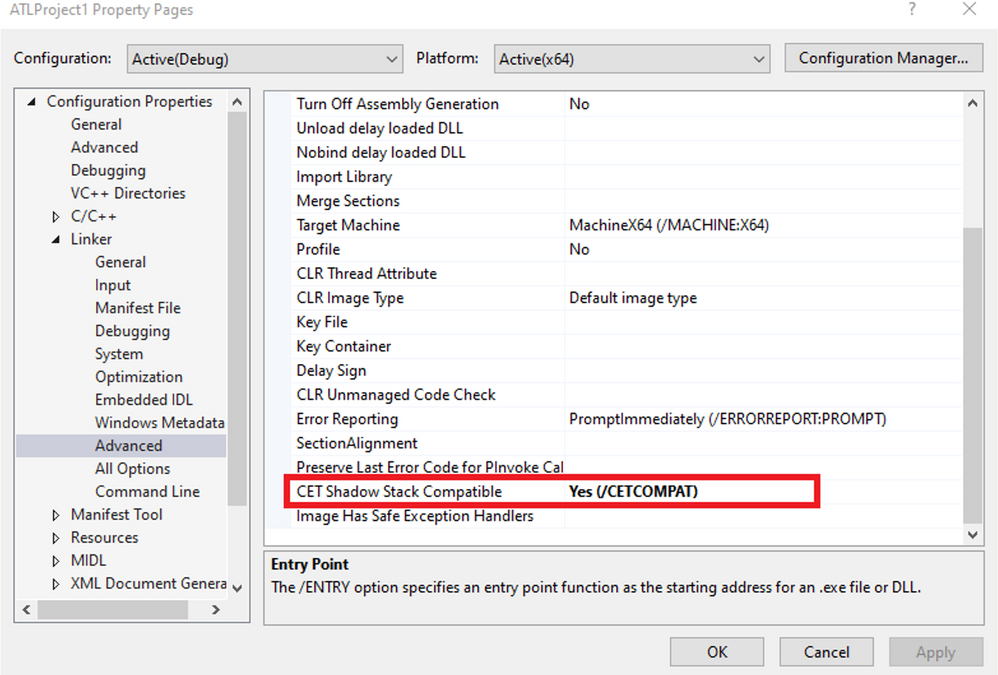
To enable shadow stack enforcement on an application, you only need to recompile the application with the /CETCOMPAT linker flag (available in Visual Studio 2019 16.7 Preview 4).

Generally, code changes are not needed and the only modification to the binary is a bit in the PE header. However, if your code behavior includes modifying the return addresses on the stack (which results in mismatch with the shadow stack), then the hijacking code must be removed.
Applications can also choose to dynamically enable shadow stack enforcement, by using the PROC_THREAD_ATTIBUTE_MITIGATION_POLICY attribute in CreateProcess. This allows programs with multiple executables with the same name to specify specific processes to enable enforcement.
Shadow stack enforcement by default is in compatibility mode. Compatibility mode provides a more flexible enforcement of shadow stacks, at module granularity. When a return address mismatch occurs in this mode, it is checked to see if 1) it is not in an image binary (from dynamic code) or 2) in a module that is not compiled for /CETCOMPAT. If either hold true, the execution is allowed to continue. This way, you can slowly increase the coverage of the mitigation, by compiling more modules with /CETCOMPAT at your own pace. To protect dynamic code in compatibility mode, there is a new API, SetProcessDynamicEnforcedCetCompatibleRanges, to allow you to specify a range of virtual addresses to enforce this mitigation. Note that by default this API can only be called from outside the target process for security purposes.
Note that all native 64-bit Windows DLLs are compiled with /CETCOMPAT.
Strict mode, by definition, strictly enforces shadow stack protections and will terminate the process if the intended return address is also not on the shadow stack.
Today, it is recommended to enable your application in compatibility mode, as third-party DLLs may be injected into your process, and subsequently perform return address hijacking. We are working with our ecosystem developers to clean up any of this behavior. At the current time, we recommend beginning by enabling compatibility mode enforcement for your application.
The following diagram illustrates how the system behaves under shadow stack. When a return address mismatch occurs, the CPU raises a #CP exception:


As you can see, return address mismatches cause a trap to the kernel, which comes with a performance hit even if the mismatch is forgiven and execution is allowed to continue.
Instruction Pointer Validation
With the presence of shadow stacks, one of the next exploit techniques attackers may use to hijack control flow is corrupting the instruction pointer value inside the CONTEXT structure passed into system calls that redirect the execution of a thread, such as NtContinue and SetThreadContext. To provide a comprehensive control-flow integrity mitigation, Hardware-enforced Stack Protection includes an additional mitigation to validate the instruction pointer during exception handling. It is important to keep this mitigation in mind as well when testing for compatibility.
When shadow stacks are enabled for an application, SetThreadContext is enlightened to validate the user-supplied instruction pointer. Calls are allowed to proceed only if the value is found on the shadow stack (otherwise the call will fail).
For structured exception handling, RtlRestoreContext/NtContinue is hardened by a parallel mitigation, EH Continuation Metadata (EHCONT), by using the /guard:ehcont flag.

When this flag is specified, the compiler will include metadata in the binary that has a table of valid exception handling continuation targets. The list of continuation targets is generated by the linker for compiled code. For dynamic code, continuation targets should be specified using SetProcessDynamicEHContinuationTargets (similarly can only be called from outside the target process by default). With this feature enabled, the user-supplied instruction pointer will be checked to see if it is 1) on the shadow stack or 2) in the EH continuation data, before allowing the call to proceed (otherwise the call will fail). Note that if the binary does not contain EHCONT data (legacy binary), then the call is allowed to proceed.
Additionally, an application can be compiled for EHCONT even without shadow stack protection, in which the user-supplied instruction pointer must be present in the EH continuation data.
Common Violations
To properly build your application for Hardware-enforced Stack Protection, ensure there is a good understanding of how these security mitigations are enforced. Since shadow stacks are present throughout the lifetime of the process, the test matrix is enabling the above mitigations and ensure all code paths do not violate the security guarantees. The goal is to ensure present application code does not perform any behavior deemed unsecure under these mitigations.
Here are some examples of behaviors that violate shadow stacks:
Certain code obfuscation techniques will not automatically work with shadow stacks. As mentioned above, CALL and RET are enlightened to push onto the shadow stack and perform return address comparisons. Instruction combinations like PUSH/RET will not work with shadow stacks, as the corresponding return address is not present on the shadow stack when RET is performed. One recommendation here is instead using a (Control flow guard protected) JMP instruction.
Additionally, techniques that manually return to a previous call frame that is not the preceding call frame will also need to be shadow stack aware. In this case, it is recommended to use the _incsspq intrinsic to pop return addresses off the shadow stack so that it is in sync with the call stack.
User Interfaces
There are some user interfaces to help you understand the state of enforcement of processes on the machine. In task manager, adding the “Hardware-enforced Stack Protection” column in the “Details” tab will indicate processes are shadow stack protected, and whether they are in compatibility (compatible modules only) or strict (all modules) mode.

Additionally, this mitigation can be controlled similar to other exploit protections, including toggling the enforcement using the Windows Defender UI, Group Policy, PowerShell, and other facilities. Use UserShadowStack and UserShadowStackStrictMode as the parameter keyword to manually toggle enforcement in compatibility and strict mode, respectively. Use AuditUserShadowStack to enable audit mode.

Requirements
You can begin building and testing your application to support Hardware-enforced Stack Protection today, by ensuring you have the following:
CET Hardware: 11th Gen Intel Core Mobile processors and AMD Zen 3 Core (and newer)
Hardware-enforced Stack Protection capable OS: 19041.622 or 19042.622 and newer versions
Conclusion
We will continue to strive towards investing in exploit mitigations to make Windows 10 the most secure operating system. These mitigations will help proactively prohibit an attacker’s ability to hijack your program in the event a vulnerability is discovered. Note in the current release, this mitigation is only supported in 64-bit code. There is no support for 32-bit code, WoW64, or in Guest Virtual Machines at the moment.
In the latest canary builds of Edge (version 90), Hardware-enforced Stack Protection is enabled in compatibility mode on the browser and a few non-sandboxed processes. In upcoming releases, there will be continued investments in expanding the list of processes protected by this mitigation. Please try it out and provide your feedback. You can send related questions to CETQuestions@microsoft.com.
Kernel Protection team – Jin Lin, Jason Lin, Matthew Woolman

by Contributed | Feb 24, 2021 | Technology
This article is contributed. See the original author and article here.
How to manage SAP IQ License in HA Scenario
This blog is an extension to Deploy SAP IQ-NLS HA Solution using Azure NetApp Files on SUSE Linux Enterprise Server
As part of this blog, we will learn how to manage the SAP IQ license when configured for High-Availability on ANF.
Problem Statement:
The SAP IQ High Availability Architecture on ANF proposes to hosts the SAP IQ database on ANF Volume.
As part of failover, the database filesystem [ANF Volume] moves from Node1 to Node2. The files including the license file on ANF Volume remain static, meaning the license will have Node1 hostname [Old Primary node] when it failovers to Node2 [New Primary node] stopping SAP IQ from start-up on Node2 as part of failover.

The above architecture points to an update (option) where SBD VM’s can be replaced with Azure Fencing Agent to simplify the architecture.
Solution:
Please refer to SAP Note 2628620, 2376507 to understand further on SAP IQ License generation and options.
Follow the below steps to update the license key for ANF volume
1. Based on the SAP IQ system, generate Production type CP license or non-production type DT for Primary node.
2. Generate Standby license type SF for Secondary node. System type must be Backup system & License Type should be Standby Instance [IB] [On SAP Portal, the selection will be IB].

3. Create two separate .lmp files with below format <hostname1>.lmp
In this LT should be equal to CP (for prod) and DT (for non-prod)

<hostname2>.lmp
In this LT should be equal to SF (for Standby node)

4. Change IQ startup script (sapiq_start.sh) and add below code lines into the script cd <path to database directory
hostnm=`hostname`
if [ -f ./${hostnm}.lmp ]; then
cp ${hostnm}.lmp SAPIQDB_<SID>.lmp fi

5. Start the cluster and execute HA test cases for validation.


Recent Comments