
by Contributed | Jan 5, 2021 | Technology
This article is contributed. See the original author and article here.
The intranet that serves both employee self-service needs and programmatic compliance for IT is one born from human-centric design that safeguards operations at scale.
The Intrazone continues to spotlight Microsoft partners, the people and companies who deliver solutions and services to empower our customers to achieve more. In our 9th partner episode, we talk with Hamish Toll (Founder and Director | Circle T) and his customer, David Benjamin (CIO | Millennium Services Group).
In this episode, we dig into Millennium’s self-maintaining intranet strategy, including integration into Teams – establishing an “enterprise knowledge platform.” We also learn about their policy center that helps “reduce time to content.” And looking forward, Millennium is interested in SharePoint Syntex to improve insider risk management and communication compliance.
And… on with the show.
https://html5-player.libsyn.com/embed/episode/id/17363834/height/90/theme/custom/thumbnail/yes/direction/backward/render-playlist/no/custom-color/247bc1/
Subscribe to The Intrazone podcast! Listen this partner episode on Circle T now + show links and more below.
Left-to-right: Hamish Toll (Founder and Director | Circle T) and his customer, David Benjamin (CIO | Millennium Services Group). [The Intrazone guests]
Link to articles mentioned in the show:
- Hosts and guests
- Articles and sites
- Events
Subscribe today!
Listen to the show! If you like what you hear, we’d love for you to Subscribe, Rate and Review it on iTunes or wherever you get your podcasts.
Be sure to visit our show page to hear all the episodes, access the show notes, and get bonus content. And stay connected to the SharePoint community blog where we’ll share more information per episode, guest insights, and take any questions from our listeners and SharePoint users (TheIntrazone@microsoft.com). We, too, welcome your ideas for future episodes topics and segments. Keep the discussion going in comments below; we’re hear to listen and grow.
Subscribe to The Intrazone podcast! And listen this partner episode on Circle T now.
Thanks for listening!
The SharePoint team wants you to unleash your creativity and productivity. And we will do this, together, one partner at a time.
The Intrazone links
+ Listen to other Microsoft podcasts at aka.ms/microsoft/podcasts.
![Left to right [The Intrazone co-hosts]: Chris McNulty, director (SharePoint, #ProjectCortex – Microsoft) and Mark Kashman, senior product manager (SharePoint – Microsoft).](https://www.drware.com/wp-content/uploads/2020/11/large-375 "Chris-Mark_in-studio.jpg") Left to right [The Intrazone co-hosts]: Chris McNulty, director (SharePoint, #ProjectCortex – Microsoft) and Mark Kashman, senior product manager (SharePoint – Microsoft).
Left to right [The Intrazone co-hosts]: Chris McNulty, director (SharePoint, #ProjectCortex – Microsoft) and Mark Kashman, senior product manager (SharePoint – Microsoft).
 The Intrazone, a show about the Microsoft 365 intelligent intranet: https://aka.ms/TheIntrazone.
by Contributed | Jan 5, 2021 | Technology
This article is contributed. See the original author and article here.
Written in collaboration with @camilamartins
This post will detail how to use Custom Rules on Azure WAF, including some examples of common use cases fulfilled by this rule type. Custom Rules provide a versatile way to build controls that fulfill security requirements and protect applications from attacks that are unique to your applications.
WAF Rule Types and Processing
Azure WAF currently offers 3 rule types, which are processed in the following order:
- Custom Rules – custom rules are processed first, and function according to the logic you select. This makes them very powerful as the first line of defense for web applications.
- SpiderLabs Core Ruleset (CRS), and can detect common web attacks like SQL injection, cross-site scripting, and command injection. These rules cannot be modified, but the ruleset can be tuned by using exclusions and by modifying rule actions (a topic for another post).
- Managed Bot Rules – these rules identify potential bot activity by matching sources against our internal Threat Intelligence feeds. If traffic is coming from a known source of bot activity, the traffic can be blocked.
This post focuses on Custom Rules, but it is important to understand how the managed rulesets work. For more information on these, look for future blog posts here or consult the Azure WAF documentation.
Important Custom Rule Concepts
Custom Rules can be viewed and built using the Azure Portal by navigating to Web Application Firewall Policies (WAF), selecting your policy, and clicking on the Custom Rules blade. Creating a custom rule is as simple as clicking Add Custom Rule and entering a few required fields. However, there are some important concepts to understand before you create your own rules.
The most important thing to mention about Custom Rules is that they are terminating. This means that if the logic of the rule is matched, all other rules stop processing, and both OWASP and Bot managed rulesets. This is the case regardless of the action of the rule; even if traffic is allowed, no further rules are processed. This can have positive or negative implications.
The Allow action should be used sparingly in Custom Rules, because since the rule terminates, it means that all other inspection provided by WAF will be skipped. Understanding this, you can use Allow rules when the intent is to skip the other checks, such as in tuning situations. If certain requests tend to trigger false positives, you can use a Custom Rule to allow the traffic at a more granular level than it would be possible by using exclusions or disabling rules.
In most scenarios, it is best to use Custom Rules with the Deny action, as a terminating Deny rule is entirely expected and without unanticipated consequences. For instance, if you wanted to use a WAF Custom Rule to create an IP Address allow list, it is better to Deny traffic that is not from the IP addresses in the list rather than Allow traffic from those IPs.
Another concept to make use of in constructing effective Custom Rules is compound conditions. Rules can be created with a single condition, or you can add multiple conditions that must be satisfied to constitute a match. When adding multiple conditions, they are added as an AND statement, so all conditions must be met for the Action to take place. If you need to construct a rule with OR logic, it is best to create multiple rules with the same Action.
Custom Rule Example Templates and Use Cases
We have created 2 ARM templates, which will create both WAF Policy types, one for WAF on Application Gateway and one for WAF on Front Door. These policies are intended to give you a starting point for creating your own Custom Rules. To deploy, simply click the Deploy to Azure buttons from the repository, select a Resource Group, and create your policies.
These example policies must be modified to fit your requirements before associating with any Front Door or Application Gateway resources, and the following sections will provide guidance on how to do so.
Block Lists
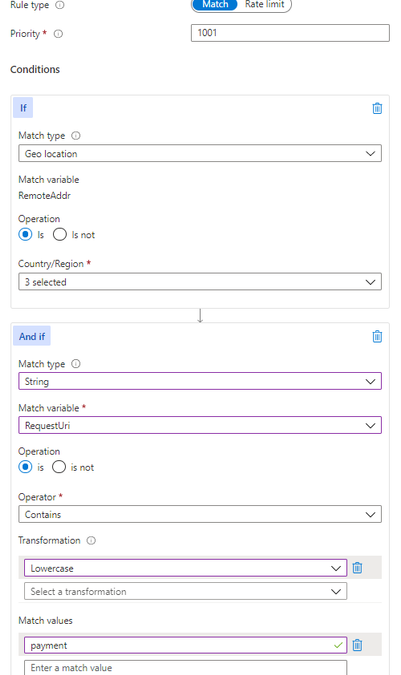
Some customers have the requirement to block certain sources of traffic based on IP address or country of origin. In these scenarios, block lists can be used, which you must create and keep up to date. The examples included in the templates are GeoBlockList and IPBlockList. The behavior of these basic rules can be modified to add conditions if necessary. For example, you may want to block a certain part of a site from a geographic region, as pictured:

Notice that there is a second condition in the “And if” box, which defines a specific request URI. This additional condition creates an AND expression, meaning that both the first condition about geolocation and the second condition about the request URI must be matched in order for the Deny action to trigger.
These block lists can be added manually via the Portal or managed programmatically using ARM, API, or CLI. One example of adding to a block list automatically using Azure Sentinel Playbooks can be found in a previous post.
Allow Lists
IP address or geographic restrictions can be accomplished effectively using allow lists. This method is preferable if you only do business in certain countries, or if you have an internal website you would like to be available only to trusted IP addresses, such as corporate IP blocks.
The following example shows the IPAllowList rule found in the template:

Controlling Allowed HTTP Methods
HTTP method enforcement can be done in a dynamic way using WAF Custom Rules. Consider the scenario where you have an API that should be available publicly for customers to GET and POST, but you want to reserve PUT and DELETE actions for traffic originating from trusted locations as an extra layer of security beyond authentication. The following modification of the MethodAllowList rule can be used to accomplish this.

Blocking User Agents
Some of the OWASP managed rules will detect well known malicious user agents, but if you find the need to block a specific set, a Custom Rule is a way to accomplish this. Of course, user agent is not a difficult element for an attacker to change, but this type of rule can help deflect unsophisticated attackers. The logic of the UserAgentBlock rule is represented in the template pictured below.

Rate Limiting with WAF for Front Door
WAF on Azure Front Door has the added capability of Custom Rules with a Rate Limit type, as distinct from Match type rules. Rate Limit rules will keep track of the number of requests from a particular IP address and block requests made after a threshold is reached.
These rules can be part of an effective layer 7 DDoS protection strategy. Azure DDoS Protection, both at the platform level (free) and using the Standard tier (paid) will protect against high volume attacks, but there are application attacks that do not necessarily rely on high volume. Some of these attacks can be mitigated by using source rate limiting in Custom Rules. The idea is that a legitimate user of a site will make a predictable number of requests to the site over a given time period, but an attacker trying to disrupt the site’s availability would likely make more requests. A threshold can be set to limit the volume of traffic to a particular path from a source, as pictured below.

In the above rate limiting rule, 100 requests from the same IP address would be allowed within any 1 minute time period, but after the threshold is met, additional requests from that IP would be dropped for 1 minute. After the rate limiting period expires, traffic is allowed and the counter to 100 starts again.
Using WAF on Application Gateway to only Allow Traffic from your Front Door
A common architectural design is to use Azure Front Door to provide global load balancing and content distribution in front of Application Gateways hosted in 2 or more regions. You probably want to allow traffic only from your Front Door service specifically to prevent an attacker from setting up a “rogue” Front Door instance without WAF in order to circumvent inspection.
Fortunately, Front Door adds a header (X-Azure-FDID) to all traffic it processes, which identifies it as your instance of Front Door. This guarantees that traffic sourcing from unapproved Front Door instances will not connect to your service.

Summary
The preceding example use cases are not very complex in nature, yet they provide considerable results to improve the security of your applications. We hope these samples help you understand how flexible Custom Rules can be, and that you can use this as a starting point to build more advanced rule logic in your environment. There are many possibilities to add complexity and effectiveness to these examples, including using Regex to look for patterns in the request body. If you come up with any particularly useful rules, please feel free to share in the comments here or add a sample to our GitHub repository.

by Contributed | Jan 5, 2021 | Dynamics 365, Microsoft 365, Technology
This article is contributed. See the original author and article here.
Today’s continuous growth of e-commerce sales drives the need for a stronger focus on fraud detection and protection. To meet demand and stimulate growth it’s become crucial to keep fraud and operational costs low by streamlining business processes. Automating the risk analysis and transactional review process with machine learning platforms, like Dynamics 365 Fraud Protection, is one way to do that.
Platforms like Dynamics 365 Fraud Protection provide a rich set of APIs that you can use to assess the risk surrounding account logins, account creations, and purchases. Rule-based linear models then use the risk score, as well as purchase or account attributes, to segment traffic and return automated decisions. Rules are just one way to automate decisions on events. It’s equally important to have this information feed into your existing business workflows and then automate where possible.
Here are three ways to help you customize and automate your own end-to-end fraud management workflow.
First: Diagram your existing risk management framework
It’s crucial that you develop a business process diagram (from transaction processing to data flows for automated risk assessments, case management, reporting, and communications) with key stakeholders and metrics for tracking success at each stage. Getting a high-level view of existing workflows will help identify areas for improvement or automation.
Second: Identify real-time decision points
Use your fraud management process diagram to identify key metrics or flags that could require real-time actions. For example, the risk score is an actionable data point used to indicate fraudulent activity and could be monitored in real-time. API latencies, rule executions, or changes to existing rules or configurations in your fraud management platform, are other examples of key data points that could be valuable to track in real-time.
Third: Configure triggers and automate actions
After identifying the key real-time decision points throughout your fraud management process, it is important to find a platform that will manage the data egress and automation components.
Dynamics 365 Fraud Protection’s event tracing establishes a real-time telemetry platform that can seamlessly integrate and extend your existing business workflows. You can subscribe to events triggered by the user or system-level actions and forward the data associated with each event to Azure Event Hubs or Blob storage. From there, you can take advantage of powerful fast-development tools such as Azure Logic Apps and Power Automate to configure trigger conditions and real-time actions from all of your connected systems.
For example, if a user’s score is suspiciously low, you can subscribe to a transactional event that will be sent to Azure Event Hubs and consumed in Azure Logic Apps to check the score, trigger an email, and investigate the order before a chargeback occurs. Using an ever-growing library of third-party connectors available in Azure Logic Apps, you can create a highly customizable workflow to cover everything from order investigation, additional verification for suspicious orders, alerting on changes made in the portal, and updates to customized monthly business reports. These connectors work seamlessly with Dynamics 365 Fraud Protection to provide you with a single solution for your business’ fraud detection and protection needs.
Next steps
Developing a robust fraud management workflow that enables your business to scale and operate efficiently is crucial. Dynamics 365 Fraud Protection and its Event Tracing capabilities aim to support your business by easily connecting to and optimizing your existing business workflows. Get started today with Dynamics 365 Fraud Protection and learn more about how Event Tracing can provide real-time insights and workflow automation here:
The post 3 Tips for Creating Intelligent Fraud Management Workflows appeared first on Microsoft Dynamics 365 Blog.
Brought to you by Dr. Ware, Microsoft Office 365 Silver Partner, Charleston SC.
by Contributed | Jan 5, 2021 | Technology
This article is contributed. See the original author and article here.
Monthly Webinar and Ask Me Anything on Azure Data Explorer
Level: beginner
Azure Data Explorer is a fast, fully managed data analytics service for real-time analysis on large volumes of data streaming from applications, websites, IoT devices, and more. Ask questions and iteratively explore data on the fly to improve products, enhance customer experiences, monitor devices, and boost operations. Quickly identify patterns, anomalies, and trends in your data. Explore new questions and get answers in minutes. Run as many queries as you need, thanks to the optimized cost structure.
By end of this session, you will know
1. What is the Kusto Query Language?
2. How to do simple data exploration?
3. How to draw basic insights from your data?
09:00-09:45 AM PST Azure Data Explorere Live Webinar “How to start with KQL”
by Olga Goldenberg and Slavik Neimer
09:00-10:00 AM PST Ask me Anything with Azure Data Explorer Product group.
Register Now and save you spot
by Contributed | Jan 5, 2021 | Technology
This article is contributed. See the original author and article here.
Storage Accounts with Data lake Storage gen2 enabled allows us to create directories within container.
When we use When a blob is added or modified (properties only) trigger. It works fine for destination where we are looking for blobs inside containers but not inside any directories.
For example:
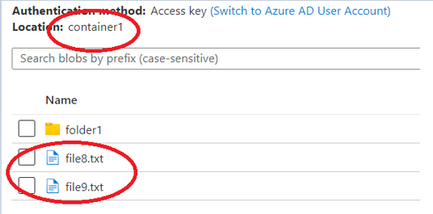
- It works for these blobs which are directly inside container.
- It won’t work for these blobs which are present inside directory in container.

Even though we choose the location of this directory for When a blob is added or modified (properties only) trigger. The trigger won’t get fired when new blob is created or modified inside directory.
To overcome this, we can use event grid trigger When a resource event occurs.
Make sure Microsoft.EventGrid is registered under resource providers in subscription.

This is webhook type trigger and it registers a webhook with the endpoint. In this case it will be a specified path inside container of a storage account.
- In Event Type we can choose from the given list.
- We need to add a new parameter named prefix filter.
- if we want to register a webhook with any container we can give: /blobServices/default/containers/containerName inside prefix filter.
- If we want to give path of specific directory, we need to append /blobs after container name and then directory names after /blobs.
For example:
- for a directory named folder1 inside container container1 the path would be:
/blobServices/default/containers/container1/blobs/folder1/
Note: the last forward slash ‘/’ after directory name is very important, otherwise you would not get the desired result.
Getting the content of those blobs:
For getting the content inside blobs we can use either HTTP action or get blob content (using path) action.
This is the data object returned after trigger got fired.

“data”: {
“api”: “PutBlob”,
“clientRequestId”: “clientRequestIdValue”,
“requestId”: “requestIdValue”,
“eTag”: “eTagValue”,
“contentType”: “text/plain”,
“contentLength”: 6,
“blobType”: “BlockBlob”,
“blobUrl”: “https://storageAccountName.blob.core.windows.net/containerName/folderName/fileNameWithExtension“,
“url”: “https://storageAccountName.blob.core.windows.net/containerName/folderName/fileNameWithExtension“,
“sequencer”: “sequencerValue”,
“storageDiagnostics”: {
“batchId”: “batchIdValue”
}
}
We can use either blobUrl or url element from data value to retrieve the path for getting blob content.
- We can use managed identity for HTTP action to get the content from URL.

Expression Inside URI : triggerBody()?[‘data’]?[‘blobUrl’]
You can also use below expression to frame audience from url element of data object.
concat(split(triggerBody()?[‘data’]?[‘url’],’net’)[0],’net’)

Expression inside Blob: split(triggerBody()?[‘data’]?[‘blobUrl’],’.net/’)[1]

Recent Comments