by Contributed | Jan 25, 2021 | Technology
This article is contributed. See the original author and article here.
The Azure Service Fabric 7.1 tenth refresh release includes stability fixes for standalone, and Azure environments and has started rolling out to the various Azure regions. The updates for .NET SDK, Java SDK and Service Fabric Runtime will be available through Web Platform Installer, NuGet packages and Maven repositories in 7-10 days within all regions. This release is only available on Windows.
- Service Fabric Runtime
- Windows – 7.1.510.9590
- Service Fabric for Windows Server Service Fabric Standalone Installer Package – 7.1.510.9590
- .NET SDK
- Windows .NET SDK – 4.1.510
- Microsoft.ServiceFabric – 7.1.510
- Reliable Services and Reliable Actors – 4.1.510
- ASP.NET Core Service Fabric integration – 4.1.510
- Java SDK – 1.0.6
Key Announcements
- .NET 5 apps for Windows on Service Fabric are now supported as a preview. Look out for the GA announcement of .NET 5 apps for Windows on Service Fabric.
- .NET 5 apps for Linux on Service Fabric will be added in the Service Fabric 8.0 release.
For more details, please read the release notes.
by Contributed | Jan 25, 2021 | Technology
This article is contributed. See the original author and article here.
Chatbots have become increasingly popular in providing useful and engaging experiences for customers and employees. Azure services allow you to quickly create bots, add intelligence to them using AI, and customize them for complex scenarios.
In this blog, we’ll walk through an exercise which you can complete in under two hours, to get started using Azure AI Services. This intelligent grocery bot app can help you manage your shopping list using voice commands. We’ll provide high level guidance and sample code to get you started, and we encourage you to play around with the code and get creative with your solution!
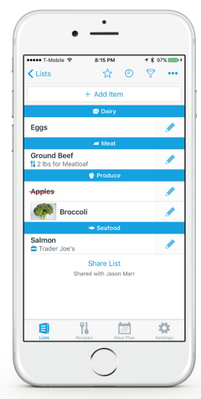
Features of the application:
- Add or delete grocery items by dictating them to Alexa.
- Easily access the grocery list through an app.
- Check off items using voice commands; for example, “Alexa, remove Apples from my grocery list.”
- Ask Alexa to read the items you have in your grocery list.
- Automatically organize items by category to help save time at the store.
- Use any laptop or Web Apps to access the app and sync changes across laptop and phone.
Prerequisites:
Key components:
Solution Architecture

App Architecture Description:
- The user accesses the chatbot by invoking it as an Alexa skill.
- User is authenticated with Azure Active Directory.
- User interacts with the chatbot powered by Azure Bot Service; for example, user requests bot to add grocery items to a list.
- Azure Cognitive Services process the natural language request to understand what the user wants to do. (Note: If you wanted to give your bot its own voice, you can choose from over 200 voices and 54 languages/locales. Try the demo to hear the different natural sounding voices.)
- The bot adds or removes content in the database.
Another visual of the flow of data within the solution architecture is shown below.

Implementation
High level overview of steps involved in creating the app along with some sample code snippets for illustration:
We’ll start by creating an Azure Bot Service instance, and adding speech capabilities to the bot using the Microsoft Bot Framework and the Alexa skill. Bot Framework, along with Azure Bot Service, provides the tools required to build, test, deploy, and manage the end-to-end bot development workflow. In this example, we are integrating Azure Bot Service with Alexa, which can process speech inputs for our voice-based chatbot. However, for chatbots deployed across multiple channels, and for more advanced scenarios, we recommend using Azure’s Speech service to enable voice-based scenarios. Try the demo to listen to the over 200 high quality voices available across 54 languages and locales.
- The first step in the process is to login into Azure portal and follow the steps here to create an Azure Bot Service resource and a web app bot. To add voice capability to the bot, click on channels to add Alexa (see the below snapshot) and note the Alexa Service Endpoint URI.
 Azure Bot Service Channels
- Next, we need to log into the Alexa Developer Console and create an Amazon Alexa skill. After creating the skill, we are presented with the interaction model. Replace the JSON Editor with the below example phrases.
{

  "interactionModel": {

    "languageModel": {

      "invocationName": "Get grocery list",

      "intents": [

        {

          "name": "AMAZON.FallbackIntent",

          "samples": []

        },

        {

          "name": "AMAZON.CancelIntent",

          "samples": []

        },

        {

          "name": "AMAZON.HelpIntent",

          "samples": []

        },

        {

          "name": "AMAZON.StopIntent",

          "samples": []

        },

        {

          "name": "AMAZON.NavigateHomeIntent",

          "samples": []

        },

        {

          "name": "Get items in the grocery",

          "slots": [

            {

              "name": "name",

              "type": "AMAZON.US_FIRST_NAME"

            }

          ],

          "samples": [

            "Get grocery items in the list",

            "Do I have bread in my list",

           ]

        }

      ],

      "types": []

    }

  }

}
- Next, we’ll integrate the Alexa Skill with our Azure bot. We’ll need two pieces of information to do this: the Alexa Skill ID and the Alexa Service Endpoint URI. First, get the Skill ID either from the URl in the Alexa portal, or by going to the Alexa Developer Console and clicking “view Skill ID”. The skill ID should be a value like ‘amzn1.ask.skil.A GUID’. Then, get the Alexa Service Endpoint URI from the Azure portal, by going to the channels page of our Azure Web App Bot in the Azure portal, and clicking on Alexa to copy the Alexa Service Endpoint URI. Then integrate as shown:
- Amazon Developer Console: After building the Alexa Skill, click on Endpoint and paste the Alexa Service Endpoint URI that we copied from the Azure portal and save the Endpoints.

- Azure Portal: Go to the channels page of the Azure Bot, click on Alexa, and paste the Alexa Skill ID that we copied from the Alexa Developer Console.

- Now, we’ll download and the bot locally for testing using the Bot Framework Emulator. Click on “Build” in the Azure Web Bot app to download the source code locally with Bot Framework Emulator. Modify app.py as below:
# Copyright (c) Microsoft Corporation. All rights reserved.
# Licensed under the MIT License.
from http import HTTPStatus
from aiohttp import web
from aiohttp.web import Request, Response, json_response
from botbuilder.core import (
BotFrameworkAdapterSettings,
ConversationState,
MemoryStorage,
UserState,
)
from botbuilder.core.integration import aiohttp_error_middleware
from botbuilder.schema import Activity
from config import DefaultConfig
from dialogs import MainDialog, groceryDialog
from bots import DialogAndWelcomeBot
from adapter_with_error_handler import AdapterWithErrorHandler
CONFIG = DefaultConfig()
# Create adapter.
# See https://aka.ms/about-bot-adapter to learn more about how bots work.
SETTINGS = BotFrameworkAdapterSettings(CONFIG.APP_ID, CONFIG.APP_PASSWORD)
# Create MemoryStorage, UserState and ConversationState
MEMORY = MemoryStorage()
USER_STATE = UserState(MEMORY)
CONVERSATION_STATE = ConversationState(MEMORY)
# Create adapter.
# See https://aka.ms/about-bot-adapter to learn more about how bots work.
ADAPTER = AdapterWithErrorHandler(SETTINGS, CONVERSATION_STATE)
# Create dialogs and Bot
RECOGNIZER = IntelligentGrocery(CONFIG)
grocery_DIALOG = groceryDialog()
DIALOG = MainDialog(RECOGNIZER, grocery_DIALOG)
BOT = DialogAndWelcomeBot(CONVERSATION_STATE, USER_STATE, DIALOG)
# Listen for incoming requests on /api/messages.
async def messages(req: Request) -> Response:
# Main bot message handler.
if "application/json" in req.headers["Content-Type"]:
body = await req.json()
else:
return Response(status=HTTPStatus.UNSUPPORTED_MEDIA_TYPE)
activity = Activity().deserialize(body)
auth_header = req.headers["Authorization"] if "Authorization" in req.headers else ""
response = await ADAPTER.process_activity(activity, auth_header, BOT.on_turn)
if response:
return json_response(data=response.body, status=response.status)
return Response(status=HTTPStatus.OK)
APP = web.Application(middlewares=[aiohttp_error_middleware])
APP.router.add_post("/api/messages", messages)
if __name__ == "__main__":
try:
web.run_app(APP, host="localhost", port=CONFIG.PORT)
except Exception as error:
raise error
- Next, we’ll run and test the bot with Bot Framework Emulator. From the terminal, navigate to the code folder and run pip install -r requirements.txt to install the required packages to run the bot. Once the packages are installed, run python app.py to start the bot. The bot is ready to test as shown below:
 }
}
Open the bot and add the below port number into the following URL.
 Bot Framework Emulator view
- Now we’re ready to add natural language understanding so the bot can understand user intent. Here, we’ll use Azure’s Language Understanding Cognitive Service (LUIS), to map user input to an “intent” and extract “entities” from the sentence. In the below illustration, the sentence “add milk and eggs to the list” is sent as a text string to the LUIS endpoint. LUIS returns the JSON seen on the right.
 Language Understanding utterances diagram
- Use the below template to create a LUIS JSON model file where we specify intents and entities manually. After the “IntelligentGrocery” app is created in the LUIS portal under “Import New App”, upload the JSON file with the below intents and entities.
{
      "text": "access the groceries list",
      "intent": "Show",
      "entities": [
        {
          "entity": "ListType",
          "startPos": 11,
          "endPos": 19,
          "children": []
        }
      ]
    },
    {
      "text": "add bread to the grocery list",
      "intent": "Add",
      "entities": [
        {
          "entity": "ListType",
          "startPos": 23,
          "endPos": 29,
          "children": []
The above sample intents are for adding items and accessing the items in the grocery list. Now, it’s your turn to add additional intents to perform the below tasks, using the LUIS portal. Learn more about how to create the intents here.
Intents
Name
|
Description
|
CheckOff
|
Mark the grocery items as purchased.
|
Confirm
|
Confirm the previous action.
|
Delete
|
Delete items from the grocery list.
|
Once the intents and entities are added, we will need to train and publish the model so the LUIS app can recognize utterances pertaining to these grocery list actions.
 Language Understanding (LUIS) Portal
- After the model has been published in the LUIS portal, click ‘Access your endpoint Urls’ and copy the primary key, example query and endpoint URL for the prediction resource.
 Language Understanding endpoint
 Language Understanding (LUIS) Prediction view
Navigate to the Settings page in the LUIS portal to retrieve the App ID.
 Application settings
- Finally, test your Language Understanding model. The endpoint URL will be in the below format, with your own custom subdomain, and app ID and endpoint key replacing APP-ID, and KEY_ID. Go to the end of the URL and enter an intent; for example, “get me all the items from the grocery list”. The JSON result will identify the top scoring intent and prediction with a confidence score. This is a good test to see if LUIS can learn what should be predicted with the intent.
Additional Ideas
We’ve now seen how to build a voice bot leveraging Azure services to automate a common task. We hope it gives you a good starting point towards building bots for other scenarios as well. Try out some of the ideas below to continue building upon your bot and exploring additional Azure AI services.
- Add Google Home assistant as an additional channel to receive voice commands.
- Add a PictureBot extension to your bot and add pictures of your grocery items. You will need to create intents that trigger actions that the bot can take, and create entities that require these actions. For example, an intent for the PictureBot may be “SearchPics”. This could trigger Azure Cognitive Search to look for photos, using a “facet” entity to know what to search for. See what other functionality you can come up with!
- Use Azure QnA maker to enable your bot to answer FAQs from a knowledge base. Add a bit of personality using the chit-chat feature.
- Integrate Azure Personalizer with your voice chatbot to enables the bot to recommend a list of products to the user, providing a personalized experience.
- Include Azure Speech service to give your bot a custom, high quality voice, with 200+ Text to Speech options across 54 different locales/languages, as well as customizable Speech to Text capabilities to process voice inputs.
- Try building this bot using Bot Framework Composer, a visual authoring canvas.
by Contributed | Jan 25, 2021 | Technology
This article is contributed. See the original author and article here.
AI capabilities can enhance many types of applications, enabling you to improve your customer experience and solve complex problems. With Azure Cognitive Services, you can easily access and customize industry-leading AI models, using the tools and languages of your choice.
In this blog, we’ll walk through an exercise which you can complete in under an hour, to get started using Azure AI Services. Many of us are dreaming of traveling again, and building this intelligent travel journal app can help you capture memories from your next trip, whenever that may be. We’ll provide high level guidance and sample code to get you started, and we encourage you to play around with the code and get creative with your solution!
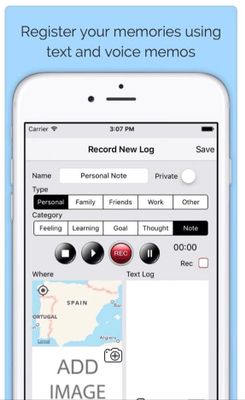
Features of the application:
- Capture voice memos, voice tag photos, and transcribe speech to text.
- Automatically tag your photos based on key phrase extraction and analysis of text in pictures.
- Translate tags and text into desired language.
- Organize your memos by key phrase and find similar travel experiences you enjoyed with AI-powered search.
Prerequisites:
Key Azure technologies:
NOTE: For more information refer to the “References.txt” file under respective folders within JournalHelper library project in the provided sample solution with this blog.
Solution Architecture

App Architecture Description:
- User records a voice memo; for example, to accompany an image they’ve captured. The recorded file is stored in a file repository (alternatively, you could use a database).
- The recorded voice memo (e.g. .m4a) is converted into desired format (e.g. .wav), using Azure’s Speech Service batch transcription capability.
- The folder containing voice memos is uploaded to a Blob container.
- Images are uploaded into a separate container for analysis of any text within the photos, using Azure Computer Vision.
- Use Translator to translate text to different languages, as needed. This may be useful to translate foreign street signs, menus, or other text in images.
- Extract tags from the generated text files using Text Analytics, and send tags back to the corresponding image file. Tags can be travel related (#milan, #sunset, #Glacier National Park), or based on geotagging metadata, photo metadata (camera make, exposure, ISO), and more.
- Create a search indexer with Azure Cognitive Search, and use the generated index to search your intelligent travel journal.
Implementation
Sample code
The entire solution code is available for download at this link. Download/clone and follow instructions in ReadMe.md solution item for further setup.
Implementation summary
The sample is implemented using various client libraries and samples available for Azure Cognitive Services. All these services are grouped together into a helper library project named “journalhelper”. In the library we introduce a helper class to help with scenarios that combine various Cognitive Services to achieve desired functionality.
We use “.Net Core console app” as the front end to test the scenarios. This sample also uses another open source library (FotoFly), which is ported to .Net Core here, to access and edit image metadata.
High level overview of steps, along with sample code snippets for illustration:
- Start by batch transcribing voice memos and extracting key tags from the text output. Group the input voice memos into a folder, upload them into an Azure Blob container or specify a list of their URls, and use batch transcription to get results back into the Azure Blob container, as well as a folder in your file system. The following code snippet illustrates how helper functions can be grouped together for a specific functionality. It combines local file system, Azure storage containers, and Cognitive Services speech batch transcription API.
Console.WriteLine("Uploading voice memos folder to blob container...");
Helper.UploadFolderToContainer(
HelperFunctions.GetSampleDataFullPath(customSettings.SampleDataFolders.VoiceMemosFolder),
customSettings.AzureBlobContainers.InputVoiceMemoFiles, deleteExistingContainer);
Console.WriteLine("Branch Transcribing voice memos using containers...");
//NOTE: Turn the pricing tier for Speech Service to standard for this below to work.

await Helper.BatchTranscribeVoiceMemosAsync(
customSettings.AzureBlobContainers.InputVoiceMemoFiles,
customSettings.AzureBlobContainers.BatchTranscribedJsonResults,
          customSettings.SpeechConfigSettings.Key,
          customSettings.SpeechConfigSettings.Region);

Console.WriteLine("Extract transcribed text files into another container and folder, delete the intermediate container with json files...");

await Helper.ExtractTranscribedTextfromJsonAsync(
customSettings.AzureBlobContainers.BatchTranscribedJsonResults,
customSettings.AzureBlobContainers.InputVoiceMemoFiles,
customSettings.AzureBlobContainers.ExtractedTranscribedTexts,
HelperFunctions.GetSampleDataFullPath(customSettings.SampleDataFolders.BatchTranscribedFolder), true);
- Next, create tags from the transcribed text. Sample helper function using the Text Analytics client library is listed below.
//text analytics
public static void CreateTagsForFolderItems(string key, string endpoint, string batchTranscribedFolder, string extractedTagsFolder)
{
    if (!Directory.Exists(batchTranscribedFolder))
    {
       Console.WriteLine("Input folder for transcribed files does not exist");
       return;
    }

    // ensure destination folder path exists
    Directory.CreateDirectory(extractedTagsFolder);
    TextAnalyticsClient textClient = TextAnalytics.GetClient(key, endpoint);

    var contentFiles = Directory.EnumerateFiles(batchTranscribedFolder);
    foreach(var contentFile in contentFiles
    {
var tags = TextAnalytics.GetTags(textClient,
contentFile).ConfigureAwait(false).GetAwaiter().GetResult();

// generate output file with tags
string outFileName = Path.GetFileNameWithoutExtension(contentFile);
                outFileName += @"_tags.txt";
string outFilePath = Path.Combine(extractedTagsFolder, outFileName);
File.WriteAllLinesAsync(outFilePath, tags).Wait() ;
    }
}
The actual client library or service calls are made as shown:
static public async Task<IEnumerable<string>> GetTags(TextAnalyticsClient
client, string inputTextFilePath)
{
   string inputContent = await File.ReadAllTextAsync(inputTextFilePath);
   var entities = EntityRecognition(client, inputContent);
   var phrases = KeyPhraseExtraction(client, inputContent);
   var tags = new List<string>();
   tags.AddRange(entities);
   tags.AddRange(phrases);
   return tags;
}
- Update tags to the photo/image file, using the open source FotoFly library. Alternatively, you can update the Blob metadata with these tags and include that in the search index, but the functionality will be limited to using Azure Blob storage.
string taggedPhotoFile = photoFile.Replace(inputPhotosFolder,
      OutPhotosFolder);
File.Copy(photoFile, taggedPhotoFile, true);

if (tags.Count > 0)
{
    ImageProperties.SetPhotoTags(taggedPhotoFile, tags);
}
- Other useful functions to complete the scenario are:
- Helper.ProcessImageAsync, and
- Helper.TranslateFileContent
The first one can be used to extract text from images using OCR or regular text processing using Computer Vision. The second can detect the source language, translate using Azure’s Translator service into the desired output language, and then create more tags for an image file.
- Finally, use Azure Cognitive Search to create an index from the extracted text files saved in the Blob container, enabling you to search for documents and create journal text files. For example, you can search for images by cities or countries visited, date, or even cuisines. You can also search for images by camera-related metadata or geolocation.
In this sample we have demonstrated simple built-in skillsets for entity and language detection. The solution can be further enhanced by adding additional data sources to process tagged images and their metadata, and adding additional information to the searches.
NOTE: The helper functions can be made more generic to take additional skillset input.
public static async Task CreateSearchIndexerAsync(
    string serviceAdminKey, string searchSvcUrl,
    string cognitiveServiceKey,
    string indexName, string jsonFieldsFilePath,
    string blobConnectionString, string blobContainerName
    )
{
    // Its a temporary arrangment.  This function is not complete
    IEnumerable<SearchField> fields = SearchHelper.LoadFieldsFromJSonFile(jsonFieldsFilePath);

    // create index
    var searchIndex = await
Search.Search.CreateSearchIndexAsync(serviceAdminKey,
searchSvcUrl, indexName, fields.ToList());

    // get indexer client
    var indexerClient =
Search.Search.GetSearchIndexerClient(serviceAdminKey, searchSvcUrl);

    // create azure blob data source
    var dataSource = await
Search.Search.CreateOrUpdateAzureBlobDataSourceAsync(indexerClient,
blobConnectionString, indexName, blobContainerName);

    // create indexer

    // create skill set with minimal skills
    List<SearchIndexerSkill> skills = new List<SearchIndexerSkill>();
            skills.Add(Skills.CreateEntityRecognitionSkill());
            skills.Add(Skills.CreateLanguageDetectionSkill());
     var skillSet = await
Search.Search.CreateOrUpdateSkillSetAsync(indexerClient,
             indexName + "-skillset", skills, cognitiveServiceKey);

     var indexer = await Search.Search.CreateIndexerAsync(indexerClient,
dataSource, skillSet, searchIndex);

     // wait for some time to have indexer run and load documents
     Thread.Sleep(TimeSpan.FromSeconds(20));

     await Search.Search.CheckIndexerOverallStatusAsync(indexerClient,
             indexer);
}
Finally, search documents and generate the corresponding journal files, utilizing the following functions:
- Helper.SearchDocuments
- Helper.CreateTravelJournal
Additional Ideas
In addition to the functionality described so far, there are many other ways you can leverage Azure AI to further enhance your intelligent travel journal and learn more advanced scenarios. We encourage you to explore some the following ideas to enrich your app:
- Add real time voice transcription and store transcriptions in an Azure managed database, to correlate voice transcription with images in context.
- Include travel tickets and receipts as images for OCR-based image analysis (Form Recognizer) and include them as journal artifacts.
- Use multiple data sources for a given search index. We have simplified and only included text files to index in this sample, but you can include the tagged photos from a different data source for the same search index.
- Add custom skills and data extraction for search indexer. Extract metadata from images and include as search content.
- Extract metadata from video and audio content using Video Indexer.
- Experiment with Language Understanding and generate more elaborate and relevant search content based on top scoring intents and entities. Sample keywords and questions related to current sample data are included in Objectives.docx solution item.
- Build a consumer front-end app that stitches all of this together and displays the journal in a UI.
by Contributed | Jan 25, 2021 | Technology
This article is contributed. See the original author and article here.
AI allows you to deliver breakthrough experiences in your apps. With Azure Cognitive Services, you can easily customize and deploy the same AI models that power Microsoft’s products, such as Xbox and Bing, using the tools and languages of your choice.
In this blog we will walk through an exercise that you can complete in under an hour and learn how to build an application that can be useful for you, all while exploring a set of Azure services. If you have ever wanted to get your financial transactions in order, look no further. With this exercise, we’ll explore how to quickly take a snap of a receipt from your phone and upload it for categorization, creating expense reports, and to gain insights to your spending. Remember, even though we’ll walk you through each step, you can always explore the sample code and get creative with your own unique solution!
Features of the application:
- Snap a picture of your receipt and upload it using your smartphone
- Extract relevant data from the images: Who issued the receipt? What was the total amount? What was purchased? All of this information can be effortlessly stored for exploration
- Query the data: bring your receipts to life by extracting relevant and insightful information
Prerequisites
- If you don’t have an Azure subscription, create a free account before you begin. If you have a subscription, log in to the Azure Portal.
- You will need to have python installed locally to run some of the samples.
Key Azure technologies:
Solution Architecture
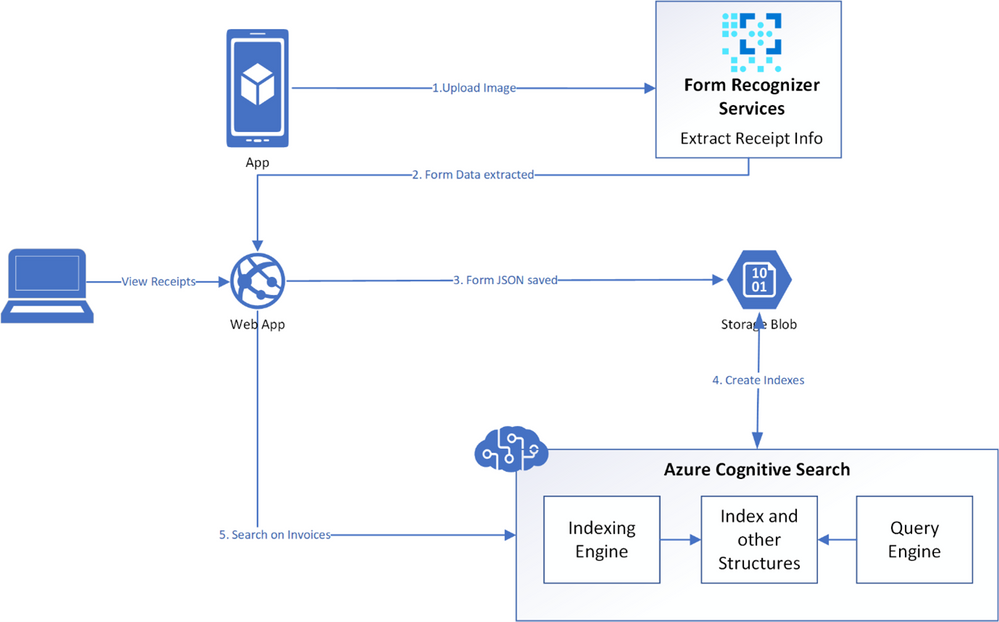
App Architecture Description:
- User uploads a receipt image from their mobile device
- The uploaded image is verified and then sent to the Azure Form Recognizer to extract information
- The image is analysed by the REST API within the Form Recognizer prebuilt receipt model
- A JSON is returned that has both the text information and bounding box coordinates of the extracted receipt data
- The resulting JSON is parsed and a simpler JSON is formed, saving only the relevant information needed
- This receipt JSON is then stored in Azure Blob Storage
- Azure Cognitive Search points directly to Azure Blob Storage and is used to index the data
- The application queries this search index to extract relevant information from the receipts
Another visual of the flow of data within the solution architecture is shown below.

Now that we’ve explored the technology and services we’ll be using, let’s dive into building our app!
Implementation
To get started, data from receipts must be extracted; this is done by setting up the Form Recognizer service in Azure and connecting to the service to use the relevant API for receipts. A JSON is returned that contains the information extracted from receipts and is stored in Azure Blob Storage to be used by Azure Cognitive Search. Cognitive Search is then utilized to index the receipt data, and to search for relevant information.
High level overview of steps, along with sample code snippets for illustration:
- Go to the Azure portal and create a new Form Recognizer resource. In the Create pane, provide the following information:
Name
|
A descriptive name for your resource.
|
Subscription
|
Select the Azure subscription which has been granted access.
|
Location
|
The location of your cognitive service instance. Different locations may introduce latency, but have no impact on the runtime availability of your resource.
|
Pricing Tier
|
The cost of your resource depends on the pricing tier you choose and your usage. For more information, see the API pricing details.
|
Resource Group
|
The Azure resource group that will contain your resource. You can create a new group or add it to a pre-existing group.
|
- After Form Recognizer deploys, go to All Resources and locate the newly deployed resource. Save the key and endpoint from the resource’s key and endpoint page somewhere so you can access it later.
- You can use the following Analyze Receipt API to start analyzing the receipt. Remember to replace <endpoint> & <subscription key> the values you saved earlier and replace <path to your receipt> with the local path to your scanned receipt image.
# Analyse script
import json
import time
from requests import get, post
# Endpoint URL
endpoint = r"<endpoint url>"
apim_key = "<subscription key>"
post_url = endpoint + "/formrecognizer/v2.0/prebuilt/receipt/analyze"
source = r"<path to your receipt>"
headers = {
# Request headers
'Content-Type': 'image/jpeg',
'Ocp-Apim-Subscription-Key': apim_key,
}
params = {
"includeTextDetails": True
}
with open(source, "rb") as f:
data_bytes = f.read()
try:
resp = post(url=post_url, data=data_bytes, headers=headers, params=params)
if resp.status_code != 202:
print("POST analyze failed:n%s" % resp.text)
quit()
print("POST analyze succeeded:n%s" % resp.headers)
get_url = resp.headers["operation-location"]
except Exception as e:
print("POST analyze failed:n%s" % str(e))
quit()
- If you run this code and everything is as it should be, you’ll receive a 202 (Success) response that includes an Operation-Location header, which the script will print to the console. This header contains an operation id that you can use to query the status of the asynchronous operation and get the results. In the following example value, the string after operations/ is the operation ID.
- Now you can call the Get Analyze Receipt Result API to get the Extracted Data.
# Get results.
n_tries = 10
n_try = 0
wait_sec = 6
while n_try < n_tries:
try:
resp = get(url = get_url, headers = {"Ocp-Apim-Subscription-Key": apim_key})
resp_json = json.loads(resp.text)
if resp.status_code != 200:
print("GET Receipt results failed:n%s" % resp_json)
quit()
status = resp_json["status"]
if status == "succeeded":
print("Receipt Analysis succeeded:n%s" % resp_json)
quit()
if status == "failed":
print("Analysis failed:n%s" % resp_json)
quit()
# Analysis still running. Wait and retry.
time.sleep(wait_sec)
n_try += 1
except Exception as e:
msg = "GET analyze results failed:n%s" % str(e)
print(msg)
quit()
This code uses the operation id and makes another API call.
- The JSON that is returned can be examined to get the required information – ‘readResults’ field will contain all lines of text that was decipherable, and the ‘documentResults’ field contains ‘key/value’ information for the most relevant parts of the receipt (e.g. the merchant, total, line items etc.)
The receipt image below,

resulted in the JSON from which we have extracted the following details:
 MerchantName: THE MAD HUNTER
 TransactionDate: 2020-08-23
 TransactionTime: 22:07:00
 Total: £107.10
- We will now create a JSON from all the data extracted from the analysed receipt. The structure of the JSON is shown below:
{
"id":"INV001",
"user":"Sujith Kumar",
"createdDateTime":"2020-10-23T17:16:32Z",
"MerchantName":"THE MAD HUNTER",
"TransactionDate":"2020-10-23",
"TransactionTime":"22:07:00",
"currency":"GBP",
"Category":"Entertainment",
"Total":"107.10",
"Items":[ ]
}
We can now save this JSON and build a search service to extract the information we want from it.
Before continuing onto step 8, you must have an Azure Storage Account with Blob storage.
- We will now save the JSON files in an Azure Blob Storage container and use it as a source for the Azure Cognitive Search Service Index that we will create.
- Sign-in to the Azure Portal and search for “Azure Cognitive Search” or navigate to the resource through Web > Azure Cognitive Search. Follow the steps to:
- Choose a subscription
- Set a resource group
- Name the service appropriately
- Choose a location
- Choose a pricing tier for this service
- Create your service
- Get a key and URL endpoint
We will use the free Azure service, which means you can create three indexes, three data sources and three indexers. The dashboard will show you how many of each you have left. For this exercise you will create one of each.
- In the portal, find the search service you created above and click Import data on the command bar to start the wizard. In the wizard, click on Connect to your data and specify the name, type, and connection information. Skip the ‘Enrich Content’ page and go to Customize Target Index.
- For this exercise, we will use the wizard to generate a basic index for our receipt data. Minimally, an index requires a name and a fields collection; one of the fields should be marked as the document key to uniquely identify each document.
Fields have data types and attributes. The check boxes across the top are index attributes controlling how the field is used.
- Retrievable means that it shows up in search results list. You can mark individual fields as off limits for search results by clearing this checkbox.
- Key is the unique document identifier. It’s always a string, and it is required.
- Filterable, Sortable, and Facetable determine whether fields are used in a filter, sort, or faceted navigation structure.
- Searchable means that a field is included in full text search. Only Strings are searchable.
Make sure you choose the following fields:
- id
- user
- createdDateTime
- MerchantName
- TransactionDate
- TransactionTime
- Currency
- Category
- Total
- Still in the Import data wizard, click Indexer > Name, and type a name for the indexer.
This object defines an executable process. For now, use the default option (Once) to run the indexer once, immediately.
- Click Submit to create and simultaneously run the indexer.
Soon you should see the newly created indexer in the list, with status indicating “in progress” or success, along with the number of documents indexed.
The main service page provides links to the resources created in your Azure Cognitive Search service. To view the index you just created, click Indexes from the list of links.

- Click on the index (azureblob-indexer in this case) from the list of links and view the index-schema.
Now you should have a search index that you can use to query the receipt data that’s been extracted from the uploaded receipts.
- Click the search explorer

- From the index drop down choose the relevant index. Choose the default API Version (2020-06-30) for this exercise.

- In the search bar paste a query string (for eg. category=’Entertainment’)
You will get results as verbose JSON documents as shown below:

Now that you have built a query indexer and aimed it at your data you can now use it to build queries programmatically and extract information to answer some of the following questions:
- How much did I spend last Thursday?
- How much have I spent on entertainment over the last quarter?
- Did I spend anything at ‘The Crown and Pepper’ last month?
Additional Ideas
In addition to the services and functionalities used throughout this exercise, there are numerous other ways you can use Azure AI to build in support for all kinds of receipts or invoices. For example, the logo extractor can be used to identify logos of popular restaurants or hotel chains, and the business card model can ingest business contact information just as easily as we saw with receipts.
We encourage you to explore some of the following ideas to enrich your application:
- Search invoices for specific line items
- Train the models to recognize different expense categories such as entertainment, supplies, etc.
- Add Language Understanding (LUIS) to ask your app questions in natural language and extract formatted reports
- Add Azure QnA Maker to your app and get insights such as how much you spent on entertainment last month, or other categories of insights you’d like to explore
by Contributed | Jan 25, 2021 | Technology
This article is contributed. See the original author and article here.
In case you hadn’t noticed, it’s a polyglot world. The number of scenarios where your application needs to communicate with services using a runtime you know nothing about is greater than ever. Fortunately, things like RESTful endpoints and JSON make life a lot easier. But what if your application needs to share settings with other applications? Or what if a backing service’s address changes between datacenters? How will your application know to switch?
The answer – as you may have guessed – doesn’t come right off the shelf. In this post we will look at some best practice solutions using an external configuration provider and a service registry. Both will complicate local development and testing, as well as add some debt to the person (or team) that maintains it in production. Both solutions have a ton of configurable possibilities, which, of course, makes things even more complicated.
Let’s focus on (arguably) the two most popular products to solve these challenges. As an external configuration provider, Spring Cloud Config is a top performer. The most popular way to configure the value store is with a Git based repository. Just check-in a YAML file of name-value pairs and tell Config Server how to connect with it. Config server will monitor the repo for future changes and interpret things like different profiles for different environments.
Using Eureka from the Spring Cloud Netflix project is a safe bet to implement service discovery. It’s a time tested solution that came from an organization that knows a little something about microservices. Starting a registry instance doesn’t have a whole lot of overhead. The work is more focused on each application that wants to register itself or discover register services. The app needs to implement a Eureka client for proper interaction, and it has lots of possibilities.
Config Server and Eureka Discovery themselves are worthy of their own discussion, which I’ll leave to folks smarter than me to cover. The fun really starts when you combine them both. Say, for example, you have an ASP.NET Core microservice that follows the config first pattern. That means in appsettings.json you add two simple values – the address of the config server and turn on FailFast. That’s it. The application won’t start if it can’t contact the server. Upon successfully connecting the application’s default logging levels, address to discovery server, management endpoint policies, connection strings, and everything else you can imagine will be loaded in.
The application also relies on the service discovery pattern to find the address of other services. For instance, instead of setting the HTTP client’s base URL to an IP address or FQDN, the application instead uses the name of the service like ‘https://another-service/api/something/2’ as the base. A request is first sent to the discovery service to find addresses where instances of the service can be reached. Then Steeltoe uses an ILoadBalancer to decide the best address to use. The decision could be based on a load balancing algorithm, the health of instances, or other strategies. Steeltoe then forwards the request to the actual service, and the response comes directly back to the calling application. To you (the Developer) all of this is wrapped up in a single HTTPClient call.
This combination of discovery and external config is quite powerful in situations where settings and service addresses stay fluid – i.e. the cloud. But I have yet to meet a developer that is willing to manage all this for the entire organization.
Meet the Pet Clinic application
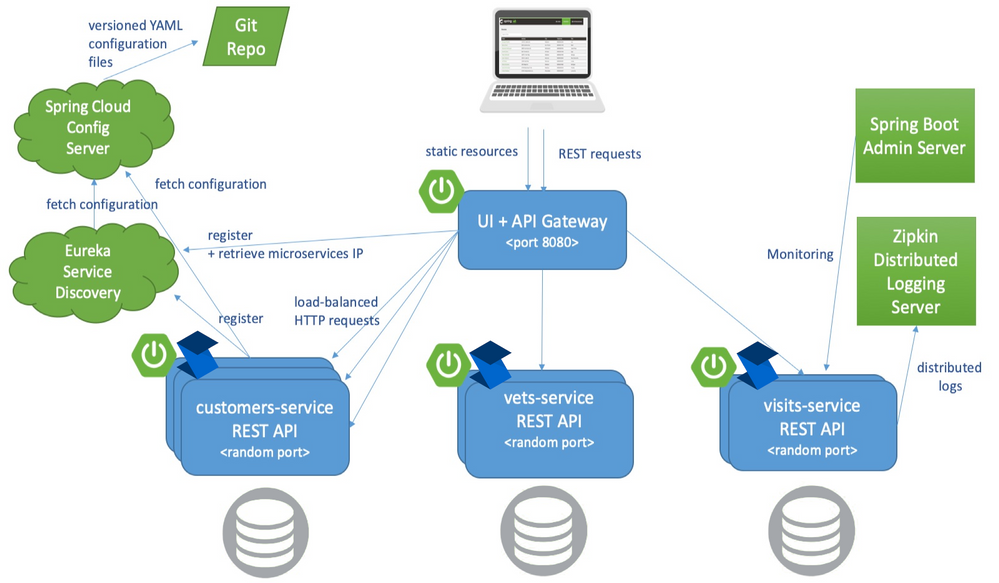
In the Spring Java world, there is an application known as Pet Clinic that has been around since the dawn of…well… Spring. Its purpose is to highlight the many features of Spring and has become so popular that it has its own GitHub org. Of the many Pet Clinic derivations, the spring-petclinic-microservices version offers a relatively real-world cloud platform scenario. This version breaks the application into different microservices and uses Spring API Gateway to host the web UI as well as host a few public endpoints.
Note that API Gateway doesn’t have any backing database. Its endpoints dynamically create responses by calling other backing services and aggregating the results together. It insulates those backing services from ever having to be publicly available.
Referring to the below architecture drawing you’ll see the relationship Eureka and Config server play. Almost everything relies on retrieving config dynamically and either discovering service addresses or registering itself as discoverable.
Also of note is the Spring Boot Admin Server. This service packs a powerful debugging punch and can serve as a priceless resource to developers wanting to see exactly how each application’s container is configured and turn logging levels up and down instantly. Admin Server can provide so much insight into all the services because the ‘actuator’ feature is enabled in each. You can learn more about Spring Boot Actuators for Spring Java apps and Steeltoe Management Endpoints for .NET apps in their respective docs.
The last feature of the Pet Clinic Microservices architecture is for performance & debugging with distributed tracing. In this case, Zipkin is the chosen server. Each application is given direction to export traces to the Zipkin server in a compliant format. The power here is around simplicity. In Spring you use Sleuth and in Steeltoe you use the Zipkin exporter. Both are dead simple to implement and know exactly how to monitor requests and build spans into traces. In fact, both can also monitor an application’s logging and correlate logs with request traces! This is a very powerful feature for developing and debugging.
Deploy Pet Clinic on Azure Spring Cloud
As you review the previous architecture, the elephant in the room is how many working parts the Pet Clinic Microservice application has. Each service brings value and takes the application to a higher cloud-native status, but adds to the management burden.
Azure Spring Cloud aims to minimize the management burden. When you create an instance of Azure Spring Cloud you get a fully managed Eureka, Config, and Zipkin compatible tracing service. They have taken care of the hard stuff. Each application running in Azure Spring Cloud is given the address to these services in a secure manner. This means Spring and Steeltoe applications are going to feel right at home the second they start running.

The customers, vets, and visits services don’t need to be public, only the API Gateway. The Admin Server also doesn’t need a public address. Instead it can use the automatically generated “Test Endpoint” that is behind Azure auth.
The applications still export traces to a Zipkin compatible service. The service provides a very useful map to drill into details via Application Map in Azure Application Insights.
As you can see Azure Spring Cloud helps developers be more cloud-native by managing the infrastructure and providing native bindings to Spring and Steeltoe thus minimizing the maintenance burden.
Get Started
For .NET developers, the Steeltoe team has refactored each Spring microservice to ASP.NET Core 3.1 and added in all the Steeltoe fixin’s so everything just works. Review the source code here and get started. The main branch of the application is meant for local development. Note, to run the entire application, you’ll need maven to compile the Spring pieces and (within the Docker Compose) you’ll see the Dockerfile used for compiling the .NET services. On my Windows desktop I used a combination of Docker Desktop with WSL and VS Code with WSL to get everything running.
If you would rather run everything as Spring Boot (no .NET services), refer to the spring-petclinic-microservices repo. There you will find exact instructions to run the application locally.
Once you are ready to get started with Azure Spring Cloud, you have quite a few options. If you prefer to get a little more familiar with Azure Spring Cloud without diving in with Pet Clinic, you’ll find how to’s, tutorials, overview, and getting started guides for both Java and .NET in the documentation. There are step by step instructions to help get familiar with the overall service and deploy different flavors of microservices.
When you’re ready to see Azure Spring Cloud in full swing, head over to the azure-spring-cloud branch of the Steeltoe application. There you will find a “deploy-to-Azure Spring Cloud” script in both powershell and bash. Either will get everything going in Azure Spring Cloud and help you see the full potential of the Azure Spring Cloud managed service.
You can also find a Spring only version of Pet Clinic for Azure Spring Cloud in the Azure samples.

Recent Comments