by Contributed | Dec 9, 2020 | Technology
This article is contributed. See the original author and article here.
By Pallavi Joshi – Program Manager | Microsoft Endpoint Manager – Intune
This article talks about using Role-based Access Control (RBAC) in Microsoft Intune to setup separate helpdesk roles for Desktop teams who manage Windows device estate and for Mobile teams who manage mobile device estate. RBAC in Intune helps you manage who has access to your organization’s resources and what they can do with those resources.
With the rise in remote working, an increasing number of organizations are now managing their employees’ mobile and Windows devices using Microsoft Endpoint Manager. This requires the helpdesk teams to work securely and productively to enable end users with their daily workings.
Many customers that we work with have dedicated teams for managing Windows and mobile devices. The helpdesk admins, part of Windows team, manage Windows devices only, but do not manage mobile devices, and vice-versa. By the end of this blog, you will be able to provide access to the relevant workloads to these helpdesk teams so they get a customized view of the devices they need to manage, and also prevent access to devices outside their scope.
Steps to configure RBAC for Windows and Mobile Device Helpdesk team:
- Create Azure AD device groups for Windows and Mobile Devices
- Create Azure AD user groups for Windows and Mobile Helpdesk Admins
- Create scope tags and assign device groups
- Create Windows helpdesk admin role and add assignments
- Create Mobile helpdesk admin role and add assignments
Step 1 – Create Azure AD device groups for Windows and Mobile Devices
The first step to setup RBAC is to create separate Azure AD device groups based on device OS type.
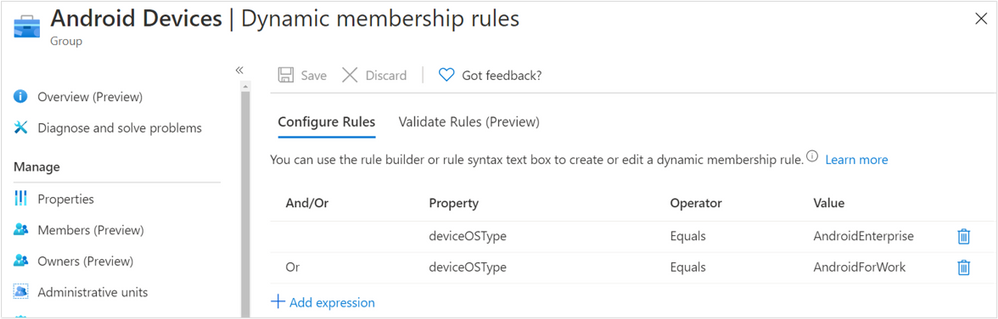
As an example, I have created three Azure AD dynamic device groups based on the property deviceOSType – Android Devices, iOS Devices, and Windows Devices:
Android Dynamic membership rules
 iOS Dynamic membership rules
 Windows Dynamic membership rules
Step 2 – Create Azure AD user groups for Windows and Mobile Helpdesk Admin
The second step is two create two user groups, one for Windows Helpdesk Admins who manage Windows devices, and the other for Mobile Helpdesk Admins who manage mobile devices.
As an example, I have created two Azure AD user groups – Windows – Helpdesk Admins, Mobile – Helpdesk Admins and added helpdesk admins to each of these groups:
 Azure AD group
Step 3 – Create scope tags and assign device groups
The third step is to create separate scope tags, one for each Operating System. The device groups created in step 1 need to be assigned to the respective scope tags.
As an example, I have created three scope tags – Apple, Android and Windows. I have assigned the Android Devices group to Android scope tag, and so on. This ensures that all the devices part of the
Android Devices group will automatically get the Android scope tag assigned to them. Similarly, devices part of Windows Devices group will automatically get the Windows scope tag assigned to them, and so on.
The scope tags would be used in future steps to control the visibility of devices and other workloads for Helpdesk Admins.
 Helpdesk admin Scope tags
Step 4 – Create Windows helpdesk admin role and add assignments
The fourth step is to create a custom role for Windows helpdesk admin and provide the permissions required by the helpdesk admin.
As an example, I have created Windows Helpdesk role, given Read permissions for all the workloads, and Wipe and Sync Device permissions under Remote Tasks. You can update the permissions based on your requirements.
 Windows Helpdesk permissions
Once the permissions are added and role is created, assignments need to be added to the role using the groups and scope tags created in the previous steps.
As an example, for the Windows Helpdesk role, I am adding Windows Assignment. The Members of this assignment are Windows – Helpdesk Admins created in Step 2, the Scope (Groups) has Windows Devices group created in Step 1 and Scope tags is defined as Windows created in Step 3.
 Windows Helpdesk assignment properties
This ensures that users part of Windows – Helpdesk Admins group can assign policies, configurations and apps only to devices part of Windows Devices group, if they have permissions for the same. In this case, we have not provided assign permissions to helpdesk because we do not want them to be able to add or update assignments. This step also ensures that users who are part of Windows – Helpdesk Admins can view only the objects which have scope tag as Windows.
You can watch my Ignite session on Deep Dive into RBAC in Intune for deeper understanding on the topic.
Step 5 – Create Mobile helpdesk admin role and add assignments
The last step is to create a role for Mobile helpdesk admin and provide the permissions required by the helpdesk admin. The process is similar to Step 4, we just need to select different groups and permissions as per the requirements of mobile device team.
As an example, I have created Mobile Helpdesk role, given Read permissions for all the workloads, and Sync Device permissions under Remote Tasks. Based on my customer interactions, I have not given Wipe permission for this role for mobile helpdesk team. You can update the permissions as per your requirements.
 Mobile Helpdesk properties
This document contains information about creating custom role in Microsoft Endpoint Manager.
Once the permissions are added and role is created, assignments need to be added to the role using the groups and scope tags created in the previous steps.
As an example, for the Mobile Helpdesk role, I am adding Android & iOS Assignment. The Members of this assignment are Mobile – Helpdesk Admins created in Step 2, the Scope (Groups) has Android Devices and iOS Devices group created in Step 1 and Scope tags is defined as Android and Apple created in Step 3.
 Mobile Helpdesk assignment properties
This ensures that users part of Mobile – Helpdesk Admins group can assign policies, configurations and apps only to devices part of Android Devices and iOS Devices group, if they have permissions for the same. In this case, we have not provided assign permissions to helpdesk. This also ensures that users part of Mobile – Helpdesk Admins can view only the objects which have scope tag as Android and Apple.
Once the configuration is complete, you will notice that Windows Helpdesk Admins can view only Windows devices. They are unable to view mobile devices. They can sync and wipe Windows devices remotely. Similarly, Mobile Helpdesk Admins can view Android and iOS devices, sync these devices remotely, and are unable to view Windows devices.
Note – For the scenarios where a helpdesk admin is part of both Mobile Helpdesk and Windows Helpdesk roles, they will be able to perform specific actions on devices defined in the relevant role.
In the above example, if a helpdesk admin is part of both Windows – Helpdesk Admins and Mobile – Helpdesk Admins groups, then they will be able to view both Windows and mobile devices. They would be able to sync and wipe Windows devices as defined in Windows Helpdesk role, but only sync mobile devices as defined in Mobile Helpdesk role.
This configuration ensures that you have created a boundary for your Desktop and Mobile Device helpdesk team to operate in, thus providing strong security. You are also able to customize their view, so they see only relevant devices, thus ensuring their productivity. Also, the automatic scope tag assignment and role assignments ensure that no manual tasks are required, ensuring scalability of the solution across your departments.
We hope this helps you in setting up RBAC for your helpdesk teams in Microsoft Endpoint Manager and enables them to work effectively.
If you have any questions on this post, just let us know by commenting back You can also ask quick questions at @IntuneSuppTeam out on Twitter.
by Contributed | Dec 9, 2020 | Technology
This article is contributed. See the original author and article here.
The Azure Purview Data Map is an intelligent graph that describes all the data across your data estate. You can start creating this intelligent graph by extracting metadata from hybrid data stores. But, typically, this metadata as discovered from the individual data stores is defined in isolation and hence, inconsistent and not complete. This is where classifications and classification rules within the Azure Purview Data Map comes in.
Azure Purview enables you to automatically classify data at scale by defining rules. Classifying data in a unified way enables both data discovery and compliance use cases.
Here are a few key concepts to keep in mind as you get started with classifications:
- Classifications can be used to describe type of data that exist in data asset or schema. In other words, customers can identify the content of data asset or schema using classifications.
- Classifications can be used to describe the phases in their data prep processes (raw zone, landing zone etc.) and assign the classifications to specific assets to mark where they are in the process.
- Classifications can also be used to set priorities and develop a plan to allocate budget and resources wisely to achieve security and compliance needs of an organization.
Now that you have a frame for the kinds of classifications that you want to apply to your data, lets take a quick tour of the capabilities themselves:
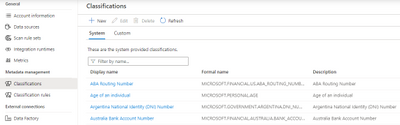
Classifications
Azure Purview supports 100+ built-in classifications that range from credit cards, account numbers through a wide range of types such as government IDs, location data and more. Customers can create custom classifications. Then using classification rules and custom classification rules, customers can apply these classifications at scale.
Azure Purview makes use of Regex patterns and bloom filters to classify data. These classifications are then associated with the metadata discovered in the Azure Purview Data Catalog.
You can apply the system classifications on a scan either manually or via the system classification rules. Similarly, you can manually apply custom classifications to a scan or via the custom classification rules. In addition, system classifications can also be applied to a scan using custom classification rules. Note that the manually applied classifications are not overridden by subsequent scans.
Classification Rules
Azure Purview provides a set of default classification rules, which are used by the scanning processes to automatically detect certain data types. The default classification rules are non-editable. However, you can define your own custom classification rules. Every classification rule will be tied to a classification.
For every classification rule, a data pattern with a regular expression representing the data stored in the asset field can be specified. We also set thresholds to reduce false positives. Also, a column pattern with a regular expression representing the column names that should be matched can also be specified while creating a classification rule.

Who can view and manage classifications and classification rules?
- Purview Data Readers can view all classifiers and classification rules.
- Purview Data Curators can create, update, and delete custom classifiers and classification rules.
Conclusion
Create an Azure purview account today and start understanding your data supply chain from raw data to business insights with free scanning for all your SQL Server on-premises and Power BI online.
For more information, check out a demo of Azure Purview or start a conversation within the Azure Purview tech community.
Azure Purview classifications provide users with an excellent mechanism to understand the data estate by tagging assets based on the type of information they represent. We will soon have the capability to automatically deduce the regular expressions for custom classification rules. Stay tuned!
In the meanwhile, go through how-to-guides to create custom classifications and classification rules, apply classifications in Azure Purview and take a quick peek into the supported classifications in Purview.
by Contributed | Dec 9, 2020 | Technology
This article is contributed. See the original author and article here.
Azure Purview enables organizations of all sizes to manage and govern their hybrid data estate. The Azure Purview Data Map enables customers to establish the foundation for effective data governance. Customers create a knowledge graph of data coming in from a range of sources including Azure SQL database, AWS S3 bucket or an on-premises SQL server. Purview makes it easy to register, and automatically scan and classify data at scale.
As you get started with setting up Azure Purview for your organization, here is a ready list of capabilities that you should know:
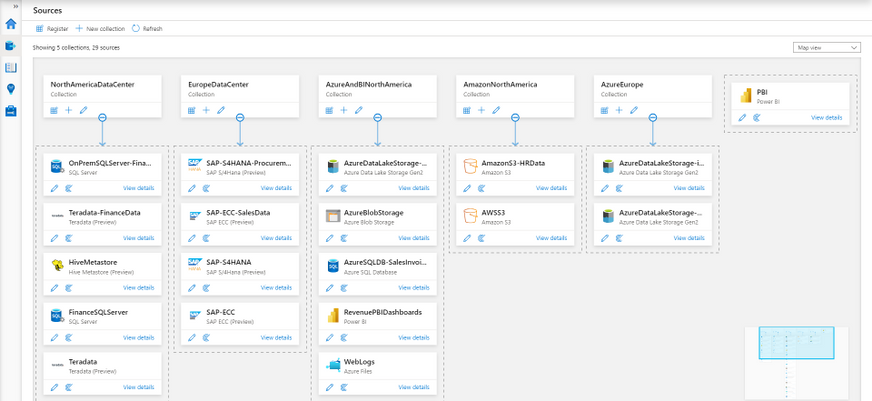
1. Collections
One of the ways of managing your data sources more efficiently is to be able to group and arrange them by function or region. Azure Purview lets you do that using collections, which are hierarchical in nature. Azure Purview will let you set up scans on individual data sources or on collections of data sources.
2. Security and Credentials
The first thing you will need before setting up scans, is setting up your credentials. Azure Purview is designed to be secure by default. All your credentials are created with a Azure Key Vault connection where they are securely stored and managed. These credentials are further used in your scans to connect to your data sources.

3. Scan-rule sets
Azure Purview scans provide users a fine balance between customizability and re-usability through its scan rule sets.
- A scan rule set lets you select file types for schema extraction and classification, and it also let’s you define new custom file types.

- You can select which system and custom classification rules you want to run. The system classification rules are the same as the sensitive information types in Microsoft 365, which will let you extend your sensitivity labeling policies in the Microsoft 365 Compliance Center to Azure Purview supported stores. Learn how here.

- These scan rule sets can be used across multiple data sources and scans.
- Azure Purview also supports system default scan rule sets that further simplify scan set up.
4. Scan schedules
Complying with industry regulations requires you to know where personally identifiable information (PII) exists. Azure Purview allows you to scan your data sources on a regular cadence using flexible scan schedules that lets you define exactly when and how often scans must be run.

5. Scoped scans
Often times, your data lakes and databases contain certain folders, files or tables that are either considered confidential or contain temporary data that you know is going to be created and deleted frequently. For both these scenarios Purview lets you scope your scans to include only assets that you want scanned and their metadata ingested into the catalog.

6. Scanning on-premises sources
Scan your on-premises sources using the self-hosted Microsoft integration runtime. With a few clicks you can set up your own IR infrastructure on-premises and can start scanning your data sources. This same infrastructure will be used to scan your Azure data sources behind virtual networks as well.

7. Scale and performance
Purview provides a degree of scale and performance for scanning which is truly market differentiating. We have benchmarks to the tune of being able to scan a data lake with a million files in less than 30 minutes for rich metadata and classification. (These values may vary, and depend on the data source type, load on the data source and content type within files)
8. Resource sets
A lot of our customers collect IOT or telemetry data to drive their businesses, which in most cases are files collected on an hourly or daily basis from their source systems. These partitions files share the same schema and classifications. A novel concept that Purview supports is Resource sets, which are used to logically aggregate files that share the same schema and classifications to represent the metadata concisely in your catalog. When a scan runs, it uses folder paths (e.g. yearmonthday) and file nomenclature (e.g. foo1.csv, foo2.csv) to determine if a collection of files can be grouped into a resource set. It is only the resource set that is ingested into the catalog and not the hundreds or thousands of partition files. We have had customers, who via Purview scans have been able to compress 150000 partition files into a single resource set! For them, this tremendously aided in enhancing discoverability of assets for their end users in the Purview Data Catalog.
9. Azure Purview Data Map
The Purview Data Map is a unified map of your data assets and their relationships that enables more effective governance for your data estate. It is a knowledge graph that is the underpinning for the Purview Data Catalog and all the features that it has to offer. It is scalable and robust to meet your enterprise compliance requirements.
Get started with Azure Purview today
Create an Azure purview account today and start understanding your data supply chain from raw data to business insights with free scanning for all your SQL Server on-premises and Power BI online.
For more information, check out a demo of Azure Purview or start a conversation within the Azure Purview tech community.
by Contributed | Dec 9, 2020 | Technology
This article is contributed. See the original author and article here.
The Azure Architecture Center is full of useful knowledge and resources. This Azure Tips and Tricks video gives you the tour!
The Azure Architecture Center is your one-stop shop for all things Architecture in Azure! It is a robust collection of resources on Microsoft Docs. You can explore cloud best practices, assess and optimize your workload, and browse many sample architectures for many scenarios.
There are so many sample architectures. There is bound to be one for your scenario. Like here, in architectures for web applications. Let’s look at this architecture, Run a basic web application in Azure.

It contains detailed guidance and recommendations, and it even let’s you deploy the sample to Azure.

There is more! The Architecture Center also contains icons. You can download these for free and use them in your architecture designs!

There’s also the Application Architecture Guide! This is a complete guide that tells you how to design an application for the cloud. It is really comprehensive!
On top of that, is the Azure Well-Architected Framework. You can use this framework to improve and optimize a workload. The framework takes you through the pillars of Cost Optimization, Operational Excellence, Performance Efficiency, Reliability, and Security.
The Center also contains Design Patterns for the Cloud. These are solutions to well-known problems. You can use them as recipes for your solutions.
The Cloud Adoption Framework is a MASSIVE collection of documentation, implementation guidance, best practices, and tools that are proven guidance from Microsoft. They are designed to accelerate your cloud adoption journey.
And finally, you can use Assessments (which are part of CAF and WAF), to assess your architecture. You can create an assessment to address your needs, and you can take it by answering questions about your design.

The Azure Architecture Center is an incredible resource for architecture guidance. Go and check it out!

The Azure Architecture Center is being developed and expanded by the legendary (and flamboyantly humble) Microsoft patterns & practices team. You can follow p&p on the Internetz at…
- This Blog: http://aka.ms/AzureArchitectureBlog
- Twitter: http://twitter.com/mspnp
- Facebook: http://facebook.com/mspnp
- See What’s New:
- What’s new in the Azure Architecture Center
- What’s new in the Microsoft Cloud Adoption Framework for Azure
Remember to keep your head in the Cloud,
Ed Price, patterns & practices Community Captain + Publishing Pirate

proven practices for predictable results
Architecture Center | Blog | Twitter | Facebook

.jpg")


Recent Comments